Transcripts
1. Introduction: Have you ever started at
an empty presentation wondering where to begin or
how to get things going, copilot can help you with that. In this course, I'll
demonstrate how to use copilot properly to draft
and outline your content, create complete
presentations from scratch, and use custom templates
that actually look good. You'll discover various ways how to edit and find tune
your presentations, properly use Microsoft Designer, or create custom images with
AI right inside copilot. Everything with
practical hands on examples that will make you
a better PowerPoint user. I'm there to make sure that everything what I've
just said will happen. My name is Andrew,
and I invite you to the co pilot in Microsoft
Power Point course, where you'll Master AI Power
presentation creation.
2. 02-01. Getting Started with Copilot: Welcome in the first
lecture where I will give you a
very brief overview about the co pilot
feature because I want every one of you
to be on the same page, no matter if you work
on PowerPoint for PC, on PowerPoint for Mac or
with PowerPoint Online. I want to tell you that
when it comes to updates, it is possible that the Mac version will
be slightly behind, but I have just
updated my Mac device, and I have all the same feature. I have the skittle, I have
the design suggestions. I have the new slide
with Copilot feature, so everything is there. Please remember
that alternatively, you can go directly to
the office.com website. On the office website, on the left side, you
have PowerPoint. You can also open
a new presentation by opening a new presentation. You will get the entire
PowerPoint online experience. So this is a normal
PowerPoint version where you also have all the co
pilot features you want. So no matter what
version you use for this course, it's
completely fine. Now, the co pilot
feature itself, it is an ever evolving feature. Currently, I will mention
this very briefly. Currently, we have
co pilot here on the right side on the home tab right next to
design suggestions. We also have here new slide with copilot and
on the Insert tab, they also added new
slide with copilot, and they are really bombarding us with those copilot features. The last place where
you can access copilot is the little
skittle above the slide. Perhaps this changes
in the future. Currently, we have
the skittle here. With the skittle, we can either directly create
a presentation. If I click on it, it takes me to the presentation
creation window. It's called the Microsoft
Narrative Builder. Or I can right click
and select Ask copilot. This will open the window
on the right side. Okay. This is about
the copilot feature. Adding it to Quick
Access Toolbar. This is optional,
but if you want, I like to add it to my
Quick Access Toolbar so I can very quickly access
the copilot window. You can do this by
right clicking on the copilot icon and selecting add to
Quick Access Toolbar. Perhaps you are adding
a lot of slides. So you can also select
this feature and select Add to Quick
Access Toolbar. On AMC device, it's
also very similar. We can go to more commands
instead of popular commands, you can go to your home tap. Here we have chat with copilot. I don't know why they don't just call this feature copilot. They called it
chat with copilot, and by adding this shortcut, you'll have the
copilot here as well. Now, whenever I need
to type in a prompt, I just open this window
quickly by selecting here, so I have one click less
because here I would need to click on it and
select ask copilot. I know what a time saver. Okay. The last thing,
overview of the future. This is not a lecture
to go into specifics, but I think it is understandable
to you that you have a couple of sample prompts that are predefined
by Microsoft. They are changing over time, so there's no point going
over them right now. On the bottom, of course, is the area where you
type in your prompt. The other important thing I want to mention is that previously, we could just type in create a five slide presentation about oranges directly
here in the prompt window. But currently, Microsoft wants us to use the Microsoft
narrative Builder. T create a new presentation. This is the Microsoft
narrative Builder. We'll work with this in
a couple of lectures, so don't worry, you'll
know everything. I think this is enough
for an overview. Let's go to the next
lecture where I'll tell you something
extremely important.
3. 02-02. AI Credits and Copilot Pro license: Do you actually know whether copilot is free? How
long can you use it? How many credits do
you have for it? Actually, the Microsoft Team was debating about this a lot. I was talking with
them directly, and they decided to make copilot free for
every single user, no matter if you have a regular Microsoft 365
license for family, or you are an enterprise user. Because the idea
first was to make it available only for copilot
P and enterprise users, but they want
everyone to test it. So what they did, if
you click on copilot, you select a co pilot. When you create a presentation, when you create an image, you are using up resources. You are using up credits. You have 60 of those credits
per month available. You can check out your status
on your Microsoft account. If you open the co pilot window, here we have the three lines, and there is AI credit balance. If I click on it,
it will take me directly to my
Microsoft account. On my Microsoft account, it will tell you how
much credits do I have left for this given month. Credits unlock AI
and Microsoft 365. Use a credit each time
you prompt AI and apps like Word,
PowerPoint or designer. Please, however, note
that if you run out of credits and you are using
co pilot extensively, you can buy the co
pilot pro license. It's around $25 for my country. For my native currency,
it's around $25. This may change in the future. The surely will, but I'm just informing you about
the state we are in. I think this is perfect. I think this is very generous from Microsoft to allow us to use copilot basically for
free for your basic needs, so we do not need to worry
about this right now.
4. 03-01. Create presentations with Copilot: In this lecture, we'll create a AI generated presentation, and I'll tell you what
to expect from it. Hit the skittle above the slide and select
Create a new presentation. Currently, here, we have the
ability to choose between the default model and the creative model that everyone was asking
Microsoft for. The frontier icon tells
you that those are new and experimental models from Microsoft for C Pilot
and its AI capabilities. I'll choose default,
and by choosing default I'm actually able to select the length of
the presentation now. I'll select a topic like marketing presentation for
a sports during launch. This will be our sample topic. For the length, let's go for a medium range and
no reference files. I'll select start with
the default model. Currently, it will create an outline of the
presentation for me. Once it stops generating it, I can either move topics around. I can add new topics, or I can delete existing topics. A new feature here is I
can also select the tone. Let's make the tone
completely professional. It will regenerate
it a little because the titles and topics were already selected with
the previous tone. I'll make the
presentation a little shorter so everything will
be done a little quicker. A new upgrade that
Microsoft has given us is more and more templates. Let's select one of the predefined templates
that Microsoft gives us and here we can select the image style
that we want to use. We can select whether we
want AI generated images, but this will take
considerably longer because all the images have to be
generated or stock images. I'll go for stock
images because I want this presentation to be
created a little quicker. Right now, he will
select the topics. He will create an agenda. He'll create section titles and slides for those sections. The presentation is created. We have a title for
our presentation. We have the agenda slide, then we have the section headers and their respective slides. It follows this structure
for the entire presentation. If there would be more content, there would be just
more slide titles and more following slides. What I like about
this is that we finally can choose
more and more designs, more and more layouts
that work well with it. If you go to a slide,
for example, like that, well, it isn't a perfect
slide, but it gets better. Layouts, you have multiple
layouts to choose from, or you can help yourself by
selecting design suggestions, we'll help you arrange the
slide a little different. This is the main
part of creating presentations currently
with Microsoft Copilot. Let's go one step further
in the next lecture.
5. 03-02. Copilot Cretive Model - Microsoft Frontier 2026: This lecture, we are creating another AI generated
presentation, but with the new frontier model, I will change the
model to creative, and it will design me a completely creative
presentation using its newest
frontier models, marketing presentation for
a sports thing launch, and now it will generate
a presentation. We cannot change the length
of the presentation, but it will create it in
a unique style designed completely from scratch with AI generated content
AI generated images. I'll select previous lights
and it will start creating. Now, this will a bit longer
than the previous one, I'll speed up this
process a little, so we see each other at the
end of the creation process. Okay, this is the
finalized presentation. I'll add this to
my presentation. You know, it isn't
perfect at this moment, but we all know how
much of an improvement all the AI models
are getting from Microsoft and from all
the other companies. So this is supposed
to get better and better. Now,
let's take a look. It created a presentation, and for now, for now, well, it gave me a
completely different date that we currently have,
but it doesn't matter. It created a picture
artificially, I put it behind
the presentation. Well, I don't know why
it isn't sized properly. This is on all the
slides because it's a very early stage in it. So it creates an image in the
background and it creates all the text for for a title slide like that,
it looks beautiful. This agenda slide
looks also very good. You would only need to
resize this a little bit. It creates the text separately, so it starts to combine AI and native
PowerPoint features. In my opinion, this is
currently a rough idea how this final creative
version should look like, and it's going in
the right direction. Some of the slides have
very good contrast and would require only
little work from me. I like that I have complete
control over the text boxes. I don't like that I don't have complete control
over the icons. The icons are baked in to
the image in the background, but it's a matter of
adjusting this entire tool. I wanted to show you, so you are one of the first
people who already understands this new
frontier technique of making presentations
in a creative way. You can clearly see
that in the future, maybe it will make very good
designs that you only have to slightly adjust and will make your presentation design
process a lot quicker. I prefer to work with
templates still, but we are going in the
right direction with that.
6. 03-03. Microsoft Designer: You have created a presentation and a presentation
with Co pilot, and I want to show
you the possibilities of design suggestions. Previously, this is
known as designer. Funny enough, as I'm
recording this video, it is still called designer in the PowerPoint
online version. I would have thought that the
PowerPoint online version will have the most
frequent updates. Why is that? I am on the Beta channel for the
regular Power Point version, so perhaps I have some
updates in advance. To use Microsoft Designer, you can select Microsoft
design suggestions, and it will give you different
variations of the slide, but you need to understand
that those variations are basically the layout from
the template you selected. If you don't know
what a template is, I will slowly explain. Right click, select layout, and here you have layout for
this template called bevel. And here you have all the
different layouts that are pre created for the
template called bevel. We have content photo
on the left side, on the photo on the right side, the photo on the top
side, the photo higher, and we can use designer to
switch between layouts. It's very easy for him
to change the design. We can, of course, adjust the design ourselves.
That's no problem. But we can use the design ideas to
have it with one click. However, as you can see, some of the layouts have
little space for text, and Microsoft Co pilot
created a lot of text, so this wouldn't be a
suitable layout for it. I can right click,
select layout, and I can now find
a layout which has a bit more space for text,
like for example, this. And you can see it starts
to get a little messy because he didn't
understood that it should change this
object into this one. This is why I'm
always a little bit cautious when it comes to
using Microsoft Designer. However, people absolutely love that you can change the
design with one click. Basically, right click layout. Currently Content
photo number seven, as you can see, is
selected. It's on gray. If I go to another design, right click layout, what it did, it switched to content Photo 13, and this is how the design
suggestions operate. They take a look at
your layout and they just select a different
layout for your design. If this would be a presentation without layout, only
the basic layout, it tries to be a
bit creative and actually create some slide
designs that you could use. For example, for
the title slide, it tries to find some solutions to make
this look really good. This is how you can use design suggestions for
your presentations. First, you create them, then you adjust the
design suggestions. And, of course, you can
also design them yourself. You can design the
slides yourself. I just wanted to show you the
possibilities of this tool.
7. 03-04. Slide-by-slide Suggestions: Let me now show you
the approach when you select a template
from PowerPoint. Microsoft created a couple
of templates that will work well with Microsoft copilot.
I'll select a template. Let's say that this
is my title slide. Since I will not use the
copilot feature now, I'll just create another slide. The design suggestions
will try to search for the most suitable thing
that will follow up my title. Usually, it is an agenda, so he automatically
suggests an agenda slide. Of course, yours
may be different. You may not want the agenda, so you just delete it and you
select a different layout. But design suggestions will
try see what you are typing here and we'll search for according layout that
might work well here. Let's say frogs
and their origin. Let's say that I have a
presentation about frogs, he'll tell me he'll show
me a couple of layouts, he'll show me a couple
of frog pictures, and it gets a little
quicker and easier, and this is the approach that
Microsoft wants to take. Microsoft would like you to have it easier to start
creating those slides. Let's select another
slide. Let's he suggests a section
this would be perfect. Let's make this a
section header. Now the next slide, and this is how you usually would
create presentations and look how quick
I'm progressing by using Microsoft copilot and
their automated suggestions. Let's say that, Hey, I want to start my presentation. I want title and content, and I'm writing here,
for example, data. Data, and he'll automatically
take the context into account and pull up what
he finds the best for data. Data, if I type in
data table, something, something, he'll try to get me going with a table. All right. This is the newest
approach that Microsoft is taking when you
create presentations. If this gets better and
a bit more consistent, it will help us a lot to create presentations
slide by slide.
8. 03-05. New Slide with Copilot: In this lecture, I
want to talk about the new slide with
Co pilot feature. You have a presentation. Let's say you have a
slide about market trend data gathering customer feedback
and refining strategies, and you would actually
want to create a new slide about directly
gathering customer feedback. You can click here, so the slide gets created right
after the selected one, and you can select new
slide with Copilot. It opens a mini window of the Microsoft
narrative Builder. Here, I could tell
him, add a slide about gathering customer feedback
for our sports during launch. We can reference a
Word document if you have one with
information about that, or you can just directly
create the slide. As you can see, this is a mini version of the
Microsoft narrative Builder. It creates one slide. It will insert it
into the presentation and wait for my approval
or for my deletion. I'm really feeling
like Caesar here. I will keep it. Now, immediately design ideas open if you don't
like the design, and I don't would
like the picture to be on the left side and
take the entire window, something like that, beautiful. It's getting very intuitive to add those slides
into your presentation. Remember, if you
have a nice template like Microsoft selected for us, you can always go to Layout and you can switch to
a different layout. Perhaps you prefer the photograph to be
on the right side. I switch but this layout actually didn't work
with this text. So you can see it's
not always perfect, but that shouldn't stop
you from changing it. The design ideas give you a real life preview
of what will happen, which is a bit better, for example, this one, and
we could leave it there. This is how you add a slide with the new slide
with Co Pilot feature. It is also available
in the Insert tab. I don't like that they put
it both here and here, I would prefer
that it is only on the home tap or only
on the insertab, but they really want to incentivize us to use
it as much as possible. Thank you for watching. Let us now continue to
different topics.
9. 03-06. PowerPoint Templates: In this lecture, I'll teach
you how you can use the official Microsoft templates
for your copilot creations. If by any chance you
cannot find this template, you can open the resource file and work on this very file. To use Microsoft templates, you can go to File or when
your PowerPoint opens, you can select them
directly here. On the top side, we
have more themes. You can open more themes, and you can select a
theme that you like. Here on the bottom, you
have different categories, and you can also search, for example, if you type in Business presentation
or any other topic, you will find some
useful templates. I have also here business. Let me click on it, and here
I have even more templates. What I like about that,
that it is automated. What I don't like about
that, to preview a template, I need to click on it,
and I only see one slide. I don't like this.
I wish that we could see all the
layouts at a glance. Okay, let me get
back. I'll select my universal presentation.
I'll double click on it. It will start a
presentation with this template opened inside
of your Power Point. If you right click
Select Layout, you can see this presentation
has real nice layout. It has a section title. It has a couple of content layouts. So this will now be used for
our presentation creation. If you go to copilot and select, create a new presentation
and use a topic like history of electric
vehicles or EV cars. You can see change design, I no longer have to change the design because
this is pre selected. I'll hit Play, so it
starts to generate the content to make
things a little quicker, I'll delete maybe
two of the sections, so only three remain,
generate new presentation, and now a presentation
will be generated as usual with the already
pre selected template. It has now created
a presentation. You can see different
slides with different layouts. Okay,
let me click on it. What you can, of course, do, you can go to
design suggestions, and if you don't like
the particular layout, you can try to click around. So PowerPoint selects
a different layout from this presentation for you. For example, I
really like the one with the circular image. If I would like this
presentation to be consistent, I would most likely try to
find it on all of the slides. Well, here it doesn't
fit, but I can always adjust this a
little bit myself, and this is the way to go. Okay. This one looks nice. I could continue with my slide, and I could try to always
select a layout that I prefer. What I, however, dislike about
using those templates and design suggestions
have a problem when there are more objects. For example, if I add
a triangle or a shape, I would prefer the
shape to be here. Designer in this moment, no longer knows what to do. He has no more suggestions, and out of the ordinary. We added something, and he
has problems with that. If I delete this, you can see the design suggestions
come back again. So my recommendation
would be at first, select the design
suggestions you like, adjust your
presentation that way. And if you need to
add your own shapes, do it at the very end. Do it at the very end. This is the stage when I've
selected everything. This is the stage
where I would add my custom designs when I no longer need
design suggestions. Thank you very much.
This is how you use Microsoft templates with copilot and we'll see each other
in the next lecture.
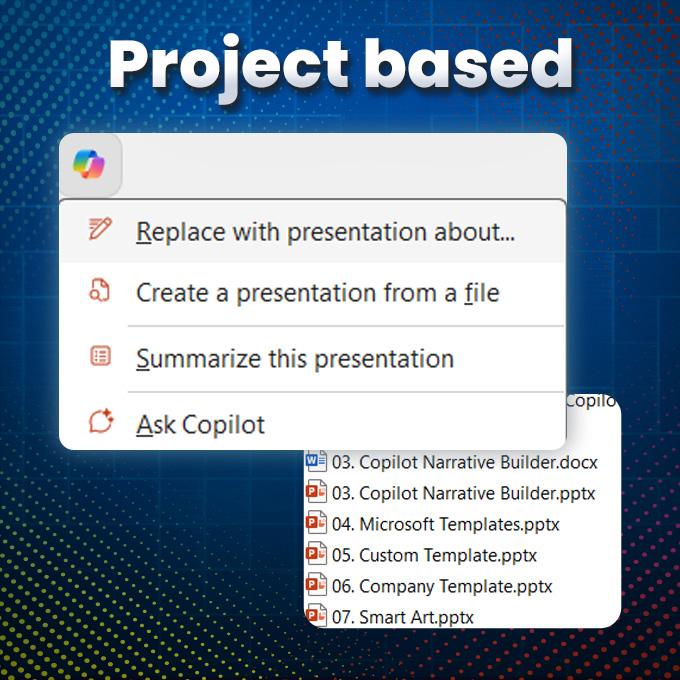
10. 03-07. Using Custom PowerPoint Templates: We have learned about the
co pilot narrative builder that first builds out the outline and then
creates a presentation. Now I want to show you how you can actually use any
kind of template you have or your
company's template to create beautiful
presentations like that. But there is something very
important to understand in order for those templates to
work with Microsoft copilot. Microsoft did write actually support article
that explained this. In order for a company or a custom template to
properly work with copilot, of course, you need to have some layouts within
this template. That's what templates are for. But it would be preferable
if within your template, you have several
types of slides. You have a title
slide, a agenda slide, a section slide that will be the beginning
of each section, a content slide and
a conclusion slide. It is not mandatory to
have those layouts, but in order for copilot to understand what layout to
use in which situation, it would be preferable
if you have those and those should be
the names for them. You can have the
title layout called cover title or title slide. This will ensure
that when copilot uses your template to
create a presentation, it will use the according
correct layout. For that very reason,
I have created this completely custom template
that I'll share with you. It is available within the
resources that includes all the correct
layouts that should be available for those
kind of presentations. Why? Because when you use the PowerPoint
narrative builder, it usually starts with a title
slide and with an agenda, and then it creates sections. It always starts with a header
slide for the section and with subsequent
slides explaining these sections, the
content slides. This is why I created
a specific layout for the section header and specific several layouts
for content one, two or three, so we have
something to choose from. Of course, you could
have more layout within your presentation
within your template. But those should
be also included in order for copilot to
select them correctly. I will share this template
with you completely for free. You can use it for
whatever you want. And because I've created it, I know that when I select a different color
scheme for this design, I know that it will
still look beautiful. As you can see, whether I change it to this color scheme
or a different one, it will look consistent with everything that
is designed here. Let me get back to the original
color and see you soon.
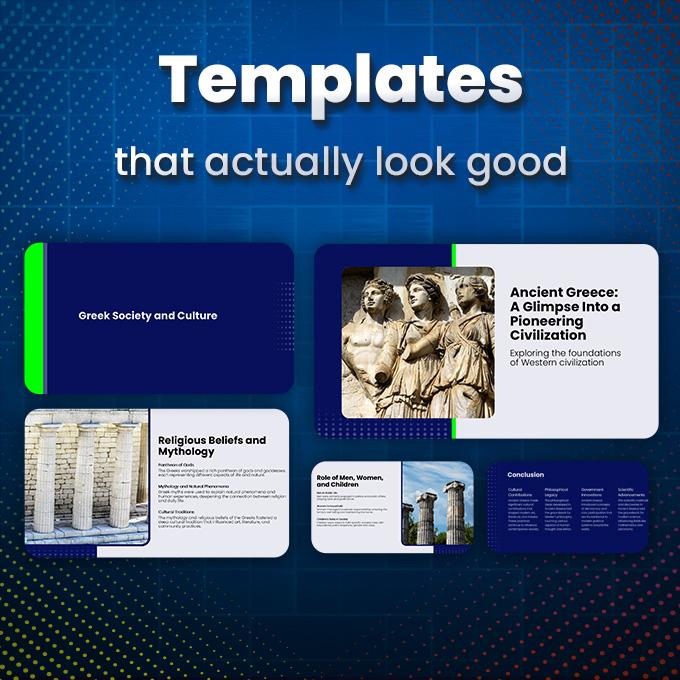
11. 03-08. Branded Templates for Company Use: In this lecture, I want
to show you how you can create a complete
presentation with Microsoft co pilot
that actually looks good or with your
company's brand template. That will also look
good, obviously. So if you have everything
prepared, you have a template. You can use this template
for whatever you want. I've created it specifically
for this course. You can open it
from the resources. It's called Andrew's Temp. I have a sample logo here, but I'll show you
later how to delete this and use it for
anything you want. Only need to open this Power
Point file to work with it, but you must know I have
used the Poppins font. I have saved this font within
this presentation file, but for future use, I would suggest that you install the font on your system in case you make any changes or you lose this file
or you delete it. Okay, so let's start. Let's go to replace with
presentation about, and I'm 100% confident that this presentation
will be made properly. Create a presentation about
just choose any topic, maybe ancient Greece. Ancient Greece, right? And it will now
create the outline. I'll just accept the outline because it's not
about the content, it's about what you will
create because I made sure that this template
has a title slide, has an agenda slide, has those header slides
for our sections. It has content slides. I am 100% confident and already know how the
presentation will look like. And as you can see, it
looks at least decent, at least better than some
basic templates that we have. We could, of course, use
different templates with more layout but here, I wanted to share
something actually usable that you can use for
your presentations as well. As you can see, it
created the presentation. For some reason, it didn't give any picture
to the title slide. That's no problem. We could use Microsoft copilot to
insert the picture. I'll show you soon how or just for the sake
of this tutorial, let's go to insert pictures, stockimages, and I'll just select any picture we see here. It doesn't have
to be matching to the template topic. All right. We have a picture now, and this is how I've
set everything up. This is the agenda slide. You
don't need a picture here. It's only there
if you wanted it. You can see we have the agenda, and if I open the slide sorter, we have the section headers, then we have the content slides, and this is a completely
ready presentation. The only little
adjustment I would make is in the conclusion. As I see, it always
colors the text black. So let me just select
the text to be a bright one and
the presentation is ready with one click. You could decide for yourself
whether you want to use Microsoft Designer or select Layout and just select the
layout on the right side. I have created Content
one and Content two. Content two is with the
picture on the right side. To get rid or change the logo
with your company's logo, just go to View Slide Master and from the very first slide. This is the big Master slide. Delete or change this logo. I'll close the Master view. You can see it's
no longer there. This is how you use
branded template for your presentations
with Microsoft Co Pilot.
12. 03-09. Working with SmartArt: When you use copilot and the narrative builder to
create presentations, sometimes, at least at this
point, it creates a slide, not only with a picture and explanations on the right side, but it creates a slide
with the title and a smart art with three
different boxes. And I'm not a big
fan of smart art because when you resize
one object here, you can see it messes up the
entire design altogether. The good news series
that I was able to talk to the Microsoft
team about this feature, and I was able to ask
why some slides are created with textboxes and
some slides with Smartart. The answer is
because in co pilot, slides are created first
by entering your prompt. Secondly, the content is
generated, and at the very end, copilot, based on the
content it generated, selects the layout
that it will use. So if there is a lot
of text generated and there is a big placeholder
on the layout, then there's a possibility that the smart art will
be inserted there. So if you use a template
with small placeholders, you'll most likely get only those pictures and text boxes. But if you have
large placeholders, there is a bigger chance that the smart arts will be inserted. I want to show you a
solution because I want you to become a
better Power Point user and actually use copilot and don't be angry at it.
You can overcome that. If you find the content is okay, you can either add a new
slide with the same topic, and it will create probably
a slide like that, or you can take the Smart art. Right click group, group or take your shortcut
Control Shift G, and now it's just a bunch
of shapes grouped together. I'll click once again, Control Shift G. Now
everything is separate. The pictures, the
titles, and the text. What I'm usually doing
if I, for example, want rounded corners because those are shapes with
picture fillings in them, I'm going to shape
format, edit shape, change shape, and here you can, for example, select the
rounded rectangle or circles. Let's select a circle. Okay? We have everything
changed at once. I would now probably select those three back together,
press Control G. So it's a bit easier for
me to move them around. Beautiful. This way, I no
longer have a smart art. I can change the size of
one individual image by, for example, selecting
and clicking it, and nothing will get messy. This is how you can adjust your smart art designs
if you don't like them.
13. 03-10. Content from Word to PowerPoint: In this lecture, I want to
show you how you can draft a PowerPoint presentation
from the Word document. If we open co pilot, there is a feature called Create a presentation from file. Technically, it
should be pulling up files from our OneDrive, but we can also paste
the direct link. Microsoft advertises that we should be able to
pull files directly, but if this isn't
working for you, you can always use a
direct link to the file. It's important that this file is available in your One Drive. You can use the
same file that I do or you can use any
document that you have. Let me go to the office website and I have my file prepared. I'll just open my file because I need to
copy the link to it. It's not a problem.
I'll go to Share, and here on the right
side, I have copy link. The link will be copied
into my clipboard, so I can paste that
into PowerPoint now. Once you are within PowerPoint, you will just paste this
link, you'll hit play. We need to again confirm that I want to delete
everything here. Yes. I have selected a template, so PowerPoint will use
this template that is loaded inside of
this PowerPoint file. As you can see, it
used the template. For example, here
it made a mistake. It didn't show any picture, but we can very easily insert
a picture later ourselves. As you can see, it gives me a great starting
point for creating my presentation
because the majority of content is already present. I could now fine
tune it, tweak it, and because I've
selected a layout, I already have the
designs that I prefer. I'm always repeating the
better the template, the better the designs
will look here. I could I could
possibly go to design, and I have some template saved. For example, the template
that I showed you previously. As you can see by layout, my template is loaded, but since the slides already
used the previous template, PowerPoint doesn't know, Hey, should I change this into
this or this into this? I would need to do this by hand, but it's possible to use
any template that you load. For example, I could
click on Layout. Let's say that I want my content with the picture
on the right side. Here I want my content with
the picture on the left side. This is why I feel
my design is a little better because
it looks just cleaner. I could be using my
template right away, but I don't want every
presentation to look the same. Is how we can create
presentations from files directly with
Microsoft Co Pilot.
14. 03-11. Copilot Prompt Gallery: In this lecture, I would
like to talk about the available prompt
within copilot. If you open copilot and you don't really
know what to ask it, how to work with a presentation, you can select this plus sign, and here we have view prompt. In the view prompt window, it'll show you sample
prompt that you can use within
Microsoft copilot, like I think this is obvious that you can
select Add an image, add a slide, or something else, but some of those
will be less obvious. And if you are a new user, it would be advised to take
a preview what is possible. Of course, you can
type here anything. You can type anything, but CPalot might not understand it. Those are the prompts
that Microsoft endorses and would like
you to test out and use. Can select the category. For example, if you are
creating a presentation, you'll most likely want only to take a look at
the create ones. You can select a certain topic, and here you have certain
prompts that go into it. Write an impact story. You might not know that
this was possible, but as you can see, a prompt like that is perfectly okay for
the copilot window. You can add certain prompts to your bookmark if those
are your favorite. Then if you click on
your prompt window, it will show you
only the prompts that are bookmarked by you. Of course, I bookmark the most important ones
for me at a stock image, add speaker notes to all
slides, at an image. Those are the ones
that I really use. Alternatively, you
can also press Control F to open
the search box. The search box isn't visible
here, but you can search. You remember that I could add images. So you select image. Oh, and it found an image here. I found create an image. Add a stock image, add a
brand image, and so on. What I also like
about is that we are in the Microsoft ecosystem. Here on the right side,
we have C all prom. If you click on this,
you are being taken to the Microsoft copilot
Prompt Gallery. You can see I'm logged
into my account, and what's interesting
that you can see prompts for other apps,
for example, for Word, for Microsoft Excel, and you might not use
them in PowerPoint, but it's important
and refreshing to see how and what prompts
are used within Excel. Then if you, for example,
go to PowerPoint, what's also very
interesting that if you click on the prompt,
you, for example, bookmark it, I will synchronize with the
bookmarks within PowerPoint, and they will appear
here in the bookmarks. As you can see, I have
my your prompts here. If I click on it, it shows me the prompts that I
have bookmarked earlier. So being in the
Microsoft ecosystem is very convenient
here because we have everything synchronized between
the online prompt gallery and between the prompts
that we have here. 99% of the time, I just go and roll with it
and I type in my prompt. But for new users, it would be very useful to
use the predefined ones to test features out and see how they
work within copilot. Thank you. Let's go
to the next lecture.
15. 04-01. Adding & Modifying Content: This lecture, I'll show
you how to add slides and start your editing
with Microsoft copilot. I have another one
of my templates, and here we have a presentation about begin your
gardening journey, and we have plenty of
things about gardening, but there is nothing
about plant selection. We can tell copilot to
add a slide about it. So for that, I'll open co pilot. I can either just start
typing at a slide or if I forget how the prompt
actually was written, I can go into my prompt gallery, and, oh, yeah, there
was at a slide. Add a slide about selecting the right plans for a
beginner, gardener. Okay, a prompt like
that by hitting play it will add it as the next slide after
the one we had selected. As you can see, it's
already prepared, choosing the perfect
plans for beginners. And here we have a couple
of points about it. The same way, if you feel
your presentation is lacking maybe an agenda
slide or a conclusion slide. Oh, we have a
conclusion slide here, but we could delete this
conclusion slide and add agenda slide and
a conclusion slide. 2000 years later. Because you may have an
existing presentation that requires those slides. I would put the agenda slide as the first slide I
would add a picture, and as you can see, we have
this agenda written out. Also, a conclusion was added. I'm not a fan of this design, but the icons look pretty well. This is because this
is, again, a smart art. As you know, we could either use the PowerPoint designer to
change the designer a little bit to a customized design or ungroup it and
redesign this ourselves. This is how you start editing a presentation that you already have with
Microsoft Co Pilot.
16. 04-02. Inserting Stock Images: In this lecture, we'll add an
image to our presentation. Now, we have a presentation and we need to add
an image to it, whether we have a
placeholder for it or not. We could, of course,
dragon drop our own image. We could go to
insert pictures and select a stock image
or an online picture. But since this is a course
about Microsoft copilot, we can use copilot. Let
me go to my prompt. If you forget what
type of images you can insert, just type image. Okay, add an image. What else did you
have? Create an image and at a stock image. So I want a stock image
of what do we have gardening of a garden. Let's just go for something
completely plain and simple. Currently, the feature
works like that, that it shows you
several pictures. It shows you four
different pictures. You can choose one of them, and you can select Insert. This was selected from the
Microsoft 365 Content Library, since you have a license
for copilot for Microsoft, so you are completely
covered when it comes to any kind of licensing
to this picture, and it was added to my agenda, and I could move on to any slide that I
need a picture on. This way, you can simply add pictures to your presentations.
17. 04-03. Generating AI Images with Copilot: In this lecture, I want
to show you that we can create custom images
for our designs. We are on the same presentation, and as opposed to
insert an image, we have created an image. I'll select the prompt
that states generate an image of a garden
and plants in it. Okay, very well written, but I think Microsoft
designer will understand. The way this works, an artificially designed
image will be created, and we will be able to put it directly inside
of our presentation. It will take a second,
but it's rather quick. It may not be perfect, but the feature will only
get better over time. As you can see, we
have the pictures, and you can select one of
them, and I'll select insert. It's just basically a different iteration
of the same picture. Now, because I already
have a picture in my slide, it
inserted separately. But if I would delete that, I have now an empty
placeholder because this template has
placeholders for pictures. And if I click on this
picture right now, it will be inserted directly
into this placeholder. Of course, you can click
on the picture itself. You can go to picture format, and from the crop features, you will be capable
of moving this around if you want to capture a
different part of this image. I don't have to
advertise this anymore. I think you feel
that this will be a very prominent
and strong feature now and in the future.
18. 04-04. Creating Images with Bing AI: In this lecture, I want
to explain BinkCreate to you and what is actually
happening behind the scenes. Microsoft owns the
majority of Open AI. It uses Dolly for
its image model, and we use now
PowerPoints Create feature to create this image. But since we are inside of
the Microsoft ecosystem, have you ever used BinkCreate? It's Microsoft's
free image creator that creates artificial images. But I'm locked in. I've just now created an image, and if I go to my
creations you can see the garden that we just created is displayed within my account. What's interesting
currently in Power Point, we have only this one design, and I can make this a
little bit clearer. So you see we have
this one design. But what actually happened
behind the scenes, Microsoft, with its Dali model, created two iterations of that. Perhaps you like the
second one more. For example, I needed a picture of an ape scratching its head, and it returned this rather
child themed design. But in the back
behind the scenes, it also created a second
version of it that I actually prefer much more if
you ever run into trouble. The images here aren't
enough for you. You can always switch
to Bin create. You can download
the image there, and you can bring it to
PowerPoint. What's even better? Since you are inside
of this ecosystem, you can click on this picture, and I could not
only download it. I can directly right
and copy this image. I could get back to PowerPoint and I could just paste it here. This would be so easy, but now it isn't inside
of the placeholder. Well, if I would save this to my desktop and I would
just dragon drop it here, it would be placed
in this placeholder. But if it won't be placed in your placeholder,
don't worry about. You will be capable
of adjusting it. Just go to picture
format, select crop, and you can crop it to shape, and I would use the rounded rectangle shape
in this instance. This would result in a
very similar picture. Of course, I could
crop it again and I could make it a little smaller. It would
take me some time. Yes, but look how
simple it would be to create a very similar result
with a different picture. If I would take the time
to download this picture, I could directly drag and
drop into my PowerPoint, and it will be automatically placed inside of
this placeholder. So this is not a big deal. This is how you actually utilize BinkCreate if you need more
iterations of your picture, and you want to see what
you created previously.
19. 04-05. Cropping & Adjusting Images in PowerPoint: This lecture is a little bonus. Please remember that
you can do plenty of edits within
PowerPoint yourself, even if you aren't very
advanced in PowerPoint, and if you need to learn more, I have a free course that brings you up to speed to
the basic features of PowerPoint or a
dedicated master class that teaches you
everything at PowerPoint. If you would like this
picture to be rounded and you don't have any placeholder for it, can click on the picture. You can go to picture format, and you can start using
the crop function. The crop function not
only allows you to crop a picture to a certain size, you can also crop it
to a certain shape. If you know PowerPoint shapes, you can open the crop
options, crop to shape. And for example, I would use the rounded rectangle or the circle here. Let's
go for a circle. I would click on the Oval,
and now the picture is oval. I would click on Crop again. I would select the Aspec ratio
and make sure that we have a perfect square circle
one to one ratio. Now it's perfect. We have
the crop function open. Maybe let's make the
ape a little bigger. Let's put it in the middle. It is scratching its head
and by clicking on crop, the picture is now
perfectly cropped. You could do this
with any shape, and don't worry if copilot doesn't do something that you would like to see here, take your time and
do those few edits. Remember that copilot
gives some outlines and not everything can be designed with PowerPoints
built in designer. We are limited with the
designs to our layouts, so I often do this
cleaning up myself.
20. 04-06. Rearranging & Structuring Presentations: If you have a presentation
and would like to co pilot automatically
divide it into section, there is a feature about that within copilot that's
called Organize. You know that you
can right click and select Add section
and add a new slide. You can add a section,
you can give it a title, and all the slides below will
be inside of this section. But let us use an automated
feature for that. Let's open our prompt gallery, and within the dit section,
organize this presentation. By typing in organized
this presentation into sections or just
organize this presentation, PowerPoint will automatically
add sections to it. As you can see,
sections have been added here, here and here. What I like to do when
sections were created, I'm going to view and
selecting Slide Sorter. You can also select
a Slide Sorter here on the bottom pane. When you select a slide sorter, here on the bottom right side, you can make slides
a little smaller, and it's very easy to read
the sections that were added. I assume that you know the
presentation that you were creating and you can
check the sections. You can move slides around. You can select several slides
by selecting the first one, shift clicking another one, and you can move
multiple slides at once if you prefer the
sections to be different. Remember that at
any given point, you can add another section. For example, you
want the summary or the conclusion to be a
separate one. No problem. The conclusion now is
within a separate section. You take this as
a starting point. It will save your time and a bit of hassle with doing
all the sections.
21. 04-07. Refining Slide Text with Copilot: In this lecture, I'll show you how to rewrite the
text that you have. Once we click on a textbox, the co pilot feature appears. The co pilot feature allows
you here to how to rewrite, condense or make it
sound more professional. You don't always have
to keep the changes. You can, for example, select condense and you can keep it, regenerate, or revert
back the changes. By regenerating, it will give you different
versions of it, but they will be rather similar. Let's say that I
want to keep it. Okay, this would be one. What if I don't want to
use this feature? I don't want to how
to rewrite or I don't want to condense
or make it professial. I just wanted to have two
instead of three bullet points. Now, about a year ago, this worked perfectly
by going to Copilot and selecting rewrite this text to be
more condensed or rewrite this text by just
giving me two points. The way I overcome this problem, because it's not
working currently, we got an error message is
I'm creating the same slide, but in a different version. Add a slide about defining your podcast
purpose on and niche, give me two bullet points
explaining explaining it. All right. By that, I will create a new slide. This will be the next
slide, and it should contain only two bullet
points explaining the slide. As you can see, I have rewritten the same slide in a different way with less
bullet points and less text. The third option that I
use is going directly to chat GPT and just
rewriting it there. Completely fine to
do either of them. I want to stay within
PowerPoint as much as I can, but there are certain
situations where I feel that Chat TBD
will do a better job, and I want to teach
you only things that I actually use and that you
will actually be using. I don't want to
teach you co pilot just for the sake of teaching. I want this to be
one of your tools that will save your time
and not give you headaches. Thank you for listening. Let
us go to the next lecture.
22. 05-01. Live Copilot Scanning for Insights: And that we created. I have a presentation
about future tech. It uses my template, and there are different things
about future technologies. I can open copilot, and by waiting a
couple of seconds, it will draft some questions
about the presentation itself that I could possibly
ask Copilot about it. What advancements in AI
algorithms are discussed? What are the ethical
implications of biotechnology and
genetic engineering? And I can refresh that to
showcase different questions that Microsoft Copilot is going through when reading
this presentation. I tell, Okay, yeah, I would actually want to know
what copilot has to say. By clicking on one
of those questions, it gets immediately answered by Microsoft copilot because on
the back end it already has the answers prepared
because it is actively scanning your presentation and the text that is inside it. I think this is a very
good starting point to get to know a tiny bit about
the presentation itself. The questions are always
displayed on the bottom of the copilot window once it
automatically scans it.
23. 05-02. Asking Copilot for Slide Explanations: This lecture, I want
to show you that you can ask copilot anything, especially about the presentation
that you are having. If you want to follow along, you can open the resource file. I created a presentation about
some key metrics when it comes to investing in the stock
market like the PE ratio. And let's say that you're opening this for the first time, you don't know
anything about that. And even though we have
an explanation here, you don't really understand it. So I would go to copilot. I will just go to ask copilot and I would ask Copilot Hey, explain the PE ratio to me like you would
explain it to a child. I want this explanation
to be rather simple, especially that the
topic is complicated. All right. And this is
the answer that I get. And I don't have to
switch to hat GPT. I can do this directly inside of Microsoft PowerPoint and use copilot to give me an answer. I have a rather
simple explanation. Like it would be possibly
explained to a child this way, I could start learning
about the things that I don't understand
in my presentation. Let's say that you have a presentation
about history about different ages and
you would like to ask something about
a specific age, why it is called like that
or what has happened, then this is the perfect
usage of Microsoft copilot, but you need to remember that
every answer is created by AI and you need to
be always careful because AI generated
content may be incorrect, you always need to do fact checking depending on what
you actually ask about.
24. 05-03. Finding Key Slides & Content: In this lecture, I want to
show you a further prompt that copilot suggests when it comes to understanding
a presentation. I have a presentation about communication here with
different sections and slides. You can see that
very prominently on the very first screen, we have understand, summarize this presentation and understand show key slides in the deck. Both of them even if they disappear from
here in the future, you can either type them yourself or go to View
prompt, of course, from the section, I
would select understand and within the
understand section, we have things like that. Stay on track, find
specific information. This is very useful, show key slides and extract
key information. I have read this presentation and I know that there
is something about using technology
and I cannot find it or I don't want
to waste time on it. I would use the prompt where was the slide
about using technology? Co pilot will search
the presentation, will give me a result
and will give me text. This text will have a
reference number one, and when you click
to the reference, it will show you the slide where the reference comes from. Then on the bottom, there
are additional references, and this is exactly
the text that was used to generate
this answer. If I click on that,
it turns out we have an entire section about this
and Copilot brought me here. Another one is show key
slides in the deck, and I don't really like
this feature because how do you determine which slide is more important
than the other? Yes, we get an answer, and we have basics to modern innovations
and different slides. And again, we have direct
links to those slides. Why is this slide more
important than the other? He has to say something and he cannot give you too many slides, and this is why Microsoft
wants your feedback. If you like what he did, please give feedback so the
model becomes better. What's interesting that this
feature allows you to play only the slides that Co pilot brought up as
the most important ones. Now, we would very
quickly skim through the presentation only through the slides that copilot decided. And this would be
one interesting way to get a general idea
of the presentation itself with just
around six slides instead of reading
all 25 or 26 of them.
25. 05-04. Summarizing Presentations with AI: Here, I want to show
you how to summarize a presentation within
Microsoft co pilot. And this is one of the better working features because, yes, we have most often a conclusion or some kind of summary at the end
of the presentation. But there are so many slides and you think that you
are missing something. This is where you
can open a co pilot. And there you have, from the understand summarize
this presentation. I can summarize this
presentation, I will hit play, and it will generate the answer directly here within
the copilot window. Again, it gives me references where the
information comes from. So the first and
second reference comes from this and this slide. I can click on the reference, so this slide will open. Additionally, I can open
all the references, and here are all the
slides that are being referenced and the text that was used to generate
this answer. This is a very
interesting feature, and we can go directly
to certain references. Of course, it's a bit
difficult if there are so many of them, so
we can show less, but I really like that we have direct references here
to certain slides.
26. 05-05. Getting PowerPoint Tips from Copilot: One little information
you can ask copilot directly
about Power Point. For example, how
to add a slide in PowerPoint or how to
change the color scheme. It will give you an answer
without leaving PowerPoint. You will now know
that by navigating to the home tab and
clicking on the new slide, a new slide will appear.
Let's test this out. I think this will
work. Home, New slide, I can click
on a new slide. Wow, this works. Remember,
if you run into trouble, use copilot to ask
things about PowerPoint. However, I have found that those answers are
often very generic and sometimes I find it quicker to just search for the feature
than to read all that. Remember that you can help yourself by asking
copilot directly.
27. 05-06. Using Speaker Notes & Presenter View: I wanted to show
you something about presenting, which is the notes. When you create
content with copilot, on the first slide, it will say, AI generated content
may be incorrect. Often it is, but it gives you such a beautiful
starting point. What's more important, it gives you automatically
created speaker notes. You need to always read them
before your presentation to see if you really want
to sound that and if this really helps
you or it doesn't. But they are there,
they are generated, and we should utilize. Because when you
present a presentation, especially if you present live
and you have two monitors, you can go to the presenterview. The presenterview allows you to showcase this slide
to your audience, and you will see everything, including the next slide and the speaker
notes on the side. You could write anything here, but PowerPoint has helped you and already wrote some
speaker notes for you. You can even delete
all the texts, have some icons here, and read this text while presenting. This would make up for
a great presentation. Remember that you have access to the speaker notes by
opening the notes function. You can, of course,
edit the text and add something by yourself, but the default ones
were written by AI.
28. Conclusion: Welcome to the summary
of this course. I'll leave a link
here, and this link, if I hit Control
and click on it, will take me to the
Microsoft copilot website. If I scroll through it,
copilot says that you can possibly create a
new presentation, summarize your presentation, organize your presentation, use your organization's
branding, and I think we've learned
all that and beyond. You've learned how to
create, how to edit, and how to understand
your presentation. I am completely confident
that AI is AI and are you. There will be always
the designer part that will be superior and the human touch can always elevate a presentation
to new heights. But please use this
tool as a timesaver. Would like to learn more, I have PowerPoint courses dedicated
to teach you Power Point, Power Point design, how
to create templates. Whether you need
a business course or a general PowerPoint course, I would be honored
to have a student like you to continue
learning with me. Now, I'm thankful that you arrived at the
end of this course. Big respect that you
want to spend time on learning and wanted
to learn co pilot. I think it's a great tool. It will get better over time, and I cannot wait what is in
store for us in the future. Thank you and see you again. And
 Andrew Pach ⭐, PowerPoint, Animation & Video Expert