Transcripts
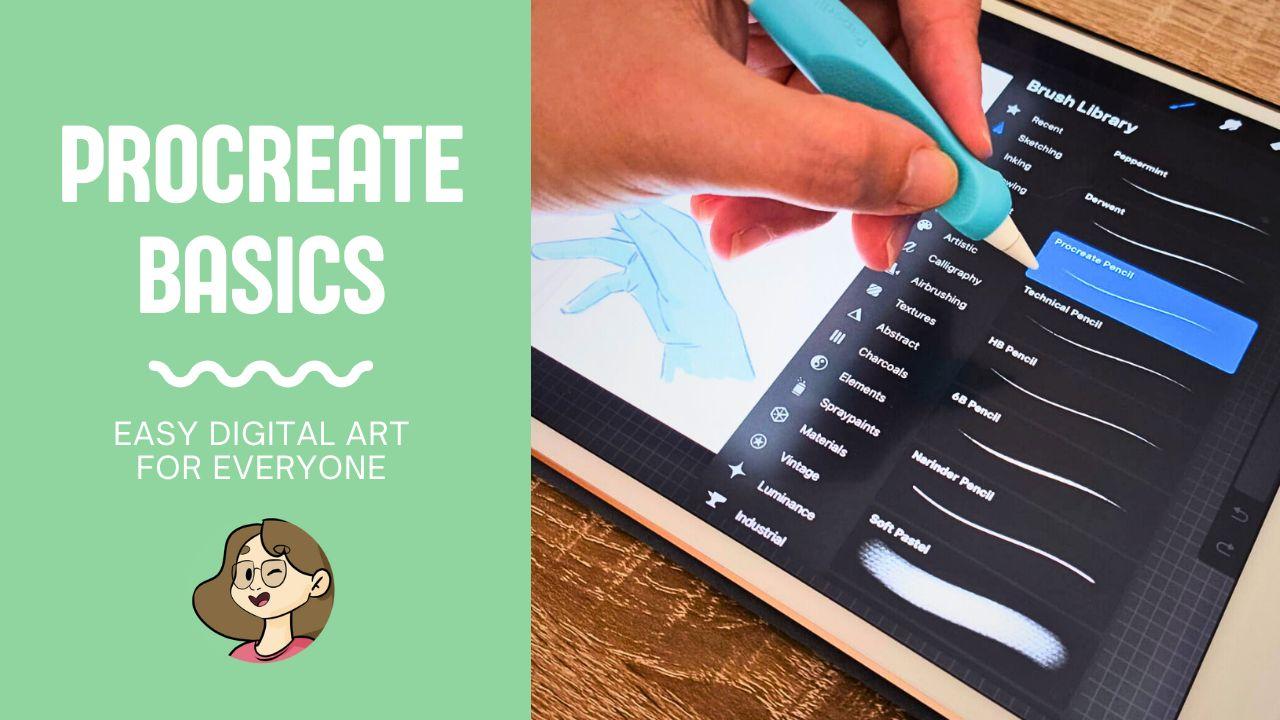
1. Intro - Start here!: Hi, and welcome. Have you ever opened, Procreate, felt a wave of confusion
and close it again, or maybe you just want to master this incredible art studio
you're holding in your hands. Then you're exactly
in the right place. I'm Patricia an art teacher, and I'm so excited to guide you through everything you need
to know about Procreate, even if you're a
complete beginner. We'll start with the essentials from navigating the gallery, and setting up your
first canvas to using time saving gestures that will make you
feel like a pro. We won't just cover the basics like the razor and smudge tools. We'll also go over
the fun stuff, like customizing your own
brushes and importing new ones, as well as importing
new color palettes. So you have new tools. Throughout the class, you'll get to apply your
new skills with fun mini assignments like sketching and experimenting
with brushes, and bringing wonderful
colors to your lineart. Class is designed
to take you from feeling overwhelmed to
creating with confidence. So are you ready to
finally master Procreate? Then I'll see you in
the first lesson?
2. Part 1 - Getting Started With The Procreate Gallery: Hi, hello and welcome. So we're going to start
through our Procreate basics, and the first thing
we're going to see is the gallery area
and what you need to know about the gallery
because honestly, there's quite a lot to do here. You can do a lot of things here. So first of all, when
you open Procreate, you'll see your
gallery right away, and you have a few
buttons up top here. So first, you can
select any file or folders on Procreate and do
whatever you want with it. So you might have
noticed that I have here quite a few
categories or collections. So I have a character
design folder. Let's say, I have a fan art
folder, and so on and so on. And how you can do this,
it's called making a stack. And I have these two arts
here, these two illustrations, and I'm going to
select both of them by tapping this circle to
the side of the title. And then what I'm going
to do is tap stack. And as you can see,
it created a stack with the two
illustrations I selected. You can then name your
stack anything you want. So for that, you just
tap here the name, and now we can write hand
practice, for example. All right, this is
it. So we created a new stack and there are more options inside
the select option. So let's go over here again and now select
this stack once again. And if we tap preview, we can see what's
inside our folder. And then we can go
back to our folder. Now, let's select again. And for example, I can
select just one or two. Let's select both of
them and then tab share. And as you can see, you
don't need to enter the actual file to
export anything. This is very useful. For example, if you
want to make a PDF, you can just go inside the stack select all
the files you want to export and then choose in which format you
want to export. For example, let's see,
let's say I want to make a whole Zine or a
booklet of my art, I can just go to the PDF option, and then it will export
all these images inside this folder into a PDF. You'll have several pages on your PDF depending on the number of
illustrations you choose, and then you'll have
each illustration or each file in one page. But as you can see,
you can export your work in different formats. Then we also have to duplicate. So if I go to duplicate
here and tap it, I will duplicate the
files I had selected. So as you can see, I had these two
illustrations selected, and now I have the
duplications right here. And for example, let's say,
I want to delete them, then I just select them once
again and then tap delete. I will show this
confirmation message, so you don't delete anything by accident and tap delete,
and that's done. So we went over
the select button and what we can do with it. Let's go for the next
one, which is import. So to import, you just tap it, and then you can go
through your files on the iPad and choose anything
you want to import. So this means that, for example, let me see what I have here. I only have reference images. But let's say I want to use one of these images for my work, then I can just
choose one of these. It will import, and it
will open and procreate. And now I can just go in. I have the image in one layer, and now I can just start drawing whatever I want using this image or any other
that you might want. To go back just up gallery here, and we are back to
the same folder. Now, I created this
file inside my stack, my hand practice stack. So that's where it
will create the file. But I can also go back to the main gallery and do
the same thing on here. So just go through your files on your
downloads or on your drive, whatever you want, and
import anything you need. So the Import is useful for files that are
not only photos, but they might be
saved on other folders besides the gallery because you also have this option here, which is opening a photo. As you can see, it will go to my photo gallery and where
I have different things, and then I can open
whatever I want. Once again, it will create
the file and open it up. It's very similar.
The only difference is that for the input, you will grab files and
specific folders that you have on your iPad or
on your ICloud drive, and the photo option
is for you to grab photos that are
in your photo gallery. Then finally, we have
here our plus sign. The plus sign is for you
to create a new canvas. So here you decide what size
you want your canvas to be. It will open up a
blank canvas so you can start your illustration without anything else in there. Now, usually the iPad will have some premade
canvas already, so you already have
here a few sizes. For example, the screen size, depending on the
size of your iPad, a square one, four K, a four, a four by six photo, paper, comic, illustration one. I'm not sure if it comes
already, or if I made that one. We also have the,
the face paint, and then the last
two, I made them. So you can make your own canvas. You can create the sizes you want by tapping this sign here. So if you want, you
can choose any of the premade canvas that are
available in Procreate, or we can tap this icon
right here with a plus sign. And now we can create
our custom canvas. Here you can choose
the width and the height of your
canvas of your file. You can also choose
how many DPI you want the file to be usually
for the illustration, especially if you want to print those illustrations,
the art you did. The best thing to do is
to use 300 DPI or higher, so it maintains a high
resolution when printing. But yeah, let's see. I'm going to a
fairly small canvas. So 2000 pixels squared formats. So as you can see
here to the side, you can also change the
units of your canvas. So if you prefer
it in millimeters, you can do so centimeters, inches, and so on and so on. Personally, I like
to use in pixels. It's easier for me
it's what I'm used to, but you can choose
whatever you prefer. Now, you might have noticed
as I change my canvas here, the size of the canvas, we have here this category
of maximum layers. So procreate so it can
continue to work properly, so you don't have any kind
of flag or slowdowns. Depending on your iPad
on the model you have, as well as the capacity, you'll have a different
number of layers you can use. You will have a limit. So,
for example, as you can see, this is a fairly small canvas, so I can use a
maximum of 63 layers. But let's say I want to, I want to make a bigger one. As you can see, it
will go down by a lot, and now I can only have
a maximum of 29 layers. So this is something
it's good to pay attention to when getting
the iPad and procreate, because if you're someone
that uses a lot of layers, this might be a bit limiting, especially if you
have a weaker iPad, let's say, with less
capacity and another model. So yeah, it's good to
pay attention to this because your layers
will be a bit limited. For me, it's fun because I don't use a whole lot of
layers generally, but yeah, something
for you to know. Let's go back here.
Let me change the name of my canvas right away because
what we'll be doing here, we're creating a custom canvas, but it will save this as a
preset so you'll be able to find at the drop down that
I just showed you before. So for example, there, right. So then we have the color
profile depending if you're doing illustrations for just
to post online or to print, you might want to change, but as you can see, you
have a lot of options here. So we have RGB or SMYK. It all depends, but if you
want to print your work, choosing this one
will be best for you. I will keep things as it is. Then we also have the
time lab settings. So if you don't know
yet in Procreate, you can set things up. So you have a time lapse when
you finish in illustration. So as you draw, Procreate is kind of recording
your drawing. It's recording the
several steps of it, and then at the end, you can export your work
as a time labs. This is very useful for
when you want to have a time lapse or a speed
paint of your drawings. You don't really need to record yourself and edit
that then post it. Now you can just export
what Procreate gives you. So it's very useful,
as you can see, you have different
options of resolution, as well as quality. So you can play with this a
bit and see what you prefer. Just take into consideration
that if you choose higher resolutions such as a
four k or a studio quality, the file will be
bigger and then a bit harder to share it
somewhere else. And now, finally, the
Canvas properties. Now, you can choose, for example, your
background color. You can just go to
the color wheel and choose any other
color if you prefer. I like to keep my
background color and white, but you can choose
anything else, and then you can
also choose if you want to keep the
background hidden or not. Some artists rather not
have anything behind it, so you can do that, as well. So everything is set. Now, all we have to do is tap creates and we'll create a new
file and open it up right.
3. Part 2 - Actions, Canvas, Share And More!: Now when we enter
our file or Canvas, as you can see, we
have quite a lot of tools and menus here. So we'll start from
left to right, so we can more or less see
what everything can do. So our wrench icon here will open several options
of your file. So for example, the first one, the ad is for you to
import any photo, ad text, copy and paste
stuff from your drawings. Then we have the canvas where
we can crop and resize. You can create drawing guides
and have a page assist. So for example, if you want to create some
symmetry in your drawing, you can use the drawing
guide to help you in that. We can also open up
a reference window. So if you're drawing
something and you want to have a reference to
the side, you can do so. You can flip your canvas, which is very useful
while drawing, so you're certain that
everything looks okay. And finally, we also have the Canvas information
that basically has all the information
that we've seen. Also we have here
the statistics, which is pretty interesting because you can then when
you finish an illustration, you can see the
total strokes made, so it will tell you
here the number of how many strokes you made
out the full illustration. There's also the track time, so how long it took to
draw that and finally, the file size, which
can be very useful. Then we have the share buttons. So we go to the Share button
when we finish our drawing, and we want to export it in a JPEG in the PDF,
wherever you prefer. Then we got the video, and here is for you
to watch the time laps that Procreate recorded
and to export it as well. Finally, we have the
preferences of your interface. So, for example, if you want, we can have the light interface. I've basically
never seen this one because the first thing
I did and I do with most of my devices is to
turn that off and have it in a more pleasing light
so it's not as tiring. You can also change
where your interface is. So for example, as you can see, if I have this turned off, the these options here
will be to the left. But since I'm left handed, I need to have this enabled, so it change to the
other side and that way, I won't be pressing on it
accidentally while drawing. So yes, you can see
there are a lot of options here that
I really recommend you to explore and to try
different things as you draw. For example, you have
the rapid undo delay, which means how long will it take to start automatically
undoing stuff. So I'm going to show
you here very quickly. So let's say I have here
a few lines. That's good. Now I can undo and we'll
talk about this a bit more, but I can undo by tapping
once with my fingers. But we have here this
option with pedanle delay, which means if I press my
screen for 0.65 seconds, it will start to
rapidly undo stuff. So for example, if I do this, see, right, that's what it does. And once again,
it's good for you to try at different timers. This is not really important, but it's good for
you to explore. You can also hide the
size and opacity sidebar. So these are your preferences,
and then finally, you got the help
button for any kind of questions for any
kind of support or even some tutorials
that you might need. All right. Next button, we have the adjustment step, and here is where you can change the hue, saturation
and brightness, where you can add blur
to your images and other filters you might want to use on your illustrations. Now, then we have
the selection tool, which is this button right here. I'm not going to go over
it right now because we will see about this
in a later video. But this is the
one for selection. Then we have our
Transform button, which we'll also talk about
in more detail later on. And now to the right, we
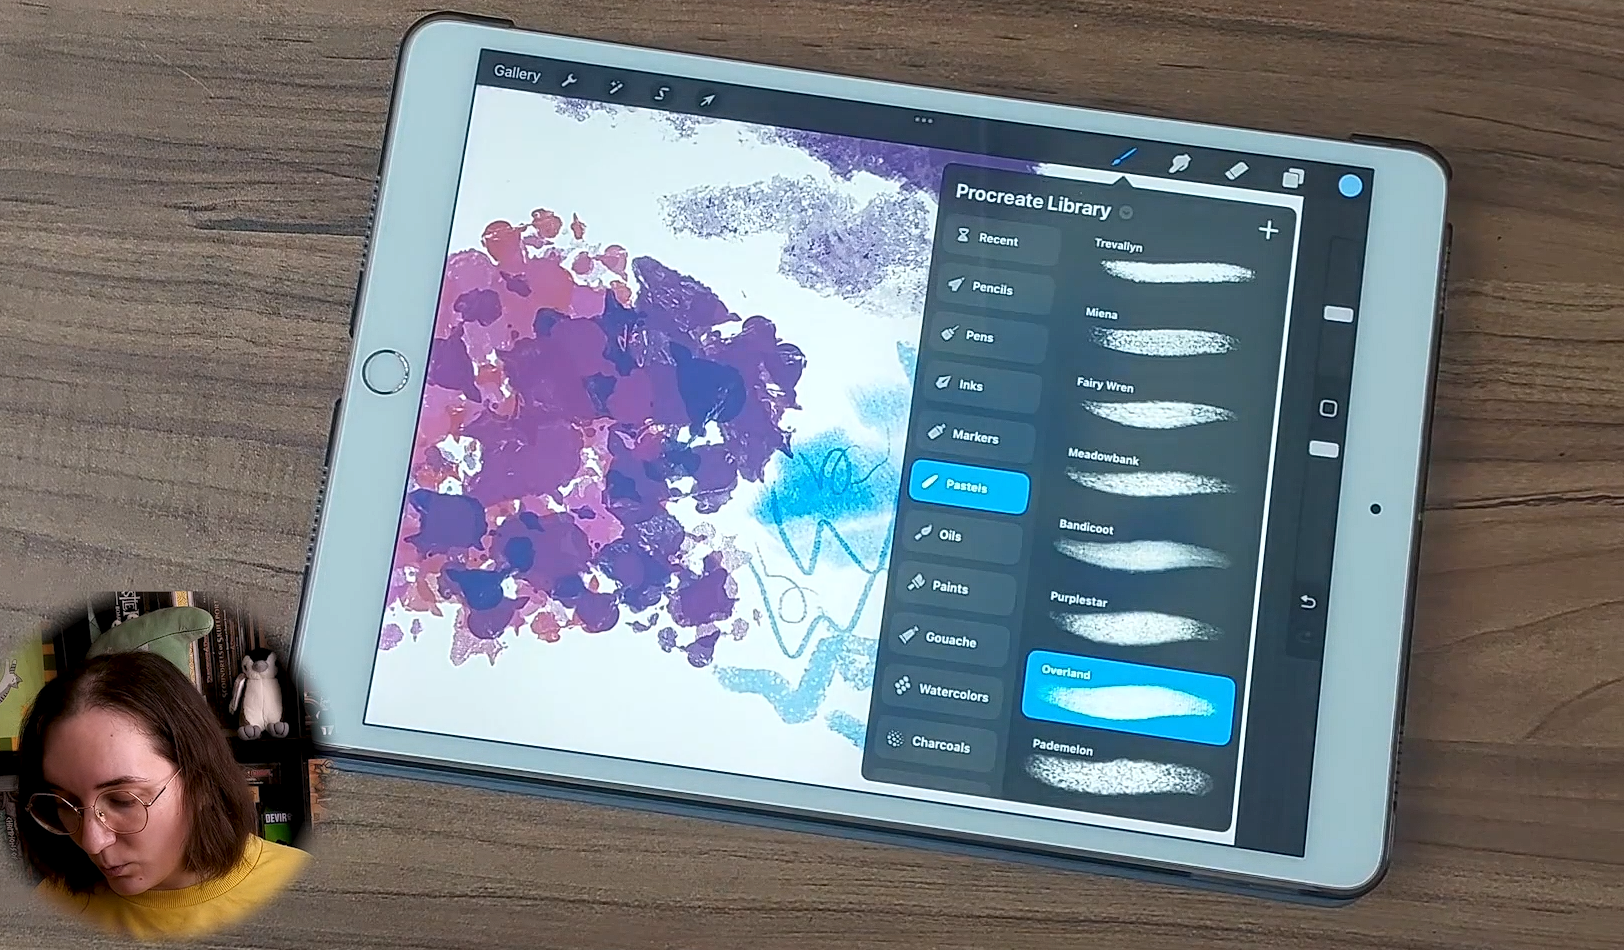
have the brush library. So as you can see,
there are a lot of brushes on Procreate already
that you can choose from. Are they all in
different categories. We have sketching, we have
inking, drawing, and so on. I really recommend
you to explore this and try several
different brushes. But yeah, here is all the
information on brushes. You can add more. You can
erase any that you want. Then we have the Smudge tool, which will use also the
same brush library, but here, but in this case, it will behave differently. Then we have the
eraser, same thing, and uses the same
library as the brush. So you can erase with any brush that
you're more comfortable. Then we have our
layers or layer menu. So here you can
create new layers, erase them, change
them however you want. And finally, we have
the color menu, which has different
ways of choosing, and we will go through
all of that later. And finally, to the side, we have the brush size. So go up and down, and we can change the
size of the brush, or you can change the opacity. Of your brush as well. And finally, we have the
undo and redo buttons. They are here, you can
go and press them. However, you'll probably
not be using them a lot because we have a great
thing, which is gestures. And very quickly,
I'll just talk to you about the most used
gestures in here. So first of all, we got
the Zoom in and zoom out. So we just use two
fingers and open up to zoom in and pinch your
fingers to zoom out. You can also do these with
two fingers, just out or in. Zooming out, you go in, zooming in, you go
out. All right. Then we also got the undo
gesture, which is tapping, as you've seen with two fingers and you will undo the
last steps you did, and you can also redo by
tapping with three fingers. And there we go. These are, for me, the most used gestures. Of course, there are others that we'll talk about
throughout the class. And if you want to
learn more about gesture controls and
change anything you want, if you go to your wrench button right here and preferences, and then you have the
gesture controls menu, and here you can control and set different things
up for your gesture. Then finally, just
one small thing is the quick menu that you
can set up differently, and you can also use
different gesture for it. Again, if you go here to the gesture controls
and quick menu, you can set it with
different things. I have it. If you tap the
square thing here, it will show the quick menu. As you can see, in this case, when I open the quick menu, it will show several options such as creating a new layer, flip the layer, copy
it or clear it. It really depends. So yeah, this is all very customizable if I tap the quick menu here, the button at the center. As you can see, there
are several options. You can create new ones and then change the actions,
and there we go. Hold on for a few seconds, and you can choose different actions to
have on your quick menu. Personally, I don't use this, but this can be very
useful if you're an artist that uses a lot of
actions as drawing, a lot of shortcuts, so you have a quick
way to get to different actions instead
of going through the menus. So yeah, this is not
as quick overview, but we went through
everything you need to know inside the gallery, how to create a new canvas and what you can do
inside the gallery, as well as inside your canvas
when you create a file. So for now, this is it.
And in the next video, we're going to
start talking about brushes and perhaps
starting a new drawing. So I will see you right then.
4. Part 3 - Essential Tools: Alright, so hello
and welcome back. So we went through a general
overview of Procreate, and now we're going to see in more detail how we can
use different tools. For example, we're going
to start with the brushes. So in the previous
video, I showed you where you can find your
brushes, the brush library. But now we're going
to go through it a bit more in detail. So first of all, we have this
icon here for the brushes. When we tap it, as
we talked about, we will get to the
brush library. And as you can see,
Procreate already offers quite a lot of options here, a lot of brushes. Most of these were already here. So we have the
sketching category. As you can see,
several options here. We have the inking, I really like using
the studio paintbrush. It's my favorite. For Line art, we have drawing, so with different options
here, all very textured. Pixel did not this one. I added this one,
so ignored that. Painting, artistic,
calligraphy, airbrushing, textures, abstract
charcoals, Elements, spray paints, and
so on and so on. So as you can see, there
are a lot of options here. However, you can import
your own brushes. And for that, there are
different ways of doing this. One way is for you
to, for example, go over here to the plus sign, and you can create
your own brush. So as you can see, you have
here several options and you can change this basic brush
into anything you want. But you can also
go over to import. And import your own brushes. So for example, if I choose
this one, there we go. I will import a new brush, and we have here the
imported folder, and the brush will
go right there. Now, as I said, you can change any brush you
have or create a new one. So, for example, if I
tap this one again, I can go over here, change anything I want to
make it more as I like it. You can also change the
stabilization of it. Very useful if your
hands tremble a bit. Procrit in general has great
accessibility options. Including the stabilization. So if your hands
tremble a lot and you have some difficulty
to control your lines, you can use that among many other things
in this software. So yeah, you can change
anything you want, then tap done, and
the brush changes. If I slide, let me just
grab something else here. If I have brush selected
and slide it to the left, I'll be able to duplicate
it or even share it. So I can also export
these brushes. If you duplicate it,
this can be great. It will duplicate with a
name and then add a number. But first ofle let's say
you like this brush, but there are a few things
you want to change, then you can just
duplicate it and then change whatever
you want to change. If I slide it to the
side again to the left, I have to delete button. If I don't want
this brush anymore, I can just delete it. There will always be a
confirmation message so you don't delete
anything by accidents. And there we go.
And as you can see, we have this huge library. So yeah, as for the library, you can, for example, duplicate one of these, just tap and hold for a bit, and you can duplicate this category if you
want for any reason. We also have this
plus sign here, which will create a new
category here in our library. So I can just open it up. I can just tap it and
then new brushes, I don't know, whatever you want. And there you have a
new category here. If you tap it for a bit and
then remove your finger, you have a few options such as renaming the folder
you just created. You can delete it if you
don't want it anymore. Again, you can share. So let's say you've created a
whole set of brushes. You can export the whole set right away instead of
going individually. And then once again,
you can duplicate it. So I'm going to go
over here and delete this because I don't need
to. I don't need this. And as you can see,
so these are from procreate and you can't really delete them for some reason. Even if you go here,
as you can see, you can't really delete any of the brushes that
come with procreate. Alright, this is it for brushes. Now, let's say I choose
a brush that I like. Once again, as I
mentioned before, we have these bars
here that you can use to change the size of your
brush or the opacity. So I have it lower. Let's make it
bigger, There we go. Let's go to full opacity
here. There we go. Now, another thing, there's another very interesting thing here is that you can actually save size presets as well as opacity presets to procreate. So for example, if I
tap this bar here, so let me go for a size I
usually use. This is good. And now I tap this little bar here and I tap the plus sign. It will save this place. So whenever I need it, I can just tap there,
and there it is. I have my preset. Same thing
here with the opacity. If I go here and
tap the plus sign, it will save this
value as a preset. This is very useful if you tend to use very
specific values, especially in size
in brush size. For me specially in brush size, and you have those values very specific values
that you use, it just makes it quicker
for you to change from one to the other without
having to guess it. You can still use
any other size, but if you need, you can just go to the precise size you need. If you don't want it anymore, just press that
little bar again, and then the minus
sign, and there we go. Alright, let's go
for the next tool, which is the Smudge tool. So as I mentioned before, the smudge tool will use the exact same library
as the brush library. So you can basically, you can have different
textures to your brush tool. I like to use the airbrushing
ones for smudging, but it all depends
on the artist. Once again, I can
change the size of my smudge tool as well as the opacity and then
just start smudging. The places I want to smudge. Let's try another brush just just so you can
see the differences. So as you can see,
it will smudge with a bit of texture according
to the brush I chose. Next, we have te eraser. Again, same thing, it will use the exact same brush libraries. So these all share the
same brush library, which is great
because that means you can use different textures. So you can paint or draw
not only with your brush, but also with your eraser
and your smudge tool. You can do different things. As you erase things, you might be creating
some texture, let's say. So for example, let's
go for this one. First of all, let
me just add here a big area with paint, right. And now let's go to
the eraser and use it to erase a bit here. So as you can see, I created
already some texture here. So you see by erasing, I'm also creating extra texture. So yeah, you can use your eraser to do more than just
erase any mistake. But as you can see, these all work very similarly
with each other. They all share the same library. You can change the size
and their opacity. You can save presets for
both of these values. There's a lot you can do here. So there's a lot
you can do here, and I do recommend you
to explore all of this and try the different
brushes that you have there and just
have some fun with it. And as for your assignment, we're going to start
doing our assignment now, and the first phase
is for you to explore these brushes a bit and then sketch
something out. I will do the same
thing. And I will also have this for you to
download, if you want, if you don't really want to draw anything
specific right now, but I really do recommend you do and explore all
the brushes here. So yeah, just try
out a few brushes, then do a simple sketch. It doesn't need to be
anything too complicated. It can be just a smiley face, and then I will see
you in the next video.
5. Part 4 - Layer Fundamentals: All right, so hello
and welcome back. So here is my sketch that I
did in the previous video. That is your assignment as well. So in the past video, the idea was for you to explore
the brushes available to you and procreate and then make a quick sketch of
anything that you want. I will also leave this for
you to download if you want, or just as a reference. And right now, what
we're going to do is explore the layer menu. So the layer menu, as
we talked about before, is this two square
button right here. So if you tap it,
you open the layer. I have here my
sketch on layer one. So if I just draw
something on it, it will add it to the layer where we are right
now that is selected. The layer selected is always the one that is
highlighted in blue. Now, of course,
there are a lot of things you can do
with your layers. For example, if you
sweep it to the left, you'll have a few
options such as lock, duplicate, and clear. In this case, clear because we only have one layer so far. But I'll show you the
difference later on. So if you lock the layer, that means you can't
really do anything on it, and a warning will appear telling you that this
layer has locked items, and if you want to unlock it, or if you just want to open the layer menu and do
whatever you want to do. If you sweep it
again to the left, you can press unlock,
and there it is. Now we can again do whatever
we want in our layer. Next, we have duplicate
that does exactly that. If I tap duplicate, it will duplicate my layer and
all elements inside of it. Now, as I said before,
if you only have one layer on your file and
you swipe to the left, you'll have the red
button saying clear. So let me just show you. If I do that, it
will clear my layer. It will erase everything
inside the layer, but I'll keep the layer itself. However, if you have more than one layer
and swipe to the left, you'll have the button delete. So pretty self explanatory here, if you press delete, you
will delete the whole layer. Now, if you want to
create a new layer, you just need to press the plus sign here
above on the corner, and it will create a new
layer empty, a new layer. And of course, you might
have noticed that I've taped this check mark
from time to time. If it has the check mark, it means that the
layer is visible. If we press it again, if we tap it, we'll
hide the layer. So this is mostly if you want
to hide your layers or not, it's always really useful. For example, if we're
doing like this, we're doing a sketch,
then we'll draw something on top and we
don't need a sketch anymore. We can just hide it
and keep it that way, so it's not bothering
you while you draw. Now, something else you can do. Let me just draw here
a circle or two, just so it's easier so you can see elements in both layers. Another thing you can do is move the order of your layers. So for example, right now, my cat is below the circles, and if you tap a layer and let it press
for a few seconds, you'll be able to move
the layers order. So, for example, I'll press it I'll tap and press for a bit, as you can see it, you can now move it
where you want it. And now my circles are
behind the CAT sketch. Let's do that again,
press it for a bit. The layer will move and put
it wherever you want it. So this is a very
quick and easy way for you to move layers around, and so they are
differently ordered. Another very useful
thing to know about layers is the opacity. So as I said before, we have this check mark button, this squared button here. You can tap to hide
or show your layer. Another thing you can do
is change its opacity. So if we press this button here, which I'll explain
right after this, we'll have a few options. And one of them is this bar
for opacity, as you can see. Now at the moment, the
opacity is turned to the max. But if I slide my finger
throughout this little bar, you can lower the
opacity of your layer. Now, below the opacity bar, you'll notice quite a
lot of options here, and this is layer
blending modes. So if you've used
Photoshop before or even clip Studio paint or
most drawing softwares, you might be familiar
with this already, but these are
different ways for you to apply coloring or even
effects to your layers. It's different blending modes. I will let me just perhaps color this a bit,
so it's easier. So it's easier to see what I mean so you can see
the differences here. So if I press the
N again and the stands for the current
blending mode we have active, it's always the standard mode
that is set on the layer, and now we can just scroll up or down to see what
else we have here. So we have multiply,
darken, color burn. Yard burn and so on and so on. There are a lot of options, and these are really
useful for when you're coloring or adding shading
or light to your drawings, and it will help you have different effects on
your illustrations. So it's very important to
explore this as you draw, so you can find
different ways of coloring or creating
your illustrations. So yeah, you just have to
scroll and choose one, tap again, and it
will be applied. And you'll see right here the blending mode that is
activated at the moment. Let me put this back to normal. And now in this class, we're going through the
most basics of Procreate, so we're not really going to deep dive into everything you
need to know in the layers, just the basics so you
can start drawing. And the last thing I want
to talk to you about with layers is the groups. So let me just draw here again so we have
a few more layers. So you can create
groups of layers. This is mostly so you can have your file organized,
properly organized. It's not the most
important thing, but it's good to know if
you tend to have a lot of layers and want to have
things very well organized. So the first thing we
want to do to create a group is to select
several layers. How do we do that? Well, we
already have one selected, then we go to the other one, and instead of
sliding to the left, we will slide it to the right. Now we have two layers selected. Et's do it another
time and there we go. If you don't want to have a specific layer selected anymore, you can just repeat
the movement, and there we go, it
has been deselected. Now, if you've noticed when
I selected two layers, a new button appeared, so we have delete or group. So, you can delete
multiple layers. Instead of going layer by layer, you can select quite a few
of them and then just delete them or thing I want to show
you is we can group them. So we just tap it
and there we go. As you can see, you can drop down to see what's
inside the new group. Or keep it organized
in just one new group, so it occupies less space. All right, so just one last
thing before we move on, it's the renaming of your
layers or your groups. So for example, if you
tap the group here, a few options will appear, and they're all pretty
self explanatory. So for example, doing group one, it will basically go back and have the layers
all separated. Then we have to flatten, which what will happen is instead of having everything separated in different layers, it will combine everything
into just layer. So every element that you had in each layer would
just come together. Then we have the march down. What happens here is that whatever is in this group will merge with the layer below. And then finally combine down, which will bring the layer below into the
group in this case. And then, yeah, we have
the rename option. So if you tap it, it will
select here or total, and we can name it
whatever we want group one or colors that can work. Now, you can do the exact
same thing with the layer, you can also rename your layers. And for that, once again, select the layer you want
to change your name, tap it once, and we
have the rename option. So I'm going to call it
sketch. There we go. I'm going to just delete this, and we just went through the
basics of our layers here. Now, your next assignment is to use a bit
here, the layers, and what you're going
to do is create a new layer on top
or more if you want, and afterwards, draw a
line art of your sketch. So basically, refine
or drawing a bit. I'm going to do the
exact same thing. I'm going to create
a new layer on top, and I'm going to
draw my line art. And once that's done, I will
see you in the next video.
6. Part 5 - Coloring Basics: Alright, so hello
and welcome back. And now I have here my line art. Let me just hide my sketch, and let's rename this
layer to Line art. So we are very well
organized. There we go. And now we're going
for the next step, which is the coloring and how to use colors in
general, in Procreate. So to access the colors,
as I mentioned before, all you have to do is press this last button
on the top right. And as you can see,
when you tap it, the colors will
appear right away. Now, you have different
ways to choose your colors. I usually use the classic one
because it's what I prefer. So you can just sly your finger around until you choose the
the color that you want, but you also have here this
bar to change the colors, and then you choose the
tone and saturation of it. But you can also choose that
through these 2 bars here. So this one is for
the saturation, and this one is for the
value of your color. Usually, for me, I just roam about the first bar to choose a color and then travel a bit until I find the
color that I want. Below it, you have the history. So for example,
right now, I have this blue selected here. And if I go down here and
start adding blue here, now let's go back
to our color panel, and as you can see, now the blue is part of
the history as well. You can also click
it if you want. This is useful for when
doing an illustration, and you have this specific color scheme
that you want to use, and that way, you
can just go back to the history and pick the colors that you
want to use again. You'll also be shown
a palette below it, and the palette that shows in here is the one that you have activated on our last menu here. But before that,
let me just show you the other ways you
can choose your colors. So we have the disc so here, as you can see, we have, again, saturation and value
on the inside, and on the outside, we have the color wheel. So you just go around
the color wheel and choose whichever
color you want to use. Then we have the harmony. So here, you can create
color harmonies. So right now complimentary is
the one that is activated. So you always see
two colors there. So you have here the min one, and the complimentary color will automatically
be shown to you. If we tap here, we can change to other color harmonies such
as split complimentary. So instead of having just one complimentary
color, we have two. Then we have analogous,
triadic and tetradic. Oh, yeah, this is a very
cool way for you to create a color scheme right away without having to
think too much. You just choose one color, and then the rest
of the colors are decided accordingly to the
color harmony that you choose. Then we have the value. Now, I know that a lot
of artists prefer to use this one because you have a bit more control
on your colors. So once again, you
have here the hue. So the color that
you'll be using then you can control
the saturation of it, as well as the value and even how much of
each color you want. So in this case, I
have this set as RGB, so I can control how
much of the red, the green, or the blue
I want in my color. You'll also be able
to see the codes of the color you're using if you want to annotate that somewhere. If you have your file in SMYK, then those colors will
appear here instead of RGB. Now, as I mentioned,
the palette. So as I said, and if you've noticed in all of these cases, you'll have a color
palette here below, and that palette
is the one that is activated at the moment
on your palette tub. Now, the paletttub is
very, very useful, especially if you're
the kind of person that likes to create
their own palette. So Procrit already
comes with this tree. I really like the campfire one, for example, and use it a lot. So at the moment, I have the
campfire palette activated, but I can change for the
SN one, for example. So for that, I just tap the three dots here and
then set as default. If I go back here,
the new color palette is selected below. And of course, you can add your own palettes
or create your own. And for that, just press
the plus sign here, and then you have
here several options. So for example, you can create
a new palette from start. So if you tap it, it
will show you here one. Let's say my palette. All right. If I tap
here the first square, it will add the color with the color I have
selected right now. So if I go back here, let's see another one, let's go for yellow, and then I'll go to the palettes
and press the next one. I have another color
and so on and so on. This is how you can
create your own palettes, but you can also create
palettes from your camera. So if you choose this option, the camera of the
iPad will open, and then you just
have to point it to any object or
place or whatever. Take a picture and procreate
tore palettes based on that picture to
grab all the colors inside that picture
and create a palette. You also have a from
file or from photos. So this is similar to
the import options you have that we talk
at the beginning. So for example, if
you want to grab any file on your iPad or
even on your iCloud drive, you can grab that from there, or you can grab something from your photos from
your photo album. And whatever you choose,
you choose a photo. And once again, Procreate will create a
palette based on that. What else can we see here? Yes, we have the tree dots. So right now this is
the default palette. So you can share
it. So you can make your own palettes and
share it with others. Same thing. If others do
their palettes and share it, you can import them, and you will use the new
from file option here. You can just tap it. I don't have anything here to show you, but you
can just tap it, go through your files and add a palette from someone
else that you downloaded. All right, then we
have the duplicate. You can duplicate
the palette that you want and then change
whatever you want, or you can delete it. There. So yeah, we've seen
how to pick your own colors, choose your own colors. And now let's see
how we can apply them and different ways
of applying your colors. So first of all, I'm
going to add here a new layer and bring
it below my inart. So below my Lenard
and my sketch. Let's rename it to coloring. All right. And now I can use let me just
change the brush. I can use any brush I want
and start coloring, right? To be and start
coloring my drawing. All right, let's choose
another color now. So I have here these two colors, and now I want to go
back to the cream one. Now, yes, of course,
I can go here to the history and pickets, tap the color that I
want to use again, or another way is to color
pick the color you want. So for that, you can use your finger and tap and press
for a bit the new color. And as you can see,
you can go through your canvas and pick
any color you want. I can pick the black again, white, the cream,
or this orange. So once you're in the place
of the color you want, just release it and the new color is
activated once again. Now I can use the
cream color again. Now, you can just by hand, color everything
you want like this, or you can do something else. Let me clear the layer, so we have everything blank again. And for that, what
you can do is tap the layer and then tap
clear. There we go. Now, one thing you
can do is drag and drop the color you want
into the place you want. So for example, I want
to color the face, and I will drag and
drop it right here. But okay, this
didn't work, right? I added color to
the whole canvas, and I don't want that to happen. So what you can do here and
this works mostly if you have another layer with
some lin art or any other drawing.
So let's undo this. So let's go back
to our layer menu, and I'll tap my inart layer. So the layer above the
one I want to color. So tap it once, and now we have here this
option reference. I will tap it, and
it's now activated, and you can even see here below that it is the reference
layer right now. Now, what will happen is when I try to drag and
drop the color, Procreate will have into account the layer that is
set as reference. So what happens is it will paint inside the
lines I created. This is a very easy and
quick way for you to color, especially if you would
like to use Lenard. Now, if I go right here, tap and drag it inside the head, as you can see, it colors
inside the bounds of my Lenard. Now one thing to pay attention to is that if I have a gap, this will not work anymore. It will go out of the lines
because we have a gap there. So yeah, Procreate will take into consideration
the other layer. But if you have gaps there, it will also notice those gaps and think that you want to color
the whole thing. Now, let me just go for a darker tone so
it's easier to see, and I want to use the
color drop once again. So I will tap and drag it, and then we have here the
continue filling option. Tap it. And now, instead of having to
drag and drop all the time, if you want to have the same
color in several places, you can just activate the continue filling
option and then just tap the places where you want to add color,
just like this. Once you're done, just
press the heck mark here. And it's done. Now,
another thing is a threshold of your coloring. So what does a threshold mean is how wide you want
the color to go. And this can really
depend on the line art that you have and many
other parameters. Alright, so I'll try to
show you as best as I can, because depending on many
factors, this can change, but you can also control the
threshold of your colors. So for example, if
I drag and drop my color and then
keep it pressed, I can change the threshold. So as you can see,
it's up there. And if I go all the
way down to the left, you'll start seeing some
gaps appearing, right? And if I go the other way, the opposite will happen. Now, this might have
different behavior depending on the
drawing that you have, how many elements, the style
of brush you're using, and so on and so on. But basically, that's the idea. So sometimes you see if there's a white gap between your
color and the line, just go through the threshold, keep the pencil down. When you add color and then slide it to the
right or the left until you have a good
threshold for your color. You can also do this
by dropping the color, use the continued filling, and then inside the place, you just add it, play with the
threshold once again. So this is not the most
important thing to know. However, sometimes
it might happen that you see a few gaps here
and there of color, and if that happens, just go to the threshold and
change things accordingly. Alright, so I think
we've seen everything. We need to know right
now about colors, and now your assignment will be, of course, to color
your drawing. So we had a sketch. We created a inart. Now it's time for you to explore the whole color menu a bit
and color your drawing. If we want, I will
leave this inart for you and you can color this cat. So, yeah, that's your
assignment for now. I will do the same, and I will
see you in the next video.
7. Part 6 - Transform & Selection: Hello, and welcome back. Now, we've seen how to draw, how to use your brushes, how to work with layers, and how to color your drawings. Now, the next step is a bit more about the editing part of it of drawing or even create
some art with these tools. So we're going to talk
about the transformation or move tool and
the selection tool. So let's start with the
Transform tool or the Move tool. Which is, as I mentioned before, this button right here, the one with the arrow. This is your move
or transform tool. And what we can do with this is move any object
inside the layer. If you tap this button, you will move everything
inside the selected layer. So we can move things
around, right? We can also scale
it up and down, and we have several
options to do that. So we can just scale things
up or down if you need to, or we can even cut part
of the element selected. So let me just first
duplicate here a few things so I don't ruin
my drawing by accident. And I'll take the
chance and show you a quick gesture for you to
merge two layers together. So as I said before, if you tap a layer and press the
merged down button, you will merge two layers together or more if you
have more selected. But another thing you can
do is just use a pinch in gesture on two layers
that you want to merge, do this, and the layers
will merge, just like this. Just another gesture for
you to keep in mind. All right, so let's use
our move tool then. So if we tap the arrow, everything inside the
layer is selected. Now, we have here four options
of scaling things around. We have the free form,
which means you can just move these corners
around these dots around, and it won't keep the
aspect ratio of your image, so you can make it wider. If you want, then
we got the uniform. And this way we can
move up and down, but still keep the aspect
ratio of your image. Same thing if you do here, see the aspect ratio maintains.
It's always the same. So it really depends on how you want to
scale the drawing, if you want to make
bigger or smaller, or if you want to perhaps
change the proportions a bit. Then we have distort, and this one is pretty great to work with perspective
sometimes on your work. So you can tilt stuff around and change the overall
perspective of a drawing. You can do a lot
of things with it. I really like to use
this when I need to add some more perspective to an
object that I'm drawing, and I don't think it's very
well drawn at the time. So you can just move these dots around until you
have what you want. And then we got the warp option, and this one is slightly
similar to the distort option, however you have
even more control. So even here inside
if you want to change something, you can do so. So as you can see, I can make my cat even rounder than before. There we go. Now we have
here in the war option, the advanced mesh, as well. So if you tap it
and activate it, you have even more
places to move, more dots to control. So you'll be given even more
control over your drawing. Also, if you're
using the freeform, uniform or distort options, you'll have this
snapping option here. I usually have it turned
on because it will help snap my drawing. Especially if you
want to rotate. For example, I want
to rotate things. Also, you can
rotate things here. I want to rotate it,
but I want it to be just a 45 degree rotation, and I can't really know for
sure if I'm doing this right. But if you add the
snapping option, it will move there. It will snap in specific
places, so it's easier for you. Then we also the flip
horizontal option, so you can flip your objects
around or vertical as well. And then of course, you
have options of rotation. We can fit our drawing to the canvas right away if
that's what you want to do, or you can reset everything. So this is very useful
for me since I just went I distorted
my drawing a lot. So if you change your mind, you can just reset
everything instead of going do and do all the way
down to the first step. Now, another thing I
want to show you with the move selection besides
scaling things up and down. And again, this is just
a very basic of it. Of course, there are
more things that you can explore with this tool. But one of them is to cut parts of your drawing or an
image that you imported. So usually with any
other drawing software, if you select an area
and then press delete, you will delete it, right? You can do that very easily. However here we don't really
have a delete button, right? And we could just go
and use our eraser to erase the things we don't need and make the selection
of that area. So in Procreate, we have this
thing that is very useful. So if you want to cut some areas of your drawing or
even some images that let's see you have a
reference image and you want to cut some areas of that
image that you don't need. So what you can do is
select the move button, the transform button, then move the area you want to
cut out of your canvas. Now, select the transform tool
again and select it again. Now, as you can see, when I
move it back to my canvas, the area that was out
of the canvas gets cut. So anything this is also something to pay
attention to because sometimes we are
scaling things up or down or just
moving things around, and we might forget that if
you leave anything outside of your canvas while using the transform tool,
you will lose it. It will cut that part and it will disappear as
you might see here. So this can be very useful for deleting some
stuff on your canvas, but it can also give you a bit of trouble if you're
not paying attention. So it's a good thing
for you to know. Alright, so move to pretty simple and very
self explanatory. Now for the selection tool, we have once again
a few options here. So first of all, we have
the automatic option, which as you can see,
you'll just tap in different areas and make
different selections. And then you can do whatever
you want with those. Now with the free hand,
as the name says, you can draw the area you
want to select. There we go. And once again,
then you can go for your eraser tool and erase only as you can
see, there's a mask here. It creates a mask of the
area that is not selected. So you can go with
your eraser tool and erase the area
that you selected, or you can use the Move tool
and move the area selected, or even add color or
anything like that. For example, I can also
create here this area, grab my brush, and then add some color inside the
area I just selected. So this can be a way for you to color your drawings. Right. So the free hand,
you'll have lots of control over the area
you're selecting, but then we also
got the rectangle, so you can create rectangles
or squares of any size. Let's go back. And then we got our lipsol so you can create circular or
round selections. Now we have here the
add and remove button. So what this means, let
me just go a bit closer. So when you have the
add button selected, so I have already here
this area selected, as you can see, hopefully, let me just
make this more visible. There it is. So this way you can more clearly see what's
selected and what's not. So if you have the
ads tool activated, you can just keep
adding area selected. If you choose to remove one, it does the opposite. So if you change your mind, you can go back to it and select areas that you
don't want to select. Then we got the invert option. So as you can see it
inverts the opposite area. So we had all these
areas selected, right. But if I do inverts, it will I will have this whole
area around it selected. This is very useful for, for example, you have a square. Let me show you, let me add here a new layer,
and very quickly. So I have here this shape, right, but it's not
really perfect, right. So what I can do, first of all, I could use the Transform tool. And cut things around, right, like we did before, like I showed you, and I'll be able to make
this perfect shape. But I can also grab here my rectangle tool,
draw the shape I want. Then I select invert,
grab my brush, and just start erasing
everything outside of it. And there we go. I
have the shape I want. What else do we have here? So we have the feathers. So here your selection will
create sort of a blur. Then we have the save
and load selection. So if you want to repeat the exact same shape
that you used before, if you don't want it anymore, just slide it to the
left and delete it. And finally, we have color fill. So as you can see,
pretty self explanatory. So you have a selection, you tap color fill, it will feel the selection
will be filled with the color that you have
active at the moment. Or if you want, you
can just clear out the selection you
have, and there we go. So as you can see,
using all of this, both the transform tool
and the selection tool is very intuitive and
very self explanatory. So all you have to
do is just go in and explore all the
options you have below. Some of them will
be useful for you. O you probably won't use them, and that's fine, as well. Just use the things
that are useful to you. And what you can
do with it, well, you can do very
simple things such as moving things around,
removing some areas, selecting specific areas
to add color or not, but you can also
use, for example, the selection tool to create a whole drawing. A lot
of people do that. They just go around making
their selections and coloring. Side of it. So yeah,
explore these tools. They are quite easy to use, but they also have
these details to them, so it's good to explore it. But this is it for the
Transform and selection tool. Play around with these a bit, see if you can make another
artwork if you want to keep the original drawing that you've been doing
throughout the class. Explore things a bit, and whenever you're ready, follow me to the next.
8. Part 7 - Exporting & Sharing Your Art: All right, so hello
and welcome back. We are in the final stretches of our class or
Procreate basics class. And now that we finished our drawing and we see
everything that we can do. For now on Procreate, it's time to export or to
share our illustration, right? So to do that, we simply go
to this wrench tool here. And then tab share. And as you can see, we have
quite a lot of options here. So we can share our drawing as appropriate or
Photoshop file. So in that way, especially
with the Photoshop, you can then open your file, your drawing on
Photoshop and finishing editing whatever
you want in there or even drawing more over there. It can be useful to
save appropriate file if you want to have a
backup of your files. So if anything
happens to your iPad, you still have your files
saved somewhere else, for example, on your Cloud Drive or whatever you want, really. Then, of course, you can
export your files in more usual formats such as JPEG. PNG, TIF, or even as a PDF. For example, the PDF
is really useful. If you're doing as
in a book, whatever, especially if you export
it from your gallery, you'll have everything in one
PDF, so that's very useful. And then we have
the shared layers. So what we do here is that we can share or export each
layer individually. So for example, if you want
to export these as PNG files, it will export a file
per layer you have visible because I only have
here three visible layers, and if I decide to export
these as PNG files, as you can see when I do that, we'll have three images
that will be exported. And so, yeah, let's export
our file. Not layers. I want to export my
trying as an image. And I'm going to
choose as a JPEG. So, yes, you can see have
quite a lot of options here. You can save the image
right away to your iPad. So if you choose this option, it will save into
your photo album. You can airdrop your file. So if you're using
other Apple devices, if you have your
iPhone or your Mc, anything that is apple, you can just airdrop it and send it directly
to that device. So for example, if you have
an iPhone and you want to post your image on Instagram
or any other social media, you can just airdrop it
directly to your phone, and then just share
it on Instagram. It's very quick and very easy. You can share it to messages, email to any cloud service that you might have such as
Dropbox or to the iCloud. If we go over here to sent two, you'll be able to send
this to your iCloud Drive. So yeah, you have just here
a lot of options that you can choose and places for
you to share your files. So just choose whichever is the most comfortable
for you at the time. So example, for
me, I'm just going to save the image,
and there we go. And now if I go to
my photo album, I have here my cat Illustration. So exporting very, very easy, choose the format you want and then choose
where to put it. Again, everything is very
intuitive and self explanatory. I think that's the
greatest thing about Procreate is
that it's very, very easy to understand it. Now, of course, some
things might take a while, especially those hidden things, but it's very, very easy to use. Now, just as a bonus, so I showed you how to
export your drawing, right? This is still image
that you just did. But as I mentioned before, you can record time laps, right? I mentioned to you at the
beginning when we were creating our canvas that you can activate
the option of time labs, and then at the end, you can actually export that time laps, that speed painting video
of your HL illustration. And for that, once again, we go to the wrench tool. This time we go
over here to video. And first, you can just watch
a replay of your time lab. Tap time laps replay and it will show you everything
you did so far. And you can even go back
and forth as you want. You see here the bar
where the video is, you can just move it back and forth to see different
parts of your process. Of course, mine is
a very big mess because it's the file
I use for this class. So there are a lot of
random things here. But as you can see, I have here a 22 second time
laps of this illustration. Let's tap done, and now we can actually go over here and
export the time lapse video. So just tap this last button, and now you can choose a full
length or just 30 seconds. Now, this depends on how long
you've drawn this piece. So for example, I
didn't really go over 30 minutes
here, apparently, so I'll just export the full length that
there is the 22 seconds. So of course, if you
have a longer video and you don't want the speed
pain to be that long, you can just choose
the 32nd option. And when you choose to
export it, as you can see, the options are exactly
same as the ones for images for JPEGs and other formats on exporting your illustration. And now I don't know
if you remember, but at the start, I showed you an area where you could see the stats
of your file, of your canvas for fun, take a look at the stats
of our illustration. So you can do the
same thing here, so we can see how long we
took with illustration. So let's go to the
wrench tool and then tap Canvas and now Canvas information let's go to statistics, and there we go. How many strokes did I
made during this class? So I went through 211 strokes. It took me 1 hour and 62. So the track time
inside this file was 1 hour and 52 minutes
and how big my file is. So I don't know, this is
just a fun feature and you can learn a lot about you
and how you work, actually. Also the video settings, I did not mention that before, but you can also see
here the stats for it. So as you can see, my
video is 22 seconds long. It will have a good
video quality, the resolution, and so on. So yeah, this is it for my
appropriate basics class, but don't go yet, follow me to the next video for
a few final words. So I will see you right there.
9. BONUS: New Update & My Favorite Brushes: Hello, and welcome back. Now, this is a bit of a
bonus video for two reasons. One of them, I
wanted to share with you my favorite
brushes on Procreate. And the other reason is that
after recording this class, there was actually an
update on Procreate, and it's all about brushes. And I wanted to show
you that as well as anything that's new on here. So first of all, if
your Procreate isn't updated yet with 5.4 updates, just go to the app store, look for Procreate
and then update it. It's very simple. It will download and install the update, and then you'll have access
to everything that is new. So as for what is new, there are not a lot of things, but the brcus wise, it's very, very expensive. So first thing is we got
a new color palette. I think it's one, the
coastline color palette. If it's not showing on
your palettes menu, just go to the plus sign and then tap historic
example palettes, and the new palette
will appear for you. Alright, so this is
it in this part. Now, as for brushes, Procreate added a whole bunch
of brushes of new brushes. It's over 100 brushes,
if I'm not mistaken. Not only that, but now
we got something new. So if we tap our
brush menu here, you'll notice that I now have here something called
Procreate library. So this is basically where
all our new brushes are, but you can still check
out your other libraries. So we have the
classic library where we have all the brushes that
we've seen so far, right, the brushes that
came as defaults, as well as any other brushes you might have imported before, it's in this first library. So we now have things
separated into libraries. So we have the classic one that has been here
since the beginning, and then we have the
classic library. Now, as you can see, to
access the libraries, you can either tap
this little arrow here where you can
rename your library, share it, or you can tap the button back to libraries
so you can see it. Or if you want to
make this quicker, you can just make this pinch gesture and you can go to the libraries
and change between them. As you can see, we
have here a plus sign, so you can create
your own libraries. So we have this whole new way
of organizing our brushes. Instead of having
everything in one place, you can have things
organized as libraries. So it's easier to just
separate everything. So yeah, let's go to
our Procreate library. And here, as you can see, there's a lot of new things. So these new library, these new brochures are very focused on traditional mediums, and I very much recommend you to check this out in detail and experiment
with all brushes. I've tried all of these already, not in detail or too deep, but I've tried them
with bits just so I could choose a few
of my favorites, for example, so I
can show you then. But, yeah, we have
pencils, pens, inks, so we already had some
inking brushes before, right, but now we
have even more. We have markers. So many. The brushes that are based on traditional mediums are
great. They're beautiful. So far for me and Procreate, I didn't really like
most of those brushes. For example, something
that will resemble watercolor wasn't for me. But now we got these pastels that the texture
is so beautiful, like the paints the
guh Dgh is amazing. So we have here a lot of things. I think they are very beautiful. The water colors as well,
like, look at this. It's beautiful. Let's
try another color. I'm not really experienced
with these mediums, but I feel they are very
close to the actual thing. So it's very worth exploring. And as you can see, we
have a lot of things here. We have more creative brushes. There are also new settings for your brushes so you
can customize them. So if you're someone
who likes to create their own brushes,
do take a look at that. So there are more options
for you to play with. And another cool thing is that you can now search
for specific brushes. So if we slide down,
like I just did, the search bar will appear. And now you can look
for specific brushes. For example, I really
like the studio pen. And there we go. And it will
look on all your libraries. Not just the library
that is selected, and then you can just
tap it and start using. What else? Oh, yeah,
another fun thing. You can now customize the icon of your brush sets,
which is really fun. You can rename your brushes. You can actually name
your brushes with an embosi for example,
so fun as well. And I think this is
mostly it for the update. And now I just want to show
you my favorite brushes, the ones that I use
the most and that I find interesting to use
while drawing on Procreate. So on the classic library, on the inking category, I really like the studio pen. It's the one I use
for Leonard the most. This is usually my default
brush for Leonard. But I also really
enjoy the ink led one. So it's very similar, but here we got a
bit of texture. So when I'm feeling like having
more texture on my work, that's what I use. It really depends on my mood or the kind of
illustration I'm doing. So both of these for Leonard
are two of my favorites. Then on the painting, no, on the drawing category, I really like the Blackburn one, so it's very simple. So it's a bit painterly, as you can see, and I would usually use
this as an eraser, mostly for an eraser or
to create backgrounds because it's a very
expensive expensive brush. And I can paint
big areas with it. That's most of the reason why, and it has a little
bit of texture. Then we got the artistic ones. So for example, we got Tarou, and I love this brush. So this brush has
color dynamics, and that means that as
you paint as you use it, the color might change. So you pick a color,
but you'll have some color fluctuations
while you draw. So I'm going to show
you, as you can see, I have this pinkish selected, but you see there are
some differences there. Let's pick something else. Let's go for this one. So
what do I use this brush for? I really like using this
for drawing flowers. If I want to have a
background with flowers, with a flower field, for example, anything like that, I'll use this brush. It's a very quick and easy
way for you to draw flowers. I'll just show you very
quickly an example of that. So for example, we have
this illustration here, and as you can see here
in the background, it has a bit of blurt all of these colorful flowers
here in the background, I made them using
the aurora brush. Then once again on the
artistic category again, I really like the art, the heart brush that also has this brush also has
quite a lot of texture, as you can see, and some transpiracy to it
depending on how hard you press your pencil and what I use this for
is mostly for clouds. I find that this is perfect to draw some clouds on the sky. It has this very
beautiful texture. Not only that bit
because of the opacity, you can create here some
differences on your clouds. I think it's a perfect
texture for it. Once again, I'm going
to show you an example. So for example, this one, these clouds here
in the background, they were all done
using the hearts Brush. And as you can see here
in the background, I also use the a brush to draw those trees
in the background. So, yeah, that's
what I usually use these brushes is to create backgrounds in a very
simple and quick way. Usually don't add a lot
of details to my art. So this is a way to add details without
taking too much time. Now, as I mentioned, I already tinkered a bit with the new brushes
on Procreate, and I've picked a few that seem very interesting,
especially texture wise. I'll show them to
you very quickly. So I also show them to you. So let's see. The
pencils really enjoy. We have a lot of pencils here, as you can see, and I
really enjoy the Pagan one. So as you can see, it
has a lot of texture. This could work
either for sketching, for example, or for lineart. If I'm feeling like
having a lineart that would resemble something
with a traditional medium, I would go for this one. And then here on the
pencils category, I also really like
the stringy bark. So it really looks
like a pencil. And again, we have that bit
of opacity happening here. And depending on how hard
you press your pencil, you'll have different opacities, so you can do a lot with that. I think this brush is beautiful, maybe for backgrounds or even for coloring. Very beautiful. Then let me see if I remember. I think it was in the pencils, yes, not the pencils in
the pencils category. I really love the pencils.
They look awesome. They look very, very good. And one of them is the
Mena. Let me show you. So a lot of you might notice that I love brushes
that have some texture. So yeah, this one
I really enjoyed. And then also got overland. Okay, this one is
perfect to add texture. Or for example, you're drawing
clothes and you want them to have that little bit of texture like
something like this, for example, or you're drawing wool I think
it works very well. So yeah, that one was
another favorite. Then we got, once again, take a look at the paints, wash, and watercolors, especially if you like
these kinds of mediums, try all of them because they are really,
really beautiful. And I'm sure if you like
to use watercolors, for example, you love drawing with watercolor
brushes on Procreate. Now let me see if I remember. Was it Sharkles?
Okay, now, yeah. I paints. We got the two and the Achilles that I
really enjoyed as well. Let's go here. And
as you can see, depending on how much
pressure you apply, you'll have different effects. And that's what I
love about this. If I'm not mistaken, these
were done handmade, basically. From what I understand of
the videos I've watched, these were basically
done first on paper and then added to Procreate
and worked on Procreate. What else? Yeah, one
more very quickly. I think it's in the
Sharkles, now the basics. Yes, and it's this mint
brush. That I really like. So it's very soft
as you can see, and I think it can work
very well to add blush, for example, to our characters. It's kind of a noise
brush that once again, I didn't really like any of those available in
Procreate before. So what I did was
find someone who did a noise brush and add it
to my library at the time. But this one now is
just perfect for that. To add some noise to your
drawings, I really like it. So yeah, the the brushes
I wanted to show you, once again, explore
this whole new library as well as the properties. There are a lot of new
things that you can change on your brushes. You can now organize your
brushes differently. So for example, if you
have your own brushes or you bought or downloaded some
brushes from someone else, you can now have libraries
for each of these, for example, so it's
easier to find everything. And yeah, this is it. So I created this
small template of my favorite brushes the ones
that I just showed you. So I will leave this image
for you to download if you want to use it as a guide
and try these brushes out. Mostly, this is
it for the update or at least the most
important things. And yeah, have fun
with your brushes, explore them, try
different things, and don't forget to download
this template if you want to use it and have
fun with your drawings.
10. Conclusion - Before You Go!: Congratulations. You
made it to the end. Thank you so much for
trusting me to be your guide and for dedicating your time to
mastering Procreate. We've covered everything
from the basic tools, but we also explore some more advanced stuff like some gestures and
brush customization, for example, and you should be incredibly proud of what
you've accomplished. Goal was to help you feel confident and excited to create, and I hope you're leaving
this class feeling inspired. If you found this class helpful, would you consider
leaving a review? Sharing your thoughts helps other aspiring artists discover this course and
allows me to create even better content
for you in the future. Thank you again for
learning with me. I look forward to seeing
you in another class soon. Keep practicing and
remember, keep on drawing.
 Patricia Caldeira, Illustrator | Digital Artist | Designer