Transcripts
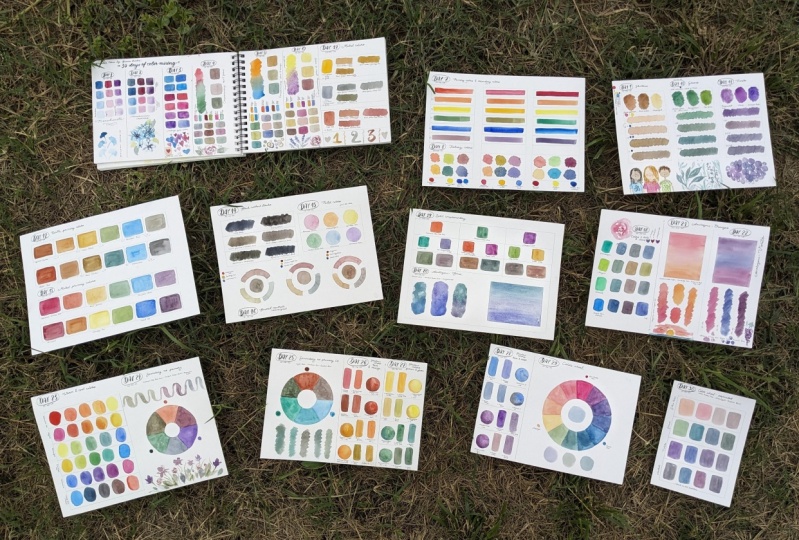
1. Welcome to this Challenge: Pink plus green
equals violet. Wait. What? This and more
fun discoveries during our 30 day color
mixing challenge. Get ready to play with colors. Welcome to this
challenge class where we'll create extensive
colors watches and charts and explore key
color schemes like monochromatic, complimentary
and analogous. We'll also experiment with
different primary color sets to mix a wide range of
use including skin tones, greens, purples, earthy
and muted colors, blacks, pastels, and
even metal colors. I will also share with you sample paintings where each
color scheme was used. Each demo video is
around 5 minutes, making it perfect
for busy artists. By the end of this class, you'll have a deeper
understanding of color theories, learn how to mix vibrant
and harmonious colors, and build a regular art routine. Hi. I'm Bianca Lustre, and I will be your
teacher for today. I've been working with
watercolor since 2018, and my current obsession
is color mixing. In fact, to reward those who will complete
this challenge, I have created this color
wheels eBook where I mixed and matched different sets of primary colors and
expanded them, which you can use as a guide in designing your
own limited palette. Find out how to get your
copy in the next video. And
2. Preparing for the Challenge: Our goal for this
class is simple. Review basic color theories, apply them in mixing pigments, and learn which ones work
together and which don't. For 30 days, we'll do lots and lots of
swatches and charts. Each challenge features
a color scheme, and sample paintings will
be presented to give you an idea on how you can apply
them on your own projects. To get started, please download the class guide where
all pigment names are listed per challenge. But it's important
to remember that you don't need to
purchase new pigments. Just use whatever colors are readily available to you, okay? It's just that over the years, I have accumulated
lots of paint because I put off learning how
to mix my own colors. For your class project, you can either choose one of your favorite swatches or lay them all together and take a photo and upload it in
the project's gallery. I would love to hear
which pigments you used. To reward your effort in
sticking with me for 30 days, I will give you a free copy
of my color wheels ebook. Just shoot me an
email after uploading your project and leaving
an honest class review. I'll see you in the next video, and let's get started
with day one.
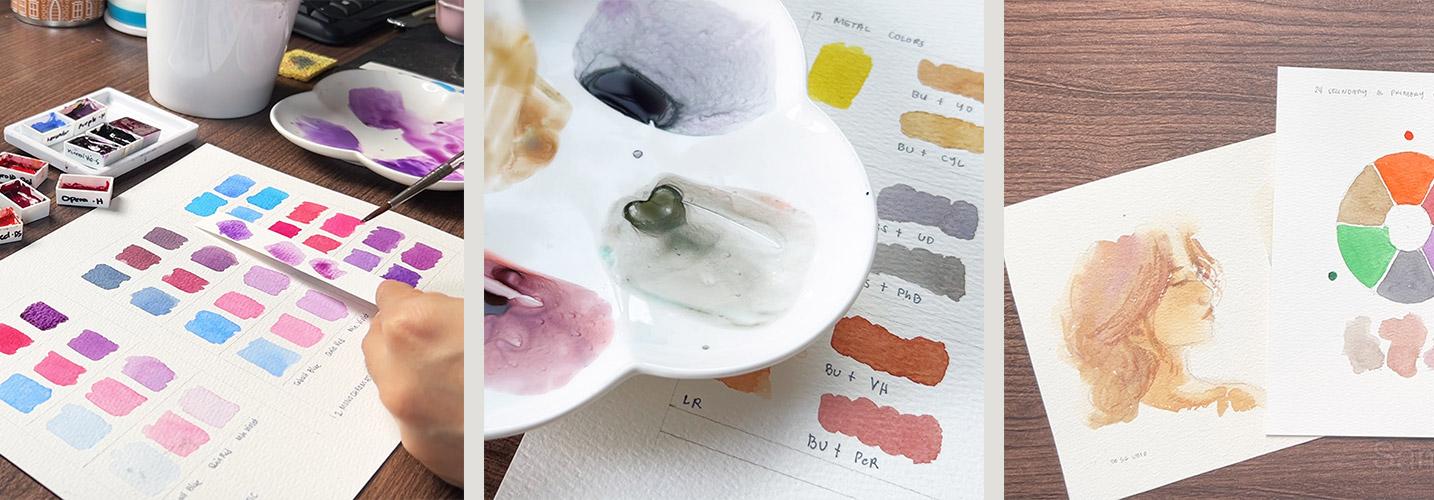
3. D1: Monochromatic: Welcome to day one of our
color mixing challenge. Let's keep things
simple by working on one pigment only per swatch. Okay, we'll create
a gradient swatch here using your
favorite pigment. I picked cobalt blue, quin red, and mineral violet, and then we will
gradually increase the transparency as
we reach the bottom. So the key here is water. More often than not, when
it comes to watercolors, we use it to clean our brushes, to rinse our materials. But ever since
studying color mixing, I have learned to
respect water and treat it as one of the
mixing components. So let's put that into practice. Give your brush a good wash, load it with the first color, and try to get this consistency. And then paint an irregular
square like this. Now, as we move downwards, I want you to add more water on your mixture and try to get it lighter
than the first one. So I have here a scratch
paper where I can test whether or not I've
achieved the shade that I want. So this is definitely
lighter than the first one. I'll go ahead and paint the second one and then add even more water
for the third swatch. And then even more
for the last one. There you go. During my face to
face workshops, I often hear complaints from my students that
they cannot seem to control how watery or how
thick their mixtures are. This is also a great
opportunity for us to practice achieving different
consistencies of our paint. Now, let's do the same
thing on the second color. I have here quin red, I'll rinse my brush, load it with a thick
consistency and do the same. And onto our third color. I want to remind you that
this is a mixing challenge. You don't need to get
everything perfect. Just enjoy the process. Okay? Now, for the purple,
I'll do the same. Can you see that? So thick? Basically, the more
pigment and less water, the more vibrant your mixture
will be and vice versa. Gen test it out on your scratch if you're
unsure if that is a shade lighter than the first
one and add even more water. And that's it. You're
done for day one.
4. D2: Monochromatic Expanded: Okay, we have this beautiful
monochromatic swatches over here for day one, and for the second day I
love to use the same colors, but adding black
and white pigments. Monochromatic color
scheme technically includes black and white to
further expand the palette. Just imagine if you're going to create an illustration
with just cobalt blue, then the darkest you
can get is this blue. But what if you want a
slightly darker tone. So that's where black
and white comes in. So for comparison purposes, let's use the same pigments
we used yesterday, but add black and white to your palette.
I'll start with blue. And by the way, it's
a good practice to write down the name
of the pigments over here and the color scheme because chances are you will forget the
colors that you used. Trust me, I've been learning color mixing
for almost a year now, and I regret the beautiful
mixes that I did just because I forgot to list down
the name of the pigment, so it's a good practice
to start now. Right. So you can immediately see just on my palette
without me painting anything that the cobalt
blue here got a lot darker. And that's a beautiful
bluish gray, isn't it? So this is ivory
black, by the way. Let's put that over here. Now, I will add more blue
on the second swatch. And see. There. Lovely. Now, for the last two, let's add white gradually. Technically with
watercolors, you can use water to substitute white, but I just want to show you
how it looks when you use white on your swatches. So now if we combine this
two vertical swatches, you already have eight different
shades of cobalt blue. Let's do the same with
quinacrodone red. Lovely deep pink color, which you cannot achieve
if you only used quin red. So now I'm adding in more pink. That's so lovely. I think by now, you'll notice how much I love color mixing. Mixing in white now. And then add even more white. It's less vibrant,
but it's more opaque, and that's what
white pigment does. And by the way,
it's a good idea to purchase white guash and mix
it with your watercolors if you are not that
sure whether or not you would like to work
with guash as a new medium. That's what I do. I am
experimenting with squash, but I only bought white and
mixed it with my watercolors. Okay. This is mineral violet. Again, that is so lovely. And then add more violet. Over here, I'll
start adding white. This is Chinese
white, by the way. You can use other whites
like titanium white, or even agua white gouache. There. So this is day two of
our color mixing. Great job.
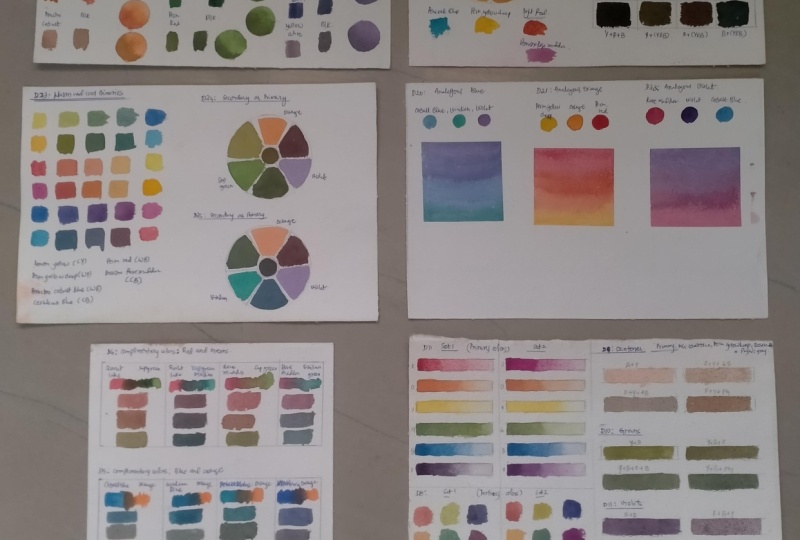
5. D3: Same Colors: Okay, as I mentioned yesterday, we will be working
with two pigments, just like what we did here, adding black or white and work with the
same set of colors. So if you chose
the same as mine, blue, pink, and violet, then I will ask you to bring out all different shades of blues or pinks and
violets that you have. And when I say all
different shades, I meant convenient
mixes like this. What I have here are
ultramarine blue, verdia blue. This is the same cobalt blue. Turquoise blue and marine blue. There will be instances when
you love a color so much, for example, this cobalt blue, but it just needs
to be a bit darker or greener or lighter or paler. And you cannot achieve that by mixing black,
white, or water. So what we do is we mix two
colors from the same family. So for example, I have
here my cobalt blue. Let's see how that changes when I mix in Turquoise
blue, for example. So now it looks
different than this one. Still a beautiful shade of blue, but by mixing another blue, I came up with this one. Let's say I love cobalt blue. I don't want it to turn
into a greenish blue, but I want the granulation
that ultramarines have. So I will mix in
ultramarine blue, and that is the result. A deeper blue. Once this dries, you can see how it granulates. Now I have vertial blue. I've used this up so much that emptied my half
pan in a few days. I love using vertial
blue in skies. So let's try and mix
that with cobalt blue. Now, it becomes lighter and somewhat near this one
where I mixed white, but still it looks different. And lastly, let's
mix greenish blue, which is marine blue. And see, look at that shade. That's so beautiful. If I just use marine blue by
itself, it looks like this. So by mixing it
with cobalt blue, it tones down the
greenish side a bit. Okay. Now let me clean this up, and I'll bring my pinks. Now what I have here are the same quinacridone
red plus quin magenta, Pyl red, padium red, and opera. Various kinds of reds and pinks and magentas but
from the same family. First, I'll mix with my
queen red with say magenta. So this is a good way to
make it a bit darker, but not really how we
mixed black and pink. So this is just a bit deeper. And I love how that looks. What if I mix spiral red? And it produces this
lovely reddish look. What about cadmium red? Cadmium red is one of my favorites when
mixing skin tones, mix it with yellow ochre, and it produces a
lovely flesh tone. That's queen red
plus cadmium red. Now let's add opera. Opera is a fugitive when it
comes to light fastness, but it still serves its purpose when you use it
with other colors. Those are the different
shades of red of quinacridone reds
that we get when we mix it with other pigments
from the same family. Now I have here lavender purple, just purple by sakura and permanent violet
and quinacridone lilac. And of course, we have here our mineral violet from earlier. Start with the first one. Oh. It's actually my first time
mixing this too, so, Wow. This is lovely. Now, this
is purple by Sakura. I don't think there's
a major change. And then we have
permanent violet, which is bluer when
you look at this two. Now let's combine. Not much change, but definitely
different from this one. And last, qu nacer dowe lilac. This is a bit pinkish and when mixed with mineral
violet, look at that. Lovely, lovely color. That's it for our day three. Thank you so much for
joining this challenge and good good job on breaking the third day because
as per experience, this is the make or
break point when it comes to the first
week of challenges.
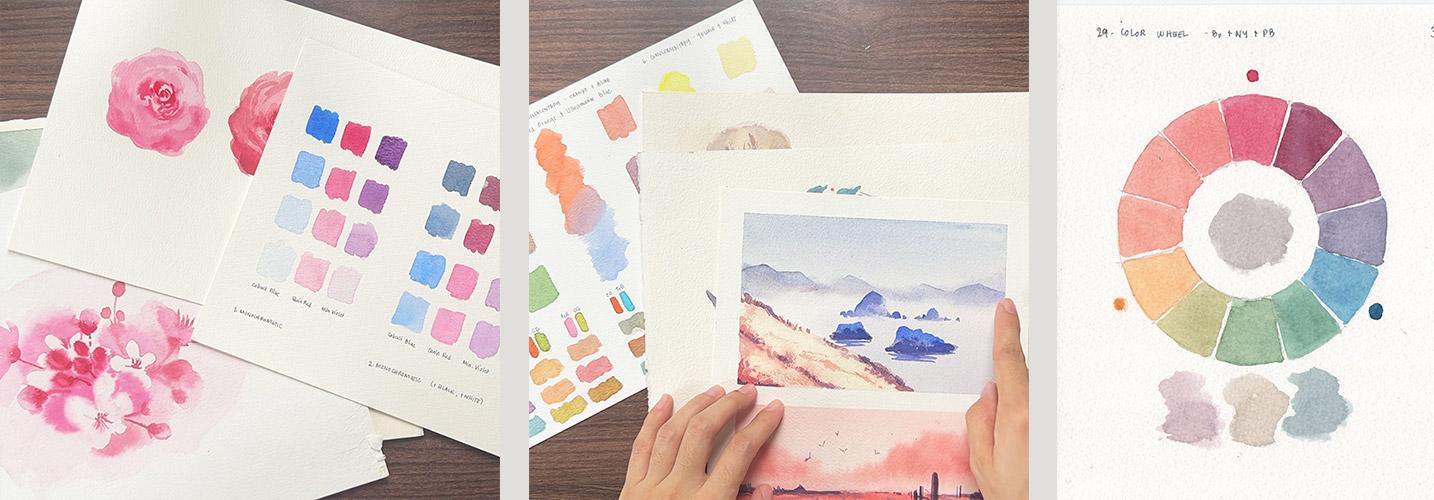
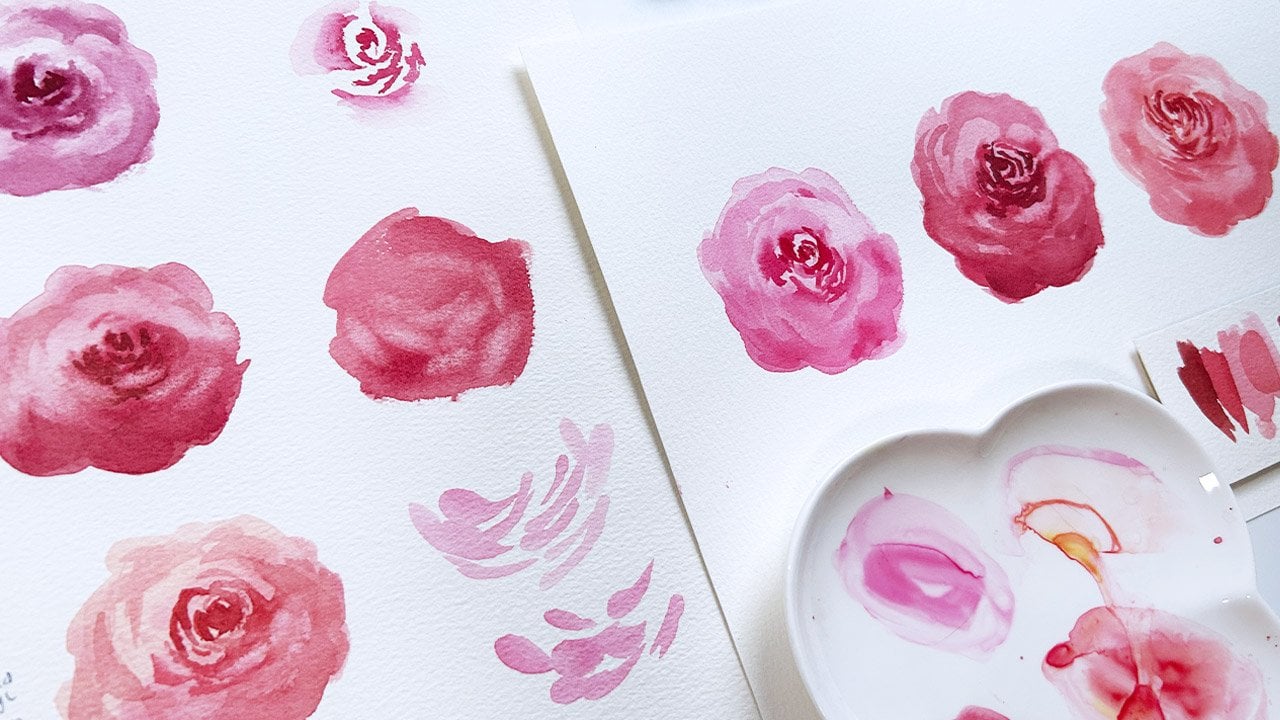
6. Sample Paintings: D1-D3: Right, you might be wondering, where can I use a monochromatic
color scheme like this? Well, using the same colors, I was able to paint these
two floral illustrations. So I use Quinn red with different consistencies from
the lightest to the darkest, and I also use the
white of the paper, as you can see here to depict the lights
or the highlights. This is also a good
example to study your values and
practice painting with different consistencies
of watercolors with thick pigment and going as dark as this and as light as this
with more water. So here are two
floral illustrations as example of a
monochromatic color scheme. Right. Now that
we've added black, you can see how further you can expand a limited palette
with one pigment, plus the addition of
either black or white. But here are some examples
where I actually use them. I love doing many studies outside like this and
this and this one. But then sometimes one pigment won't be enough like what I did. Here on this portrait and on
these mini planar studies. I use burnt umber for this one, but then I realize
that I need to go darker and I cannot do that
by just using burnt umber. That's when I
grabbed Ivory Black and introduced that
in my palette. Technically, you are
still working with a monochromatic color
scheme because you only have one base color,
which is brown. So if you use cobalblue and
add black to it or white, or you can substitute
water with white, as we've seen yesterday, then it can still be considered as a monochromatic color scheme. So here are some examples of that being applied. Not this. I use three colors
for that portrait. Right, isn't that lovely? Now we tried mixing colors
from the same family, and I will show you
some applications or how I use them on
my own paintings. Here on this simple
landscape painting, I mix two blues for the sky and various shades of greens
for the foreground. So that's one application. Another one is here, where you'll see I
used varying shades of browns for the trees in the background and the
grass in the foreground. And on this portrait, I use different
shades of brown, too. I used one yellow for
the accent, but here, I used a slightly redder brown and a dark brown and even sepia, if I remember it correctly. So that's how you can work with two pigments without
the pressure of what color will I produce? Well, surely, you'll know
that when you mix two blues, you'll still achieve a blue, but a different shade that is neither blue number one
and blue number two. So here are some applications. Tomorrow, let's discuss
complimentary colors and start with a red
and green pair. Sea.
7. D4: Complementary - Red & Green: Right. Now let's talk about
complimentary colors. A quick review. They are colors that lie opposite each
other on the color wheel. When you place them beside
each other, they look good. Think of strawberries,
red and green. So they look good, but when
you mix them together, you'll get various
shades of neutrals, from browns to different
shades of gray. Now, let's start
with green and red, our first pair of
complimentary colors. By the way, after
monochromatic color scheme, I would normally go
to primary colors, then secondary and tertiary, and then complimentary colors. But for the sake of simplicity, let's work first by
mixing two pigments, and then we'll gradually add the number of pigments
that we'll be working with. So what I have
here are Pyle red, bordeaux, vermilion hue
and permanent rose. For the greens, I
have permanent green, viridian hue, sap
green and olive green. This three are this three. I watch them so you'll see the difference that it makes when you start
mixing them together. Let us start with
our Pyrrole red. It is a lovely color,
a somewhature red, not leaning towards
orange or violet. And I'll just swatch
it over here. Now I'll swatch permanent green
and start from the bottom up and sort of mix them
together, wet on wet. I'll create three swatches here. The first swatch would
be a 70 to 30 ratio, meaning there's more
red than green. Let's see how that looks. I'll add a bit of
green to my red. You'll immediately see
how different that is with our pure
pyrrol red mixture. You have to also take note that when you use a
complimentary color, it desaturates or
tones down that color. So this is the 70 30 ratio. And then on the other hand, that's mix a bit of
red to our green. Again, that tones down our green mixture, and
I'll put that here. And then at the middle, try to mix the two
colors equally. So if it's too red, you only have two colors, then it means you'll
need to add more green. If it's too green, then
you'll need to add more red. But if you achieve a
neutral color like this, then that means you have
successfully mixed them equally. It is perfectly normal for
you to keep on adjusting the mixture until you achieve a neutral color that is
neither red nor green. So don't worry too
much if it's taking you longer to mix the
colors that you want. With practice, you'll get
faster and more efficient. Now let's proceed
with the second pair. We have bordo and Viridian hue. Now, let's see first how that looks when you
mix them equally. Lovely, lovely shade of gray. Now, I'll use the
70 30 ratio now, just a bit of green to my red. Lovely violet. And then
I'll add more green. So that's the mixtures that I get with the bordeaux
and Viridian pair. Now moving on to the next pair, which is vermilion a sap green. Try to mix them equally first, and you'll get a lovely
skin tone shade. So for the first pair, we got a lovely gray shade. For the second pair, we
mixed a skin tone shade. Now add more red to the mixture. Now add more green. Kind of turns it into a brownish green. And for a last pair, that would be permanent
rose and olive green. First, try to get an equal mix. Again, this is another shade of skin tone, but slightly darker. Now add more pink
to that mixture, you'll get a lovely shade of
pink. Now, add more green. That's our Day
four. I might have done this fast and efficient, and that's only because I've practiced color
mixing for months. So take your time, work on your first pair of
complimentary color, and I'll see you tomorrow for
this second pair. Good job.
8. D5: Complementary - Blue & Orange: But Welcome to Day five of
our color mixing challenge. We worked with reds
and greens yesterday. Now let's work with
oranges and blues. If you want more
information about color theories like monochromatic
complimentary primary, then you can head over to my other color mixing
class where I discussed in detail how I was able to choose which
colors to work with. And as a bonus, I
will also demo how I painted different
landscape scenes using a limited palette. Moving on, I have here
different oranges and blues, starting with red orange, cadmium red orange, light
red, and burnt sienna. Now you might ask why
did I include brown? Because if we review and
check our pigment wheel, then you'll notice
that browns are also grouped in the
orange section. So you can also use
them if you have them. For the blues, I have
ultramarine blue, turquoise blue, royal
blue, and cerulean blue. You should also take
note that having the same pigment name from different brands will also
affect how your colors look. For example, this Bernsena
is from Daniel Smith, but Bernsiena from Holbein looks a bit different,
more vibrant. So it's okay if you don't get the exact swatches that I
am working on right now. And please don't forget to put the names of the
pigments that you work with. I use a code, for example, for
bordo yesterday, I used VO for Vidiant Hue VH. And I sort of get it right away because these are the pigments that I've been working
on for so long. So if you need to write the whole pigment
name, then no worries. Right, start with orange. Rinse and load it
with blue. Move up. So you'll get an idea what kind of mixture
this two creates. Now, the 70 30 ratio, adding a bit of
blue to my orange. I think that's too much blue. I'll be add my orange. Again, as you can see,
you don't need to stress out about getting the shade
that you want right away. Can see that I keep on
adjusting as I see fit. Okay, so this is the tone
down version of my orange. Now, adding a bit of
orange to my blue. Oh, it turned into a violet. Now let's try and
get an equal mix. It sort of turns into
a grave violet again, just like what we got with
bordo and Vidian hue. Should have added more
blue here, but it's okay. Now, moving on to my second pair of cadmium red orange
and turquoise blue. Let's start with an equal mix. Another shade of gray. Now add more orange
and add more blue. Interesting, isn't it? Let's move to light
red and royal blue. I added too much.
So if this happens, you can then swatch
this one first. Wow. This is a lovely brown. This is for my equal mix. More often than not,
I am surprised with the combinations that
this color is great. And for our last pair, burnt sienna and cerulean blue. This is the equal part. This a lovely gray. And this is more burn
Sienna and the last one. Just add more blue. Lovely, isn't it? Again, don't forget
to write down some codes or the pigment names, and you're done with
Day five. Good job.
9. D6: Complementary - Yellow & Violet: Last pair of our major
complimentary colors. I say major because you can also choose yellow
orange and select the complimentary color of that or red violet and
check the color wheel, which is a complimentary color of that and work with them. But we're using primary colors, red, blue and yellow, so I call them the major
complimentary pairs. Yellow and violet. If you watch my skin
tone color mixing class, you'll know that this pair is the most challenging
to work with. I almost gave up finding the perfect yellow and the perfect violet for
a skin tone mixture. So I'm kind of
excited to try out these combinations as it's been quite a while when I
worked with this pair. By the way, these are my
colors here, hansa yellow. Gambognova, maples, yellow
dip, and yellow ochre. For the violets, I
have mineral violet, permanent violet, quinacridone
lilac, and lavender. So let me prepare my
hands a yellow first. So there you go for
the yellow and violet. Mmm. Okay. So I can already see here another shade of brown
when working with this too. Now, adding a bit of violet to my yellow tone down
version looks okay. You might find a use for this
in your floral paintings. That's a lovely shade of violet. Then let's mix them equally. You'll notice that
compared with my reds and greens and blue and oranges, that this is a bit transparent. Now let's go with
the second pair, gumbo Schnova and
permanent violet. And there you have it
a lovely brown color. Okay, next, I'll
add more yellow. This looks like a good
shadow color for yellow, which we'll talk about later, a lovely shade of violet, which reminds me of Ube,
if you've heard of that. Moving on to naples yellow
deep and quinacridon Lila. A lovely shade of brown that
could work with skin tones. Keep on adjusting
as you see fit. Don't get to attach to your first mixture and pressure yourself by trying to get it right the first time. Now, moving on to yellow
ochre and lavender. I did not expect this. Okay, so this is
a shade of gray. This pair is a bit different leaning towards gray when
you mix them equally. Now, this is 70 30
ratio with more yellow, and now I'll add more violet. But still, it leans
towards gray. There you have the
three major pair of complimentary colors. But
10. Sample Paintings: D4-D6: Okay. That was a nice experiment with complimentary colors. Now let me show you some sample paintings where
I applied this combination. Well, first off, to show you that complimentary colors
really work well together. Here is an illustration
where I used yellow and violet as
my primary colors. Basically, I'm using a
complimentary color scheme, but I added some flash tones
and some darker blues, but you can really see that complimentary colors
really work well together. Now with the mixing, I have here some sample portrait studies where I used for this
one, yellow and violet. While this one I
used red and green. You can really see the
difference of the two. Then I have here other illustration where I used the bordeaux and Veridan
hue combination. A simple illustration. Now, over here is where I use blue and orange
dominant color scheme. You'll see how I
mix oranges with the blues in the distant
mountains to desaturate them. It's really exciting to see
how this can be applied on different kinds of
subjects and styles. Tomorrow, let's make this even
more challenging by adding one more pigment and working
with our primary colors.
11. D7: Primary & Secondary Colors: Now, this challenge will get
more interesting and more challenging because we'll now be working with three pigments. It's okay when you work with two pigments because as
you noticed yesterday, if you're mixing red and green and the mixture is
leaning towards red, then it only means that you'll
need to add more green. But it's different when
you're mixing three colors. I have three sets of
different primary colors. As I've mentioned earlier, when it comes to
liquid pigments like watercolors and
your printer ink, the primaries are not
really red, yellow, and blue, but magenta,
yellow and cyan. So for the purpose
of comparison, I am using three different
sets of primaries. But if you only have one set of primary color, then no berries. I have here cadmium red, cadmium yellow, and cobal blue, which I'll use on
the first column, queen red, which
is a pinkish red, permanent yellow deep,
which is leaning towards orange and ultramarine blue
deep for the second column, and quinacidon
magenta, lemon yellow, and palo cyanine blue, red shade for the third column. We'll swatch red
here, yellow here, and then blue here, leaves one space for the
secondary colors. Then at the bottom, we'll work on this tomorrow.
Don't worry about it. We'll deal with the
tertiary colors. Okay, I'll start swatching. Now I have swatched my primaries and you can see how different
they are from each other. This red from this from this, and this yellow from
this and this and so on. Now, I said, Think
about the rainbow. So what comes after red orange. That means red, less
yellow, equals orange. Let's see how
different the oranges that can be produced with different sets of
primary colors too. So you'll want an equal mix, an orange that is not
too red or too yellow. And let's move on to quin red, pinacrodone red, and
permanent yellow deep. I've also switched
to a flat brush, since it's easier to create horizontal swatches
with this type of brush. Moving on to magenta
and lemon yellow. It's a lovely, lovely skin tone. Compared with the
first two oranges, it's really different. Let's proceed with the
next secondary color. Red, orange, yellow,
green, blue. So yellow plus blue
equals green. Right. Alas, my dear friends, I was so excited with color
mixing that I forgot to hit record when I was mixing
this greens and violet. So I will do a retake of that. I know you pretty much
get the idea of mixing yellow and blue to get green and red and
blue to get violet, but it's different when you actually see someone
doing the thing. So I have the same colors here. Let me prepare my yellows, cadmium yellow, permanent
yellow deep, lemon yellow. You can see how
different itch are. Then when I mix the blues corresponding to
this primary sets, let's see how different
the greens they make. This is cobalt blue
mixed with cadmium. And then permanent yellow
deep mixed with ultramarine. This is really deep while lemon yellow mixed with
salo blue, red shade. Side by side, you can see
the difference that it makes when you pick up
your primary colors. So it's almost the same as this. I've managed to
create the mixes. Now I'm preparing my reds and pinks and magentas
to mix the purples. I have here cadmium red, queen red, and then magenta. I'll mix my cadmium red. It's not as vibrant, but still it will
serve its purpose depending on what
you're painting. But this one, the second
purple that I'm mixing is queen red, plus
ultramarine deep. It is leaning
towards blue violet, and that is a good color. What about Tal blue plus
magenta. Almost the same. And again, if I add more
magenta to that, it changes. So let's see. Yes, I was able to
recreate this purples, and now we have our complete set of primary and secondary colors. Tomorrow, let's
add more challenge by working on our tertiary
colors. Good job. Sure.
12. D8: Tertiary Colors: When we look at
this color wheel, you'll see that the palette can be further expanded by
adding the tertiary colors. Tertiary only means that you'll add a primary color
to a secondary color. For example, you want to
achieve a red orange. So if we break it down, the name itself is
actually a giveaway. Orange is red, less yellow, and you add red again at
the front of the name. So red orange only means red, less red, less yellow, meaning there's more
red than yellow. The same goes with
yellow orange. Yellow yellow, red,
more yellow than red. So in this boxes, I will mix tertiary colors, starting with orange,
green, and violet. You have two options here on how you'll mix your tertiary. First, achieve a
secondary color. So this is my orange. This is the same as
this orange, right? And then you can sort of
divide that into two, and for the first
bit, add more red. I think I've added
more than I intended. I'll add in yellow. So as long as it's redder, then that can be
your red orange. Now, on the other
half, this one, this bit that I did not
touch, add more yellow. As long as it's leaning towards yellow compared to this orange
and it's not too yellow, then that is your yellow orange. The same goes for your greens. So mix an equal
part of yellow and blue first and sort of
divide that into half. So that is neither
yellow nor green. That is my yellow green, and on the other
half, add more blue. That is neither green nor blue. That is my blue green. The same goes with your violet. On the first half. This isn't actually a red violet because as I've mentioned, red, a true red and blue with watercolors
creates a muddy violet, so that is good enough. And then on the other
half mix in blue. This is actually a gray. But in this case, that
is our blue violet. Now, do the same with
the other two sets. I will cut off this part, but I want you to take your
time all the time that you need to mix in your tertiaries. This is my orange again, for the first half mix in more red to
achieve red orange, might be hard to achieve
a yellow orange, but that's totally fine. Let me start with my blue green and move to my yellow green. You'll see here
with the second set of primary that this is looking more of a red violet and a blue violet compared
to the first one, but my yellow greens and blue greens are not
really that great. Let's check what the
third set will bring us. You can also skip the step where you'll want to mix
an equal part. For this one, I accidentally
added more red, and that could be my
red orange already. And then add more yellow, and that would be
my yellow orange. I accidentally Oh, not
really accidentally. I have intentionally
added more blue, so that could be my
blue green already. Then I'll just add more yellow to make it
my yellow green. Now, this is blue violet, and I'll just add more magenta
and make it my red violet. Here's our day seven
and eight. Good job. Which is your favorite among the three sets of
primary colors? Or did you use another set? Let me know in the
discussion stab.
13. Sample Paintings: D7-D8: That was fine working
with different sets of primary colors to produce our
secondaries and tertiaries. Now, applying them
here you'll see the different secondary
and even some hints of tertiary colors where I
used this combination. It's really good to see
them in one picture. Now I have here mini studies where I use different
combinations of primary colors. You can observe how different
the blues, the purples are, the greens are from
each other because I mix and match different sets of primary colors
with each other. Then here are some
examples where I use palette sort
of same to this one, and then this one is
more of this palette. Again, this proves that depending on the set of
primary colors that you have, the mood of the painting
can be affected because of the secondary and
tertiary colors that you'll be able to
achieve using them. Tomorrow, let's work with
different shades of skin tones, greens and violets. See you.
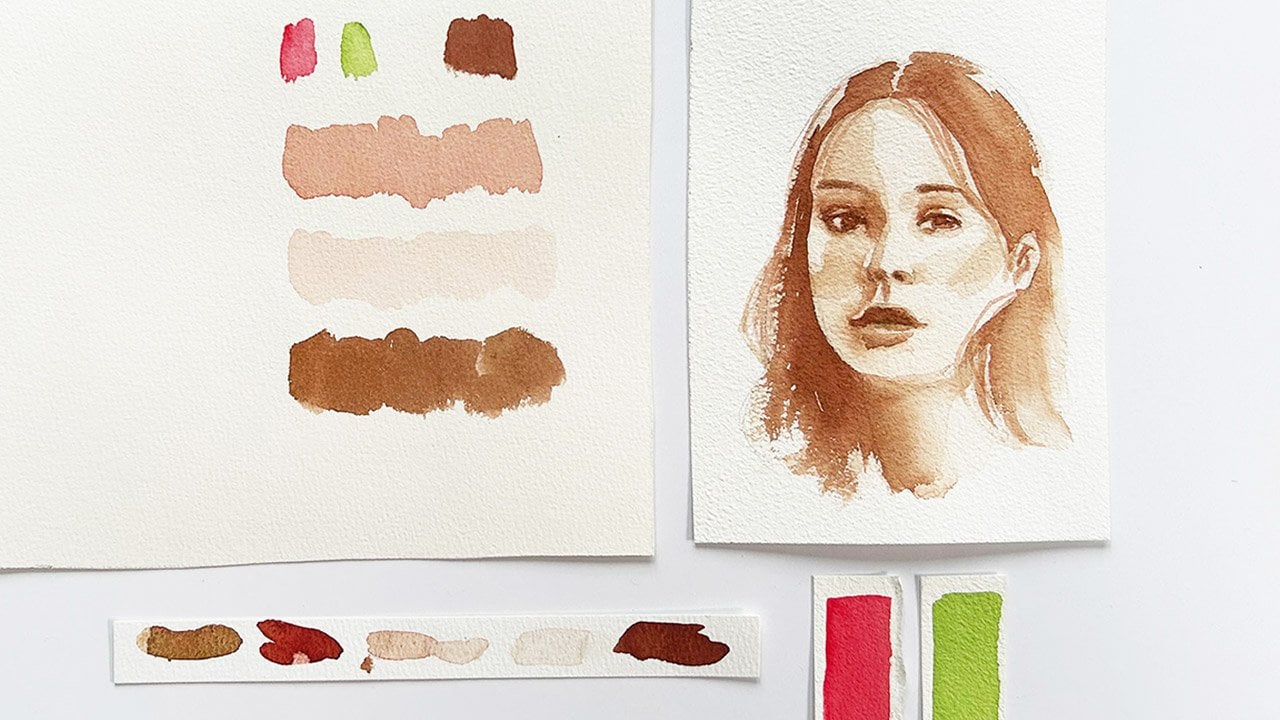
14. D9: Skintones: Right. As I've mentioned, we'll add more challenge by trying to achieve different
shades of skin tones, greens and violets on
the succeeding days. Now, I have chosen Quin
red, cadmium yellow, and salublue which is actually from the three different
set of primaries we've worked with for the past few days with
the addition of black. I have also swatched
here what we call convenient mixes or pre mixed colors of skin tones,
greens and violets. I have here burnt sienna, burnt umber, and naples yellow. Hooker's green,
permanent green and sap green, mineral violet, pinacidone lilac and lavender
for comparison if we can achieve these colors and
we'll start with skin tones. I have been
conducting workshops, face to face workshops, and one of the colors
that my students find to be so challenging
is the skin tone. If you want to dig dipper and learn more about skin tones, then you can head over
to my other class. But let's finish this
class first. Okay? With skin tones, all you need
to remember is that most of the premixed colors
like these fall in the orange side of
the pigment wheel. All you need to
remember is I need to mix an orange first and then adjust it to my liking to achieve different
shades of skin tone. So here, if you'll notice, I just mix my quin
red and yellow, and this gives me this
shade of skin tone, which I actually like. So let me swatch that here. Now, I only use colors two
colors for this one, right? What will happen if I
added blue to my mixture? Be careful when adding
blue because if you added more than
you intended to, it will turn into a
dark brown mixture. So I'll gradually add blue, and you can see that it makes it a bit darker
than the first one. And then let's add even
more blue to our mixture. Just be careful because
as I've mentioned, here you have really,
really dark blue. Now, since we are working
with three pigments, how do you know which
color is missing? I was planning to
mix the skin toad, but what happened here,
it turned into a blue. Look at the color wheel. What is the complimentary
color of blue? It's orange, right? And since we're working with
primary colors and not with a convenient mix of orange, how do
you get orange? You add yellow, that's red
again back to the mixture. As we discussed during our
complimentary challenge, the compliment of
blue is orange. So if I mix the two, I should get a neutral color. That's a good color for shadows. See. Lovely. Now, what about black? If you're planning
to join my skin tone or you, you've already did, then you know that we can also darken the skin tone
by adding in black. So let's substitute
blue with black and see how that looks. There. So here is our skin tone swatch. Go and have a play by
experimenting with different combinations and do not forget to put in
the pigment names here, which I'll actually do now. So I used Queen red, los, cadmium yellow, los,
ToblueNPlus block. And here we have it.
You can also take notes on what you did for itch
swatch like yellow plus red, yellow plus red plus blue, yellow plus red plus more blue and yellow plus
red plus black.
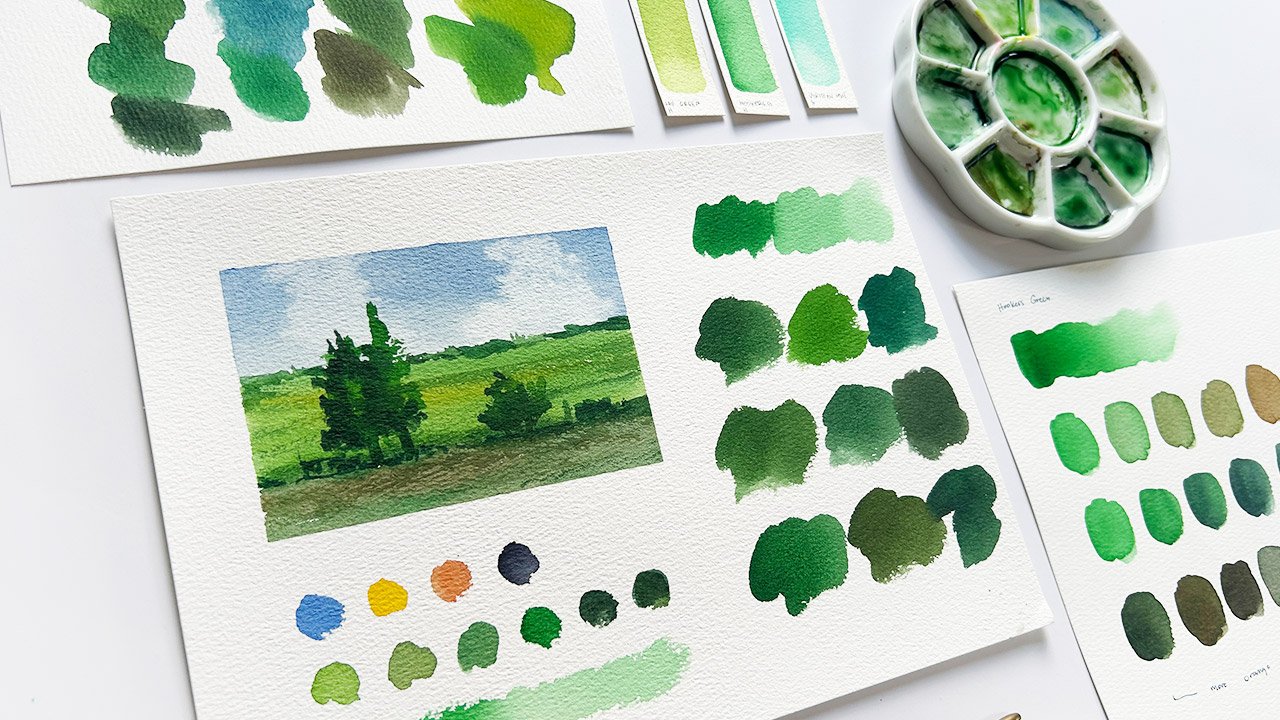
15. D10: Shades of Green : Now let's talk about greens using the same set of primaries. I've also put some codes here, yellow plus blue, yellow
plus blue, plus red, yellow plus blue, plus red plus blue and yellow plus
blue, plus black. You can do the same or you can just have fun and
experiment with the different
combinations as long as you stick to
these four colors. We know from the previous days that yellow and
blue makes green. Oops, I added more
blue than I intended. And this is a lovely
shade of green, right? But what if you want
to tone it down? Going back to our
complimentary days, you'll add a bit of red, just a bit of red. Because if you add more red, it will turn into a brown, just a bit of red, and it makes the color
into a dull green. And then here, I'll
just add more blue, so I still have a
pull of blue here, so I'll just drag it down to my mixture and see
how that changes. Now substitute blue with black and it turns into
a deeper shade of green. This is ivory black, by the way, if you're using a different
black like lamp black that could be really granulating and will add texture
to your swatch. But again, just use whatever pigments are available to you. I'll need to stress out and buy the exact pigments
that I'm using. Okay. Takes away the
fun and color mixing. Our goal for this class is to really learn how
color mixing works and help you decide to choose what colors you'd pick
for a limited palette. I'll see you tomorrow, and
let's work on our violets.
16. D11: Violet Variations: Right. Welcome
back. It's day 11, and let us mix our violets. I made the mistake of not
pressing the record button, so I will recreate
these watches that I have on another
sheet of paper. But basically, we're doing the same approach as we did with our skin tones and greens. The first watch would be
your basic red is blue. The second we'll add a bit of its compiment
which is yellow, and then the third we add
more blue or more red, depending on your preference. And the last one will add black. Let's start with red and blue. Did you see that? I wanted to mix an equal
amount of red and blue, and I did I did grab
the equal amount, but the blue is
really overpowering. So halo blue, Russian blue, and even marine blue, based on my experience, are really strong pigments. That's also the beauty
of color mixing. You'll get to know which colors are really,
really strong. So when you use that
with color mixing, take note of that and just grab a tiny bit of that
overpowering colors. Now I'll add a bit of yellow, it's compliment and see how that changes. Lovely, isn't it? It tones down the
violet, and I like it. So I'll add in
yellow again to this and see if it's, it's
a bit different. Then the first one. I actually
close to mineral violet. Okay, now for the last swatch, let's add black and
see what happens. That's a really deep purple. Lovely, lovely purple. That is the beauty of color
mixing, and I should have. For the past six years, I should have learned
about color mixing. Just a bit of a backstory. I started painting since 2018, but I sort of ignored and
avoided color mixing because I thought it's really hard and
it's only for the experts, only to find out that
if we know the basics, like the color
wheel, the primary, the secondary colors, the
complementary colors, if you know those
basic color theories, then that is a really good guide to help you in mixing the
colors and the shades you like. So we've dealt with our tertiary colors.
We expanded them. By trying to achieve
different shades, not only yellow
orange or red orange, but really skin tones,
greens and violets.
17. Sample Paintings: D9-D11: Right. How was that experience? I really enjoy
mixing these colors, and I find it interesting that by using
different pigments, you'll achieve different
results like what I have here. These are mini portrait studies. For this one, I use
quinacridone red, yellow ochre, and Prussian blue. While on this one, I used
another set of primary. On this floral painting, I used a set of
primary colors again, but tried to achieve different
shades of green and you can see how that
plays well together. Sort of almost the
same with this one, but I added a brighter
yellow over here for accent. Then another floral painting where I used various
shades of violet. But I added here just
like how we added black on the last
swatch for our purple, I added a hint of neutral violet
over here and then just mix purple over here. These are some examples of applying what we learned
for the past three days. Tomorrow, let's test out how an Earth primary color thmed
palette will look like. Sea.
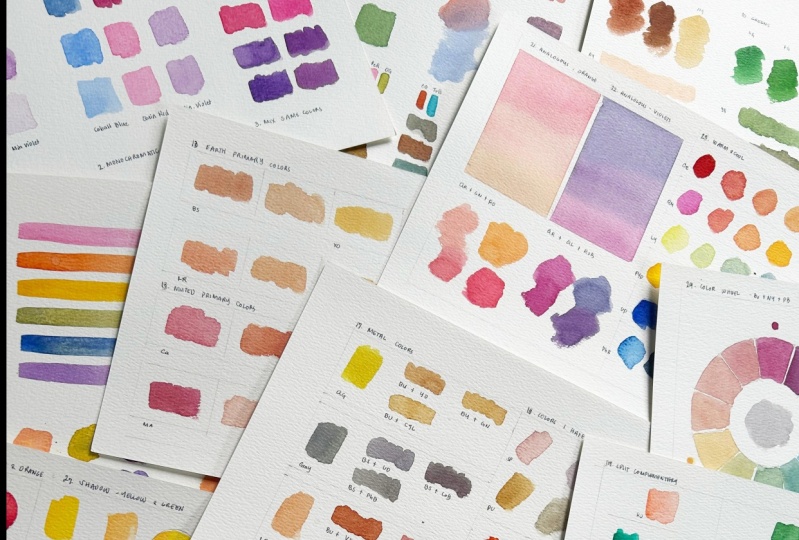
18. D12: Earth Primaries: Okay, welcome to day 12 of
our color mixing challenge. I want us to step back and work with another
set of primary colors. This time, we'll be
dealing with Earth and muted primary colors because
I want it to be flexible, especially if you have
a color set like this. This is from Kure
take Gansai Tambi. By the time I received
this as a gift, I really don't know what
to do with this palette, since I thought I don't have the basic red,
yellow, and blue. But you'll see later
when we work with our muted primaries that
you can achieve such colors that you like and even paint portraits and landscapes as long as you have a color close to
blue to yellow and to red. Even if they are a bit muted, less vibrant or desaturated
compared to our first set, which includes our cadmium red, pinacridone red, and magenta. The colors I have here
are yellow ochre, cerulean blue, and Bernsiena. Actually, if you'll check
Daniel Smith's Earth primary, you'll see colors or pigments
close to these three. And as substitute,
I have raw umber, compost blue and light red. Okay, let's start. This time, instead of a vertical
rainbow or swatch, I decided to have
a horizontal one. So it's basically the
same like what we did with our primary colors. Leave one space
after each primary. Here you have burnt
sienna, leave one space, yellow ochre, one
space, cerulean blue. You'll notice that with
this earth tone primaries, there's not much
difference when it comes to mixing red and
yellow counterparts. So here, is a flash tone achieved by combining
our red and yellow. Technically, our burn
sienna and yellow ochre. Now we'll mix yellow
ochre and cerulean blue. You'll see that the tones that
we're able to achieve here are really that of earth tones. Lastly, of course, do not
expect a vibrant purple here. Burn Sienna plus cerulan blue, which we actually tested
out earlier gives us gray.
19. D13: Muted Colors: When I started creating this e book about
different color wheels, I was so excited to have discovered that even if
the muted colors will produce different shades
of colors that you might never produce when you use
the basic set of primaries. So what we have
here are carmine, Manganese blue, and naples
yellow deep for our first set. And then I took out these huge
pans from my Gansai Tambi. They are the closest that I'll get to our primary.
This is maroon. This is greenish yellow, and this is cobalt blue. Let's start with our first set. This is Carmine. I didn't
like this color at first. I actually almost regretted
purchasing that one, but you'll see later why
I came to love this. So you'll notice by now that the three are almost
of the same shade, so it's okay whatever
muted blue you use. As long as you stay away from the intense colors that
I mentioned earlier, such as Toblue, Russian
blue, and Marin blue. Well, you can use them
but use them sparingly. Right. Let's start with carmine
plus naples yellow deep. It's a lovely orange. It can even be a good
substitute for burnt sienna. Now naples yellow
deep and manganese. Lovely color. And look at this. I am a fan of muted colors, so I love, love, love this so much, especially if you mix tertiary colors, but
we won't get to that. But on your own,
you can of course, mix and expand this even more. Can even add black
to your palette and see how farther
you can expand it. This next combination is
more interesting for me. You have maroon, you
have look at this. It's green. But it's the closest to yellow that I
can get from the palette. This cobalt blue somewhat close, but it's darker than the first cobalt blue
that we used earlier. So if I mix this to, let's see what will happen. This is greenish yellow. What we learned earlier with
our complimentaries is when we mix red and green,
you'll achieve brown. And this is also a
tint of yellow to it. So red plus yellow
equals orange. So I would guess that
this should give us a color that is
somewhat similar to these. I'm smiling because it's pretty much close, isn't it? There. Lovely, lovely color. Now, what about greenish
yellow clos cobalt blue? That's why it's so
important to swatch and mix and match your colors
first before judging them. I'm guilty of that. Don't worry. I used to avoid colors
that don't look good on the pan or when I
squeeze them from the tube. Mixing them, playing with
them proves me wrong. And look, another
beautiful shade of purple. This doesn't look
pretty to the eyes. It's kind of blinding
actually when I look at it. But when you start mixing
it with other colors, you get the basic secondary
set that you'll need, which are orange,
green and purple.
20. Sample Paintings: D12-D13: Okay. That was
looking really good. I have here some examples
where I used Earth. And muted primary colors. For example, this one is
looking really different from the other examples I showed you during the first few days. This one I chose an Earth
themed primary colors, and the browns are
really tone down. The greens are also not
that bright and vibrant, but they serve their purpose, and you can see the
application here. I also expanded this
palette by mixing black on some parts where
the shadows are really dark. Applied on a floral painting, this is how a mutant
color palette looks like. For this one, I
specifically used the Ganze TabitaiGanz tambi
set I showed you earlier. And for this one, I chose another mutant
primary color set. This is also actually, these are the colors that I
used from the Gansai Tambset. I use a greenish yellow,
the cobalt blue, and the maroon to mix my flesh tones and
achieve this one. On those parts where you'll see that it's looking almost black, I did add black. This is how an earth
tone primary color or a muted primary color set will look like when
applied on some paintings. Tomorrow, let's mix black
without using black. It.
21. D14: Black Without Blacks: At some point in your
watercolor journey, you might have heard someone
saying that you cannot use black in your paintings as it creates a hole on your artwork. Ever since hearing that, I think that would
be four years ago. I omitted black completely
from my palette, only now that I revisited the fundamentals and
studied color mixing again. That I found that black is really essential when you
are mixing your colors. You've seen earlier how
we were able to expand our monochromatic color scheme just by adding
black to it, right? So now to sort of follow
that tip of not using black, but instead mixing
your own black. Let's take a look at these
different combinations and see if that could
really substitute black or at least
get closer to it. So for comparison purposes, I have here lamp black. And ivory black. Now for the colors over here, we have burnt sienna, burnt umber and sepia,
and at the top, you have manganese blue
ultramarine deep, and royal blue. Let's see if we can
mix and match them and achieve color
close to this one. Right, I'll start with burnt
sienna and Manganese blue. It is somewhat gray, but that could be a good
substitute to black. What about its
darker alternative burnt umber and ultramarine
blue, which is, by the way, one of my favorite
mixes ever since discovering that you should
avoid black at all costs. So this is my ultramarine
blue, less burnt umber. Of course, if you
added more blue, then it would change
into a bluish gray. Sepia is much darker
than burnt umber. Royal blue also is a dark one. And you get this
lovely dark neutral, which could actually
substitute your blacks. Now let's mix and match. I will try Sepia less
ultramarine deep. This is, I think, the
closest to Ivory Black. Do not forget to write
down your pigments here. That's it for our day 14. Today marks the second week
of our 30 day challenge. Good job on sticking
with this challenge. I'll see you tomorrow, and let's mix our own pastel colors.
22. D15: Pastel Colors: The 15 pastel colors. We're halfway through,
so you can do this. Now, at some point
on your journey, you might want to
explore pastel colors. For whatever reason,
you might be tempted to use it for
fashion illustration, for children's book, artwork or whatever
purpose, it may serve. But I thought when I was a beginner that
I have to purchase all of the pastel colors if I want a pastel themed artwork, only to learn that all you need to add to your
palette is white. Doesn't matter if it's Chinese
white or titanium white. Just choose any white and sort of play or experiment
with a different combinations. So I chose here a rainbow color. I have red, pyal red
gambochnova for my yellow, cadmium orange, hookers green, ultramarine deep, and
permanent violet. Of course, I have here my white. Now, this is going to be simple. Just mix white with them. During our first day
of this challenge, you'll know you should have
observed that mixing just white with a pigment is different with
mixing it with water. For example, I have
here my orange. Of course, you can choose any
color that you like, okay? And try and create a pastel
color scheme with that. So that is my pastel orange. If I just use water
to tone it down, it's a bit different. Red, orange, yellow. Now I move on to green. This is my pastel
green. Pastel blue. Here's our pastel palette. I'll see you tomorrow and
let's work with our browns. We'll add more challenge
by creating biased browns.
23. Sample Paintings: D14-D15: That was cool. You might be wondering where will you apply a Black without black mix or a pastel
color like this one. Let's start with a
black without black. You'll notice that some parts
are appearing to be black, but I did not use black. For this particular palette, I used paints gray
mixed with burnt umber. Those are really deep
blues and browns and you can see how it
appears to be black. The same goes for
this one where I use neutral tint and
burnt umber again. Some parts appear to be
black, but they aren't. It also depends on how you
play your values well. Another application
is over here. Same goes here. The flower is really light. So when I use paints gray mixed with a bit of
greens and reds, it would appear as if I've
used black, but I did not. Now for the pastel colors, I also mixed white
on this pink and on this blue to make them
appear more opaque. A here, I mixed white on the sky because the orange
itself is just too bright for me and also
some white for the blue. Same thing here. They appear really pastel. I mixed white and pink here
and then white and red here. For this one night scene, I mixed white with my pinks
and yellows to depict a city, a busy city at night. That's how you can
use black without black and pastel colors
on your paintings. Tomorrow, let's make this even
more challenging by mixing biased neutrals or
biased browns and grays. Si.
24. D16: Biased Neutrals: Right. I brought back my three
sets of primaries, but I mixed and matched them. So feel free to do
the same or you can just work with
one set of primary. These are Pyl red GambochNva
and ultramarine Dee. Quinacridone red, cadium
yellow light, so blue. Don't worry about this black. Quinacridone magenta, permanent yellow deep,
and cobalt blue. What we'll work on? Today is what I call
biased neutrals. Could be a biased brown
or a biased gray, but let's get to it. For the first set, I'll
work with this three, quin red, cadmium yellow
light, and palo blue. For the first mixture, try to achieve a neutral color where all of the
primaries are equal. Feel free to adjust over
and over and over again. You don't need to get it
right the first time you try. So I would say this is
a good neutral color. Place that at the center. Now imagine dividing the
outer circle into three. You'll have red here,
yellow and blue. What I mean by that
is I'll grab some of that brown and I'll
add more red to it. So now this brown
is red, biased. There's more red
on this mixture. And then I'll add
more yellow to this. And I'll have my
yellow biased brown. Then I'll add I'll mix the two, and I'll add more blue. Now, here you have your
blue biased neutral. So what we want to practice today is that by adding just
a bit of one primary color, and if you want a reddish brown, then just add more red
to your brown mixture. If you want a yellowish wine, add more yellow, and so forth. This ladies and gentlemen, is a good practice in estimating how much of each color you'll need to produce
the result that you want. Let's do that again with
the quinacidon magenta. Permanent yellow deep
and cobalt blue trio. You might not get it
as fast as I can, but that's totally,
totally fine. Okay? I actually have here a
yellow biased already, but to be fair, I will mix a brown first, a neutral color and put
that at the center. Now grab some of that. Mix more magenta, and you'll
have a pinkish brown here. I'll add more yellow. You'll have a yellowish brown. But when you add more blue, it turns into a darker brown, not really a bluish one. Compare that with this
one, we got a gray. But in the second
set of our trio, we got a dark brown instead. Now for the last one, if you could grab your salty
different set of primaries, that would be a really,
really good practice. Now to my third set, which is pyral red, gambochNva and ultramarine D. I'll change the order
and add blue first. That again is a
wonderful shade of gray. Add more yellow next. Oh, sorry, it should be here and add
more red tuna mixture. There. It goes to show that
the mixes that you'll produce really depends on
the colors that you'll pick. Don't forget to
label your colors, and I'll see you tomorrow for another set of challenging
color mixing exercises.
25. Sample Painting: D16: Time for samples. Here you can see two
different floral paintings where brown is one of
the dominant colors, and I want you to move your
eye around and see how I use different shades of the same brown to depict
what I wanted to depict. For example, on this one,
on the lighter part, I mixed more yellow, so it would appear lighter too. But on the shadowed parts, I mix more browns. On the other painting,
you can also see, I use the same brown,
but over this part, I mixed more yellows. This parts are
somewhat an equal mix. But for the background, I mix blues so that
they would move backwards and would really create depth for these
two floral paintings. That's how important it is to learn how to mix biased
browns and grays too. You can use these
different shades to portray distance and
also for harmony. If you're using the same
color and just changing the amount of reds and
yellows and blues to it, then it creates a
harmonious effect and your painting is uniform. These are just two of the examples that
I can find where I use the same brown but mixed more yellows
and blues on some parts. See you tomorrow and let's
work with metal colors.
26. D17: Metal Colors: We will add more challenge
or color mixing, if it isn't challenging already by trying to
mix metal colors. The color of these metals, of course, depends
on your preference. For example, you might
like gold that is really, really yellow, but for some
it might not be the case. For comparison, this
is quinacridone gold. Now, for silver, the closest convenient mix
that I have is gray, and for bronze, I don't
really have bronze, but I think light red
would be close to it. Now we'll try and recreate
these metal colors. First, with the gold, I will use a combination
of brown and yellow. I have here burnt umber, cadmium yellow light,
Gambogva and yellow ochre. Let's see which combination suits your preference the best. Starting off with burnt
umber plus yellow ochre. This is a different
shade of gold, but for me, that's
better than this one. Again, it's a
personal preference. Your taste with colors
comes with experience, have fun and experiment
what kind of combinations you would
really love to use. Just use a brown and a yellow, and you should be able to achieve a color
somewhat close to gold. This is burnt umber,
cad yellow light. Then lastly, we have
Gambonva plus burnt umber. Which one's your favorite? Next, I have silver. Now, for this color combination, all you need to do is
search for a brown, a ready mix brown polls, a blue. So for this for silver, I will try and mix burned
Sienna with ultramarine deep, palo blue, and cobalt blue. Here's my burnt sienna mixed
with ultramarine deep. This is just basically
different shades of silver off gray, sorry. But if you want it to shine, sort of a metallic a
real metallic look, then I suggest you go ahead
and purchase Mica powder, which is used in
creating DIY makeups, and you'll get a shining,
shimmering combination. So this is my burnt sienna and cobalt, basically just gray. Now what about recreating this orange brown or
let's say bronze? The combination that you're
looking for is a brown, a dark brown, plus a red. It can be true red or a pink. In this case, I
will be using burnt umber mixed with vermilion hue, permanent rose, and rose madder. Let's see what happens
when I mix those. Starting off with burnt
umber plus vermilion hue. Does that look like
bronze to you? What about permanent rose
mixed with burnt umber? Same but different. And lastly, rose madder. Plus. Ooh, the light
is shining on me. Rose Mudder, plus
Burnt umber. There. To make an object look metallic would depend on
how you apply it, how you apply different layers, starting from the
most transparent one into the most opaque layer. This is your metal colors. We did our best, and I hope you had fun experimenting
with these colors. Next, for tomorrow's activity, I want you to choose
the colors that you hate and the colors that
you really, really of. Tia.
27. D18: Colors I Hate: But Okay, this is take two. By the way, once again, to my excitement for a guide through hit record,
but no worries. I love color mixing, so I would be happy
to record this again. This is day 18, and let's go with a bit of an
unstructured approach. I want you to choose your
list favorite colors. I have here shell pink, raw umber, cadmium red
orange, and viridian hue. And just by looking at these
colors, especially the two, it annoys me and
somewhat I think to myself that I wasted money
purchasing these colors. Anyhow, these colors lost
the colors that you love. On my end, you'll
know what I love, and we use that
during our first day, and those are cobalt blue, mineral violet, and
Poinacredon red. So let's see how
this will turn out. I actually have the
swatches here already, but I'll just kind of cover them and share with
you my excitement in discovering and giving these
colors a second chance by discovering the kind
of mixes they would create when mixed
with my favorites. Let's start with shell pink. I'll mix co bolt. Blue
and look at that. A pastel violet. So instead of white, I can substitute shell pink. I think I added
more violet. Wow. That is so lovely. I
used to hate shell pink because it gets muddy when
you mix it with other colors, but I think I didn't give it justice since I only use it once and then
forgot about this. But look at that by mixing with my top three
favorite colors produces these lovely
shades that I would have never got because I keep
on avoiding them before. Now on to raw umber. I didn't like how hard raw
umber gets once it dries. So it keeps on cracking
and it's hard to re wet, but I've used this earlier, so it's easier now. So I just kind of
avoided this color. How it looks when
mixed with cob blue. That is a lovely neutral green. And you know that I
love neutral colors. Mix with violet. Okay. Neutral violet. And mixed with pink would
give us a red shade. Interesting, isn't it? That's the beauty
of color mixing, even if you hate
a color so much, if you just give it
another chance and mix it with other
colors, get to know it. You'll be surprised.
With the combinations that you'll be able to grade. Okay, cadmium red orange is one of the top
colors that I hate, especially when I got
pregnant with my daughter. I nearly threw it away. I hate this kind
of vibrant orange. But let's see. What will happen? Wow. When mixed with blue, that creates a violet. Turns into something
that I actually love. What about orange plus violet? It's this lovely wine color. What about oh, It's too
vibrant to my liking, but it could be something
that you can work with. So except for this, I really love how
this two turned out. But of course, these
are just three colors. If I take out other colors
that I'm in love with, especially the neutral ones, Indigo, sepia, then that
would be a different story. I can even expand
this palette and I could even say that I'm
starting to love them now. Now onto our last,
look at that green. Veridan hue plus Cobalt blue creates a lovely shade of blue. Hmm. Wow, look at this. When I mix aridian
hue with violet, it turns into a deep
blue green color. What about mixed wig? This is so amazing. Pink plus green, who
would have known that we can create a purple
out of this mixture. That is the beauty
of color mixing. You'll never know
what you'll get unless you are really
acquainted to this color. So, ladies and gentlemen, this is our colors that I hate mixed with
colors that I love. I hope you had fine as much as I am having fun
creating this class.
28. Sample Paintings: D17-D18: Metal colors. I did
not say metallic, but only metal colors. On some of my paintings, I have already used
different shades of gold and bronze by mixing my browns and yellows
and then my browns and reds, for example, this
fairy house over here, which by the way is
another class of mine and this floral study over here, where I mix my browns with reds to achieve
these colors and then browns with yellows to achieve a golden look on my florals. But if you really want
to apply this scheme and paint a somewhat
metallic object like this Christmas
balls over here, then you have to be careful and place your lights where
they are and then darks where they are by adjusting the amount of browns and
yellows or browns and blues or browns and reds on
your mixture so that you can achieve different
shades of the same color. For example, this one, I use
burnt umber plus Gambogova. On my silver one, I use
Bercian and ultramarine deep, and then on the third one, I use burnt umber plus vermilion hue. So by creating
this illustration, you can see that
I've achieved to use the metal colors to make these objects look
a bit metallic. It's not perfect and it
doesn't appear to be shining, but I'm satisfied as long as
I achieve that sort of look. When I look at it from afar, it does look like a gold and silver and bronze
to me, good job. Right. That is fun. I would like to admit
that I had fun, even if I worked with
the colors I hate. Now you might be wondering, where can I use these colors? Well, those are days when I
was really tired that all I can do is watch create
little studies like this. That's when I
discovered that yes, I can give a second chance
to the colors that I hate. For example, I have this
painting the clouds. Are so beautiful. I used ultramarine blue and cadmium
red orange to achieve that. You can see a hint of cadmium
red orange over there, which I tone down by
adding more water. I'm really glad that I gave
this color a second chance. Another study that I have here, I haven't featured this
color that I hated, but I used Tra verte, which is a shade of green on
this part of the painting, but I adjusted it to my liking by adding different
shades of green too. So if you have a color
that you think is a waste, I strongly encourage you to give that color a second chance and mix it with different
colors that you love. Who knows? You might find your next
most favorite mixture.
29. D19: Split Complementary: I I'm actually excited
for today's activity. Today's challenge would be working with split
complimentaries. So we know that when we
look at our color wheel, the complimentary color of red is what's
across it or green. But now let's make it a bit more challenging by working with split
complimentaries. And I will use secondary
colors, orange, green, and violet as my
primary colors here. So orange instead of mixing
it with blue, let us split. We'll have blue green
and blue violet. The closest I have here is
radiant hue and neutral tint. Let's see how that
will work out later. It's actually my first time working with this color scheme, so I'm quite excited. Now for green,
instead of red split, you have red orange
and red violet. I have Hookers green,
and the closest I have is cadmium red orange
and pinacidon lilac. Now four Violet instead
of yellow split, yellow orange and yellow green. I have here my mineral violet. I chose olive green for and permanent yellow D. So let's
see how this will turn out. First, with the orange. Let's mix Viridian
hue two colors that I hate. So let's see. Oh. Okay, I still
creates a neutral mix. But again, this would be different depending on
the pigments you choose. Just work with
whatever you have. Oh, this is beautiful. Like a wine color. So this plus this
yields this one, and then this creates this one. Col. Let's move with green. This is Hooker's green. And let's mix
cadmium red orange. This could actually work as a
skin tone, don't you think? And Hooker's green
plus quinacredon Lila. Oops, I added too much. Wow. It's a greenish
gray. Interesting. And lastly, our violet. Mineral violet plus olive green. Okay. Sort of similar
when you add yellow, and this one is the closest
I have as a yellow orange. I think I added too much. And of course, that
will give us a brown. So in short, even if you don't have the exact
complimentary color, you can go with a split
complimentary color scheme, and you'll still achieve different shades
of neutral colors. O
30. Sample Painting: D19: You can see here it's not
a completed painting, but this will demonstrate
that I was able to apply without knowing split
complimentary color scheme. I use greens here and
violets and I mix them. It's a different violet, not the mineral violet and
olive green that we've mixed, but I mixed different greens. This is soft green, and this is a combination of compost blue and
quinacridone red and I used that throughout different parts of the painting to keep adjusting my green. This is a tone down version of that sap green and
you can see on some parts where it gets darker or turning towards violet
that I mix those two. I actually applied this and
this without me knowing that I don't have a
finished painting where I specifically focus
on split complimentaries, but I hope this study
somewhat gives you an idea where you can
apply it on your artwork. Tomorrow, let's work on
analogous color schemes.
31. D20: Analogous - Blues: But Welcome to Day 20, and you're doing great. Last ten days, and we've successfully completed this
color mixing challenge. Right. We've talked
about primary colors. The three basic colors equidistant each other
in the color wheel, which are red, yellows and blues or technically
with watercolors, magenta, yellow and cyan. We've also talked about
our three major pairs of complimentary colors, those that lie opposite each
other in the color wheel, for example, red and green, orange and blue and
yellow and violet. Now let's talk about
analogous colors or groups of colors that are next to each other
in the color wheel. That's what we'll do
for the next three days where we'll work with three
sets of analogous colors, starting with blues,
greens and violet. So I have here cobalt blue, hookers green, and
mineral violet. As far as I remember, we haven't mix these colors yet, especially with the use of
convenient mix of green. I'm also taping here a small rectangle where we'll try placing
them to each other, the color combinations
that we'll come up with. Depending on your choices, you can even create ocean
blues. Right. Let's start. This is cobalt blue mixed
with green. That's lovely. You can even adjust, add more blue if you want or add more green depending
to your liking. Now let's try green and violet. We've tried this,
but with this set, you add more violet, we'll turn into this color. If you want more challenge, then you can work with
primary colors and try to mix these colors. Okay? It's up to you. This is a nice blue violet. And if I add more blue, so now let's try
mixing all of this, creating a gradient, starting
from the lightest one. I think the lightest
one would be this one, the green plus blue. What I'll do to achieve a smooth background would
be to prepare my paper. I'll grab another brush and
just wet this whole area. Then let's try
creating a gradient, starting from the blue
green to the blue violet. Oops. It's okay. That's how it looks. If I take this off, it will reveal this
nice crisp border. I could really see using
this two in seascapes. Depending on your need, you can make use of this
analogous color scheme. Tomorrow, let's
work with oranges, yellows and reds. A.
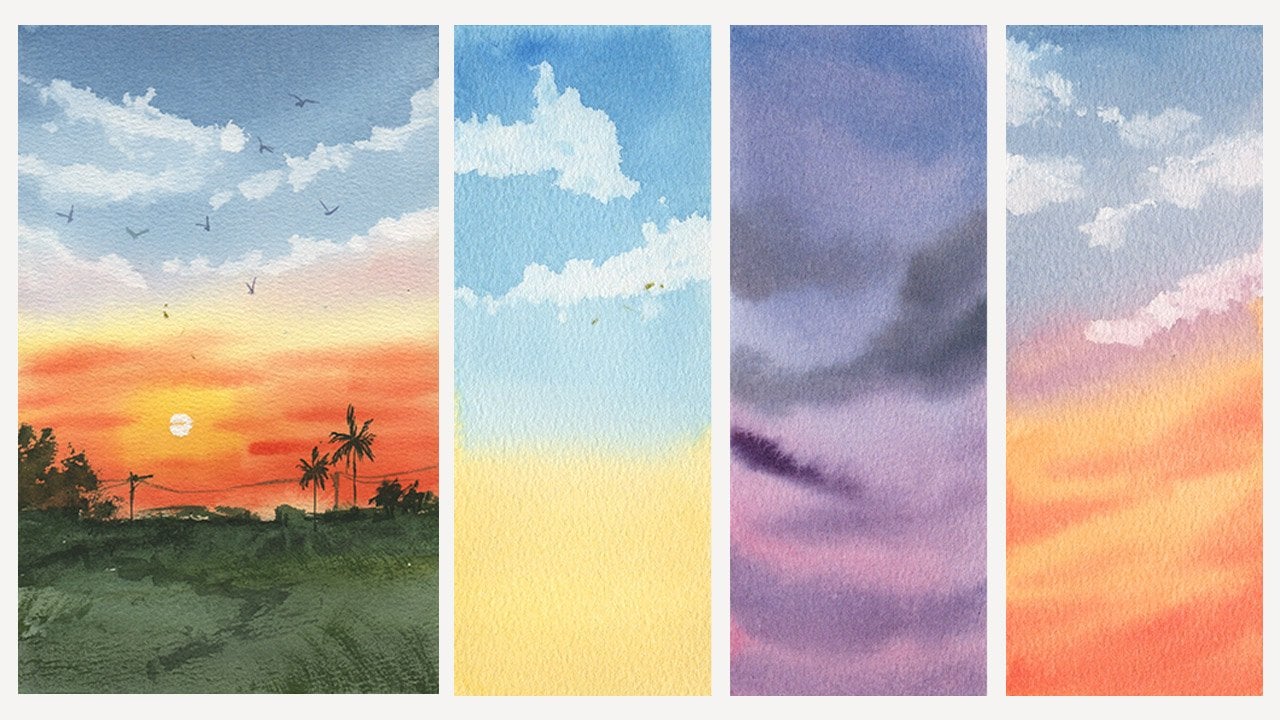
32. D21: Analogous - Oranges: Now, we're done
with our first set of analogous colors which can work if you are looking to paint an ocean or
a seascape scene. Now, I will use queen
red, Gambochinova, and red orange for
a sunset palette, and let's see how they will look when we mix them
with each other. I'm pretty sure that
I mentioned this in my basic color mixing
class that if you mix magenta or pink
with a bit of yellow, it will turn into a
reddish tone like that. So pretty. So let's try and
mix more of that. I can already imagine how this would look like
in a sunset scene. If I add more pink, that's the color
that it'll create. Next, red orange, plus yellow. A vibrant yellow orange. What about orange? Plus pink. Is it different? Yeah, it's
different from this one. Now, doing the same thing
that we did yesterday, I will create a gradient
starting from the lightest one, and I think I'll start with this moving on to this
mixture and lastly, this one. Or we can turn it around since we are imagining a sunset scene. This will be at the
top, followed by this, and this will be at the bottom, where the sun is. Again, do not forget
to prepare and breathe your paper with water so that they will blend
smoothly with each other. Starting with that,
moving on to this one. The key here is to just let
them mix with each other. Do not disturb the pigments too much and let watercolor
do its magic. Wow, that's really pretty. I would be honest with you, I haven't tried working with
analogous colors before. With my sunsets, I love working with an orange
and blue combination. It's very rare for us
to see where I am. To see a sunset like this. Most of the time,
it's just yellow and blue or orange and blue. Okay. Now, this proves to be a really useful palette when you're working
with a sunset scene. Analogous colors of red,
oranges and yellows. I'll see you tomorrow
for our Berries edition. Where we'll use red,
violets and blues. See ya.
33. D22: Analogous - Violets: Right. As I've
mentioned yesterday, we'll now work with vary colors. I have here quinacredone red, quinacredone lilac,
and royal blue. Let's start with the two
quinacridones in our set. Okay, they look different
with each other, but this is my first
time mixing them. I think it will just
create Alright. It turned my
quinacridone red into this beautiful red
violet color. So lovely. So lovely. What about Queen
Lilac loss, royal blue? Oh, that's a nice
blue, berry color. Wow. And royal blue plus
quin red. Wow. These are beautiful,
beautiful shades of violets, you know, that I'm
a fan of violet. Okay. Now I'll create a
gradient just like what we did. The past few days, I'll start with this one, going to this color and
then finally this color. But when creating gradients, you would want to start
with the lightest color, so I will lay down the red violet color
first at the bottom, and then without
rinsing my brush, I'll just grab the second
and then the third colors. That will save us time
because remember, if you want a smooth
gradation like this, you should not let
her paper dry. And if that happens, then just let it dry completely and get back to this and re wet. Okay, I've loaded
my brush with my quin red and quin lilac mixture, followed by my quin
red and royal blue. This is so pretty. I'm actually so happy I
started this challenge because I am discovering
color combinations I haven't tried before. I used to stick to my
basic combination. So this is a great chance
to really experiment, get to know your colors, fail, learn, and discover
some combinations that you wouldn't have used, if not for this challenge. Right. So that's our three
sets of analogous colors. Tomorrow, I want you to prepare your primary
colors again, and let's have a quick review of the warm and cool colors. I'll see you there.
34. Sample Paintings: D20-D22: We've played with three analogous color
scheme with blues, with oranges and with violets. Now, here are some examples
where I use this palette. First off, you have
this blues and violets and then you
have the sunset, color palette, of course, only applied on this part. Then you also have this
bright blues and pinks. They really work well together. Sitting beside each
other on the color wheel will give you this
harmonious effect and of course are really
bright orange red and yellows for this
dramatic sunset. These are just some examples on how you can make use of an
analogous color scheme. Tomorrow, let's discuss about warm and cool primary colors. Sea.
35. D23: Warm and Cool Colors: I Welcome to Day 23. One more week, and we will
wrap this challenge up. Right. Now let's discuss
about worms and cools. If you want an in
depth explanation, then please go ahead and watch this color mixing class
after this challenge class. But as a quick review, for reds, we will consider cadmium red as our warm and quinacridone
magenta as our cool. For yellows, we have
lemon yellow as our cool and permanent yellow
deep as our warm yellow. And for blues, there has been a debate which is warm
and which is cool. But for me, I would consider ultramarine deep as warm
and Taloblue as cold. But you can swap them. The key here is, if you
remember this exercise, I've used quinacridone magenta, lemon yellow, and
Toblue together. But now you'll see
that I will use quinacridone magenta with
permanent yellow deep. Pinacidone magenta
with ultramarine blue instead of to blue, and then I will mix lemon yellow with ultramarine deep
instead of to blue. You'll just mix and match the primaries that
you used earlier. Now if we don't have
that many colors, just make sure to use
another set of primary different from the
ones that you've used earlier. Let's get started. This is actually interesting. We'll get to see a
different set of secondary and
tertiary colors that this combination will create starting off with cadmium
red and lemon yellow. First try to achieve
a neutral mixture. This is already a
beautiful shade of orange. If I add more red to half of it, I'll have this red
orange, more yellow. I'll have this yellow orange. What about mixing
quinacridonagenta and permanent yellow deep. Oh. That is so vibrant, that I hate vibrant oranges. That's the orange that
it creates, but it does. Wow. That is so beautiful. A beautiful shade of red when you mix more
red to the mixture. This is also a bright one. Okay. Now, going to our greens, we have lemon yellow
and ultramarine deep. Earlier, we mixed lemon
yellow and palo blue. Now we're switching
things around. Oh, this is like a pastel green. Right. When you
place a color here, just remember that you're adding more yellow to the green, you should be careful and not switch things around
and where you'll put blue green here
because yellow is the closest color
to this mixture, so it should be yellow green. And here just add more
blue ultramarine, and you'll have blue green. It's really different from this two that we created earlier where we use lemon
yellow and Taloblue. That's why it's also
nice to give it a try and mix and
match your colors. Don't get too
married, as they say, with the first set of primaries. Wow that you have
been working on. This is a deep
green. Let me check. So earlier during
the first few days, we used permanent yellow
with ultramarine deep. This is that color. This is obviously more
vibrant, right? That's nice. Oh, sorry, sorry. I should
have been this one. And then I'll add more To blue. I'm being careful
with my To since I know it's an intense color. It's overpowering.
Really different, really different from
what we mixed earlier. Next, let's work on the violets. This is quinacridone magenta
and ultramarine deep. Let me check. Quinacidon
magenta and to Blue. That is a different violet. Let's add more magenta. Wow. That's so lovely. And let's add more blue. Mm hmm. Now we'll mix Thalo
blue and cadmium red. We used cobol blue and
cadmium red earlier, and we produced this
muddy violet gray color. So let's see what
this would create. Oh, I added more red. I think that would
be my red violet. If I try and mix an equal part, that would turn into
this lovely gray color. Sort of different
from this one, right? Now, if I add more blue, then I'll have this lovely, lovely, bluish gray color. So far, what I'm loving so
much is this combination. I'm biased towards violets, but I love this and I love how permanent yellow
deep and Taloblue creates this deep green
perfect for forests, and for skin tone, cadmium red and lemon yellow would prove to be
really, really useful. But you can also try
different combinations of primaries and let me know in the discussion stab
what you tried and which combinations
really surprised you. Tomorrow, let's have
fun and experiment with secondaries being
used as primaries, LCU.
36. D24: Secondary as Primary: I have experimented
with different set of primary colors and created
this color wheels. Yes, that's how obsessed I am when it comes
to color mixing. And then I suddenly
had this idea that, what if instead of these primary colors of reds
or pinks or magentas and yellows and blues or Cyan what if I use
my secondary colors, the convenient mixes
instead of these primaries. Now that's what we'll do. I have here red orange, hookers green and
mineral violet for today's activity and tomorrow
I will play with light red, viridian hue and lavender. I hate that color, but let's go. Here I have a simple
color wheel divided into six and just so we
won't get confused, this is my primary, that would be my orange. This is another primary. This wheel is just
divided into six, so we will be able to mix our secondaries,
but not the tertiary. But it's up to you if
you want to divide your color wheel to make
place for the tertiaries. Right. All you need to do is
fill out those spaces. First with your primary color, this is red orange once again. Followed by Hooker's green. And lastly, mineral violet. Again, feel free to swap colors, whatever color is already
available to you. But it would be
best if you choose premixed colors instead of using your primaries because it
would be no different. With our first activities
if you use primary colors. Now, let's start with the
first secondary color, which is orange plus green. We mix this during our
previous experiments, but let's see what
combination this set creates. That's a brown. Okay. You can leave space, a tiny, tiny space between
the colors in case your orange and green swatches
are not yet fully dried. Don't worry about getting
this perfectly colored. Just focus on mixing
your colors, okay? So that's a brown. What about orange and violet? Red, orange and mineral
violet. All right. I do remember mixing
the same color, but it's different when you
see them in a color wheel. So this is orange and violet. And then green and violet. Turned into a gray. This color mixing
challenge is also giving us lots of opportunities to
practice our brush stroke. Okay. That's looking
weird, but that's okay. In a way, if you look at the combinations
that we have here, sort of look like our
metallic colors, right? This could work as your silver. Let's see what happens
when we mix the two. This could work as your gold. Let's mix that with this one. Now you have your different
shades of neutrals here. Then let's mix this
with this gray. Hmm. Right. You might find some uses here. For example, the Black without black exercise
we had earlier, you can actually substitute this hooker's green
and mineral violet and forget about your blue
and orange combination. That is interesting. This also can really work with roofs when you're painting
roofs in your landscape. And this one, you can sort of use this for
your skin tones. So that's a great discovery. Tomorrow, let's do another set with some of the colors
that I hate. ICU.
37. D25: Secondary as Primary 2: We're already on day
25. That's so nice. And I like how this test
swatches are piling up. So, great, great, great job. Oh, actually, I haven't used
the back of this one yet. There you go. Now
we'll do the same. But this time, instead of an
orange, this is a light red. As I mentioned earlier, browns are also
grouped with oranges. So if we have a red
mix of brown there, it could be a burnt sienna, burnt umber, you can substitute
that with this color. Feel free to use that.
Oh, here we go again. I really don't like this color, but for the sake
of color mixing, let's use Viridian hue. And then lavender. I also sort of avoid this color. Like shell pink, it gets really muddy when
mixed with others, but a standalone
color is good work. Right. Let's try light
red with viridian hue. That's a brown,
but a muddy brown. Muddy brown, of course. Brown is the color of mud. But compared to this one, this is looking duller. What about light
red and lavender? This is the first time
I'm mixing these two. I would take a guess. This
should look like a grey. That's my guess. Let's see. Ah. What? I think I'll need to
add more lavender. Still a brown. Okay.
It's not a gray. I was wrong. But it
was good discovery. And then lavender and green
should give me a gray. Oh, no. No, you're
giving me a blue. Okay, it's giving
me a pastel blue. That's nice. So these two colors that
I hate are actually giving me a color that I favor. Now let's try and get the same neutrals by mixing
these a greenish gray. What about this too? A neutral gray. And what
about this too? Brown. Lovely. Lovely, lovely colors. Let me know what secondary
colors you used as primary. I'll see you tomorrow and
let's mix shadow colors.
38. Sample Paintings: D23-D25: Okay, I created this
painting specifically to join a challenge where we used a combination
of warms and cools, and this is the
result, and I'm so happy that I joined
that challenge. You can see some really tone
down purples over here. I also used a red, and then different
shades of yellows. You also have blue
close to Silo blue. So I hope this gives
you an idea how you can apply this too on your artworks. Okay, I was really excited to see that I've actually
done this before. I thought I would need to create a new illustration to
show you how you can use a secondary color set and use them as
your primary colors. This portrait study where I used cadmium orange, sap green, and a combination of
ultramarine blue, and opera for my purple and
use that for my skin toe. You don't worry about this one, but you can still see
hints of purples over there and some greens over there and a lot
of how it turned out. I was so happy that I found
this small study and that proves that even
if you don't have your basic reds and
yellows and blues, you can still find some
substitute because in a way, if you really think about it, orange has red and yellow. Green has blue and yellow
and purple has red and blue. In a way, you'll
be able to achieve neutral colors and it depends on you where
you'll apply this. You can even use this on a landscape painting or a still life or even
just a value study. So I hope that gives you
an idea on how you can use this color palette on your own projects.
See you tomorrow.
39. D26: Shadow Colors - Reds & Oranges: For today, we'll talk
about shadow colors, how to mix shadow colors, specifically for red and orange.
Don't worry about those. I made a mistake
labeling my colors, but for the next three days, we will explore how to mix shadow colors and
what works best. So I have reserved these
two circles for my red, orange, yellow, green,
blue, and violet. But of course, you can just
choose colors that you'd like to discover what pigments
work for their shadows. What I have here is I will
use pyal red for my red. I'll color this up with my
Pyl red and whichever is, I think the best shadow color, I'll drop those here. For my pyral red, I have quinacridone magenta, which is from the same
family, but only darker. Cadmium red orange, which
is an analogous color because it's beside red in the
color veil Hooker's green, which is its complimentary
color and black. Let's see which is the best one when it comes to mixing
shadow colors for red. This is my Pyrrole red, so I'll prepare four pools, starting off with
pinacidon magenta. So that is the shadow
color that I've achieved. Next, cadmium red orange,
an analogous color. Okay. What about Hooker's
green? It's compliment. Oh. If you achieve a color
like this, a neutral color, try to add more of the
red because what we're aiming is only the shadow color, not really a neutral wine. And lastly, black. Okay. I think I'd go
for this is hard. I think I'd go for
Hookers Green and black. Let's see how that will
look like when we paint Pyl red along with
these colors that I've chosen. That's too dark. And then while it's still wet, I will drop in the
shadow color over here. That is Pyle red, that's hooker's green.
What do you think? Next, PyroleRd again then Pyrole red with black. I might need to go over again one more time
and make this redder. And then I'll add more
black and drop it here. Okay, interesting, isn't it? This only shows that
we really shouldn't ditch black and remove it from our palette just because
someone said that you cannot ever use blacks
when it comes to painting. That's for our red, but obviously you can
also choose a color from the same family
or an analogous color, which is this tube, magenta and cadmium orange. Now, I'll go for orange. This time, I have cadmium
orange, red orange here, and I will mix it
with burnt sienna, which is a darker orange, actually, a brown color. And then scarlet lake, which is an analogous color. Royal blue, it's compliment
and, of course, black. I'll always use black
throughout this exercise. Let's start with burnt sienna. Cadmium red and burnt sienna. How does that look as a shadow? It looks a bit dirtier. What about one mixed
with scarlet lake? I'd definitely choose this one. And what about royal blue? Here again, since we're using
its complimentary color, it will naturally turn
into a brown color. But maybe depending on
what you're painting, this can also work as a
shadow color for your orange. What about black? Oh. Almost the same with my royal blue. So this time, I will
choose this two, a color from the same family, which is burnt sienna and
then a color analogous to it, which is scarlet lake. So I'll remove this two. I won't need them,
then I'll color in my circle with orange and
drop the shadow colors. Alternatively, of
course, you can use the same color and just let the first layer
dry and add another one. Most of the time,
that's what I'm doing, but there will be times
when you'll need a slightly darker shade darker than the original color
that you're using, and this is a good
exercise to do to discover which color works best for you. Okay, do not forget
to write notes here. So this is what I chose. And for the Pyl red, I chose hookers green and black. To clarify what I was talking
about earlier about letting the first layer drive first and then adding
another layer, let me just look for a green.
For example, this one. This is my first layer. Imagine this is a leaf. And then it dried already. You can go ahead and
use the same color. Let us assume that
it is hooker's green and then add
another layer. So that can also work. But for the purpose of learning
how to mix our colors, we will deal with same color, family, analogous color, complimentary color,
and of course, black. I'll see you tomorrow, and let's work on yellows and greens.
40. D27: Shadow Colors - Yellows & Greens: Day 27 will work with yellow
and green shadow colors. Yellow must be the
hardest colors among the primaries to mix
the shadow color. I'm actually excited to
try this one because I've been wanting to
paint some sunflowers, and I find that it's really, really challenging to
mix shadow colors, especially for yellow
because it's easy to get a body mixture instead
of a shadow color one. So for this, I will use cadmium light as
my primary yellow, and then for color
of the same family, permanent yellow
deep, cadmium red, orange for an analogous color, permanent violet for its complimentary and
of course, black. Now for green, I'll use
permanent green as my base, M hookers green for
the same color family, royal blue for an
analogous color, scarlet lake for its compliment
and, of course, black. Let's get started
with the yellow. Cadmium yellow is
a neutral yellow. It's not warm, like this
permanent yellow deep, or it's not cool
like lemon yellow. So this is a good base color. Let's start with
permanent yellow deep. Okay. Not much change,
but that's okay. But about cadmium red orange. I think I've added more
orange than intended. As expected it turned
out like yellow orange, but about permanent violet. We've always been
using mineral violet, so now it's time to try
a different violet. Okay, a bit muddy. That's okay. And,
of course, black. Oh, it's hard to decide. But if I am to choose, I would go for the orange and the violet and let's paint the circles
with the base color, which is cadmium yellow light. Don't worry if you
go outside the line. You can even paint
a cube if you want, but I like to do it this way. So this is my cadmium
orange mixed with yellow. I forgot to watch the black one. Next, we have the cadmium yellow light loss
permanent violet. Which do you think is better? Now we'll go with greens. Green is sort of easy, I think to mix shadow colors. We haven't really gotten into the other color combinations like mixing greens with browns, but I will leave it up
to you to experiment and find out shadow colors for
your favorite pigments. This is permanent green. I'll start it with a color from the same
family who cars green. Maybe I mix too
much. That will do. Hooker's green. What
about royal blue? Royal blue is a dark blue. So Wow. That looks so good. But might not be too good when you are working with floorls. Well, it depends. It's a case
to case basis, actually. Mixing it with scarlet lake
turns it into an olive green. Lovely. What about black? Oh, it's hard to choose. I'll go with Royal blue
and black this time. Let me just star them so I
won't forget which I chose. Again, royal blue and
black. Goodbye, this two. Permanent green plus one
mixed with royal blue. The sun is shining on me. I think it's approving
of my color choices. This one is the one
mixed with black. So what have we learned here? For some colors, adding black is a good
choice like this one, one with the green and
the one with the red. But for yellows and oranges, they don't really
look that good. So that teaches us that you can really choose
another color instead of black to achieve a shadow
color or a deeper color or darker shade that you want
for a specific pigment. I hope you're having fun
discovering shadow colors. Tomorrow, let's discover
what works best as a shadow shade for our
blues and violets. See ya.
41. D28: Shadow Colors - Blues & Violets: I Okay, it's time to mix
colors that I really love. So for blue, I have chosen
ultramarine deep as my base, and I will add royal blue as
a color of the same family, permanent violet for
its analogous color, burnt umber, for its complimentary
and, of course, black. For my violet, I will use mineral violet as my base,
add permanent violet. Add Hooker's green as
its analogous color, yellow ochre, and then black. Let's get started. This is Ultramar indeed. Another color that I really love except when working
with portraits because it granulates. That's fine. Let's mix it with
royal blue. Lovely. See how that change. What about permanent violet? Okay. Not really good for its shadow. What about burnt umber? This is a combination that I
really, really, really love. This would be my first
choice, obviously. What about black? Oh, almost the same with my burnt umber. Okay, what do I choose? Burnt umber and Royal
blue combination. Goodbye, this too. I won't be needing
you for a change, let's use a color
from the same family. This is royal blue. That's ultramarine blue. Then the one mixed with
its complimentary, which is burnt sienna. Sorry, burnt umber. Burnt sienna can also work
with ultramarine blue. But obviously, you'll get a deeper shade when
you use burnt umber. Should have added more
blue. Let's do that. There. One has a subtle change, but the other one,
the shadow color is really, really obvious. That's for our blue. Let's clean this
up for our violet. For our violet, this is
mineral violet once again. Let's start off with
permanent violet. One is leaning towards blue, which is permanent violet. But I don't think that looks
like a good shadow color. What about an analogous
color, ocher is green. I've added too much, let's
add back mineral violet. Yeah, that could work. But maybe add more violet so that it's not
an abrupt change. Yellow ochre. It made
it a shade lighter. So no. No, no. Black. Add more
mineral violet. Right. So it's obvious, I'll
choose this too. Booker's green, it's
analogous color and the one where
we added black. This has been an
exciting challenge. I'm so happy I pushed
through with this one. I hope you'll find joy, too, in practicing color mixing. So this is my Hookers green. And lastly, the one
mixed with black. Lovely deep violet colors. Right. Last two
days, you can do it. Tomorrow, let's create a
complete color wheel. See ya.
42. Sample Paintings: D26-D28: I have various examples
here where you'll see almost all of the colors,
starting with yellows. Here you can see that
I really love mixing my yellows with oranges
to get a deeper shade. Same goes with greens
where I mix them with blues and sometimes over
here I mix them with black. Same goes with reds and violets, where I mix blues and
blacks also to achieve a shadow color and
here's another one. I mix browns with
my pinks to get shadow colors and the
same goes for the greens. The branch, on the other hand, I mix blue with it to
achieve a darker one, just like how we mixed royal blue with our
cadmium red orange, well brown is also in
the orange family, that's how it looks like when
you apply the same concept to your paintings. No
43. D29: Color Wheel: Okay, I'm so excited. For today, since I will
be using some colors that I haven't used the
entire challenge. And if you have another set
of primary colors, again, you can use a pink, a red, a magenta, even a brown for an earth
themed color wheel. This is bordeaux. This
is naples yellow. I haven't used it. It's long as I remember, I haven't used it
in this challenge, and then Prussian blue. Prussian blue is
an intense blue, so I was avoiding it really
during this challenge, but just like Talublue, you can control it once
you get to know how little or how much you should
only be using per mixture. Now, this is a complete
color wheel, as I call it, in a way where we will
plot our primary colors, our secondary colors, and
even our tertiary colors. If you remember, this is
during our day seven. We plotted our
primary and secondary in sort of a rainbow format, and then the tertiary
colors go here. We also plotted an Earth themed primary and secondary
colors like this and another
set of muted tones. But this time, we will
be using this format. It's a circle divided
in 12 sections equally, and then we will place
our primary colors equidistant to each other. So one primary goes here, another goes here, and
another goes here. You should leave three spaces
between each primary color. Now, I'm so excited because this is the
format that I have always been using when working
on this color wheel eBook. And so far, I haven't used this trial before the
bordeaux naples yellow, and Prussian blue combination. So let's get started. I would also recommend that
you plot first the primary. I like to mark them with a dot. Just to remind myself that hey, give space for the others. One, two, three, so
my yellow goes here. And then one, two, three, my blue goes here. I'll start with bordeaux. Bordeaux is close to magenta. This color wheel doesn't
need to be perfect. But as I mentioned earlier, this challenge also gives
us lots and lots of opportunities to
practice our stroke. But I don't want you to prioritize creating
a perfect swatch, creating a perfect circle, painting inside the lines. Perfectly, I want you to focus
on the mixing part. Okay? That is our priority. Not creating beautiful
looking swatches. Took me some time before I managed to find out which brush works well
with the swatches. But my earlier attempts
look similar to this, not uniform sizes, blotches
of colors, but that's fine. Okay. Let's start with our
first secondary color. If you remember, if we mix
red or pink plus yellow, we should achieve orange, and that orange should lie here between the two primaries. That's what I'll do. I already have my naples yellow here. I'll just grab some bordeaux
and oh, what is that color? Okay, that is flesh
tone, I think. As long as you
achieve a color that is bordeaux or that is
neither red nor yellow, that will be your secondary. See? This is a
beautiful color for me. I am a fan of mited colors, and then I will sort of
divide this mixture into two, starting with one where
I will add more yellow. This is kind of tricky since Naples yellow is a weak color, and then for the other half, I'll add in more
bordo. So far so good. Now we have our first set of primary border and yellow,
maples yellow, secondary, which is this flesh
tone, and then tertiary, which is supposed to be
yellow orange and red orange, but they are not,
and that's fine. Next, I will work on this side. This should yield violet. I already have my
halo blue there. I'll just add more bordeaux, and this is what it gave me. I think that's try to
achieve a color that is neither red nor blue and
that should be a violet. It's also good review for the primary and secondary
colors and also tertiary. If you keep on doing this
over and over and over again, you don't have to
check your color wheel just to find out, Oh, how do I make violet again? How do I make orange again? That happened with most of my students with my
face to face students. I took them quite some time
to kind of memorize by heart, which primary creates
which secondary color. And that's totally,
totally fine. Again, if you're lost, just
remember your rainbow. Roy Ji Biv without the indigo. And on the other
or the other half, I have my blue violet. I'm in love with
this combination. They are giving me the muted
colors that I love so much. And finally, for the greens, let's have maples yellow
back on our palette. I wouldn't expect a bright
green since naples yellow is. So you can see it's
a weak yellow, but I love using
this for my skies. Oops. Weak yellow
versus a strong blue. It would really be a
challenging task to mix them. Another mutant secondary,
which is green. Once again, divide
that into two, mix in yellow first, and
fill in your yellow green. Then make more blue here. Now for the space over here, you can just mix
all of these colors together and try to
achieve a neutral color. I'll add in more yellow. Maybe I need more
bordeaux, no, more blue. Yes, this is a good
neutral color. Put that over here
at the center. Then try to add more red, more yellow on one part. This is our biased neutrals, if you remember, and
more blue on one part. Lovely. I'm so in
love with this trio, I should add it to my e book. Okay. So that is our
complete color wheel. Now for tomorrow, we will expand this palette and
create skin tones, Paris shades of
greens and violets. I'll see you for our
last day. Good job.
44. D30: Color Wheel Expanded: Starting off with skin tones, we know that the basis
of skin tone is orange. So that again, ladies
and gentlemen, is yellow, this red. Oops, too yellow, too red. This can actually
work as a blush, so that could be
another variation. For this part, I'll
just add more yellow, and that is it. This is my first watch
straight up yellow pus red, and this is my blush. We're actually just remaking
some of these colors, but that's totally fine. Now for the third one,
we will introduce blue. I did this because I know
Prussian blue is so intense, so I will just pick up some
of my blue here instead of just dipping my brush
directly on my pan, which more often than
not, is too much. Once again, I added more
blue than intended. There, this is better. And lastly, let's add black. We will extend this
palette by adding black. This could work for the pupil
of the eyes or the nostril. So those are your skin tones with our bordeaux naples yellow, and Prussian blue trio. Next up, greens. I already have my blue here. So let's mix greens. You can even take a look at what happens if you add
more water to your mixture. So that is a transparent wash. This is my second wash. I added more blue. There you go. And, of course, add a bit of red or bordo. It happened. Okay, it
turned into an olive shade. Olive green. That's what
I wanted to happen. It's different from this
green, so that will work. And of course,
lastly, add black. There you go. Next up, purples. Again, add more water to see a lighter version of
the tertiary over here, tertiary color or
secondary color. Then for the second swatch, you can just add
whatever you want. Is it more blue, more red? It's up to you. But
for the third swatch, we will be adding the
other primary color. This case is yellow. That is a lovely
shade of violet, which we weren't able
to achieve when we were working on this color
wheel and add black. Lovely. Now it's time to have fun and experiment with kind
of neutral colors. Yes, we did. We mixed this,
but they are too pale. So now let's have fine and just mix everything
on our palette. I will even grab the other
one and mix them here. So I was able to
as long as they're different from the
mixtures already. Okay? This is like a neutral gray. What about this one? Sort of different, but same. What if I Okay. What if I add black? Oh,
that's too much black. It's a way to clean up your palette, too,
when you do this. Beautiful, beautiful. See how we were able
to really expand a palette of three
plus one black by learning to mix our colors. Let me just put it here as
black on last swatches. So I'll know that it's
not really only bordo, naples, yellow,
and Prussian blue, but I used black. Congratulations on
completing this challenge.
45. Sample Paintings: D29-D30: Okay. This is looking good. Some examples where I used
primary colors again, but different sets
of primaries to create this winter scape, this beach scene and this
lovely Mountain illustration. These are actually
some outputs from my in person workshop where we focused on
mixing our own colors, specifically working with a set of primary colors plus black. And coming up with
different scenes. You can see here how I managed to achieve different
shades of oranges, of purples, and of greens. That's why I love color mixing
so much because you don't need tons and tons of
tubes of different colors, but you'll need
patience and of course, your love for the medium to really learn how to
mix your own colors. I hope you're having fun. In the next video, let's take
a look back at what we did during this 30 day challenge and what you can do from here. Oh
46. Before You Go: That was an amazing experience. Even for me, who's
been obsessed with color mixing for
almost a year now. Which combination is
your favorite so far? We did a lot of mixing, starting from a
monochromatic color scheme, complimentary primary
colors and mixed them to achieve secondary and tertiaries and expanded them to
produce skin tones, different shades of greens
and purples explored using earth and muted primary colors mixed are black without blacks, our own pastel colors, and even metal colors. We also gave a second chance
to the colors we hated. Then we tried a split
complimentary color scheme, reviewed our warm
and cool colors, experimented using
secondary colors as our primary and tested out which pigments works the
best of shadow colors. We finished strong with
a complete color wheel. You all put in an
incredible effort. Thanks for sticking
with me till the end. But if there's one thing that I want you to take
away from this class, that is making time to
create mini color studies. It's the best way to get to know your colors and improve
your mixing skills. Hope you had fun in
this challenge class, and I'm looking forward to
which colors you played with. So don't forget to upload your class project with a list
of pigment names you used. Let's learn from each other. An honest class review is
greatly appreciated, too, as it will help me
improve my future classes and help other students decide whether this class
is for them or not. See you in my other
classes, and together, let's make this world
a little bit more colorful with our artwork.
 Bianca Luztre, Watercolor, Productivity, Color Mixing