Transcripts
1. Hello!: Hello, hey guys,
welcome to this course. In this course,
our explain to you about the colorful
food photography. I will explain in detail
from preparation, from the tools and how
we set the background, and then how we
should end finally, how we added every
single picture. And then here's
some of the results that I will share
to you about the step-by-step of its production are k. So in the next section, I will explain to you more
about our preparation from the camera lighting
until it's photoshoot. Okay. See you in the next section.
2. Introduction of Camera: Hi guys. In this section,
I will explain to you about the camera lenses and how I set my camera for
my empire food photography. At the first, I will explain to you about the lenses first, the lens I use the most
is only two lenses. The first one is the canon. 50 millimeters, have 1.8. Okay? This is one of the most affordable and
high-quality lenses you can find on the market. And even if you are
not using Canon, you can still find these kind
of lens in different brand, okay, 50 millimeter, 1.8. When I decided to use this lens, when I want to shoot on the
top and go like this, okay? Yeah, I wanted to
shoot some angle. I will use this lens. And when I want to shoot the front angle and
45-degree and go, then the lens, my go-to lens. Canon macro 100 millimeter, 2.8. This is one of the most preferable lens for me all the time when I want
to shoot food photography. Because I really
like the sharpness, the contrast, and the
blur is really natural. And then I really
liked the color produced by this lens
because in food photography, we want to make sure that
the color is delicious. So I really liked
this one because this one produce really good
color for food photography. And then when shooting
with this kind of lens, I suggest you to always
use the lens hood. Because when you shoot
using this kind of lens, using flash, when you shoot
with this kind of position, when you have foot right here. And then you sit like this. There's a possibility that this lighting will come
directly to your lens. This kind of situation happen. It will produce the
flare in your image. Sometimes you are
not aware when you see directly from your LCD here, the reason it seems, okay. But when you put this
one on your lens, then you will realize
that why the color is much more beautiful
when I put this lens, because it will reduce
the flare in the image. So when you shoot
with this position, the right thing from this flesh wound come
directly to your lens. So the color will be
more beautiful and then the quality will be much
higher only using this one. So make sure when you shoot, you put this one, okay. If you're still not
have this kind of lens, you don't have to worry. Just use any lens you have. And start with the, another strategy that we will explain in the
next section, okay? And then above the camera, okay, what kind of camera I use? Actually this is this camera
is already discontinued. I want to show you
that you don't have to invest on
the latest camera. Okay? Because actually the one depth increase the quality of the
lighting is your strategy. Camera is not the
only one factor that make your picture
looks beautiful. Because the more
strategy you have, you will have more control
about the result, okay? Yep. I use Canon 6D. Actually, this camera is
already discontinued because I want to show you that
whatever camera you use, then it's okay Since you
have the right strategy for the lighting and
another strategy that we will explain
to you later. Okay? Yeah. And then I will explain
to you also about how I set the camera because maybe not all of you already have experience
using DSLR camera. Then I will explain
to you a little bit how I set this camera, okay? For food photography,
especially when you use flash like this
or smaller flash, because the color of the
flask is already consistent. And then when you shoot with
this kind of frightening, you will not have problem
with the amount of light. Okay. Because you will have control about the
amount of lightning. Yeah. You will not have
problem with the amount of lighting because the
lightning power is really high. So yeah, it makes your camera
setting will be easier. Okay. There are so many settings here. I'm the only one. I changed frequently while
I shooting is only one. So it is very simple. When you look at the LCD, you will see it right here. Okay. There are so many other things, but I don't want you to be
overwhelmed with the settings. I will explain to
you one by one. The only trees are things
that will affect the amount of light of your result
is the shutter speed, the f number or aperture. And the final one is the ISO. Okay. The shutter speed seems I
want you to have read them. Either I use it on tripod
or I shoot handheld. I don't want to
change many settings. Again. Mostly I use the shutter
speed is one per 125. There is the setting that I
use for all of my photos. You Okay. When I shoot handheld, one per 125 is really safe. Even if you shake a little bit, it's still okay because
your picture will be sharp. Yep. And then the second
settings is the ISO. I want to have the highest
quality of the picture. So I set the lowest
ISO possible, okay, so I will not
change the ISO. And the ISO is one hundred, one hundred ISO will
produce the highest quality possible from your camera, okay, since you already have the
high power lighting here, then you don't have to
worry about the ISO. So I always, you're
using 100 as the ISO. The only one setting I change frequently is the
f number as F9, the aperture of your lens. Okay. So for the aperture or f-number, usually I start
with five to eight. Okay. Let's say I started
with five, okay, I started with 125 as
the shutter speed, 100 for the ISO and
five for the aperture. Okay? And I should, when the
result is too dark, then I want to lower
the ISO to four. But if the lightening of
the result is too bright, so I increase the f number. Okay. There is my decisions I
made when I do the photos, you're the only one. So it is really simple guys. And then I want to
explain to you more about another settings
for the picture's file. Usually I use pander and then for the white balance
usually I will use Kelvin. And Kelvin number is around
5 thousand to 5,500, okay? Actually kelvin is the
color of the light thing. Okay? And since you already have
the flask, large place, year, huge splash, then I won't change my kelvin
for the smallest. Since I don't change
my brand of disliking, then I will not
change my Kelvin. Okay, so the Kelvin
number for this time, I should using 5,200, but I suggest you try your
Kelvin from five thousand, five thousand, five
hundred around that according to the
brand of your lighting. Okay. Yep. That's easy. You just have to set
this one and then the only thing you change
is only f number. Okay? I have explained to you
before how I decided. So that's how I set my DSLR camera and then
explanation about the lenses. Okay, I'll see you
in the next section.
3. Introduction of Lighting: Okay guys, Welcome
to this section. In this section, I will
explain to you about the lightning equipment we
use for this entire course. Okay? The main tools here
is the lighting. Okay? Why disliking is
one of my favorite. I know that you have
so many options, water-like thing for
food photography, you can use this flashlight, this huge blast lied. You can also use the
natural lighting. You can use also the
continuous likely or you can use like
small light like this. Okay, so what's the difference? Why finally I choose this
one as something that I use for like
maybe seven years. Okay? Yes, this is huge. And when you travel a lot, this is not as flexible
as the small one. But finally, I just
this one because I need the powerful lighting that will overpower the
ambiance light around us. Okay. When I shoot in restaurants
sometime I have no control about the ambiance
lighting in the restaurant. Maybe the lighting in the restaurant have
a certain color. Like there's a restaurant that have the green
light being there. There's a restaurant that
have the warm lighting. I don't want the ambiance
lighting whenever I shoot, I don't want the ambiance. Like think of my photography. I don't want that
green lighting effect, my food photography. I don't run that warm
lighting effect. My food photography, all I
need is consistent lighting. Okay. The powerful I think, will overpower the ambiance
lighting, so okay. I will get consistent lighting. Okay. So that's why I
love this one. Okay. One of the brand
I use the most is the Go Docs and scale like this. Two hundred, three hundred, four hundred yeah,
for its variation. The one I use the most
is a scale 400, okay. If you want to find
this kind of product, you can just search in your online store in your country and maybe
you can pipe like this. Yeah. And then the second question, maybe it's about
lighting modifier. Okay. What is the lightning modifier I use the most is this one. This one is standard reflector for most of the light
thing you purchased. Mostly they include this one. It slightly modifier. Yep. I use this one the most because
they're slightly modifier can give really clear
direction of our lives. And I know that if you don't use me diffuser in
front of the liking, disliking will be very harsh. That's why we need this one. Okay? This one is five
in one reflector. If you want to find in a
market place in your country, then you can just type like
this five in one reflector. The one I use the most is the one that shapes like
all four like this. Okay. Yep. Shaped like this. Why
I like this one is because when I want to shoot
on the top of the table, it is really easy to put it. And there's no space here. If you use the round one. Yeah, maybe if you want
to put it on the table, there are so many space that
the light can come through. Okay, So I like the
awful one like this. And then the size of my favorite
is the 120 centimeters. Okay? Yep. And how I use this one is when I want you to change the
characteristic of the lighting, I can just put it in front
of the lighting and I have control to make it softer
or to make it more harsh. Okay. The Right Thing
from its diffuser, the lighting will be softer. And if I make it
close like this, the right thing
here will be harsh. Okay, So that's how I have control about my
characteristic of the lighting. Just define the distance between the lighting and
the diffuser here. Okay? Yeah. Then the next one
is this one, okay? This one is reflect our holder. Okay? I use this one must lead
to hold my diffuser here. If you want to find this one, you can also type
in Marketplace. You can easily find this one. And then there's two more, okay? The next one is the
lifespan. Okay. If you travel a lot, if you're not sure in
your studio mostly and you should in the Arab
peoples restaurant, I suggest that maybe you
can choose the smaller one because usually when I traveled to another
person's restaurant, I put this one in my luggage. Okay, So it is very handy
and very easy to pack. If I want to find
the smaller one, I don't want to have
the lifestyle that is more than 70 centimeters
when you fold it like this. Okay. Yeah. And this is about the lifespan
and then the final one, I will introduce you. The trigger, okay? Okay. Yeah. This is a trigger. We put on our camera
like this. Okay. So when we shoot the
lighting, we'll turn off. This one is got dogs, X1, t. Okay, if you want
to find this one, you can also type here. And what is the
usage of this one? Actually, it connects
our camera to our flask. Okay. Like this. Okay. So if you put it on your camera, then every time you shoot, then the flash real turn on. Okay? Yeah. If you buy the gold box X1 t, If automatically
connect with this, disliked him because
this is the transmitter and deep already have the
receiver in its machine, so you don't have to
put anything here, but it connects automatically. That's about the right thing. And then I'll see you
in the next section.
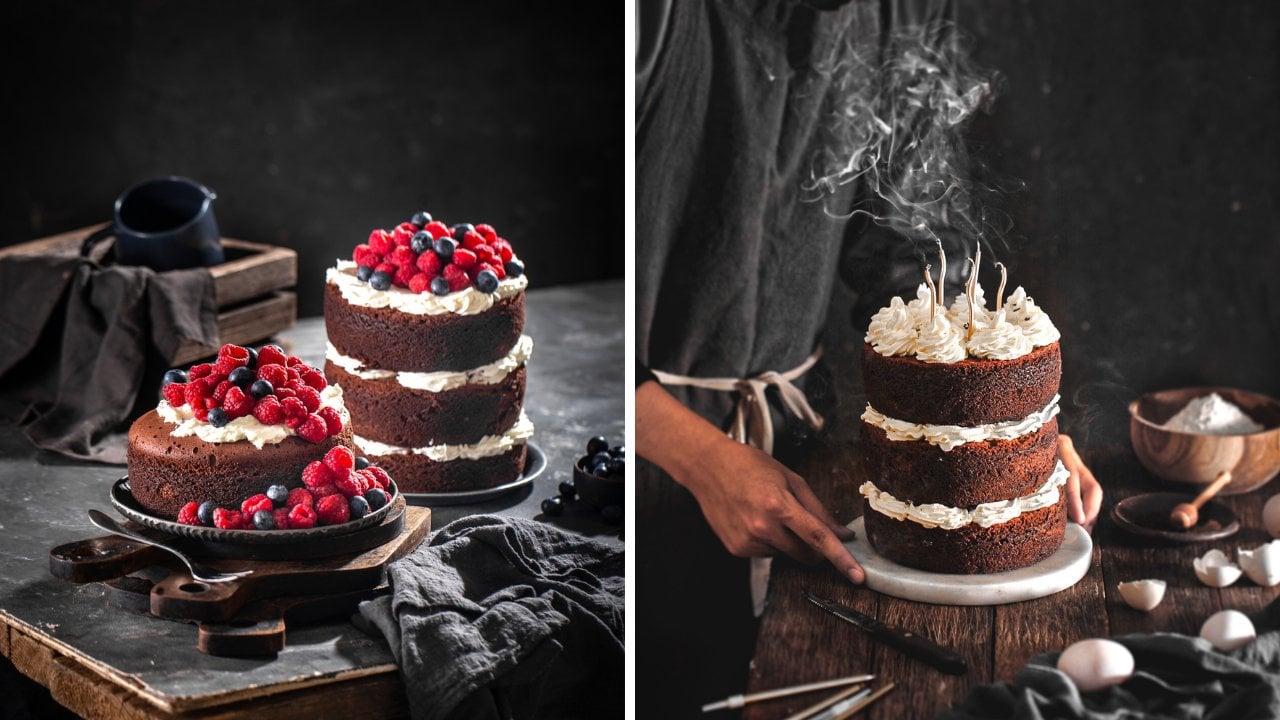
4. Project 1 : Choose the Right Props & Compose It!: Okay guys, Welcome to
the preparation part. This is the first
picture we will pay. Okay? That is, if you want to set the colorful food
photography theme that I suggest to you
to blend the color. Okay, So the colors
strategy we will apply in this section is the
analogous color, okay? The one Tyler I
want to enhance is the brown color to
a bright brown. Okay. So all of the prompts
I use an background I used in this section is the brown color for
the background. Here. This is the very bright, but it is still brown
but very bright. Maybe you will see this as y, but it is slightly brown. And then in the vertical
background here, I also use the
bright brown year. And then the prompts
like this one, I use the also slightly
darker brown and then be resourceful and you will find many brown prop you can
use in your surrounding. Like this one. I use right
branch on my garden and then I'll put it right here because it matched
our color plan. Okay, so the colorful
food photography for me, less is more because
I want to make sure that the main
subject we should, which is the DRI in this
glass, will pop out. So I don't want to make
up another color that will drag a pension from
the subject here, okay? And then I also use this plate. Actually this is a plate, but I will make it
standing like this here as the texture
of our background. Then you can also use the
leveling technique here, okay, so I use this white
chopping board here, I painted white, and then I use this for baffling strategy. Okay, so instead of just putting our main subject in the same level of the
rest of our props. Then I want to make
sure that there's a variation of level
of our subject here. So I put another
two levels here. This is the level one, this is the level
two and our subject is on the top of second level. Okay, so to make the
variation texture also, Yep. And then we will ask our assistance to
poor dream like this. And then I also use beautiful
cookies on this position. Yep, that's how we
plan the color. If you want to make
your product pop out, then I suggest you not to
add too many colors in this settings of
the ground because too many colors will lead
confusion to the viewers. Okay, so, yeah, that's
how we plan our color. Is that simple? And then I'll see you
in the next section.
5. Project 1 : Lighting Setting: I hope you guys
enjoyed this section. I will explain to you about
the lighting position, r k. So this is how we
set our lighting here. The position is
above a piece and the method from our subject
to the light pin here, and then the Hague, different between our
subject and the lighting. The lighting is higher above
twenties and the method. And then we kicked down a little the angle
of the lighting. And then this is straight line. And I slightly move
the lighting for word about like pens and Demeter to make sure that the shadow is dropped
in this position. Okay, if I put it here, maybe the shadow
will be further. So I don't want to make
the shadow too far away. So I pushed the
light thing about 20 centimeters in
front of our subject. And then the power of the light thing I
use is one per 16. And actually for disliking the smallest power
is one per 16, okay? Yes. That's how we set
our life being here for what's on my colorful
food photography, I use only one light thing
because it is that simple. And I use one lighting
because I want to make the harsh shadow in this
area and in this area. And colorful food
photography like this, I really like have a nice harsh shadow in many areas to make
my product pop out. And then also actually
wore this theme. I want my shadow as
additional texture. Okay, I want to add
more texture in my background to also
make my product pop out. And then if you feel that
area here is too dark, you can also use
this whiteboard. Actually, this is too
bored and I paste it into one so I can make
position it like this. Okay, when I put it here, it will bounce lighting from
there to make sure that this area is still
hellish, harsh shadow. But since it's a bright mode, foot photography, I want to make sure that the shadow
is not too dark. Okay? Yeah, here's the position. And then while I
did a photo shoot, I will ask my assistant
to make motion here to pour our drawing here
from this position. And also these white board also will bounce lighting
from there to here. So to make sure that the hands position
here is not too dark. Also, we don't put the
bouncing ball here. Maybe this area will be too dark and I don't want to
make this area dark. And yep, I will ask
the Assistant to hold it here and then
pour the dream over here. Okay? Yes. Yeah. That's how we set our
lighting in this settings. Okay. And in the next sections, we will also simulate another
lighting positions for you. But after this, I
will explain to you about how we shoot this one, and then we will
show you the result. Okay. See you in the next section.
6. Project 1 : Camera Setting: All the rise. In this section, I will
show you how I set the camera in the
sections before. I have already tell you about the setting and then
this is the proof, okay? Because in this API, as I explained before, the shutter speed is 125
and then the ISO is 100. The only setting I change
is only the f number. And in this section, I will set the line as
the f number, okay? When I sat and when I take them, line is the perfect
exposure for listening. So yeah, I'll settle with nine. Okay. Yeah, that's how
I set up the camera. I don't want you give
headache for you about the complicated
explanation about how to SAP. And actually, we already knew this kind of setting for like
seven years of our career. So I also teach all my students around the
world just the same like this. Again. In the next section we will take the photo shoot and
show you the result.
7. Project 1 : Preparation Before Doing Photoshoot: I already have my
assistant here. And then the scene
is I want to ask my assistant to pour
the drink over here. And then as I explained
before that the writing here, and I don't want to make this area become
very dark shadow. So I put the bouncing
here to bounce light to make sure this area
is also bright, okay? Even if there's a
little shadow here, you can also edit it in Lightroom and we will
explain to you in the editing section after we are doing the photo
shoot, after this, okay? And then I'll explain to
you also the advantageous of shooting the colorful
food photography here. Because actually one thing
I like breathtaking, colorful food photography here. It is very easy to get negative space because
the scene here, this area will become a very powerful
negative space that if a graphic designer
use your image, it is very easy
to find out where they have to put
the tax when they want you to pause
your picture in like promotional tools like like Instagram story like
prior banner and others. Okay? And also if you take the colorful food
photography like this, this area is the area where a graphic designer also
very easy to expand. They only need to copy
this area and expand it if they want you to take the longer image
of your picture. And then I suggest you not only pick one angle which
will portrait angle. And I suggest you also take
the landscape angle and also make sure that there's negative space in
the right area, in the left area. So if a graphic
designer wants to expand your picture in
the right or in the left, they also can expand
it easily. Arcade. That is the powerful side of
taking this kind of picture. I suggest you not to put too many things
in the background. So the graphic designer can
easily spot where the area of negative space they can utilize to put the
text in your picture. Okay? Yes, That's some tips and then I'll see you
in the next section. After for those youth, I
will show you the result.
8. Project 1 : Photoshoot Session: Hey guys, We have already taken our pictures and then
I'll show you the result. Okay, this is the
landscape and portrait. A picture as I will
show you. Here you go. Okay. As you can see that
we purposefully the harsh shadows
in this area to make sure that our
product is pop out. Okay? And then here's the comparison between before
and after the editing. Okay, as you can see that that is the beauty of colorful
food photography. Mostly for most of colorful
food photography sessions, I added it to watch. But the simple part is if you are editing or
post-processing your picture, There's certain area
that you have to follow to make sure that
even a good picture, if we are convinced about
the editing process, the result, you like the result, but if you do it right, and in the next section
will explain to you about the step-by-step editing
using the light room, okay, so I'll see you
in the next section.
9. Project 1 : Edit Your Food with Lightroom: Okay, hello guys. In this video I'll give a
tutorial on how to adjust the color in a
colorful theme image in the first photo guys. Okay, so I'm here using
Blight Room guys. You can just download it on the App Store or also
on the playstore guys. Ab light room is free guys. So you can download
it right now guys. Well now guys, I'm going to
edit the first photo guys. Well, for the colorful theme, we'll change the color to a very good color without changing the original color of the foot that we take guys. Well, that is our
challenge when we edit foot photos with
colorful themes, guys. Well, I'll start now. First of all, I'll
crop the image first because the
original image, the raw image, doesn't fit or doesn't match with the
existing background guys. Let's go to crop first. Then we rotate guys until we find the right position guys, if it's done we can
immediately check it out. Okay, just like this guys, Well, let's make
the top fit first. That's the top fit.
It fits already. Guys, here guys, we can just go to the menu
called Light guys. Well, here guys, there is
such a thing as exposure. Exposure is the level of light brightness in
this entire image guys. For example, if I increase it, then the exposure will increase in all parts of our image guys. While if we decrease it, then everything will
also become darker. Well, for this image, I don't
want to use the exposure. Then the contrast, the contrast will increase the
saturation, guys. That will make your
images more lively, the images or the colors. Now for this image, because we are editing
a colorful image, we don't want the color not
to match our original color. We don't set the
contrast here guys, but here there is
the highlight guys. Well, the highlight here is the reflection of light
from the lamps guys. For example here
we use lamb from the left guys while it's going
to bounce off the glass. This reflection is called
the highlight guys. We therefore, I'll adjust
the highlight here. I'll change the highlight to be left a line or I'll reduce it to -100 Y so that the highlight is not to
over guys, the guys here. There is also such a
thing called the shadows. The shadows are shadows
on your pictures guys. The shadows that are
not reachable by the lamp are the
ones called shadows. Well, I'm going to add the shadows here until
it's right align. I add it to the right guys. Hopefully the
shadows are not too dark but not too bright guys. Well, for the white here, I'll also add guys, the difference between the
white and the exposure is if the exposure will add brightness
to your entire image. But if it's the white, it only brightens up
certain parts, guys. Well, here I'll
broaden this image by raising the white
to plus 60 maybe. Okay, this is enough. Well, that's all part
of the light menu guys. We can immediately move to
the menu called Color Guys. While in the color menu, we want to make our
image not to warm. We'll adjust this image. The temperature
we'll reduce guys. Well, here we reduce the
temperature to minus seven so that the image that
we edit is not to warm guys. Well, for the color
section here, because there really
isn't a red color, we won't edit it then. We don't edit the
orange color here too. Let's just edit the color that we really want to edit, guys. That is the purple color guys. Well, for this purple color, we're going to increase the
saturation a little bit. Around plus two maybe. Then we click Done guys. Well, for the color
menu, it's done guys. Just get there guys. After going to the color menu, we can go directly to
the evac menu guys. Well, in the effect
menu there is such a thing called
the texture Gui. While the texture is the
texture level of your image. Like this cake for example. Well, this is the texture guys, while the line on this glass is also called the texture guys. We therefore we want to
compress the texture, adding the texture
to this image. So we'll add the texture
up to plus 50 maybe, so that the lines of your
image become stronger, the texture are more mature
and also better guys. Well, for the clarity here, I do not adjust it, I also
don't adjust the haze. But for the fgette guys, we'll add the finet
up to plus 17. What is the fgette? The
fget is a circle on the edges of your picture that
will dramatize your image. Therefore, if we have
set the finette, then what we'll set next
is the details guys. Well, in the details menu there is something called
the sharpening guys. Well, the sharpening
is the level of sharpness of your image guys. Well, here I want to
sharpen this image to 122. Well, that's enough guys. It's done for the sharpening. However, if we increase
the sharpening, the picture will look more
broken Like this guys, if you look at it, there
are a few more ends guys. Well, that's what will happen if we over raise the sharpening. Therefore, we'll counter this by increasing the
masking as well guys. The masking here will
increase it to the '80s. Maybe that your doesn't have too many hands
or too sharp guys, the picture is not too
broken like that guys. Well, that's what the
masking will control. Well now we can swipe
up in the Details menu, there is what is called
the noise reduction. The noise reduction has the
same use as the masking, which is to reduce the
existing noise guys. Well, here we're going to
raise it to about 20 maybe. Okay, well around this guys, it will reduce the noise
in our pictures guys. Well, for the details,
we don't set it anymore. Well, actually guys,
just to set for menus in Adoblight
room like this guys, your picture is already good, better than your raw pictures. If we can see here,
this is before guys, then this is after we only edit four menus
in Adb lit room. Because of that,
if you really use Adb lit room, which
is free user, you can just follow
the four steps above the four editing menus. You can immediately
get a good picture. Impressive. And also nice
to look at, isn't it? Not like the previous
raw image guys.
10. Project 1 : Edit Your Food with Premium Lightroom !: But you can also use
the menu that you get if you subscribe to Ad
B Light room, guys. Well here there are
some menu that you can actually get if you subscribe
to ad B light room. Here I'll teach
the healing menu. Well here the healing
brush tool will disguise the blemishes that we don't
want to show on our image. For example, guys, here are some dirty looking stains
on the glass tray. Well guys, you can directly set the level of
the selective here. Here we can disguise it guys, it's that easy guys, in the parts that we
really want to disguise. Okay guys, it's a time lapse. We use the healing
brush tool guys, while the stains
will disappear guys. Well, we can see here
guys this is the before there are lots
of dirty stains. After we use healing brush, the stains will disappear. Guys, there is one more menu that we'll get if we
subscribe to Abila room, it is the masking guys. For the masking,
you can just select the position or which
side you really want to set in the masking. I'll change only the parts
that we've selected here, I want to give an example. The first is the
linear gradient. We can draw straight here
guys, the linear gradient. The linear gradient is a straight line
that we can adjust. Guys guys, I want to adjust the image in the upper left
corner using the light guys. Then we'll add the shadows
here to full plus 100. Why? Because in my opinion, the shadows over here are
a bit too dark, guys. Then I'll repeat
the activity, guys. We use the linear gradient. We go to the light, then
we go to the shadows guys, then we add the shadows at 93. Okay, that's enough then
in my opinion here, the texture is a bit too
much for our background. We'll use the linear
gradient again here guys. Well, this is the good thing. We have a masking menu guys, we can select what part
we want so we can arrange it compared to we just arranging everything like
that in the picture guys. Now I want to go to
the effect here, then I reduce the
texture to -100 Then I'm going to the Details
menu here in the Details, I'll also make the
sharpness -100 because I want the background of
our image to be a bit soft. Guys, if the background
is already in place, we can directly use the masking it on the lower background here. We continue to use the linear
gradient and want to adjust the lower part of our photo
background guys here, I'll set the light again. Then we set the shadows
because I think it's too dark, so I need to increase
it around 70. Okay, let's check then guys, there is the masking
menu called Brush. Just like before, we can
just paint directly. Which part we really
want to arrange guys. Well, here I'll brush here guys, then we'll set the effect guys. Then I want to adjust
the texture to write a line guys around 97. Well, that's more or
less for the effect. Then we go to the details guys, then we add the sharpness
because in my opinion, it's a bit too soft, guys. There should be some
texture in there. Okay guys, that's enough. Then we'll use
another brush guys here to brush the hands guys. The hands and drinks guys. Well, here we go to the light. We add the shadows around three, okay, because it's a
little too dark guys. Then we go to the effect guys. In the effect menu, we reduce the texture
first to -60 maybe guys. Okay, enough guys. We click the tick.
Well here guys, I'll also continue to select the hands because I want to add the shadows
because it's too dark guys. But guys, you can make sure that only the hands
that we choose guys for how we delete the parts that we
have already selected, we can directly use the
eraser menu here, guys. Then we brush again on the part that we really want
to get rid of guys. For the masking. The red color is the color that was selected. Guys, let's go to
the light, guys. Let's go to the light then
we reduce the high light first so it's not too
bright guys, it's soft. Then we add the shadows here to make it lighter than
the original image. Well, that's enough, guys. We'll just select
the glass guys. In the champagne
part here, guys. We'll select it guys. Only in the champagne part. Guys, only in the
water part here. Okay, let's select, we can
tidy it up with eraser guys. Okay. Then we'll adjust the
light menu. We'll adjust it. We'll add the
highlights here, guys, so that the focus is only on
the water, not on the hands. We go to the color,
then we reduce the saturation guys
just a little. Okay. Then we click
the tick. Okay? If the lighting is done, we can go directly to the color. Then we lower the
saturation guys here. I want to lower it a bit until it's the same color
as the one here guys. We click the guys here, there are still lacking guys
in the upper left corner, it is still dark,
it turns out guys. So we'll continue to
use the masking with the linear gradient here so that the upper part
is cured guys. Okay, we can use this. We'll add the shadows
in the light guys. We add the shadows here
to plus about 50 maybe. Then we click the tick. Then
we will brush on the top, which is a bit too much. Guys, the highlight we're going to brush at
the top of this. Well then we go to light and
then we add the shadows. We checklist here. I will match the
picture above guys. We'll use the masking guys using a brush all over the
top background guys. Okay, then let's go to
the details menu here. We'll reduce the sharpness guys. Then for the texture guys, for the effect here
we'll reduce it. We also reduce the
clarity guys so that it looks off for
the top background guys. Well okay guys, we'll arrange
in the glass part guys, we'll use the masking
using a brush guys. We'll tidy it up with
an eraser here guys, so that only the brush
part is selected. On the brush part is selected. Okay. We'll reduce
the highlights guys. Okay, then for the white, we'll brighten up a
bit here guys guys, let's click the tick
so that the color of the water here and the water here is somewhat the same guys. The colors are similar guys. Well then guys, I'll use the masking on the plate
here using a brush. Okay, then we'll set the effect. Guys, we're going to
lower the texture guys, roughly the texture of
this plate will decrease. Well, for the clarity we also
reduce guys, for the haze, we'll also reduce it
but just a little at -11 maybe for the
sharpness guys here. We'll add guys. Well, okay, 76. 77, okay. Okay. Let's check it out guys, now that we'll change
the plate which was dirty before
it becomes good, like this guys,
the color becomes white and not too dirty guys and sharp in the
lines, isn't it? Well, if it's done guys, actually the step of editing
is already finished guys. We can see this is the
before image guys. If you want to see the before, you can just click on it. Just press on the picture
guys in at the light room. Then if you want to
see the after image, you can just let it go. Well, that's the after image. This is the before and this is the after from the image
we edited earlier, guys. Now if we've passed all the editing stages
guys, we followed it. We can directly click
the share icon there. We can directly export
the camera rule. Your image can be directly available in your
smartphone gallery guys. No need to bother
sharing here and there. It's directly in
your gallery, guys. Well, that's a tutorial on how to edit in Adobe light room for the first food photo in our colorful theme editing guys. Well, if it's been
rendered now you can see your picture
in your gallery. Well, maybe that's all the
video for this colorful theme. Thank you. See you in the
next tutorial video guys.
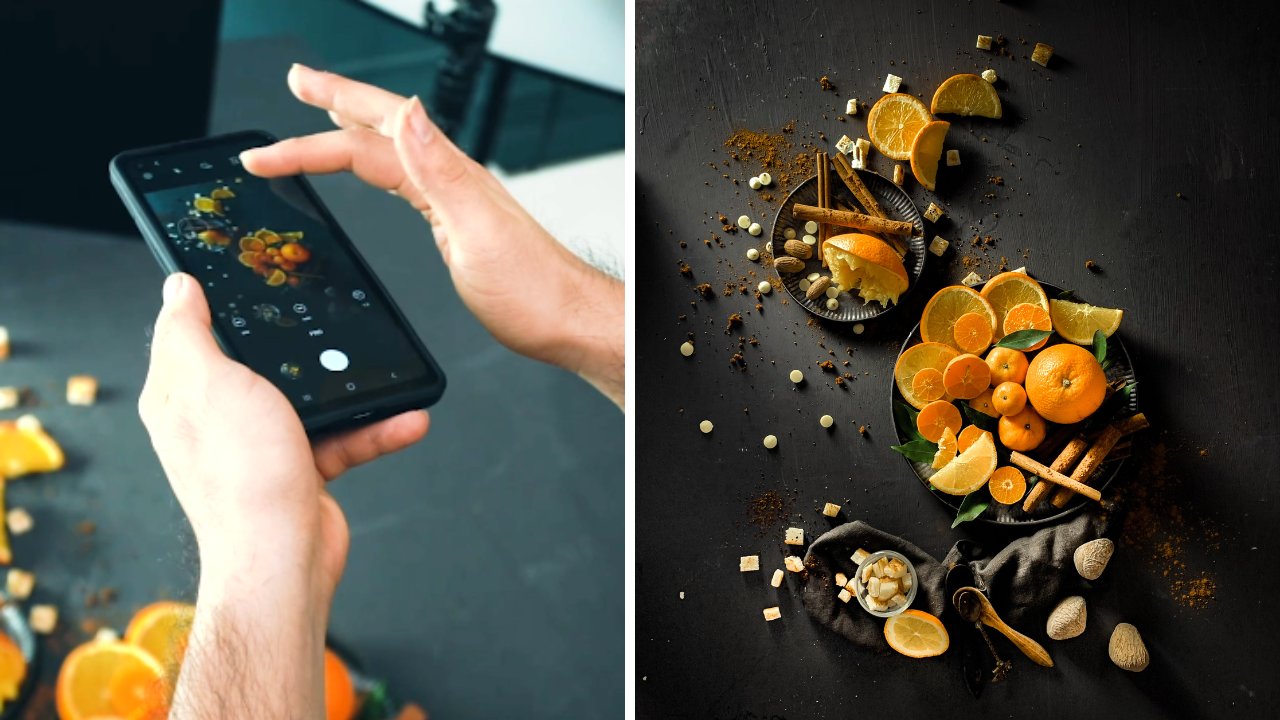
11. Project 2 : Choose the Right Props & Compose It!: Hi guys, Welcome
to this section. And in this section, I will tell you how to
take food photography, colorful theme like this. If you want to shoot it
from the top and go, okay, then I will
explain to you. But before we shared to
you about the lighting, I will share to you how
we plan this scene, okay? The first important thing you
have to decide is what kind of main color you want to
plan for this thing, okay? As you can see that
the main color, we choose, the yellow color. And I used the analogous
color strategy, which means I use only
the yellow color, the brighter yellow
and the darker yellow. Okay? Yeah. Then
for the foot here, I used the rule of technique, which is I use three plates
here instead of 23 plates. And then I suggest to you to infer smaller
plate like this. This is very small. Actually. This is just
like 15 centimeters. It's okay to have smaller plates rather than like comfy
centimeter plates. Which means if you put up on the pop off like turkeys
and the metal plate, you have hope for so
many of the advocates and you are selling a plate because there
are so many empty area, you use the larger plate. Okay? So, yeah, this is very small. And then you can also
do this packing here. Actually, this is also the leveling technique for this one, I used two plates to make variation of the
leveling of my foot. And the third one, if you face the
situation like this, when you only have the
larger plate, then okay, How to three to make sure that the
plate is not too empty. You can also put like
small for inside your plate to add more texture in your
plate so if it's not, seems to empty, okay? Yeah, you can put this one. And I suggest to you that you also purchase smaller
work like this. Because the small work
or small props here, even like small spoon like this will make your
food look bigger. Okay. Yeah. Yeah. I usually put small,
for instance, my plate when I see my plate
is has too many empty area. Okay, And then we also put the fresh fruit raspberry
on the background. And I use the app, what I do here to add the
texture on the background. And also, this is the
baby bread flour. If you want to search
this one you can find on your marketplace
and type baby breath. Actually, why I really like use this kind
of flower is because it adds texture but don't
dominate your picture. You want to make sure
that your picture is dominated by your
footnote, your prompts. And then I also
used a cup of tea, and there's a teapot here also. You can also have the small
one because that is just prompts and I don't want to make it to dominating our food. Yep. Yes, this is
the preparation, how we plan our color, and how we plan our prompts. And then in the next section, I will explain to you
how we sat the lighting. Okay, see you in
the next lecture.
12. Project 2 : Light Your Food!: Hi guys. In this lecture, I will
explain to you about the lighting position
for top angle, okay? So in this accident I
will shoot from the top or slightly
angled like this. And then this I think I set
my life being from the top, from the left corner of my foot n The Hague difference between our background here to the
lighting is 1.3 methods. And the distance here
from the center of our background should the
lighting is 60 centimeter. Yeah, 60 centimeter here. And then the distance here is also sixties
and the method. Okay? And then I set my lighting heading down to
our product there. And why I choose
writing this high is because I want to make
sure that the shade though, is not too far away from the subject and the
shadow is still, still near the subject. And then I set the
light thing is from the top left lot in the center. If I set like this, then this shadow will drop
in front of the product, which means I don't really like the shadow when the shadow
is not diagonal position. If we set like this from
the front like this, then the shadow will drop
in front of our product. And I don't think it's sexy enough because
in people's eyes, we really like this. See diagonal position. Yeah, naturally human eyes
will attract it to something diagonal when you look at a photo of our look
at a painting. So to make sure that the
shadow drop diagonal, then I put it here on the top left corner
from my foot here. Yep. There is mice happens
mostly if I wanted to shoot top angle using
color background. Okay, so you can also
copy this kind of servings in your color
food photography, okay? Yes. This is my explanation about our lighting position and I will see you in
the next section.
13. Project 2 : Photoshoot Session: Hello guys. Before we do the photo shoot, I will explain to you
a little bit again about the cameras are
being here actually. Yeah. The camera setting. I hope you already
done it because it's still the same
with the sad thing. We do photoshoot
before this one, okay. There's shutter speed is
still 125 and ISO still 100. And the one that
I change is only its aperture or Ack number nine. Yeah, that's the
only thing I changed from my Pamela's
ethene and then yep. I'm more than ready to
lead a photo shoot. Okay. Let's do it. We have already measured and then I will show
you the result. And here's the result
of the role pictures. Okay, As you can see
in the row picture, we show you the
one that you use, your board threat landscape and the one that have negative
space on the center. And also we do
change the position and we also have the negative
space in other area. Okay? And then here's the comparison between before and
after the editing. Okay? As you can see that especially for the color food photography, when you do a photo shoot, sometimes you find out that
the color is not to pop out. As you can see from the picture, the yellow is not shining. The yellow is not really great, but you don't have to worry. We can add it it easily
in the Light Room, which means I will share
to you after this. And then another one is when
you do the photo shoots. Sometimes there are
certain shared though in the foot that actually
you don't really like it. But even if the foot
here, we should waffle. And as you can see
that there are so many texture in the waffle. So if you shoot it like this, there will be so many
dark area in your fruit, but don't have to
worry because we also can make it brighter
in the Light room, okay? Yes. In the next section, in the editing section, I will show you exactly
step-by-step how we do that. Okay. See you in the
editing section.
14. Project 2 : Edit Your Food with Lightroom !: Okay, hello guys. Well this is the second foot of our colorful theme photo guys. Well, in this video guys, I'll also give a
tutorial on how we can adjust images
or edit images so the colors and other things become better guys for
this picture guys. Well, let's just go
straight to crop guys, because I'll cut the
image into an image that fits its position
with our frame guys. Well, here I'll use crop then. We just crop in this part guys. Okay, let's crop right away. Well, this is the image
that we want to edit guys. If it's crop, we can just go
straight to the light guys. We set the light in
the light menu here. We'll adjust the
exposure guys because overall this image
is a bit too dark. Well, that's the
good thing if you get a dark image like this guys. Because if you get an
image that's too bright, it's a bit more
difficult to adjust the light to make it
more appropriate. It's better to get a dark image because we find it easier to brighten the image than we
dim or darken the image. Guys, we can immediately
increase the exposure. Here. Guys, we can increase
it to plus 0.30, maybe. Then guys, we don't
set the contrast here because I rarely adjust
the contrast in my photos. Then we lower the
high lights again. Guys to left align -100 guys because I want to get an image whose light is just right guys. Then here the shadows, We make the right
alignment for the shadows. Then guys, under the shadows there is the one
called the white. The difference between the
white and the exposure is that the white will only
brighten certain parts. Not all of our images
will be bright guys. Well, that's why I'm
going to add the whites instead of adding too
much exposure guys. Well, here I'll add plus
60 guys up around plus 60. Then for the black guys, this is a feature where we just the darkness of shadows
or objects that are black. Well, here I'll reduce
the black to -20 guys. Well this is the right setting
for the light guys guys. We immediately move
to color guys. Now in the color for this image, I'll set the saturation
to minus guys, But only a little,
because we still need the original saturation from
the image we took guys. Well, then we go to
the color guys here, we'll set the red color guys. Well, the red color here is
in this picture guys, right? Well, I want to add the
luminance here so that the red color is a bit
more vibrant guys. So I'll add it to the plus '60s. Then for the orange here, I'll add the saturation as well. But only a little guys because there is a lot of
orange here, guys. That is the color of the akio, that includes the
orange color and the color of the carrots
is also orange guys. I'll add about plus seven maybe. Okay, well this is
already fit guys. Then we'll reduce the hue guys. Let's just reduce it a
bit to minus two maybe. Okay, minus two is enough. Then let's go to the yellow one. For this yellow image, we'll reduce the
luminance because the yellow color here
is quite dominant guys. Okay, therefore we
reduce the luminus here. Just a little minus two maybe. Well, if you finished guys here, we'll move to the green color. This green color,
I'll add the luminus because this green color
is quite a lot guys, that is the leaves, then
here is the avocado also. Well, therefore, I'll add the luminance for the
green color here. Now for the blue color here, because there is no blue, we don't have to set it. It's also dark blue. What's more purple and pink, We don't have it, so we
don't have to set it. We'll click down
right away guys. Well after that we go straight
to the effect menu guys. In this effect we're
going to increase the texture to plus
17, more or less. Then let's move on
to the details guys. In the details we'll add the
sharpening up to plus 134. Okay, Around that much guys. Then we'll get a pretty
broken picture guys. Well, you can see it here guys. This is broken, isn't it? Therefore, we need to counter sharpening using
the masking guys. We'll add the
masking to plus 80. Well, that will reduce
the sharpening guys. Well, if it's still
not enough guys here, there is such a thing as
the noise reduction guys. Well, the noise
reduction will reduce the sharpness of our
images guys here. I'll increase the
noise reduction guys. This is enough, actually
guys, for this picture. The settings from
these four menus are actually enough to get
a realistic proper And also nice to look at guys. We can see this is the before
image guys before we edit. Well this is the after. Better right guys,
we only set form And guys guys if you have subscribed
to add be light room, you can immediately use
the healing brush tool. Here you can brush the parts
that are really annoying. Well, over here
there is something like duct tape in
the background. Well, I'll remove it using
the brush tool guys. Okay guys. For the brush tool, it's more or less like that. For the step by step how
to use the brush tool, we'll just click the thick guys. Well, we'll use the
masking here guys. Now in the Masking menu, I'll use the Masking in
this part guys because it's two over high light guys until
it looks like this, right? Well, here I'll use the
masking using a brush. I'll use a brush here in the part that I
think is to over. Okay, if you've finished you can just set it on
the light menu. We reduce the highlights
guys to around -13 maybe. Okay, that's enough guys. Let's click the tick right away. Well, in my opinion, the highlights have been
reduced quite a bit. And now I get a picture that's starting to
look good guys. Well, here guys, there is
a texture on the right. The curves of the
background that we use are a bit too
disturbing, guys. I'm going to use the brush
tool again in the masking. Then let's brush
in this part guys, that the texture of the
background doesn't bother you too much guys and it becomes
a flat color, just yellow. Then we select the effect menu. Then we reduce the
texture guys here. Then we also reduce
the clarity guys. Then we move to the details. Then we reduce the
sharpness guys. Well, the curves will be
reduced guys, not like before. That's the right way
to use masking guys. Those are the editing stages
for the second foot guys, this is the before then this
is the after guys guys, you can just follow
the step by step guys. You can practice
right from the start. We edit this guy guys, don't hesitate to watch this
video while editing guys, you can just practice how I edit this from
beginning to end. Guys, if you've been following
from start to finish, you can directly
click the share. I can hear. Then guys, click Export to Camera role. While it will save your
pictures directly to your gallery, let's just wait. Here's the download. Your photos can be directly
saved in your gallery. Well, that's a video tutorial
for the colorful theme. We'll meet again in the editing session
for the next foot, guys. Thank you. And a.
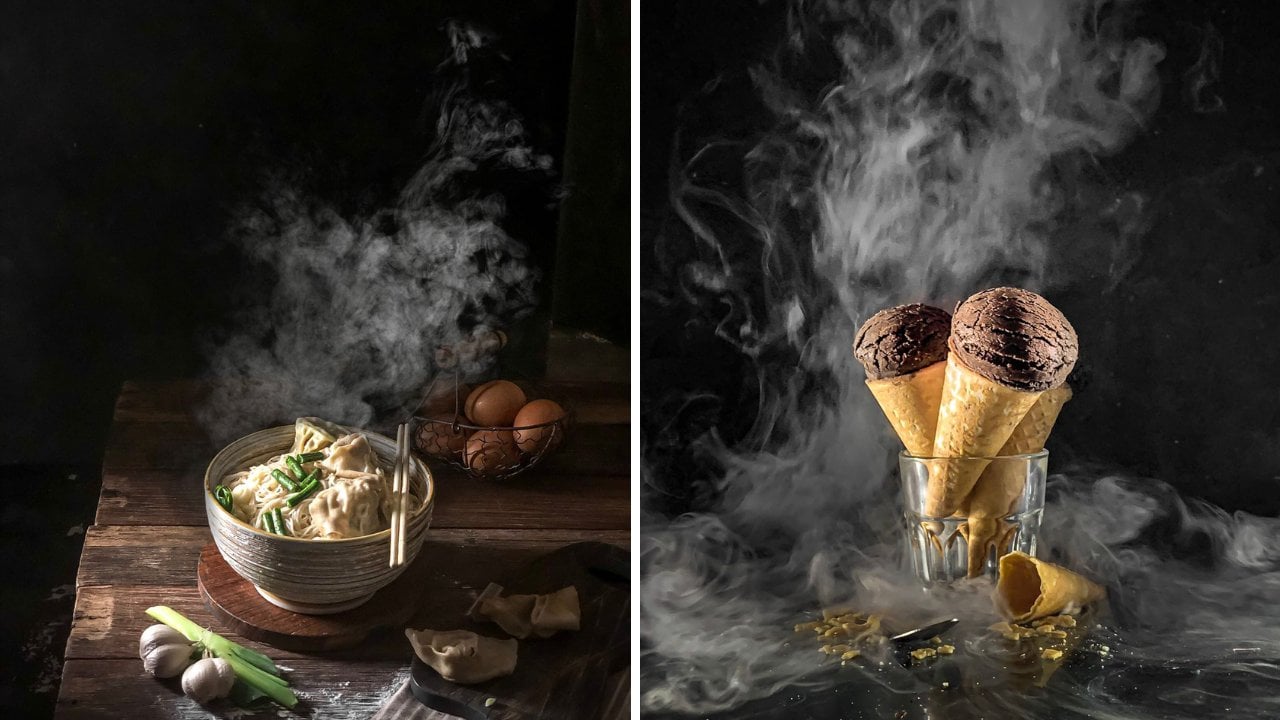
15. Project 3 : Choose the Right Props: Okay guys, Welcome
to this section. I really love this concept. Okay, I will explain
to you, okay, yep. So our concept here is we
want to focus our frame in this area and we will have a
ginger here and lime here. And then we set it like this. Then we fought the orange here, and then we put the
drinks over here. Okay? Yes. If you shoot concept like this, because it's only in this area and very
limited object here. So you have to make
sure that you use the beautiful shape of every
object that you should. Okay, like this Ginger here, we clean it and we also got it so we can stand it like this. And as you can see, for the orange,
this is chopstick, just ordinary job thick, and we put it like this so we can easily direct
the position of the chopstick and just
edit it and remove this chopstick later in
the editing section. And also same with
this lemon grass. Actually we use two of them. I want to make sure
that the texture is not too boring because
if you use only one, yeah, that's not too
interesting for me. Yeah, I used to and then I stick it together with
the toothpick here. As you can see, that
we put it like this. Okay. And to make like this, I use a paper, just
ordinary tapes. Yeah, yeah, this
happening is very simple, but I really liked the concept because it's quite creative. And also in the writing section, I will explain to
you how to make the inside of this glass
is Very clear, Okay? I want to make sure that every texture of the food
inside the glass, and also I want to enhance the texture of the ice
cube inside this glass. And we use special lighting
in this section to make sure that we have a clear picture
inside this last, yeah. Okay. That's our preparation
for this concept. And then in the next section, I will explain to you how we set the perfect likening
for this concept. Okay, see you in
the next section.
16. Project 3 : Light Your Food!: Okay, guys, Amy's agenda, I will explain to you about the lighting position
and don't be confused because this time
we sat with two lysine, but I will explain to you why. Okay. This is our first main lighting. This is our main light beam and it will define all
of the picture here. This is just the supporting one. I will explain to
you the first one. And the position between our main subject here to the lighting here is
about seven days. And the methods and the
Hague difference between the background to the lighting
about sixties and Demeter. And then I push the lighting for word above 15 centimeter. So the lighting is slightly
in front of our subject here. And we'll kill down to make sure that the lighting is
basing our subject there. And then the power
here is one for eight. Okay, in this, I think before we set up the lighting
power is one per 16. Then why we increase the power, especially for this one. Actually, for this scene, I want to shoot with the
larger number of F, Okay? I want you increase
the f number. If we want to increase
the f-number, the image will be darker. Okay, so I need to
increase the lightning to make sure that I can
shoot with larger number. Okay. So I increase the
lighting to 148. Yeah. Then why I said the light thing slightly in
front of where subject is because I want to make sure that the texture here will
be very beautiful. Okay? I want you to make
the lighting here to **** beautiful each shape, our Ginger here, okay? And then our explain to
you our lighting here. Since the position will be like this and will be like this, then I want to make
sure the things inside our glass here
looks very clear. So I use this
lightning modifier. You can find this
in marketplace. People name, it's not. Okay. Yeah, you can type in marketplace like this and
then just place it here. The function of smoke is it can make the lighting
more focused in 1. Okay, I want disliked
him to shoot in the back of our
glass of rings here. Make sure that inside our
glass looks very clear. Okay? Yeah, this is the
function of this loop. And I position this note here at the same level as
this dream, okay? Because I go one
to evict anything, I don't want to have any
shadow come from this node. If I issue like this, hire them. It can have the same
effect with this one, but the higher level of snow will make shadow
in front of kids. Okay. We don't want this. Okay. So I make it in low angle. So I make the right thing in
the same level of our glass so it won't event anything just at work clarity
inside our grass here. Okay, so that's our settings
for the lightning here. And then I'll see you
in the next section.
17. Project 3 : Set Your Camera!: Okay, guys, In this section, I will explain to you about
my camera setting here. As you can see, I put my
camera on a tripod because we wanted to combine
images in this section. So we want to make sure that the camera is
doesn't move at all. And then in this, I think we use the same
shutter speed and ISO, the one that we change
is only f number because in this scene I don't have
anything that I want to blur. Then I want to make sure that everything is in focus. Okay. So I said my increasingly
F Number, 213. Okay. Yeah. That's why I explained to you. If I increase my F number, then I need more light. That's why I increase the
power of the lighting. That okay. Yes. That's how we set our camera and then let's
do the photo shoot.
18. Project 3 : Preparation Before Doing Photoshoot: Hi guys. In this section, I will explain to you about
how we take this one, and I already have
my assistant here. Okay, so actually, as
simple as we bought us, think actually
this is chopstick. We put a chopstick
to our fruit here, so we've placement all
of our composition. And then in the
editing section we just take off this
black tops thick, so it looks like
every day thing. Okay. Yeah. And then
the drinks here, we take two times. The first time we
take like this, and then the second time
we think like this. And then we combine both of the pictures so there
will be no hands at all. And then I suggest
for you to give to spray our grass here to keep. It looks great. Okay. We want water texture in
the front of the class. Yes, this is how we set our shoot here with assistant
and then let's do it.
19. Project 3 : Photoshoot Session: Hello, can you guys
have already done our photo shoot and then I
will show you the results. So here's the role result. Okay, so we will combine
all of that picture and then here's the
comparison between before and after the editing. Oh, okay, as you can see that when you want to shoot
the concept like this, I suggest to you that you
minimize the amount of editing. So live this scene, I only want to erase this speak. So I want to hide as much as possible for this peak so
the editing will be easier. And then into editing we will use who apps
are two software. There is other Photoshop
and Adobe Lightroom. And Photoshop, we will
combine the picture first and then in the Lightroom, we will correct the color. Yes, that's the
part of everything. And then in the next section, I will show you exactly step-by-step and see you
in the next section.
20. Project 3 : Edit Your Food with Photoshop !: Hello guys. Well here guys. We've entered the stage called Levitation Image Editing guys. Well, in this colorful course, we'll edit the pictures that
we took before Guys here, I'll give you the tutorial
from start to finish. Guys here, I'll use Adobe Photoshop software guys
to be my editing software, my Photomerge editing
this time guys. Well this is the initial view when we've entered DB Photoshop, you just click the
file, then click open. Well, here guys,
you can directly select the photos
that you've selected. Well, it's a coincidence that
I've prepared the photo. I just click the guys, you can directly click
open your photos, will go to the editing
page of B Photoshop guys. Well, this is how it looks. If you get a landscape
photos like this, you just go to the Evac menu. Then you can directly
click the image rotation. Well then you choose
90 degrees clockwise so that your photo becomes
a portrait like this. Well, if it's done,
I'm here to explain what tools I use for
this levitation editing. Well now here I'll explain the first tool called
the move tool. We use the move tool
to move the object of your image guys here you can directly click on the image, then you can move it. We usually the move
tool is used if you want your photos to be
enlarged or reduced. For example, you can
directly control, then the cursor will
move to move your photo. We just a tip. When you enlarge and reduce photos
in Dob Photoshop, you can directly click
Save on your keyboard. Hold on guys. This is when
you use the shift key. Hold it down. Well, this is when we don't
use the shift key. Those are the tips.
Well, the second tool that we'll use is the
pain bucket tool. Well, we use the
pain bucket tool to spill the image on
the whole layer guys. For example, I choose
the white here. Then here I select
the pain bucket tool, then I'll select
the top layer guys. Then this layer will be white. If your layer is a photo, then the pain bucket tool
will only spill on one image. But if the pain bucket tool is selected on an empty layer, the entire layer
will turn white. That is an example of
the pain bucket tool. Well, here we'll use
the pain bucket tool. Well, the third tool that we'll use is the spot
healing brush tool. Well, the use of the spot healing brush tool
is very unique. Guys you can delete objects that you
really want to delete. For example, here I'll
remove the stick guys, well I'll delete this. The stick in this image
will be erased when using the spot healing brush
tool. That's an example. The point is the spot healing
brush tool will erase the area or object that
we'll select guys. Well, the Ford, the tool that we'll use is the
clone stem tool. Well, with the clone
stem tool we can copy the color on our image. For example, here I want
to copy the orange color. Here I click to copy the image, then I'll move it to the stick. Well then the image
will move to the stick. The color that we select
will move to the stick. That is an example of the
clone stem tool guys. The use of the clone stem tool, usually I'll patch objects
that are a bit annoying, then I'll patch it using
the clones stem tool guys. Finally the tool that we'll use, or what we'll try, is
the ad factor mask. The use of the ad factor mask is the same as
adding a new layer. The difference is
a new layer here, it will stay connected
to our main layer. For example, we are going to change the layer in
the factor mask. That means we are going to
change our main layer as well. For example, let's say
we add the factor mask. It means we'll also
add a layer only on the photos that
are on this layer. That is the function
of the factor mask. The explanation of the
tools has been completed. We'll immediately move
to the editing guys. We immediately edited
the image here. I'll patch this part guys, here is the hand part
of our photo assistant. I want to add to this photo with a photo that we've
taken without hands. In this part here, I'll patch with the
image that I've chosen, guys, the image without hands. If the photo looks like this, you can right click
on it, then you can directly rotate
it to 90 degrees. Then you can just adjust it according to the
layer of your photo. Okay, you can just click Enter. Then here, I'll always reduce the opacity guys as a
control of our photos. Well here guys. Just fit the part that you
really want to add. Well, here I'll fit
the glass part. Okay, I'll tilt it a bit guys. Okay, here are the tips. Usually I'll equalize
certain lines, guys. Perpendicular line like this. Here is a glass here. I'll even the line so
that your photos are in sync and also not
inconsequential guys. Okay, if it's done guys, you can immediately increase
the opacity again to 100. Then here I'll add what
is called a factor mask. As I explained earlier here, I'm going to add a factor mask. Then here I'll spill
black color on the factor mask until
the image disappears. Well, if the image is
gone, here are my tips. When you spill black
on the factor mask, your image will automatically be invisible as a cheat layer. I'm here going to click
control J on this layer. Then I'll delete
the factor mask. Delete layer mask here. I'll reduce the opacity guys so that it matches the
layer we've created. Now this new layer
which I've copied as our cheat layer for brushing
the factor mask guys here, brush on the factor
mask part with the brush tool with
white color guys. Logically, since
we've already spilled black on our factor
mask layer here, we'll use the white instead, guys that our photos will
appear in our image area here. I'm going to push that, this glass image will
appear again, guys. Well here I'm just going
to remove his hands guys. See the details, guys, don't let us feel it because
the details that are left behind are very influential
on our pictures. Well, if you're done guys, you can just delete
our cheat layer. Then this hand photo
is already done guys. Now all we have to do is
remove this hand part guys, but that's for later because we remove the hand on this side,
the one with the stick. Okay guys here, I'll repeat the previous step
to cover the top, the side and below guys. Then I'll also delete it
on the hand guys here I'll repeat the same step here. I'll select the image
that I've selected. Then here I'll rotate using
90 degrees clockwise. Then I'll fit the image
to match the layer. Then guys, I'll
reduce the opacity. Then guys, you can just fit
the picture right away here. I'm going to make it straight
with our background. Okay, that's right here. The opacity, I'll add again. Then here I'll click
the add layer mask. Then here I'm going to
spill the black color. Then here I'll brush
on this hand part. Guys using white color, also don't forget to
delete the shadow guys. Then the stick is removed. Okay, Then here when it's done, I'll remove the part of the
hand that's in this part. Okay guys, since the left and
right hands are done here, I'm going to remove
this area at the top, this blank one, and also
this area at the bottom. By the way, we're going
to select this layer. Then here I'll click the
spot healing brush tool. By moving this layer using
control J or copying it here. I'll merge the layers here in these two object layers control. Then I'll use the spot healing
brush tool at the top. You can also use the stem
tool for this top guys. Yeah. Then for the bottom here, I'll also use the same tool. Okay. When it's finished. This is the after image guys, just tidy it up at
the top and also at the bottom if there are photos that don't match
your photo frame. Here guys, actually the
picture is already done guys. But because the picture
is a bit tilted here, I'll correct it by
selecting the entire image. Then click control J. Then I'll click Control here. I'll combine everything
into one layer guys here. I'm going to move a bit in this part that a little
bit to the left guys here. I'm going to reduce it a little bit for the pixel
layer properties. Well, this picture is already
good to see you guys. It's already in the middle guys. Well, actually the photo
is already done, guys. Why? Because actually
this levitation photo is not too complicated.
It's a bit floating. You could say this is a semi
levitation photo, guys. Next here, I'll edit the semi levitation image
in the next session, guys, now we'll move to
the next foot photo guys. Thank you.
21. Project 3 : Edit Your Food with Lightroom !: Okay, hello guys. Well, here's a tutorial for the next color theme
photo editing guys. Well, this is the next foot
photo, we'll edit guys. Well, for the foot guys, actually this photo
has been edited guys because basically this is a semi levitation
foot photo guys in the photo, merge editing. Actually, this image
has been edited guys. Well, because of
that, we just edited the color right away guys here, we immediately select the red color guys
in the red color. We'll add a little on the
saturation around plus one. Just a little guys then
we click Done guys. Well that's actually enough
for this color session guys. It's that easy because we only need to add around that
much editing guys. Well guys, this
time we'll also add the masking guys here. We'll use the masking in this section, guys.
Lemongrass guys. Well, in the lemongrass part
it's a bit too over the top. The highlight given
from our lighting. Well, we'll brush in this part, guys, then we'll
select the light menu. Then we'll add the
shadow here to plus 100. Well guys, after we are
done with the light, now we'll go to the Evac menu. Guys, in the Evac menu, I'm going to add a little
texture around the plus '60s, then I'll add the clarity. I'll make it right
align or plus 100 guys. Well, from here we'll move
to the details menu guys. In the details, we'll
add the sharpness. We'll make the sharpness
right align guys so that the lemongrass image is a bit better than the
previous image guys. Okay guys, then we'll
use the masking again. We're going to add it here. Then we're going to click
the Select subject guys. Well, we'll choose an object
only the main object guys. That is the lemon grass
and also the glass, the ginger and also
the oranges guys. But here I'll invert
using the button guys. Well, I inferred in
the left corner guys above the delete symbol. Now there is an inert well
there you can directly choose, well, it will be selected guys. On the other hand, if we
selected our main subject, when we inverted it, it means we'll select the outer
part of our main subject. Here, I'll set the lighting, we'll reduce the highlights
to the left aligned guys or -100 because in my opinion, the highlights from
our raw images are a bit too over guys. Well then guys. Here
I'll just select the glass section using
the brush tool guys. Here we can select the
glass at the top guys. Now if it's selected we can just delete objects that we
don't want to change. Then we'll go to the light, then we'll reduce the high
lights guys to -100 Then guys, we'll go to the effect guys, we'll at the texture from the glass guys
until it fits here. Maybe plus '60s maybe. Okay, maybe this is the right size for the
texture of the glass. Okay, then guys here, I'll also use the masking, using linear gradient to
select at the top guys, because in my opinion, this pop still needs
to be adjusted guys. We're going to change
the color in the color. We'll change the tint, we reduce it to -76 guys. Then we'll also reduce
the saturation here. A little bit guys. If we're done we can immediately
click the thick guys. We can immediately see the
before and the after guys. Well, it doesn't really
look that different between the before
and the after guys because basically we've edited this foot photo in the
photo, merge editing guys. Actually for the raw
images it's already good guys but it just needs
a little adjustment guys. Well, but if you
have followed it step by step from
start to finish, you can just click the share. I can. Here we directly
export to camera O. We are waiting for
the rendering. Then your photos can be found directly in
your gallery guys. Well, that's a tutorial on how to edit colorful
food photo guys. Well, hopefully it's
useful and we'll meet in the next video
guys. Thank you.
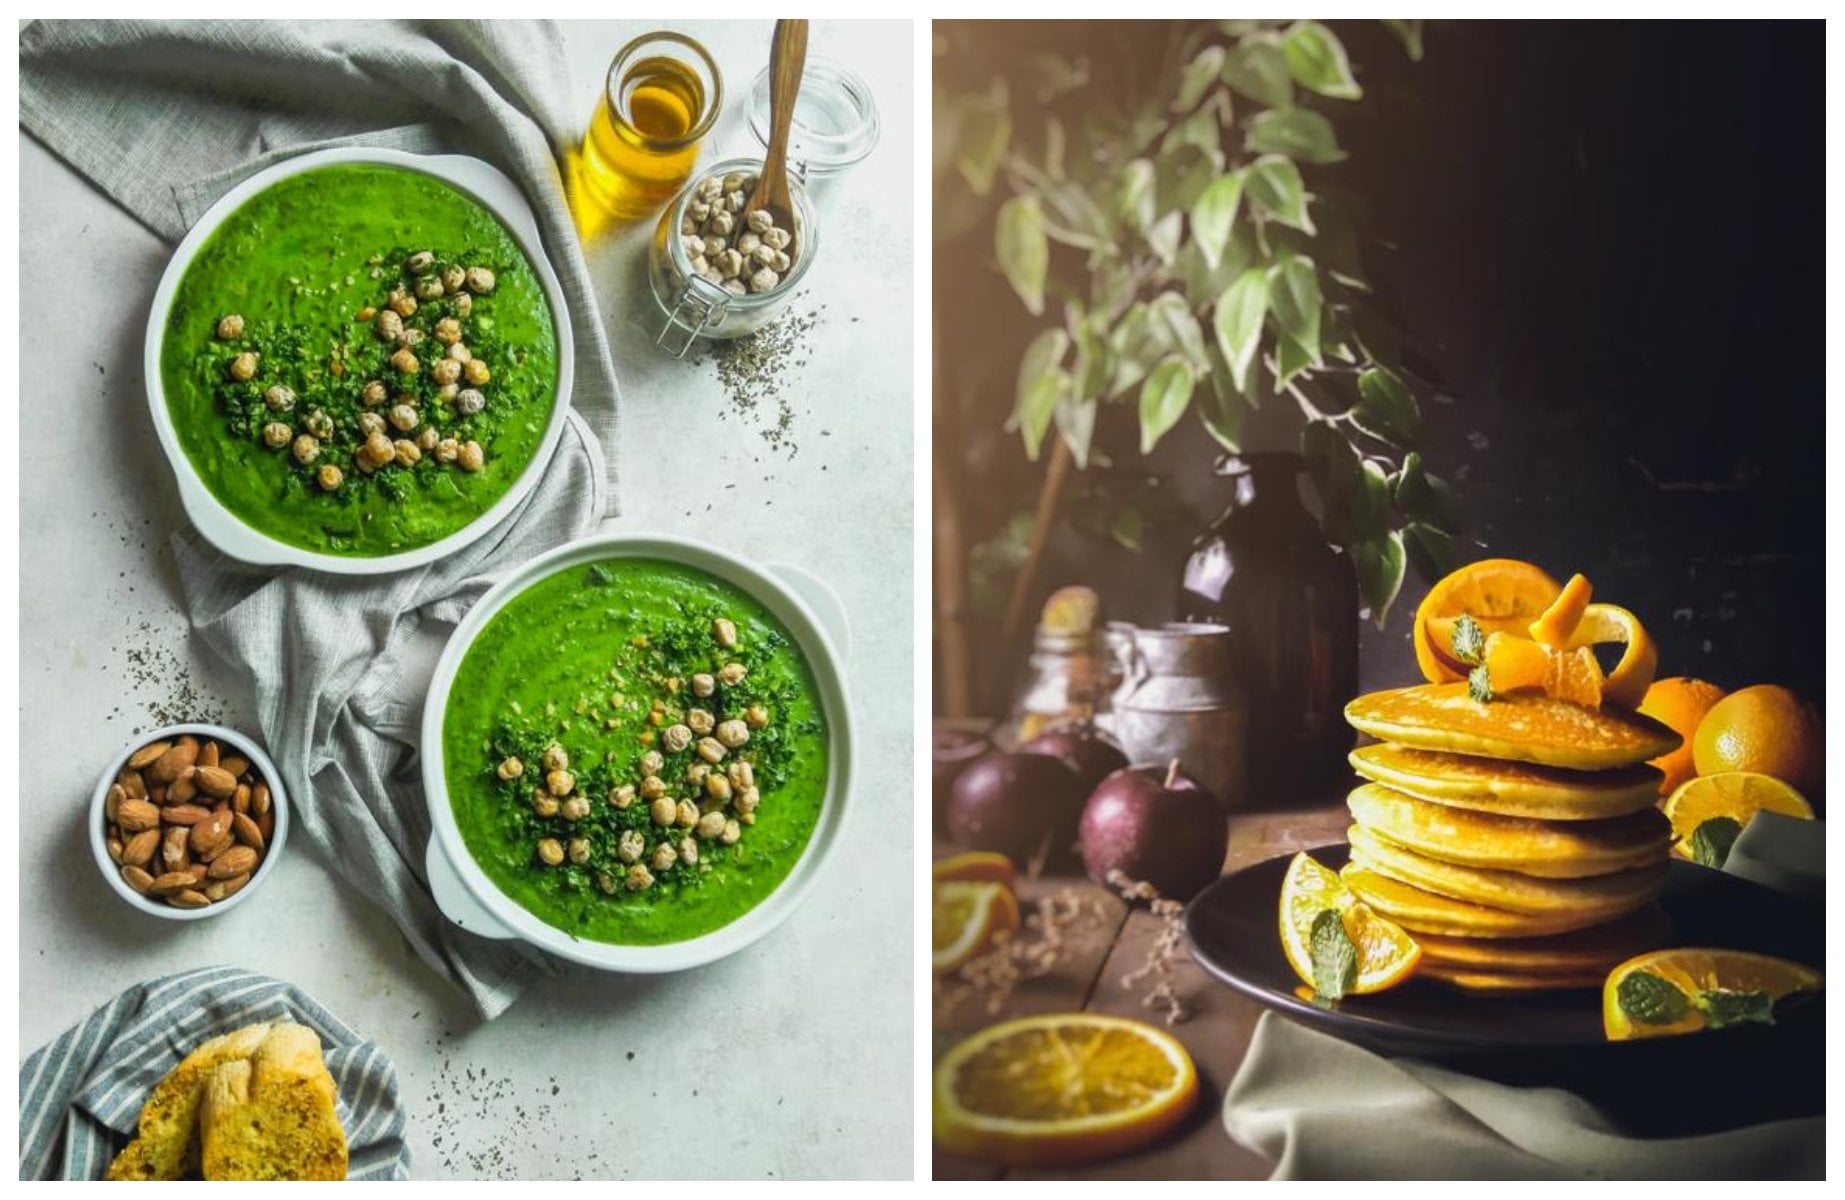
22. Project 4 : Choose the Right Props: Okay guys, Welcome
to this section. In this section we will use another example about the
levitation of this dreams. But this time I use
different kind of ingredient and different
color core, its background. And then this time I also
use darker beverage. So we need to increase
our light pink to make sure that the texture
inside this glass is feasible. And then our ingredients here, we also have orange, and in my country, it is very hard to find the
orange leaves on this orange. Actually, we just try to make it like make a hole
inside this orange. And who believe on the orange. So it looks like a
fresh orange again. And then we also have
another fruit here. And we use put fake here to
compose our orange so it can stance like this and make sure that if you want to
shoot this kind of concept, you also prepare a
double pipe here to make sure that the orange
bands play B. Okay? Yeah. For example, the composition
can be like this, and the grass is over here. Okay? Yeah, this is how
we plan our setup here. And in the next section, I will show you how we set
the lighting for this one. Okay. See you in the next section.
23. Project 4 : Light Your Food!: Okay guys, In this section, I will explain to you about the lighting position
for this setup. Okay. Yeah. This is the second example of our like Mimi legislation. Yeah. Okay. I said this
mini levitation because we only
levitate the glass. Yeah. Here. We have the lighting position y, the same with our
Photoshop before. And the difference
is this time we used this diffuser, okay? Why we use this diffuser? Okay? This is, you can use
this one conditionally because this time when we
should, this actually, if we don't use the fuser, it produced like very bright
and thin highlights here, and I don't really like it. And then we put that the fiercer to make the
lighting less harsh, to make the light being softer. Then why should this
one you can also, you can kill two right
and left who see that? Which kind of lighting
the best to your product. And then the position
of the lightning here. The distance between our
product here to the lighting is herpes and dimethyl in
front of our product here. And the distance between
our product here to the lighting is
about 70 centimeter. And then the Hague
different between our background to our product is above the Sunday
midnight also. Okay. And then we placed
the diffuser 15 centimeter in front of our
lighting to diffuse the light. And then for the power of
the lighting in this ethane, we used like one per
row for the lighting. And foremost, we increase this moot because
in this product, the color is very thick
and then it is very hard to show inside of this glass because
it's quite dark. Decide to increase
this newt lighting. We send it to the maximum. I said it one per one, which is the maximum power
that this class can shoot. Yep. The Hague of the lighting
here is the same level, is at the same level
with our product, then we don't have to
worry because there won't be any shadow
in this area. Because we said the smooth
straight to our products. So there will be no shadow, so you don't have to worry. Okay? Yeah, this is how we set our
lighting for this setup. And then I'll see you
in the next section.
24. Project 4 : Set Your Camera: Okay. Our explained to you about
the cameras having here. Actually, the cameras I think
is still the same width. The sad things before. We still use protein
as our aperture. And let's do the photoshoot.
25. Project 4 : Photoshoot Session: Okay guys, In this section, I already have my
assistant here to hold our dreams,
our beverage here. And then we hold and
paste it two times. The first time we will
take when the hand is on the top of our beverage
with paint, our first job, and then the second job, we pick with the hand below of our beverage and then we
combine the picture again. Okay? Yes, that's
how we take it. And then let's do
the photo shoot.
26. Project 4 : The Result: Okay guys, we have
already done our photos. You I'm so excited to show you. And here's the row picture, the one with the hand on
the top of our reference and the one with It's ten
in below on the reference. And then we combine
it together to get rid of the hand
in our frame. Okay? Yes, Here's the row picture. And then here's the comparison before and after the editing. And editing, we already prefers step-by-step system that you can copy our system to edit yours. And then yes, let's go
to the editing section.
27. Project 4 : Edit Your Food with Photoshop !: Okay guys, we've entered
the next photo guys, we can start just right here. This is the initial
view of Ob Photoshop. We can go directly to
the file, click open, then we select the image
that we've selected here. I'll select this image,
then we click open. The guys here is the
landscape image, then we'll convert
it to a portrait. Guys, we click image, click the image rotation, then we choose 90
degrees clockwise. Well, here the photo
has become a portrait. Well now I'll remove
the hand like this in the photo earlier guys, we're going to overwrite
this image with an image that we actually took
without the hands here guys. Now let's go to the file. See like an image that doesn't
have a hand in that part. Then we go to rotate. Then just click here guys. Then we fit it according
to our frame guys. Okay, if it's done,
we click Enter. Then here we reduce
the opacity guys. Well, here we'll fit
the glass guys so that the glass fits here. I usually fit it according
to the overall line guys. Okay guys, if it's right
we can just enter. We'll fix it first whether
it's right or not. Okay, if you're done here now we'll increase the
opacity again. Then we'll use the
add layer mask. Then we'll change the color to black using the paint
bucket tool guys. Yes, until it's gone. Then we'll draw
using the brush tool with white color
in this part guys. But before doing that we'll
use the cheat layer guys. How we copy this
layer with control J. Then we'll delete
the layer mask. Then here we reduce
the opacity well so that we can see which parts will brush using
white color guys. We'll brush on the layer mask
on the layer below guys. Well, after this we'll brush on the glass to remove
the hands guys. Okay guys, we can just delete
the cheat layer right away. It's done for the
hands guys now. It's just a matter of tidying
up the top In this way, guys, here we'll use the
rectangular marquee tool guys. Well, here I'll select
the bottom part of the black section
at the top guys. Well, if it's done
I'll control J. Then here I'll move
it to the top guys like this then guys, so that the color
is a bit the same. In this section here, I'll go to Edit,
click Transform, then click flip Horizontal. Then we'll click on the
flip vertical guys. Well, if it's still
not enough here, maybe I'll go to the
flip horizontal again. Well, here the color
is a bit faded, guys, Part of the black color at
the top is missing guys guys. Well now I just need to
change the bottom guys. Well, for the bottom
part to remove it here, I'll remove the white part first using the spot
healing brush tool. Well, here are some
pieces of flour here guys in our background. We're going to tidy it up a bit using the clone
stem tool guys. Okay guys, just stay
here at the bottom guys. Well now here I'll use the spot healing brush tool
to remove the white areas. Guys guys, I'll tidy up this
part because there is a slightly translucent light. Use the spot healing
brush tool here. I'll create a new layer, then I'll brush on this
part until it disappears. Okay guys, if this part is done, we'll move to the bottom guys. We're going to use the
spot healing brush tool to patch these parts. Yes, we'll separate first. Okay. So that's it
guys, for this image, it's actually easy guys, guys just brush at the bottom using the
spot healing brush tool. Then guys just patch at the top using the
rectangular marky tool. Then guys will remove the
object of their hands using photo patches that you took without using your
hands in your photos. Well, that's all for
this photo guys. We'll move on to the next
foot guys. Thank you.
28. Project 4 : Edit Lightroom with Lightroom !: Well, in this video
to trial guys, we'll repeat step by step how we arrange images from the
colorful theme guys. Well, in this photo guys, this is a photo that is
actually semi levitation guys. This object is a bit
floating around guys. I'm actually here to edit
a little bit because this photo has actually
been edited before guys. Well, here I'll go
straight to the evac guys. In the evac, we go straight
to edit in the vignette part, guys, fines section, we
make it to -16 guys. Well then we'll set
the midpoint to the most left align guys
which is zero guys. For the midpoint. Well,
here guys, the roundness. We'll add the circle
so that there will be a dramatic effect on
our pictures guys. Then for the feather it is also the same as the roundness. We'll make it right align guys. We've edited the eve guys then
we'll move to the details. In the details, we'll add the
sharpening up to 117 guys. Then to counter the sharpness of the sharpening,
we'll use the mask. And guys in the masking, we'll add up to 80, well so that our image becomes sharp but not
too over the top. Okay, then under the masking, there is the noise reduction. Well here we'll add the
noise reduction as well so that our image
has no noise guys. Well, here I'll
add about 18 guys. Well, actually we finished
editing our image guys. Well, this is the before then. This is the after. The image we're editing is telling us that there's drama in our image. If our pictures are
telling a story, guys, when people see our pictures, that's how it is guys. Because we didn't set the
light and the color part here, we went straight to the
masking part guys here. The masking part can only be
obtained if you subscribe to add the be light room guys
here we'll use a brush. We'll brush in the
lower left corner of the back round guys because in my opinion the highlight of this
background is to over well here we'll reduce the highlight
to the left guys. Then we click the
tick. Okay, then we move to the color here. Then we move to the color. Now in the color menu, I'll add the temperature
up to plus 16. Okay, that's enough
then for the vignette. I'll also add this guys here. I add about 50 maybe. Okay, it's just right guys. Well, for the saturation, I add at plus 52 here. Then I click the thick guys. Okay guys, if you still
feel lacking here, you can directly add
the brush guys by clicking at to mask one brush. Then you can brush here guys. In that part it turned out to
be left for selection guys. When you're done guys, just click the thick guys then your image will be better than the pictures earlier guys. Well guys here, I'll use what is called the radial gradient here. I'll select the glass part only. Okay, we've already selected
the glass part here, guys. Well, I'll set it in the light, guys, I'll make the
highlight right align. Then for the exposure here, I'll add around 0.60 here. I'll reduce the shadows
here until they are left align fur color here. I'll add the temperature guys. Then for the Tin,
I'll also add it here to the '40s, '50s. Then here I'll also add
the effect guys here. I'll add the texture. Then I'll also add a bit for the clarity, for the dehaze here. I'll reduce it, but
just a little guys. Okay, then we click the tick. Okay guys, I think that's
enough for the glass part. Then I'll select all of the main objects guys
using the brush tool, still in the masking part. Guys, brush it. Then we'll just select
the main object. Now the objects that
we've already selected, we can delete them here. I'll arrange the details,
the details here. I'll add the sharpness
to the right align. Guys guys here are
pomicranates guys, I'll select guys so that the texture will be
better in color. Guys, use a brush here. I'll brush on the
inside of the seeds, guys, on the inside
of the fruit. Then we're going to
choose the color here. Then we'll reduce
the temperature. Then I'll add the thin
until it runs out, guys, because the color of this pomicranate
fruit will come out. Guys, if I add the thin. Okay guys, enough
for the pomicranate. I'll make another masking, that is the select subject guys, in the select subject
we can immediately get the object that we
really want to choose guys. Well, here I'll infer the
select subject section so that what is not selected is
only the main object guys, while the others it
will be selected guys. Well, here I'll set
the light part. I'll reduce the highlights to minus a bit. May be minus two. For the white, I'll reduce
to -30 Then for the color, I'll add the temperature
to plus five. And for the tint here, I'll reduce it to
minus four guys. For the effect here, I add the he guys until
it's right aligned. We finished the masking guys. We can just click the thick, then the result will look like
this guys. Well here guys. I'll also use the masking in
the upper left corner guys, because I think the shadows
are a bit annoying. In that part, we can use the linear gradient or the
straight gradient here, We can just pull it then
let's add it here, guys. We slide it, then we adjust the position guys according
to the position that we want. Well, for color here, I'll set the theme for
the temperature. I add it here, plus seven. Then for the Fet here, I'll add up to plus 20. Then here I will add the
setration guys around plus 70 guys, more or less like that. Guys at the top, it's a bit cooler and the
color is quite the same with other colors
guys. Well, here guys. I'll also adjust the masking on the glass again using
a little brush, guys, because I think the color is a bit different
from the other glass colors. Then here I'll adjust
the light menu, guys to add light here. I'll increase the exposure. Then I'll mute the highlights
guys to left the line. Lastly, the dehaze
in the effect. I'll add up to plus 72. If it's done, we can
immediately click the tick. Well, this is the result of
the image that we want, guys. This is the before
picture, guys. If you want to see
the before picture, you can just click on
it. Hold it right away. Now that's the before picture. Well if you let it go,
you'll get the after image. Well this is before and
this is after guys. If you follow step by step
from start to finish, you can click the Share icon. Then you can directly
export to camera, your image can be found
directly in your gallery. It's really easy. We
can just wait for the rendering where
your pictures are already saved
in your gallery. Well, that's all for
the video tutorial for the colorful theme photos. Let's go to the next
foot, guys. Thank you.
29. Project 5 : Choose the Right Props & Compose It!: Okay guys, Welcome to the
preparation for this scene. This scene is very interesting. Maybe you want to ask like, what is another alternative
that I can use? Warm colors like this. Okay. I only spoke with two
background color like this. Or is there any idea to
make a different concept? Okay, So this time I should
using three big ground. And the first one,
the Brighton one. I don't know, but
I really like to put the brighter
background on here. Okay. Yeah, because I think since
the shadow is too bad, so it will make our
product pop out. So I really liked the brighter
background below, okay? And then the second one
is here, the red one. And then the third big girl, I will put ten centimeter, five to ten centimeter in
front of our background here. So if we set the right
thing over here, then there will be a nice shadow because there's a gap between
these two big ground. There will be a
nice shadow here. Yep, so there's a sense of
dimension in our image. Okay? So that's our
big long planning. And then this is our main product that
we have to shoot here. Yeah, Actually, when you
are doing the photos youth, sometimes the
condition is not true. Ideal timeline. You get the product
that the color is pale or not too
colorful like this. This product has only two
color and mostly white. And sometimes it quite hard to shoot to make this kind
of product beautiful. And one of the strategy is if you get the really
bright product like this, you can set the
darker background here so it will make
your product pop out. And then if you also have
only one ingredients, you have those youth,
then I suggest you to change the texture
of your crops. So we cut it in half. And then we also place the foot on our small
bowl like this. And we also have put
this on our background. So with the same products, we have three pets journey here. So there's a
variation of texture. And then to do the left leg, I also use this kind
of drops to make sure that the level of
your product is different. Yeah. We will set it like this. And then with the lighting here, we will create a beautiful
shadow over here. Okay, so that's the plan. And then let's move
to the next section. I will share the
details for you.
30. Project 5 : Light Your Food: Okay guys, before we
did a photo shoot. So in this section I will
explain to you about in the lighting
position once again. Okay. So in this section we set
the right thing, okay, about 17 per centimeter
in front of our products. So our shader, we'll be here. Yeah, we're diagonal to the back area of our
fridge here. Yeah. We'll be here. Okay. So the shadow will be diagonal. And the distance here between our product to our bright thing, the distance here is
about 80 centimeter. Hey, different between
our backgrounds, should the lighting
is above 9070 method, okay, the power of
lighting we use is 148. In this scene we
said more powerful lighting because I
want to make sure that I can use the
higher f-number to make sure everything sharp. Okay? Yep. We don't use any diffuser
and also I want to get a solid shadow in this area. And then when you
set the lighting in front of your subject, you have to make sure that you still get the dimension
of your product. Usually when we try to shoot with the light thing
in front of our angle, sometimes we forget to make sure that they're still any shadow
in front of your product. So we set like this and
after do the photo shoot, you have to check. You have to measure
that in this area. You have to make sure that
you still half shadow, okay, so on the right side
of your product, you have highlight and on the left side of your
product you'd have shadow. Okay, so you still
get the diamonds. It is really easy to lose the dimension of your
product if you're writing in front of your product
k. So you have to double-check and make sure that the product here is not flat. You list the dimension of this product when
you lose the shadow, okay, so you still
have to make sure that you still have this
yellow in your product? Yes. That the tapes for the lightning and then let's do
that for the shift.
31. Project 5 : Photoshoot Session: Hello guys. In this section we already have my assistant here to help
me to hold our background. Okay, in the vertical
bigger here, there's a distance
between the big ground, the orange one and the red one. This about ten centimeter gap. So I want to make
the shadow effect here because there's a gap
between these two backgrounds. So this orange and the
dark area will be here. And then here is
the red area, okay? And then we also have Assistant, you hold these leaves. And then once you have
two alternatives, the first alternative,
we don't use the leaf. So in this area, we don't use the leaf and in
this area will be cleaned so anyone can put copyrighting
on our image here. And then in the
second alternative, we will paint the
background here with the shadow of
our lives here, okay? The shadow will be very clear if we don't
use any diffuser. So the lightning will
be directory here, so the shadow will be solid. Okay. That's how we set
our scene here. And then for the cameras a thing all the same thing,
feel the same. And the one that we've
changed is only the f number. Now we use nine FDF numbers. So let's do that for this year.
32. Project 5 : The Result: Okay guys, we have just done our photo shoot and I'm so excited to show you the result. Okay, so this is the result
for the row picture, for portrait and
landscape angle. And then here's the
comparison between before and after the editing. Okay, and then if you guys want to know about step-by-step, how we edit it. And then let's move
to the next section. I will show you step-by-step
in editing section.
33. Project 5 : Edit Your Food with Lightroom !: Okay, hello guys. Well, we've arrived at this
color theme, foot photo guys. I'll just repeat the step by
step from beginning to end. Well, the very first step, usually we'll go
to the crop guys. I want to show that
our main object is in the middle of the frame. Well, I'm going to crop it, that the main object is in
the middle, like this guys. Then we'll go to
the lighting guys. We're going to the
light menu here. We'll set the highlight
to -100 or left line. Then for the shadows here, I'll keep reducing it
to -70 about that much. Okay, now we're going to set the whites as
the brightness. Then for the blacks here, I'll also add because
basically for this photo, I want to show the
shadow object here. It looks a bit dark guys. Okay guys, for the light menu. That's all guys. Well, now
we'll enter the masking guys. We can add the masking here, which is the linear gradient. Then we'll drag here guys. We'll select in the
upper left corner, guys we can arrange. Okay, then we'll
enter the Lat menu. Then we'll change
the highlight again, guys around the -80 guys. Well now I'll adjust
the black here. I'll reduce the black so
that it is a little dark, which is -54 guys around -50 Well if
it's done we'll select using a rounded masking
guys or radial gradient. Here. I'll set it
up first I drag, then we'll select here. Let's set the opacity guys here. I want to set the opacity
to be in the middle. Then we'll enter the light menu. In the light, we'll set
the shadows to -90 guys. Well, if it's done we'll add another Masking using
brush guys here. I'm going to brush on the main
object of the glass guys. If it's done, we'll go
into the light menu again, we'll reduce the shadows again, guys around -100 or
left a line guys. Then here guys, we'll reduce
the blacks to -24 guys. Okay. More or less
like this guys. And this is the result we
want for our foot photo guys. This is the before and
this is the after guys. Now if you follow step by
step from start to finish, you can just click
the Share button. Then you can directly export to camera role so that you can get the photos
in your gallery. We are waiting for
the rendering. Well, if you finish,
that's how we adjust or edit color image in
Adoblight room guys. It's actually simple guys. You can immediately learn
and practice how we edit images from stop to finish guys, you can also watch this video
while editing your photos. Okay guys in the session. Thank you and see you in the
next video guys. Thank you.
34. Project 6 : Choose the Right Props: Okay guys, Welcome
to this section and let's have fun
in this lecture, because in this
section we will take the levitation for
color pool with photography and we
only use one lighting. The lighting that excellent. I will explain to you in the next section,
but yeah, actually, I will give a little
hats for you if you have only limited
color for your background. Actually, if you set your
lighting position here. But yeah, I know that you
work in fast on light. This is blue and you, maybe you will spend too
much money if you invest. Bright blue, dark blue, darker blue, very bright blue. Okay. Yeah. Maybe you will spend
too much money for it, but I will give hatch to you, could change the color
of your background. Okay. So if you're lighting
position is over here, if you want to make your
background is brighter, then you can just
peel your background facing to your
lighting source there. Then your background color
will change into bright one. And then if you want to make
it darker than just raising, just face here, so you won't get too much
lighting from there. Okay. So this over here will become shallow and
it will be darker. So you didn't have to
spend too much money just to buy the darker
color and brighter color. Just do this little hacks then you can have as
many color as one. Okay? Then, yeah, I tell you
that, let's have fun. So we will do trial and
error for this scene. Will only have this
bow on the center. And then I already
put the stream with a wire here so we can take it in
different positions. So there will be so many
ingredients in this area, so we will take string
and then we also won another texture using
broccoli and then Chile, okay, we will get
another color from here, and then spinach. Okay, So we also plan to have another texture from
flour and also oil. Okay. And then okay, so yeah, there's no
rural area in the video. So just let it flow
and let's do it. And I will show you exactly step-by-step how we create this until this one into become a beautiful levitation
photography, archaic. Yes, I will see you
in the next section. I will explain to you
about the liking.
35. Project 6 : Light Your Food!: Okay guys, I will explain
to you about the lighting. Then. Actually you can also use
the ordinary lighting. But since the thing
have limitation, the limitation is you cannot shoot way up the shadows
bit more than 160. If you shoot with
ordinary flash, actually used, still
can use that lighting. But if you want to shoot faster like you want to throw
the flower like this. Yeah. Then to make it freeze, then you need a shadow
speed more than 160. And ordinary flesh, It's
not capable to do it, but you still can do it, but it's not 100% freeze. If you want to get
a higher-quality, then you need the
high speed flash. And this is one
of the place that I used for high
speed photography. And it is Go Docs AD 200 Pro. If you want to
find this product, you can search like
this over here. Okay, so yeah, the
lighting position here, actually, it's in line
with our product here. And then the
distance between our fighting too is 1.1 meter. And then I also put
the diffuser here, 15 centimeters or ten
centimeters in front of the lighting to make
sure that we get softer light here
because we only use one. And then one of the hats here. If you want to make sure that
the texture of your stream, your praise verbal,
is very beautiful. You will have to be mindful when you place your
stream like this. I want to avoid that. I'm facing my stream over there because there's
no lighting there. If I facing over there, then it will become a shadow. So since my lightning
is over here, then I want to hear my stream a little bit
to the lighting here, so we will get the maximum
texture here, okay? And then you also can
do many position, but you still have to remember that the lighting
source is over here, so just killed a little
bit to the source of the light beam to get the
maximum texture for this one. And then it also worked with
broccoli and other products. Okay. Yeah. That's housing while we sat the lightning and then I will see you in
the next section.
36. Project 6 : Set Your Camera: In this section, I will
explain to you how we set our camera for
levitation shot here. Okay. My camera position? Yes. Exactly in front
of our bold there. I will make sure that my camera
is a lobe because I want to make sure that the horizon
line here is not abrupt. Our goal, okay, I want
my horizontal line is below my bowl to make
it more beautiful. And then shoot the
levitation photography. You have to make
sure that you put your camera on a tripod
and then you don't move your camera at all
because you want to have a consistent image for every single movement
we made over there. Okay? Yeah. And then for my
camera settings here, yeah. For the shutter speed, we increase the shutter
speed through 250. Okay, So for ordinary place, I suggest you use 125 maximum
for the shutter speed. But since we have
the highest thing, spit trigger and
high speed flash, okay, So we can short in the
shutter speed one per 250. And then the aperture
is 6.3 here. And then the ISO is 125. Okay? Yeah, I'm then the length
I use here is metro 125. And make sure you also
put your lens hood here. Yeah. Okay. That's how we set our
camera up or this shot. And I'm so excited, left.
37. Project 6 : The Result: Hey guys, We have just
done our photo shoot here. And if you see the row picture, then maybe you will
get some time. You will get confused that how
can I compose this images? But before we move
to the next section, I'll show you, Here's
the raw features. Okay, and then here's
the comparison between before and
after the editing. To edit this kind of image, to compose all of this image
into one beautiful picture, I suggest you start with
the Photoshop first. You combine all the
row picture into one picture without
editing its color at all. And then after you
combine into one picture, then you add it, that single picture that
you have combined still raw images and you
edit it in light room. Okay, so you just need to edit
one picture in Lightroom. So if you want to know
the details step-by-step, how we edit it, then let's move to
the next section. I will explain to
you step-by-step.
38. Project 6 : Combine Shrimp and Vegetables with Photoshop !: Okay guys, we've
entered the next photo. Guys the foot with frame guys. This is what it looks
like when we insert our main photo into
B Photoshop guys. Well, here I've already brushed the part of the wires guys using the spot healing
brush tool according to the way we practiced in
the previous photos guys. This is the photo that
we've brushed guys. This is the before and this
is the after I brushed guys. Well now guys, we'll add
ornaments to the picture, guys. I'll add shrimp in
this section, guys. Why? Because the shrimp is quite monotonous If it's
only in this part, guys, we'll add the shrimp
in this part, guys. In this way I'll go to file then using the photos
that we've selected guys here. Well, if it's a landscape shape, we can directly click
Rotate 90 degrees. Then we equate it according
to the frame layer guys. Okay, we're going to click
Enter the guys here. I'll reduce the opacity so I can see the
shrimp that I'll add. Well, here I'll add the
shrimp guys because the position is really better than the other shrimps
position guys. Well, here I'll place the
shrimp in this part, guys. Yeah, if it's already in
the position we want, we can immediately increase
the opacity to 100. Then here I'll add add
layer mask. Here guys. Well in the add layer mask
I'll add black color. Then I spill it using the paint bucket tool
until it disappears. Well, as a cheat layer here, I'll create a cheat layer. First, click control J, then we delete the layer mask. Then we'll reduce the
opacity to about half. Well then guys, let's move
again to the layer below. We select the layer mask, then we'll brush
with white color on the stream part that
we've selected guys. Okay guys, if
everything has been selected we can just delete
it in the cheat layer guys. Then here we can tie up guys in the parts that we've
already corrected guys. We can choose the black one. Then we delete guys guys here, I'll add the brightness
and contrast guys. The trick guys, we can
directly move down. Then there is such a thing as
the adjustment layer here, guys, you can directly select the brightness
contrast here. I'll add the brightness
at number nine guys. Okay, then here I'm
going to click out. Then I'm going to point
the pointer in the part between the brightness contrast
and also the layer below. Well, here I'll combine them
using my left click well, so that the brightness
of contrast will be applied to the shrimp
part that we choose guys. Okay, then we'll move
to the next tool guys. Okay guys, if this part of
the shrimp is finished, we'll add another ornament
to this photo, guys. Well, here I'll add
vegetables, guys. Vegetables and
chilies that really seem to fall into
this pole, guys. Well now we'll repeat
the step by step. We'll go to the file, We select the photo
that we've selected. Then we rotate guys, 90 degrees. Then guys will match the position to match
the position of our frame guys. Well here guys. We'll change the opacity
so that it is low. Well, here I'll fit the object where I really want
to put it guys. Then here I'll increase
the opacity again, guys. Then we'll select
the add layer mask. Then we'll spill the
black color using the paint bucket tool
until it disappears. Then we'll create
our cheat layer. We delete the layer mask here. Then we reduce the opacity guys. You can directly select the add layer mask
below which is black. Then we'll brush
using the brush tool on the chilis part guys. Okay guys, when you're
done with the brush tool, we can just delete
our cheat layer. Well, we can see again guys, is it in accordance with
the picture we want guys in the brush part. If it doesn't match
what we want, we can just delete it
using a black brush. Well, if you're done guys here, I'll add the brightness
or contrast here. I'll add the brightness
around 52 guys. Okay, like the
previous file here. I'll also move the layer
mask to the bottom guys. Well, here I'll
put the mask down, the vegetable image
becomes lighter. That's it guys. Well okay guys, if the chilies and
broccoli are done, we can just add more
ornaments guys. Here, I'll add the
leaves guys which will fall from above into
this pole guys. Well here I'll repeat
the step by step. We'll go to the File Explorer, then we select the image that we really want
to include guys. Well, here we just click Enter. Then if the raw
file is landscape, we can directly rotate it
90 degrees to portrait. Then we adjust the object
to the frame that we have. Guys, we click Enter. The guys here, I'll reduce
the opacity guys here. I just need to
adjust the position of the object that we've chosen. Guys, the leaves. Well guys, let's put it here
because this is the position I want
this object to be in. If it's in the right position, I'll add the opacity again
guys until it's full. Then here guys, I'm going to
click the add layer mask. Here we spill black using the paint bucket tool in
the add layer mask earlier. Well if it's gone we can
immediately create a chat layer. We control J. First
delete the layer mask, we reduce its opacity. Then we'll return to the
layer mask below with brush using white color guys
on the sleeve object guys. Okay guys, if we're done we just need to delete
this heat layer. Then we'll click the
adjustment layer. We select the
brightness contrast, then we add the brightness
to around 49 guys. Then we'll move it to the
layer below by clicking a. Then we point our pointer
here until there is an arrow. We can just click this photo of the leaves
becomes brighter.
39. Project 6 : Add Egg & Flour with Photoshop !: Okay, guys. If you're done, we'll add this part with guys. So there are egg ornaments that fall from above into
our bowls guys. It's like the movement of an egg falling from above, guys. Well, how, we'll repeat step by step from
the beginning guys. We open the file
Xploer then we select the photo that has the
egg. Then we just click. Then we rotate 90 degrees, guys. We'll fit it to fit
our frame here. Then, guys, we'll
move the position according to the
position we want. Before that, we'll reduce
the opacity first. Well, here, I just move it
guys in the part we want. In this part, guys, I'll
add x in this part, guys. Now I'll increase the
opacity again to 100%. Then we're going to add
the add layer mask here. Then we'll spill the cool guys. Now, if it's gone,
we can immediately create a chat layer by
clicking control a. Then we, delete the layer mask, then we reduce the opacity
in the chat layer part guys. Let's go back to the
previous layer mask below. Then we brush using
white color guys in the object area
on the x guys. Okay. Okay, guys. If
you're done here, guys, we'll add
more the brightness or contrast for the x guys. We go to the adjustment layer, then we select the
brightness or contrast. Then guys will increase
the brightness 2409 guys. Then we click the
layer mask down, guys. We click out, then we point the pointer to
this section guys. Until there is an arrow, we can immediately click. Okay, the x will be
brighter and also be good, guys. Okay, guys. If the egg above is done, I'll add another egg
at the bottom, guys. Why? Because at the bottom, it looks more empty guys. Okay, I'll repeat
the step by step. We'll open the file explorer, then we'll choose the x that
we've already selected. Then if the position is
landscape like this, I'll turn it into portrait by rotating it 90
degrees clockwise. Then here we fit it first, guys. We fit the photo. Okay, then we click Enter, then here I'll reduce the
opacity first. Okay, guys. Then I'll move the g a
little to this part. Well, this is the
position I want guys. Well, if it's done,
we'll increase the opacity again to 100. Well here, I'll select the
egg using the add layer mask. Click the paint bucket tool. Let's peel black here, guys. If we're done, we
can immediately create a cheat layer guys. We delete the layer mask, then we reduce the opacity. So let's go back
to the main layer. Here I'll brush using white
only on the egg, guys. Okay, guys. If you've
selected the X, guys, here we'll delete
our later, guys. Oh. Then we'll add another
adjustment layer here, guys, namely brightness
or contrast. Here I'll increase the
brightness by about 49 guys. Then we'll move the mast
down guys by clicking out, then we'll move it below guys. The only thing that
gets impacted is the layer below. Okay, guys. If the X are done guys in the above and
below are done two, I'll add smoke at the
bottom here, guys. It's as if the foot we're
taking pictures of is warm and also falls down and the
smoke evaporates, guys. Well, now here I'll
repeat the step by step. We'll open the file explorer. We select the photo
that we've selected. Then we'll rotate 90 degrees if the main file
is landscape guys. Because here we'll make
it a portrayed guys. Then we click Enter. Then here we'll reduce
the opacity guys. Okay, let's reduce
it first, guys. Then the bowl is here. I'll align it so it's
parallel to our frame guys. Okay, then here I'll increase
the opacity again, guys. Well, then here, I'm going
to add the add layer mask. Then here I'll speel
the black color into this part, guys. Well, if it's gone, here
I'll create a cheat guys. We click Control J, then we delete the layer mask. If we're done here, I'll
reduce the opacity guys. Now we move again to the previous layer
mask, which is below. Then we're proce sing
white color guys. Okay, guys. If everything
has been selected, we can just turn off our
cheat layer right here. We'll delete it, guys. So you can see the part that
we selected earlier, guys. Well, this is the
smoke we want to produce guys. Okay, guys. If you've added smoke here, guys, I'll also add guys. So there is flower that fell from above in this part, guys. Well, how, guys, we'll repeat the step by step that
we've tried, guys. We'll go to the file
manager here, guys. We'll select the photo
that we've selected, we track, then, guys, we rotate here, guys. Then we'll adjust it to the frame that we
already have guys. Well, if it's done,
we click Enter. Well, here, I'll
lower the opacity, then I'll adjust the position
to the position we want. So I'll add flower in
this position guys. Now, if it's in accordance
with the position we want, we'll increase the
opacity to 100%. Then I'm going to add
the add layer mask here. Then here, I'll spell
the black color using the paint bucket tool on the flower part guys until this part of
the flower is gone. Well, now, I'll create a chat layer by
clicking on the layer, then we'll control J, then we'll delete
the layer mask here. I'll reduce the opacity guys. Let's go back to the
layer mask below. We'll brush using white guys. Well, here, I'll brush on the flower part that
I want to add, guys. So, guys, if we've selected all the parts
of the object we want, we can just delete
our cheat layer here. Delete layer mask. Well, this is the flower that I want to put in our photos guys. Well, actually, the photo that we've edited is finished, guys. Guys, you don't have
to worry when editing levitation photos
in the B photoshop. You can see our tutorial
from beginning to end. In the first to the
last photo, guys, we now I'll tell you how to
export these photos, guys. Well, now, first of all, I'll tell you how we can
save this image guys. Well, first, we can
go directly to file, then we can directly
click Save or Save as. Well, here, I'll select Save as. Well, we'll save
the PSD first guys. What is PSD? The PSD is a raw file from DB Photoshop
that we've edited guys. Well, now we can
just click Save as. Then we click PSD here, guys. We save guys. Well, when we've saved, then here the whole PSD file that we've edited
will be saved guys. So how do we save
the photos, guys? Well, to save the photo,
it's the same guys. You can go directly to file. You can directly click Save as. Then here in the Save
as type section, you can choose JPCGuys. Now in the J PAC, you can directly click Save. You can just change
the name right away. For example, ftationFrame. Guys, you can just click Save. Well, here, in the
JPEG Option section, I usually use maximum
quality guys. Well, I can just click here, so your photos can be saved
in your photo gallery. Well, that's all for the Stream evitationFood photo
tutorial, guys. Thank you because you've seen this video from beginning to end on our colorful
DSLR course guys. We can immediately move to the editing section in AB room, guys. Thank you, guys.
40. Project 6 : Edit Your Food with Lightroom !: Okay guys, well now we'll edit the Levitation image for
this colorful DSLR theme. Guys, actually this
photo has been edited in the photo
merge editing and we just have to change
or edit the color guys. Well, let's just
get straight to it. Let's go to the light guys. We're going to adjust
the exposure here. I'll just add a
little bit, guys, so it's brighter and
more different than the raw image guys
for the contrast. I'll also add here guys, now for the
highlights guys here, I'll reduce the
highlights to -50 guys. Then for the shadows
themselves here, we'll also add
guys plus 20 guys. I'll add the white
here to plus ten guys. For the black here, I'll
reduce it to around -15 here for the light. It's done guys. Now let's
go to the color guys. We'll add the fibers
to plus ten guys. Then we'll go to the
color guys in the color, we'll choose the
green color to set. Then we change the lumins. We'll reduce the lumins
more or less at -57 guys. Now all we have to do is
click Done here guys. Now let's go to the blue color, the light blue. Here guys. We set the hue, we make it
all left align or -100 guys. Well, after that we're done for the color guys,
this is finished. Let's just click
Done After Color, we will go two details
guys in the Details menu. We will increase the
sharpening to around 40 guys. I'll go into 41 here. Now since we've increased
the sharpening, our theory is that we'll counter the sharpening
with the masking guys. Well, we'll make
the masking right align maybe in the '90s. Yes, I'll choose 97 to
keep this image sharp. But not so sharp that it
brings up in your image guys. After the masking is set, we'll set the noise
reduction guys. Well, here we'll add the noise
reduction around plus 43. Well, actually we're done guys. The pictures are
really good, guys. Well, this is the before image. It's still blurry,
it's still blank. The color isn't out yet. Meanwhile, when we've edited
with the three menu below, the picture
immediately comes out. The green color is really
good. Really good. But we'll use the menu
called the Masking Guys. In the Masking menu, I'll first use the select
subject guys. Well, when we've selected
the select object, I'll invert it so that the
selected image is an object that is outside of our main object or in
the background guys, we click invert, which is on the left above the
delete button guys. Well, like this guys,
we've already inverted. Now after we invert, we'll enter the light menu. Guys, in the light menu, we'll increase the
shadows to plus 100. Then the color guys, this time we'll add a little, the temperature around plus one. Then for the vignette,
we'll reduce it guys, because when we add it, it will reduce the image. Instead, we'll just reduce
it to around -30 maybe. Well, I'll use -33
for this picture. Well, I'll adjust the
effect again, guys. In the effect, I'll set the
texture to minus eight. Why? Because I want to reduce the texture because this is a
bit too many objects, guys. Yes, these are flying guys, especially if
there's water in it. Okay, well I'll also add the
clarity about plus two guys. Okay guys, if it's done
we can click the thick. Then we add another masking
called the linear gradient. In the linear gradient, we can just draw a straight
line like this guys. Then we invert if it doesn't
match with what we choose. I want to select
on the right guys. Well, if the selection is
appropriate with what we want, we can directly enter the light. Here guys, I'll go
into the light, then I'll add the shadows to
right a line plus 100 guys. Then for the exposure, I'll add it because
in the right area, on the right, it's
a bit dark guys. I'll add it here plus 20 guys. If we're done we can
immediately click the thick. Then we'll use the masking
again for this area guys. But I'll use the radial gradient to make it easier here guys. So I'll select the
Srim object guys and also the bowl here until
everything is selected. After that I'll infer it so that only the outside
is affected guys. Well, if it's done we'll
enter the light guys. Now here the lighting so
that the background of the shrimp guys doesn't come out too far from
the main object. I'll reduce the high
light guys until it's left aligned well. On this left align side, I made -100 guys. Then for the shadows I'll add, I'll add the shadows
to plus 100 guys. Well, for the white here guys, I also reduce it to
around -60 so that the picture looks good and also focuses on the
main object guys. Then we can click the tick here. Well, actually the image
is already done, guys. This is the before
image and this is the after image guys,
it's better, right? The image is more interesting
and also stronger. The dominant green color is
also really good here guys, if you follow step by step
from start to finish, you can just click
the Share icon here. Then click Export to Camero. Well, if you're
done, the image will immediately be in
your gallery, guys. Well actually to
understand and be proficient in editing
images in blight room, you just need to practice
constantly, guys, you can watch this video to edit images in your
Edblight room. You can just
practice right away. Practice every detail guys, It's enough to practice
and be proficient in the light color effects
and details menus. You can produce pretty
good pictures, guys. Well, maybe that's all for
this video. Thank you And a.
41. Bye bye!: Okay guys, finally we reach
the end of our course, but I believe this is the
start of your journey. Okay? So my first tip is
be kind to yourself, okay? When you are doing
the photoshoot, sometimes we get frustrated. Okay, even for a
professional photographer, we don't get the image we
want in our first shot. Okay. Mostly with you live like first 50 picture for every
single day of our photoshoot. So so the next one, I suggest you, if you are
doing your own photo shoot, then you can still read Oakland this course again and
make sure that you follow every single detail steps to make sure that you get the closest result compared to the image that we
produce in this course. And also you can try to recreate all of the scene
that we set and show you. I'm more than happy to see the result of your
practice, okay? If you have the result
of your practice, then feel free to share to us and connect to us wherever
you are in the world. So this is the end
of our course, but maybe you can see us
again in another course, okay, I'll see you
again in the future.
 Foodior Class, Professional Food Photography Trainer