Transcripts
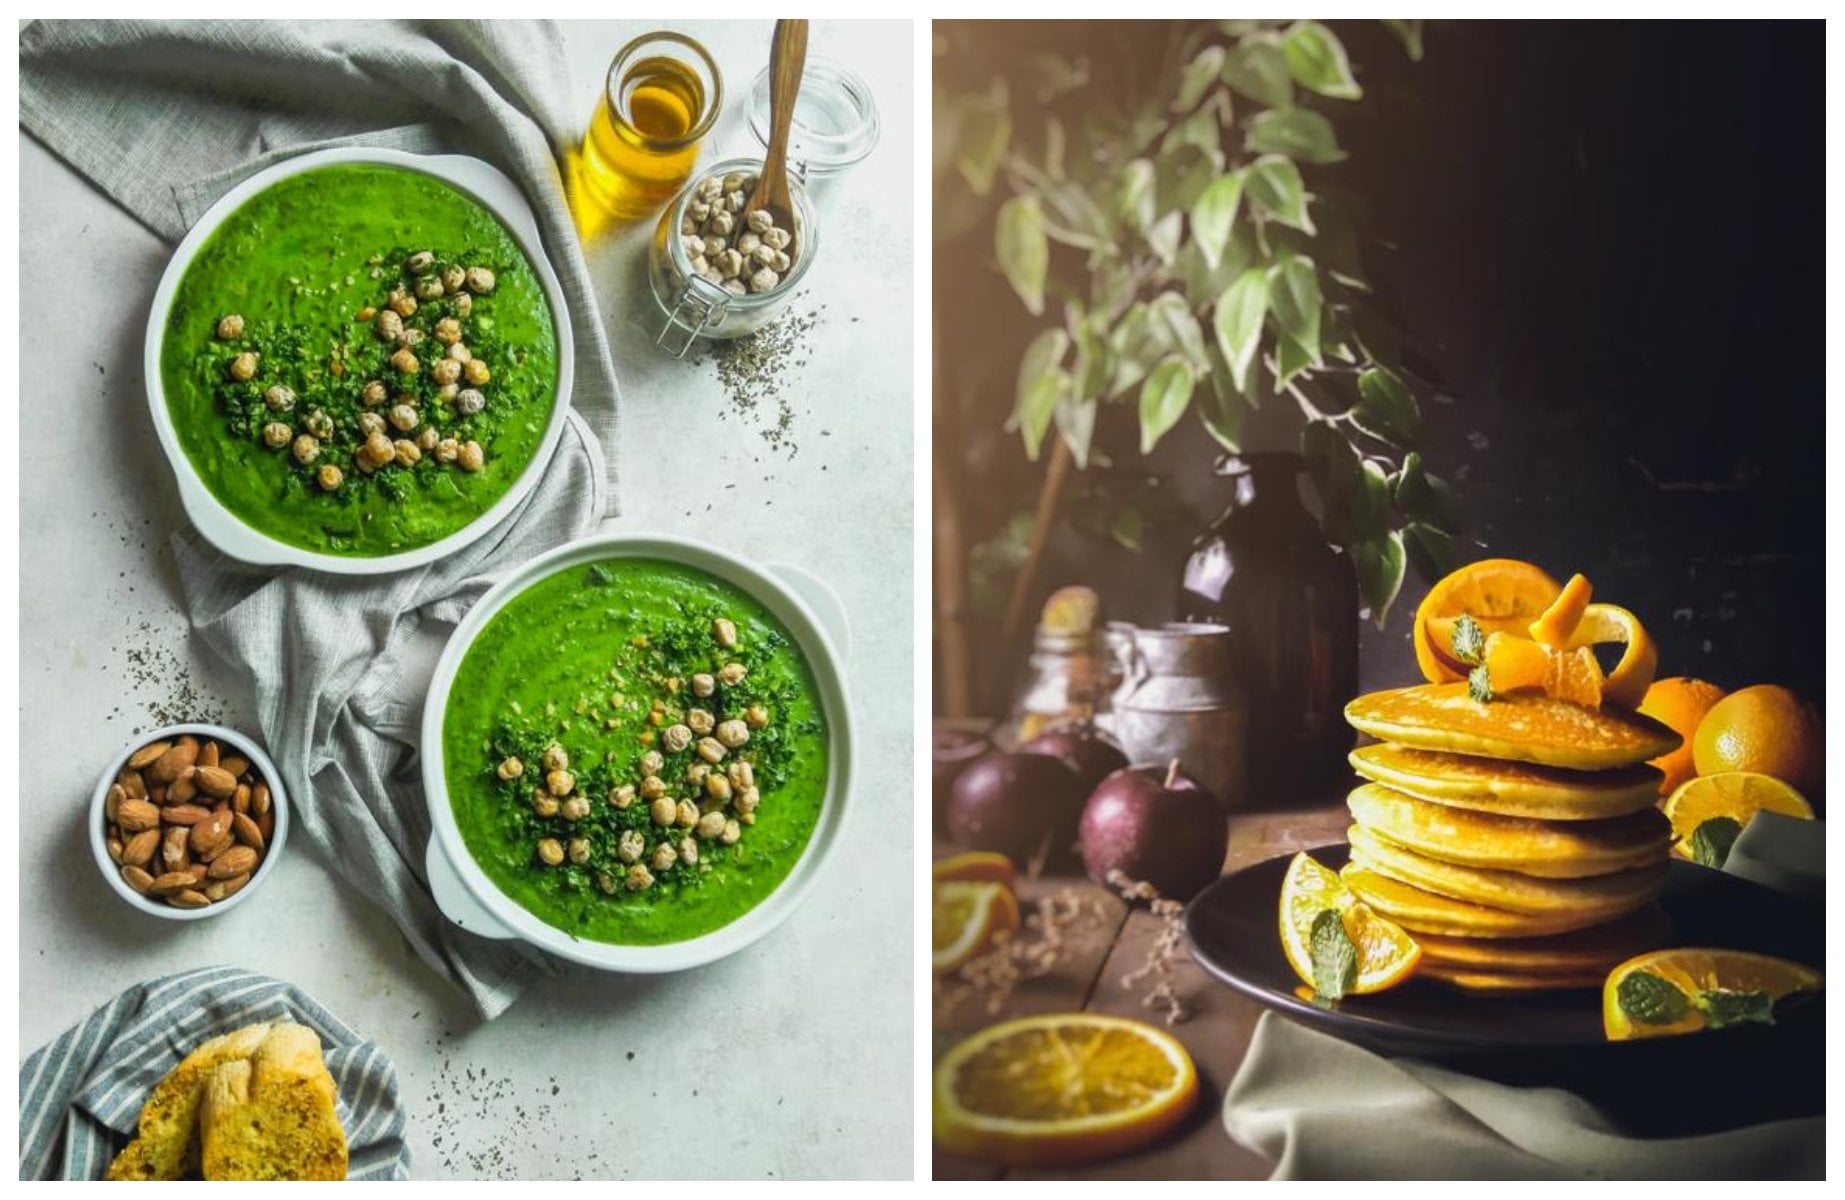
1. ECO23 Introduction: Welcome to the eyes. Again. This time, I will show you how I create a beautiful
picture like this. And then, as you know, we shot this picture
only using my phone. And then look at
the big J closely. Some of them I showed
using the iPhone X, and some of them I showed
only using iPhone six again. So then I believe you post
this kind of picture. No one will know
that it is produced the only smartphone or even using iPhone sick
there is enough. Okay. So the topic for this
course is how does showed a beautiful
food photography using only the old smartphone and then how to create a
beautiful smoke effect. The smoke effect is also
shot using smartphones. Some of them is edited, some of them is real. I will show you how we
create a real smoke. And I will show you also how
to create I didn't smoke, but looks very
natural hierarchy. So I'm so excited and I
will see you in the course.
2. ECO23 Introduction of Smartphone Camera: Okay guys, I have
a tapes for you. If you are using the smartphone camera in
many smartphone camera, mostly they use wide angle
lens in your smartphone, the wide-angle lens is very
common in every smartphone, exists in this world
because it is very easy to use light angle
in the smartphone. So if you want to
shoot anything, then you can cover all
your views here, okay? But the limitation and white
lands in your smartphone. It has the distortion. I will explain to you. You don't have to worry if
you're not familiar with the word distortion
because I will exactly show you
that difference. Okay, so I have my assistant
here and the first picture, I'll stand here and then I'll take a picture from here, okay, using the normal lens in your smartphone than
normal wide angle lens. Okay, I will take one
big change here. K. Yes, As you can see
in this result, the limitation of
what angle lens is, they're stretching area in
the side of the picture. As you can see in this area, you can see that the picture is stretched to the age and also the other side is also dredge
to the edge of our picture. So this is the limitation of the wide angle lens because Yep, this distortion make the
picture looks and proportional. So in the next picture, I will explain to you how I
solve this kind of problem. We still use the same camera. We don't change it to
another lens because I think that not every
single smartphone, half the portrayed bands. So I just assumed that we all have standard
camera in our phone. Okay, so with the same angle, with the same lens, but this time I
suggest you to zoom in 1.5 until two times, okay, for this picture, I used two times in
the Zoom settings and then I will take
the picture here. Oh, okay. Yes. As you can see, there is no stretching area, so the picture looks more proportional and I'll show
you the difference here. You can see side-by-side
here in the left side. Yeah, this is the picture of wide angle lens
without any Zoom In. And the right side here is
the picture with zooming in. You can see the difference in the side area of the
beach in our case. So this is the little
secret that will increase the quality of the picture you take using your smartphone.
3. ECO23 A01 First Food – Choose the right props & Compose Your Shot: Okay guys, Welcome
to this section. In this section, I
will explain to you the preparation,
this picture, okay? Okay. And then I will show you how we create this feature
step-by-step, and this is the preparation. Okay, so as you can see here, we have a couple of background and I will
show you like this one. Okay, this is the background
that we used to block the light thing and we
use the darker word here. And then our main background is the wooden background
like this. Okay? If you don't have the
wooden background, you can also use the board
background like this. Actually we pin this
background by ourselves. It is very easy. You just used the thin
wood playing like this and then use the dark gray
and bright gray pain. We just mix dark
gray and bright gray and pain on the wood
plank like this. Okay, and then in the scene, I really want to
create a table scene. So I use the small table here. And then under the table, I also put the background here, okay, there's a dark
background here. So while I take the
shock from this area, it will look like the floor. Okay, and then for
the setup here, I really want to make sure
that my foot here is the hero. Okay? I don't want to
distract any of the items. So I use the darker
prompts like this one, the small basket that
I put the eight here, and I purposefully use
the darker basket here, and then also the
chopping board here. I turn the chopping board here
is half the wooden color, and I paint it by myself, so it looks a little bit darker, so it doesn't distract
our scene because, yeah, if you put very
bright item in this scene, it will strike all of
the picture, okay, so I conciously choose the
darker props to make sure that this is the main hero that naturally will be highlighted. And I also use the
gray tablecloth here, and then use the garlic
and also some greens. Okay, and then underneath
our mole here, I use the small chopping
board like this, actually for food photography. My favorite items is the
smallest chopping board. This, okay, I think
this is just like 15 to 17 centimeter
for the diameter, and then this one is
just 20 centimeter. It is really easy to
use the smaller one because if you put it
under your background, it doesn't dominate
your picture, okay? It will create a
beautiful effect and also use the small
chopping board like this. It will make your
foot looks bigger. That is the most important part. Then while you set your bowl
on the background here, maybe sometimes if
you directly put your ball to the
background like this, sometimes it looks like, is it too simple? Can I make this picture
looks more beautiful? Sometimes if you feel like that, maybe you have to use the
leveling technique, okay? This is the leveling technique
that you have to apply, maybe some of your
food photography. Sometimes you have to
put some layers below your bowl here to make sure that you add more complexity
in your settings, but it doesn't
distract your picture. Okay? Sometimes I use
four layers below or above the ball here, okay? This time, this is the
first layer I put. This ball is the second layer, and then the third
layer is this one. Okay, So first level, second level, third level, okay? Sometimes to add more complexity to make the settings
more beautiful, I use at least three
until five levels on my main subject here, okay, after the chopping board, sometimes you can also put the tablecloth here
that also work. Okay? Yeah, this is how we
prepare our settings here. And I will explain to you how we liked this picture
in the next section. So I will see you in
the next section.
4. ECO23 A02 First Food – Lighting Setting & Photoshoot: Okay guys, Welcome
to this section. And in this section
I will reveal the secret enlightening
settings for food photography. Or this time, I want
to edit the photos. I want to add the smoke in the photo in editing
section later. But if you want to create
a beautiful smoke editing, you also have to make sure
that the photo is right. Okay, so I really want to add the smoke here later in
the editing section. But while doing the photo shoot, I have to make
sure that the area that I want to add small
will be darker than usual. Okay, So this area, the front end should be darker. The background area
also should be darker. And the site area here also, we have to make it
darker than usual. Okay. So the first I will explain to you about the lighting
position, okay. The Latin position here,
it's just 50 centimeter from the light into
our main subject here. And then the position is exactly on the left
side of our food, exactly where the
lightning is here. So the lighting is exactly on the left side of our foot here. And then the head of our lab is about like just three centimeter
higher than our bowl. And then have you
ever experience that you shot a really pale
product like this? Okay, if you see this one, it is consist of like white noodle and
then also dumplings. Most of the ingredients
of this bowl is white, so it kind of boring. But that is a lighting
technique that you can apply to make this
become more beautiful. Okay, So since it
is really pale, there's no color here. I really want to create a nice
three-dimensional effect. So RLC are you, this is the result I
really want to make. If you see this picture, okay? You can see that the
texture is so beautiful and then you can really see the difference between
highlight and shadow. The lighting is very
harsh to create a three-dimensional
effect on our bowl here. Okay, How to do that? Okay. Usually while you're
doing the photoshoot, sometimes you should
cover like this one. You see the white cloth here. Actually this one will
diffuse the light thing. It will reduce the texture
of our food, okay, but since our foot here is
dominated by white color, I really want to
create a harsh shadow to make the picture more punchy. Okay, so I released this one. Then I let my lighting
become more harsh. So it will create the
effect like this. But the story doesn't end here. Because after you already
positioned delighting, the next job is to make
sure that the lighting only focus on our bot and the surrounding area
will become darker. That's why I use for many board to block
the light thing here. Okay? I will release the
blocking first, okay, then I will show you the result if I'm not
blocking the liking. Okay, So I raised the blocking and then I will show you the result
without the blocking. Here you go. Hey, as you can see the picture
here, without a blocking, the lactic is
evenly come through all the area and then there's
no focus on our image. Okay, but while we do
the blocking here, I used this board to block
the back area of the foot, and then I use another board to block the front area
of our bowl here. Okay. So yeah, the lighting only
come through this area. Okay. Straight chew our food. And then the last
one is maybe you are wondering why I put
the board here, okay? So actually there is no
lighting in this position, but the dark color will
reduce the light beam. Okay, So if you don't
put the blackboard here, the lagging will still
come to this area. But if you've put
a dark board here, this area will
become darker, okay, because it reduced the lighting
come from that position k. So this is how we
set our lagging here. The most important point
here is if you want to create a very
beautiful dark, moody, and then if you
want to more smoke in our image later in
the editing section, I suggest to you to
make the surrounding darker so it will
become more beautiful. And to do that, I suggest to you to use
blocking like this. So remember, it's not just only about the
lighting strategy, but the blocking
also as important as the lighting
position I k. So next, before I shot this picture, I will show you some
tricks to create a beautiful picture
using your smartphone, okay, after you open
your camera like this, as you can see that I
use the photo mode and then usually maybe you take the picture
directly like this, but you have to know that camera phone usually use
the wide angle lens. So as you can see from here, the camera is really wide and it doesn't
look proportional. And you can see in the
back area like this here, we call this this portion. Okay. I don't really like this
torsion and food photography or product photography. So I suggest to you you still
can use the photo mode, but to reduce the
distortion effect, you have to zoom in from 1.52, okay, this is 1.5 and
then another one is 2.0. Okay? So then I will show you the difference
between both of them. Okay? This is the picture. We only use the photos
without a zooming in. And then another one is
the one that we zoom in. Okay, I really liked the one that we zoom
in because it looks proportional and it doesn't look like perspective picture. And then another technique is you can also use portrait mode. Maybe nowadays, most of the camera phone
have portrait mode. In portrait mode, you don't
have to zoom in anymore. Okay, it looks more proportional directly
because in portrait mode, we use the different lens. We don't use the white, but we use the portrait lens. So it looks more proportional
and it looks better. Okay? So you have options. Who use the portrait or you
can also use the photo mode, but you zoom in 1.5
until two times. Okay? So I'm so excited to paint
this picture and let's do it.
5. ECO23 A03 First Food – Photo Preview: Hey guys, We have already
done our photo shoot and then I will show you the
result of the row picture. And then this is the
comparison between before and after the editing. And then as you
know that the one, the row picture that I show you, this is the one that we
shot with the iPhone six. Okay. Before I already paid
using the iPhone X, but I'm not satisfied. I really want to know how far we can push the editing quality. So even if you use
the old smartphone, like I've won six, okay, How to increase the quality from iPhone 62? Beautiful picture. And yes, this is the result of the picture that we shot
with the iPhone six. And why I show this one, because I know maybe
not all of you have the proper tools to create
a beautiful picture. Maybe some of you only
use the old DSLR. Maybe some of you
are not confident between the smartphone
that you use, okay? But one of the secret
is the editing. In the editing
section, I will show you how to increase the quality. So even if you shot
with the iPhone six, then no one will know. Oh, okay. So I will see you in
the editing section.
6. ECO23 A04 First Food - Editing Session: Okay, hello everyone. So we've entered the
editing section stage guys, after we did the photo shoot. And also some of the
explanations at the beginning. Okay, now I use an application called
to be Light Room guys. Well guys, you can
download it directly on the App Store
or Playstore guys, because this
application is free, guys, you can just
download it directly. Well, here are the raw photos from the photos we took guys. Well, this photo is still
really lacking, guys. There are still noise, it
still looks blurry and it still doesn't look that prominent in the foot area guys. Well, the point of
editing is that we'll make this photo
more interesting, better, and also more visible to our main object guys
in the foot area. Well, I'm already in Edobilite
room on my phone guys. This is the initial
display when you've imported your photos
into the application. Well, here are some menus
that you can add it. Well, I'll immediately enter
the lighting menu, guys. Well, this menu is the most important menu for me to edit. First of all, here
I'll change the curve. Well, in this curve there
is a line like this guys. Well here we can
change the line. Well, for me, I usually
make three dots first. Like this guys, 12.3 Well
when it's done here, I'll raise the mid
to this middle area is the mid tone guys. Then for the highlight, the
highlight is at the top guys. I'm going to lower
the highlight a bit. Okay, then below is
the shadows here. I'm going to lower the shadows. Just a little guys. Okay,
More or less like this guys, then we can immediately
click done. Then guys, after we
edited the curve section, we'll go to other
sections like this guys. Well, here I'll add the x sure, more or less up to plus 40. Then for contrast here,
I don't increase it. Then here are the highlights. The highlight is
the reflection of light from your lighting
onto the foot object. Well, like this, the white
ones are highlights. Well, here I want to reduce
the highlight In this photo, I'll reduce the highlights guys, more or less -40 Okay, well then after highlight
here are shadows here. I'll add the shadows more
or less to the right, which is plus 100 guys because here the object is
too dark in my opinion. Then for the whites here, I'll add plus 35 guys. Then for the blacks here, I'll reduce it to -35 guys. Well, that's more or less for the lighting menu section guys. Well, for the explanation,
the black guys, blacks will increase
the darkness in areas that are dark
or black in color. Well, here, the black one
is going to be really dark. Okay guys, totally dark. Then for whites is
the brightness. If shadows is the shadow, then highlight is the
reflection of lighting guys, then the exposure is the
overall light in your photos. Well, when we've edited
the lighting section, we can immediately move on to another section, the color guys. Well, in the color menu section, I'll change the
temperature to plus five. Okay. Then for the ten, I'll change it to plus three. Okay. After that, we can immediately enter
the mixed color menu. In the section guys, there is something called mixed color. I just press it then here I'll show some
of the colors guys. These are the colors that
we'll addit in our photo. Specifically, guys, for example, if there is red in
color in your photo, then we can immediately
addit the red color here. For example, here for red, I'll reduce the
hue two minus ten. Then for the saturation, I'll add plus nine, okay? Okay, for the luminance, I don't set it at all. Then we'll move to
the orange color. In this orange color, I'll add the hue plus 15. Then for the saturation
I add it two plus 25. Okay? Then we'll then move
on to the yellow color. In this yellow color, I'll add plus five to the hue. Then for the saturation,
I'll reduce it to -17 For the luminance, I don't set it anymore. Then we'll go into
the green color. For the green color, I'll
add the hue to plus 14 guys. Okay, for the saturation here, because in my opinion, the green areas
are still lacking. I'll add the saturation
up to plus 100 guys. That the green part of
the area lights up guys. Then I'll move on to
the turquoise color. Well, in the turquoise color, I'll reduce the saturation to
-100 because in my opinion, the turquoise color will disturb the mood
of our photo guys. Then we'll move on
to the blue color. Well, the blue color
is also the same guys. I'll reduce the
saturation here to -100 But for the here I'll increase it
slightly to plus six. Okay, then we'll move
on to the purple color. In the purple color, same guys. I'll reduce the saturation to -100 because in this photo
there is no purple color. I'll meet the purple color
here up to -100 Why? Because if there really is some purple color
around our photos, it will disturb the mood and
feel of our photos, guys. Then we move on to pink. I'm also going to reduce the saturation to -100
If it's done guys, you can immediately
click down here guys. Okay, next we go to the
next menu, the effect menu. In the effect menu guys, first I'll add the texture guys. Well, what is the texture? The texture will increase
the sharpness of areas on your object
that are textured. It's only going to enhance
the textured parts like in the photo that is in the
dumplings guys here, it does look textured. When we increase the texture, the texture of the dumplings
will increase guys. Well, that's the magic ice. Then for the clarity, I'll just add a little. Well, okay, well, I'll
reduce the fine here to -30 The point of the net is to focus on the main
object in your photos. Then under the Fignete
there is the midpoint here. I'll also reduce it to ten guys, so that the fignette, we'll point to the object of the photos guys
on the dumplings. Well, okay guys, if we're
done with the effect menu, we'll go directly
to the optics menu. Well, the optics menu is simple. You only need to activate remove chromatic
aberration here guys, just click guys.
Very simple guys. Well guys, actually for
editing that's enough guys, this is the before,
this is after guys. The difference
looks so far isn't guys just editing
these four men. Guys, you've got clear photos better than the initial photo. More beautiful to look at
the mood of the smoke. Looks more visible to guys. More focus on the foot, guys. Well, this is the before
and this is the after guys. Well, that's better, right? Well guys, you can just
export it directly. However, in this editing I'll add a menu called Masking Guys. This masking menu
is in Adbliteroom, which is indeed paid for. Those of you who don't
subscribe to adult room, you can just follow to edit the four menus
in the section. Then you'll get a better
photo than the first photo. However, if you subscribe to adult room on your smartphone, you can just follow our method of masking in this masking menu. Guys, how to use it. We first click masking. Then here I'll use
the radial gradient. Well, in this radial gradient, you can form a circle. On the main object guys, I'm going to make a circle here. Then you can set the menu
that we've set earlier, but only in the
selected part, guys. Just the one in the red part? Well, that's the greatness of the masking menu in
adobe light room. Guys, we can go directly
to the lighting menu. We'll add the lighting here. I'll add exposure to plus
31 to make our main menu brighter for the contrast here. I'll reduce it two
minus ten guys. It's not too flashy either because if for example
we increase the exposure, the contrast of our
photos will increase two. Then we'll reduce
the highlights here. We will reduce it two -25 Okay. Then for shadows here, I will add guys up to plus 40. Well, this will make the
colors of photo more stand out guys. Okay. Then there's thing
called whites. Well, in the whites we'll add up to plus seven for the blacks. I'll reduce it by just
a little guys here. I'll reduce it to minus two. Okay then guys, we'll
go to the color menu. Well, in the color menu, I'll increase the saturation
only in the section, in the part that we
selected earlier. Guys in the masking, well, we add the saturation
up to plus six. Then I'll go to the effect menu. Guys in the effect menu, I'll increase the texture. Well, for the clarity here, I'll add up to plus five. Then I'll also add the
dehaze up to plus three. Okay, just a little guys. Well, for the details menu, there is something
called sharpness here. The sharpness is the sharpness
level of our photo guys. Well, for the sharpness
in this image, I'll add up to plus
five just a little bit. Not too much because if you increase the
sharpness too much, your photos will be broken guys. Okay guys, if you're
done in this section, we can immediately click the
thick button here, guys. Then we can add more giz, the radial gradient area in the focus of our first object, which is on the dumplings guys. Well, for the dumplings, when we've selected them, we'll go to the lighting menu. In the lighting menu, we'll
reduce the highlight, two -20 Then I'll just add a little more
for the exposure here. Two plus 15 maybe. Okay, then for the shadows here, I'll add plus four guys, so that our main object
will more stand out guys. Then for the whites here, I'll add plus 15 more guys so that the dumplings
look more prominent guys. Okay. Then for the blacks, I'll add plus seven to make
it look more H D guys. Then for the color menu guys, I'll increase the
saturation up to plus 15. Then for the temperature here, I'll add it to
plus three because here I want the dumplings
to not only look pale white but slightly
yellowish guys, just like the
original dumplings. Okay, we can check
list here guys. Well, in this course, our
main focus besides the foot, we also add the smoke guys
in the smoke section. I'll also use the masking. Unlike before, I use
the radial gradient. Now we'll select
our main object. With the brush tool, we can brush the parts
we want to change. Here, I'll brush
on the smoke guys. Well, this is the part of the smoke object that
we want to change. Well, in the part of the smoke object that we want to change, we'll increase the light guys. In the light, we'll
add up two plus 0.75, guys, so that the smoke
is more feasible. That's it. Well,
for the color here, I want to change it to
make it a little bluish. Guys here, I'll reduce
it to minus nine guys. Then for the tin here, I'll add up to plus 15. Okay. Then for the
saturation here, I'll add it to plus
two in the smoke part. Okay, then for the details here, I'll add the noise
section up to plus 50. If it's done we can immediately
click checklist here. Then here I'll
select another part of the smoke first at the top, I'll first select guys. Then I'm going to
reduce the saturation. Because the saturation at
the top is a bit bluish. I'm going to reduce
the saturation here. Okay, then here there is also a part of the smoke
which is a bit greenish. So I'll select it with a brush. Then here I'll reduce the
saturation to minus stand. Just a little guys. Okay, the guy here, I'll select at the bottom guys, because here you can see that there are several gaps guys. You can still see the gap
under the table guys, I'm going to select
the masking here, then I'll use the
linear gradient. If earlier we use the radial
gradient and also the brush, now we'll use the
linear gradient. Well, how to use this linear
gradient? It's easy, guys. You can immediately click
and then drag it over guys, Then you just have to change its position according
to what you want. Well, here I'll edit
the lighting section, then I'll make it left a
line for the exposure guys, so it becomes dark guys. Then I'll make the
highlights and shadows left a line to -100 The
shadows are the same, I will reduce it to
-100 If it's done, you can immediately
check list guys, this is the result guys. The photo at the bottom
will look more darker and not disturb the area
around our main object. Why? Because we've just edited
the masking where we want it and the gaps that were still visible are
now in visible. Guys. Then guys, here, I'll also add the linear
gradient in this section. Guys, while the method
is the same as before, we used the linear gradient, I edited the lighting new guys, I'm going to reduce
the highlights and also the shadows because this part is the position where our lighting shoots the
light onto our foot. Well, usually a lot of
lighting will be left. Because here I want to
make the mood more visible than the main object
area in this object. I'll darken it guys. Okay, we can immediately
check list here guys. Well lastly, when I look at, again, the object of our
foot is still noise. I'm going to use
the radial gradient only for the ball area. Well, here I'll reduce the
noise in the Details menu. Then I'll add the noise up to plus 20 so that the foot in our balls
doesn't look broken, guys. Okay guys, if you're
done then actually the editing process for this
food photo is finished guys, this is the before it
still looks bad, guys. After we edit and
this is after guys. Okay guys, if you're done guys, you can just export it by
clicking the shared logo above. You can immediately
click Export to Camera. So your photos can be directly
saved in your galleries. Well, if you're done,
then your photos can be directly stored
in your galleries and you can just upload
them directly on your social media or
in your sales area. Well, that's all. Maybe for the editing section
on this food photo. Thanks for watching
it to the end, then we'll continue
on to the next photo, guys. Thank you guys.
7. ECO23 B01 Second Food – Choose the right props & Compose Your Shot: Okay guys, Welcome to
this section and we will create an amazing
picture like this. Okay, so I want to explain
to you step-by-step. So don't worry, this time we
use the real smoke or gay, It's not added at one, but it is real. Then the setup is really simple. I believe that you also have
a cup of tea in your home. And then I also believe
that it is very easy to order some cookies
like this in your home. Okay, So this is just
who ingredients. And then we also use some of small chopping
board like this. Yeah, the first strategy is
I want to make the T-loop dominant so I don't put the tea directly
to the background, but under the t, I put two chopping board
like this to make it higher. So the image of this T
looks more dominant. It make the tea higher
and looks more dominant. And then if you only have
cookies like this in your home, then you have to
be more strategy. Not just put the
cookies like this, but you can also have options to make different
texture of the cookies. The first one is because I take this picture directly on
the front of our T here, then I stack the cookies like this to make it
looks more color. This is the first form
of the cookies, okay? The second form is I just spread the cookies
on the second form. The third form is, I break the cookies like this. So it gives a different
feel, different texture. And then also I
cross the cookies. That is the fourth form. Okay? So even if you only
have one kind of item, you have to remember
because you always have the choice to create different texture of
your ingredients. Okay? Yeah, this is how
we prepare our scene. Here. I said that T on the center of our frame and then you will also need dislikes Blackboard
to block the lighting. Okay? Yes. And then you will also need
this large blackboard here. Okay. I'll put it here. And then another tip is
because you plan to have the smoke come
from here and then also the cookies that
is levitating here, okay, if you want
to make your work easier in the editing section, I suggest to you to not
put any object here. If you put so many object
on the background here, it will really hard to crop and combine the
picture later, okay, just let the background
here clean and then you can combine
the picture easier. Okay, So this is
the introduction, and in the next section,
I will show you how we live this picture. Okay, I'll see you
in the next section.
8. ECO23 B02 Second Food – Lighting Setting: Okay guys, In this accident, I will explain to you how
we set our lighting here. Okay. So the first one is here. Okay. I would like the
position is just the same as the shot before. The distance between our
lighting to our beautiful d here is only 50 cm, okay? It's 50 centimeter,
and then it's Exactly on the left position
of our beverage here. This is the light bulb here. The height is the same, okay? With the different share, Okay? And then it is also very important to make sure
that the background is very dark because
we want to create a beautiful small effect
on the background. So I have to make sure that the beggar is completely dark. So the first one is, I have to block the
light thing with this huge blackboard here. Actually, I have
to put something to make it higher
because I have to make sure that the
this area doesn't effected by the lighting
because if I put it here because it is lower
than the lagging will come through this area later,
higher like this. Okay. And then the second one is
this background actually, to make it darker, it is also very easy because the lightning is
come through this area. You just have to
kill the background facing here. Facing there. Okay. So the lightning
won't come from this area. Okay, So I purposefully set the background
facing that area. And then the final one
is in this background. This is the background
that I use to make sure that there's no
lighting in here. Okay, So this is also
the blackboard here. Actually, you will use
so many dark board here. Usually I paid it by
myself to make it cheaper. Okay. And then for
this kind of shot, you have to use
this tripod, okay? Because you have to chart
the consistent position, because you have
to combine each of the picture later in the
editing section, okay? Yes, the first picture you have opaque is the main picture. This is the main feature
that we will use. So I will take one
first and then the next one is we have to take this levitation items here, have some peanut cookies here, and then I put some wire on the peanut cookies so I
can hold it like this, okay, to make the
editing section easier, okay, I have tips for you. You have to make sure that your hands is far away
from your cookies here. Because sometimes if you're accidentally like
shot like this, then it is very hard
to crop the cookies here because there's your
hand on a bag of cookies. So please make sure that you
hold it like this to make sure that the bed area
here is dark, okay? Yep. And then another tip
is, if you want to, the beautiful lighting
effect on the cookies, you have to face the cookies to the
source of the lighting. So you tilt the cookies so they get the
lighting from there. So the texture will
be very beautiful. But if you face the
cookies to this area, since there's no lighting here, the texture won't
be that beautiful. Okay? So you have to make
sure that at least you have more discrete
facing that area. Okay? Yeah. Okay. We just hold it like this
and take the picture. Okay. Yeah. And then you can also
hold in different position. Okay. Yeah. Actually there's no pressure in taking the levitation
photography like this. Just have fun and then explore
many position because it will be very useful in the edit bay session if
you have so many options. Okay? Yep, we have already picked some options for the
cookies position. And then the next one, I will show you how we create a beautiful smoke effect here, okay, This time we
don't edit the smoke. This is the real smoke that
is produced from the dry ice. Okay, whether I will show
you in the next section how we create a beautiful
smoke using dry ice. Okay, let's do it.
9. ECO23 B03 Second Food – Introduce Dry Ice & Photoshoot: Hey guys. Now, we have already
prepared the dry ice here. Actually, while I
purchased the dry eyes, it is the very large block and then we make it
smaller like this. Actually, it is
very cold here, k. And then to create a
beautiful smoke effect, we put it in small
bowl like this, and then we put it with water. If you want to create
more dramatic smoke, I suggest to you to
use the hot water. Actually this is the
boil water here. So the hot water and really cold dry ice will create very beautiful
small effect. Okay? So like this, okay, You can get so many smoke like this if you use the hot water. Okay. I suggest to you to
use what hot water. If you use hot water
and then times goes by, the smoke will be less. You just change the water, you pour the water and change
into the new hot water. Okay. So I suggest
to you to prepare another bowl to put
the cold water. Okay. So I don't see any smoke at all. So I pour the water K and
then add another hot water, then the smoke will come
up again like this. Okay? Yes. So this is how
we create the smoke effect. So I will ask my
assistant to put in this position and take as
many pictures as possible. Okay. Sometime is quite tricky, but take as many pictures
as possible so you have option to choose which
one is the best fit for you. Okay, so let's do it.
10. ECO23 B04 Second Food – Photo Preview: Okay, guys, we have already
done the photo shoot with a hundreds of pictures. Okay. Yeah. Because we
can control where the smoke will be and
then we just take take, take all of the picture. So we have already selected some of Best Picture
in our first-gen. And here you go,
the row picture. We select the one
with the smoke. We also select another
one with the cookies, and then we combine
it with smartphone. And here's the result. The fun fact is, this is
the first thing that we shot using the old iPhone. Okay? This is the First-Gen that
we use, iPhone six, okay? Actually, the raw file
is only 900 kilobyte. The quality is very low, but we can prepare and create into this
beautiful picture. Okay, So why I shop with
the old smartphone is because even if you shot
with the batter gadget, the better smartphone, I believe that the
result will be way, way better if you want
to know step-by-step, the workflow, how we
edit this picture. Then I will see you in the next session in
the editing section.
11. ECO23 B05 Second Food - Editing Session: Hello guys. Now we've come
to the second dish, guys. Well, because the second
foot is levitation and we happen to only
edit on smartphone. Therefore we need
another application besides Do be light room. That's why I'm here using Pigs Art as the
application for us to cut first the part we want
to make. Levitation guys. Well, how now? Here I've entered the
main page of Pigs Art. Then we can just click at here. There is a photo in
this photo menu. We select the photo that
we've chosen to cut guys, here, I chose this photo. Well guys, you can just look for a menu called Cut Out Guys. You can just click Cut Out. Well guys, there is something
called Select and Outline. Well, we chose the outline guys. After we select Outline, we here want to cut
just the biscuits guys. Therefore, we'll just select the biscuits by cutting them. Like this guys, we tidy up guys. Okay, if you're done guys, you can immediately click
on this section guys. Well guys, you can
click right away. Then the photos that we've selected will be cut right away. Guys, like this, the
outside is immediately cut. Guys, well, you can immediately tidy up
the selected parts. You can immediately
click safe here. Then the photos have been cut. Guys, just in this section,
just the biscuits. We, therefore, we can
immediately click next. Then guys, you can immediately
click safe Here guys, the safe picture on your device. Okay, if it's done, then your photos
have been selected and have also been
cut into one part. Examples like this guys. Well, we'll continue to
the next photo guys. The second photo which
is this photo guys, then we cut it, two guys
using the same method. Okay guys, we click Outline, then we select the biscuit part. Okay, If it's done, we can immediately
click on this. Guys guys, your photo
will be cropped again. The click next, then click Safe. Then the photos are stored
in your gallery, guys. Okay guys, if you've cut off the parts that you
indeed want to levitate, you can just join
them right away. How you can open a photo that doesn't have levitation
in this section, guys, the photos you've
already taken. Okay. Well if it's been open guys, you can immediately click
at or at a photo here guys. Then click on the part of the photo that we've
selected guys, and also the guys, then click at here. Then the photos
will be attached. Well, in this section, guys, you can directly adjust which part of the
biscuit you want. You can adjust the
size of the biscuits, whether big or small size. You can adjust and arrange
the position in such a way. Okay guys, if it fits like this, then the photos
will already fly. Guys guys, you can immediately click
Apply, then click Next. Then we save guys. Okay, after that, let's move directly to the lit
room application. Guys, let's go Okay guys, let's just continue with
the lit room section first, we just put the photo, then let's crop the
photo right away, guys, in the crop menu here. Okay, I want to crop it
so that the photo doesn't send to the right and left
guys. The photo is straight. We just click checklist. Okay, Then we continue
on to the lighting menu. Guys, in the lighting menu, we set the exposure
to plus 47 guys. Okay, for the contrast here, I'll reduce it to -13
For the highlight here, I make left the line to -100
And for the shadows here, I'll increase it to plus 37. Okay. Then for the light here, I increase it again to plus 65. Then for the blacks here, I'll reduce it to -44 guys. Okay, if the lighting
menu is already on, let's just move on
to the color menu. Well, for the color menu, I went straight to the color
mix guys in the section, we go to the color mix, then we go to red first. For the satration, I'll
reduce it to -24 guys. For the orange color here, I'll also reduce
the satration to -31 Then for the
yellow color here, I'll also reduce the
saturation to -38 guys. Okay, let's move on to green. Incidentally, because there
is no green color here, I don't set it at all. Okay guys, then for the
turquoise color here, I just reduce the saturation to the left line or -100 guys for the saturation setting guys. Okay, then for the
blue color here, I reduce the saturation
to -43 Okay, Then for the purple color here, I'll also reduce the
saturation to -90 Well for the pink color, I also reduce the saturation to -100 because there
is no pink here. Okay, we can click done. Right away, we go
to the effect menu. While in the effect
menu I'll add the texture up to plus 100. For the clarity, I
keep it at zero. I add the dehaze up two plus 46. Then for the gett here I'll
reduce it to -29 guys. Okay, for the midpoint I'll
change it to number two. Okay, for the roundness here, I'll add up to plus eight guys. Okay, then for the feather here, I'll change it to 100. Okay guys, we're done
in the Evac menu. Now we go to the
details menu, guys. Well, in the details menu here, I want to increase the
sharpening of this photo. I upgraded to 130. Okay, then for the masking here, I'll also change it to 93. Then to reduce the
sharpness here, I'll use noise reduction here. I'll add it to 62 for
the noise reduction. Okay guys, well, if you're done, actually the editing process for this levitation photo is done. Okay guys, it's already good. It's different from
the raw picture. This is the before and
this is the after guys. Well, it's really cool, right? Well, but I want to add a
little using the masking menu. Well guys, for those of you who haven't subscribed
to adublite room, you can just save the photos because this is
actually finished guys. But I want to add
the masking menu. For those of you who may
subscribe to adublite room. Well, we click on the masking, then here I want to select
the smoke section guys. If it's done, I go straight to the lighting menu for the
section that we selected. Guys, let's reduce
the highlights because the highlight
is really bright, right guys, It's too much. Then for the color
menu in this color, I want to reduce the
satration to -20 Okay, then for the effect menu, I'll add here the texture
up to plus three. Okay, if it's done we can immediately
click checklist here. Okay then guys, we'll use the masking,
whose name is Elex? Subject guys, this ex object
is an auto masking from adubiltroom which
immediately selects the main part of your photos. Well, this is our main part. Let's get straight to the
point in the light part. I'll reduce the
highlight because the highlight is really too bad. So I'll reduce it two -48
Then for the shadows here, I'll increase it two plus 33. Okay, then we'll move
to the Details menu. Well, in the Details menu, I want the sharpness to
be sharper than before. I added the sharpness up to plus 100 for the masking area. We just click on the checklist. Well guys, here I will add more masking using
Select Subject. Guys, here it has been selected in our main
object section. Well, but here there is a
menu whose name is inferred. I want to select on the
outside of our main object. Well, here guys,
I'll also delete it first using a
brush in the area, which I really don't
want to select. Okay guys, if you've deleted it, well, the red ones are what
I want to change guys. What I want to
select, therefore, I'll go straight
to the lighting. Then I'm going to lower the shadows guys so
that they are darker. Okay guys, I'll reduce it to -20 Then I'm going
to the color menu. Guys, in the color menu, I'll change the saturation to -58 so that the colors other than our object
are not too striking. The striking color is only in the main object of our photo. That's it guys.
Okay, if it's done, we can immediately
click the checklist. While here guys, I want to add another Select object
from the masking menu. Then guys, I'll go
to the effect menu. Then I'll add the texture
so that the photo of our main object
looks more textured. Guys, we can immediately
click the checklist. The guys here, I want to make
a selection on the area. Guys, use the brush tool. Okay, here I'll go to
the lighting menu. In the shadows guys, I'll add it to the
right or plus 100. Then we go to the effect menu. In the effect menu, I'll add the texture up to plus forty's. Then for the clarity, I'll reduce it to minus three. If it's done, we can just
click the checklist for guys here I also want to add masking to the
biscuits guys. The biscuit we selected
earlier using pigs art. Okay guys, for the
lighting menu, we'll change the
highlight to minus eight. Then for the color menu, I'll reduce the saturation
just a little to minus eight. Then for the effect menu, I'll reduce the texture
to -18 Then for the Cl, I'll also reduce
it to -60 70 here. I'll also add another
brush in the area guys. Okay, if it's done
for the brush, let's go to the effect menu. Then we'll reduce the
texture guys just in the area and we'll also
reduce the clarity. Okay, if it's done we can immediately click the checklist. Well, the most
important thing about our photo is the smoke
guys in this photo. Well, we'll select the
smoke using the brush tool. Okay guys, if it's done we can go straight
to the effect menu. In the effect menu, I'll increase the texture
with the smoke. Then for the clarity I'll
also add up two plus 18. Then for the hays, I'll
add up two plus 20 guys. Okay, if it's done we can immediately click the checklist. Then guys, here I'll also add the masking using the linear
gradient to the top area. Guys, we'll select
it if it's selected. Like this guys, I want to
change the light menu area in the area that we've
selected in the exposure. I'll increase it two plus 50
so it's not too dark guys. Okay then guys, I'll add more masking to
this biscuit area. Using the brush tool, I want to reduce the contrast on the image that we've
selected in the biscuits. I'll add the contrast
up to minus Ts guys. Well guys, if you're done we can immediately
click the checklist. Then we'll add
another area that we are masking in the section Guys, we mask first in the area. Again guys, I want to
reduce the effect again. That is I reduce the
texture to left a line and I also make the
clarity left a line guys. Okay, so that it doesn't
break too much guys. Okay, if it's done we
click the checklist, then we immediately click
on the Details Menu. In the Details menu, I'll
reduce the noise guys to -30 Then for the sharpness, I'll also reduce it to -50 guys. Okay, if it's done
we can immediately click the checklist
for the masking area. Then guys, I'll also add more masking to the
select Subject. Okay, then in the Details menu, I want to increase the
sharpness up to plus 100. Okay, then we click Check List. Then we add more for the
area we want to mask using the brush tool in
the biscuit area guys. Okay, then we'll add the light. We'll add the exposure
up to plus 40. Okay, so that our
biscuits are brighter. Okay, If it's done, we can immediately
click the checklist. Then the editing process for this photo is finished, guys. This is the before and
this is the after. Of course, the image is getting better and the
color is friendly, it becomes centered
in the section Guys, in our main area. Yes. Okay. If it's done, we can immediately click the
share icon above the guys, you can directly
export to camera rule. Well, if you're done
then your photo is already stored in
your gallery guys. Okay guys, that's the editing
section for this menu. We'll meet again in the next
editing section. Thank you.
12. ECO23 C01 Third Food – Choose the right props & Compose Your Shot: Okay guys, Welcome
to this section. And in this section
we will create a beautiful picture like this. Okay? Have you ever felt
that you have already put things in your background but it doesn't look
pleasing in your eye. Okay. It happens every time while I'm doing the
photo shoot until I found that simple technique like counting how
many levels you have. So it is breathing simple. I already explained before about leveling, but
this time around, I will show you while practicing composing
this frame right here. Okay, So as I explained before, one important question while you're setting your
background is sometimes you have to count how many level below or above your
product, okay? So like this one, actually this product
has one level, but if you put something on
the top of your background, then it has two levels. Okay, maybe you
can change it with the spoon and another garnish. It adds more levels. The more levels you have
on your main subject, the more focus people will
be on your main subject. So I tried to as many levels as possible for
my main subject here. Okay, so there's
two levels here. And then below this product, I will put wooden
board like this. This is the first level, and then this is the
second level, okay? Okay. And then this
is the product and this is the third and
fourth leveled, okay? Yep. Yes. This is how I add
more levels in our picture. And then you also have choice
with your ingredients. So domains have up
here is like this, but there's also strategy, how to place your
ingredients, Okay? So while placing
the ingredients, I usually also give the variation where I put these
ingredients for this one, I put this one in
the top and then I put another crumbs on
the levels below it. So I put the same ingredients in the different levels like this, this one on the below, this one on the background, okay? Like this here. Okay, So if you place your ingredients in
different levels, it also gives variation
in your viewer. Okay? Yeah, and then I also put shot glass here and
also the glass here. Yep. How cake? So this is how we
set our frame here. Doesn't have to be
so many things. But sometime you just have to be strategic leap where you
put your ingredients. Sometimes I bought many
things in different level to make it more natural and
more pleasing to the eye. Okay? Yes. So that's how I set the frame.
It is predictable. And then I will see you
in the next section. I will show you how we set
the lighting for this one. Okay. I'll see you in
the next section.
13. ECO23 C02 Third Food – Lighting Setting & Photoshoot: Okay guys, Welcome
to this section. And this section, I will show you how we set the lighting. And then maybe you have
a question like why we set the light thing just
the same as before, actually, to create a
beautiful food photography is not that complex for someone. Maybe they thought that who
create a beautiful picture, the lighting should be more than one and the
position should be changed. And then also, like
there's so many tools, the fact is it's not
always like that. Okay. The Best Picture,
in my opinion, is how you combine the pools. You have, the
ingredients you have in your home with
the skill you have. Today you learn the skill. And then I suggest
to you to keep the settings simple how k, and then this time I
used the Khafre in the softbox because the one that we want to
shoot is this jar. And then if I don't
use the Kafir, then you have to
know that the source of the liking is
only these dots. It will become a dots here because the light bulb is
like this. Yeah, this size. And if I don't use the cover, it will become a line here. Okay. Or just dots
reflection in this glass. I don't really like it. So while we cover the softbox, the source of the light
pink become this square. This square, okay? So it will create a nice square
reflection in this glass. That's why I used the comfort
of the softbox this time. Okay. And then like before, I also cover the background
here, just like before, to make sure that this
area is become darker then later on while
we add the smoke, it will be very visible. Okay, So that's how
we said that likely. And then let's do the Photoshop.
14. ECO23 C03 Third Food – Photo Preview: Guys, we have already
done the photo shoot and then I'm so excited
to show you those out. Okay, here you go. Okay. That is the raw picture. And then, okay, this
is the edited version. Sometimes while you're doing the Photoshop using smartphone, it is very easy to feel
frustrated if you get the picture like the
robots are that we have like this, okay? But you have to realize
that in the editing section there's always a way to increase
the focus of our object. Let's focus on the
edited version. And then as you can see
that in the edited version, I purposefully only set the key color and
some of the color. And then I make the
surrounding areas, especially for the woods and another area becomes
less saturated. Okay. Why actually sometimes
when we want to increase the intensity or increase
the focus on our picture, it's not always increasing
the saturation, but it's also
important to decrease the saturation on the
unimportant objects. In this picture, I assumed
that the one that I don't really want to expose the
wooden and another area. So I brought the surrounding
and decrease the saturation. I don't increase the saturation
of the object at all. But since we decrease the
saturation of the surrounding, then the picture automatically
look more focus. I will show you step-by-step
how we create this one. And then I'll see you
in the editing section.
15. ECO23 C04 Third Food - Editing Session: Okay, hello everyone. So we've entered the third guys. This time the foot
is tea with smoke. Well, now we're going to the
menu called lighting guys, so we can set it up guys. Okay, we immediately set
this in the lighting menu. First we go to the
curve section guys. As usual in the curve section, we have to give three dots. First guys, 12.3 guys. Okay, first of all, I'll reduce the shadows in the
shadow section. Then in the mid tone section, I'll just add a little guys, then for the highlights here, I'll take it down guys, it's not too bright and flashy. Okay guys, for the curve, it's more or less
like this guys. We immediately click Done here. Okay, let's go straight
to the lighting menu. We set the exposure
guys in the exposure. We add up to 30 for
the contrast here. I'll reduce guys
around -30 Okay guys. Okay, for the highlights here, I'll reduce it to -75 guys. Okay, then let's move
on to the bottom. At the bottom, I'm going to
set the shadows to zero. Then for the whites here, I'll add guys up
to plus 50 guys. Okay, let's move on
to the blacks here. I'll reduce the
blacks to -15 Okay, then guy here for the
lighting menu, it's done. We just go straight to
the color menu, guys. Well, in the color menu, I'll reduce the ten
to minus seven. Then for the temperature here, I'll add it to plus two. Okay, just a little guy. We go straight to the
color mix section guys. In the color mix for
the red color here, I'll increase the
hue to plus ten. Minus two for the
saturation guys. Okay, let's move on to
the orange color here. I made minus two for the hue, then for the saturation here, I made plus 15. Okay, then let's
continue guys in yellow. In the yellow color,
I'll reduce the hue to -30 Then for the
saturation here, I'll add it to plus 20 guys because there is a
yellow part here, guys. Next for the green color here, I'll add the hue to plus 15. Then for the saturation here, I'll add it to plus 11. I don't set the lumon ends. Then we move on to
the turquoise color. Here in turquoise color, I'll add the hue to plus 20. Then for the saturation, I'll add it to plus ten. Okay, I don't adjust
the lumin ends. Then in the blue color guys, I'll add plus three for the U. Then for the saturation, I'll add it to plus ten. Okay, then we continue with
the purple color guys. In the purple color, I'll make the saturation
left a line or -100 so that the purple color doesn't interfere with our
main object here guys. Okay guys, for the purple
color is just like that. Then we move on to
the pink color. In the pink color,
MS, the purple color, we change the saturation
to -100 guys so that the pink color doesn't disturb our main object
area too much guys. If it's done, we can
immediately click Done. Okay, for the color menu.
It's finished guys. Then we go to the Effx menu. Well, in the Effx menu
I'll add the texture. Up to plus thir guys. Okay, let's move to the clarity. I'll add the clarity
to plus six, then for the Hayes
it's the same. I'll add it to plus six. Then for the Fete, well, for the Fnet, it's
important. Okay guys. We'll add it so that the
mood of our photo becomes real and also focuses on
our main object area. We're going to reduce the
Fett down to -69 guys here. Okay, here we have something
called the midpoint. Well in the midpoint I'll
change it to 40 guys. Then for the roundness here, I'll add it to plus 35 guys. Then for the feather here, feather is the distance
between the borders that we selected and those
that we didn't select. Well, the bigger the feather, the more real and
natural the one selected in the
fine will be guys. Okay guys, in the effect
menu, we're done. Then we move to the optics menu. In the optics menu
here we'll add remove chromatic
aberration guys. Okay, then actually
the settings have been finished guys for
this photo because our photo have become
better than the raw photo. This is the before and
this is the after guys. It looks more real. The smoke is also more visible
guys, it comes out more, it's more pop out
and it's also more focused on our main
foot guys in this area. Okay, this is the before
and also this is the after. But guys here, I'll add several options for
using the masking guys. Well, for the masking menu, as usual, I'll add
a radial gradient. Here, I'm going to mean a radial gradient
in our main object. First, we set the
position in such a way. Then for the lighting,
we'll change it guys, in the selection area, guys. Okay, first of all,
in the lighting menu, I'll add the exposure guys here. It's around plus 39. Okay, for the contrast here, I'll reduce it to -20
Then for the high light, I'll reduce it to -30 Then
for the shadows here, I'll add more or
less to plus 50. Then guys, for the whites here, I'll add it to plus ten. Then for the blacks here, I'll reduce to minus ten. Okay guys, next here we
move to the Effx menu. Well, in the Efax menu, I'll add the texture
so that the texture of our main foot
looks more prominent. Guys, we'll just
add it to plus ten. Then in the Details menu, we'll reduce the
noise to -20 guys. Okay, we can immediately click the checklist guys here
because it's finished. Then here I'll add more guys, the area that I want
to select guys. But the difference is with
the previous one here, I can just copy it guys. Here it's a selection
from our first masking. We can directly duplicate guys. Click Duplicate here. While the scene will
automatically be copy guys into two parts. Well here this time
for the selection, I'll click the inferred mask so that the selection is
only on the outside. Guys, You can arrange
a little bit guys. Okay, well here I really want to select only
on the outside. Okay. I can arrange
it here so that the selected ones are only on the outside of our food Guys, if it's done because the masking is the masking that
we duplicate it, we can just edit the
lighting to reset. Okay, we reset. We click two times. Guys here. Okay guys, if you're done we can immediately checklist first. Then we select again in the part that we've masked in
the right section. We'll change it in
the color menu. I'll reduce the
saturation guys to -100 so that the colors on the
edges will disappear guys. Okay, okay, so the color is only focused on the center of
our main object. Then we can immediately
click the checklist. Then here I'll add
the details menu to guys in the noise section. Here, I'll reduce
it to -100 Okay, let's go straight to checklist
then guys here I'll add another radial gradient for our area in the section,
our main object. We'll continue to set the
feather guys. I'll set it here. Okay, if it's selected in
the main part of the photo. This time I'll go to
the lighting menu. In the lighting menu, I will change the exposure to plus 15. Then later for the
contrast here, I will reduce it to -15 guys. Then for the highlight
here, I'll make it 20. Then for the shadows here, I'll add up two plus 35 guys, if you've changed
the shadows here, we go to the white section. Well, in the white section I'll add up two plus seven guys. Then in the black section, we reduce it to minus two. Just a little guys. Okay, if you're done, you can
just review it right away. This is the before and
this is the after. You can see right away what
is missing from this photo. Well, here I see this part. It's a bit bright, so I'm
going to masking it using brush to Then we select, just in this section guys. Okay, if the
selection isn't net, you can just delete it. Then tidy it up again. Okay. Then guys, here I'm going
to change the exposure to -20 Then for the
highlights here, I'll just reduce
it to minus seven. Okay, this is before,
and this is after. Then you can immediately
review it again. Well, here I have
two objects guys. First this, then this one. This blue one, it's still too
dark guys, in my opinion. I'm going to make a selection in this section to
make it brighter. How? It's easy, guys, we just use the radial gradient. We select only
this section guys. Okay, let's tidy it up. Okay guys, if you're done, you can just set the exposure in the Latin menu to plus
57 right away guys. Okay, then I don't
set the contrast, but for the highlights here, I'll add up to plus 30 guys. Then for the shadows here, I'll also add up to plus 50. Okay guys, if you're done, we can immediately
click the checklist. It's a bit better, more visible as if it's not
as dark as before. Well, the last one guys
will brush the smoke. The most important thing in
this photo is the smoke. Therefore I'll mask it using a brush on just the smoke guys. Okay guys, if it's been
selected and it's not neat, you can just delete
the part that you really don't
want to be selected. Okay guys, if you're done I'll set it here
in the lighting menu. In the lighting menu, I'll
add the exposure to plus 19. Then I don't set the contrast, but I'll reduce the
highlight here to -40 guys. It's not too bright
guys on the smoke part and you cannot even see
the texture of the smoke. I'll reduce the high light. Then for the shadows here, I'll add up to plus 18. Then for the whites here, I will add it to plus ten. Then for the color menu
here on the color menu, I'll reduce the
saturation to -100 Why? So that the smoke
is colored less and also only colored like
normal smoke guys. Then finally guys here I'll
add a linear gradient to the JS guys so that it's more impressive that in this photo it is only focused on
our main object. Okay, let's set it up
in this section, guys. Okay, next we'll set it
in the exposure menu. In the lighting
menu, I'll reduce the exposure to minus F. Okay, then I'll add the
Blacks as well. Here are, reduce the Blacks
down to -20 Okay guys, if you have set the Blacks
in the masking section, it will look like this. Guys. This is, this is a, well, this photo is getting better and better because when
we see this photo, our eyes will automatically only focus on our main object, which is the T and
also the smoke. The smoke also
becomes more textured and visible than
raw picture guys, this is the picture
we want, guys. Okay, if you're done guys, you can just click immediately, then your photo will be
immediately to your gallery. Well, that's all for
the editing section. Thank you for watching
it to the end. See you at the next
meal. Thank you guys.
16. ECO23 D01 Fourth Food – Choose the right props & Compose Your Shot: Okay guys, Welcome
to this section. In this section, we will create a beautiful picture like this. Okay, so the main subject
here is the ice cream here. So this composition, we
use the rule of odds. We use the odd number of items. This is three ice cream to
make it looks more pleasing, instead of like you use a for
ice cream or six ice cream, I use the odd number for my main subject and then actually the sad things
is previous involved. Okay. I asked you to look
at the picture once again, if you look at this picture, shows a little bit
elegant actually to create the elegant hype
of picture like this, you don't need to use
so many ingredients. So actually, if you look at the ingredients we
use in this picture, actually this is pretty simple. I'm sure that you also
have them in your home. Just need a glass here, but the ice cream and
then the ice cone, that's all for the ingredients. We make the icon
cross like this, and also the small
crumble or cone. Also we put on the background, and then also we
use the spoon here. Okay? I usually use the smartphone
like this because the small spoon makes
your food larger. Okay, I rarely use the large
wound in my photo shoot because usually human can
imagine the size of spoon. So if I put the large bone
in my background here, it will make my
product looks smaller. Okay. That's why I always came first the
small spoon like this, okay, this is how we
compose the picture here. And then also if you need
the dark background, but once you make the
background looks more elegant, There's a hat for you. Instead of just using
this kind of background. This is the classic background, but on the top, this drastic vagrant when
we use the glass like this, okay, actually this is a
glass, a piece of glass here. It's quite large, but you don't have to buy this large glass. 60 centimeter is enough. Just put the glass on the
top of this background. Actually, it will make the
background looks more elegant. Okay, I suggest to you to try this one because it
is very interesting. And then also this class will make the reflection
of our object. Our object here, we'll have
nice reflection below. And also while we use
dry ice smoke here, it will also reflect
on the background. So it will look a
real nice, okay? So yeah, this is how we
plan the frame year. And then I will see you
in the next section, I will show you how we create a beautiful
icon for this one. Okay, see you in
the next section.
17. ECO23 D02 Fourth Food – Lighting Setting & Photoshoot: Okay guys, Welcome
to this section. And in this section,
I will explain to you how we set the
lighting for this one. Okay. Disliked. It is quite unique, but before I explain
the likely position, you have to know
the reason behind. Okay. The reason behind why we sent more complex lighting
is because it is not easy to take the dark chocolate
in the black background. It is not that easy if you don't use any
lighting technique. Okay, so our goals is we want to separate between the
chocolate and the background. Okay? We want to separate. The technique is we use the
backlight position, okay? This is the position if the lighting is in
the same horizon, I push the lighting backward
about 15 centimeter here. Okay. So the lighting now is from the left corner to
here, okay? Yep. Since we are using the softbox, the lightning is very
straight to here. That's why the lighting
won't come to this area. And then to make sure that there's no lighting
to come to this area, we also block the light pink, but it is very important to set it like this because it will make the backlight effect so it will separate
from the background. If you said the lighting here, there will be so many
Lighting come to this area as you can see that
if I set the lighting here, you can see the lighting
also hit the background and it will make the
background brighter, and it will also make
this one brighter. So if your subject and
the background is at the same brightest level or the nearest same butterfly fall, then your chocolate
won't be that stand out. Okay, So it is very important
to set it like this. Just makes sure that
the lighting hits directly to our ice cream here, but the lighting doesn't
come through this area. Okay. It's just the same as that one. And then the distance
between our liking here should the subject here
is about 50 centimeter, and then they have the same hate our k. And then this time, I want to make the
product looks taller. Okay, so I set my camera
backwards like this. Okay, this is the camera here. I said the camera backward
because if you set the camera lower
than your product, it will make your
product looks taller and looks more dominant, okay? Yeah. And then as usual, I've zoomed into two times. Yes. This is how the angle will be. And then later on, I will ask my assistant
to set the dry ice, dry ice in the back
of our product here. And one dry ice will be
helped by my assistant. And then another tapes. It takes a lot of picture. Okay. You already got this. Okay. And then make sure that
you use hot water, especially for the
one that you hold, because you will
need so many more if you want to make it look
more dramatic, okay? Because I have to
hold the product higher than the smoke will not be very feasible
in there below. So you will need hot water to make sure the
mall come up more. Okay? Yes, this is how I plan the lighting and plan the
shop, then let's do it.
18. ECO23 D03 Fourth Food – Photo Preview: Hey guys, We have already
do the photo shoot. And then I will show in
the picture, here you go. How k, and then
here's the comparison between before and
after the editing. If you see it close up like, okay, this is the
edited version. And then let's look at closer. If you can see that there's a separation between the
chocolate and the background. This is Back off the backlight thing
and also the editing. Okay? Then if you look at
the row vector here, okay, this is the raw beaker. And then while you're doing the photo shoot,
most of the time, you will see that the dark
area won't be very dark. Okay. It looks like gray or something, but the one that you
have to make sure. At least the chocolate and
the beggar is separated. You can make the gray area here become the dark later
in the editing section, okay, to make it more dramatic. And then I will show you
step-by-step how to do it. And I will see you in
the editing section.
19. ECO23 D04 - Fourth Food - Editing Session: Okay, hello guys. Well, now we've entered the last dish guys for
the editing section. Well, earlier we had
fun playing the Smokes. Now let's get into
the editing guys. Okay, let's go straight
to the lighting menu, then to the Curve menu. Then we'll make three dots. First guys, then here I'm
going to change the shadows. I'm turning them down a little. Then for the highlight,
I'll increase it a little. Then for the midtone, I'll lower it a little. Okay, like this. We
just click done. Then we'll set the exposure
and we'll add it to plus 18. Then for the contrast here, I'll reduce it to -18 Then
for the high light here, I'll reduce it to -70
Then for the whites here, I'll add it to plus 30. Then guys, for the blacks here, I'll reduce it to -21 guys. Okay, let's go straight
to the color menu. Guys in the color menu, I'll change the
temperature to plus three. Then for the tenth here, I'll reduce it to
minus one guys. We go straight to the
grading menu Guys, we can set the shadows
to -24 on luminens. Guys, that is in
the section guys, you can just check
these are the shadows. Then we'll change the luminends, the shadows to -20
Then guys we slide, we go to the tons menu. Guys in the ones menu, you can immediately set
the luminends at -16 Okay, let's go straight to
the highlight menu. Well, this is the highlight. We set the luminance
up to plus 23 guys. Okay, if you're done you
can immediately click Done. Then guys, let's just go straight to the
color mixed menu. Guys, in the color mixed menu, what I'll change is the
orange color setting. I'll change the
hue to minus five. Then for the saturation here, I'll add it to plus 20. Then for the green color, I'll reduce the saturation to -100 Then for the
turquoise color here, I'll also reduce
the saturation to -100 Then for the blue
color, it's the same here. I'll also reduce
the saturation to -100 In the purple menu here, I'll reduce the saturation
to -63 Okay guys, let's go straight
to the ping menu. In the ping menu, I'll reduce
the saturation to -52 guys. Okay, if you're done guys, you can immediately
click done here. The Latin menu is finished, the color menu is finished. We'll enter the
effect menu guys. In the effect menu, I'll
change the texture to plus 30. We continue to the details
menu guys for the sharpening, I'll add 20 to this photo. Then we'll go to
the optics menu. Then we click Remove
Chromatic Aberration. Then guys, actually this
photo is finished guys, just by editing these five menu, actually your photos have
changed for the better guys. This is the before and
this is the after guys. Well guys, but here I want
to add the masking guys. Well, in the masking menu, I'll add a radial gradient. Then I selected the main menu, the ice cream guys. I'm going to the lighting menu. Then I'll change
the highlight to -11 Then the shadows here, I'll add to plus 20. Okay guys, let's move
on to the Blacks. Well on the Blacks,
I'll reduce it to -11 Then we go to
the effect menu. Well, in the effect menu
I'll add the texture. Up to plus 40 guys. Well, if you're done guys, you can immediately
click the checklist. Then you can immediately add another radial
gradient here. However, here I'll use
infrared because I want to select the outer area from
what we selected before. Guys, I want to select in the section guys in the outer area of
our main object. Well, here I'll change the lighting menu
for the contrast. I'll increase it
to plus 50 guys. Then for the shadows here, I'll add it to -45 Then
for the blacks here, I'll reduce it to -13 Then
we go to the Effx menu. In the Effx menu, I'll
reduce the texture to -41 Okay then guys, here I'll select another area which is the smoke part guys, because the smoke
in the photo is the most important extra Guys, I'll select the smoke part. Okay guys, if you're done you can go directly
to the lighting menu. Then we'll change
the highlight to -18 Then I'll increase the whites up to
minus seven, guys. It's brighter. Okay guys, Then we go to the effects menu. Then we'll add the texture guys. Okay, I'll add the texture
up to plus 19 here. If we can see here, there are
some backgrounds that are still hollow or are
still translucent guys. Well, I want to change
this background to make it blacker
and darker too, so that the eyes that
see this photo will immediately focus on
the ice cream guys. Therefore, I'll select the background using
the brush tool. Okay guys, if you're done you can go straight
to the lighting menu. Then I'll reduce the exposure to -1.26 Then for the high light, I'll reduce it to
the left align. Then for the shadow
section here, I'll reduce it to -50 guys, the background of the
photo will be darker. Well guys, if indeed your main object is
selected like this, you can just delete it immediately
using the eraser guys. Okay? Yes, like this, your objects won't be
disturbed anymore. If it's done, then the editing process for this
photo is finished, guys. This is the before and
this is the after guys. Well, the photos
are more focused on the ice cream and it's also
better guys for the smoke. Well, if you're done guys, you can just click the
share logo above the guys. You can just click
export to camera roll. The photo will be stored
in your gallery guys. Well that's it for the editing
section this time guys. Thank you for following this
editing tutorial to the end. See you next time.
Thank you guys.
20. ECO23 Closing of Smoke Smartphone Food Photography: Okay guys, finally we're
reaching the end of our course, but actually, this is the
start of your journey, okay? So actually I have
some tips for you. The first one is sometimes, I also feel that if I start
learning something new, it is easy to feel frustrated when we first
do the practice part. Okay. It is very easy to feel frustrated like when
you first practice. Oh my God, I think
this is wrong. Oh my God, this is wrong. Oh my God, I shouldn't do
this. I shouldn't do that. Okay. It is very easy to feel that. But the one that you
have to pay attention is even for a professional
photographer, like myself, when I
do the photo shoot, the first 15 min
of my photo shoot, maybe like 2025 picture. I pay for the first 15 min. Most of the time I delete
those pictures because most of the time I use pen until 15 minute to
trial and error. Okay. So when you are
doing your practice, you don't have to be frustrated
before your first 1 h, your first two hour. You don't have to feel
frustrated because the enjoyment of this empire
photoshoot is the process. When you take the first picture, you add another element. You take another picture, you move the lighting, and you take another
picture to do what? To compare each
of those picture. And finally, you take 2010 until 20 per cent of the picture
that you want to add it. Okay, so feel free
to change and apply many techniques that I have
already shared in the course. And then I suggest to you if you are doing
your photo shoot, you can also play this
course once again to make sure that you follow every detail of the instruction. Wow, I'm so excited
to see the result. If you have already
do the practice, feel free to share. And then I will see you
again in the next course. Bye bye.
 Foodior Class, Professional Food Photography Trainer