Transcripts
1. Introduction: Hi, my name is Elizabeth
and welcome to my class, creating decorative
papers for collage. I am the kind of artists
who really enjoys experimenting with media and seeing how far I can push it. I've been sharing
my passion for art with my students since 2006. And I work in a wide
range of media as well as exhibit across
the state of Michigan. My dinosaur illustrations,
which turned into a book that I authored
an illustrated in 2017. And I'm often exploring
combining media in unusual ways. One way that I really
enjoy working with art materials is to
create decorative papers. They can be beautiful
on their own, but they can also be used in traditional or digital collages. Some of the techniques
might be ones you've heard of or
experimented with before. And other ones might
be new to you. But no matter where you are
not in your artistic journey, our goal is to have fun,
experiment, explorer. It's always so fun to
see what colors students too is and how students approach the
different techniques, even though they're relatively simple techniques on their own. If the great thing about
art is that we can all be doing roughly the same thing and never achieve the
exact same results. That's what I love about art. There's so many new
ways to approach it. In the end, you'll have some
beautiful decorative papers that you could try and to painting tool for collage or photograph and incorporate into your digital collage artworks. In the demonstration videos, I'll walk you through
several ways to create abstract
decorative papers. Then it'll be your turn to try the techniques out and see
what results you can achieve. How does color choices impact
the decorative details? What else could you add to your papers to
further enhance them? The options are endless and I can't wait to
see what you create, so please be sure to share
them in the project section. And one of the great features of the projects section
is that you can share your papers as you
finished creating them. And you can edit
your project to add additional images and taxed
at any point in time, I really hope you'll take
the time to share what you create at the end of
class or along the way, please let me know if
you have any questions as you're working with
the different techniques or suggestions along the way by posting to the discussion
section of class.
2. Class Project: In this class,
you'll be exploring the different decorative paper
techniques that I show in my demonstration videos and seeing what results you
can get with each of them. So the class is really
about exploring techniques that can
create decorative results for papers that could
be incorporated into traditional or
digital collages. We're going to explore
some techniques that you might be familiar with, like using bubble wrap or plastic wrap to create texture in your
watercolor paintings, as well as some
techniques that you might not be as familiar with, such as marbling paper
with shaving cream. So the few supplies are going to have a
lot of fun creating decorative papers and then
share those with the client.
3. Materials: The materials we're
gonna be using for this class vary a little bit. And there's lots of flexibility in the kinds of
materials that we have. So I'm going to be
using watercolor. You can use any kind of
pan watercolor you have. I like to use tubes and then
I felt my tray from my tubes and then reactivate with
water spray bottle as needed. I've got a big watercolor brush. Any, any large size
watercolor brush will work. How are we going to be
applying the paint? I'm also going to do
some of the techniques and acrylic paint. So any kind of
acrylic paint works, I happen to have a set of some Blick studio acrylic
that I'm working it through. But literally, any kind of acrylic paints will be
great for the watercolor. You'll also probably also
need a container of water. This is my old
Kool-Aid, one that I've been using for decades. And I really loved this
because it's got a lid. So I can take this with me
anywhere I need to go when I'm headed to a watercolor
class or traveling. And I'm going to
be able to travel somewhere and set up
my watercolor paints. I'll grab this big guy. You're gonna want
some table salt. You can use table salt, you can use sea salt. Play around with the
different kind of granules if you want to, but this is just
regular old table salt. We're going to need some
Saran wrap or plastic wrap. I happen to have read
just because it's from an old sale on holiday Saran wrap that
they had years ago. And then some bubble wrap. Anytime any size, small
bubbles, large bubbles. These are just a scrap
from a frame that I bought and it had bubble wrap on the
coordinators to protect it. So I saved those corners of our app so that I could
use this in our projects. Then you're also going to want some sort of marriage spray. This one is a reusable one. It doesn't have to be this deep. Anything where you
can kind of get a little bit of height. So we're going to fill this. She didn't bring him. So we need to have
Canada shaving cream. The cheaper the shaving
cream, the butter. I like to pick up
my shaving cream at dollar stores here in the US because it's
really cheap and it works perfect for
shaving cream marbling. We're also going to
need food coloring. So any kind of car, you have, these boxes of all kinda been reorganized with different
color combinations. They're actually sorted by cool and warm colors
or similar colors. So I would say at least two different
colors of food coloring. You can do more if you like. You're going to want
to have two colors that are probably closer to each other on the color
wheel so that if they happen to mix as
you're moving around, the color and the shaving cream that they create
pleasant new colors. Or you can play with
contrast if you like, and have complimentary
colors instead. But that'll be a
little bit of trial and error and experimentation, but at least two colors of food coloring and then
toothpicks or a cooking a skewer to move around the food coloring
ways you're adding it to the surface of
the shaving cream. And then for our paper, you can really use whatever
paper you have on hand. I'm gonna be doing
mixed media paper. I've got a lot of these
Canson sketchbooks around with different sizes. I really like to experiment
with materials and surfaces. So I've got some paper
bags that I've saved from our grocery trips
that I'm going to try some of our decorative
paper arms and have that really nice and
neutral brown tone in the background as opposed to the white of the mixed media paper. And then you could really
try anything you want to. But I would say we want a
little bit of a thicker paper. So the mixed media paper
or the watercolor paper, or something that's thicker like this paper bag material
so that it can really hold up to what we're gonna do to the surface to create a decorative papers
would be great.
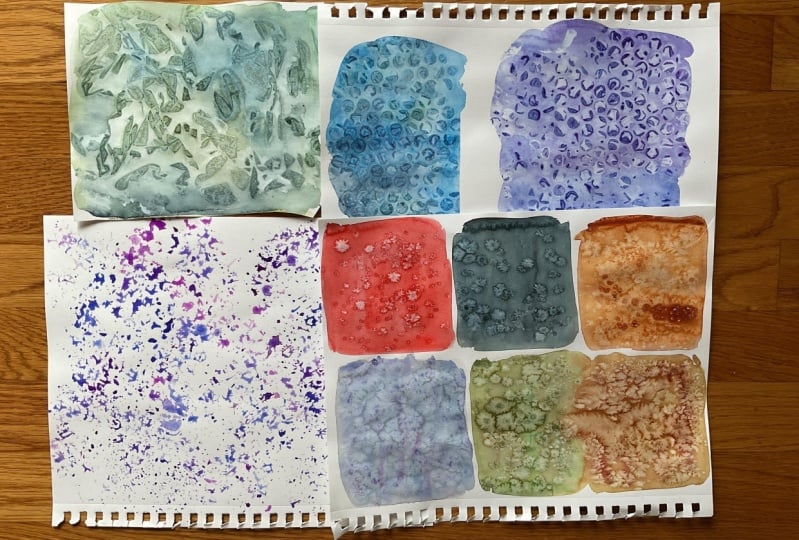
4. Bubble Wrap: 3 Techniques: The first technique
we're going to create a bubble wrap textured paper. The appearance is going to vary depending on whether
you're using a small bubble wrap or
larger bubble wrap. The packing bubble wrap comes
in two different sizes. Usually, I happen to have the small bubble wrap on
hand for this demonstration. But in the past, I've used the larger bubble
wrap and they create some really nice texture that create some beautiful
decorative papers. So you can work into
experiment with both. If you have access to both, you both are easy to find in the mailing section
of any kind of general store you
might have near you. So to begin, I've got my
mixed media paper sets, I've wet my paints. I've got my very well
loved water cup. And we're gonna be working
pretty wet with this one. You're gonna wanna have
some paper towel on hand to dry off your brush
or take care of any spills that might
happen along the way. There's a couple of different
ways you can go about this. But for the bubble wrap texture, you really want a very saturated
paint, saturated paper. You really want bold color to really see the bubble
wrap in the end. This is a technique
where there's two ways to go about it.
I'm going to show you both. One is where you apply the paint to the paper and then you put the bubble wrap down and press it on there and then let it dry. Once the paint is dry, you
remove the bubble wrap. And that's how this bubble
of texture was created. I painted the surface
of the paper, laid the bubble wrap down, let it dry, and then
when it was done, I peel the bubble
wrap off where the plastic touches the
watercolor paper. The color kinda
pulls a little bit. So this is probably
a technique that you've seen or tried before. But it works really nice
for collage papers too. I've used it mostly. I use it in my abstract
watercolor artworks. And it's in one of my other watercolor
classes on Skillshare, but I really like it also
as a decorative paper. The other way to do this, we're going to paint
the bubble surface itself and then we'll use
it more like a stamp. That is how this one was made. I was working with
warm colors and I painted right on the bubble
wrap surface with watercolor. And then I stamped it down and moved it and let it create. So as the original stamped
area that's much bolder. And then there's the ghost
images as the paint began, as the paint was removed from the bubble surface
and onto the paper. I'll show you that 1 s. So first step, we're going to do a wet application
of watercolor. You could wet your paper first, but I want to really have
more control over my paint, the areas that I preserve white. And I want to have a really
saturated color so that I know those bubbler textures
are going to transfer. So I'm going to have
a really juicy brush loaded up with color. Pick some colors that I
know are going to look good together because
they're going to bleed. And actually it's more
interesting when they do bleed. So go ahead and overlap and
mixed right on the paper. You had some very pretty colors. You can use any colors
you want for this. It doesn't have to be analogous colors that are next to each other
on the color wheel. Doesn't have to be just
warm or just cool. Go with whatever feels like
what you want to paint today. Experiments. Sometimes colors that don't seem like they're gonna
look great together, end up being beautiful. And the decorative papers
in our class are all about experimentation. So have fun. Experiment. See what happens. Alright, I'm going to wash
off my brush because I'm done with the paint
parts for now. And I get that out of the way. Now I'm going to
take my bubble wrap. Depending on your bubble
wrap, there's a bump at your side and a smoother side. Usually tell by looking at it. Sometimes it's not as varied. And you can also easily tear this to create
different sections. I want to have a play
of bubble areas to not bubbled areas for this. And the great thing is, we're not trying to
make an artwork. This isn't about a
finished masterpiece. This is about creating
texture paper that we're going to then use in
different ways in our artwork. So it doesn't matter
what happens. If you pop the bubbles. It'll take a different
kind of texture for you. But it doesn't
matter how it looks. In this stage. Chances are we're going to be
cutting it up for collage, or we're going to
be photographing or scanning it in and using
it for digital collage. So many different ways to use these papers across
your artworks. Can also cut them. You can also cut the plastic. I think I'd be having
a better time. If I cut it. I'm
going to cut it. Now. You can take it off
ahead of time and have that texture two and move it around and kinda stamp into it. Which actually is a
pretty cool effect. I'm going to do a mix
of that and a mix of letting the bubble wrap dry. You do have to work
relatively quickly because as the watercolor dries, it'll lessen the effects of the bubble texture
that we're creating. So we're going to let this dry and move on to our
next technique. And then we'll see how they
both look when they're done. For our second bubble
wrap technique, when we get a new
sheet of paper, we're still going to be
working with watercolor. And then we'll try
it with acrylic. Because this one is
gonna be stamping. I don't have to worry so much about cutting it up
so that it fits my paper. I can just kinda let it whatever
my paper out of the way. A feel for the bumpy or
side if I can find it. Because it's plastic, it's
going to resist the paint. It'll be a little bit
different with acrylic. Acrylic is a plastic base paint. So it'll give you different
effects with each kind of using that technique with
different kinds of paint. Again, you can mix right
on the bubble wrap. And I didn't get my
paper back over here. Flippen stamp. And because I'm
using watercolor, It's giving me a
pretty almost like a controlled splattering effect because it's only touching where the bubbles are raised up. But that can make for very
beautiful decorative paper and so easy, so fast and easy. I love this. I can see so many different
ways that I could cut this up or scan this in and use it as a background in art work. Or if I did a
representational collage, I could use this as some
texture in the sky. For the clouds, this
could be fabric. If I was doing a figure
and I wanted to cut it up to create clothing on a, on a figure in a collage. So this one is going to look a little
different when it dries. And you can have a
play around with it. Different colors will appear different ways I was
using pretty bold color, but again, let it dry and then we'll check back and see how they look
when they're dry. But this bubble wrap texture, I'm going to switch
to my acrylic paint, which I have all set
up on my palette. I don't like to use my water cups for
watercolor, for acrylic. So I have a glass jar that
I use when I switched to acrylic paint versus the plastic when I had earlier
my watercolor. And I'm switching my brushes
to a nice big acrylic brush so that I know it can handle the paint that I'm gonna
be applying on it. This is very similar
to the other one. You can wet your brush
or not. The wet. It'll depend on how thick
your paint is too right? So if your paint is very thick, you might want to thin it down a little bit with some water. Or it just might be a habit that you've picked up as a painter. I like to send my
paint just a little bit so you can help it
move on to the brush. We're going to load
our brush with paint. And we're going to
start painting it onto the bubble surface. Because this is a plastic paint versus a water-based paint. Even though there's
some water in there, I'm not getting as
much resistance and pedaling up as I had before. I can really see where
the paint is going. You can also preserve some
white areas if you want to. You don't have to
paint the whole thing. You can layer into it. Uses many colors as you want to. But again, I knew these
were gonna blend. So I wanted to have colors
that we're going to create an interesting lens to them. When that happened. Then I dropped this in my water, rinse off my brush so
that reversals day good. You don't ever want to leave your brushes sitting
in the water, but for a very short period of time it's going to be okay. So for now I'm going to leave
it there because I want to get to this damping
for this one, I want to go a little bit bigger because I want to be
able to have some of the ghost images
coming through there a little more exciting with the
acrylic things like that. A larger sheet of
mixed media paper. I've got my painted bubble wrap. I'm just going to start
letting it down as tamping, pressing gently, peel it off. You can keep going. I can create a mirrored
image of that if I want to. You can see how the
original progress darker than the second print right
to the registers differently. Now I can paint back into this is where I probably
didn't need to wash my brush and add
some more paints. I want to maybe just
some areas like the ghost markings and
I'm getting a little bit. You can overlap them. If you want to. See what happens
when you do that. I could go back
into this with more spilled a little bit,
cleaning my brush off. There we go. Okay, They around.
I can add more. I can add different colors
to my bubble stamp. That is what happens
when it overlaps, are going to get this
cool muddling effect. It's pretty fun. Stamp Have fun. Work as big or as
small as you like. When you're happy with
the texture that you've created for your
decorative paper. You're all set. If you want to. You could wash this off
and reuse it if you like. If you wanna be when I keep using your bubble
wrap, that's great. If you have a lot of it on hand, feel free to just throw it out, but you can also let it dry and then keep stamping with
it because it's acrylic, it doesn't really hurt the bubbles or impact the
stamping in the long run. So this one and the nice thing
about the acrylic paint, as I don't have to
wait for this to dry to see what it's
gonna look like. The colors are true, pretty much true to what
they're going to be wet or dry. A little less sheen on some of the thicker areas when it's dry. But I know what I've got as far as the decorative
paper with this, it could be really fun to
layer this up so I could get another color and drop that in there and keep
going and have it be as dense and as rich
in color as you want. Now that our papers are dry, let's see how they turned out. So this is the first piece that I did in the demonstration
for bubble wrap. So remember, here is where I laid down the bubble
wrap section and then I lifted it before it had
dried and these other areas, I let it dry all the way. So I have more of that pedaling. That happens as the plastic and the paint and
the, on the paper. The other technique that we did was to paint the
bubble wrap with the watercolor and then
I stamped it down so create more of an
abstract texture. It's similar to
splatter painting if you've seen that
technique before, this is with a pretty big brush. So I get those
pretty big watches. The difference is you don't get as many of the smaller ones, and you have a little bit more
uniformity to the types of organic shapes that happen when the bubble wrap gets pressed
down to the paper surface, but it is similar in technique. Then the third way that I did the bubble wrap was
with acrylic paint. For that one, I painted the bubble wrap surface
and stamped it and let it let the stamping
overlap and kind of get some of these ghost
images and the folder areas. That again, will vary depending on the viscosity or
thickness of your paint. But you can have a play around a bit and see which
technique you like best, or how you could use these in
different types of collage. I would love to see the
results that you get. So please be sure to
upload your project to the project section and
share with us how a lunch, what techniques did you try? What results did you get
and how do you think you might use it in future
collage artworks.
5. Plastic Wrap Technique: For this technique,
we use watercolor and the plastic wrap
I have on hand, much like the bubble wrap one. We're going to
start with a pretty juicy paint application
to our paper. This time though I'm gonna put a little bit of water down, just dependent helped
move the paint around. Make sure I've wet my case. Platinum, my paper a little bit. You could tape your paper
down if you wanted to. I like to just kinda
move move through these papers pretty fast when
I have time to make them. So I don't often take them down. But you could have a bunch
of different Plexiglas or flat surfaces that you
use to take your papers, doing kind of tape
a couple to them, and then do your decorative
paper, set that aside. But I don't mind when it
runs all over the place. So just like with the
bubble wrap or loading up some pretty intense color. Again, the colors
are going to move, bleed together because
it's watercolor, especially with having dropped some water onto the surface. I want to make sure that
I choose colors that I'm going to enjoy when
they make new colors. Wet on wet application
of watercolor, where the paper was wet, the surface was wet,
the paint was wet. And then you get
some of these really nice bleeds that happened. But we're not in it
for the bleeds today. We're in it for the texture that are plastic wrap and create. The cool thing about plastic
wrap is there's a lot of ways you can control it for the texture that
you're creating. So I can, I can punch it up
and drop it down like that. And we'll kinda precedent. And then anywhere
the plastic touches, just like with the bubble wrap, It's going to the color
is going to print a pool there and
kind of push away. The other thing I've found is especially when
I was trying to create different textures in the backgrounds of
my watercolors, which would also apply
to different textures within my decorative
papers for flash, is that I don't have
to just bunch it. I can split and kind of create these strands across the paint. That it creates a really
great wood grain texture, which can be really beautiful in a collage or in a
watercolor painting. For decorative papers. We're going to focus on applying it in a way to
create texture that's going to be general background that's used in your picture. It could be a textured fabric. Again, if you have a figure in your collage that
you're creating, depending on the colors you do. If you're doing a landscape, you could use some
browns and create some really great bark
texture for your trees, or brown texture for an
interior scene for collage. Really the sky's the limit. But again, like the bubble
wrap with watercolor, we have to let this dry. We can peel it off
and see what happens. It's gonna be more muddled. If you want kind of a softer
edge to your textures, That's a great way to do it too. So again, there's
all these rules and guidelines, not rules. There's guidelines
creating the textures and the declarations
for our paper. But all art rules and concepts can be twisted and
turned on their head anytime. And I love doing
that as an artist. I kinda learn the
technique and then I see how far I can push it. We wet the paper with water, we loaded up a bunch of
paint you could also do and just you could also go in
with a ton of paint first. Any colors you want to, they're going to bleed together. Just know that when you're
laying down your colors, then switch up your plastic wrap any way you want
to press it down, set it aside, let it dry. Once it's dry, we'll
check out what the finished decorative
paper looks like. The plastic wrap decorative
papers crumpled up the plastic wrap in a variety of different ways,
different textures. So areas where I
pulled it like this, I have more of a
linear feature to the declaration and then the bunched up section
is more like this, where it's kind of that
shattered glass almost effect. So depending on what kind of decorative papers you're
interested in creating, or if you can see different ways to use
this and your collage work. Or really any, any
of your array. You might want to
play around with different ways of applying the plastic wrap to create different textures
in your watercolor.
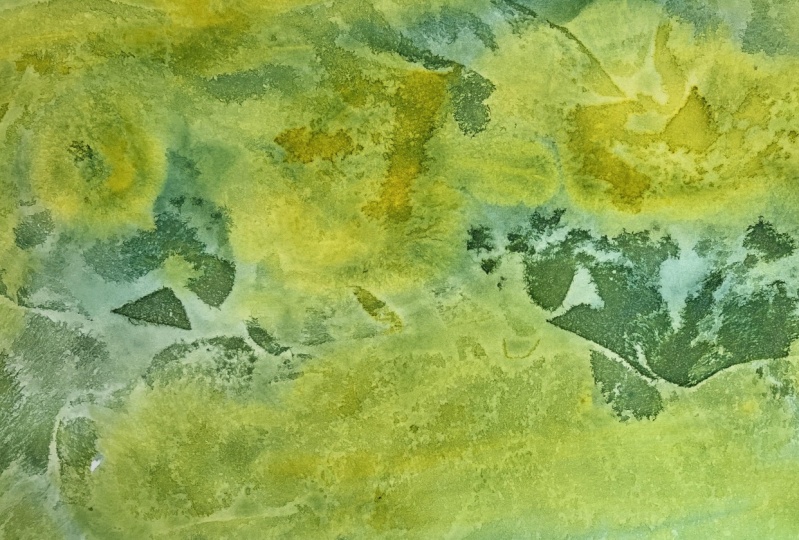
6. Salt Technique: This technique might be one that you're familiar with if you work with watercolor and play around with
watercolor textures, It's one that I
really enjoy using in my watercolor
and ink artworks. But I also really
love doing it for a decorative papers
that I then can incorporate into digital
collages are traditional. It's just a really fun, easy way to get some really beautiful
texture that can be abstract or it can be
used more intentional. Like say if you're doing see in it and you want
to have a sand texture, this works really
great for that. And actually, I was kinda
worked with greens, but since we're talking about
potentially using this in representational
collage, Let's do that. I'm going to work wet
on wet again like I did with the Saran wrap just to kinda keep
the colors moving. But you don't have to. You could just get some
really juicy color on your brush and you could
just kinda go from there. Making this with the
intention that it might end up in a landscape based collage. But I don't want to let that
limit how I approach putting the paint or the salt
crystals onto my paper. So I'm just gonna kinda go
for neutral earthy tones. May get those all
over the place. This is another one that
like the plastic wrap. The more the Boulder
the color you put down, the more effect you'll see. So really load up
your brush with paint and use quite a bit
of water to activate it so that you can get all
that gorgeous color down because the salt crystals are going to work like a sponge. They're going to attract. They're going to
pull the pigment towards the crystal and creates some areas where
you've got the color that's been pulled away and then the color where
it's pedaled up. So the more color you have down, the more you're going to have those crystals are going
to have to work with. Which is really great. Comrade may actually
put in little blue to mix that with my brown to
get some really beautiful, rich, darker earth
tones in there. Now, this looks
like a mass, right? This is nothing that's
terribly beautiful to look at. But that's okay because that's
not what this is about. This is about
getting that texture so that we can use
it with our papers. And I might have
found a little far. I'm not quite sure. They're not quite sure. Muddled it a bit. That's okay because it's
all going to change. Once I put the salt down. I'm going to wash
off my brush. Then. I like to keep
salt in the studio just in a small
Tupperware like this. I don't need a lot of it. Let's get a little bit of salt. You're just going
to drop it down. Like I said before, you
can use table salt, you can use sea salt, you can play with other stuff. I recently saw
another artist doing a similar technique with
heights and different grains, which should make sense, right? Because their purpose is to absorb water and salt
absorbs water too. So I'm really
excited to try that. But salt has been a tried and true companion to my watercolor application
for a long time. Don't go overboard with
my students in class. When I teach high school, I have to really say less is
more when it comes to salt. Want to just pour it on? You don't need a lot, a
little bit goes a long way. So really bold color, really nice rich colors on your paper leave as much
whitespaces you want to. And then while it's still wet, sprinkled down,
sprinkled assault down. You could even for little in your hands and
sprinkle that way to have more control
over the application. But then just like the bubble
wrap and the plastic wrap, we have to let this dry. The salt has to work its magic. And actually I've got a couple
of petals of color there. I'm going to put
some more in there. Because I'm making this to
have it as a collage paper. It can go farther than I
would take it if it was a small area in a watercolor
picture was working on. The other thing you can do is drop in more color
if you wanted to. I want to really
beef up some spots. It will change what happens
with their crystals slightly. So you don't go too crazy. But if you wanted to drop in a few other areas of color
to kinda see what happens. That's great. We want to let it do
its original thing. But you could you could
go in there a little bit. But I'm really doing I'm in
danger of overworking it and not deactivating the salts, but, but letting it
be less effective. So I'm gonna just stop there, set this aside to dry and we'll see the results in a minute. So here is the finished result for the salt technique
that we did earlier. There are still some
granules assaults on here. I haven't brushed them off yet. You could decide
to leave them on there or you could
decide to take them off. Usually I just use my finger
and I kinda gently rub it. If you're at all worried
that this is still wet, to not do that. If you're confident it's dry. This has been sitting
for well over the night. I can gently go in
and rip those off. But I also don't mind the literals structure
of the salt on top of the implied
texture that was created where the salt
absorbs the color. So I'm gonna go ahead
and just leave it like this and have that be another layer to this
textured paper result. One where I did remove the
salt would be this one. All of the salts has
been removed from this piece and it was a
very different effect. As far as, I mean, some of it is the colors
because the colors are so different as far as being
very bright and very needed. They're both very saturated. And the fact that I used a
lot of pigment to create these water-to-cement
ratio as well as salt amount will determine
how the effect happens. So, play around with it, experiment what results you get. In the end, you'll have a lot of different decorative
papers that you can incorporate into your collages
in many different ways. Be sure to upload your project
to the project section and feel free to edit as you go as you work through
the different techniques. I would love to see what you create and the
results that you get. Each technique is going to be yet have a different
result depending on the artist and their specific materials
and their application, feel free to share those. And if you have any questions
about this technique or anything that you're
struggling with, he should have posted to
the discussion section so that I can help
you along the way.
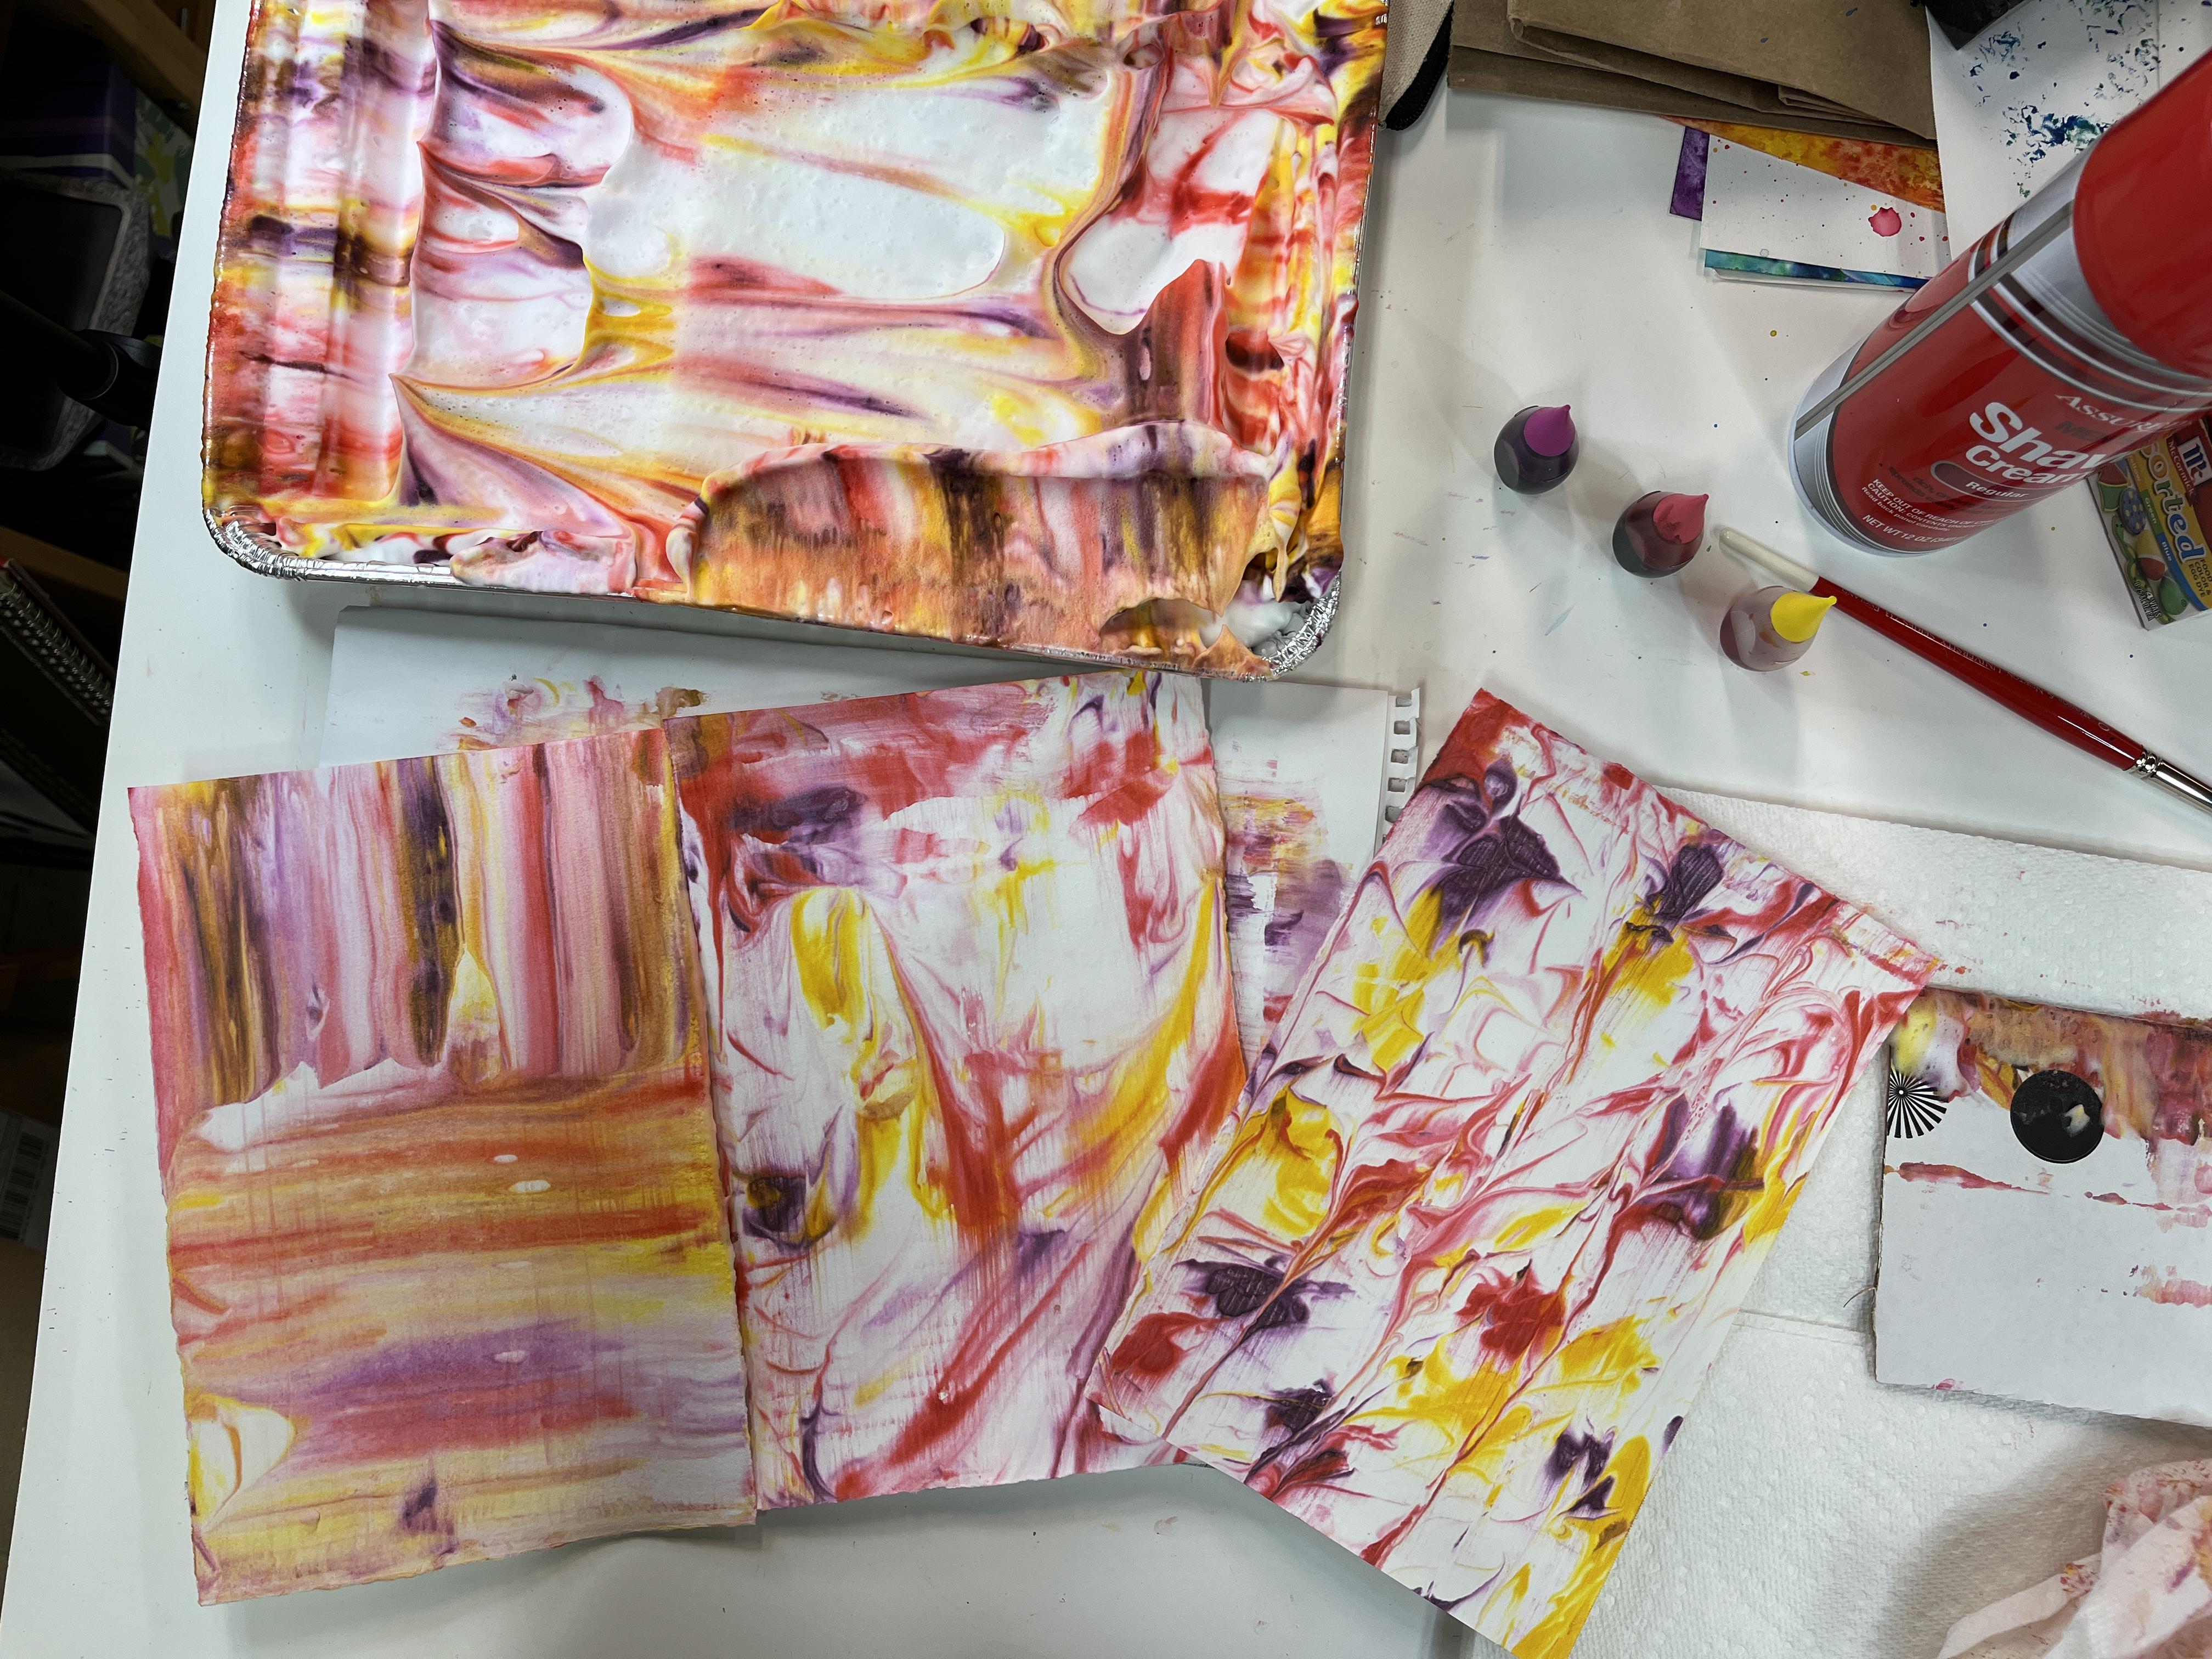
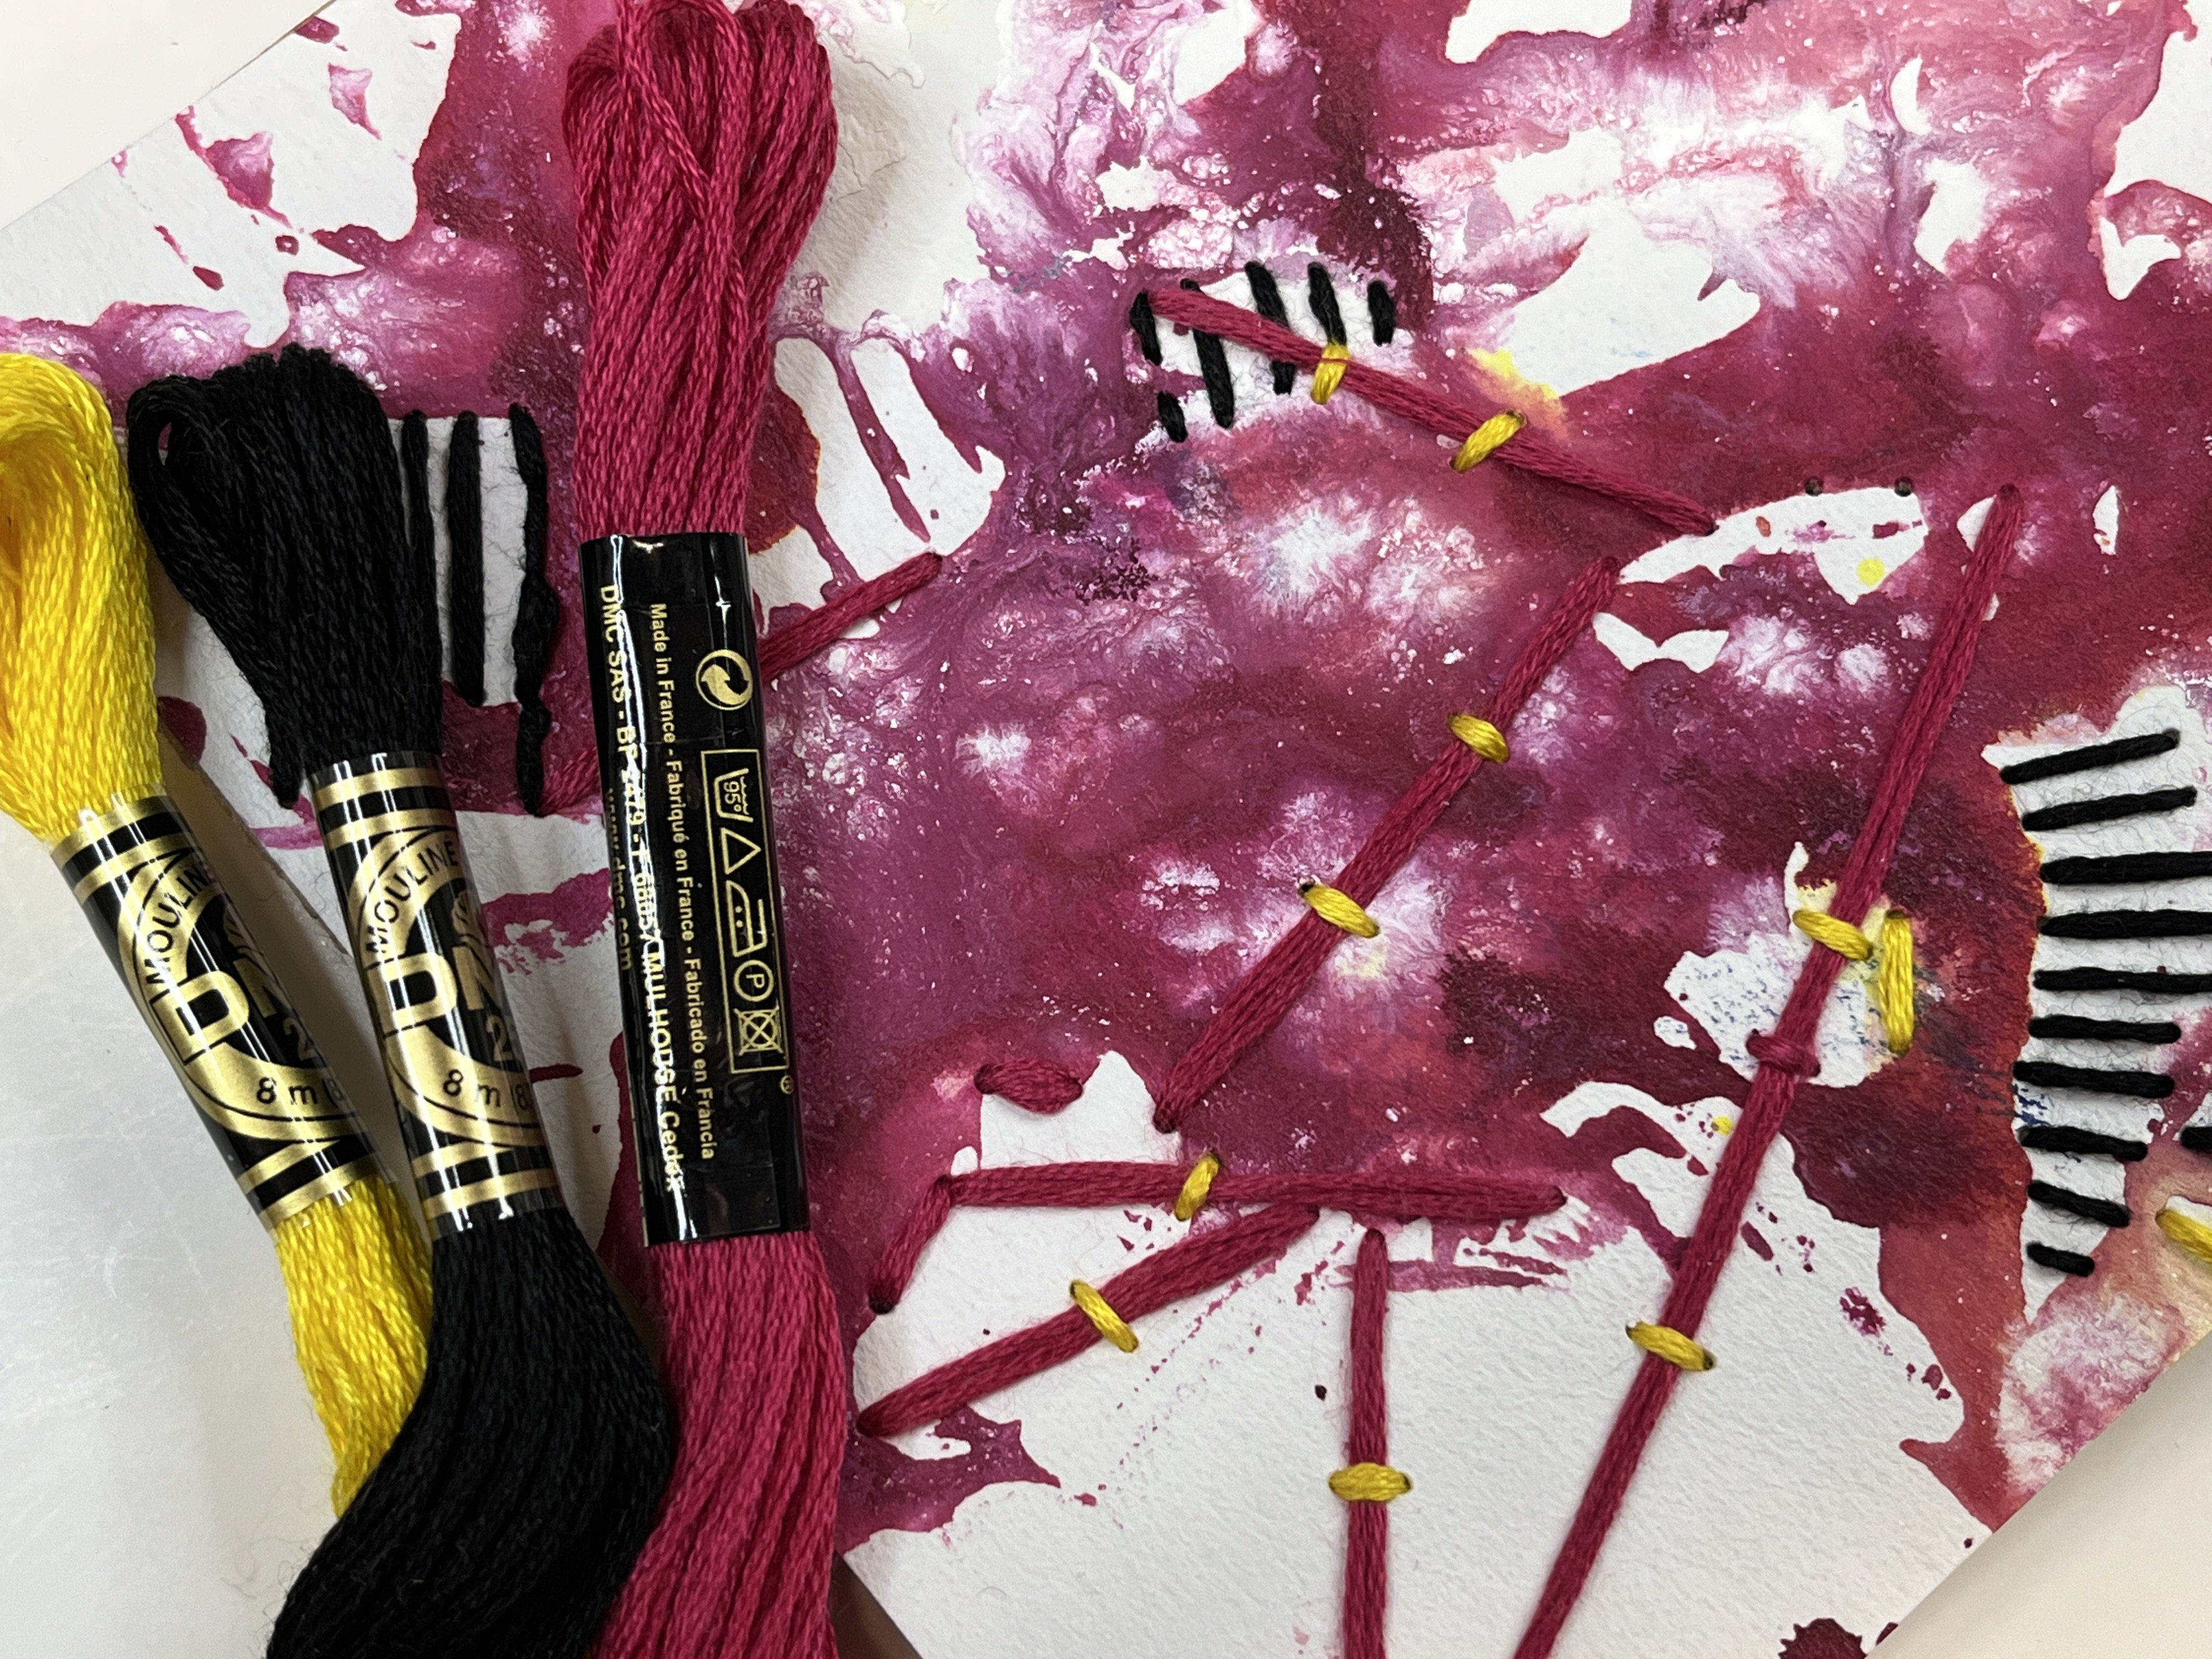
7. Marbling Technique: So now we're gonna do that
shaving cream marbling. This one's really fun. It's really messy because we're working with food coloring that will turn your fingers some fun colors for
a little while. But you can always work with you guys work
with gloves on. I don't because I don't mind getting a
little bit hard on me. And I find that I'm more
aware of where the message, if I actually have my hands available yet covered in whatever material
I'm working with. So we have our tray, we have our nice
cheap shaving cream. I got my food coloring, got several sheets
of paper that I tore up that I know are gonna be small enough to
fit in the pan. Feel free to work smaller
than this if you like, but you are going to
need your paper smaller than whatever hand
size you're using. And then I've got
my toothpick to do to move the die around. You're also going
to need a piece of cardboard to scrape the
paper off in-between. After each marbling session to have a clean your work area, I just tore off a bunch of paper towel that I just
kinda have on the side, so I have somewhere to set
my dirty cardboard down on. Then you're going to
have quite a bit of paper as we go through this. So have some open areas where you can lay
these out to dry. And the fun thing is shaving
cream smells pretty great. So here paper was will
also be slightly scented. So shake up your shaving
cream really, really good. Then we're going to
fill our tray with it. It doesn't need to be filled
up all the way to the top, but you do need to fill it. It grows as you spray it out. If you haven't worked for
shaving cream before. So you can kind of just
go back and forth. I'm only going to
work with a couple of colors because they're
going to mix together. The more marbling. And I wanted to go with
colors that when they mixed together are
going to look pleasing. So I went with a
warmish color scheme. I've got a, I've got yellow
and pink and purple. So we have our shaving cream. Now I'm going to start
dropping in my colors. There's really no right
or wrong way to do this. I'm just gonna kinda go
around and tell him places. With each color. You can be more strategic in how you plan these
out if you want to. And you can be very
strategic in how you move the shaving cream and the die to create different patterns. A lot of people tend to do this swirling pattern,
which is really pretty. I'm going to try a
couple of other ones. And the great thing is you
can keep going back into this quite a few times before you get a pretty
muddied colors system. The other thing you
could do if you didn't have a toothpick
or I wouldn't skew, or you could also use the
handle to a paintbrush as well. So whatever you have on hand, that would be okay to get some Diane would be great for
doing the next step. I've got the shaving
cream and the pan. I've got, I've dropped in
my fried food coloring. And then I'm going to start
moving the die around. The more you move it, the more colors
you're going to have. I want to work more geometric,
I think in this one. But let's look, that
looks like a heart. Like I'm starting to
create heart-shaped. So you really could do some of those beautiful
designs that we see sometimes in cookie frosting. I have a friend who is
a really amazing baker and decorator, baked
goods decorator. And it's so fun to see what she does with
fasting on keys and you, if that's something you
have a background in, could definitely
apply those skills to the next part of the class. And have some fun with this. I'm gonna try stamping
this as it is, because the more I work into it, the more muddled
that's going to get. And I want a lot of different decorative papers out of this one session of marbling. Then I'm gonna take my paper. I'm going to set it down on
top of the shaving cream. I'm going to gently push
it down into it a little bit so that the die can
register on the paper. This is the other
part that gets messy. We gotta get our
paper back out again. So kinda heal it up. Like so. That is quite a bit of white. I'm going to go back down
and kind of press in some of the areas that didn't
get as much dy. Now we are at this stage, so I'm going to set my tray, this type out of the
way for a second. I've got a scrap paper. Just let a job with a giant table covered
in shaving cream. So they wanted to be
able to just tell you quite a few French registers of stamping that you're going
to push down on your paper. Start at one edge. Then you're going
to scrape across, remove the shaving cream. And then I'm going to scrape the access shaving cream
back into your tray. If you watch you or you can
wipe it off on a paper towel to it doesn't really matter. The goal across this again, and it's going to take, it's going to spread
the dive further. And then you can play
around with this. I could scrape it this
way because I've got some die on my cardboard. So yeah, let's do that. We have some nice white areas. We've got areas. It didn't
register all the way. So I'm going to do
some partial scraping just to kind of push
it a little further. Yeah. I'm set to my
cardboard and there is a little bit more on there. So the other thing you can do, you can keep scraping it, but you still have some
foam on your cardboard. So the next step that you
could choose to do would be to take a clean paper towel
and wipe off any excess. We don't want the
shaving cream on there. We want the colors
to stay behind. And you can see it's already got areas where the colors
are blending together. Because I've shown,
I've chosen to use yellow and purple
or yellow and violet. I have some complimentary mixing that's creating some
neutral browns, but that's just part of the game and having fun with this. So let's set this aside
and let's do another one. Now I can keep
stamping without doing any additional work to any
additional movement to this. Or I'm kinda start playing
around with things a bit more. Get some more of this
colored and move out. Then you could also play around and doing
this with a bigger, bigger stick, like
if you were using, you could use it with straw. Even straws are wider.
Then toothpicks. Alright. So now let's do
another one away, but my fingers just
to make sure I'm not accidentally registering
any mass onto my paper. I'm gonna go ahead and set
this back down, stamp it in, make sure that they fit
even rub a little bit, do a little free with your
hands and peel it off. One more spot that
I kinda want to. Times it happens, it doesn't
quite register everywhere, but you can always
dip it back in. Let's switch it aside again. Set it down. Wipe off my fingers. My handy-dandy cardboard
shown one ends. Scraper for us. You've got to swoop
up at the end, really helps you kind of
lifted off the paper surface. Then I can scrape the
excess off in here. Then I've got a little bit
more leftover on the ends. I really love this one. This feels very floral to me. Very springtime, summer happy. This is exciting. I am
definitely going to use this paper in
a project soon. I am very happy with
how that turned out. That one. I'm going to set this one aside and I'm
gonna do another. And every time I
stamped back into it, it's registering
differently, right. So it's just like
it's printmaking. Basically. I mean, your marbling
paper by doing, you're creating a surface of material that will
transfer to a new surface. And then every time it
does it, it's different. So it's very similar
to them autocrine. You could also play
around, I mean, we're, we're making
decorative papers for class. But you could also
experiment with different ways to do more
representational imagery or more intentional
patterns between the food coloring and
the shaving cream. It's always one little
area that doesn't quite wanna pick it up for me. Misstep paper down. That one's going to
be really pretty. Now, I really like
this section a lot. And if I pull it this way, I'm gonna be pulling
my red and my purple across into my yellow and I kinda wanna
maintain that brightness. So that's something
to consider too. So I'm actually going to change how I get
the I get this out. I'm going to go this direction. Can I tackle that violet side? One of the things
where you can get as particular about
this as you want to. Then I'm gonna go
this way to get the rest of that
shaving cream off. Yeah. Yes. And I maintained my yellows. I didn't lose them and end
up with any muddled purple. This would have
been fine if I had. But even though some
of these processes, there's a lot of chance, there's a lot of
happy accidents. You can still be relatively
in control or at least try to work with the technique to achieve the results you want. So there's three different ones that all started out with
the same color scheme. But they achieved very
different results. So let's see, we have
put them in order. We have the first one, the second one, the third one. So first, second, third
of this variation, you could keep going as
much as you want you. I have a lot of color
left in my tray. So what I could
do is I can kinda pull some of this
down into the middle. You can also start
using smaller and smaller papers at
any point in time. If you really liked
one certain area, you could do a smaller
register of paper to get it. Actually. I can even play with
this even more. There's lots of great
white happening here that kinda helps
separate the colors. But there's also some really pretty mixing that's
happening over here. So I could take my cardboard and kind of manipulate this
a little bit more. Which is pretty cool. Then I can pull this this way. Yeah, that's gonna be gorgeous. Okay, so let's see
what that looks like. The great thing is because we're making decorative papers with the intention of cutting
these up or using them, using a smaller
sections of them. We're probably not going
to use the entire paper in its original form. We can really play around
and have some fun. So let's see what happens. Now. Check to see if
everything registered. And again, it doesn't have to. You can have white areas. That's fine. You're in control. Right? Oh, well, I'm excited. Okay. Wipe off my fingers just so I'm not going to let me
shaving cream chaos. Then I'm going to go
ahead and scrape off. Oh, that's beautiful. And this is great. Like I've essentially created. This could be, you know, they can be used in combination of the vertical and the
horizontal stripes. I could cut this into two
smaller papers and kind of keep those in my stash
of decorative papers. So many different
possibilities and options. I'm going to get off
some of the extra. I'm going to dab it a
little bit because I don't really want to muddle. Be fine. My kidding. It doesn't matter. Alright. This one might be one
of my favorites yet. Play with your colors, play with the way that you move the color on the shaving cream. Experiment with
scraping back into it. How else can you manipulate this tray so that you
get really interesting, unique, and varied results? These projects are great because every technique
is going to yield different results for
every different students. And even within a
single student, we're going to have
such varied results. So it's going to
be so fun to see a big collection of beautiful decorative papers
when it's all said and done. All of these were created
during the demonstration video, but I have many other
ones that I've created. This one is using more of a cool colored analogous scheme. This one, this one came
from that same stamping. See what happens when you have more of the violet ended up being a little
more prevalent there. And then this, the blues
and the greens kinda took over for this
section of the tray. This one was fairly even smaller
papers and bigger papers in the same it was I was using a pretty large tray for this. I think it was a cookie
sheet size when we did this with a group
of my students. And then you can do it
with smaller papers TO this is very, very thin, know, kinda paper. This is just some
scrap paper round. So these are very small pieces that I put into
different parts of the tray from a couple of different other color
combinations I have. So have fun with the marbling. Explore your colors, explore
the way you move it, and then explore how many
times you use damp jack, like you press the
paper back into the food coloring and shaving cream to see
what results you get. And please be sure to share these in your projects section. The results are always
so surprising and it's really fun to see how
each approach, this technique.
8. Final Thoughts: Thank you so much for
taking this class. I've really enjoyed sharing
these techniques with you. I really enjoyed putting
this class together and exploring these techniques
further myself. And I've got a lot
of great ideas for collages I like to
create using my papers. So stay tuned for updates to my projects when I get
that posted in the class. And I hope you have as much
fun as I have creating decorative papers
for your collages and sharing your
decorative papers in the project section. If you enjoyed this class
and you want to stay up-to-date on additional
classes I create in the future. Sure to click the follow
button so that you get notified every time
I post a new class or anything gets updated
in this class or any of the other classes I have
posted on Skillshare. I also really appreciate it. If you took the time
to leave a review, it means so much to me to
learn from my students as I continue to grow as a Skillshare teacher
until next time.
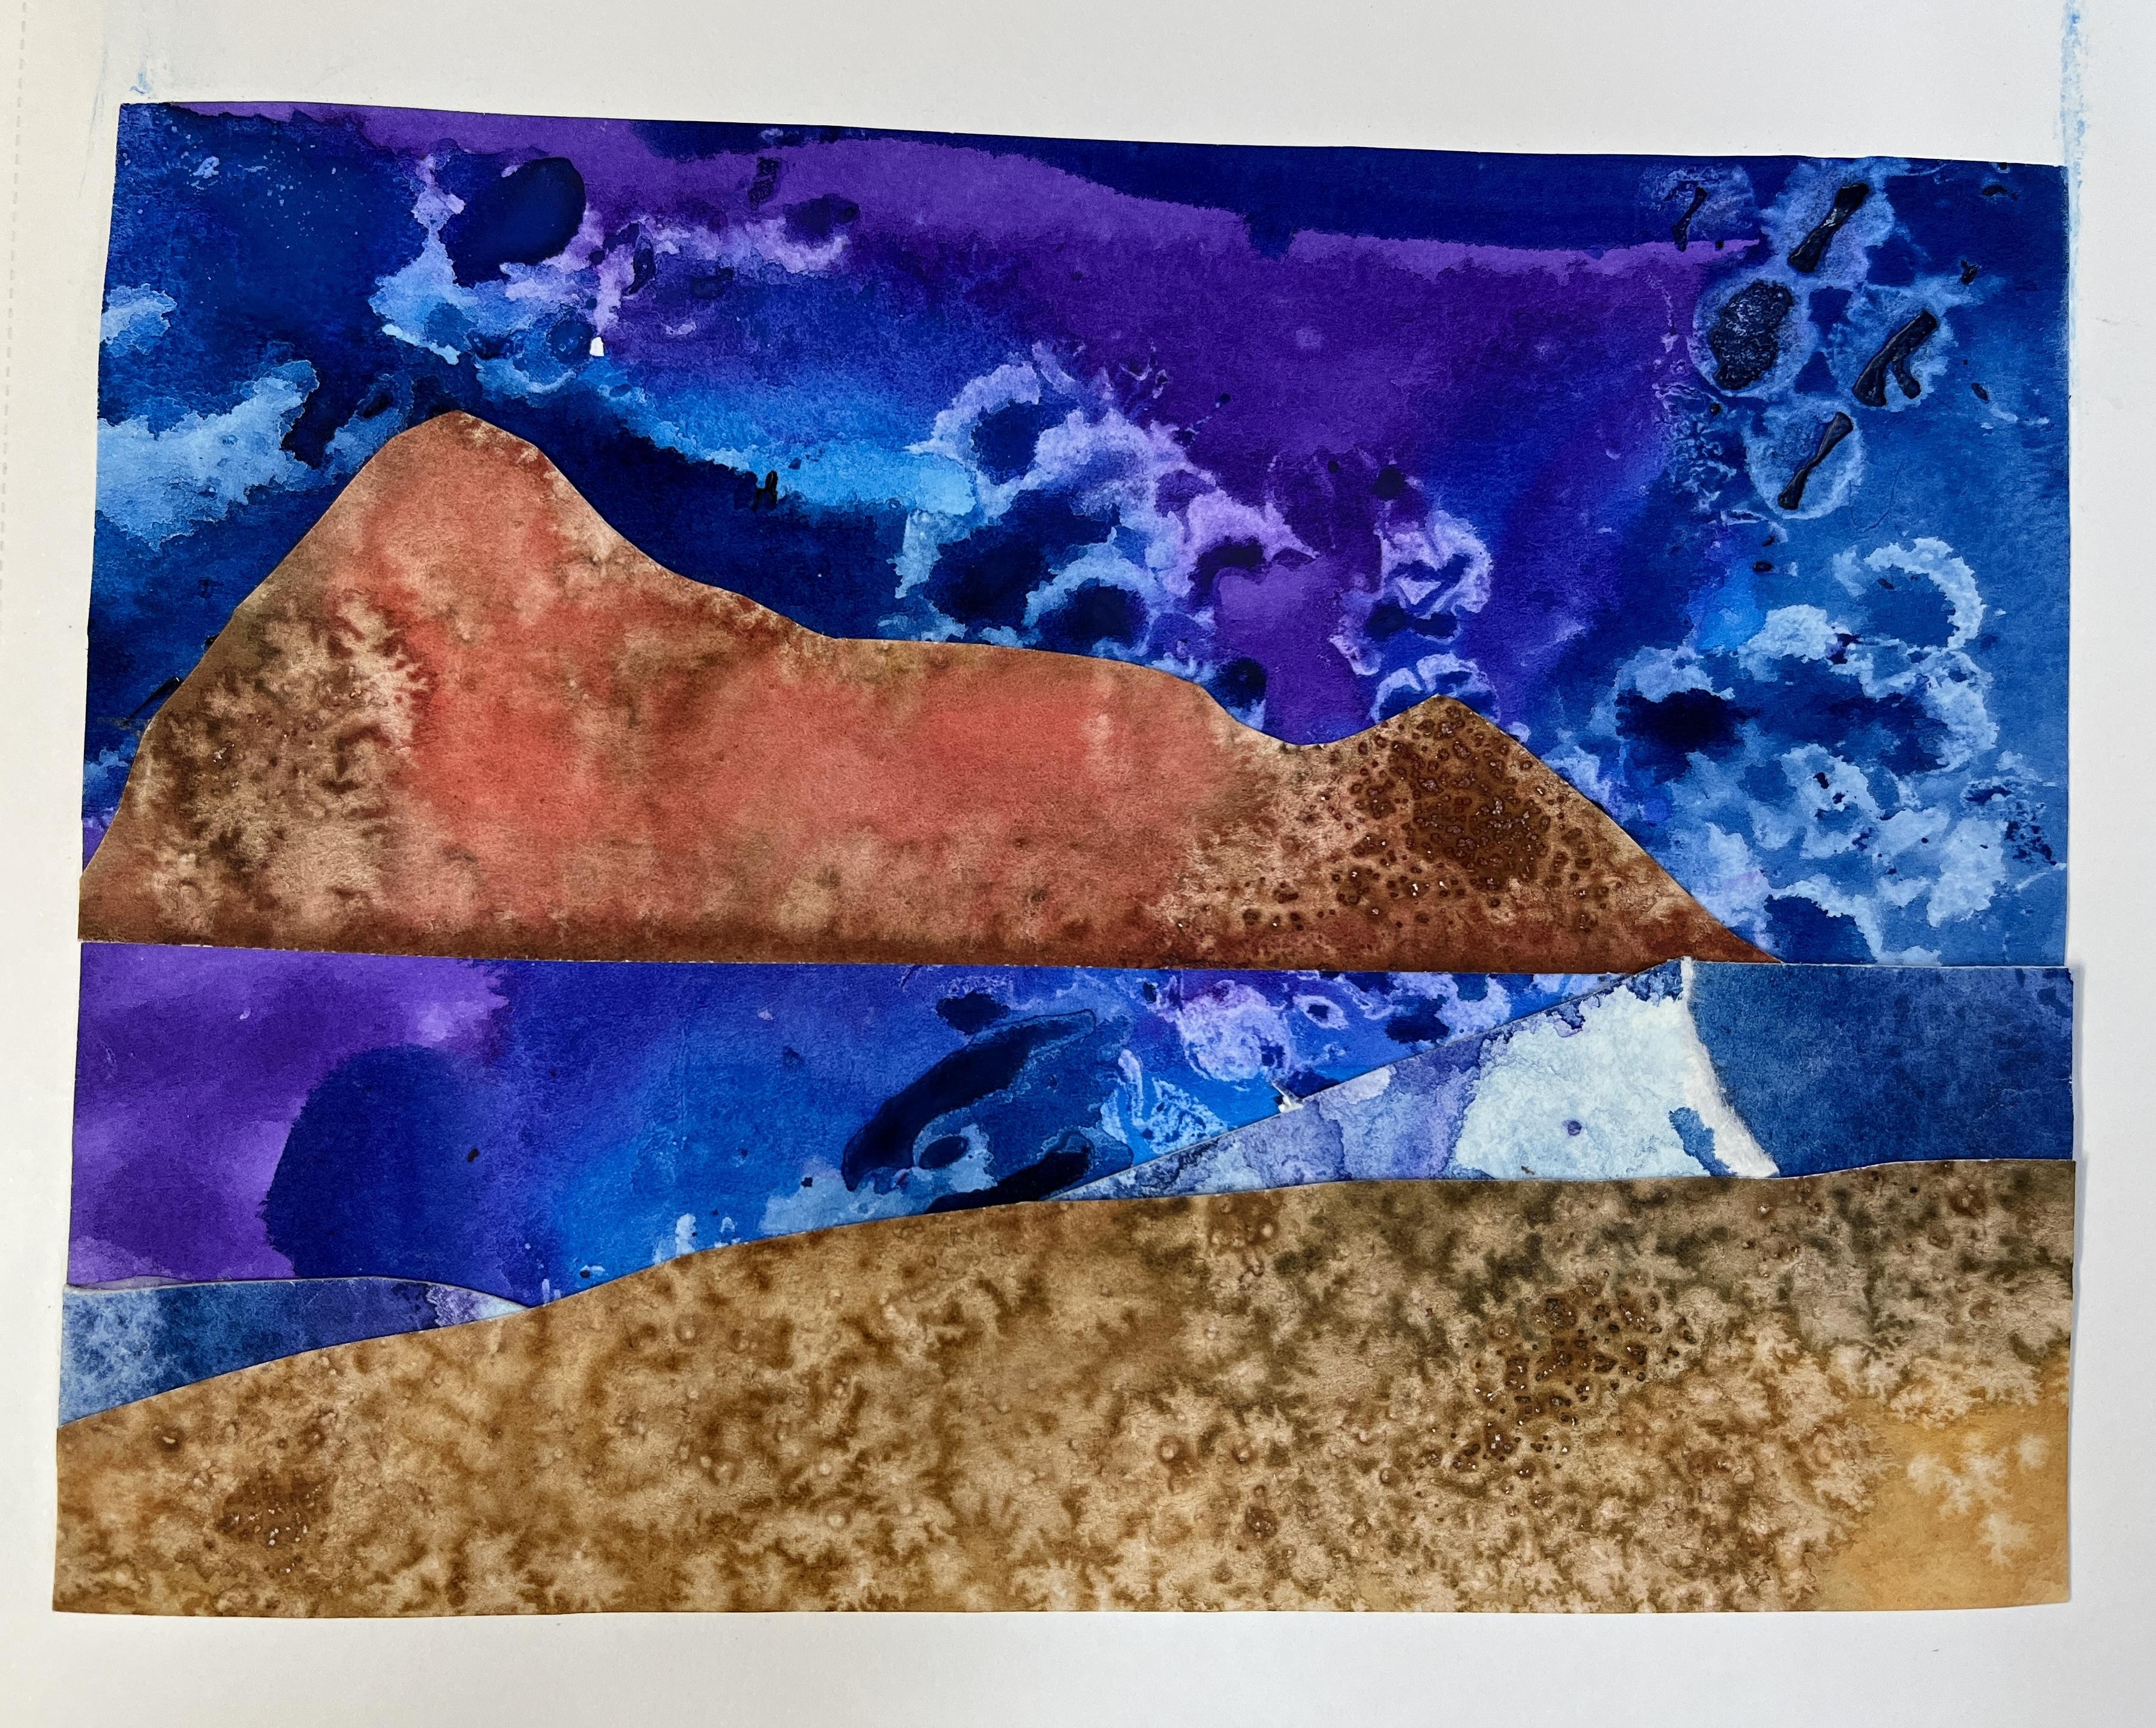
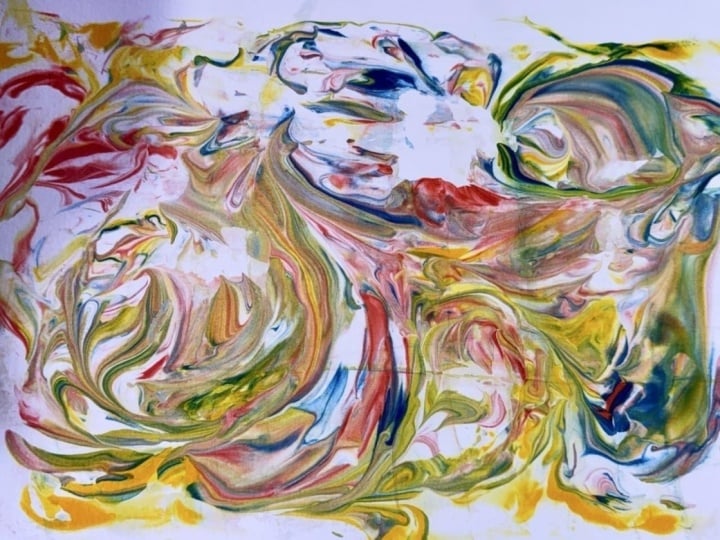
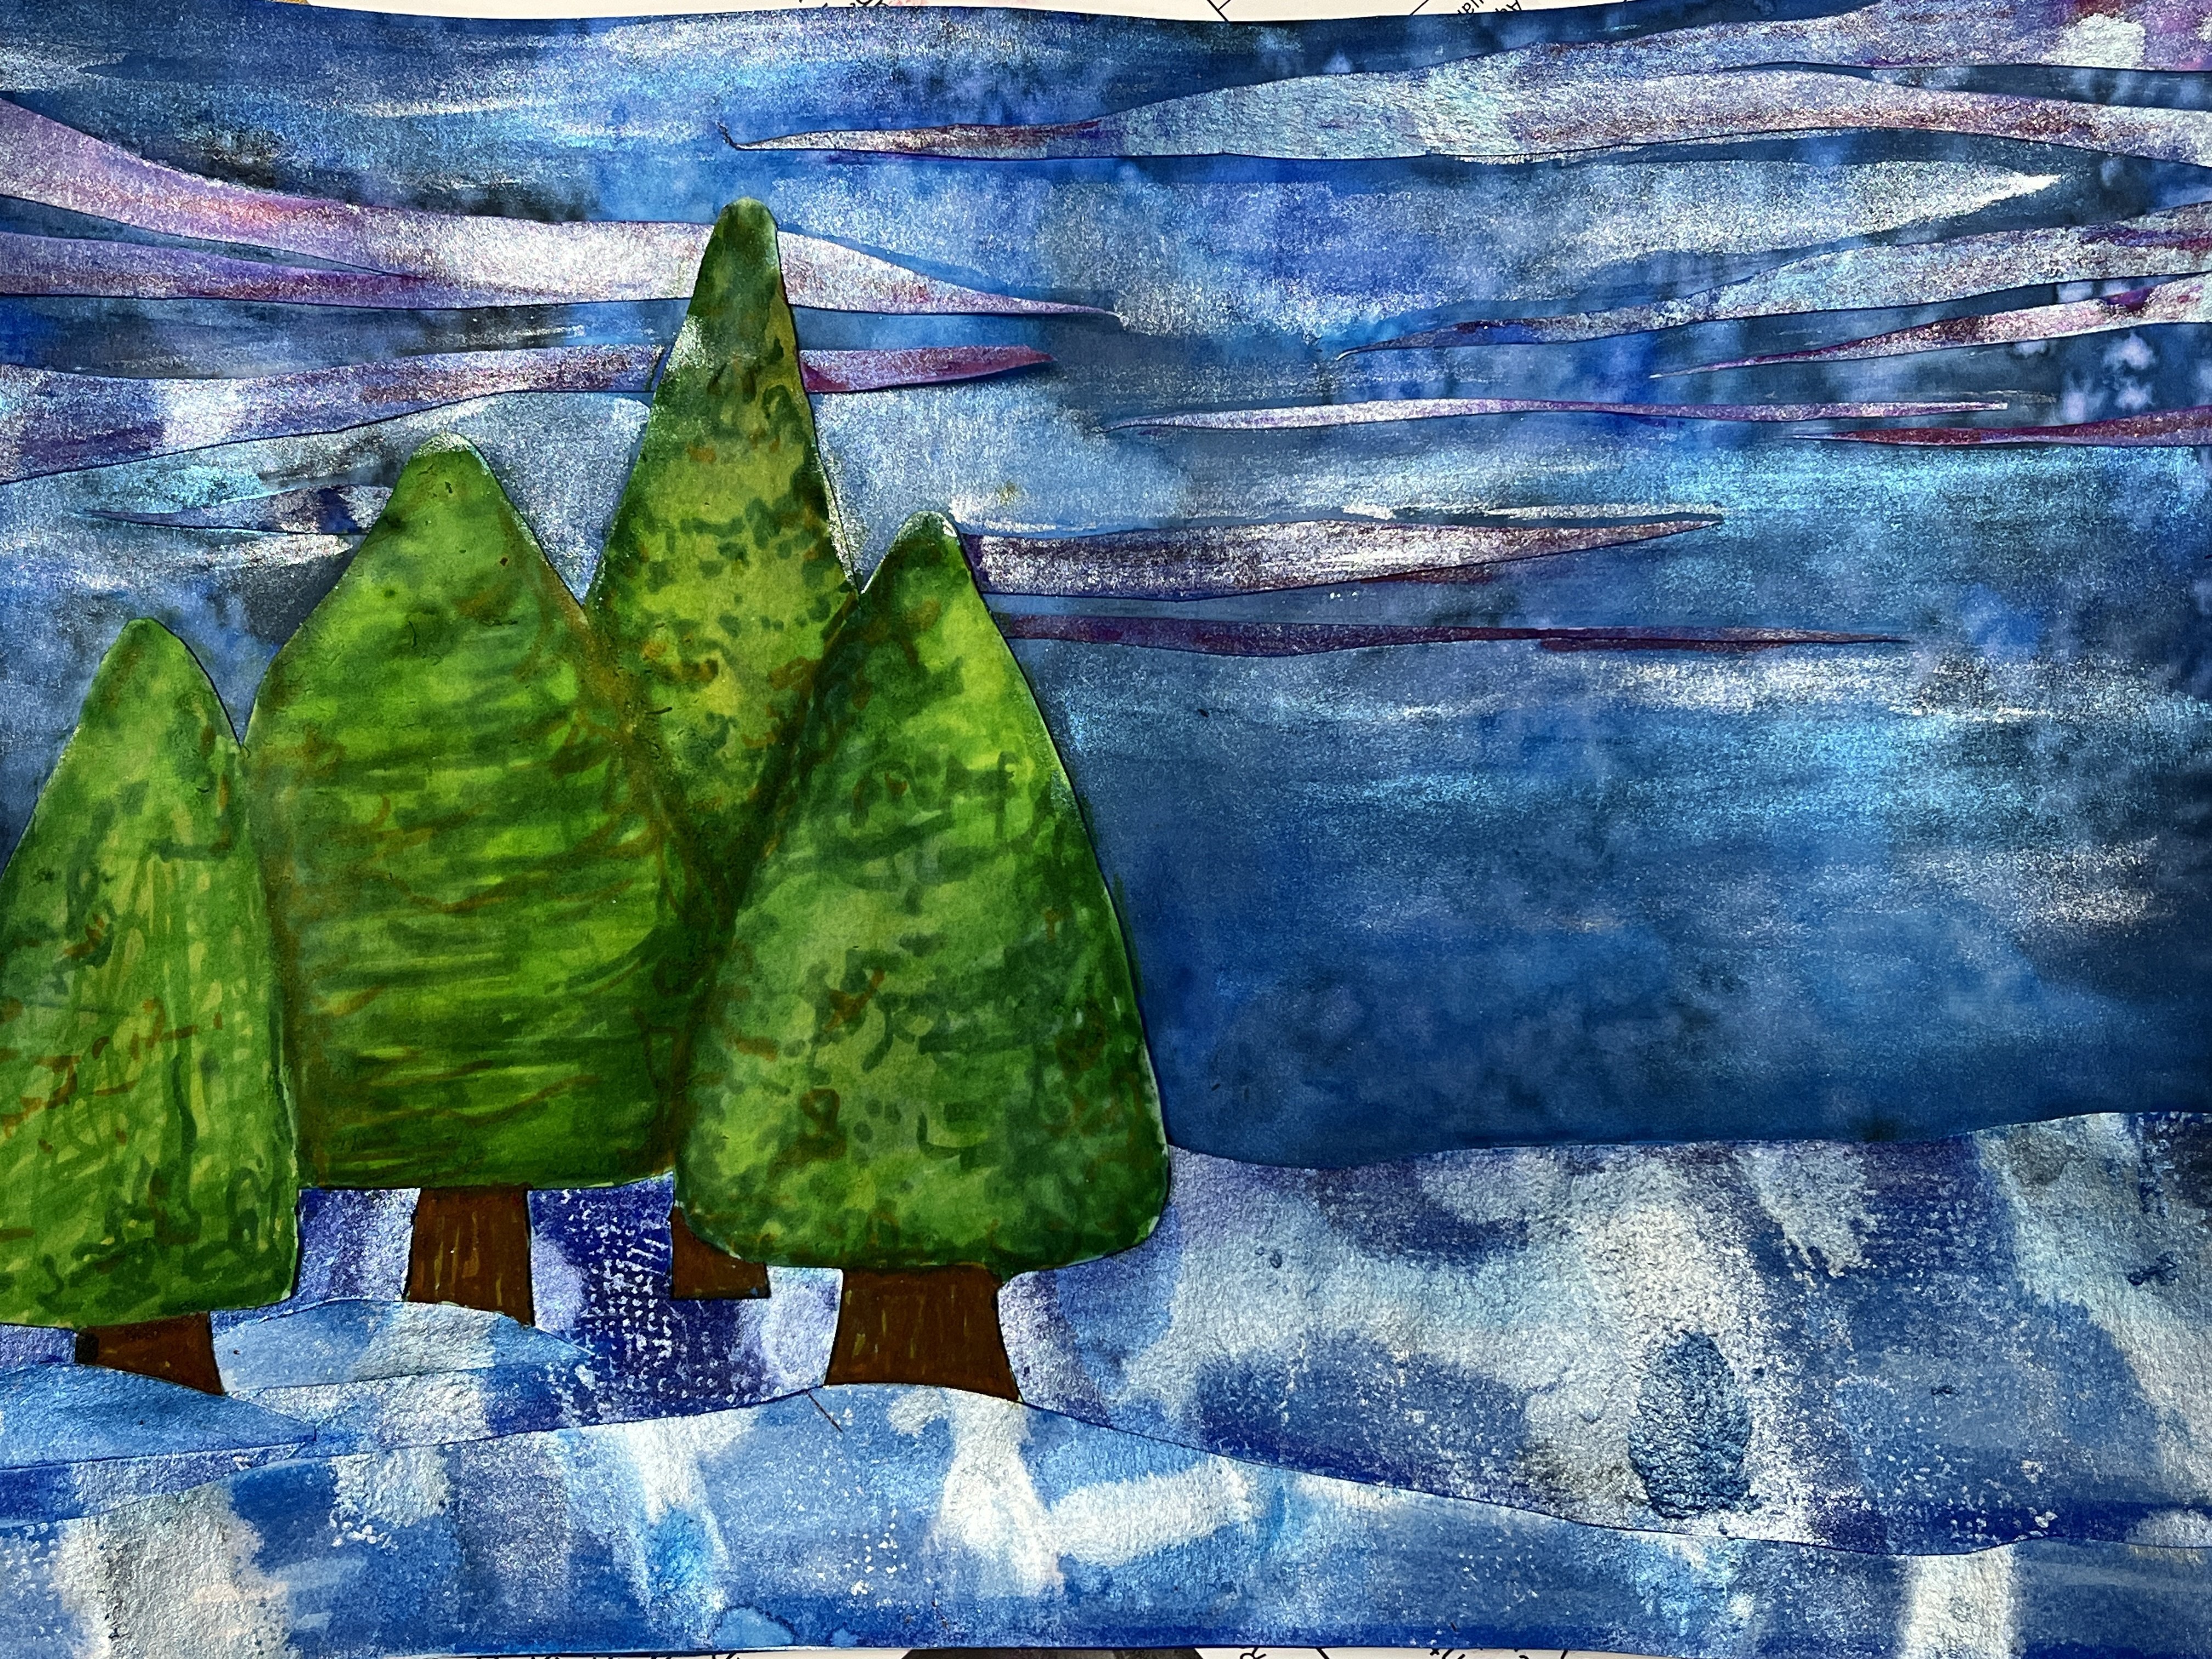
9. Bonus: Decorative Paper Collage: So now that we have our
decorative papers that we've created using the
different techniques. I'm going to cut
them up and create a simple landscape
collage because that's kinda what these
decorative paper spoke to me. I'm going to start with this one with the bubble wrap as my sky. I'm going to glue this
right into my sketchbook. It's a great way to kinda keep
small collages organized. Especially when it's
experimental or just for fun. I wasn't creating
these papers with the idea of a grand or work. I also really enjoy my
process in my sketchbook. So I am going to do that. I'm going to start
by laying this down. And this one was kind
of the foundation for how large I wanted to go, since I used roughly the
same size paper that worked out really well to
give me a size to work with. Then I grabbed a couple of
other decorative papers that I had scraps laying around
from a different project. So this paper came
from this piece. So I've entered a whole sheet of watercolor paper like this. And then I flipped it over, drew the whale shapes. And so I wasn't
paying any attention whatsoever to which parts of
the decorative paper I used. I wanted to kind of let
that process happen organically as far as where what it looked
like when I flipped it. And then if I had my little shapes
and then I ain't into them and add them to another decorative paper that I created specifically
for this artwork. This one was very
intentionally made, but I had all of this extra
beautiful paper leftover. So I wanted to use that
in this piece also. I've got some of that here. I'll have to see how it's
going to come together. And actually, I think
I spoke too soon. I think I put this
in the wrong way. That's okay. I'm going to peel it up. I'm going to flip it. Remember? Now, here's what happened. I created another collage in this sketch book using
other decorative papers. This one, I created, this one using same paper and
some old salt paper I had. And then the marbling that I had created as
part of this class. Behind I started with that. I cut out a section
of the marbling and then build it up from
there, melted down. I should say. For this one. I was thinking in my head, I had this all worked out. I already kinda mapped out
the size but I didn't. That's okay. So we're gonna go backwards
and try to figure out, I know that in my head this was an island in the back of
the landmass in the back, and this is definitely my sky. This one I wanted to
put in the front. And then I was going to overlap these two papers
to create my seat. I had it all mapped out grades and then I didn't bring it down their studio or getting food
down right away because I wanted to make a video
to show the process. Kinda lost my organization
for this piece, but that's okay. I
hope that's right. Okay. Now I'm remembering this section wasn't what this wasn't
level with this. So I was going to glue
it down at an angle. It's all coming back to me now. And then this piece
wasn't going to be an overlap section because it was going to create
some interesting contrast. But I haven't quite decided
how do I manage that. So I'm gonna grab my
scissors and I need to I can make the
overall thing smaller, but I'm actually just going to give this more
of a slope to it. So it doesn't feel so abrupt. When it gets cut off there. Then this piece goes on
here to be the land. And then you just kind of
adjust everything down. Somewhere in there. It looked pool upstairs. You know what? I'm going to change directions. So I really like the
landmasses that I've created. I really liked the sky. I have more of this. Now that I'm downstairs
in the RStudio, I have tons more decorative
paper at my disposal. That is why I don't
throw away the scraps. So I started doing was
saving them in a box. Just kinda took a regular
old whatever kind of a box-like some other words, replies that come
in or something, something that was
like a decent size, it's not very tall. Show you how I
organize my supplies. They're not mature
organized, but there is a box that they're
supposed to live in. So that I can keep my scraps
for moments like this when I just need a little bit
more to work with. Okay, so now I've got now I've got some
more going on here. So one thing I can
do is I can go whew. I could plan it out
and I could have it, glue it down into my
sketchbook right away. I'm going to actually
map it out here. And then I'm going to
trim up the edges. And then I'm gonna put down, one thing you want to be
careful of if you're creating a landscape is having
too much evenness. So I don't want, I know I want this landmass to
cover up the white. It feels like it's
taking attention away. So what I'm gonna do is I'm
gonna pull that down first. I'm just using a regular
glue stick to do this. I've got scrap paper underneath, so I don't have to worry
about making a mask. Then I'm going to do the
island and where I want that. Because this is pretty
thick mixed media paper. I'm going to wait us down
when it's all attached. So I've got that island there. Now what this
actually looks like, it's a reflection of that. So I don't know that I wanna do, and I was originally
going to do. This is why it's fun to play. It's really, really
fun to play what I might need some more land. Like another level. I feel like there
should be something that's happening that's changing this section a little bit. Maybe not. That's not necessary. This is where you can fiddle
with it all day long. Do you want to I really
liked that reflection. Okay. So change of plan. I'm going to see what other what other land mass type
papers I have around to see. What else I can do there. I can extend the
horizon line with ink or even the very thin
scrap of this paper. Just cut it off there and
keep it super simple. Because then it's not grounded. Too many decisions. I'm gonna do a tear
this for right now. I think I need that
to define the edge. Maybe that needs to be darker. You don't have to cut to
you can I'm gonna cut. You can tear it too. It's a little trickier
with the thicker papers. The whales remain on very
thick watercolor paper. So that creates a little bit of a challenge when
I'm doing stuff down. It's good for the
watercolor part. But i, if you're
really be mindful, and I attach that, okay, so now that gives me a
little bit of a break. They are, but it doesn't crazy distract from
what's happening there. Now. We'd have to merge
the two somehow. Somehow, some way. Not as crazy as that seems,
that actually works. I'm going to do it like a
brush glued on this section. Sometimes the things you don't
think you're going to work for going end up being perfect. So just play. When you get to
this point, just, just have fun and
see what happens. I'm going to put that there. But actually now I
kinda think that maybe should bring very
hard break there. Anything that has this
much purple in it. I don't think there's some
parts of that whale painting. Well, decorative paper do
have some more purple. So maybe we just need
a little bit of that. Yeah, that's it. So now we're gonna move
down this little bit. I want it to kind of
follow that line. You just have to figure out
where that's gonna go and then I can lay it on
the second landmass. Yeah, I like that a lot. Let's do that and then
I'll trim off the bottom. Okay. So the landmasses, remember we're papers that I created
using the salt technique. Naive at painted back into it even after I put the salt down, just to pop some of
those colors folder. And I'm really
glad I did because I ended up really loving. The red orange affects that. That's there and it
creates a nice contrast to the lighter yellow,
yellow ocher tan. Over there we go. So now this can be
done or I can go back into it with ink or markers or colored
pencils, oil pastels. Sky's the limit. But what
I really want to do, all that glue is still wet. It's pretty heavy book over it. There's a great use
for those really thick our history books that he may have a collection
of like I do as a teacher, I was always kind of acquiring history books to share with
my students in the classroom. It makes for a
really great weights when it comes down to it. The other thing that
could be super cool for these scraps is to kinda patchwork them and create
a border around a piece. And they can be
contrasting pieces. They could be colors that
are within the piece. This isn't something
that I have ever done. This is just an idea
that came to me. In this moment. The happenstance of laying down,
How cool is that? Trimming them up
like a clean border. So that's kinda cool. I might play with that in the future. But for right now I'm going to get some heavy art
history books out. I'm going to lay this down
with a blue is wet because I asked because I went to glue it into my
sketchbook right away. I'm gonna be very careful
to put a scrap paper, scrap copy paper down. Put that down over it to protect the artwork and my
art history books. I'm going to weigh it down with a little history and let that dry for probably half an hour, at least just to kind of
let everything settle. And then I will put it into a spot in my sketchbook where it was originally going
to go, alright, now that this has been
drying for plenty of time, we're going to
take off the books that I had weighing it down and the scrap paper, my printer. And I'm going to put
the client over. Now I do need to deal with some final work
through in this app. I'm just going to
take my scissors and clean up the edge of bed. The bottom. They wanted it to end. Then clean up this
edge a little bit. And I could be super
fussy about this. I could get out my paper cutter. You can see this isn't straight. But I'm just going to
eyeball it a little bit. I think. I'm going to use a
scrap sheet of paper. I'm just going to decide that this edge is
gonna be correct. Line it up there, and then just use that
to kind of roughly trim. Awesome Access here,
straighten that line up, and then rotate it around.
And I'm going to line it up. I'm gonna make it
flush with this one. That one is actually
pretty good. Like crazy. Let's see. I'm going to line it up. There we go. That's where the
weirdnesses line it up flush with this edge. And I can see how long
have you been at is again, you could lay down I can lay
down a ruler to do that. I could get out my paper cutter. This is just when they
go in my sketchbook. So they're much, much better. Now. Take that page that I was
going to glue it to initially. I've had a torn it up a bit. My paper is small and now I'm
going to ignore that one, finds a new section. I'm going to glue it in. So that's a really
nice way to organize your mini collages is just to glue them
into my sketchbook. Especially if it's a hardbound
sketchbook like this one. And the glue picked up a
little bit of the watercolor. But that's okay because
I can just rub that out. Actually. Take some paper towel, misleading the watercolor
behind. That's okay. It gives a character.
Mr. embrace it. Decorative papers turned into a very simple collage landscape that goes in my sketchbook. And then I'm gonna go
ahead and close this up and put those books back on, tap it down a little bit more, and move on to the next piece.
 Elisabeth Wellfare, Artist, Art Educator