Transcripts
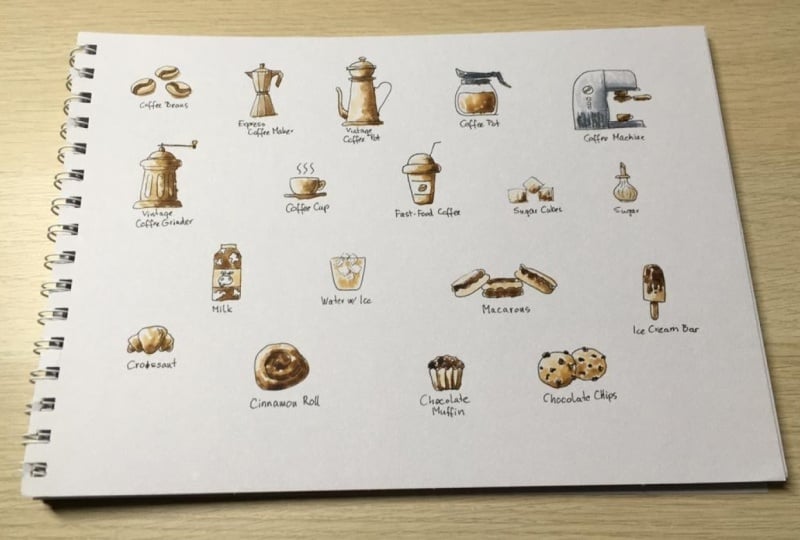
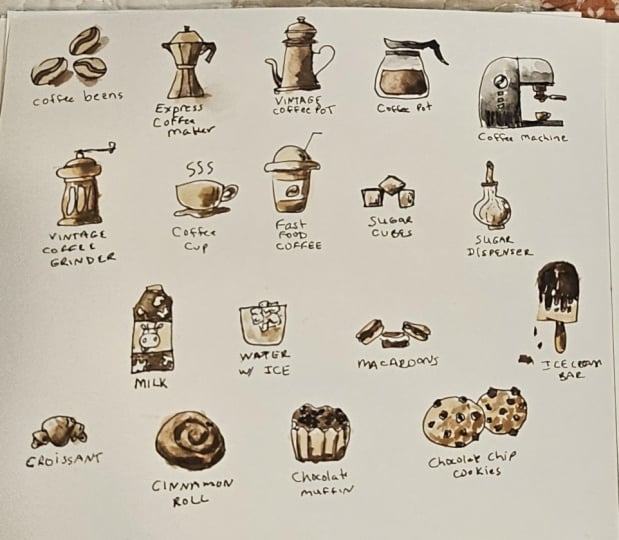
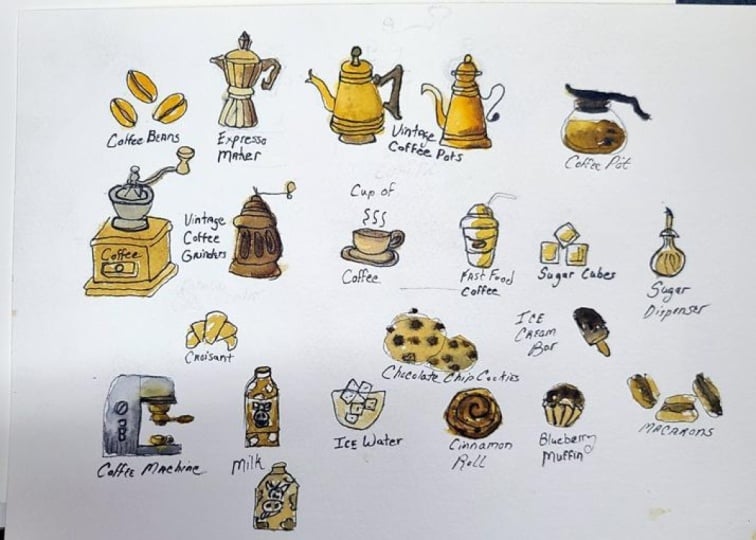
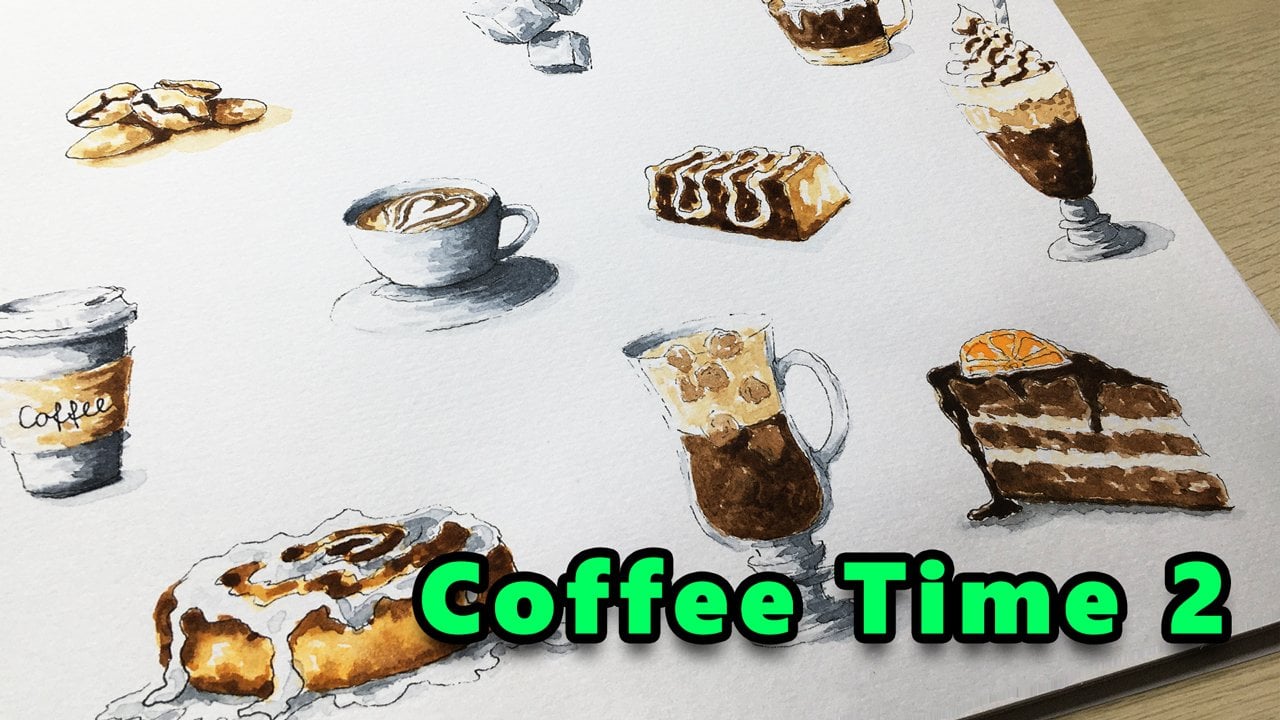
1. What's in This Class?: Welcome to my coffee time in
watercolor class, Part one. My name is Thomas, and
we are here to learn and practice a simple
illustration technique called line and wash. This is when you draw
your sketches with an ink and add some
watercolor paints to them. This can be a great
class for you if you are a beginner at drawing and
relatively new to watercolor. I'll show you how you can create some simple but
impressive illustrations. We'll be drawing all kinds
of coffee related items. You will learn how
you can build up your subjects from very
simple lines using only two dimensional or
flat shapes and how you can make them look more engaging with just a few
watercolor brush strokes. This session is also
a good preparation for part two of this miniseries, where we will make some more advanced coffee
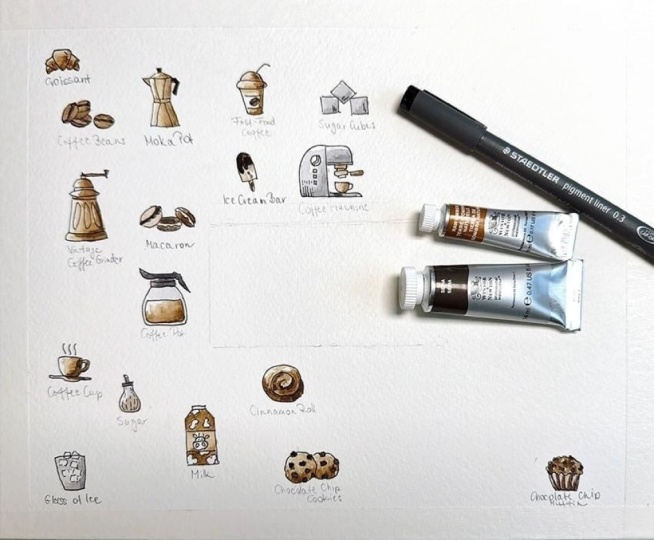
related illustrations. I'll be using an inexpensive cod pressed watercolor paper. Here you can see its parameters. Nothing really special.
For the sketching part, I'll be using a pigma micron
archival ink, size four. This has a relatively thin tip. It's important to note that this is a water resistant ink, so you can paint on it without any blurring or smothing effect. An alternative can be a permanent marker that can
be easily purchased locally. As for the painting part, I'll be using a size
six round brrush and a very limited
color palette, including a light brown, in my case, asiana
and a dark brown, in my case, Mrs brown
watercolor paints, plus a bit of paints gray. Other than that, you will need the common watercolor supplies
like a water container, some paper towels, and a mixing palette where
we dilute our paints. Now I hope you are
excited to dive into my coffee time drawing
and painting session. It will be a great fun where your drawing and painting
skills will improve too. I'll see you in the first video.
2. Coffee Beans: I'm glad that you are
taking this class. Just a few practical notes here. I'll be drawing and
painting as slow as I can, so hopefully you can
follow along easily. But you can pause the video
at any point and catch up. Another option is to watch me making the
ink sketch first, just a minute or so, pause
the video and make your own. As for the painting part, I
suggest you do it with me. Now let's dive into and fill in this empty page with
some interesting stuff. As a first step, let's
draw some coffee beans. Try to arrange your
items as I do. So you will have space for
everything on your paper. I'm drawing simple
ovals like so. Now I'm drawing some as curves right in the
middle of these ovals. That's it. This is our first
sketch. How simple is that? Now I'm shifting my sketchbook and taking my mixing palette so you can see what I'm
doing with the paints. I'm adding water to my paint in the pan and put some over here. I'm starting with Ro Sienna,
the light brown color. Now with my size
six round brush, I'm making some brush
strokes inside the outlines. Try to create a light shade like this by adding the proper
amount of water to your paint. You can always make
your watercol paint lighter by adding
some water to it. Very good. I'll let
it dry for a minute. It's a good practice to
keep your brush clean. So I'm using a paper towel to
take off the excess paint, and I'm rinsing my
brush in my water bowl. Now you can see it's clean. All right. We'll come back to our coffee
beans in a minute. But while the paint is drying, let's start sketching
our second item. During the session, we'll be working on several
items in parallel. This way, we can
proceed continuously without any downtime.
Hope that makes sense.
3. Express Coffee Maker: Now let's draw an old
school cuffe maker. As a first step, I'm
drawing a trapezoid. Like this, this will
be the lower part. Now a narrow middle section, and another trapezoid
upside down. The top section, the lid will be another trapezoid,
a squeezed one. The knobe at the top,
rectangle shape, the spout is a triangle, And the grip looks like this. A bit more complex shape. And some vertical lines to mark the sections on
the body. That's it. We have an express coffee
maker. We can start painting. Okay I'm taking from
this light brown. Maybe I'm adding
a bit of water to it and filling in
the whole body. Now I'm cleaning my
brush on my paper towel, rinsing it in the water and
taking some dark brown paint. I'm adding some water to it. Note that if your brown
is not dark enough, you can always make
it darker by adding a tiny bit of paints gray
to it or some black. I suppose the coffee
beans are already dry, so we can add the
second layer of paint, some dark shade
right in the middle. The dark shade marks the crack running
through the coffee bean. With a slightly lighter shade, we can also paint some shadow areas somewhere at the bottom. We can run through the outline, so the rest will mark a cast
shadow right below the bins. Good. Now let's take some middle brown and paint
these middle sections. Actually, we can also paint these surfaces with this shade. Very good. We are
proceeding layer by layer. By adding darker
and darker shades, we create the illusion of
depth or three dimensions. This is how we turn our
otherwise flat two d shapes into three dimensional.
How great is that? So we don't need to draw in perspective and know all
those intimidating rules. We are just using light
and dark shades to create the illusion of
three D. All right, let's clean our brush and go to our next item until the
paint dries on the paper.
4. Vintage Coffee Grinder: Now let's draw a
vintage coffee grinder. This will be the top
section of the box. The box itself. And the base. The very top section
is a curve like this, a kind of semicircle,
and the handle Like so. Let's add the simple
texture to the surface. And that's it. We have a simple
coffee grinder shape. Now, let's paint it. I'm taking a light
shade of brown. Note that in watercolor, as for the layer, we usually
go from light to dark. You can always make a
light surface darker, but because watercolor
is a transparent medium, you cannot cover an already dark surface with
a lighter paint. I need more asana
here and some water. Now, I'm using a
technique called dabbing, so I can leave some white space
between my brush strokes. These white areas will serve as highlights
on the surface, you know, where direct light is reflected towards the viewer. Now, let this one dry a bit. I'm taking some dark brown and paint the shadow side
on the coffee maker. We are assuming that the light is coming from the top left. This way, we are getting a nice, three dimensional look by using only three different
shades of brown. How simple is that? Let me add some dark to
the coffee beans as well. Nice. Now I'm cleaning my brush because I'm going to add
Middleton to the coffee grinder. Note that this is our second
layer of paint on this one. The light comes from the left, so I gradually make
the right side darker. Very good. Now let it try. Okay.
5. Vintage Coffee Pot: Now let's draw a
vintage coffee pot. Here is the base. The body part, similar
to the grinder. So separation at the neck. And the top section consists
of two semicircles kind of. The handle is curving like this. And finally, the spout. Like so. Tapping and dabbing
with light brown. I'm taking some mid tone. I We can also add the second layer to the
grinder with this shade. Something like this. A small amendment to
the coffee maker. Now, let's take our dark brown to add the third
layer to the pot. Notice that the
paper is still damp, so the different
shades blend nicely. This will create a natural look. I'm taking some extra paint from my mas brown to get
a darker shade. I'm barely touching
the surface here. Too much paint would
spread more than we need. Let's add some extra dark
to the pot, as well. I'm cleaning my brush, rinsing my brush, and we can
move on to the next one.
6. Modern Coffee Pot: Now that's true a
modern coffee pot. It's almost like a square
with some rounded corners. The top section will
look like this. The liquid will take this space, leaving some gap for the
glass material on the sides. Dabbing with a light
tone. So mid tone. And the dark Notice that the right side
and the bottom are the darkest. Very expressive. Let me bring some more original dark paint directly
from the pen, and we can increase the contrast between light and dark further. It's good to know
that watercolor paint gets lighter once it has dried. So this shed may
look too much now, but it will be just
fine in a few minutes. The tiny white dots you see on the screen are just light
reflections on the wet area. They are going to
disappear soon. Anyway, let's clean brush. And I'll be using a bit of
paint scray for some parts. Oops, this is stuck. Okay, just a tiny bit of paint. I'm diluting with water. And painting the
handle plus the rim. I'm dipping my brush into the water to get a
very light gray. That's it. We have our
modern coffee pot.
7. Coffee Machine: Now let's draw a coffee machine. This is our baseline. I'm drawing a vertical line
somewhere in the middle. On the left, we have the
water tank inside, I guess. The hot water will come
out from this part. H. The filter and stuff here. And the coffee cup to fill up. Some control buttons. I don't know. So
ventilation over here. And we can paint. I'm using light brown
on these elements only. I'm cleaning my brush, adding some water to
my mixing palette, so I can paint the
machine with light gray. A bit darker shade. A third layer. I guess that's it. Let me add some dog
brown to the rest. M. And we can clean our brush. Maybe I'm adding some darker gray to the
coffee pot as well. And so for the machine. Very good. We can move
on to the next one.
8. Coffee Cup: Now it's time to draw a coffee
cup to serve some coffee. It's a very simple to
D shape like this. The handle the little plate underneath with a bit of volume. Some steam going up. And we can paint with the light on. Some mid tone. And some dark. We keep it very simple. I'm cleaning my brush. And we can move on
to the next one.
9. Fast-Food Coffee: Now let's draw a fest
with coffee cup. The bishop is very simple. It's almost like a flower pot stretched in vertical direction. At the top, we draw a
semicircle, like straw. Let's not forget the straw. A little coffee bean
illustration on the front face. One or two lines and curves
to mark some shadows. And we are done with the sketch. I dip my brush into water to
dilute my osiana just a bit. So I can start adding the first
layer of paint to my cup. Slightly darker
tone on the right. Plus the coffee bean. And we can clean
our brush for now. We are going to add the
darkest dark a bit later. Let's move on to our next item.
10. Sugar Cubes: This one is going
to be very simple. Let's draw three squares
positioned like this. Forget about perfection now. We don't need exact
straight lines or right angles at the corners. I'm adding some lines just to suggest that these are not
exactly flat surfaces. And we can paint. Tapping and
dabbing with light brown. Well, this time I
shouldn't have cleaned my brush as I'm about
to take a darker brown. Nothing really bad
would have happened if my brush had
some lighter shade. Let's add a bit of dark
to the cup. Like so. And to the cubes. Now they hopefully seem like brown sugar cubes to the viewer. Good. Let's move on
to our next subject.
11. Sugar Dispenser: Let's draw simple
sugar dispenser. So ribbing on the glass surface. And that's it. We can add some volume to the sketch by painting with
different shades of brown. This was super fast. Let's
move on to the next one.
12. Milk: Now let's shrew a
carton of milk. It's inside you, just like
all of our other items. For the sake of fun, let's
draw a cow on the front label. Some spots as a pattern. And we can paint. The libel will be lighter. The rest of the carton
will be darker. Very good. Now, let's clean up. Brush. And move on to the next one.
13. Water with Ice: Let's draw a glass
of water with ice. I'm starting off with a
flower pot shape again. Let's draw some square shapes
representing the ice cubes. They are floating at the top. With a light shade of brown. Let's suggest the water
inside the glass. As simple as that.
Let's move on.
14. Cinnamon Roll: Now let's draw a cinnamon roll. It will be in top view. So we are drawing a
snail shape. Like so. Let's give some volume to
it with the light tone. Then dabbing with the
mid tone like this. Looks nice. Now, I guess
we wait for it to dry it. You know what? Let's
try to add some dark. Very gentle. It looks like a well
baked cinnamon roll. Let's clean our brush. And move on to the next
item with the ink.
15. Chocolate Muffin: Draw a chocolate muffin. First, I'm drawing the holder, the pouch, or the basket, and I'm not sure
what's the right term. Like that. And the muffin will look like this with small chocolate
pieces on the top. A light base layer
for the paper holder. In the meantime, let's add some really dark shade
to the cinnamon roll, as it has already
dried and a bit faded. Good. We can increase the contrast on
the cross on too. Now we can paint the muffin
itself with this dark brown. In the meantime, I'm scanning our previous items where
more dark is needed. Maybe over here. We are going to add some shadows to the muffin
holder in a minute. But first, let's
draw our next item.
16. Macarons: See how we can illustrate
some macarons. I'm drawing a
squeezed allip shape. Some wavy lines will represent the cream and a curve like
this for the bottom part. Very simple. Now we are drawing two more
in different positions. Like so. Now, let's try to make
these pieces diversified, even if we have only three
shades of brown to work with. Mm. I guess base layer on the muffin holder is
pretty dry by now, so we can add those
shadows to it with dark, and it hopefully won't blend. Water control is an important part of
watercolor painting. Sometimes we need damp surface, sometimes we don't in this case, we need sharp distinction between two shades
of brown here. Now, we are going to get
back to our macrons, but before that, let's
throw our next item.
17. Chocolate Chips: Now let's draw some
chocolate chips. We are going to have
some small pieces of chocolate at the top
embedded into the cake. So I draw some of them first. And now I'm drawing
the circle outline. Some more small pieces around, keeping them variegated
in size and shape. And let's draw another cookie partially behind the first one. It's slightly
smaller, which will suggest the viewer that we
are in the three D space. Remember, size is
one of the tools in the hand of the artist to
create the illusion of depth. Anyway, let's go back to our
macrons with the dark shade. There's some bleeding effect happening in here,
but that's okay. The base layer for the
chocolate chips will be light. And by adding some darker
shade at the bottom right, we can suggest their
three dimensional form. Looks pretty cool, huh? Not that watercolor is the only medium with which you can achieve an
effect like this. Even on a simple piece, I find it fascinating. Now let's move on
to our last item. O
18. Ice Cream Bar: Finally, let's draw
an ice cream bar. The base shape is
very simple again. Let's draw some pattern for the chocolate
coating at the top. Like this, and we can paint. Light tone first. If our chocolate
chips have dried, we can paint the small
pieces with dark. You can leave some white
spots here and there, you know, for light reflections. Mm. And we can paint the top section
of our ice cream bar. I'm leaving wide
gaps here as well. It can add to the final look. Shadow side on the stick. A little bit of mid tone
on the middle part. Some extra dark here and there. Me mars brown directly
from the pen. I have the darkest
shade possible. And I guess we are done. How do you like the result?
19. Final Thoughts: All right. I hope you enjoyed this drawing and
painting session and created something that
you are satisfied with. I believe that the drawing or painting can be simple and
great at the same time. I'd really like
to see your work. So please don't forget
to upload it in the project section
right below the video. Now it would be extremely
valuable for me if you gave some feedback on my class in the form of review or rating. For you, it takes just a minute. For me, it will mean a lot. And if you like my
teaching style, I definitely have some
more classes for you. Make sure you check them
out on my profile page. I hope you had a
good time with me. See you in another drawing
or painting session.
 Tamas Benko, Drawing & Painting Classes