Transcripts
1. What's in This Class?: Welcome to my kits and Outfit
sketching class. Part two. My name is Thomas, and
we are here to create some more advanced kit
figure illustrations with ink and watercolor. This is the second part
of this miniseries. If you are an absolute
beginner at sketching, I suggest you start with
P one, then return. This can be a great
class for you if you are a beginner at
drawing and you are interested in making some eye
catching kit illustrations while you are improving
your sketching skills. In part one, we were drawing some very simple kit figures by using mostly two
D or flat shapes. In Part two, you will learn how to make your
sketches more realistic. I'm going to show
you how to construct very expressive human figures by using some basic principles
of gesture drawing. The must have tools you
need are some papers, a pencil, an eraser, and an ink. Other than that, the coloring
tool is your choice. I'll be using my pastel
watercolor palette. You can see the common
watercolor supplies here. Nothing really special. Now I hope you are
excited to dive into the second part of my kits
and outfit sketching session. Let's make some captivating
kit illustrations together. I'll see you in the first video.
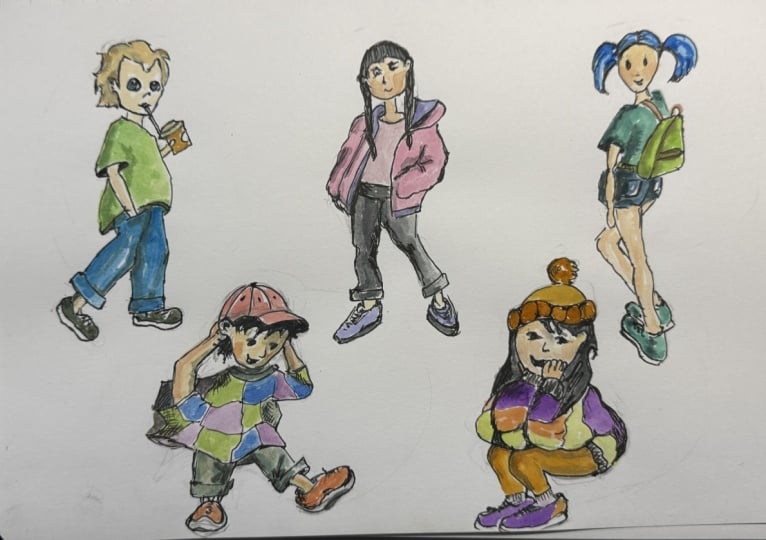
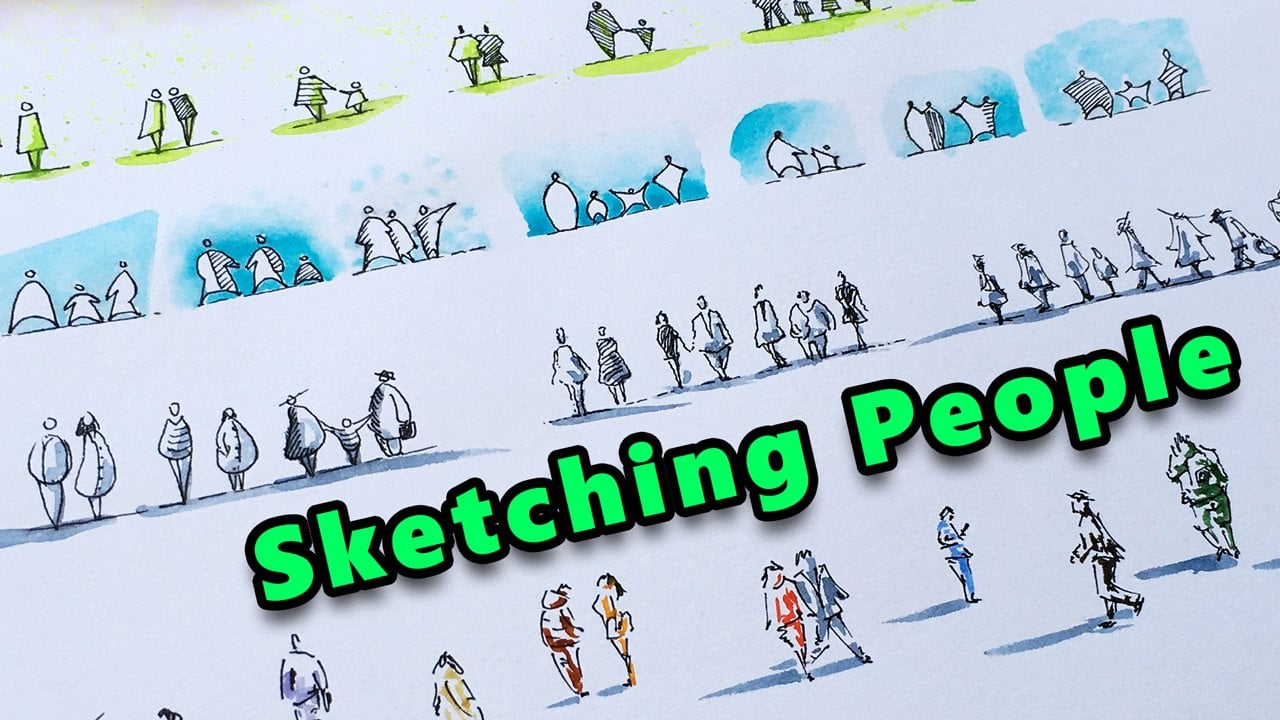
2. Walking Boy: Pencil Draft: It's great to have you here. We'll be sketching five different kid characters
on this page, three in the first row
and two underneath. I'll be drawing relatively slowly so you can
follow along easily, but feel free to pause
the video at any time. I'll be using this
regular graphite pencil to make the rough sketch first. This has a four H grade, which means it's a
relatively hard graphite, so I can make very light
pencil strokes with this. Watch how I hold the pencil. This will help me making
very loose gestural lines. Let's start off by
drawing the line of action for our
first kit figure. This will define the primary
direction of the pose. The action line represents the main direction
of energy flow. If you want to draw an
expressive character, you will start your sketch
with a curve like this. A curve holds tension. By this, it conveys
energy to the viewer, which is generally
beneficial in illustration. I'm marking the
head with a circle, I'm making very
light pencil strokes because nothing is
final at this stage. I hope the camera
can still show you. Our kit figure will have a walking pose with
one leg behind. One of his arms will
be in his pocket. In the meantime, I'm
refining the posture. The way how these curves bend, will have a significant impact on the final look
of our character. Note that we are in side view. His other hand will hold
a cup of, let's say, tea with a straw in his mouth. We might also want to mark the vertical center
line of the pose, just to see where the
balance is located. I plan to draw a figure
in a stable position. I mean, in this case, he's walking, but he's in
balance within his movement. It's also useful to show the
orientation of the face. We can do this by drawing the vertical and horizontal
center lines of the head, which will be curves
in perspective. This way, we know which
direction the kid will look. This skeleton drawing can show
the gesture of our figure. Its purpose to capture the essential posture or
movement of the body. Now I'm drawing the rough
outline of his T shirt. Something like this,
as well as his pants. And the shoes on the legs. Now let's draw the approximate
location of the eyes, his mouth, and his nose. So we get the idea
how he will look. Now we can start
forming the outline of the head, including the hair. Our character will have a relatively big head
compared to his body. This exaggeration is
typical in case of cartoon characters,
especially for kids. It can lift the cuteness factor. I'm trying to imagine the final character and see if the gesture will
work in this form. As you can see, I'm gradually
increasing the line weight. In other words, my pencil
strokes are getting darker. I'm adding details
to the T shirt. Now we can see the sleeve. The folding at the bottom. I'm giving volume to
his arm in his pocket. On the front, the T shirt
will come down like this. Let's form the cup. With his hand as
he's holding it, we may see the forearm
partially covered by his chest. Now let's form the pants. This leg is bent at the knee. This is how our character
is taking its final form. Step by step, we are drawing
more and more details. Now let's see the shoes. Something like this. And the other one
will look like this. I'm still leaving loose marks on the paper. Nothing is final. This is supposed to be
just a rough sketch. Now, let's get back to his head. And let's define his
hairstyle more clearly. I might want to shift
the ear backwards a bit. I stop from time to time and see how I can make the
look more interesting. And I guess we are done
with the rough sketch. It's a bit messy at this point, but it's perfectly
okay at this stage.
3. Walking Boy: Ink Sketch: Now we can take our ink and finalize the
lines and curves. I'm starting with the face,
the most important part. Let's draw the eyes. The nose, and the mouth, which will be slightly open. Let's not forget
he'll be drinking. Let's complete the ice leaving a little white dot at the top left corner
for the highlight. The ear. Like so. Now let's form the cup. Not that I'm making relatively quick ink sstrokes when I'm drawing these lines. Let's find a good
angle for the straw. That looks okay, I guess. Now, let's finalize
the hairstyle. Okay. Something like this, a little bit of
messy hair volume. Now let's move downwards. With quick and
dynamic ink strokes. The kid is in motion
and we want to convey these dynamics by each little portion
of this illustration. Very good. We have the
upper body completed. Now let's throw the pants. I'm breaking the
lines frequently. I will create a more
realistic dress. And finally, let's
draw the shoes. In here curved lines
will dominate. H. I think this looks pretty good. We can add some further
details here and there. Refine the outlines
if we need to. And we are done with
our ink sketch. Now, let's remove the pencil
marks with the eraser. Awesome. We can move on to the painting part.
You know what? I'm still adding a few
details to the kid. I'm fine with that.
4. Walking Boy: Painting: Now, I'm taking my color palette and using the spray bottle, holding water to prepare the
paints for the painting. You can also use your brush to add some water into the pans. These are beautiful
pastel colors. In case you don't have
pastels out of the box, it's easy to mix
something similar. Pastel colors are
just normal pigments with some white
paint added to them. I encourage you to experiment
with color mixing, or you can just use your
normal watercolor paints, colored pencils or markers,
whatever tool you like. Anyway, I'll be using the
size one round brush, as we may need to paint relatively small sections
on our character. Let's depart brush into water. Also squeeze the
air bubbles out. And I'm starting with this warm green to
paint the T shirt. I'm trying to stay away
from the ink marks. These pastel paints are not that transparent than
regular watercolor. What a nice color. Just for you to know,
it's a mixture of green, yellow and white paints. M I'm using this paper towel to clean my brush before I'm
rinsing it in the water. So my water remains
clean longer. Now I'm taking from
the celestial blue and painting the pants. You may know this painting
technique from part one. I'm leaving wide gaps on the fabric to give it a
more natural and realistic now I won't repeat this, but I'm cleaning my brush on the paper towel and rinsing it in water
before I change color. I'll be using this light
brown for his hair. Again, let's leave some white
space for the highlight. You know, where light
reflects on the surface. I'm painting the carp too
with this light brown, mainly on the left side. And I'll be using this meat gray color to paint the shoes. Like so. I'm also using this color to paint those sections that are
probably in dark or in shadow. So cast shadow
areas on the pants. And on the hair. I forgot to fill in the
ice. Let's do that now. Don't forget to leave
those tiny white spots intact in the corners. The wet paint is
reflecting the light now, but it dries in a few minutes. Now, I'm using this
yellow orange paint where diluted with water to add some skin tone
to the character. Use whatever skin tone you like. Okay. And that's pretty much it. We have our first cute
kid figure in an outfit. I hope you didn't run into
any major difficulty, and you are ready to move on
to our next illustration. See you in the next video.
5. Posing Girl: Pencil Draft: Now, I'd like to show
you how you can create a very effective
eye catching pause by using some fundamental
drawing knowledge. First, let's draw the center
line of our character. This will be the
head of our girl. It will be tilted to the left. We can indicate this by marking the horizontal
center line of the head. I'm also drawing the
ears and the mouth. Now let's draw the
action line that you already know from
the previous lesson. As we will have a
figure in front of you, the shoulder line
becomes important. So I'm drawing it in a
slightly tilted angle. The other important line on
the body posture is the hip. I'm drawing it like this. Notice that they are making
an angle in the distance. This is key when you
create a dynamic pose. The shoulders and the
hip make an angle. Otherwise, the body posture will be neutral and kind of boring. Now, let's say that one of her arms will be in her pocket. The other one just follows
the curvature of the body. One leg will be
pushed to the side. And the other leg will provide the main support
for the upper body. This will be the neck
orientation, and that's it. This is where the design starts
for a nice body posture. Now let's start adding
details by forming the face. Adding a hairstyle. And the neckline. Just a bit of anatomy here on
a very basic level. This will be her pelvis
and the rib cage. Now, let's give
volume to the legs. This shoe will be
in front of you. Let's deal with the arms. This one will be in the
pocket of the pants. Let's show a pair
of jeans for her. On the other leg, too. Our girl will be
wearing a jacket, so I'm drawing its outline. This is the curve of the zipper. I similarly on the other
side with the collar. Now, let's form the sleeve,
which will be wide. Let's complete the
check it over here. The bottom curve
will run like this. Make sure you are consistent
with it in its full length. The other side with the arm like that. Now let's refine the outlines. And add further details to
the shoes, for example. Remember, I'm using
light pans strokes. Nothing is final in this phase. And I guess we can
move on to the inkwk.
6. Posing Girl: Ink Sketch: Now let's take our ink and
make the final sketch. As usual, I'm starting
with the head. Et's illustrate the eyes. Like this. To little ears. And let's form the hairstyle, which can be familiar
from part one. A, Now let's move on to the middle section. We already have the guidelines. We just need to create
some nice organic curves. And we start adding
further details. Very nice. Now, let's see the other side. This folding will
make the jacket more interesting once we add
colors to our sketch. This will be the belt. And let's draw the
pair of jeans. With the leg opening
tucked up, like so. Now, let's draw the braids. H And I'm completing the jacket on the
other side too. Same for the jeans. And moving on to the shoes, make sure that the
small visible part of the leg is consistent with
your genes orientation. This is looking good. Let's not forget her
hand in the pocket. And I guess we can start
erasing the graphite. We'll see if anything is missed. Uh huh, the outline
of the jacket. Let's fix that. And I'm adding a bit
of folding over here. Very good. Our ink sketch is
complete. Now let's paint.
7. Posing Girl: Painting: I'm taking my brush, and let's start adding a
skin tone to our girl. I'm using the same yellow orange paint just
like for the boy. Now, let's paint a jacket with
this vibrant pink colour. It's a mixture of red
and white paints. Uh, um, Sure look by Dean's jacket. Good. Now I'm cleaning my brush. And taking some from
this lavender colour, which will harmonize
nicely with the pink. Let's paint the intersection of the jacket with this colour. By the way, this color
is a mix of violet, blue and white paints. I guess I'm painting the
shoes too with this lavender. Oops, I forgot the
pattern on this braid. Now I'm taking from
the smith gray and painting the pair of jeans. This looks very good, I think. I'd like to have a nice
contrast with the jacket, so let's also paint
her hair dark. What about her t shirt? Let's use a well diluted pink. I think it will look nice. Oh Some further details to the jacket. And we are done with our
expressively posing girl. She looks pretty, doesn't she? Now we can move on to
our next character.
8. Girl Looking Back: Pencil Draft: Now, let's show another
interesting pause, a girl with a backpack
as she looks back at us. I'm starting with the head, kind of oval this time. The gesture will look
something like this. We will see her from the back Her right arm won't be visible, but I'm still placing
it just to have the palm at the right spot as
she grabs her left forearm. Let's mark the orientation of the head with
the center lines. Maybe I'm shifting the
head to the left a bit. And altering the tail
tangle, as well. Let's show her hairstyle. Which will look like this. Now, this will be a bit
challenging because we see her upper body in
a three quarter view, so it may feel unnatural to
draw the shoulders like this, but it will make sense
within a few minutes. Let's draw her pelvis, which will also be in
three quarter view. Here is the belt and
she'll be wearing shorts. Her left leg will be closer to the viewer in a
straight position. Now I'm making
some measurements. I'm using this
length for the leg, so she will have long limbs. In fashion design, the length of the legs is usually exaggerated. This is just a guide.
We are going to check the proportions with
our eyes in a minute. Her left foot will be
positioned like this. Here comes another
challenging part, the other leg behind.
It will be bent. I'm drawing the food first. She stands on tiptoe
with her right leg. Now, this is where we
need to be careful, with the placement
of the knee at the right spot compared
to her other leg. If you notice, it will be located a bit higher
than on the other one. This thing comes from
the ruse of perspective. She'll be wearing a T shirt, so I'm marking the sleeve. She's holding her left hand
straight right next to her body like this while her right palm
is grabbing the elbow. Let's emphasize the
curves of the shorts on the top on the legs. And on the butt. This is the sock and
let's form the shoes. Drawing a subject
in perspective is usually more difficult than
in front or side view. All kinds of funky stuffs
are happening here, like distances get compressed. Drawing these shoes and legs
is definitely a challenge. So don't be upset if it's not successful for
the first time. Especially that we also have an overlap here with the legs. Now, let's place the backpack. Which will look
something like this. It will partially
cover the body. In the meantime, I'm continuously making
corrections on the leg. So it feels more real. Now, let's refine the
curve of the face. And the right shoulder. And I think we are done
with our rough sketch. We can move on to drawing.
9. Girl Looking Back: Ink Sketch: All right. Now let's finalize
our sketch with ink. We are also going to add
some details as usual. I'm thinking through which part is closer to the viewer when I'm drawing these curves just to avoid unnecessary
intersections. I already have one here with
a pum, but that's okay. It's not that noticeable. I'm drawing the outlines
for the shorts. Let's not forget that we are going to have the
backpack in the front. Now, let's draw the backpack. Good. Now let's
deal with the legs. Here I'm drawing a bit
slower as I'd like to be accurate with my ink strokes
in terms of perspective. I guess this looks right. Some further details
here and there. And we are done. We
can start erasing. Oh, I missed the neck.
10. Girl Looking Back: Painting: Now, let's start coloring. As usually we do
with watercolor, I'm starting off by adding the lightest tone to my sketch. In this case, the skin tone. Now, I'm moving
on to warm green. Oops. Actually, I wanted to paint the backpack with this colour. I'm gonna fix this in a minute. Okay. Now, I'm cleaning my brush. I'm adding some moisture to the surface and trying to lift off some of
the green paint. Not that if it
mattered too much, as I'm planning to paint a t
shirt with this mint green. It's a mixture of green
and white paints. A Let's paint the shoes as well. Now, I'm taking from
this royal blue and painting her hair. Hopefully, she will
outgrow this fad. Let's paint her shorts, too. Very simple. And this time, let's use this brownish color to fill in the shadow
areas at the sleeve. I'm also adding a bit more
dense yellow orange here. Let's make the socks blue. And I guess we are done with another cute outfit
illustration. See you in the next lesson.
11. Boy in Cap: Pencil Draft: Now let's throw another
challenging gesture. A little boy in an action pose. Let's start off by drawing
the line of action. He'll be in three quarter. Stepping forward. Why are adjusting his baseball cap? Maybe he needs to be taller. I'm drawing his T shirt, which will be at least two
sizes bigger than his body. Let's mark the
orientation of the head. He's looking slightly downwards, and the baseball cap
will look like this. The ear, his eyes, the nose and his mouth. Alter your curves until you
get something satisfying. Now, let's see his arms. This one is behind. The sleeve of the T shirt on the side and his other arm reaching for the cap. I'm refining the
outline of the T shirt. Adding multiple fours to make
it look more interesting. Let's see the pants. And the shoe in a
challenging perspective. The viewer can see
some of the shoe so other shoe will be
in front of you. Something like this. Refine the curves
if you need to. Now, let's draw the hairline. I'm changing the T
shirt outline a bit. And let's consider our
pencil draft done.
12. Boy in Cap: Ink Sketch: Now let's take our ink and
create our kids final form, starting with the
head, of course. Let's show the facial features. As you can see, I'm relocating
the feature slightly. You can always change the course with ink
if you feel like. His mouth is slightly open. Now, let's deal with
the baseball cap by drawing some
very nice curves. In the meantime, we can add
some details, of course. Et's draw the ear. And the hairline. And the head looks okay to me. Now let's move on
to the T shirt. The style of this T shirt is similar to the
green one above. I'm drawing his left arm in the back and the one that
is closer to the viewer. His pump will look like this. For the t shirt and the pants, I'm using the same
quick technique that we used on the
first character. Now, let's see the pants. Notice my quick and
gestural ink strokes. And finally, let's
show the shoes. This one is a bit challenging in this specific viewing angle. The other one is easier
to draw in front you. Well, the one on the
right is not perfect, but I'll make some correction
with the paint later. Now, let's make our
illustration more attractive by drawing some
patterns on the D shirt. A kind of a grid that we can fill in with multiple
colors nicely. This pattern will help to show the uneven surface
of the fabric. And I think we are
done with the sketch. So we can erase the
pencil marks real quick. Very good. See you in
the painting session.
13. Boy in Cap: Painting: Now let's take our brush. And as usual, start off by
creating the skin tone. If you feel your paint is
too intense on the paper, you can either add some extra
water to the surface in order to lower the pigment
density or with a dry brush, you can try to lift off
some paints from the paper. Good. Now, I'm choosing this
bright color for his cap. It's a mixture of some
red and white paints. It's fantasy name is coral. You know, after those colorful
species in the ocean, I'm also painting the
shoes with this paint. Now, let's fill in the
grid on the t shirt. I'm starting with
this warm green. We are going to have three
or four different colors. I'm trying to
distribute them evenly. Now, I'm using this bright
blue as the next color. Looks nice. How much Now, let's take this lavender. Oops, I have a bleeding in here. We'll fix it in a sack. Okay, so with the dry brush, I lift off some of the blue
pigments from this block. Lift and clean. Lift and clean. I let it dry for now and come back a bit
later to paint over. And I think I'll be using this royal blue as
a fourth color. This time, I'm trying not to
touch the adjacent paints. These colors are pretty close to each other
on the color wheel, so we are basically using a so called analogous
color harmony. Now, let's paint the pants
with this creamy light brown. I'm also using this
for the neckline. And suggesting some shadows
with it here and there. Finally, let's take some
mid gray for the hair. And for the surfaces
that don't get direclt. Oops, I forgot this
part of the t shirt. Let me fix that. No And now I'm trying to
improve the shoe. Something like this. It's not
perfect, but that's okay. We have to accept
our imperfection. I'm painting some cast
shadows on the pants. Maybe I'm using some darker yellow orange
shade on the skin. Let's not forget
to fix the grid. And we are done. I'm happy with my sketch. I hope you too with yours. See you in the next lesson.
14. Crouching Girl: Pencil Draft: Now, let's show
another interesting pose a girl in a
crouched buddy posture. Let's draw the gesture lines. Her head orientation
will look like this. With her palm next to her mouth. She'll be wearing a winter hat. And maybe a bit lower than that. She's going to have a
hairstyle like this. This will be her other arm in a similar position, on the other side of the face. The forearms will be
parallel with each other. Her body will bend like this. Her leg is bent in the knee. Let's draw the shoe. Something like this. She'll
be wearing a loose sweater, curving like this on her body. Her other leg in the
back with the shoe. The legs are al parallel
with each other. The loose sweater on her arms. I'm refining the outlines over
here, forming the sleeve. I'm trying to create curves that seem natural and are in
balance with each other. The body parts are supposed
to be proportionally right. This is a quite
difficult body posture. I guess the head
should come lower slightly, but that's okay. We are in the draft phase, so it's easy to make amendments. Good. I guess she looks
kind of real indisposed. We are done with
the rough sketch.
15. Crouching Girl: Ink Sketch: Now, let's finalize the outline of our illustration with ink. There are plenty of
overlapping surfaces, so we have to make sure we
follow a reasonable order. I'm drawing her tiny palm. Let's form the facial features. Yeah. Yeah. Let me draw the head. Her right pum is
covered by her face. Let's show the sweater. The outline for the hair.
Something like this. Let's s draw the sleeve
on the other arm. And let's complete the
curve at the back. Let's see her legs. H. Per shoes thrown nicely in perspective. The one in the back is
a bit smaller in size. I This is the sweater wrinkled at her elbow. And this time, let's
show a stripe pattern on her dress that we can
colour nicely in a minute. Um, Something like this. I'm trying to be consistent
on the other arm. And I think we can
start erasing. I'm satisfied with
the final sketch, so we can start painting.
16. Crouching Girl: Painting: No surprise. Let's start the coloring process
with the skin tone. For the sweater, I'll be
using three different colors. First, this dense yellow orange. I'm checking which stripe I need to paint
on the other arm. You know, just to
remain consistent. I'm counting the stripes. I guess this comes next. We'll see how the other
stripes turn out. Until then, let me add this color to the
heel on the shoe. I continue with this pink. A, This is the fun part
of the illustration. We already have a
solid structure, so we don't have to
stress ourselves. We just need to decide
which colors we use, which I definitely
find relaxing. In the meantime, I'm thinking of how I should
distribute the colors. I don't know. Let's move on and we'll come back to
this pink if we need to. As a third color, I'll be
using this coral paint. Again, these colors are pretty close together
on the color wheel, but this time on the warm side. I think the coral will also
look nice on the shoes. Now, let's deal with the hat. It's base color will
be this creamy brown. But first, let me draw the
stripes on the folded brim. Good. Now we can paint. Like so. Now let's move on to the pens with this color Good. Let's add some contrast by using this mid
gray for the hair. The forehead seems kind of
empty, so let's fix that. Let's eliminate this
hole below the ear. And let's add some
variety to the sweater. Like so. Same at the bottom. I Now let's get back to the stripes. I'm trying to maintain the
same order for the colors. Let's take the pink
for the next one. I guess we need coral
for the last one. Now, I'm adding a second
layer of paint to the pants, where the surface is possibly darker because of the shadows. Actually, this looks
lighter at the moment, but it's going to darken
in a few minutes. A bit of dark to the heat. Maybe a bit more saturated
shade to the skin tone. That's too much. So I'm using some water to
lighten the shade. I guess we have completed
our last kid illustration.
17. Final Thoughts: All right. You can
be really proud of you that you got to the end
of this sketching session. You know, very few people have the stamina
to get to the end. I hope you enjoyed
every minute of this activity and don't
be too hard on yourself. This project was
pretty challenging. But this is how you can push your boundaries of your skills. I'd really like to see
your illustrations. You can upload your work in the project section
right below the video. Please don't forget to
give some feedback on my class in the form
of a review or rating. For you, it takes just a minute. For me, it would mean a lot. If you like my teaching style, I definitely have some
more classes for you. Make sure you check them
out on my profile page. I hope you had a
good time with me, see you in another drawing
or painting session.
 Tamas Benko, Drawing & Painting Classes