Transcripts
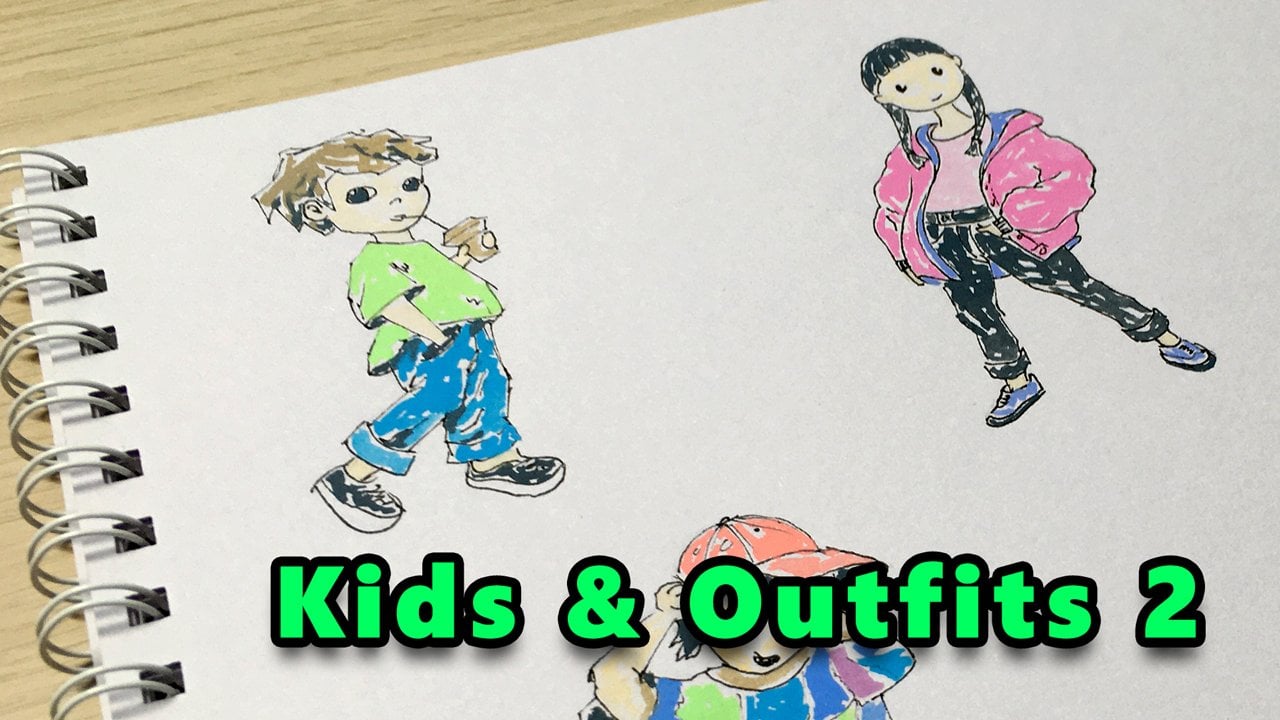
1. What's in This Class?: Welcome to my Kids and Outfits
Sketching class part one. My name is Tamas,
and we are here to practice a simple
illustration technique. We'll be drawing
some cute figures in different colorful outfits. This can be a great class for you if you are a beginner at drawing and you are afraid
to draw human figures. I'll show you how
you can overcome your fears by simplifying the illustrations to
a digestible level. We'll be drawing very
simple kit figures in three easy to follow steps. First, we make a rough
sketch with a pencil. Then we finalize the
outlines with an ink. And finally, we color
our little figure. I'll be using watercolor, but you can use any other
coloring to you like. I'll be drawing very slowly, so you can follow along easily. Note that this session is also a good preparation
for part two of this mini series where we will make some more advanced
kid illustrations. The must have tools you
need are some papers, a pencil, an eraser, and an ink. Other than that, the coloring
tool is your choice. If you go with
watercolor like me, you will need a
watercolor paper. Mine is an inexpensive one. It's great for practicing. Watercolor requires
a waterproof ink, so I'll be using this pigma micron archival ink, size four. An alternative can be
some alcohol marker. I have a size one round brush and this pastel color palette, but feel free to use any
other color palette you have, and I encourage you to use
your own color choices. You can see the common
watercolor supplies in here. Actually, the tools you use
are not that important. In this session,
we'll be focusing on developing your figure
illustration skills. Colors will be just
icing on the cake. Now, I hope you are
excited to dive into my kids and outfit
Sketching session. Let's make some cute
illustrations together. I'll see you in the first video.
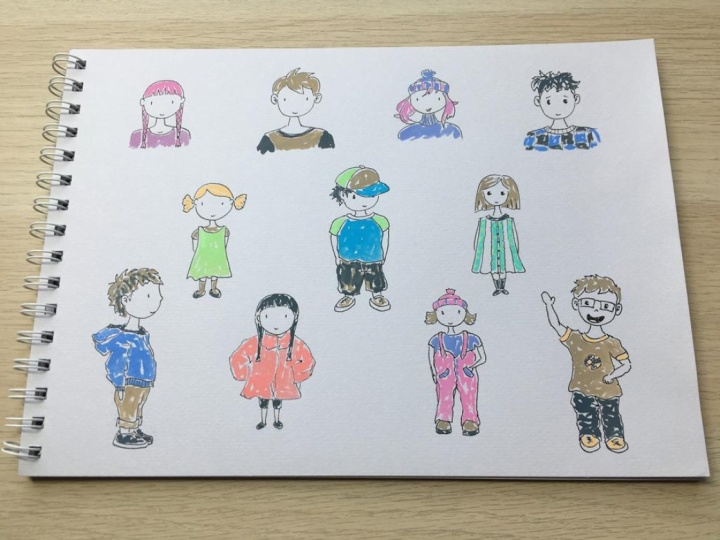
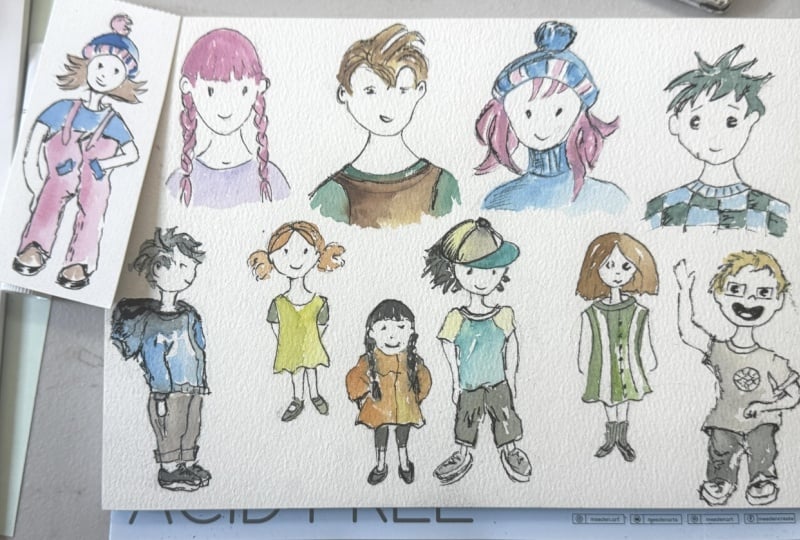
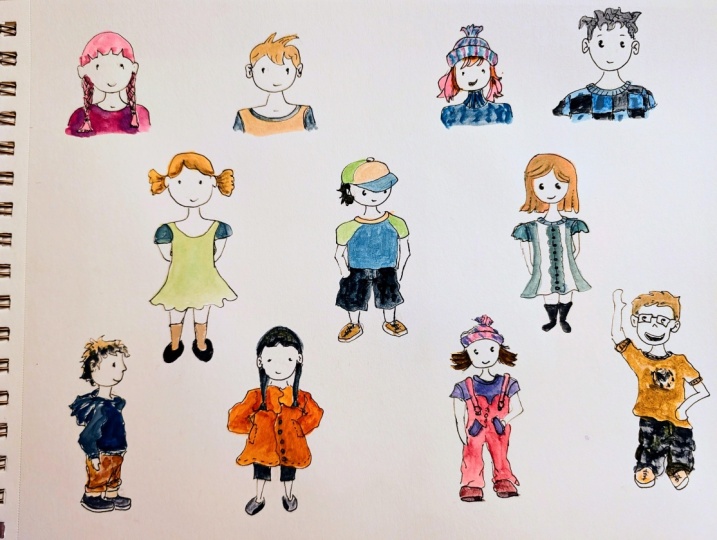
2. Girl in Pink: It's great to have you here. Let's fill in this
intimidating empty page with some kid figures. We'll be placing our
characters in three rows. In the top row, we
will have four, let's say, mini portraits. Let's make our first
simple pencil sketch. By the way, I'll be
drawing very slowly, but feel free to pause the video at any
point and catch up. The first step,
let's draw a circle. Like so, this will be the
head of our first character. To little ears on the sides, somewhere on the middle level. This will be the hairline, curving slightly like this. Let's add some
style to the hair. A semicircle at the top, just to add some
volume to the hair. Now, let's show the neck
like this and the shoulders. The neckline of the t shirt, and let's draw two braids
as part of the hairstyle. Like so. As for the
facial features, we will use very simple
illustration elements, two little dots for the eyes and a little curve
for the tiny mouth. So you don't have to worry about how to draw these things. We don't even need a
nose, if you notice. The face looks just
right without that. It's one of the great
things of simplification. Okay. We have our
first sketch ready. Now let's redraw with ink. As we already have a
guide on the paper, we don't need to be afraid. Otherwise, drawing with an ink would be terrifying, right. But this way, it's really
a straightforward process. The sequence of the different elements doesn't really matter. Just make sure you
don't smudge the ink. It can take a few
seconds for it to try. M, very good. We have the final sketch. Now we can erase
the pencil marks. This is optional, of course. You can leave them
there if you want to. With a spray bottle, I
dilute my dry paints. You can also add some water into your pants by
using your brush. Well, I shouldn't have done
this next to my paper. Let me fix that for quick. I forgot to add some curly
lines to the braids. Let's do that with ink. I'm drawing wave forms
in vertical direction. To intersecting curves
for each braid. I'm rinsing my brush and squeezing the air bubbles
out from the bristles. I'm taking some from
this pink paint. It's called magnolia. It's basically a mixture of a certain red and white paints. In case you don't
know, pastel colors are made by adding white
paint to the base color, so you can easily mix your own even if you don't
have it out of the box. Anyway, I'm painting
the hair first. Note that as pastel colors
have some white in them, they lose some degree of
their transparent property. I try to avoid the ink marks. It doesn't work on the braids in this case, but that's okay. We'll see how it will
look once the paint has dried and you can always redraw later with the
ink if you need to. But I guess it
will be just fine. Now, before I bring
another color, I'm cleaning my brush
on the paper towel. This way, I can keep my
rinsing water cleaner. I'm rinsing my brush in the
water and we can move on. Now for the t shirt, I'm taking from this lilac, which is a mixture
of violet and white. At this moment, it looks pretty similar to
the hair color, but it will become
different as it dries. Watercolor paints usually
get lighter once they have dried and they lose some of the vibrancy compared
to the damp state. Interestingly, these pastel
paints are the opposite. They will get darker
and more intense. You'll see that
in a few minutes. Anyway, let's clean
our brush and ns. Our first sketch is complete. I hope it was simple and easy and you are not afraid
of doing some more. I'll see you in
the next with you.
3. Boy with Light Brown: Now let's draw a boy by making
the pencil sketch first. This time, let's just draw a semicircle for
the head like this. I'm drawing the ears, a bit bigger ones than
for the pink girl. You can add some
curves like this to illustrate the inner structure
of the ear very simply. Now let's design a hairstyle. The hair line on the front
and the outline above. A typical messy hair in his age. Astrow the neck and the shoulders with two
quick pansy strokes, the neck line for the T shirt, the simplified facial features, and we are done. We
can take the ink. As you start feeling
more confidence, try to be quicker with
your ink strokes. This way, your lines
and curves start to become more energetic,
more expressive. But if you need more time, don't feel any
pressure to do this. Proceed in your own pace. Whatever rhythm is
comfortable for you. Speed will come with practice. Very good. Now let's
erase the pencil marks. And we can start painting. I'll be using this light creamy
brown color called Junes. My brush strokes are
more dynamic this time. Let's leave some white
gaps here and there. They will make the volume of
the hair more interesting. Now the T shirt will
have two colors. So I paint only this middle
section with light brown. I'm cleaning my brush, which includes
rinsing in the water. And with this
grayish color called Marno I'm painting the sleeves. Like so. And that's it. We have an illustration about
the boy in front of you. We can clean our brush now. And move on to the next one.
4. Girl in Winter Hat: Now, let's throw another girl, but this time, with a
winter hat on her head. Something like this. She will wear a turtleneck. Let's make a hairstyle for her by using all
kinds of curves. Try to use different
curves on the other side. Asymmetry usually makes
the loop more interesting. This time, let's draw
the mouth like this. You can make it slightly
more complicated. Some pattern on the head. And we can switch to. If you make a mistake,
don't worry about that. We are just practicing. Very nice curves on the hair. Good. Now we can erase. And I'm taking my brush. And let me try this
slightly darker pink shed called pink peony. I'll be painting the
hair with this color. You know what? Let's also add some
hair to the forehead. Now, let's paint that hair. Um, Let's also paint these stripes on the heat. So this color will harmonize
nicely with the other one. Which will be this lavender. A mix of violet, blue and white paints. I'm painting the heat And the turtleneck. Very nice. These colors seems to work pretty
well next to each other. Now we can clean our brush
and move on to the next one.
5. Boy in Plaid T-Shirt: Let's draw another boy with
a different hairstyle. Something like this. This time, we are going to draw another type
of cartoon eye. Look at them as two C letters
thickened on the left. We can also draw eyebrows. T shirt. And we can draw we ink. Now, watch how the
eyes will look like. So I don't complete the circle. This way, we will
have the illusion of those highlights on the eyeballs that will make
the face more interesting. Feel free to use some other
hairstyle if you want to. Now let's make the
T shirt a bit more interesting by adding some
square grid better into that. Like so. He will have a dark hair. And let's use this
middle gray for the grid, too, like this. Okay. And I'll be using this royal blue to
complete the pattern. I guess this will match nicely with the gray. Awesome. So we practice some really
simple head illustrations in cartoon style. Now it's time to take one step further and make some full
length illustrations. See you in the next video.
6. The Red-Haired Girl: Just plan the placement, we are going to have three full length illustrations
in this row. Let's start off by drawing a cute red haired
girl in a skirt, a loose circle for her head. Let's draw the hairline. In the meantime, I'm drawing
two skirs for the ears. As for the hairstyle, let's make it look like this. The neckline is the
same as before. But this time, we
finish her dress, which will be a skirt like this. A short sleeve T
shirt underneath. And the legs will
be very simplified. We show only the lower legs, so we don't have to worry
about human anatomy and such. Two little shoes, which are basically just simple
unfinished ovals, kind of sea curves. Let's not face our
fears just yet, so we hide her pumps like this. Drawing hands can be intimidating even in
a simplified form. Good. Now let's take the ink. We can add some further
details of course. Let's keep the facial
feature simple again. Her arms behind the body, which can actually express
some kind of emotional state. Maybe she's shy a bit. Who knows? By placing another
two sea curves like this. We have designed
little shoes for her. Now we can erase. I'll be using this
yellow orange color called peach for the hair. You can mix something
like this from yellow, orange and white paints. This paint seems to
cover the details now, but in a few minutes,
we are going to regain some level
of transparency. For her skirt, I'll be using this
warm green colour. It's made of yellow,
green and white paints. Very nice, vibrant color,
perfect for a kid. T shirt will be less dominant. So using the tune St. Same for the socks. Finally, let's paint the
shoes with mid gray. And we are done. We can
move on to the next one.
7. Boy in a Cap: Now, let's make
things a bit more complicated and
interesting as well. Let's draw a boy
in a baseball cap. This will be his
head, his chest. He'll be wearing pants. Now, let's start adding
details, starting with the cap. Drawing a baseball cap in
perspective may seem difficult, but look, it's really just
a few well placed curves. One, two, and three. That's it. His ear will be
located over here. The shoulder on the left, the visible part of the hair, the eye on the left. I don't know. The other eye may not be visible from
this angle, or is it? Anyway, let's form the
T shirt. His arms. This time we may show
them in full length, but we keep it very simple. Let's form the actual
outline for the pants. I'm using very quick
dynamic lines. Let's mark the
orientation of the shoes. And we have the rough sketch. We can switch to ink. I usually start with the head, the most important part, then align everything else to that. And we have his head ready. It's simple but great. Let's move on to the T shirt. It looks something like this. The pants. Like so. The shoes Mm. I find it amazing how
a few simple curves can form an actual object in
three D like these shoes. Let's show his arms, but we keep them low key. I'm trying to avoid any
challenging body parts for now. You know what? I missed the other eye. So let's show that partially. Very good. I hope
you made that too. Now we can remove
the Pansy marks. For his outfit, I'll be using two
bright colours. The celestial blue
for the visor. And for the middle
section of the T shirt. Like so. I love this color, which will harmonize nicely
with this warm green. And I think I'll be using the creamy brown
as a third color. Okay. To the hair, for the sake of contrast, I'll be using my mid gray. It will be even
darker when it dries. I guess I will also paint
the pants with this gray. Yep, he looks better with
this colored combination. Awesome. Now we can move
on to the next one.
8. Girl in Striped Dress: We'll be drawing a
little girl again. Let's make the rough
sketch real quick. Her head with the hair.
We'll look like this. Here is the neckline. And the dress, we have
a pattern like this. Again, let's keep
her arm simple. And we can draw the legs
together like this. Simple enough, you
can start thinking. This time, let's use another style for the
eye illustration. Her hair will look like this. The neck and the neckline. And let's design her dress. Something like this.
Arms are hidden. And she has two legs. Nice. Shiv have light brown hair. And let's see how
this mint green color looks like on her dress. This colour is a mixture of
some green and white paints. And I guess I'll be using my mid gray for the
socks and the shoes. And for the neckline, too. Maybe I'm also adding a few touches of warm
green to the stripes. And we are done with
painting this little girl.
9. Boy with a Hoodie: Now let's draw a
boy inside view. In case of our
previous characters, we were drawing the pencil
sketch relatively slowly. Now let's take a slightly different approach
with our sketch. It's time to start to become quick and loose with
our pencil strokes, and we are going to refine
the details with ink later. His head will look like this. I'm placing the main facial
features And the hair. The body will look like this. The hoodie at the back, the arm. And basically, that's it. This is how you record an idea with a rough
sketch just in a minute. Now, let's take our ink and spend some time on
forming the details. Now is the time to
form the hairstyle. Which will be this
kind of messy. Let's form the hoodie. With all sorts of
folding on the fabric. Okay. The shoe inside is
easier to draw. And we have made our sketch
just in a few minutes. Now, let's add some colors. A human body in a dress is a very complex
three D structure. It interacts with light in
an infinitely complex way. But we can actually use
this fact to our advantage. You can make the look
more realistic by leaving these random white gaps
inside your painted area. These light spots will convey the illusion of a real fabric
surface to the viewer. This is also, of course, a kind of simplification, but it can work effectively. I. Let's paint the hoodie
with royal blue. If you notice, I'm making sudden changes of
direction with my brush. This way, I will have randomly
placed gaps on the fabric, which will add a certain level
of realism to my sketch. He I'm using mid gray for the shoes. And I'm adding some dark
shades to the hair. Also, this inner surface
is definitely darker. And we have another outfit
illustration ready, which looks pretty good, I
think. Now let's move on.
10. Girl in a Jacket: Now let's show a little
girl in a big jacket. I'm drawing her head real quick. She will be wearing
a puffer jacket with hands in pockets. Let me form to check it roughly. Thin legs will be in contrast
with the big jacket nicely. Now, let's take the ink. Our first figure
has this hairstyle, so it shouldn't be
a problem by now. Let's see the puffer and creates its final form
with all those details. Let's draw their legs. And we are done with
our ink sketch. I haven't used this
coral paint yet. Let's see how it looks. It's a mixture of some
red and white paints. It's a very nice
dazzling colour. And to create some contrast, I'll be painting with
dark on her hair. H And on the legs. She looks pretty, doesn't
she? Now, let's move on.
11. Girl in Ski Suit: Let's show a girl in a ski
suit with a hat on her head. We have a reference
illustration in the top Pro, but this time, let's give
her a different hairstyle. Now, let's show her body, which will be basically
about the ski dress. It will look
something like this. The ski boots in front of you and one of her arms
will be in her pocket. Good. Now, let's switch to ink. Her head will be
similar to the one above except the hairstyle. H. Let's give some variety to the outline of the dress. Uh, here comes the T shirt
with the sleeves. Her left hand is in her pocket. Like so. Let's
complete the dress. And we have two ski
boots at the bottom. And her right hand
next to the body. A bit of correction
here and there. Actually, I managed to take her shoulders and chest a bit
wider than I should have. Not dramatic, but anyway, not much I can do about it now, so I accept my
mistake and move on. The colour scheme will be
pink and lavender this time. I'm starting with
the main colour, which will be the pink
by painting the heat. And the ski suit. I think this looks nice. The boots will be painted
with creamy brown. And Gray, Let's fill in her t shirt
with the lavender. Remember, this is
a mix of violet, blue and white paints. I'm painting these little
sections too with the colour. And finally, let's make
her hair light brown. Very good. We can move on to A lastiga.
12. Boy in Glasses: Finally, let's draw a boy
with a waving hand gesture. Let's create a fancy
draft real quick. Yeah. He will look
something like this. Now, let's define the
outlines with ink. Y. This time, let's make the mouth
a bit more complex. Like this. I'm also
illustrating the nose, like so. Very simple stuff. He's got his hair shape. Now let's work on the T shirt. A little bit of hand
gesture like this. And the waving arm
on the other side, keeping it simple, of course. Let's keep the pants very loose. And we have the shoes
in front of you. Very good. Now, let's erase. Okay, I forgot the neck, but I'm going to
draw it in a second. And complete the
outline of the T shirt. You know what? Let's draw a
soccer ball on the front. Like s. Now we can paint. He's going to have
a light brown hair. And I'll be using this
paint for the t shirt, too. His pants will be grey. H. Let's sparkle up the outfit with
this peach color. Just like that. Let's not forget the bow. We need precision here. So I hold my brush in a vertical position
while I'm painting. Now, I'm checking all
my illustrations. Oops, I forgot to erase
the penci marks over here. We can redraw with ink here
and there if we want to um, I'm adding a tiny
detail to the ski suit. And I guess we are
nicely done with our kids and out with
illustrations. It
13. Final Thoughts: All right. I hope you really enjoyed the
sketching session and created some cute kid
figures in lovely outfits. Now, I'd really like
to see your artwork. You can upload it in the project section right
below the video. Please don't forget to
give some feedback on my class in the form
of a review or rating. For you, it takes just a minute. For me, it would mean a lot. And if you like my
teaching style, I definitely have some
more classes for you. Make sure you check them
out on my profile page. I hope you had a
good time with me. See you in another drawing
or painting session.
 Tamas Benko, Drawing & Painting Classes