Transcripts
1. 0 intro: Alright guys, I'm
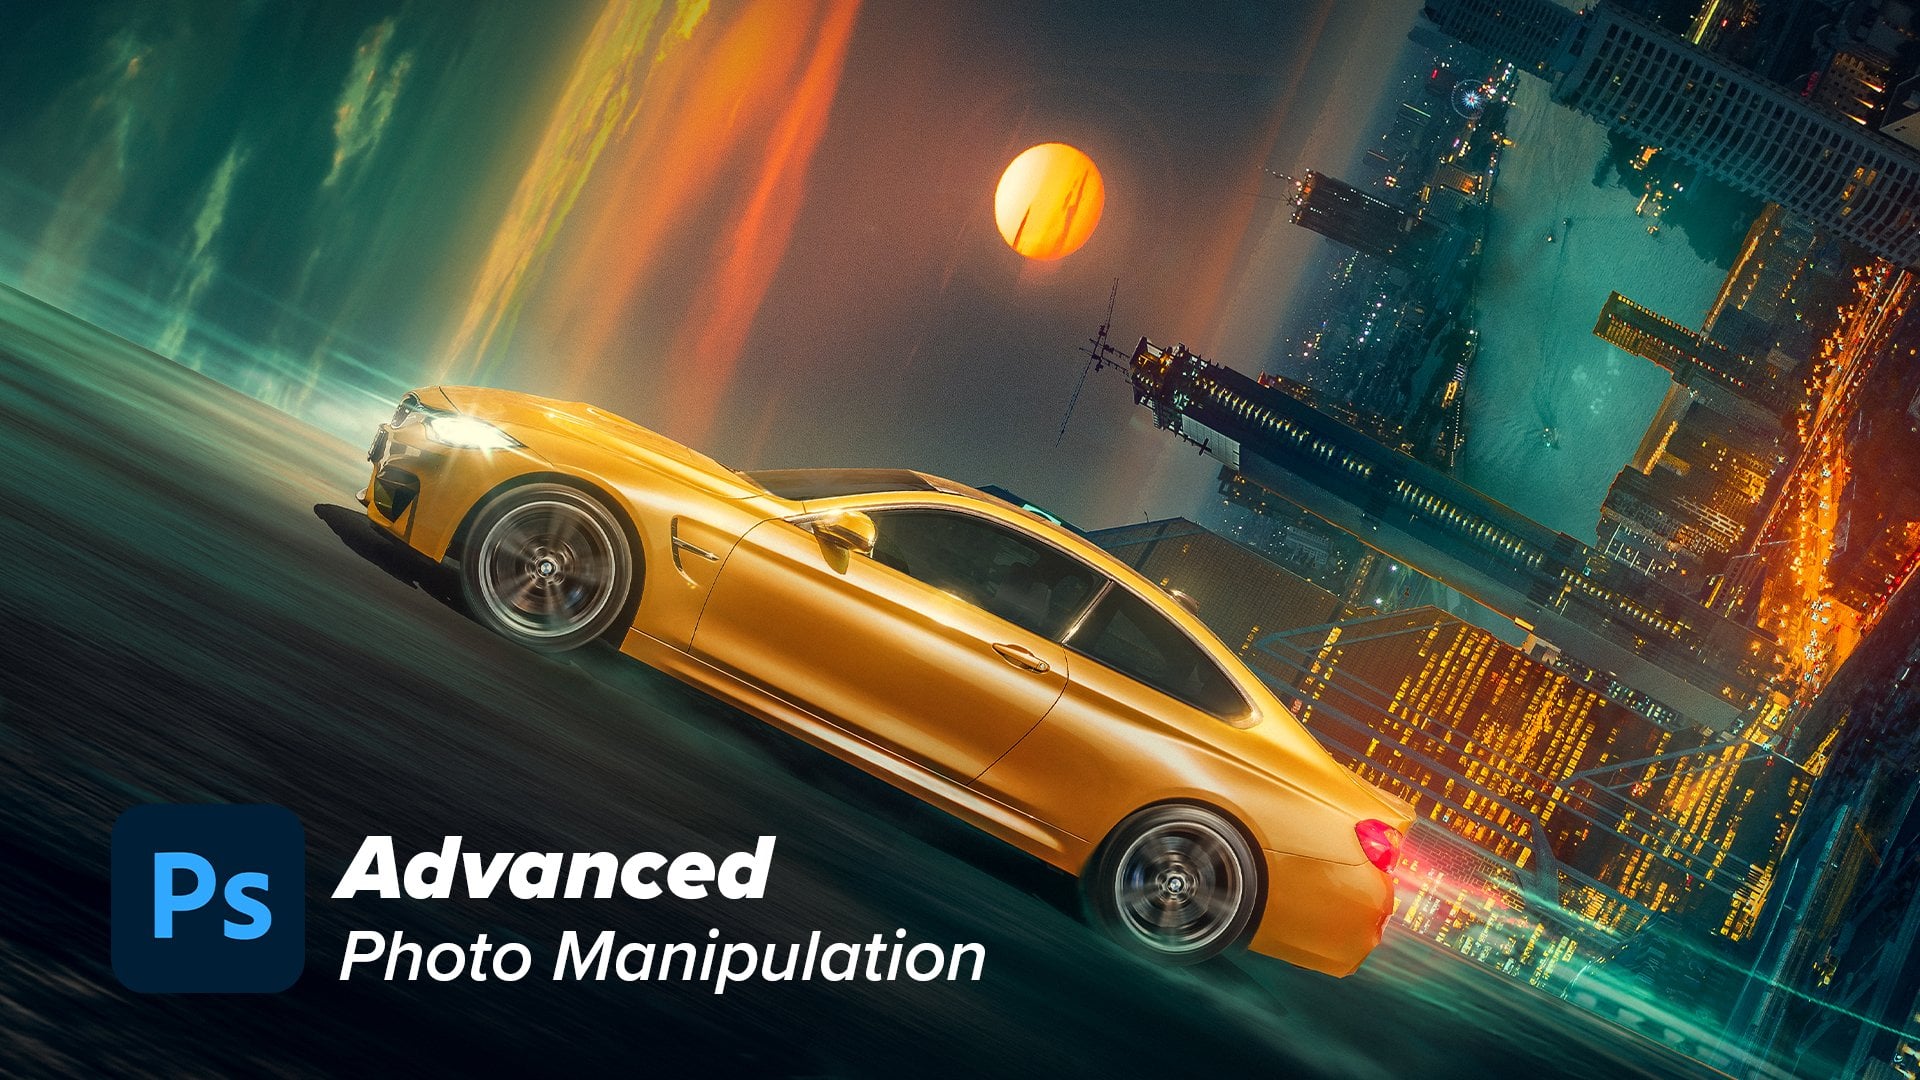
very excited to start with this tutorial
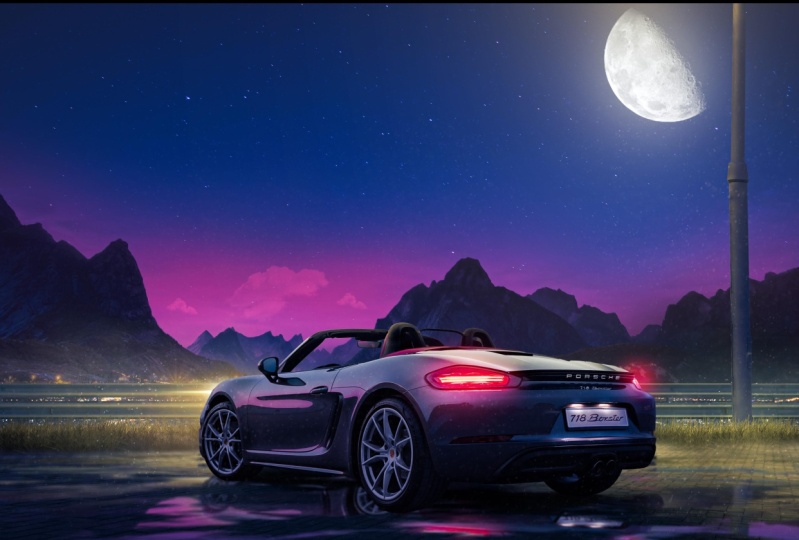
in this video are going to learn how to create this amazing visual
step-by-step, no scapes and every
detail will be explained. So without any further ado, let's dig into business
2. 1 The Idea: So as usual, before we start, I'd like to share
with you the brief behind creating this
visual of the idea itself. So what was in my mind is that I want to create a
visual that represents the peaceful vibes of that
don't timing and simple scene. It doesn't have a lot
of elements because I don't want to make it
like a complex tutorial. I want just simple
elements to be blended together to create
a good looking visual. And at the same time, it's telling a story and
it's evoking some emotions. So here I wanted to
create like peaceful, relaxing emotion in the
soothing air this time. And that's it. That
was the main idea. So let's get to Photoshop
and let's start
3. 2 Putting images together (Adjusting composition): So I will start with
creating a new canvas to 1920 by 1080 dB and
then press Create. Then I will just
press Control Alt I to expand this
Canvas tool for k. This will give me more flexibility in
zooming, in zooming out. So you will find all the
images that I am using now in the description so that you can follow
along with me. I like to start with the sky. So let's get this guy here. I want to share some things about choosing
the right images. Because if you have an
idea of a night scene, you need to find similar
images to the idea that is in your mind so that you don't put a lot of effort in
blending images together. So e.g. I. Could have get sunny days, a sky here, and then
turn it into night. But this will take time and it will not give me
realistic results. So if I have the choice, I will just search for a sky that has already the style
that I am looking for. That's why I chose
this night sky. And another reason
I liked this image is this horizon lights, which will serve our visual. This is the first image. Next we will get this
Mountains image. Let's drag it and
put it right here. Very cool myths. Let's make it bigger. And of course, obviously
the first thing we're going to do with this image
is to select its sky. So let me just hide this
image and then From select, I will press sky, this option. Select the sky in a very good way as you
can see right now. And then I will
press into the mask. This will select the sky itself, and then I will press Control
I to invert the mask. The way I will put the mountains in specific place is that I want the horizon
line of this image, which is this line. I want it to be at the same level of
the horizon line of the background image, which is this line here. Okay? So let's try to match
the two horizon lines. I want these lights
to be visible. So let's make this
bigger like this. And let's put it right here. Let's go to the next element, which will be the
middle ground parts. For this, I have chosen this
image of a city, this one. So for that, I will
just try to match the same level of horizon line here and put it right here. And then I will mask it later. Okay? So I'm now trying to
match the horizon line. Then press Okay. You can see the horizon line here is
matching with this line. Maybe it needs to be a
little bit to the bottom. Yeah. Very cool. Now we need to mask
this part of course. So we will create a mask and
using the gradient tool, I will press G and just we'll create a mask and this update, this lifetime gradient,
you will find it only in the updated
version of Photoshop. Maybe this area needs to
be mascot in a better way. So let's bring our soft
trend, that price. And with a low flow, we can mask this out. Okay, this is the middle ground. So as I am always saying, if you want to create
depth into your visuals, you need to have several
levels of depth. So the first thing
is the background, which is the sky
and the mountains. The second thing
is the mid ground, which is closer to the camera
that is shooting the scene. And the last thing will
be the foreground, which will make right
away for the foreground, we will get this
image of the car. And I prefer to open it into
a new project to create all the adjustments that we want and then put it
into the project. Firstly, I will cut this
scar from the background, and I'll do this
by simply going to the Select Subject tool
and then select the core. Let's see if it's
making goods results, I would create a mask. Yeah, it's not bad, especially because we will keep these shadows and we
will not delete them. If, of course, if
we need to separate The car perfectly. We need to use the pen tool. But this, for me,
That's not bad. You know why? Because the core
now is separated and that's what we only want. Okay, so let's get
these two layers into our main project and let's put it right
here and press. Okay. So what I created basically is two versions
of the car image. The first one, I mask it, the car, like so, but the information is
still in the mask so I can reveal some information
back if I want. And the other one, I will delete the mask from it. And let's try to be
organized here I will choose these two layers
and put them into a group. Now let's care about
the car image. At first we need to
get rid of this area, the sky of the car. So let's create a mask, and then let's select this area. I will do this by the
Polygonal Lasso Tool. So I will just create
a selection like this. And I will mask it, press Alt Backspace to
fill the mask with black. Very nice. And let's move the core a
little bit to the left. Very nice. I can see now that the horizon
line is not horizontal. Okay, So let's create a
horizontal line and see, yeah, it's not horizontal. So let's just rotate
the whole group like this to make it
completely horizontal. That's very nice. Press Enter and we can
then make it part. Now we need to care about extending this
part of the image. So I will do this by simply
selecting this part of the image and cutting
it from here. So let's just select
it, press Control C, Control Shift V to paste
it in the same possession. And then press Control T again
and start to distort it. So I will press control and start to distort it like this. No, I don't, I don't
want so much distortion. So I will keep it
as it is right now. Then press Enter and I
can simply duplicated. But firstly, let's
smoothen these edges. I will simply do this by creating a mask and
with the software and the black color
increase the flow. I can soften this edge and then we can take
a copy from this. I press Alt and drag
this layer and take it, take a copy of it and
put it right here. Of course, the perspective of
these lines is not matched. So I will do the same
thing we did before. I will simply try to
distort it like this. Okay, try to change the
orientation of the lion's. Very nice, Not bad, especially
because this area will be dark and the details
will not be visible. So for me it's okay. The next thing we're going to bring the fence in this area. And as you know, I like to put all the
images together at first, that's what I like. And then I blend
the images again. So for this, I will select
the white background simply using select
and color range. And we'll decrease
the fuzziness. And I will simply plug, press into the white
color and press Okay. And we'll create a
mask, simple as that. Then I press Control
I to invert the mask. Very nice. Let's get this to our main project and let's
drag it and put it here. Press yes, and let's
make it smaller. I need the sides of the fence
to look like it's not big. So that's why I'm
making it smaller. And let's duplicate it
by pressing Alt and Shift to drag it
at the same level. Very nice. Let's put it here and let's
duplicate it one more time. Pressing Alt and Shift to
drag it and put it here. And the last part will
be the light bulb, the street light bulb, which is this one. So for this, I will
simply do the same thing. I will select it
using color range. Who is in color orange. Maybe I will increase
the fuzziness to maybe seven and then press OK, select it, press Control
I to invert the mask. Let's bring it into
our main composite. Precious. For this, we don't want
to reveal all the size of this bulb because it will not be visible
in the real life. So I will just put it
like this, simple as that
4. 3 Fixing colors of sky (Putting the initial mood): Okay, now we have all the
elements in possession, so we need to care now about
blending all these tokens. So let's start by the sky. That's what I like
to start with. For the sky, I want to create like don't effect
in which you have a very subtle orange light in the horizon and the
sky is still bar. So let's start by
trying to give the sky a little bit of cyan
ish, greenish color. That's what I found, that it will look
complimentary with these orange subtle colors. Okay, so let's start by creating a color balance layer and
create a clipping mask. And let's give in the mid tones, some say Anish tone and some may be greenish
tone and some yellow. Very nice. Let's
go to the shadows. For the shadows,
I will just give it some push in the blues and maybe tiny push in the
greens and some Spanish push. Afforded the highlights. I will give it a reddish color. Can you see the horizon now? When I'm increasing the red, it is increasing the
red in the highlights, which is this tiny area. Okay, so I will just
give it a little bit of orange color and maybe some little touch of magenta and some little
touch of yellow. Very nice, very
nice subtle effect, but it's what I want. So Here's before
and here's after. The luminosity of
the sky is good. So I will not dark
in it or something, but I will go straight to
this horizon line port. For this, let's try to make
the reddish orange light. I will do this by
firstly duplicating this sky layer and then change its blending
mode to screen. So I'm now creating glycoprotein lighter version
of the sky image. And I will then press Control U to bring up the
hue saturation adjustment. And then let's try to shift its colors towards the orange. Or maybe we can create
a colorized effect. And yeah, that's much better. Colorized effect and then
increase the saturation. Maybe like this press. Okay, and then I will create a mask press Control
I to invert the mask. And then I will paint here over this area was a very
subtle flow effect. So let's make the flow like 8%. And let's draw this. Can you see it right now? This is what was in my mind. We can put some
clouds brushes here. So I will just
duplicate this layer, press Control J and present to the mask and then
press Alt Backspace, and then Control I
to invert the mask. Let's get another cloud. Brush. This one looks cool, so let's make it bigger. And let's put some tiny
touches of clouds. Very subtle effect. And it looks very nice. Maybe we can decrease
the opacity. Very cool. I think we need to increase the green color or the cyan
color In the mid tones here. Maybe these parts of
the sky are very dark, so we need now to open it
a little bit using curves. So let's open the
shadows a little bit like this and then
darken the highlights. And let's zoom out to see. That's nice. That's really nice. Before, after, before, after. That's very nice.
5. 4 Blending the mountains (Color and values adjusting): Okay, so now let's care
about the mountains. The first thing that came into my mind for the mountains is that it is very dark and
the edges specifically. So let's start by correcting
the lightness values. That's the first
thing I start with. So I create a curves
adjustment layer and create clipping mask. And now let's open up the shadows and let's
darken it like this. Very nice, Very nice. Now let's care about the colors
and maybe the saturation. So let's start with
the saturation because the colors are
really blue colors. So let's start by creating a hue saturation
adjustment layer, create a clipping mask. And then let's shift the colors a little
bit to the greens. Like so and desaturate
it a little bit. Very nice. Very nice. Maybe we need to make this
a little bit contrasty. Now let's give it some color, and I will do this by the same
thing with color balance. You can use the selective
color if you like. It's okay. Both are great tools. So here I'm going
to give it some say Anish touch and
you can notice me. And now I'm trying to
zoom in, zoom out. This is a habit that I developed
because I want to see, always see the big picture. I don't want to be lost in the details and then I don't
care about the full picture. Okay, let's add some
Sans and the shadows. Maybe, maybe let's
add some blues. And then the final thing
is the highlights. Let's see what if we
increased the reds? Yeah, That's very nice. Let's see, before,
after subtle effect. But it is what we need. It
6. 5 Blending the midground city lights: The next element will
be this city lights. So let's start by. At this time, we will correct the colors using selective
color because we basically just need to shift these blue colors
towards cyan ones. That's it. So I will create selective color
adjustment layer and create a clipping mask
and choose the blues. And let's see what if we
increased the science? Let's zoom in and let's
try to match this to this. So I will simply
increase the greens. Yeah, that looks nice. Maybe add some yellows. Very cool and maybe make
it a little bit darker. I think let's go to the
science and see where the science needs
to be a little bit darker and shifted
to the greens. Yeah, That's very nice. Let's zoom out and see. That's very nice. Here is
before and here is after. Maybe it needs to be
a little bit darker. So we will do this by creating
a Curves Adjustment Layer, new layout from the
Photoshop updates. It's just bothering me. Okay, anyway, so let's create a clipping mask and let's
make it darker like this. Subtle effect. Very nice. Let's see. Okay, Not bad, not bad at all. The next thing we're going to bring the soft
trend that Prakash and smoothen the edges of
this city lights image. So I will just decrease
the flow and let's smooth these ports to blend
them in a good way.
7. 6 Foreground blending (Color and values adjusting): Now let's care about this area. So I will start by changing
the colors of the ground. That's why I put it
into a separate layer. So we can marriage all of
this into a smart object, all the ground layers into
a smart object by pressing, right-click and convert
to smart object. And then we can apply all
the adjustments on it. So I will start with
creating curves, adjustment layer to care about the luminosity or
the lightness value. So I will make it
dark like this, because the closer
you go in distance, the darker and the more
contrast in your image should. So this foreground part
should be dark, darker. And that's nice. So let's create color balance
layer to adjust the color, I will just add a bunch of science and some
greens, some yellows. Whoops, no very forget to
create a clipping mask. And the next step, let's go to the hopes of deaths. That's very high
amount of yellow. So let's store it. Very nice, Very nice. Let's go to the
highlights and let's add some cyan and some greens. Do the same thing with the
shadows at some science. And some, maybe here I
will add some blues. See this oversaturated? I have oversaturated the effect. So let's get back
to the mid tones again and let's decrease
all the cyan color. As I'm always saying, this is not a one-way process,
this ongoing process. You will always get to your
image and edit it again. So it's okay to make mistakes. And what is more important is to learn
from these mistakes. Very nice. Now, let's care
about this fence. And I will simply blend all these images into a new smart object or merge
them into a smart object. Let's put it into a group
and let's name it fence. Okay, so let's create a
curves adjustment layer, the same process
again and again, create a clipping mask. And let's make it dark because
it's a very close element. So maybe we need to put it
a little bit to the bottom. Next, we will correct its
color by color balance. Adding some cyan and some blue, create a clipping mask. Again, I always forget this. Okay, for me, that's, that looks nice for now. Now let's care about
this layer of the bulb. So let's put it into another group and
let's call it bulb. Want to be organized
here because it's easy to get lost with layers. Believed me guys. So let's create a
curve clipping mask and make it dark as ****. Like so. Next we will do the same thing, Color Balance thing,
Clipping Mask, add cyan color at some yellow, maybe some green, not so much. Let's go to the highlights. Do the same process again. And you need to make your
eye all those working. And it needs experience. Actually, let's care
about the final element, which is the car. For the car, I will
decrease the lightness values the same way and I
will give it some color tint. But I don't want this color effect to be dominating the original
color of the car, which is actually neutral. So it's okay to dominate it. But I don't, I want the car itself to have its
original color. So try not to exaggerate in
the coloring of the car. Okay, So let's add some
cyan, Dutch, maybe. Some blue. It's very nice. Let's see. Okay, Very, very nice. Now everything is blended. But I can see that we
need something here to create a transition between
this fence and this road. So let's get this grass layer and let's put a two right here. Oops, the image
size is very big. So let's make it small. This, and let's select it. Maybe we can select
it using color range. I don't know. Let's try it out. So I will press Select Color Range and let's
select this white color. But here I will increase
the fuzziness a little bit. Then press OK and let's
see, create a mask. Press Control I to
invert the mask. But it just is terrible. But if we want to get rid
of these white fringes, I can say we can create another copy of this
and create a clipping mask. Then shifted a little bit to the top and maybe
we can make it bigger. So by doing this, we are just putting some grass pixels into the
white friend, just like so. And then press Enter. Let's see, doesn't look bad, but we need to
erase these edges. So using the brush
increase the flow. I will erase the researchers. Very nice, very nice. Make it smaller. And now we can blend it using the gradient
tool and the mask. So let's create a mask and
create a gradient like this. Oops. Like this. Yeah, very nice. Press Enter and let's fix
its colors and saturation. So I will create a curves adjustment
layer and make a dark, create a clipping
mask, make it dark. Almost the same
darkness as this fence. And next we will reduce the saturation
of this green color. So, or we can shift the color
toward more cyan color. So let's try it. Let's make a clipping mask and let's try to shift its colors. Yeah, Now, this looks better, but we need to decrease
the saturation. Vary. Very nice. Of course, it's placement
is not the best here. So what about putting
it right here? I think maybe we
can make it bigger. Then press Enter and see. Yeah, it's not bad. Okay, so now let's duplicate it. And the reason why I didn't duplicate it from
the first time because I want to make the
whole Effects and then duplicate it only one time. Okay, maybe we can make
the duplicate bigger because we need it to not
look as it's identical. Okay? So maybe this looks nice. And we can create a duplicate
and put it right here. Very, very nice. And I can see that the edges, these soft edges that we
made are not the best. So let's get some of
these edges back.
8. 7 Street bulb light painting on each element: Okay, that's not bad. Not bad at all. Now let's care about putting
the lighting effects. So let's start by creating the colors that is
coming out of this bulb. I will start by creating a
solid color adjustment layer. Let's choose some orangey, yellowish color like this
and then press Okay. And then press Control. I, I will make the
brush very big, and then I will put some clicks. And then let's make the
brush smaller and put another touches and then
make the brush smaller. And that's how I create like a glow effect that is coming
out of a center point. And let's make it smaller. That's very nice. Now let's change
the blending mode of the layer to screen. And let's try to
put it right here. I did this because I want
to have like a glow, very subtle effect coming
out of this street ball. Okay. Very nice. Make it big, very big. And maybe we can
put it very cool. Maybe the colors
are not the best. So let's shift
this color towards less saturated color like this. That's better. Then press Okay, Very nice. Now let's draw or
paint the lighting that's coming out of this bulb into each element
in our composite, we will start with the
light bulb itself. So I will do this
by simply create another solid color with the
same color we did before. Some color in this area. Then press okay. And then I will create a
clipping mask to this layer. And maybe we can put
the layer into V. Let's make it when
you're dodge and let's decrease the
felt a little bit because the reflected
light should be lower than the source of light. Then press Control I
to invert the mask. And now let's care about
painting the light. And here I want to
tell you something. I want you to care about the placement of the lighting and the intensity
of the lighting. So here we need to
put the light here. But it should be very high at this area and it fades
away to this area. And at this edge, it should be high. And here it should be faded and then it should be
faded to this part. Okay, so using the
soft round brush because this bulb is rounded, It's like a cylinder. So we need to create
like a very soft edges. So I will simply increase
the flow of the brush. And then using the wide brush, I will just paint like this. I'm pressing shift here to
make straight line. Okay. Let's erase some
areas from here. And let's paint it
again. Very nice. Very nice. Let's see. Very good. Now in this area, we need to select it, maybe using quickly
Polygonal Lasso tool. And the reason why
I'm selecting it, because I don't want the lights to get into this
area at the bottom. Okay. So using the white brush, I will paint over here. Then. Maybe it will fade it out
like this. Very nice. Let's see. That's very good. Now let's do the
same thing here. So I will select this area
and then all of this area. And then I will paint
with the same brush. But this should be subtle. Simple as this. That's very nice. Let's see, see before and after. Here is before. And here is after. Very nice. Now let's care about painting
the light into this fence. And we will do the same thing. But firstly, this, can you see this edge needs to
build let also, so what about letting
it like this? Tiny details is what makes
your visual Interesting. Okay, Very nice. Now let's care about
the fence coloring. I will just duplicate
this layer and put it This solid color layer
and put it here. And then I will remove
everything from it by selecting the mask and then
pressing Alt Backspace. And now I can care about
this fence lighting. So I will use the same brush
to paint the lighting here. So I will just press the Shift key and try to
paint over this area. And then let's
paint it like this. Okay. The edges. And let's do the same
thing into this edge. Using yeah, I'm pressing
Shift to create straight lines and
then make the brush smaller and erase the edges. Let's do the same thing here. And here. You need to understand
the shape or the form of any object that you
are drawing light on. That's what I have explained in the tutorial of painting light. Alright, Very nice, Very nice. Let's see, before and after. We will do the same thing here. So it looks very nice. See before, after,
before, after. Very nice. Now let's care about the
grass and the ground. So I will just duplicate
the same layer and put it into the ground part. And then we can paint
some lights here. Okay? And for this, I will use the blend if trick. That's because I
will want to remove the colors from the black
areas in the ground. So I will double-click into the layer and using
blend if sliders, I will remove the color from
the black parts like this. Very nice, very nice. And then press Okay. It see here is before
and here is after. We can make the effect bearer and then faded away, then fade. It's very nice. Now let's care about the
lighting of the grass. So for this, let's go to the grass layer
and let's duplicate the same coloring layer
we're using always. And let's create clipping mask, press Alt Backspace
to remove everything. And then maybe we can press
Control Backspace to fill it. And then using Blend If slider, we can remove it from
the black spots. And that's it. Yeah. We don't want don't need
to paint on it. I think. Yeah, that's very good trick. And we can press Control
I to invert the mask. And using the soft round brush. We can paint the light back. So we can paint it here with high-intensity and
then fade it away. So let's see. It's not bad at all. I don't like how it looks here. So for this, I will go
to the mask and start to refine this using
the black color. So it should be defined
and a little bit sharp. Not as it was. Very good. Maybe we can
fade it a little bit. Not so much. Yeah. That's cool. That's better. Let's do the same thing
here in this area. So I will go to this. What about duplicating gate? So let's just delete this one
and delete the other one, and just duplicate the one here. So I will press
Alt and duplicate it and put it right here. Very nice. Of course, the selection
needs to be edited, the mask. Okay, now let's care about
lighting the car itself. So for the car, At first, we need to get rid
of this darkening that we have done with curves. So let's go to the
curves and let's Get some lights back. So I will just to reveal the main lights of
the car itself, which is in this
bag, torch or light. And here we have some lights. Okay, very nice. Maybe the slide
Saul's really nice. Now let's paint over
the ceiling of the car, the same software
and that price, I will just remove some darkening from the areas that
we have done using curves. So I'll just softly
do this. Let's see. Looks nice. Let's see the
effect that we did. Here's before and here's after. We just reveal the lightness
of the core itself. So let's start putting
some colors into the car. I will start by the
same layer here. Put it right here, press Alt and press between the two layers to
create a clipping mask. And let's remove everything
from this layer by pressing Alt Backspace and then using the soft
rounded brush, I will create like soft
light above the core because the core itself has
very good light distribution. So I don't want to break
this or to ruin this. So I will just create soft
like light effects like this. And of course it
doesn't look good. But using the blend, if magic, we will remove the light
from the black areas. So I will just split
the cursor like this and remove the color from
the complete black areas. And that looks good for me. Maybe we can refine it more. So let's try to
refine this more. I will paint over here. Maybe we can remove it
from here and from here. And from here. Let's decrease the flow of
blood rush because we don't want it to be like a
contaminated light. We don't we want it
to look like natural. So this is not bad. Not bad. Next we should put another
layer of this lights. But at this time, I will not use blend if because I would create
some how sharp lighting. So let's change the
blending mode to Linear Dodge and
decrease the fill. And then press Control I
to invert the mask and using any textured price. So fuller, e.g. I. Will use this texture brush. I will paint light here. Okay. Nice. Maybe use another brush. Oil, pastel. Yeah. I like this brush. Yeah, let's decrease
the flow at first. Okay. That's not bad. Maybe we can decrease
the fell again. And now that looks good.
9. 8 Car lights painting: I think we need to create like a glow effect coming
out of this bulb. So let's create a
solid color with an orange color, red color. Press Okay, and let's make the blending mode
screen and then press Control I to invert the mask. And let's create a
clipping mask and let's use the soft round brush, the same price we used before to create
like a glow effect. So using the white color, I will paint over here too
to create this glow effect. And I think we need to remove the clipping
mask because we need the glow effect to be
outer the size of the car. Very cool. Let's see. We don't want to exaggerate. So this is nice. Nice. Now, we can create some lighting effect from
the front lights of the car. I will use overlays for this. So I will use this light
overlay for the front lights. So I will put it
tight right here, right-click Flip
Horizontal to get this color and I
will make it bigger. Of course, all of this
will not be visible because I will put it
behind the car itself. And then I will change the
blending mode to screen. And neck is I will put it right here and remove this
part using mask. Increase the flow.
Using the mask. Very nice. And I will change its
color by hue saturation. So let's press Control. You press colorize, and let's choose this orangey
yellowish color. Maybe increase the
saturation a little bit, change the hue,
and then press OK. And let's see. Looks nice. Maybe we
can make it bigger. Then press Okay. It looks nice. And we can also
put this overlay. It's like a lens flare oval
relay for the car lights. Yeah, let's flip it horizontally and let's
put it right here. Very nice. Change the blending
mode to screen. Press Control. You colorize
and give it the same color, increase the saturation maybe. And then press Control L
to remove these edges. So I will just remove this, it just like so. And then using a mask, I will remove these parts. Very nice, very nice. Let's see. Here is before. Here is after. Of course we need some
lights in the ground. I will paint these
using the same layer. Put it right here, remove everything
from the layer, and using the
Polygonal Lasso Tool, I will paint the
direction of the light, so it should be like this. And then using the
soft round brush, I will paint some light effect. And of course, it will
not be as sharp as this. So I will try to fit it out using any kind of blur effect. So maybe we can convert
this into smart object. And then using the
field blur filter, I will fade it. So let's put a point right here and another point here in which the light
should be sharp. This will give us this
effect of the light spreading out. Very nice. Press, Okay? And C. Lastly, we can create
some hazing or fog or dust effect right here using fog brush with the same color. So I will get this fog brush and choosing the same
color in a new layer, I will just make
some fog effect. Of course it should be
the flow should be low. And I will just
create some hazing, thus defect like this. And oops, it's very high. Let's create a mask
and let's erase from it. That's not bad. Very cool, Very cool.
10. 9 Creating water reflection puddles : Now it's time to create the
water reflections effect. For this, I have like this little map which I will use to create the water
reflection effect. And let me explain that to you. I will just put this
into the ground plane. So let's make this together. I will right-click, press
distort and then press Alt and Shift at the same
time to distort the map. So I want to get this
distance perspective. And then I will
make it like this. Maybe put it right here
and we can make it bigger. So right-click scale and
then make it bigger. Press Alt and Shift to
make it bigger. Very nice. Now, I want to select the white colors to put
our reflection on it. So I'll simply select it by only making this visible and then
press Control a, Control C. So I have copied this, and then let's get
back everything. And then I will create a mask, press Alt and pressing
to the mask so that I get into the mask mood
and then press Control, Shift V to paste it
into the mask itself. Okay, So when I get back
to our main project, I will see only the
white spots. Okay? The next thing, I will just hide this for a moment
and then create a new layer at the top of everything and press
Alt Control Shift E. This will create another layer
from the visible layers. And then I will press
Control T, right-click, Flip Vertical into this layer, and then I will just
skew it like this. Because that's where the
reflections should be. And at the same time we can
distort it because water is simply the reflection of the objects that you
have in the scene. So if I make like a
duplicate like this and put it into the our map layer here. We can create a clipping mask
and just be visible here. I hope you understand the point. Okay, so I will simply drag this layer until I
find a decent place. And I can do this
more than one time. So e.g. here, I can only care about the car
reflections here. So I am showing this. So for now, I only care about the reflections
of the course. So let's try to get it right. And you could have done
this element by element. So e.g. I. Could have just copied the
car element and reflected it. And then copied the bulb and make a clipping mask for
each element by his own. Okay, but for now I will
just make it as a whole. Image isn't any kind of brush, so I will only keep reflections
of the core. Very good. Now let's create another
duplicate of the car reflection. And I will simply create
a clipping mask again. And I will, now, I will care about
this line here. So let's put it like this. I am caring about the
grass part right now. So let's make this bigger
and let's care about this bulb reflection and
the gap and the grass. That's all what I'm
carrying about right now. Very good. Press
Enter and then let's remove any other reflections
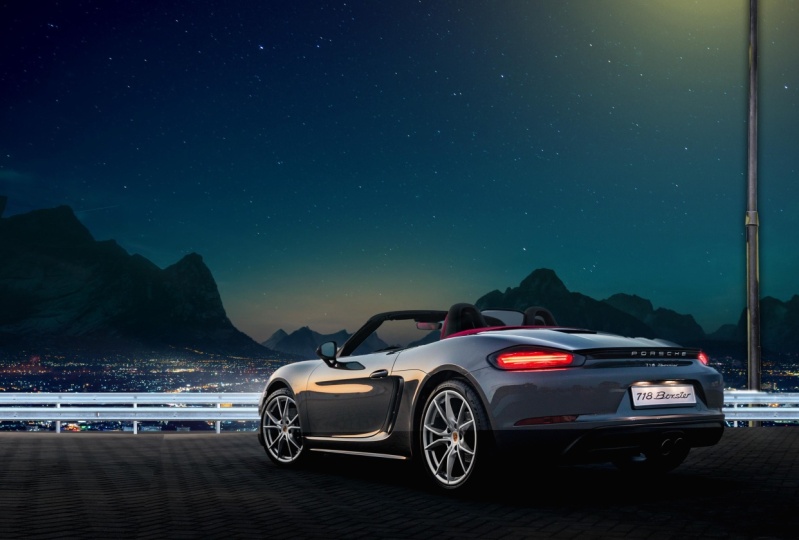
11. 10 Final look and color grading: Now everything looks good. Now let's go to the
final color grading. So I will simply start by creating curves to create
a vignetting effect, making it contrasty like this. And then press
Control I to invert the mask using soft
rounded brush. I will just make the edges a little bit dark because I want the focus to be in
the core itself. And the final thing
is I'm going to create a new layer and press Alt Control Shift E to
create another layer. And then right-click
Convert to Smart Object. And let's go to
the final ******, which is the Camera Raw Filter. From this, I'll go to fertile filter and
camera raw filter. Here the magic starts. So here I think we need to
add a little bit of contrast. And maybe we can change the white balance a
little bit to the yellow. Yeah, I think Let's
go to exposure. Maybe you can make
the image darker. Open up the shadows. No, alphabet. Highlights are good,
but let's push, push it, and it's too much. Let's go to the texture, add a little bit of
texture, not so much. And let's increase
the vibrance because I want it to be
like a vivid color. See. Okay, to go to the calibration, let's start to change the calibration of
the orange colors. I think this is better. Let's see here. Okay, The saturated
one is better. So go to the orange. No, I don't like it. So let's keep it as is. Let's see before and
after. And very subtle. Okay? Now let's go to details
at some sharpening. Let's see some sharpening. And maybe we can go to the
effects and add some grains. Let's see. Yeah, the grains is giving
it a very good touch. Alright, I bothers me how
this yellow color pops. So let's go to the Color
Mixer and let's shift these colors to
more orangey one. Let's see. The sky colors needs to be
shifted into more orange one. Yeah, that's nice. Let's go to
luminosity decreases, increases the
luminosity of the reds. And what about the oranges? Maybe decrease them
or about the yellows? Decrease that much. Let's go to the saturation. The saturation of the yellows. And let's see, seance maybe
increase the cyan blues. It's basically
changing every slider. You can until you
get the best result. That's what I'm doing. Great now, let's go to curves. I like to add split
toning effect. So add some yellow
in the highlights, some blue in them. This tiny blue touch, it's giving it a
very good touch. Maybe we can increase
the contrast like this. Yeah. So go to the reds. Let's see. That's very nice. Maybe you can add a little
touch of red in the shadows. Just a tiny touch. Let's see if we added cyan. Yeah, it always work. This split toning effect, all those work for me as less, at least, maybe you can
increase the contrast. And there we go. Here is before, here
is after this, okay? And see, yeah, that's the final result and here
is before and after. All right, guys. That was very intense and I hope you enjoyed it as
much as I enjoyed it. So these kind of projects
takes some time, at least for me to record it. And you may find that I
have made some mistakes. It's okay because I am trying to explain while I am
doing the work itself. So it's okay to
make some mistakes. Try it yourself. Try to make a better
version from this. And you will find
the stock images in the description and the piece
 Nour Art, Digital artist, Youtuber