Transcripts
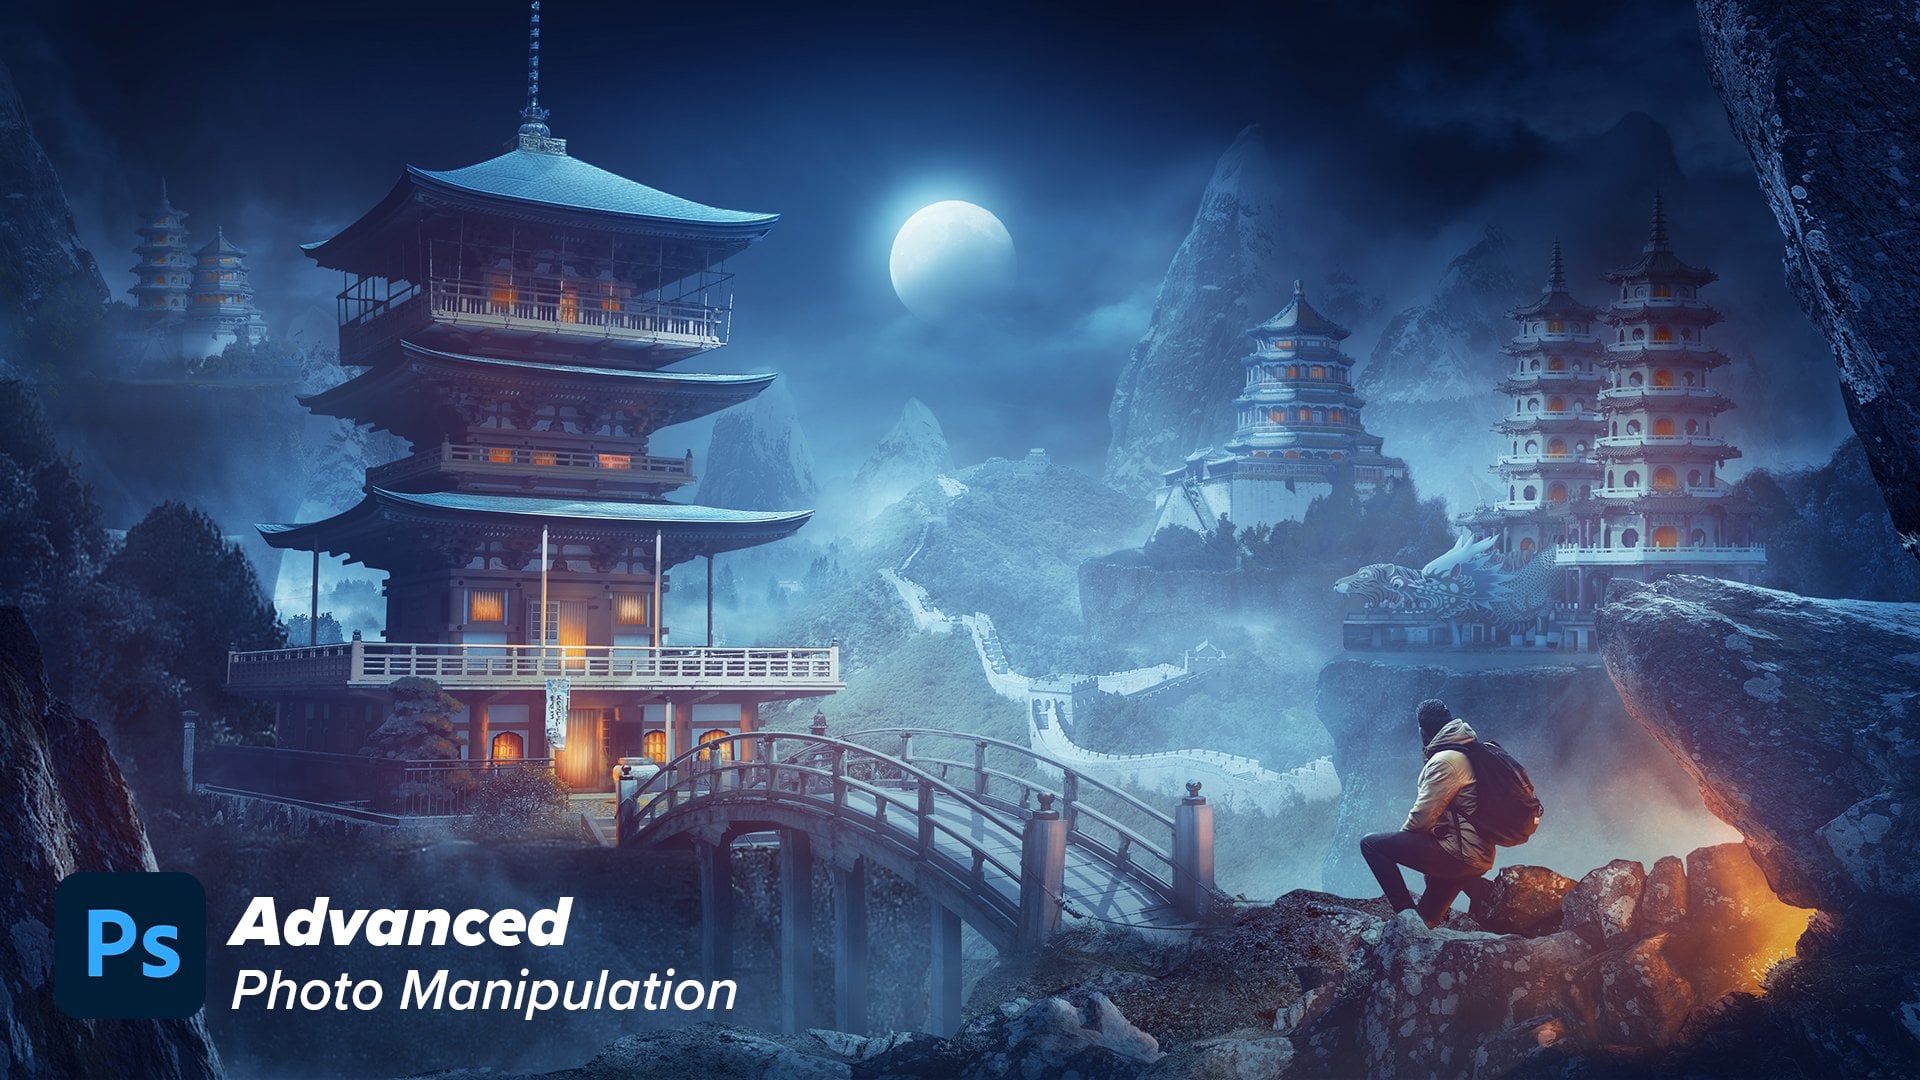
1. 1 Intro: Welcome to the masterclass
in photo manipulation. In this class, we will
learn how to create this artwork using advanced photo
manipulation techniques. So this class will go
beyond the basics. We will learn how to cut images and put them together properly. How to adjust the light
values to create depth. Also how to correct the
color and the saturation of each element to blend
the image together, we will learn also
how to draw light and shadow and how to distribute light from the light source into all the elements
into our artwork. Finally, how to put the
final look and final grading into the image who was
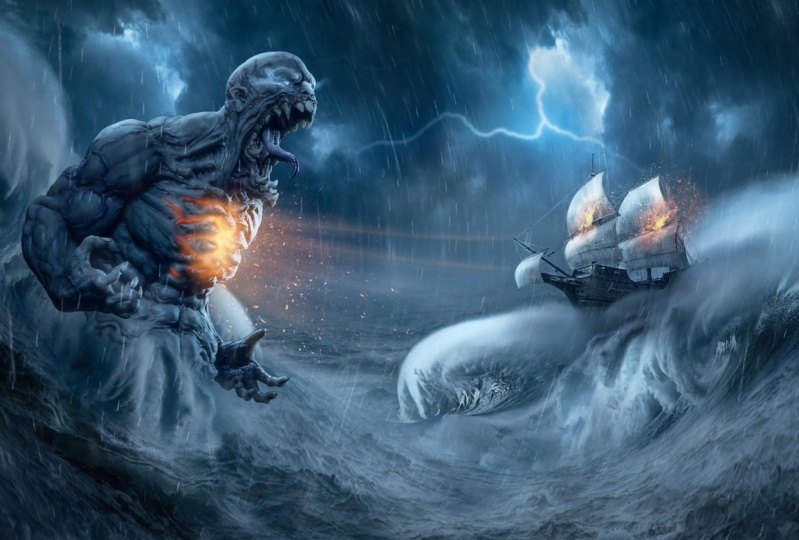
inspired by Pacific Rim movie? I was fascinated by the visual effects into
this movie ends the story. It was really unique
and eye-catching. So I decided to make this visual about it without
wasting any more time. Let's dig into business.
2. 2 Blending the sky & Background sea: Alright guys, firstly,
I will start by 1920 by 1080 db Canvas and
then press Create. This is the full HD size. I love to start with the sky image because it's
the main source of light and it gives the whole image their mood and the color
tune that we want. So I will put this here
and let's make it bigger. As you can see, when
we make it bigger, the scaling is not
adjusted properly. You can see the scale
of the clouds very big. So we need to make it
smaller like this, and then we can duplicate it that will make the sky bigger. So I will create a mass. And then with the
soft round brush, we can erase the edges like so. Let's increase the
flow a little bit. And let's erase the edges. Let's make it bigger. Select the two layers, and let's make it
bigger than press. Okay, here we need to open up the shadows that black parts. So let's firstly merge those two layers by
pressing Control E. And then let's create a
curves adjustment layer. And let's open up the
shadows a little bit. Change the blending mode into luminosity because we want to affect only the
lightness of the Slayer. Then I will press Control I, to invert the mask. And let's draw in
these dark parts. Like so. Make the brush bigger. And let's draw in these parts. Let's select these two layers and press Control
E to merge them. And now I will create a mask to fade the edges a little bit from here using the soft turn the brush and I will
just erase this part. Now we need to
change the shape of the clouds a little bit
to make it dynamic. So I press Control T, and then with the help
of the warp tool, we can change the
shape of the skylight. So because we want
it to look somehow dynamic like this,
maybe like this. Okay? This gives the
clouds some motion. And then let's make
it a bit bigger. Now let's create a group to keep everything organized
by pressing Control G, and then let's name it sky. Next we will get this, see an image like so. I want, I don't want to make
it bigger like this because we will lose the
scaling, as you can see. So if I want the texture
of the waves to be small, then I will not make it as this. I will just make it very small. And that's the same
thing we did in the sky. And let's duplicate it. Put it here, and let's press Control T, right-click,
Flip Horizontal. And let's stretch it a
little bit like this. Perfect. And using mask, we can
erase these edges, make the brush smaller, and we can erase this edges. Very good. Now, let's merge these two
layers by pressing Control E. And let's create a new mask and erase this white part with
the soft rounded brush. I will erase this
part from here. And we didn't make it
sharp because we will have hazing layer that will hide this intersection between
the sky and the waves. So I will just use a
soft turn that purse and erase this part. Very good. Now I want to illustrate
some constant. If we want to create
depth in our designs, we need to understand that. We need to create three
layers of lightness. The close element like this part should be
dark and contrasty. The four elements like
this should be faded. And the middle ground elements
should be our focal point. So we need to understand this concept because
we will use it here. This will prevent us
from making flat visual. So firstly, our press Control T, and let's change the
shape of the waves. These waves will be
in the background, so I will just change
it with Warp tool. And I want to make it
somehow dynamic. Let's put a point
here, press Control, and put a point, and let's change the
wave's direction. This will give us more
movement into our Visual. Now there is another thing
I want to talk about. I wanted to create a Golden
Ratio Spiral composition, as you know the golden
ratio composition rule when you apply it
in your visuals, this gives you a decent
look in your visual. And also I wanted to use the rule of third
in our composition. And as you can see here, focal elements are in the points in the
rule of third rule, though these are helpful composition tabs that
you need to be aware of. All right, now let's
change the colors, a little bit of the
sky and of the waves. So firstly, I will use a color
balance adjustment layer to change the colors of the sky a little bit
in the mid tones, I will increase blues, maybe subtle effect and
the science, the shadows. I will also increase the
blues and the hands. And in the highlights, I will increase the
science and the blue also, as you can see here, here is before and
after, before and after. Let's change the colors
of the waves also. So I'll press
Control G to put it in the group to keep
everything organized. And let's name it background C. And let's create a color
balance adjustment layer. And let's change the colors to match the colors of the sky. So I'll of course, create a clipping mask. And let's increase the blues and the mid tones and
thus ions also, the in the shadows increase. The blues and the sands and the highlights will
do the same thing. Those n sounds very cool. Maybe we can increase the
magenta a little bit. And the shadows. We can also increases
the magenta because we want to decrease the
greens. And this is good. Here is before and
here is after. Now I think we can make the sky brighter by using
curves adjustment layer. Let's brighten up the sky
a little bit, not so much. And let's create clipping mask because we want only
to affect the sky. And let's change
the blending mode of the curves tool luminosity, because we want to change
only the lightness value, as you can see here
is before and here's after the sky is a
little bit brighter. Next, I will fix the
values of the waves layer, so I will just brighten
everything up. Let's create a clipping mask. And then I will darken it a
little bit because I want it to be less contrasty
than the near elements. Like so. And let's change
the blending mode into them. And Ostia also, because I don't
want to affect the color. Here's before and here's after. Very good. Now we need to lend this intersection between
the sky and the waves. So I will do this by creating atmospheric perspective
hazy layer, by creating a solid
color adjustment layer. And let's chain choose a bluish color and
let's press Okay, maybe we can choose a color from the waves layer or the sky. This color, I guess. This is good. Let's press Okay. And then press Control
I to invert the mask. And with the soft round
brush we can draw here. Don't forget to lower
the flow of the brush. And let's draw some
hazing effect. This is the atmospheric
perspective effect bigger. They think the colors
needs to be edited. It's very desaturated and dark, so let's brighten it up and let's make it this
color, I guess. Then press Okay, maybe
we can decrease it. Very cool. Now as you can see,
everything is blended and we are ready
to the next step.
3. 3 Blending the left waves: Next I will bring this waves
layer and then right-click, Flip Horizontal and press. Okay. And now we need to
select the waves. We'll do this by
creating a mask. And with the brush, we can erase these parts easily. I will erase this part
with the hard brush. We can erase this part like so. And we then we can refine
the waves part easily. So I will just erase this part. And let's go to the mask and the properties of
the mass from here, press Select and Mask, and then we can define it
using the Refine Edge tool. We can refine the
sports of the waves. This will give us
the transparency of the edges of the waves. Very good, simple and easy. Then press OK, and
we're good to go. Now let's choose the possession of the waves to match
what we are expecting. So I will firstly
right-click and convert to smart
object to the layer. And now let's put the
waves layer behind them, the monster, and we can
hide the monster layer. And then let's change the rotation and the
possession of the waves. It's about a t here, make
it a little bit smaller, like this, and then
press work from here. And let's press Control
and put some points to change that rotation in the
direction of the waves. So I will put a
point and then drag it and change that
possession like so. Let's rotate this point. And let's drag this point here. And drag this point here. Also, maybe we can extend
this part like this. Very cool. We get, we will refine this part of the C later because
it lost the details. But now we are focusing only to get the best shape of the waves. Very good. Let's stretch this
part and then press Okay. Now the shape is good to go. Let's make it a little
bigger and let's tweak that orientation
like this. And now we're good to go. Now let's fix the lightness of the waves by creating
curves adjustment layer, and let's decrease the
lightness a little bit. And let's create a color balance adjustment
layer from here. And let's change the colors. So I will just add
blues and science. And in the shadows will
do the same thing. Maybe a little bit
of green or magenta. Yes, I guess a little bit of magenta in the highlights
will do the same. Ads, ions and loose. Very cool. Maybe we can bring
up the lightness a little bit like this
and make it darker. And let's get rid of this point. We'll just make it
darker from here. Now we need to fix
this part because it's stretch it out and it's
not looking proper. So we need to put some
waves details here. We will just duplicate
this part and then put it here as a clipping mask
and we'll remove some edges. So I will just select
these layers and duplicate them by pressing
Control J and put them here. And let's change the lightness of this layer because it
should be a little bit darker. Base layer because it will
be in the foreground. So it should be
contrasty and darker. So I will, using the curves, I will just make it
darker from here. And maybe like this. Very good. Now, let's merge
everything by selecting them and right-click
Convert to Smart Object. And let's create
a clipping mask, and let's choose a
proper possession and then Control T to
change its possession. Maybe you can warp
it a little bit. So using the warp, plot a point here, and change that
possession like this. Very good. Now we can use the mask tool, erase some parts. So with a soft turn the brush, I will just erase these parts
like so because I want to show the details and the
waves, these white waves. So just bring back these parts. This part also make sure to
give attention to details because that's what gives
the whole scene. It's Look. We need to change the
colors of the waves a little bit because it's
somehow needs some blue. So I will get to color balance and adjust it a little bit more. So I will add some cyan ones
from here, maybe some blue. And we're good to go. Very good.
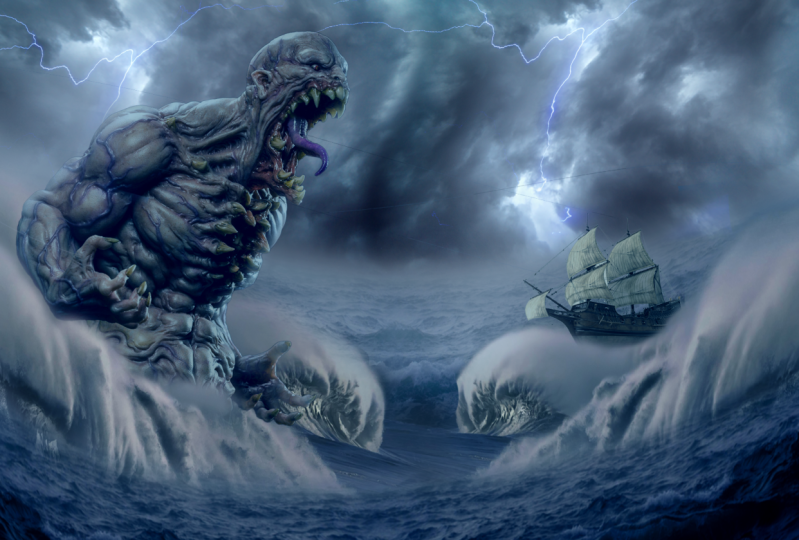
4. 4 Adjusting the composition & blending the Monster: Okay, the next step, I will bring this monster image. I will just make it a little bit smaller and then press Okay, and let's select it using
the object selection tool. I will just select it like this and it will
automatically selected. And then we can
create a mask and we can refine the
mask as we want. So here are some parts that needs to be erased
using the brush. We can edit them and we
can also delete this part. Let's increase it
flow a little bit, and let's delete these portals. Very good. Now let's
put the monster here. And now we want to
adjust the composition, the arrangement of the
elements into our scene. So I will firstly create rule of third grid by pressing View and New Guide Layout and make it three columns by three rows. This will just divide our canvas into three
columns and three rows. And from this point we can define the focal
points possession. So here is our main focal points in which we need to
put our main elements. So I will just put
the monster here. Let's press Control T. Let's change his possession
a little bit because I want the monster to be
looking at the ship. So I will rotate it a
little bit and make it smaller and put his face
into our focal point. Very good. Let's put it into a separate group and
let's name it monster. Now let's get back our monster and let's put it in
a proper possession. I want to put him here. And let's duplicate this
waves part by selecting the whole layers and
press Alt and drag. I will create a copy
of all these layers. And then let's make it smaller and let's change
its shape like this. Maybe somehow bigger
because we want the monster to look like that. It's coming out of these waves. So this intersection
between the monster and the waves should be epic
and has a lot of splashes. So I will just merge everything
by pressing Control E. And now let's refine the
Monster part selection. So I'll just using the
software in that parish. But firstly, I will
right-click and convert the layer into a
smart object because we don't want to
lose our selection. So using the software
and I will try to blend this intersection between the monster and
the waves because I want the monster to look like it's
coming out of these Waves. Very good. And maybe we
can erase the sports. We only want this
part of intersection, only just this
part of the waves. We don't want the other parts. Now, let's change the possession of the monster with the waves. Let's put it here, change it, and let's choose
a proper possession. And let's erase this part. Maybe we can get this
part back on the waves. Let's get it back. And let's now just trying
to blend everything better. So everything that is
annoying to your eye, you need to just erase it and try to make something that
looks good to your eye. The intersection
should make sense. Now let's fix the colors and the lightness
of the monster. I'll do this by the same way. So I'm just creating curves adjustment layer and
let's decrease the lightness. Never forget to
create clipping mask. And let's open up the
shadows a little bit, decrease the lightness
of the monster. And then let's go to color
balance to change the colors. But firstly, I want to create a hue saturation
adjustment layer because the monster has a lot
of magenta color. So I will just decrease the
saturation of the colors. To make it easy to add some blue color
using color balance, I will just add blue and cyan. And maybe in the shadows, I will also increase
the blues and say, and maybe some magenta in the highlights or increase
also cyans and blues. Very good. Maybe we can adjust
the curves a little bit so I will open up the highlights like so
maybe and the shadows. Let's open up the shadows. Very good.
5. 5 Blending the Ship: Now let's duplicate the whole
waves part from the left. That's firstly put it into a group and let's name it waves. And then let's press Alt
and drag to duplicate it. Control T and then flip horizontal to put it into
the other direction. So I will use the same
waves part to put it here. Let's change its possession. Like so. Very good. Maybe we can bring the whole scene a little
bit higher or so. And let's rotate
the whole elements a little bit to the
right. Like so. Very good. Because we want the
monster to be like a giant monster and the
ship should be very tiny. These contrast in the sizes
make it more interesting. Let's name this group
as waves, right? And now we can rotate
it a little bit. Like so. Very good. Now let's get to the chip part. I will open it into
a separate project. And the easiest way to select these white background
is by the color range. So I'll press Select, and let's choose the white color from here and then press Okay, create a mask and then invert the mask by
pressing Control. I. Very good. There are some parts
here that are selected, so we need to get them
back with the mask. I'll just draw like this to get the sports back because they were very
private, very good. Now let's convert it. Smart Object because we
don't want it to lose details and let's drag it
and put it into our project. Press Control T, flip horizontal for it here and
make it very small because we want this
contrast between sizes in our C. Now we want to choose a specific
possession for the ship. I guess here is good, and the intersection
is good this point. And let's create a mask. And with the hard
edges pressure, we can erase this part
following the waves. Lines. Like so. Very good. It's now like it's immerse it into waves and the
blending will not complete until I give it some splashes in
front of the ship. So I will just duplicate the
whole part of these waves. Drag it, press Alt and drag it. And let's press Control T and let's make it
very small like so. And now let's press Control
E to merge the layers. And using the mask, we can erase the edges
to blend it better. So using the software
on the brush, I will just erase the sports
until I get good results. So this part, let's increase
the flowlet, the bed, and let's erase the
sports from here. And here. Very good. Keeping an eye to detail
is always a good thing. Very good. Now, let's create
a group for the ship part, and let's name it chip. And now let's fix the colors
and the values of the ship. So firstly, I will create
a curves adjustment layer. And let's drag the
lightness down. Like so. Maybe we can open up
the shadows that vet. And that's okay. Let's also create a color
balance to correct the colors, I will add some blue color. Don't forget to create
a clipping mask. Add some blue, add some
cyan. In the same way. We will add in the
highlights and blue and in the shadows
will do the same thing. Very good. I guess, a little bit. Very good. Now let's open up
the shadows a little bit to match our scene. Okay, I guess we need also a hue saturation
layer because we want to get rid of this
yellow color in the shadow. So I will just decrease
the saturation. And that's it. Very cool.
6. 6 Putting the foreground waves: Now it's time for making
the foreground part. I will just duplicate the
background C and put it here. And let's get rid of
this hazing layer. And let's increase the contrast and the lightness of
the foreground part. Because as I've told you, it should be contrasty and dark. And maybe we can increase
the colors a little bit. And now let's change its possession and
direction to fit our scene. So I will just press Control
T or rotate it a little bit. And using the Warp tool, I will just make
the waves to have the same flow of
the other waves. Like so. Change it like this. Maybe you can put some point to change the orientation
of these waves. And also this part, also the right part, also here. Point. And let's rotate it like so. Very good. Now let's create a mask. And with the software
in the trash, we can erase the sports until we are satisfying
with the blending. So I'm now trying to blend
them together here and here. Very cool.
7. 7 Drawing lightning lights & shadows: Now we have everything in possession and the colors
are already matched. Now it's time to put the light effects and
the fires and the reins, everything that
spice or seen up. So let's start by creating
a vignetting effect. We'll do this by creating a curves adjustment
layer until the sky. Let's make it darker. And let's press Control I to invert the mask
and we can put it above the background C. And let's draw some
vignetting effect, make the brush bigger and
with the white color. Let's draw the effect here. Very good. This part and this part. And maybe this part. And let's change the blending
mode into luminosity because we don't want
to affect the colors. So I'm Joel, some parts here. Very good. Now we need to make the
light source in the sky. So I will bring this lightening overlay
and let's make it bigger. Put it here, right-click
Flip Horizontal, put it here, and press Enter and then change the
blending mode to screen. And maybe we can press Control
U to change its color, I guess into some more
cyan color like so. Decrease the saturation a little bit and maybe decrease
the lightness. Like so. Press Okay, and then let's press Control
L to erase these edges. So I will just adjust
these sliders like so. And then press,
Okay, Let's create a mask and let's
erase some parts. This part needs to be erased, and also these lower parts. And as you can see here, the lightning port is so clear, so we need to make it
a little bit blurry. So I'll do this by going to Filter blur and Gaussian blur. So let's make it a little
bit higher, and that's okay. Next, I will create a curves
adjustment layer to create a glow that is coming
out of the lightning. So I will open up the curves like so and then change
the blending mode into luminosity and press
Control I to invert the mask or a mask where they end with a soft turn the brush. I will just draw some lights glowing
out of the lightning. So maybe we can
change the brush to use this brush,
decrease the flow. And let's draw some
lights that are coming from this lightening
and falling into the sea. Erase some parts. Very good. Now we should reflect the lightning lights
into the monster. So I'll go to the monster group. I'll create a solid
color adjustment layer, and let's choose a bluish color, very bright bluish color, and then change the
blending mode to screen, create a clipping mask. And also we can add
blend F effect. So I'll double-click
into the layer and let's erase some parts
from the shadows. I will press Alt to
split the coarser, like so, and then press Okay, press Control I to
invert the mask. And with hard edges, I will draw the lights. So I will just make
the flow one or 2%. And then I will draw their
reflected here in this part. And also in his eyebrow. I guess. You can follow the
form or the shape of the monster and try to draw
lights on the facing parts. The light, as you can see here, these parts of his teeth
will face the lights. So we need to have
some lights here. And this part, maybe
of course, his tongue. It's a sum now toggling between the white and black
color to draw into the mask and
then erase the edges. Let's make the brush smaller, and let's draw in this part, anything that is
facing the light should have some
reflected light. This part here. Here also is apps. Of course, in his hands, the outer edges of his hands. Here. Try to follow the
shape of his body. And try not to create
flat lighting. Because I see a lot of
beginners doing this. It's part also. And maybe Reese part. Cool. Now let's draw some lights into his head. And of course into his traps
and shoulders should have some reflected light I'm just drawing and then
erasing the edge. That's it. Needs a lot of practice, but you can nail it. And it's really fun. Okay, Let's duplicate
this solid color layer and put it into the shape group. Let's create a clipping
mask and then let's get rid of all these parts. Then press Control I and now we can paint the light
into the ship. So I will also follow the
shape of these parts, then erase it from some parts. You know, you need
to practice it more. If you don't know how to draw
lightings, you can firstly, practice drawing it into simple shapes like a
slender, like a cube, and then you will nail it, I guess this part. And then you can increase the hardness
like painting light into some complex organic shapes
like these monster and they ship and other
stuff. Very good. Now let's draw some soft
light reflected on the waves. I'll do this by creating a
Curves Adjustment Layer Amir. And let's make it
very bright, like so. And let's change the
blending mode into luminosity and put it
into the waves group. So create clipping mask and then press Control I
to invert the mask. And now I can draw
some soft light in the sweeps using the
soft turn the trash, I will just draw some soft light that's increases the flow
a little better. Let's draw some lights
here and there. This part. Maybe of
course in this part. We will also do the same thing, duplicating this curves layer. And let's do the same thing
in the waves into the left. Now it's time to create some
shadows because of course, if you have light, then you should
have some shadows. So I will create a
curves adjustment layer and lower the
brightness and change the blending mode
into luminosity because I want some
color into the shadows. And let's plot this
layer above everything. Then let's press Control
I to invert the mask. And let's draw some shadows into the left because the light
is coming from the right. So the shadows should be
coming from the left. This part here. Very good. And this part. Okay.
8. 8 Adding the fires effects: So now we get everything in possession and the
lightning lights are good, but it's still
missing some colors because it's now
just mono color. It's, the whole scene
have this bluish color. So we need to add
some orangey color to create contrast and to make
the scene more interests. So I will start doing this by creating a hue
saturation layer and colorize and create a clipping mask increase
the saturation, increases the brightness, and then double-click
into the layer. And using blend F, I will just get rid of this
very dark parts, like so. And then press Okay, then press Control I to invert the mask and now
it's time to draw the red light coming
out of his stomach. So let's increase the flow and let's paint this part
using the pressure, the pressure sensitivity
of the graphic tablet. I will draw this part and draw these veins coming
out of his atomic like so. So like this. Using the pressure sensitivity, I can control the
thickness of the brush. So pressing more
means thicker lines and pressing lighter
means thinner lines. Very good. Maybe we can
increase the feather from here. And the properties of the mask, we can increase the feather. Very good. Now let's create
another layer of lightness by creating solid
color adjustment layer and choose bright
orangey saturated color and change the blending
mode into screen. Create a clipping
mask and then press Control I to invert the mask. Press Control I. And then let's draw
some light here. This should be glowy
lights like so. And erase some parts. Very good. Now it's time to use
exposure layer to make a third layer of lightning. This should be the brightest
layer of the lights. So I'll press Control I, and let's paint the
brightest part of this orangey, glowy colors here. Very good. Now we are talking. Alright, we need to add
some overlays to this part. So I will just bring
this ray is part and change its shape like so. And put it here. And change the blending
mode to screen and press Control U to colorize it
with the orangey color. Let's make this saturation high, and let's change
the hue into orange and let's decrease the
lightness a little bit. Then let's press Control L to adjust the levels
and then press Okay, now we need to create a
mask to erase some parts. Firstly, let's change the
shape of these trays. I will just use the warp tool
to change the rays shape. Then let's create a mask
and let's erase some parts. This part and this part. Very cool. Here. We want the effect to be subtle. Like so. Erase this part. Here. I guess this is way better. Now let's spice things up again by using
this sparks layer. Flip it, make it smaller,
chains that possession. And let's put it right here. Change the blending
mode to screen. And let's put it right here. Very good. And
let's create a mask and let's erase the edges. Now the scene is looking more dynamic and it's kinda
looking as a movie, not a picture, still picture. Next, I guess we need to create some shadows
into the monster. So I will create a curves adjustment layer
is the same way, change the blending
mode into luminosity, and then press Control I to invert the mask and using
the software on it. I will just draw some
shadows here because these parts should
not be bright. So I'll just draw some shadows
here and there. Very good. We need to create some
balance into the color. So I will bring these fires overlay to put it
into the shape. So I'll just choose
one of these. I think this is good. So using the Lasso tool, I will just select it, press Control C Control V to put it into
a separate layer. And now let's change the
blending mode into screen. And maybe we can decrease
the saturation a little bit. Press Control U and decrease the saturation to
match or a scene. And press Okay, and let's make it smaller and
put it into the shape. Like so. Very good at swore bit,
change its position. Like so. Because we want
the fires to look like there are some fires. Let's make it smaller
and very good. Now we can create a mask and erase some parts
from the edge. Good, Let's duplicate this. Fires layer. Press Alt and drag it into here. And let's change its shape
a little bit because we don't want it to
be like identical, so I will just change its
shape like so and then press. Okay. Very good. Now we need to create some color glowing from these fires. So I will create a hue
saturation adjustment layer. Bring up the saturation, bring up the lightness, and then create a clipping mask into the shape press Control I. And let's change the blending
mode screen and let's draw the fire glowing
effect. Very good. Here. Maybe that's good enough. Now we can duplicate
this particles layer. I will just duplicate it
and put it into the ship. Group. Rotate it, make it smaller
and put it right here. Very good. Let's erase some parts. From here. It's erase some parts. Very good. Now I guess we need some
shadow for the ship. So I will do the same thing we did in the monster
Curves Adjustment Layer, press Control I, and then
draw some shadows here. Simple as that.
9. 9 Final Touches & color grading: Next I will bring this range overlay and
also I will not make it bigger because I want to
keep the scale of the rains. So put it here and let's
put it above everything. And then let's duplicate it, press Alt and drag. Posit here. We'll select both
and duplicate them. And then let's select all these layers
and duplicate them, put them here, and let's select all of
them and put them here. Very good. Now let's select
everything and merge it into one layer and then press Control T to change
its position. What I've done now is
that I tried to keep the reins particles very small also to
maintain the scaling. So now let's press warp. And let's change the
direction of the strains to match the perspective
and to be more interesting. So I want the reins to be like coming from the
left to the right and also in the left part to be coming from the right
and going to the left. So it will look like it's making a circle around
our main objects. Very cool. I'm doing this because I
don't want it to be boring. So now let's change the
blending mode to screen and we are good to go. Maybe we can refine
it a little bit. Press Control L to
bring the levels. And we can choose the
intensity however we want. Maybe this is good. And then press Okay, very good. Now it's time to the final adjustments with
the Camera Raw Filter. I'll do this by creating a
new layer and then press Alt Control Shift E to merge all the visible layers
into one layer. And then right-click
Convert to Smart Object. And let's go to the Filter,
Camera Roll Filter. Here we will change
every slider we can to match the colors and to
capture the mood that we want. So firstly, I will increase
the blue color alphabet. And let's go to the calibration. I will change the
slider a little bit and increase the saturation
also in the oranges. What's back to the basics? Maybe we can decrease
exposure, no. Contrast, decrease it alphabet, the highlights.
Maybe decrease it. Opened up the shadows a
little bit and the whites, maybe we can decrease it or
increase it to this point, decrease the texture, and
increase the clarity. Maybe also increase
the vibrance. Let's go to the color
grading and let's add some bluish color
into the shadows. Like so. We want the saturation
do not exceed 10%. And then let's make it darker. And we will also choose some light blue color
in the highlights. And let's bring
the highlights up. So very good. Now we can go to the
Color Mixer and let's increase the saturation
of the reds and oranges. A little bit more like so. And maybe we can change the balanced
the hue a little bit. Very good. Maybe change
the balance of the blues. Feel free to take your
time to play with every slider you can until
you get satisfying look, let's add some gradients and
add some vignetting effect. Maybe we can increase
the feather. So that's very good. Then press Okay, very good. Now we forgot something. We forgot to create
the light of the eye. So we will do this quickly by a hue saturation
adjustment layer. And let's press
colorize and let's choose some light
bluish color like this. And let's change the
blending mode to screen. And maybe we can increase the lightness and
saturation with, and then press Control
I to invert the mask. And let's draw the
lightness into the eye. Like so. This is
the first layer. We will duplicate the
layer pressing Control J. And now let's draw the glow
effect around the eye socket. Be like so. And of course we will
not keep it as it is. I will erase some
parts from here. And from here also we
can use smudge tool to adjust the shape of these blue vibes that are
coming out of his eyes. Very cool. Adjusted a little bit from here and feel free to tweak it. Maybe we can duplicate
this layer also. And let's draw some
lights into his nose. They should be reflected
out of his eyes. And here and these parts, and in this part's very good. Now I think everything is good. So feel free to apply everything you've
learned today into your vegetables and try to use some new elements
into your Visual. Don't stick with the images that I've used
because this enhance your query devotee and this will make you a better
problem solver. Okay guys, thanks for watching. I hope you benefited and
most importantly, have fun. Thank you guys and see
you in next classes. Piece.
 Nour Art, Digital artist, Youtuber