Transcripts
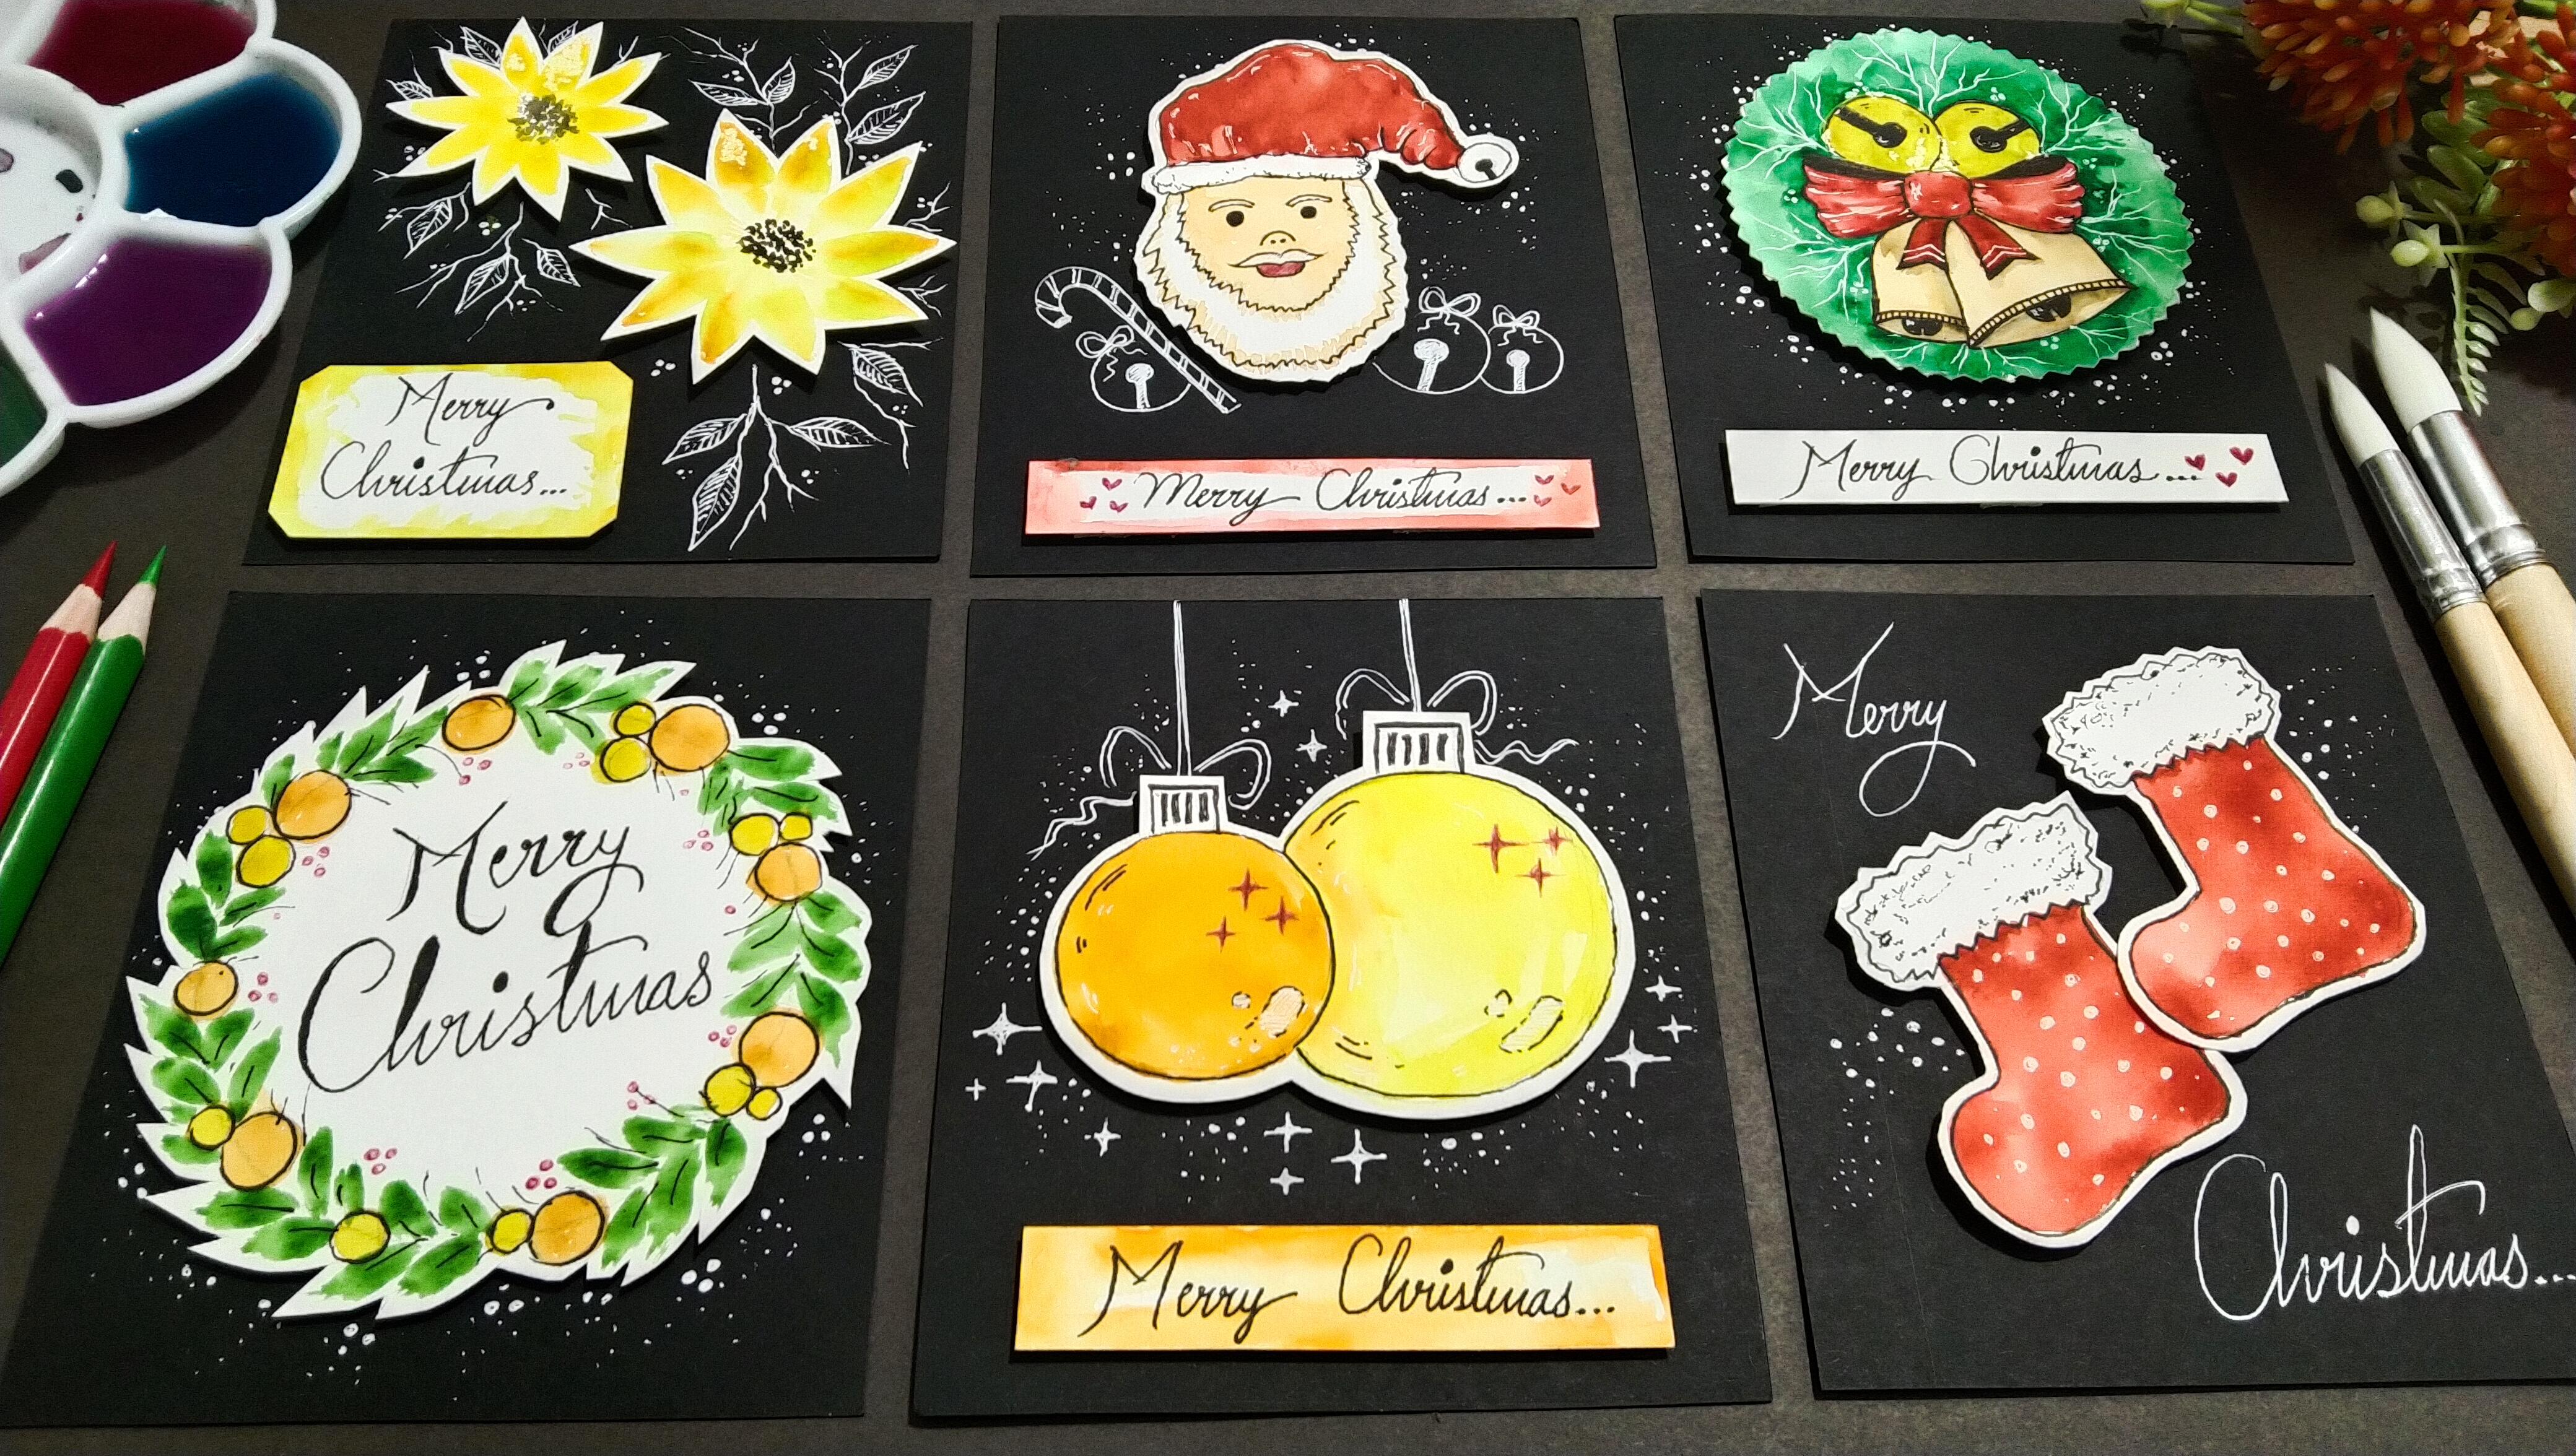
1. Hello & Welcome: Christmas is something I have always enjoyed the most during the winter times. If I recall, a beautiful childhood memory, very friends used to meet and my father used to guide us in drawing a huge plant, a gloss on the road with chalk. And those memories are very precious and delightful to me. During Christmas, we do give presence, gods to our loved ones, and reading gods or something. I enjoy making the most. Hey everybody, welcome back to my new glass, myself, rubric buddy, and I must have done independent artist, these lingo John, India. I'm also a professional Indeed or designer. So people who might not be knowing me and had joined me recently can find most of my modules being displayed on Instagram. I go by the name should Raja additions. This glass as absolutely isn't good for beginners, and that is based on Christmas. So we are going to create six different kinds knees don't Christmas theme. Creating different elements and assembling together to form a beautiful garden is what if you can create your own customized Christmas greeting God? Having different elements related to Christmas. It's been a while. I have been exploring watercolors. So this class is going to be a beautiful combination of watercolors and grasp. We will be starting with a base table, and I'll be giving you each and every detail about the measurements. We are going to learn how to use around to draw a perfect circle. There'll be starting with our basic sketch on each and every individual element. I'll be giving you all the details about the watercolors that we're going to use. We are going to use deficient techniques for painting different elements in each and every god sends its craft related projects. So we are going to give each and every element of beautiful 3D effect. And we are also going to add my new details to the car. And we are going to use some easy calligraphy so that you can write your final message for medic Christmas. No need to worry at all. I'll be taking you through each and every step in detail. So we are going to make six different gods. Christmas class, the cute Santa, Christmas light, fantasy hocks, the Christmas wreath. And the prisoners bed. With each and every greeting card. You're going to learn different techniques based on classed as well as watercolors. And I'm very sure that you are going to learn something new and creative out of this class. This class as Bessel did for beginners and also intermediate and advanced level artist can try it. So if you are an art enthusiast and a Christmas level, this class is definitely for you. And without any delay and go grab your supplies and join me in this beautiful journey of Christmas cards.
2. Art Supplies: Hey everybody. So before we start, it is very important for all of you to know about the art supplies that we are going to use. Plenty to worry at all. You will find all the art supplies very easily in any nearby local stationery. So let's start with the first thing, which is our watercolors, but we're going to use to, the watercolors that I'm using are from Bristol. And these are artist grade watercolors. If you are a beginner artist student, then I would recommend you to go for our students that they enjoy version. So we have learned to use our black paper of size 10 centimeters by 10 centimeters. And this will be needed in every individual guide. So you can just simply dig in a full-size black paper and cut it from there. And this is my color palette for watercolors. So this is basically a really good organizer for your watercolors. So you have these smaller spaces to put your watercolor tubes and some mixing space as well. So it's kind of very nice organizer. And it is absolutely fine if you do not have one, you can simply use our simple color palette, RR ceramic plate audits are the basic tools like sharpener and eraser that everybody will definitely have. Now this is rounder or you can also see it as a compass. So this is basically used to draw a perfect circle. So you have one strong middle and pencil holder. So you just have to simply send the radius and it is a good tool. No need to worry at all. It is very easy to use. Now talking about the most important part, which is our watercolor papers. So these are Canson watercolor papers and these are in 300 GSM. So the most important thing is the GSM that we are using, and these are cold pressed papers. So you can find this from any nearby local stationery. It is not compulsory to use that same brand. Just make sure that you have the same DSM. Now this is a simple double-sided tape which has a certain amount of thickness in it. You can find this very easily in any nearby local stationery. And this is a half-inch double-sided day. So for this particular glass here are willing to use two types of scissor. One is assembly blade Sousa, which I am ready, Shawn, that everybody will be having. The other one is a baton Cezanne. So you can see bad beam leads on this scissor is in a zigzag pattern. To renew candy bar, you'll get the exact baton as you can see on these up. No need to Wadia dial if you do not have a baton to there, you can definitely use this and bellman ozone. So here is our spray bottle for loosening up your watercolors. Body in DIA class, we'll be using a simple query brush. And the Said's father's quill brush as ADMM. So non-intuitive. Your dial. If you do not have our same brush, you can go for any Underwood. Oh, they're needing ADA down Bashar al-Assad. And now let us talk about Aldi handy materials. So the last one is a Benson, which I am very sure that everybody will be having. The second one is a black pen from Sakura Gelly Roll. Then we have a vape pen again from Sakura Gelly Roll. And I read Ben from gold x. So these are all the bands and benzyl that you really need to draw and add some details to your cards. When we are working with watercolors, it is really good to have tissue paper handy so that you can write baldly extra amount of law debate easily. And you can also use it to clean up your brush. Now, at last we have our simple glass of Florida in which I have my dirty brushes. So please don't mind, but this is something that you will need. And assembled ruler you can use as D latch or a plastic ruler so that we can take correct dimension. No need to worry will be only meeting of 15 centimeter one. So that didn't, these are all the materials that you will need for this entire class. And don't bother about the brand which I'm using. You can definitely use any other good at anytime that you have. So now let's get started with our first reading guy.
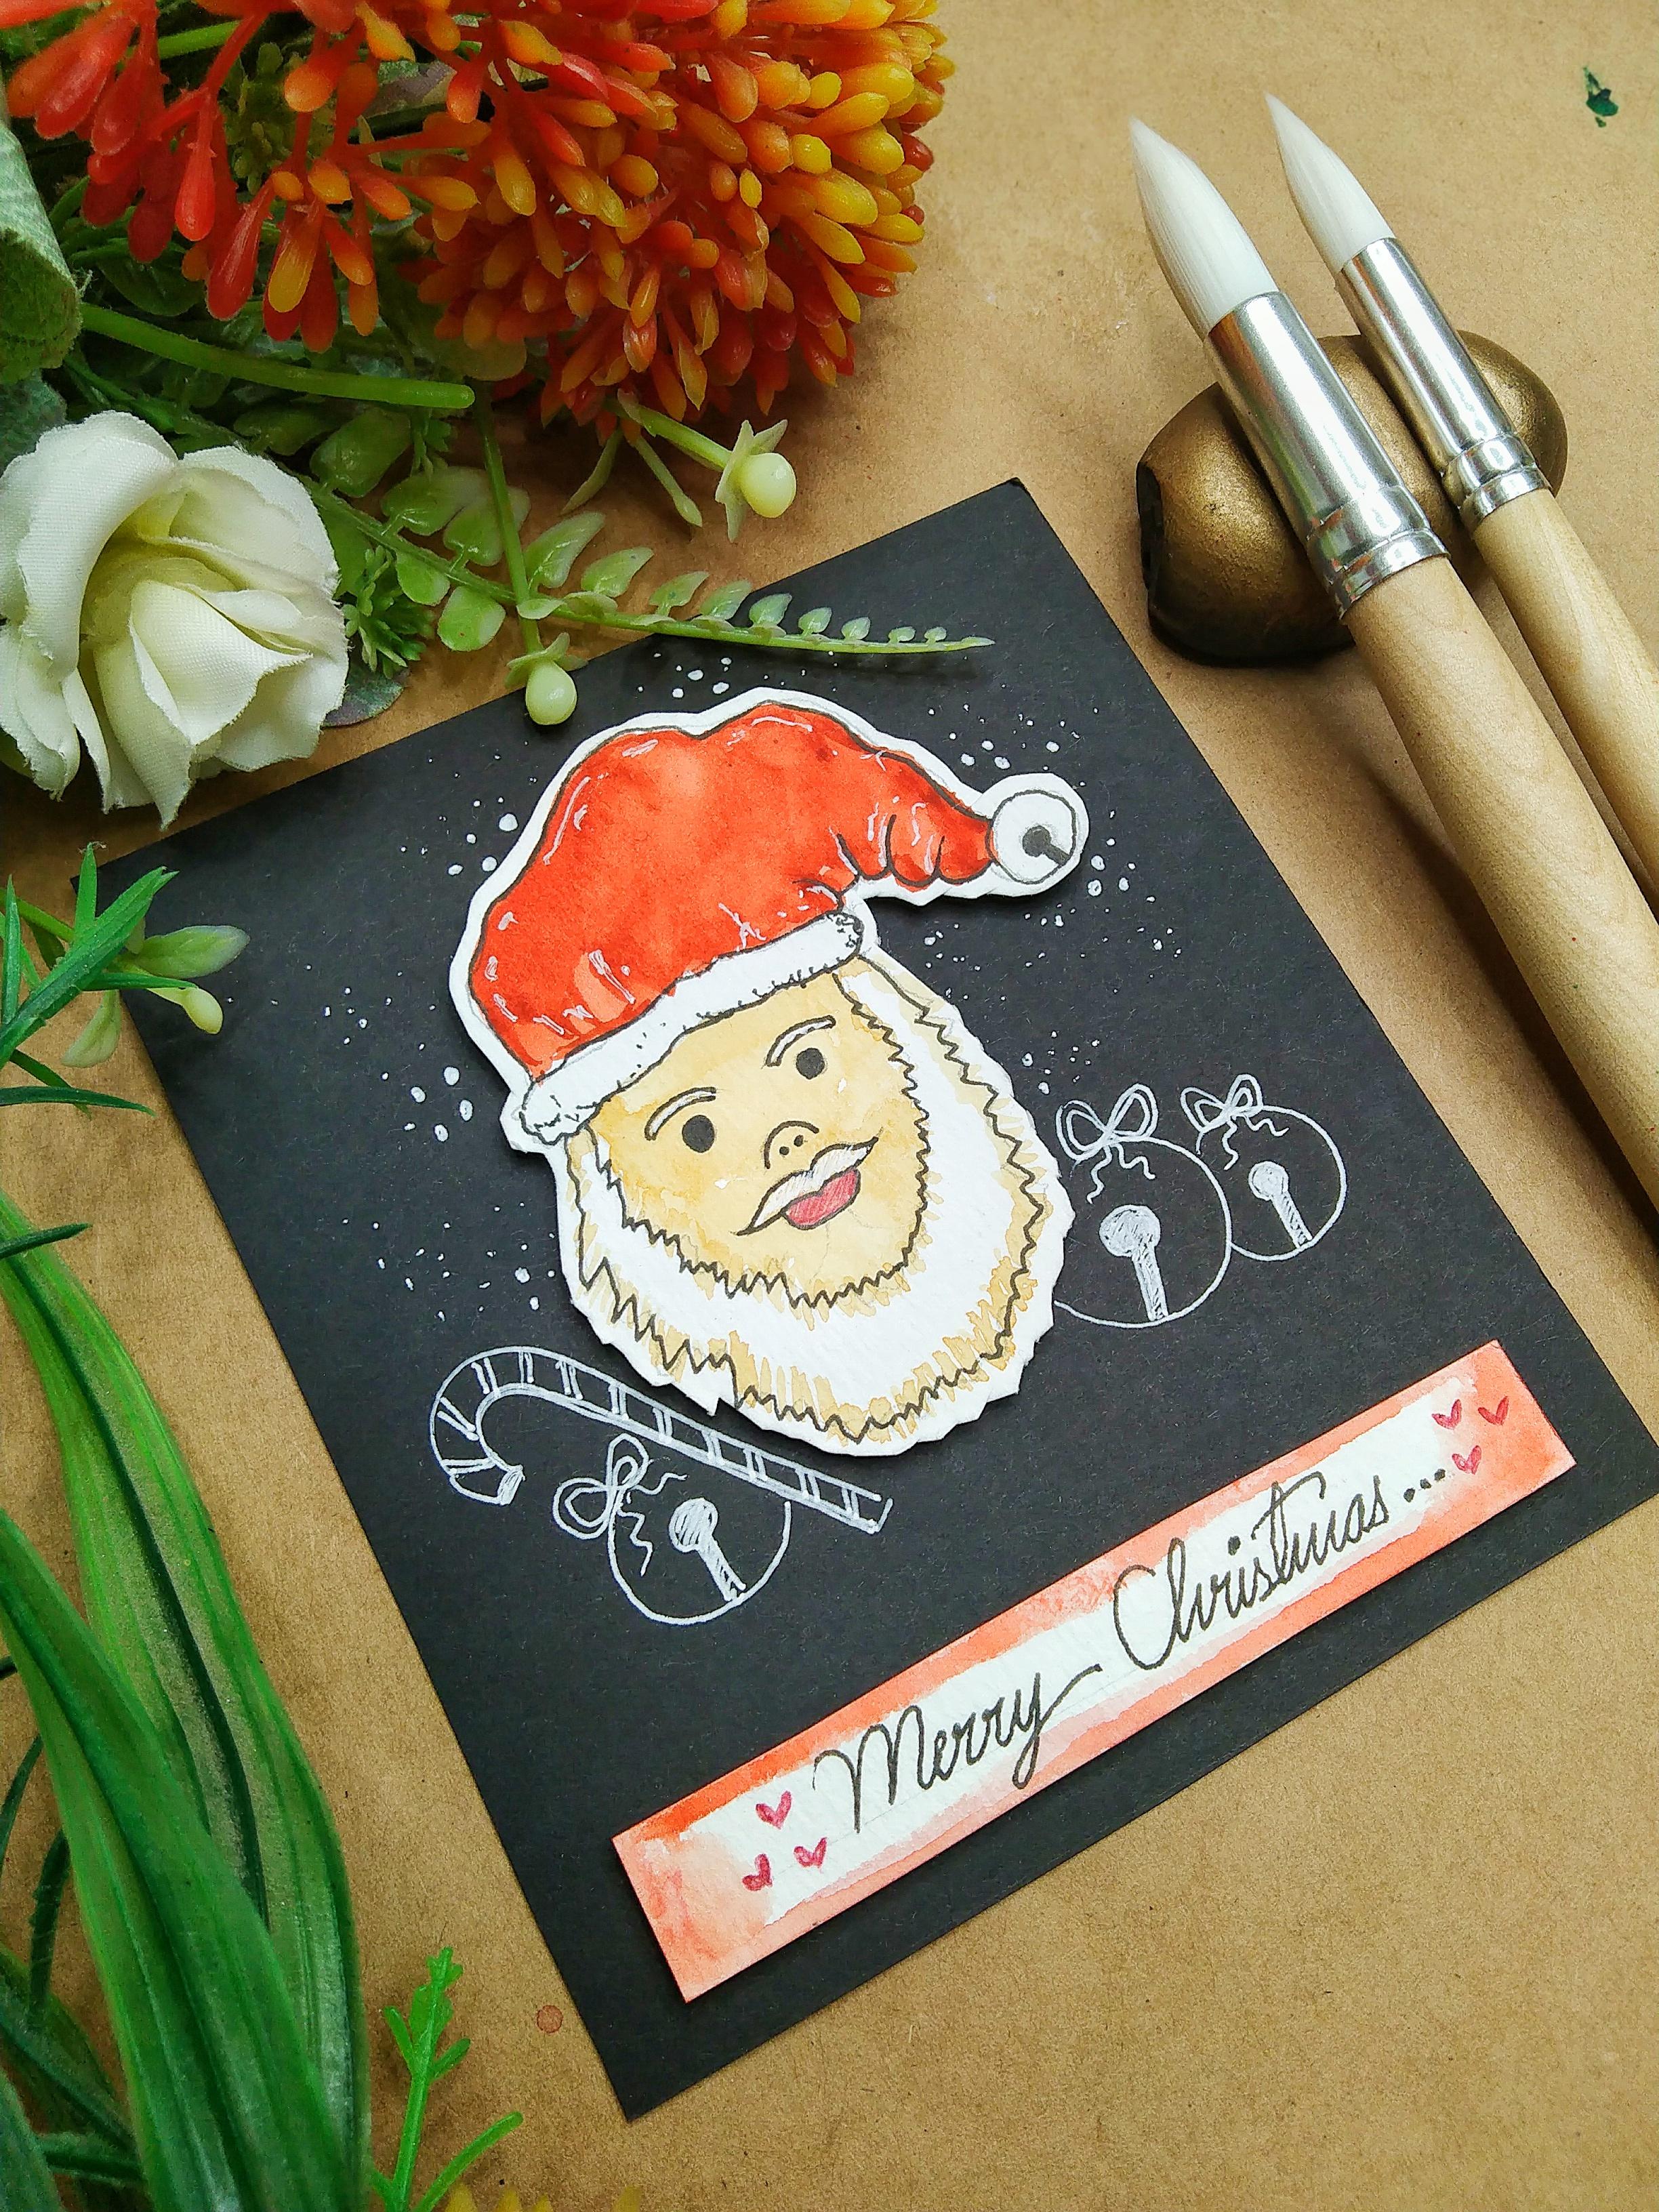
3. The Cute Santa - Part 1: Now let us start with our first reading gun, which is the QB center. In each and every leading GAN will be having two parts, part one and part two. So we're starting with our part 1. So here I have my simple Benson. And we are going to draw a simple sketch of Santa Claus, faze them starting with the gap forced plans. You can see you have dual, just draw very random and rough sketch of the gap. It is always better to draw in a lighter tone forced. And then when you think that these sketches both E2, you can dock it. And there is a small bell at the end of Nissan does gap as you want it might be knowing. Now let us start with the beard does start with the gap portion and made these symbols zigzag, line and form I'm making right now. So it is basically a U shape. As you can see. Now, we are also going to repeat this. And you can see that it is looking really nice. So this is not realistic kind of sketch. We are going to make it a little bit cartoon type. And you can see I have made two beautiful small eyelashes and two eyeballs. And so now in-between both the eyes just simply draw a smaller nodes with two dots. And we are going to just simply make almost damage. Below the mid stance. You have to draw the lower lip. Now let us talk about the watercolors that we will need for this entire class. So the first one is cadmium orange, then they need while mainly on and sap green. And these are all the three colors that you will need. Now we are going to paint the gap pause. So I have just simply taken some darker values of a million as you can see on the right portion. So just take your Gullah valid, mix some water with DACA values of 1 million and start painting. So the brush that I'm using is acquittal branch of ADMM. So the reasoning behind using a quill brush is that you can fill a nice solid color when this, at the same time, you can paint the difficult areas with the tip of this branch, as you can see it as a very thin and pointed edge. So now I'll just simply fill up the Gullah. And let's just finish this. Make sure that you do not leave any area and just try to apply double quote. If you find the color lighter in tone. No need to hurry at all. You can take your time and paint. As you can see that we have almost completed painting the entire gap. I'm just adding some datas. So now you're going to observe that how the tip of this brush can be used to color the outline portion. And we are done. So now what we're going to do is that we are willing to take some cadmium orange. As you can see in my Gullah ballad, I have taken some cadmium orange with some amount of water. Make sure that you do not have access amount of water because that would definitely call your painting. So we are willing to being the phase. I'm just simply applying it on the entire area and make sure that you do not pull the color and the beard because the bird is going to be white. Try to dig lighter values of orange as we want or skin tone in the phase. And we are not willing to apply a solid patch of orange that wouldn't look nice. Now using the quill brush, I'm trying to enhance the beard and the outer portion post and then we're going to do an ends and the inner portion. No need to worry, you just have to make these little strokes that the weight is small in size. Now let us make this strokes and repulsion also looks a little bit more realistic. And we are done with the painting bond. So now what we're going to do is that we are going to enhance the facial elements. So I'm using a black pen, and this black pen is from Sakura Gelly Roll. But it is not at all necessary to use the same. You can use any other Blackmun also. So I'm just making those models are goods cloudy eye bonds has, you can see that we have just applied solid black color. And we have just drawn the nose also. So as you can see that this is not a difficult task and all you just have to simply raise the NFL lines and we are just giving it an outline. So do represent a loan of cotton in this portion, we are just adding these logs model black spot so that it looks a little bit more fluidly. So now I'm just getting an outline, do the most damage. And you can also just give an outline to the lower lip. Now what we're going to do is that we are going to mean the eyebrows, also black. So just give an outline. And now as you can see that we are just giving trees on the pencil line for the Bian. And now in the outer portion, that's vj's the pencil lines. And we are done. Now let me just crazily metadata so as you can see. And we are going to fill it with black color. You can simply just give this lines in between the gap so that it looks a little bit more realistic. And after we are done with outlining the gap, The NDI sketches ready? So I hope that you didn't find it much more difficult. And drawing and painting. This is a very easy and simple sketch of a cute Santa Claus. So now I'm using a white pen again from Sakura Gelly Roll. Again, it is absolutely fine if you use any other brands that have just simply fitted the mustache and eyebrows with white pen. Now let us fill the lower lip with red color. So here I have audit Ben from gold x. You will find any red sketch pen or a red pen. So now let us enamored of the gap with the white pen. We are going to add some little strokes in the dark red color so that it looks even more beautiful. So just think we mean be little strokes, Neo default, and add some random strokes all its own so that the dark lemma Leon gets even more enhanced. So the entire sketch is ready. I'm just adding some more details. Here. The forehead portion also you can add some bytes strokes. Now let us move towards the part two.
4. The Cute Santa - Part 2: I hope that the bad one for the integrating god who was easy to understand. Now let us move towards the PO2. So here the entire sketch of the Santa Claus is ready. So what we're going to do is that we are going to leave a little bit of combined bays and we are going to cut the entire face. So use your symbols with simple blade and tried to cut the entire face on the Santa Claus carefully, make sure that you do not call it yourself. One thing that you have to keep in mind while cutting isn't that leave a little bit of whitespace? So then when we put this and directories on the black paper, it gets really nice contrast with the background. And now we are at the last portion. So just mean the little triangle, the exact form near them beard. And it is done. Now as you can see, we have an entire separate piece of Santa Claus phase. And now we're going to place it on the black paper. Time designing dual, place it on the upper portion. Now simply flip the phase. And as you can see, I have taken a used watercolor paper, but definitely you can take our freshman also. So now what we're going to do is that we are going to take a double-sided tape and cut it into two parts, plays it on the backside on the Santa Claus phase, as you can see. Now, simply remove the back deep. So this tape is having certain thickness and when we are going to place it on the black paper, you're going to find a nice 3D effect. So on our black paper of 20 centimeters by 10 centimeters, we are going to place it a little bit above. The reason behind glazing the face a little bit above is so that we can write our message on the below abortion. So now what I'm going to do is that I'm going to draw certain elements with my white pen. We are going to draw two circles. One is a little bit bigger in size, and another one is a little bit smaller. So these are the Christmas bells which we are drawing, and a little bit of smaller element in the inner portion. So what you have to do is that simply fill it with a solid white color. And similarly, you can give it the solid band in the smaller bed also. Now once we are done with this step, what we are going to do is that we are going to draw two little bow on both the bells. Let's make our double lines so that it looks more attractive. And we are done with the right portion. So now let us draw some elements on the left portion also. So since about God size is smaller, it is very comfortable to draw as you can just rotate the card as you want to. Now let us draw candy stick, which is also a Santa Claus stick. So you have to just simply make this kind of shape on the left portion. And we're going to add these little lines in between. And now what we're going to do is that we are going to add double line in the state so that it looks exactly the same. And we are done with the left portion also. So since it is looking a little bit MD on the left portion, let us add one more battle on the left portion, just below the candy stick. So as you have drawn on the right portion, similarly, how to draw one wrong on the left portion and a little bowl on the above. And we are done with drawing all the elements. Now it is time to add your Merry Christmas DAG and degrading God. What I have done is that I have simply taken or used watercolor paper and we are going to cut a small piece from it. So here I have a small rectangular piece of watercolor paper. Just try to make it a little bit smaller than the width of the rectangular black paper. And you can see that it looks nice. So what we're going to do is that we are going to write our message for Merry Christmas on it with some easy calligraphy. Now I want you all to have a look at the color palette. I have simply taken some lighter values of mammalian, and I'm using my quill brush. So what do you have to do? Just take your straight both people and add these color elements on the edges. So as you can see, I'm just applying some watercolor layer on the borders. But John decide edges so that the message looks even more attractive. No need to hurry you do this way gently and carefully. Because if you will not be attention and do it, then you can end up coloring the entire table. We just have to apply it on the edges of the paper. And we are done. So as you can see now though, these ought to be but looks even more creative and a little bit traumatic to those. And applause pays. So now I'll just simply D Kilojoules and a Benson and draw DOJ reference line. Very lighter and dawn so that your message comes in a very straight line. I don't know that in the different line is visible to you or non, but it is absolutely fine. It should be just visible to you so that by writing you can keep the alignment of the text. Bold effect. So now we're going to write armies Asian though flows. What is Mehdi? So I'm going to write it in an Italic format. It is absolutely fine. You can write it in your own handwriting. And now I'm riding the second load, which is Christmas. To conceive that by drawing the different line, the alignment of load the woods is very much in straight line. Now using the read Ben Biao drawing some heart. So we have drawn three hearts on the right portion and yards on the left portion. Now what we're going to do is we're going to add the MRC deg, and also our 3D format. So what I have done I've taken to be double-sided tape again, and I had simply taken its toll pieces, please it on the backside autonomous age DAG, and they won't be back d. And we are going to place it just below the Santa Claus phase. Now we are almost done with the entire treating gone. Now, let us add some minute details. So what we're going to do is that I have simply taken my white pen and we're going to add these random buying dog around the Santa Claus. So that isn't a particular pattern. You'll just have to randomly put these white dots around these anticyclones pays. So what I'm doing is I'm just drawing some bigger dots and some smaller dots. And you can just send beauty beam the same method. Now by adding these dots, your God looks more complete and attractive. And the keywords on document is ready and you can see how beautiful it looks. Let me just take you a little bit closer. You can see it has a really nice 3D effect and the message DAG, and these end up Las Vegas. I don't know, it is very much visible in the camera or not, but it is looking really nice. I hope that you're about to learn something new and creative from this particular card. Not without any delay. Let's move towards our next card.
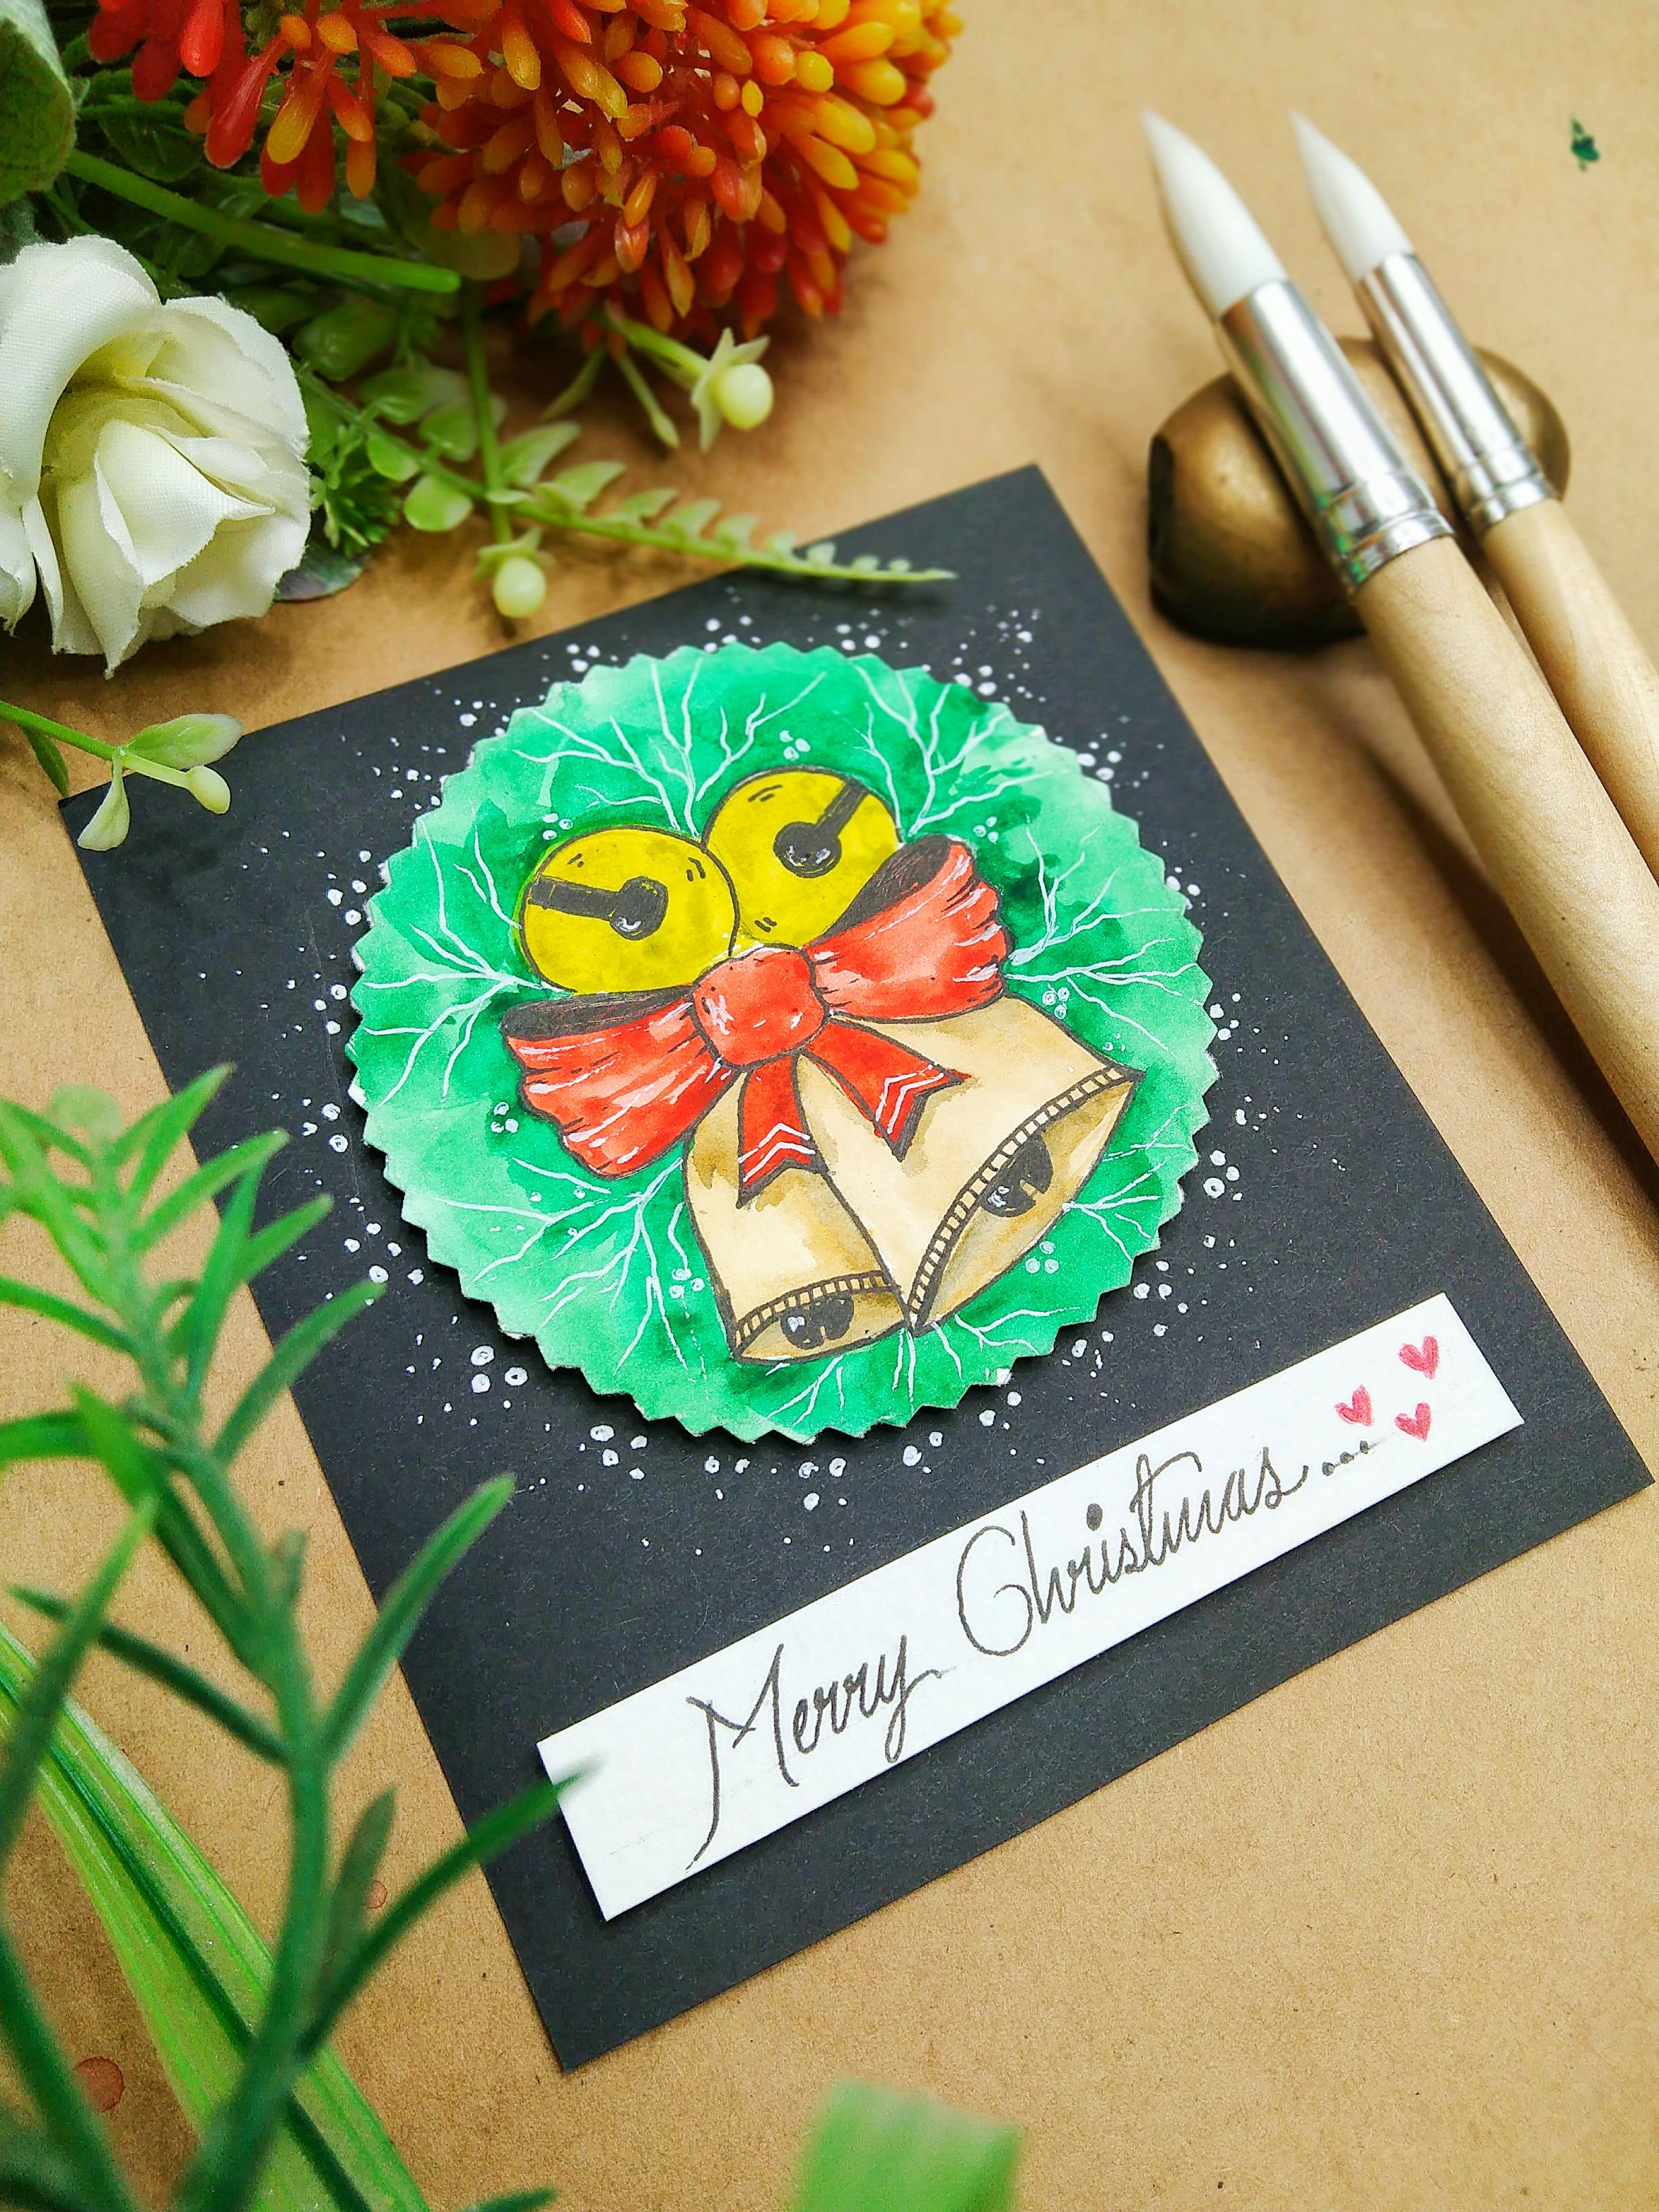
5. Bow And Bells - Part 1: Hey everybody. So we are going to start with our second greeting card, which is low and bells. So for this god, you will need a rounded and a roller. So the one that you can see in my right hand is down, down basically also known as a campus that has a needle and a pencil or law to they're going to place the needle at 0 centimeters and the benzyl at four centimeters. So we get a radius of four centimeters. Now simply take your watercolor paper and place the middle at 1. And OData a benzyl and the way I'm moving. So as you can see, the god of a perfect glimpse alcohol. Let me just take a simple season and we are going to separate this circle out. So just simply take your blames is on and take on these alkyl portion. Make sure that you leave some whitespace from these alkaline because we are going to paint the background awesome. Now as you can see, we have OS Update bees in which we have other claims are good. So now we are going to start with our basic sketch. So initially we are going to draw two barrels post on the upper portion. So I haven't drawn a simple circle first and another circle just beside that. So as you can see, we just have simply scribbled two circles and only to be that much perfect, It's absolutely fine. You can draw it in a rough manner. Now we are going to draw the mole. As you can see, I had just simply drawn gold square type portion on the center, which is R naught basically. And we have two loops on the side. And I'll let me draw the belts. So for the bears, one we have on the above bond and another one is beside that too. Can draw it this way. No need to worry at all. You can draw the sketch slowly also. If you find me drawing a little bit faster, then you can just slow down. We DO. There's an option below. So after we die double, there are two loops hanging. So we are drawing that item. Now once the sketches ready, we have to put some details in it. So we are placing the goal in our darker format so that we can get a collect either way to paint. I'm also darkening the bells. So I had just simply erased a little bit portion of the bed and I had taken the mall and different band. So now what we are going to do is that we are going to render so areas so that we know where to put the darker color values. So I am just simply shading it to add my benzene. This is just to give you an idea where we have to put some darker colors. Now let us add some details to the bells also. So these are the hollow portion in the bell. So I am just drawing it simply and we are willing to shade the darker band again with our benzyl only. You can just give these darker strokes so that you know how to put an acapella values in it. And we are ready with the sketch. Now let me give you the color details and the watercolors that we are using is cadmium yellow, gamboge, Ramanujan, that green, and green. And these are all the watercolors that you will need. So we are starting with the first cadmium yellow. So just take your color palette and take some darker values of cadmium yellow. Now we're going to start with the bells first time just putting the darker values of yellow on the upper two beds. As you can see, we just have to apply a solid badge of color. So I had just simply taken my quill brush of size eight. And we are just simply putting our solid match. As you can see, it is not at all difficult. You just have to simply move your brush and make sure that you do not get out of the line. And you can see we are almost done with the yellow. Now let us be in the bowl. So again, in my color palette, I'm taking some darker values are vermilion. Make sure that you do not have access amount of water that will definitely spoil your painting. So now we are going to paint the bowl. Just simply use your quill brush and fill up the areas. Make sure one of the borders do not get out of the pencil line. Since these are watercolors you can add lady deals with your brush only as you can see, I'm just trying to give some folding lines that we find in the bowl. And I'm just covering up the area, wet my brush. So since a desert small painting at Juan de que more time to paint it, There's a very small area already. So again, take your time and some patients and being this in a direct manner. So now we are going to leave the strands of the bowl falls and we're going to paint the lower Bell's palsy. They had just simply deacons and Gambian cadmium yellow in my brush. And I'm painting the lower belly, forced. No need to worry. You just simply cover up the area and make sure that you do not want out of your center line. I'm just putting some DACA value. Now let us cover the upper bed, covered up the ADR. Now what you can do is that you can dig some darker values as cadmium, yellow, and gamboge together and enhance the details where you get certain depth and shadow. So there are these openings in the lower belly portion. So we are going to add some depth there. So we are going to apply a little bit on darker values on the lower bed so that it gives a nice shadow effect. Also that is this LOS lower portion on which we can apply these darker values so that it gives them a shadow effect. So we have almost dies adding some darker values on the lower portion. Now again, taking some darker values. And they are going to be nimble way John dotting meaningless trends. So just simply put the darker values of a million independent in line. Make sure that you do not go out of their lane because we have already built in the bells. So we are just simply applying a quarter of a million. That is not at all difficult. You just have to fill up the area. Now we are going to bend the background. So in the color palette, I'm taking some time green and some deep green together with some amount of water. And you have to simply take your quill brush and add knee background. Use the tip of your brush and if you do not have a quill brush around threshold log, definitely. So just simply use the end tip is sharp and pointed. So this would help you to cover up the difficult areas. And you can use them down rush to cover our solid bad. So they're adding some darker values of green near the shadow areas. This is really fun guys. I'm just enjoying it. Now let me just being the process and that would definitely annual gain penetrate inside. So now as you can see that we have almost been in the background. And I'm just adding some darker values so that it looks even more attractive. So near the edges and corners you can add these darker values. Papers ending photon shadow effect. Today ignore. It might look a little bit watery, but it really looks really nice when it dries up. Also one more thing that you will need to keep in mind by using watercolors is that the code that is obliged right now will be one shade lighter when it dries up. So now using my black pen from Sakura Gelly Roll, we're going to add the details to what I had done as lad family on the bed and the darker ocean we have just applied a nice solid dark black color with reluctant. Similarly on the second bed. Thymine tenuously. You can also do the borders and add some dots, strokes. Now let us give outline to the mall also. Give us all in black mat with your black men. On the darker area. There we gave a nice dark shadow effect with our pencil also initially. You can also add these little strokes to add some details to the ball. Now let me just give an outline to the right portion of the song. And I'm adding some details. Now let us give an outline to the bells on the lower part also. So I had just assembly faster number of videos, we'll add weekend consume some time. But normally two, Wudi and these don't hurry guys. You can simply slow down the video. There is an option below, and if they are observing for us to do absolutely fine. So now I am also darkening the belly knob so that it can just get a good contrast with the background. Now with the black Ben, I'm just drawing a double line on the bell to add some more details. After getting a double line, you can just draw these little vertical lines so that the bell looks active. Now I'm using my white Ben from Sakura Gelly Roll. And we are going to add these little details. Now from the details, I mean, these little strokes which are looking journey nice on the dark background color. You can add these literals. Job Sandy did, according to your convenience, you can add leaves. So now on the dark green background, we are going to add these little branches with our white pen. So as you can see, the contrast with the white and dark green color is looking really nice. And not only to what he uses, have to randomly draw these boundaries. So as you can see, it gives a very nice and good effect of Christmas. So this is a battle for decorating basically, where we find a lot of MOS and belts together hanging on the door during Christmas. So we are almost done with the bad one for the bleeding God. Now let us move towards the bar, do fireball and battles.
6. Bow And Bells - Part 2: So I hope that you're enjoying the band, one for bowl and bears. Now let us move towards the barn door. So here I have my in diabetes being ready. And now we are willing to use our BATNA MRSA, as you can see. So I have those exact pattern to that here. If you do not have abandoned the Zona, it is absolutely fine. You can use our sample blades, etcetera also. So now what I'm going to do is that the sulcus that we had drawn initially with the rounder, if you have observed carefully, is visible right now when the painting is completely dry. So what we have to do is that simply follow the pencil line and cut it with your baton scissor. And if not with a bad answers or you can get it read assembled blame lead to their Also Sam just simply trying to cut it with my zigzag pattern scissor. And you can see badly bad and looks really beautiful. So then I went to place it on the black paper, is going to look early maze and the bad and would it be resembled? Ready? Clearly. Be very much careful while cutting the entire circle. Follow the Pentel line so that you'll get a perfect circular cut. So we are almost done cutting the entire circle. And you can see the endows exact baton around these outcome friends. Now let me take my black paper of 10 centimeters by 10 centimeters. And we're going to place the entire cutout on the abortion. Before that, I'm just adding a little bit of more details with my white pen. So these are just a combination of two dots together that the painting looks even more attractive to once we are done adding the readings, we have 1, 2, and double-sided tape on the back of the cutout. So that will again give a nice 3D effect to Leica doubt. So just simply blades two pieces of your double-sided tape on the back and immoral the backdate so that you can stick it. So a double-sided they basically have so dentin thickness. So the level of the cutout will be a little bit above from the base guide. And we are just getting it a little bit of press so that it gets stuck to the Mac paper. And you can see that it gives a really nice and cool 3D effect to the entire card. I'm just taking remaining scrape off my watercolor paper. So this is 1.5 centimeters. May 9 centimeters canal. I'm just giving you a basic dimension if you want to have a random cut. So it is absolutely fine. This is just to give you an idea. So now using my December 15th centimeter ruler, I'm just drawing out our friends line. So this is a simple horizontal line to have a nice great day bar graphs are we can see our calligraphy basically. So we, I went to write the message as meadow Christmas. So this line will be really useful for you to write your calligraphic in a straight manner. So the first word would be merry, and the second word wouldn't be Christmas. Me very much basion and graded fairly slowly. No need to hurry. You can write it in any text you like. And it is not a dial compulsory to remain the same. So now using my red pen, I am just drawing a little hard. So the air drying it in a bear of three. And the message DAG looks at early beautiful. Now let us just erase the reference line. Empty deque your visa, and make sure that your ink is completely dried up. As you can see, I had just assemblies bed in the three dots and the end. Laying may be read during that time. So nobody's, anyways, now just simply flip your message guide. And again, dQ, your double-sided tape, please, three pieces of your double-sided tape on the message. Now I'm just assembling the back deep. And we are going to stick it just below the beds. Be very much careful and mundane the guideline with the message DAG so that it comes in a bad manner. Now in the black background, we are going to add some details with our white band. So again, to let you know, I am using a by Ben from Sakura Gelly Roll. This is a very nice lady. Ben with nice obeyed kind of light color getting applied on the Blackboard shell. And as you can see, but it is absolutely fine if you will, with any other brand also. Now, I am just simply adding these little circular dark with my white pen. So the dogs and they all do the cut-out are a little bit darker and a little bit bigger. And as you move towards the outer portion, you'll just have to adapt their light Ben that you'll get a nice mild arts. You can see bad. This makes your leading God even more attractive. So I had just assembly fast and I'm WDL so that we can Zoom some time. Your desktop to the beam doesn't stamp. And if you are making the reading guide with me, you can definitely slow down the video. There's an option below to let me just simply complete the entire process. And we are almost done adding these little white dots. And the guard is ready. And now let me just show you a little bit closer. So on the upper portion we have our entire watercolor painting and we have our beautiful calligraphy on the bottom portion. So you can see that painting is in a 3D effect. Also the message dan is an ODD effect. I don't know, it is visible in the camera, but it looks really beautiful. Line say hold bad deal. Enjoyed making the reading guide lays down low end bears. Now let us move towards our next two, Judean God.
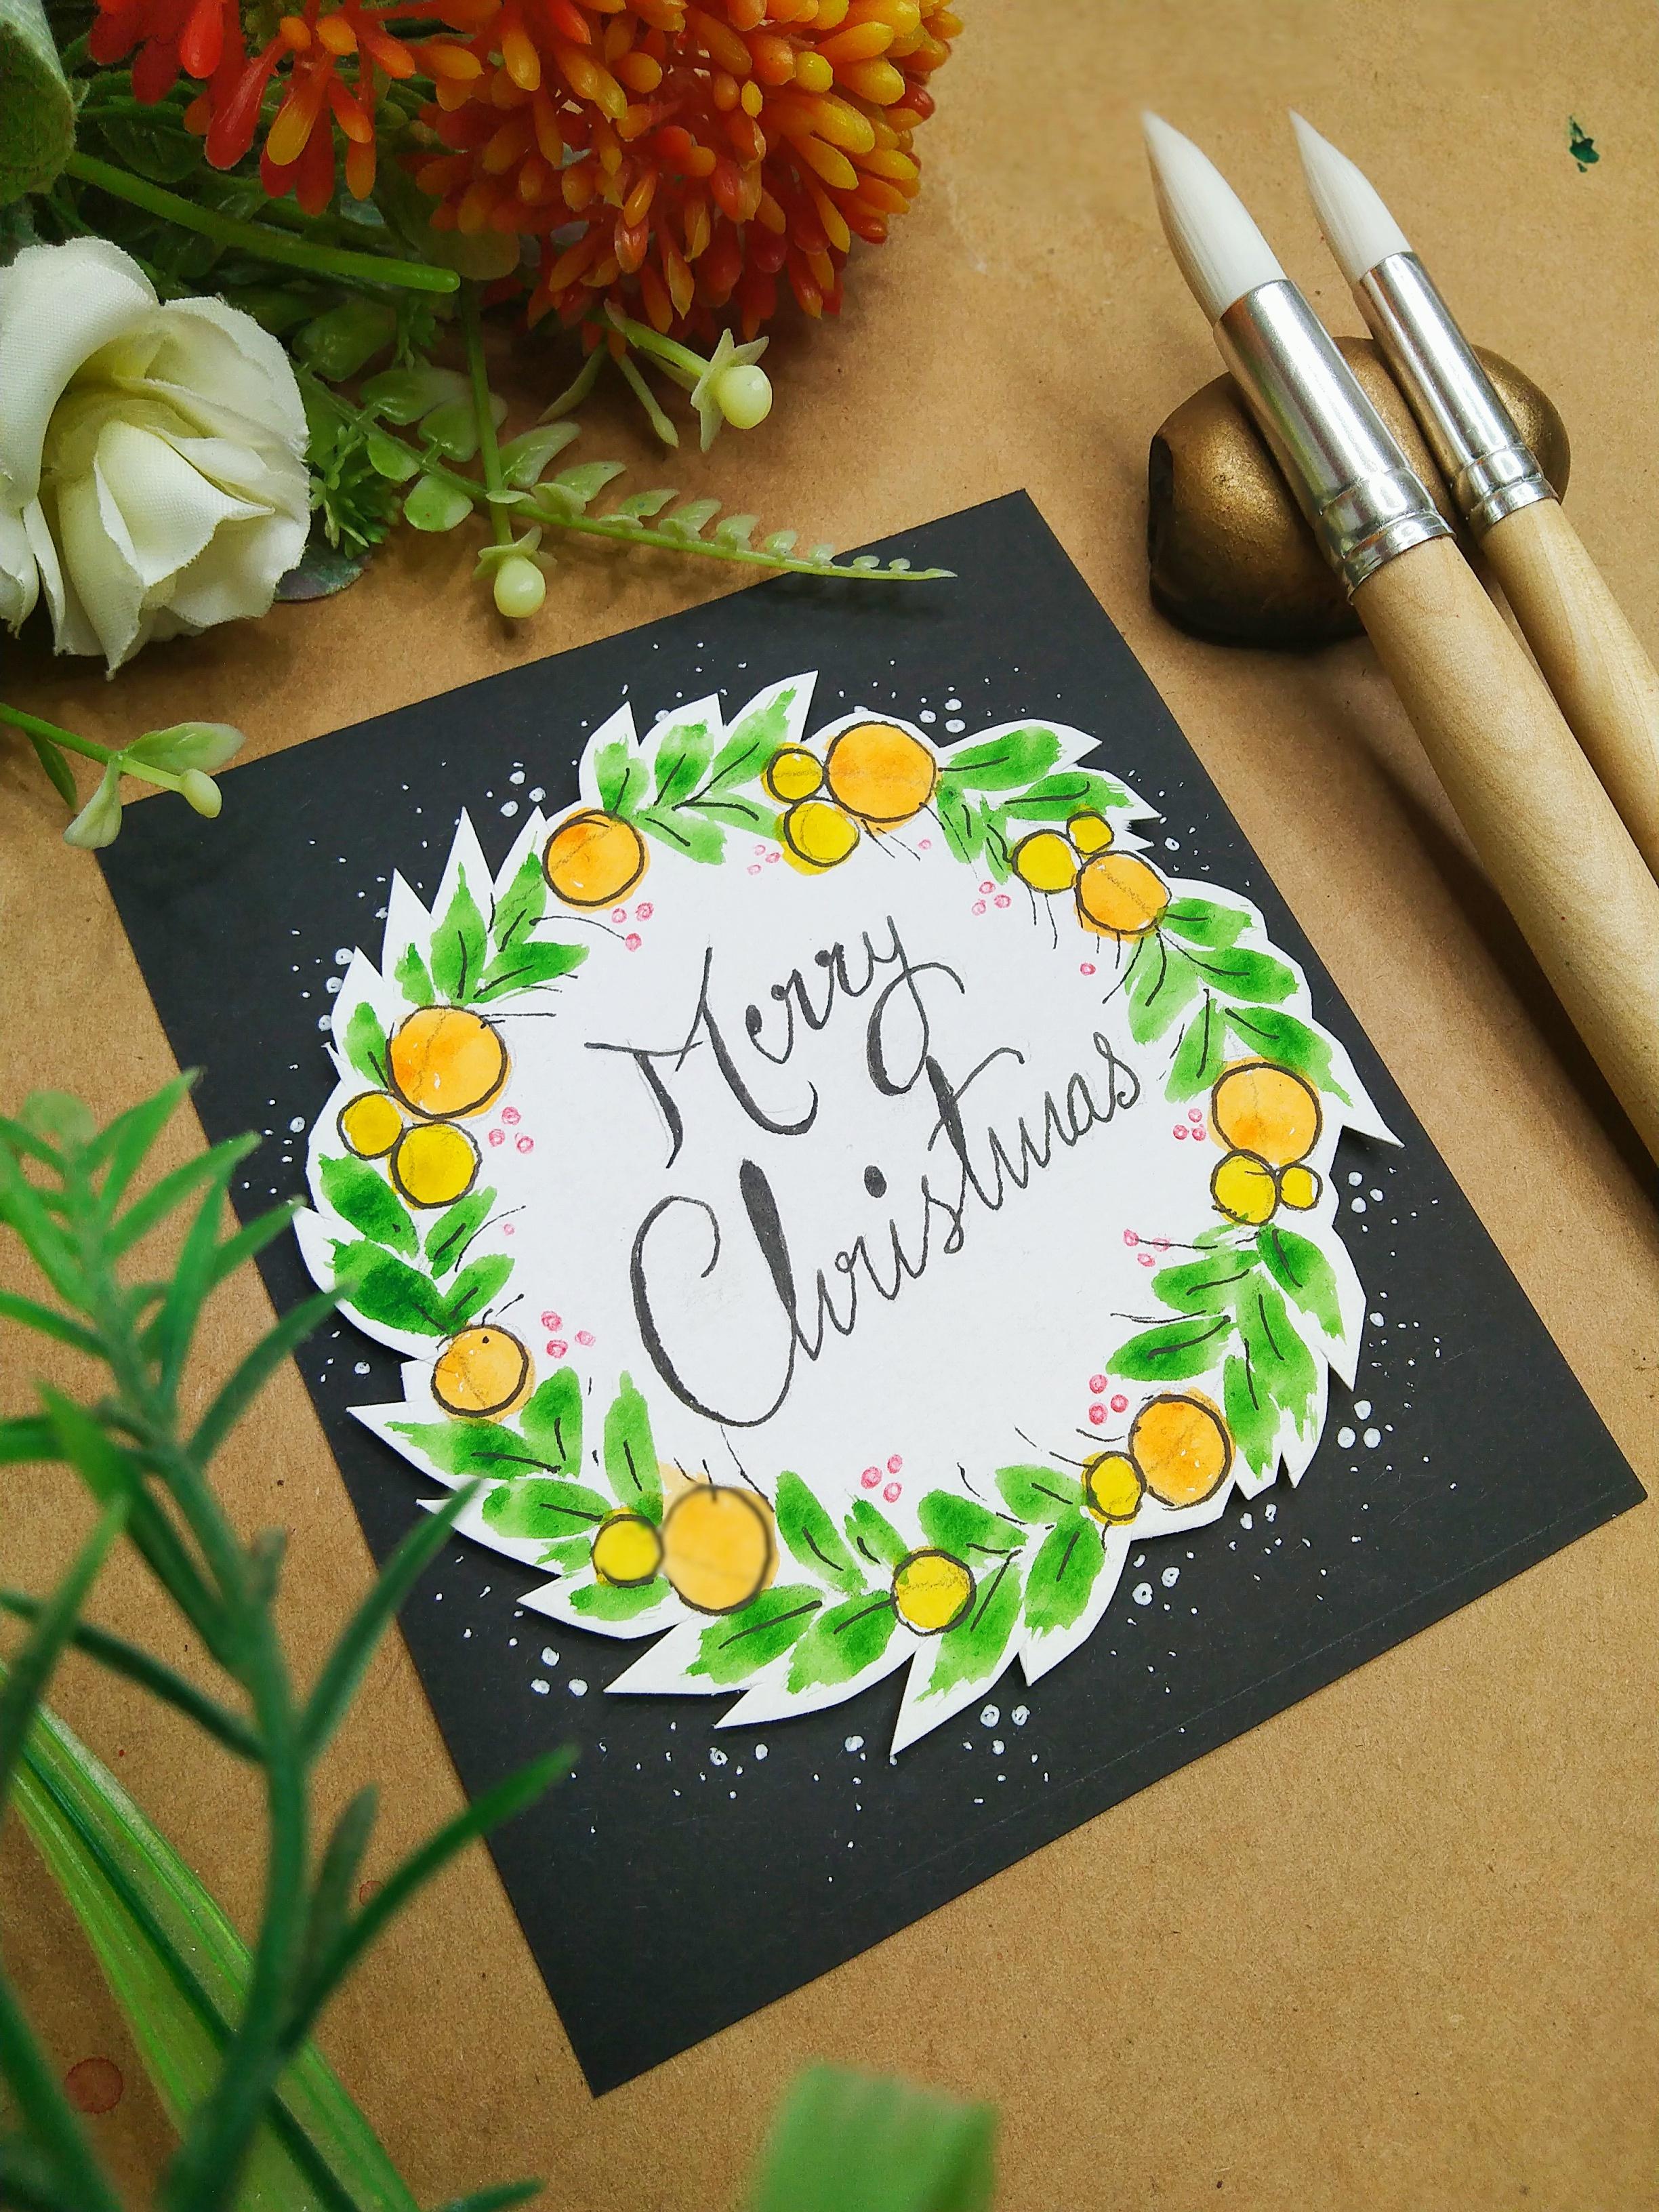
7. Christmas Wreath - Part 1: Hello everybody. So you are most welcome towards the third greeting card, which is a Christmas wreath. So here I have my symbol, watercolor paper and my rounder. So rounder basically is simple pencil tool from which you can draw above at circle time, just taking a radius of four centimeters. And we are going to place it on the center of the watercolor paper. The size of the watercolor paper basically is 10 centimeters by 10 centimeters paper. And the adjust, placing the rounder onlys Enter and I'm just drawing a perfect circle on it. So no need to worry, you just have to place your needle on these Enter and rotate your Benson. And you can see that we can get a nice and clean circle. So now on the pencil line, what we are going to do is that we are going to draw some little circles and the combination of 23 together. So you can just randomly draw these circles which represents light. Are we can see small little yellow belt. So we just have to decide the positions. Tried to draw these little circles and even format so that it looks beautiful when we paint it. I'm just drawing these little circles and completing the entire sketch. So now as you can see, we have drawn all the circles in a given format as we find it in our Christmas read. So now we are going to talk about the watercolors that we will need for the entire project. So the first one is a cadmium orange. Then we will need our cadmium yellow and sap green. So these are the three watercolors you will need for this entire pre-reading guide. So now in Michaela balance, what I have done is that I had taken some cadmium orange and some cadmium yellow with some amount of water down, make sure that you do not have access amount of water. Because we are going to paint these little circles that we have just drawn time just filling up the area to try to cover the pencil area and make sure that you do not get out of Nevada. Side. Just simply filled up a solid area. No need to hurry. You have to just paint it in steady and slow manner. Try to use your round brush tip so that you can fill up the AGI easily. Now once we are done painting all of these alcohols. So as you can see, badly, yellow and cadmium orange color looks really vibrant on the Christmas read. So now what we're going to do is that in Michaela ballot, I had simply taken in some sap green and mix it with some amount of water. So using the round brush, we are going to add these little leaves. So you just have to make a single stroke. So this is not at all difficult. What you have to do is that simply take your round brush and Bess it initially and value. Move towards the outer portion. Just pull your brush up so that you get these beautiful little leaves. No need to hurry a doll and just simply faster and Abduh video repeating the same steps. You can definitely slow down the video if you are painting with me. So if you might have observed Christmas, read carefully, it has generally full of light leaves and berries altogether. So we have somehow tried to achieve it in a painting farm. Now I'm simply using my black pen and we're going to outline the little bells are, we can say light on the Christmas read. I don't know exactly what to say. Land Eigen see leaves are little lights only because nowadays we get a lot of creative Christmas treats also. Anyways, give it whatever you like. Okay. So now I'm just adding these little strokes and some veins in the leaves using my black pen. Sorry if you find the LEA do a little bit faster it as being time lapsed. So you can definitely slow it down. There's an option below. Now let us write the message on the center portion. So we are willing to write medic Christmas. So I would suggest you to write it with pencil first because if you write it with ink directly, you might make a mistake. So once we are done with depends on what we're going to do is that we are using our black pen and yeah, just tracing the pencil lines. So the last one is Mary, and then we are going to write Christmas. So since the first initial letter of the words are a little bit bigger in size, I'm just going to darken it up with my Blackman. And then we have Christmas. One more thing that I would like to tell you guys is that you can write it in your own handwriting. Also. No need to write it in a same manner. You can create your own write-up as well. You just have to make sure that your write-up is readable and really composed. So as you can see, Latvia done with the message also. Now let us move towards the next step, which is bark do for the Christmas read.
8. Christmas Wreath - Part 2: So I hope that you enjoyed be one. Now let us move to what the B2B product business. So here I have our entire painting with the method of media Christmas. Now we are going to cut the entire time using my simple blade scissor. This is not a bad answer. So we are just going to cut through the outline, make sure that you leave a little bit of white space in between. So that when we place the entire cutout on the black people, which is the base of our greeting guide at looks and a really good contrast. So what do you have to do is that simply make tool symbol cuts so that you can get a nice leaf cut out and add the metal portion. You can just simply make our gut have a lot of patients and do it really slowly and make sure that you do not harm yourself. So as you can see, we have almost completed cutting out the entire portion for the Christmas read. Then the video I had just simply faster number videos so that we can Zoom someday. So as you can see, being direct cutout looks really beautiful. Now I have my base b bar, which is the black paper of density meters by 12 centimeters. So here I have, again, my double-sided David has certain thickness. So we are going to have, AS failed business of this assembly cut it with your blamed scissor. And you can see my numbers, I did pass certain thickness. So we can give an, a 3D effect to the entire Christmas read. Okay, so we have made six bytes. So now just simply flip your watercolor paper. And as you can see, I have taken or used watercolor paper so that we can save some paper. And now simply place your double-sided tape on the back portion. Plato blazed the double-sided tape on the outskirts. So we have blazed all these pieces. Now let us remove the back deep sea again, just carefully remove the bacteria and the sticky part will help you to place it on the black paper. And we're done. So now we are going to place it on the center of our black paper. Be very much careful. Leave equals Baines from the sides and top and bottom. And desert with your fingers so that it gets stuck to the black paper. As you can see, it looks fairly beautiful and it has 33 defect in it. So it does in level difference with the black paper. So now what we're going to do is that we are going to add suddenly deans time using my red pen from old x. And we are going to add these little combination of three dots on the inner space. So this could represent little boards of levels on the Christmas wreath. So you can just simply to be in the process and we dry it on the entire circumference of the inner circle. No need to worry at all. This is very easy. Just make so kilohm moment with your red pen. If you do not have a red band, you can also use it at sketch pen. And we are done. So now as you can see, we have solid black space around the Christmas read. So we are going to take our white pen Trump Sakura Gelly Roll. And we are going to add these little white dots and me are depressed, misread. So why do you have to do is that the dance which are very near to the Christmas read, are a little bit darker and bigger in size. And then as you move towards the outer portion, you have to just simply make them smaller in size. So you have to just simply randomly draw these little circles. So you can see that letters isn't any particular baton enrich. You have to drag a new style goes, Uganda, be rough and random while doing this, just make sure that the dots which are near to the Christmas wreath are a little bit bigger in size. And we are almost done giving the entire baton. So we have just completed BY Denver steps. And I had faster not WDL so that we consume some time. If you are making the endocrine gland with me, you can definitely slow down the veto. So as you can see then diluting God is ready. And you can see that we have a nice 3D effect when the police misread. And the wind on make a beautiful contrast with the black background. So I hope that you've got to learn something new and creative with this and dive greeting card. I wouldn't be very excited to see all your projects and this particular reading card. For now without any delay, Let's move towards our next guide.
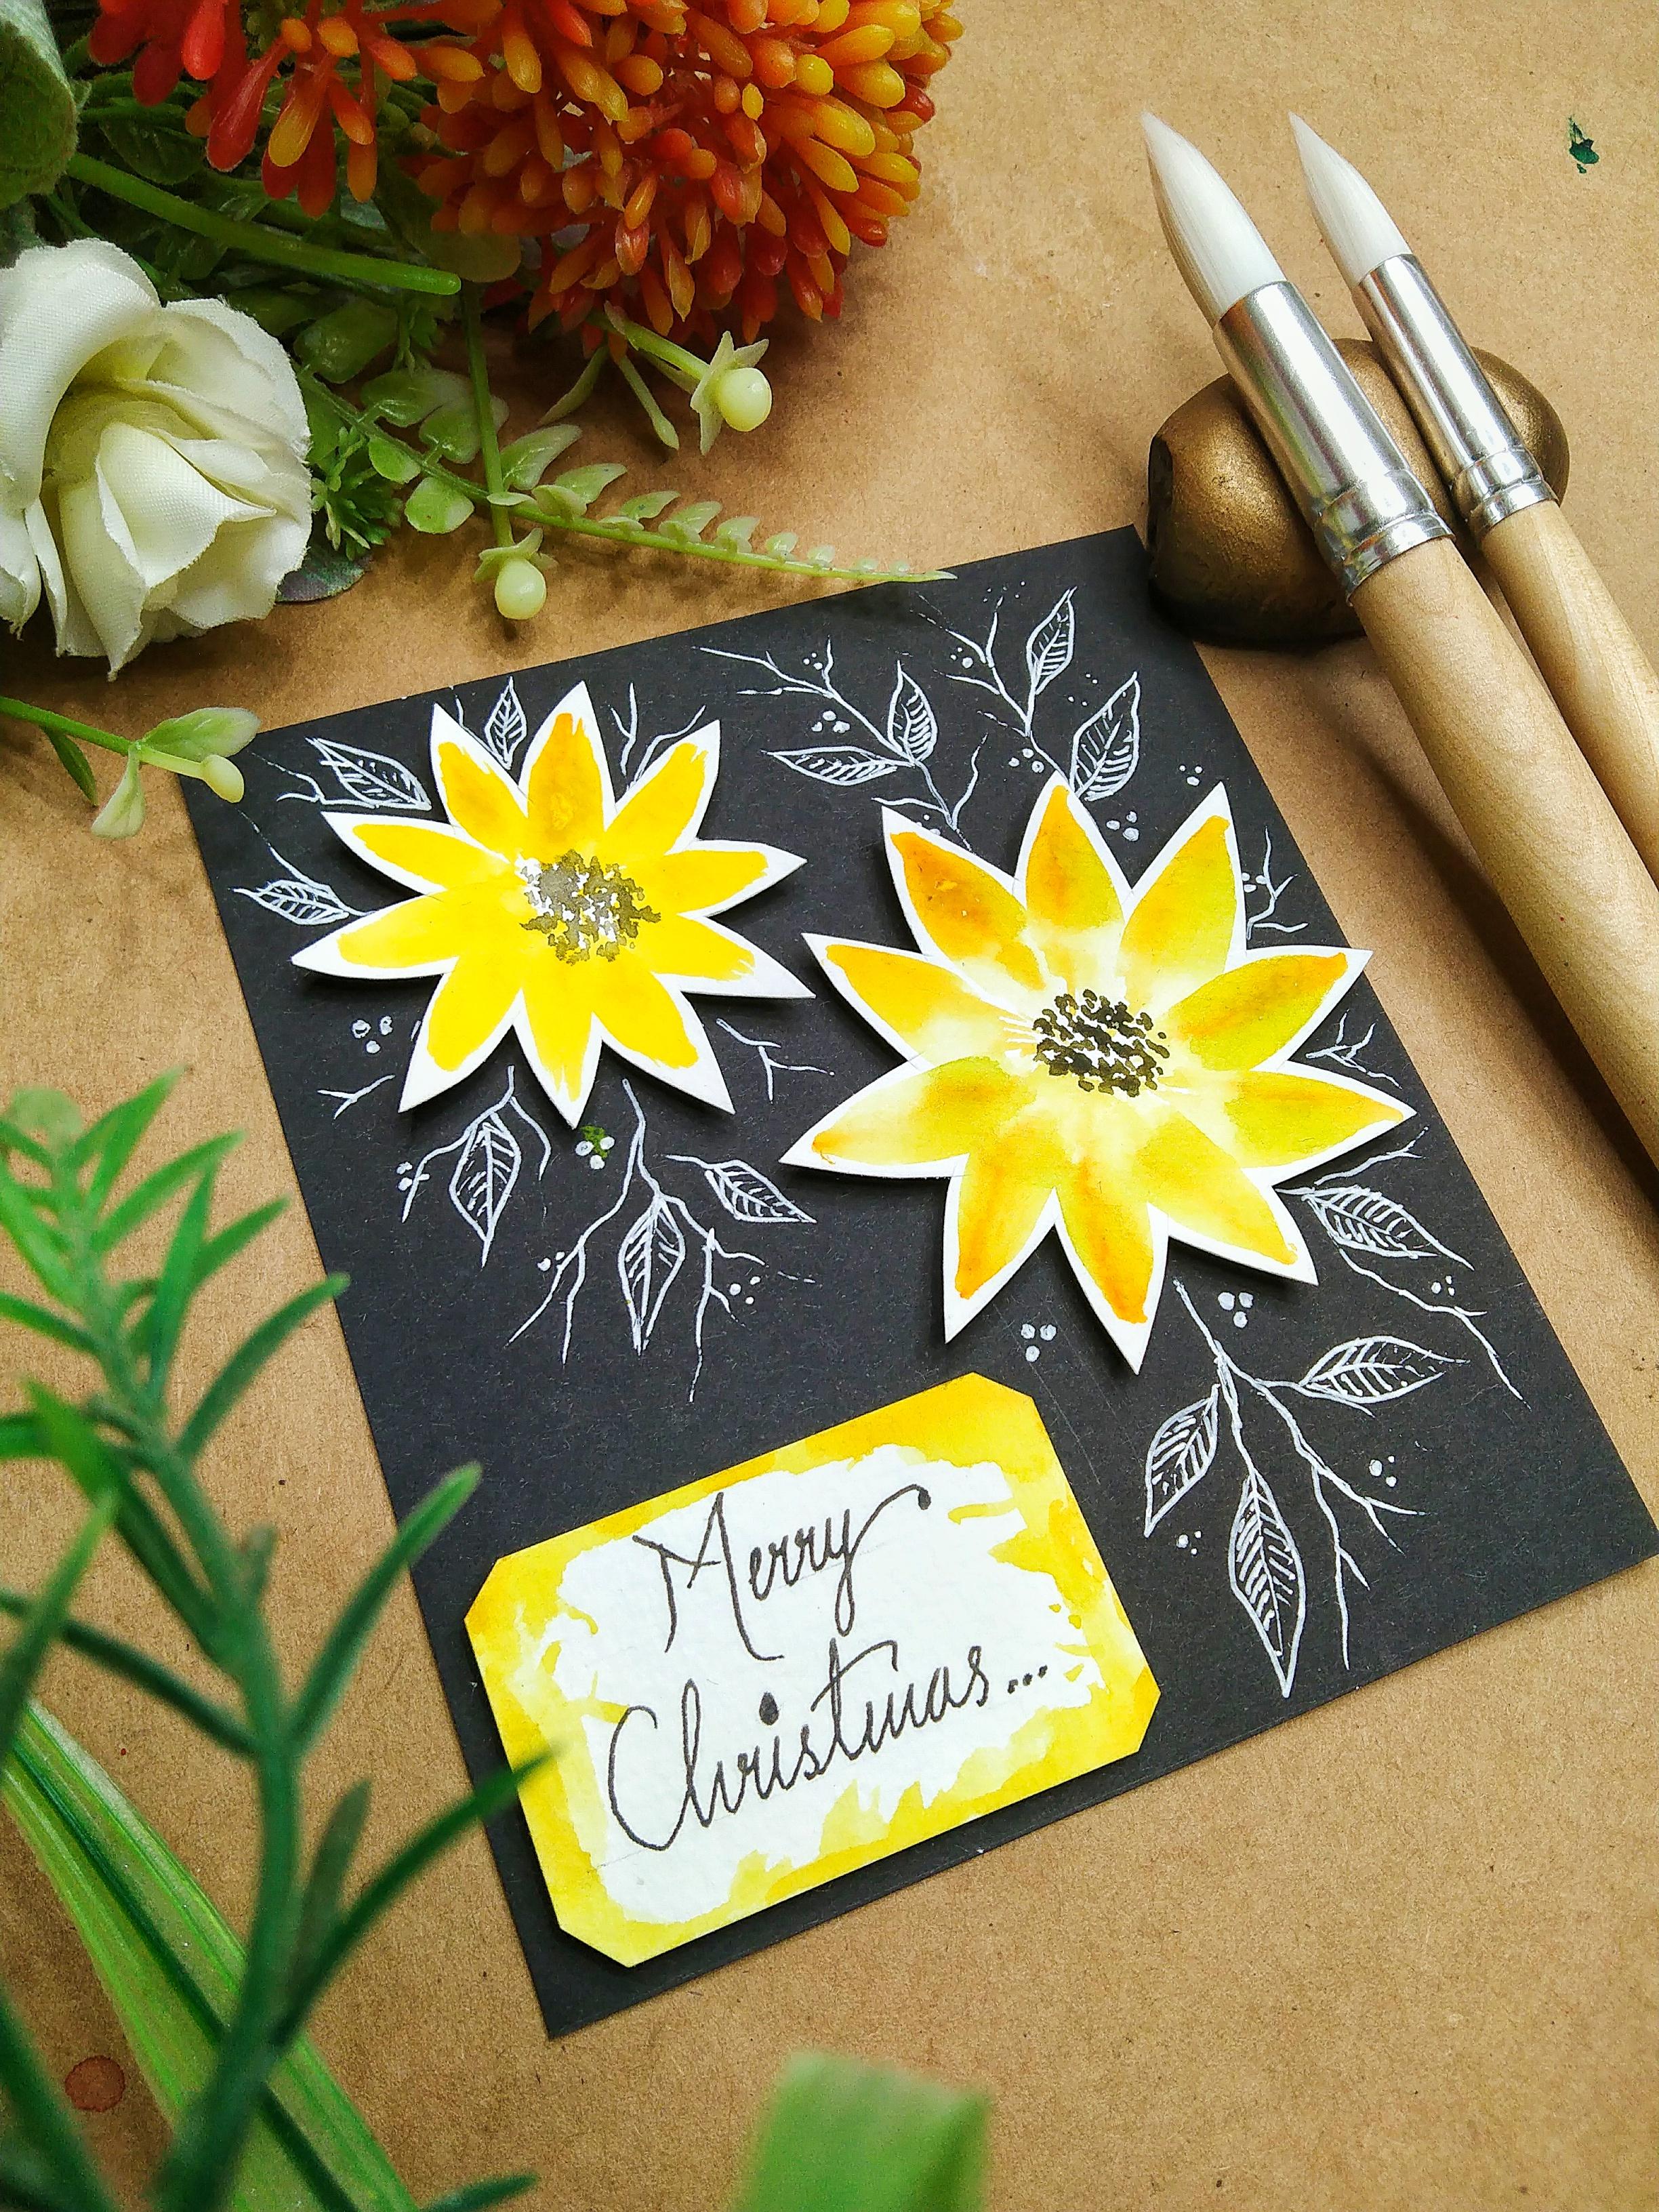
9. Christmas Flowers - Part 1: Hey everybody, welcome back to the fourth greeting card, which is Christmas class. So in this particular reading, Gandhi, I'm going to bin tool beautiful fun class with some 3D effect. And we are also going to add a beautiful message of medic Christmas. So here I have a piece of watercolor paper which I had taken from the waist. Great. Now the colors that you will need to paint these flowers are cadmium yellow and cadmium orange. So we only need these two colors. Now let me take you towards my color palette. So simply take some cadmium yellow in your color palette and mix it with some water. Make sure that you do not have access amount of water in your brush. That will definitely spoil your painting. Just, you have to get a thick coat of cadmium yellow. Now making these beautiful sanitize is very easy. You just really need alcohol brush size eight and you just have to meet these things called stroke. So initially you have to just simply press your brush on the watercolor paper and you have to pull it as you move towards the inner portion. No need to hurry a doll and just to follow the pattern as I'm doing right now, and do it very slowly. If you feel that the color and your brush is getting dried up, just take some more color from your color palette. And as you can see, we have somehow completed the entire sand clock. And it is almost done. So the reason behind taking a sunflower is that I feel that and Florida really vibrant and looks really beautiful Integrating gun. And also you will find a lot of flowers as decorated during Christmas time. Now just simply take some black color and your quill brush and a little bit of cadmium orange together. And you have to tap your brush in the center portion, as you can see. Now let us paint one more sun Clark, again using my quill brush and we are going to repeat the same pattern. So this quill brush is of size three. And you just have to meet these single stroke again. So be very much careful and patient by doing this. I'm just, I'm really fast running up. We DO so that we can Zoom some time. If you are painting with me, you can definitely slow down the video. There's an option below. And we'll, the flowers are ready. Now let me also add these black dots and the smaller flower. You just have to use your brush tip, which is very thin and chai so that you can make these nice little dots in the center portion. Although you can use a black pen, but it would be fine if you will use watercolors only. Okay, so we are ready with both the samplers and we're going to just separate them. Use your simple blade scissor and carefully remove the flowers from the main paper. Okay, So I had a remote default one. Now let us come to the second Bush and also, ok, so now as you can see, I'm using my simple blades ISIL, and we are going to cut the entire smaller flower really carefully. So you just have to follow the outline of your watercolors and leave some whitespace so that when we place it on the black paper, it gives a nice contrast with the background. Just me, this is not at all difficult. It is very easy. You just have to meet these little strokes. And as you can see, you can cut it very easy. Tsunami have to just simply follow the same pattern. Be very much careful while doing this. Make sure that you do not end up cutting the petals. Have some Bayesians and do it slowly. I'm just summing up the video so that we consume some time. So this isn't difficult. You just have to repeat the same method. And you can see how beautiful it doesn't flower is looking. And we are done. As you can see, the entire cutout looks very beautiful. And similarly, the second one. So I hope that you enjoyed making these beautiful levels and plasma. Now without any delay, Let's move towards the second part. So I went to complete the waiting god.
10. Christmas Flowers - Part 2: So I hope that you enjoyed the part one, hopelessness flies. And I hope that you want to learn something in painting these literals and flowers and cutting them. Now let us take a double-sided. So this tape particularly has certain thickness in it so that when we place it on the greeting card and gives it a 3D effect to your son cars. I'm just having four pieces of this. Use your planes as RN cut it into four parts. Now we are going to place it just behind your sunflowers. I guess only do bases are needed in one sunflower and we'll be putting one on the other one. Okay, that's it. Now simply take the cutout and it will be backs to go from the double-sided tape. So that began its ticket to the main black greeting card. So the size of the black card is 10 centimeters by 12 centimeters. Now we are placing the first sunflower on the position just in the middle portion of the black paper. And now I'm removing the sticker from the smaller sampler. So they are willing to place it on the top left corner. As you can see, wildflowers look really beautiful and it is leaving a nice 3D effect also. I don't know whether it is visible in the screen or not, but it is looking really nice life. Now using my white pen from Sakura Gelly Roll and they are going to add some beautiful branches and leaves together so that we can make the greeting card even more attractive. So trust me, this is not at all difficult. You just have to meet these random branches. And it is absolutely fine if you draw it in your own day also. You just have to make sure that we are willing to leave some space on the bottom left corner, because there we are going to write our merry Christmas message. Then I'll, I'm also drawing some little leaves. And once we draw the leaves, we have to add these little wings. Awesome. You just have to give these lines in between. And you can see how beautiful it is, literally looks. You can add as many as leaves you 12, but I'm trying to add it. And minimum manner. And you can add these little branches variable you want to. I'm adding one more leap between the petals on the biggest flower. Some guarantees also. The one advantage while making meaning greeting cards is that you can rotate because as much as you wanted to, to have a good angle for drawing and painting. We are also adding these little dots to show some flower buds so that it looks fairly attractive. Now let me just fast enough the video, you just have to simply repeat the same process. Normally. Do draw it in exact manner as I'm drawing. You can draw it in your own way also. This is just to give you a simple idea. Now, again, I am adding these leaves and branches on the elbow portion. So we are almost done. Now let us add some more leaves on these smaller flower also. Just simply taken some branches. We have learned to add a few leaves also. Let us add some combination of darts as well. And we are done with the entire drawing. But now it is time to add a medic, Christina's message on the bottom left corner, the head, I have a scrap of watercolor paper left with me. So let us cut a piece from it and wanting to have a perfect size, just make sure that it fits in your reading card. Now, I particularly believe in randomness only to be perfect all the time. So if you want a codec measurement for this small piece of watercolor paper, it would be, I guess, three centimeters by two centimeters. Then I'm just getting it a little bit smaller because it is a little bit bigger. So approximately I have just embedded mood, some extra part from the watercolor paper. Now I think it looks good. So all let us just jam for the corners, commit time, just assembly digging my blame dissolve. And we are willing to cut the corners. So I'm cutting the forest corner. And you can see you'll just have to do modal little abortion from the coronary band. Similarly on the other two corners also. And as you can see, the watercolor paper looks really beautiful. Now what we're going to do is that we are going to enhance it a little bit so that it looks dramatic with Lord declares. Before that, let us just draw two reference line. They killed some bolder color and add these lines so that you can have your calligraphy in our street manner. So now I'm digging my black pen from several. Don't delete all. So the first one is Mehdi, as we have done in all the above cards also. And the second one would be Christmas definitely. So I would suggest to to write it in your own handwriting. It is absolutely fine. No need to write it in similarly. Now once you are done writing the entire message, you can just simply get a speedup trends line, which we drew with benzyl. Now what I have done is that I had simply taken some cadmium yellow in my brush. We are going to just give the borders a little bit enhancement. They are not willing to being the diet of whatever. Obey Bobby, I'm just adding these colors, talks on the borders. And I'm just giving the final Dodgers and the entire DAG is ready. And now what we're going to do is that again, for the message data, we are going to give it a nice 3D effect. Now some blue flip your message, DAG, and we are going to please double-sided day behind it, as we did in the sunflowers. So assembly case, two small pieces on double-sided tape and more dieback sticker. Now we are going to replace it by leaving some space on the bottom left corner. And we are done. So as you can see, the entire card looks really beautiful. So it has a nice 3D effect in it. And the message that looks really dramatic with Bowlby flowers. So I hope that you enjoyed making these beautiful Christmas cards greeting card. I'm very excited to see all your projects now without any of the day, lead more towards our next card.
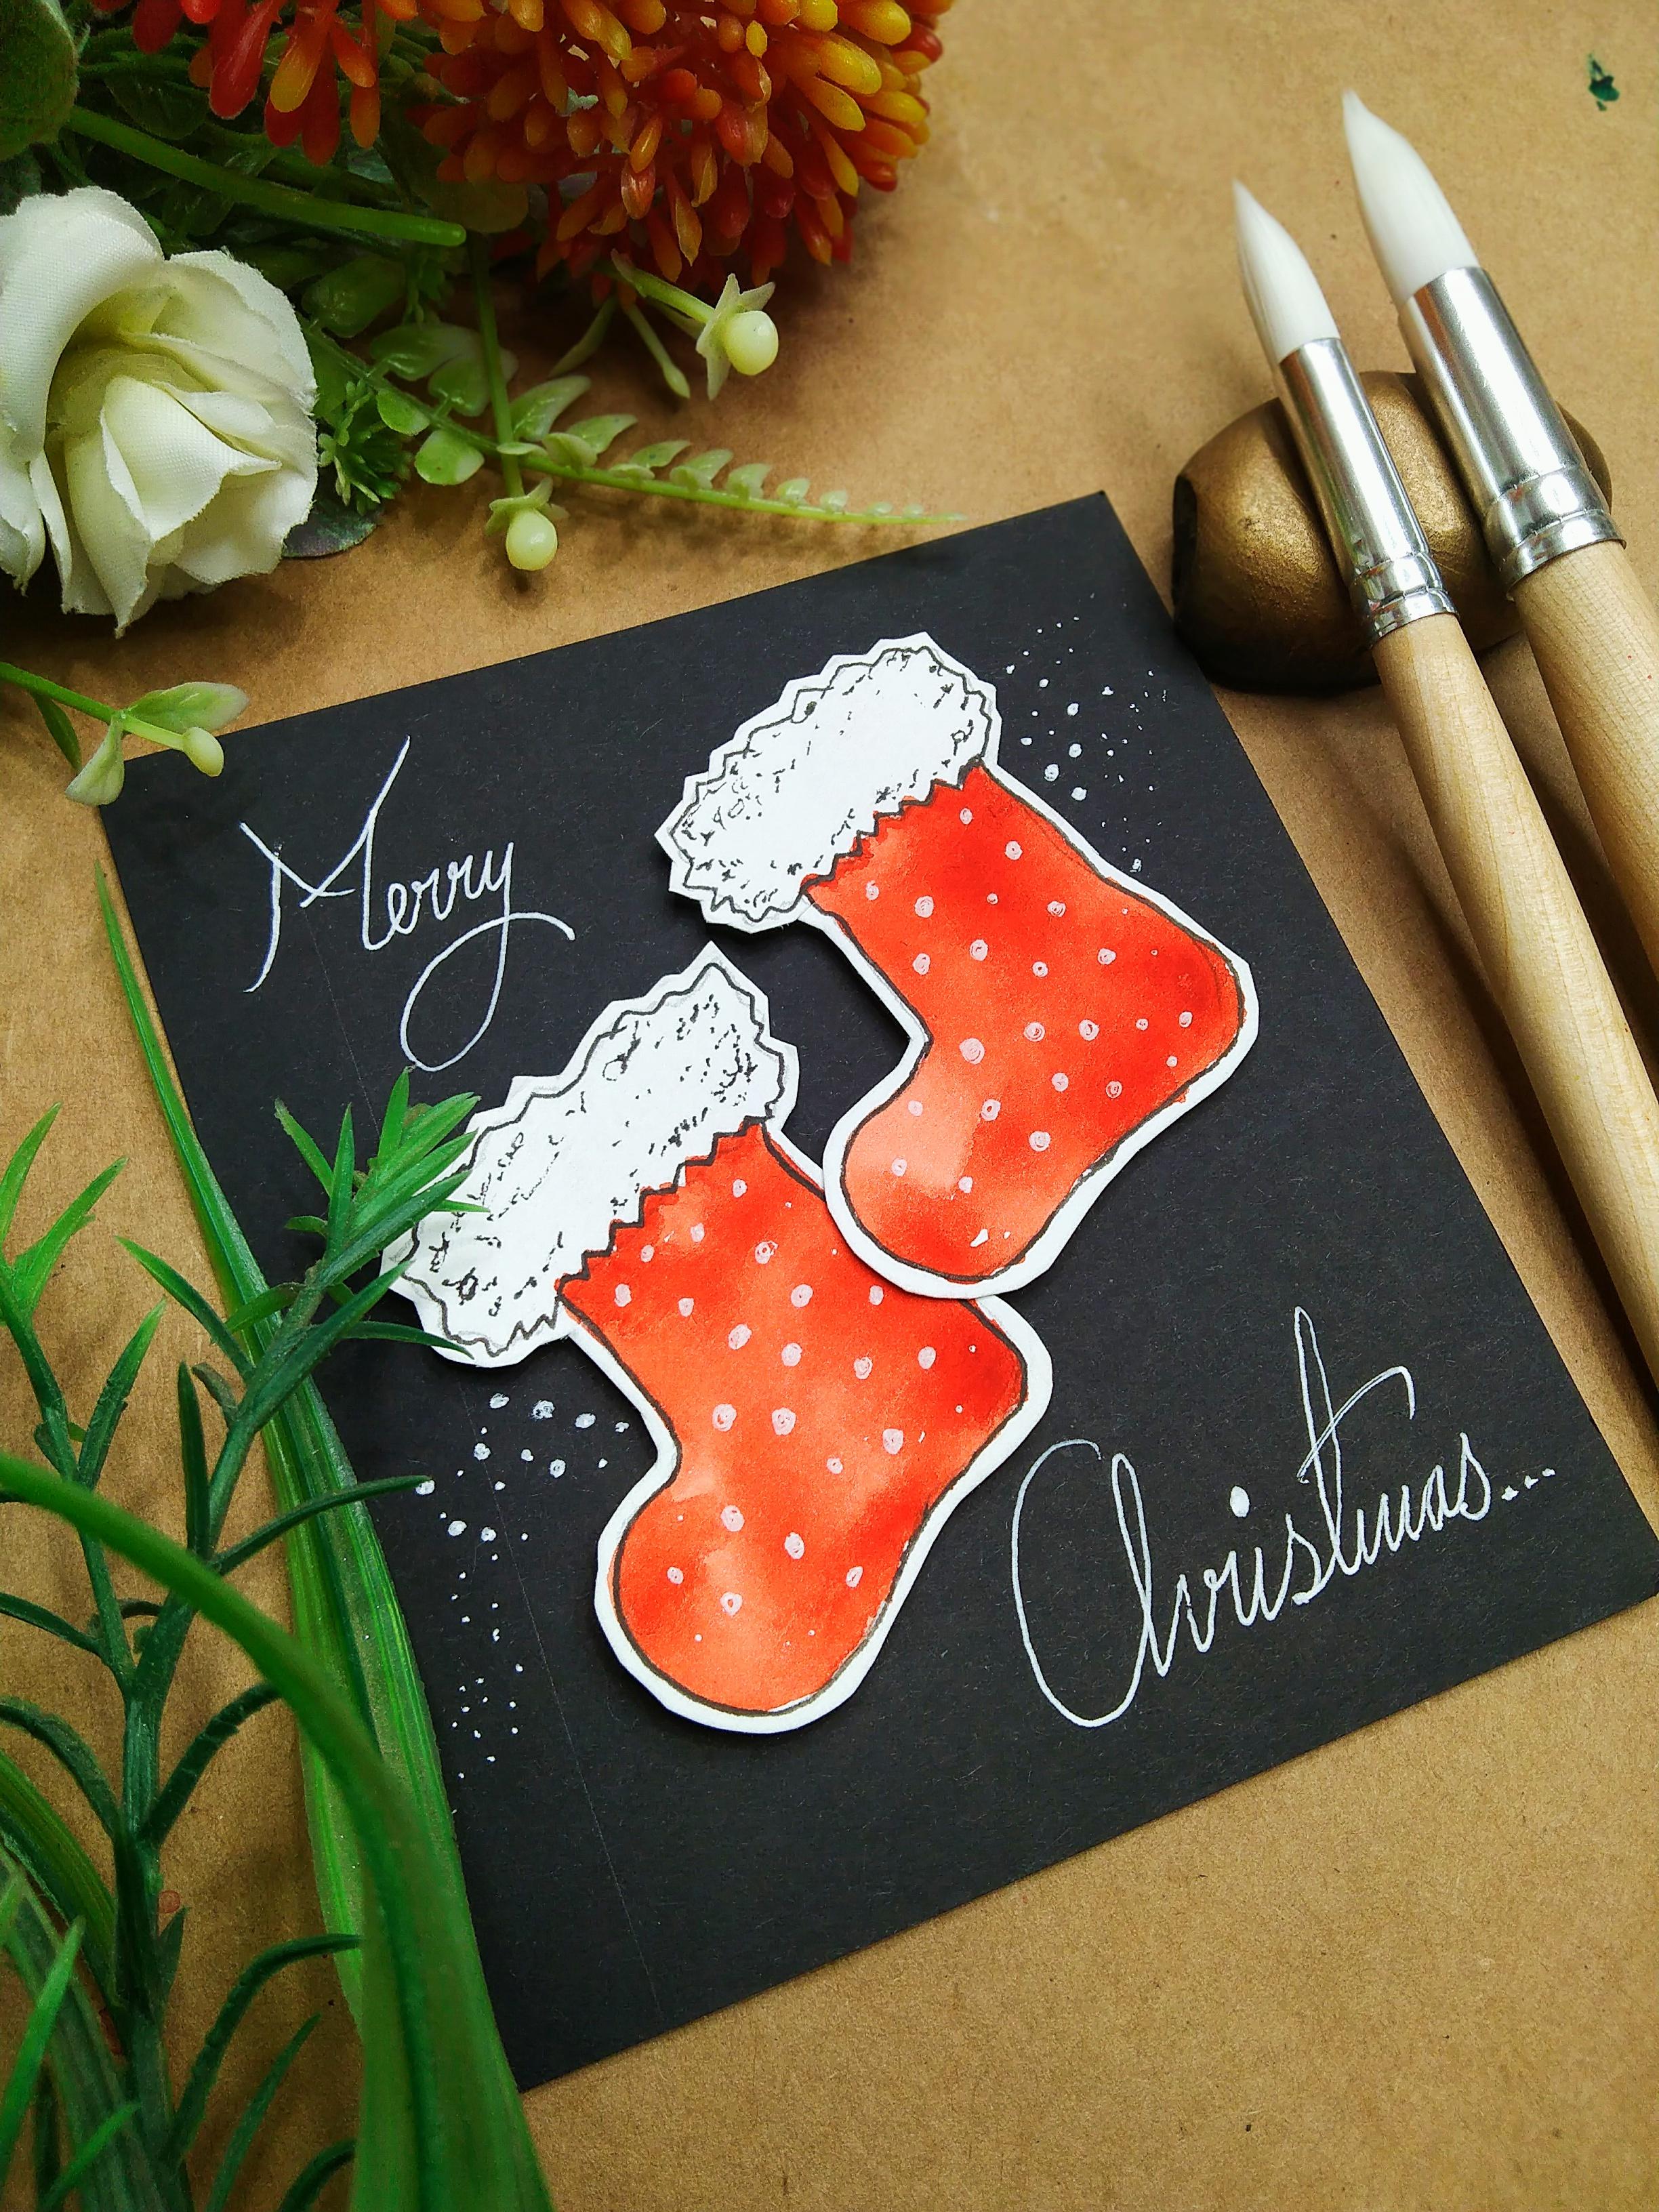
11. Santa Socks - Part 1: Hey everybody, Welcome to the Santa dogs greeting card part 1. And I'm very excited to share this greeting card with all of you. This is my personal favorite one. So here I have a scrap of watercolor paper and we're going to start with an initial sketch. So the abortion is fuddy textured cotton that we have on the Santa socks. And we are going to draw the foot area just below that. And the sketches ready? As you can see, this is very easy. No need to worry at all. Just be patient and come by doing this. You just have domain these little zigzag lines on the upper portion, which replicates file texture. So the only color that you will need for this entire painting is Rami Leon. Now, I had taken some 4 million with water, as you can see, my color palette on the right portion. So take your brush and take some solid values of 1 million and start painting. The we just have to simply apply a solid batch BBA much patient. While doing this, you just have to carefully applying the solid coat off watermelon enzyme events in line. Make sure that you do not go outside the pencil line. Now simply fill up the color as you can see. Now one more thing that I would like to suggest to you is that whenever you are going to be these little small elements, try to use your watercolor paper that you have already used for practicing so badly, we can save paper. Now let us just add some details near the furry texture area. So we have to just mean these little zig-zag patterns so that it is not going to be any color in that white portion area, which is generally the fore in this ox. So here I have my black pen from Sakura Gelly Roll. You can use any other Blackmun also. It is not necessary to use the same brand. You can go for any other good, alternate it. Just simply follow the pencil line and give a nice border. Be very much careful by doing this. Now similarly for the next salts, also, we are willing to give these borders and we're done. So now to represent the far end, nice way, just make some little scribbling on the white portion so that it gives a nice party texture and some realistic look to the entire socks. Now here I have my light bend from Sakura Gelly Roll. And we are going to add a cube print toward these arcs. So you just have to meet these little circles with solid, right? And you can see how cubed the entire stalk looks. Now similarly, you will add these cute baton to the other sock also. I guess these salts have certain story behind it that being Santa Claus, generally port mirror gift, enzyme, these dogs that you hang inside their house. So now I'm just AND gates operating mode these arms and they are going to make a nice cut out. So while doing this, make sure that you leave a little bit of whitespace from the black border line. So that when we place it on the black paper and gives a nice contrast with the background. Be very much careful while doing this. Make sure that you do not cut the painted area. That we do is a little bit fast. So you can simply slowing down if you are doing the entire project with me and I'm done with it, the cutout. So similarly, you have to cut the other one also. And both the cutouts are any. So we're going to place it on our black paper of 10 centimeters by 12. And me Don, I'm thinking to compose it in an overlapping manner. Let's see what we are going to do in part 2. So without any delay, let's move to what we bought 24 descent as ox.
12. Santa Socks - Part 2: I hope that you enjoyed the pipeline for this endless arcs. Now let us move towards the Part 2. So as you can see, we have two cutouts of mode, the Santa socks. Now we're going to place it on the black paper, which is our base meeting God paper of size 10 centimeters by 12 centimeters. So I'm thinking do overlap both these arcs before that. Let us just place the double-sided day behind it. So here I have my BSW of double-sided tape. We are going to make four pieces out of it. Now simply take one of these half and flip it. These two pieces of your double-sided tape behind it, make sure that you place it in certain distance. Now simply remove the backdate and please one of these arcs and then angle. Now similarly, let the other sock also, and we are going to place two pieces of the double-sided tape again. Then we'll be back stucco. Now while placing the other sock, make sure that your overlap a little bit of fun portion the other sock so that it looks really well composed and beautiful. And as you can see, both the stocks look really amazing. Now what we are going to do is that we're going to add the message. Now we have two portions to add the message, one on the top left corner and one at the bottom right corner. Today I want to write Merry Christmas. That greatly. O here you don't need a reference line. You can just simply write a message like the first one would be maybe, and make sure that you write it in your own handwriting. And it is not necessary to write the same as I'm writing. Since this is our greeting card and you're willing to give it to your loved ones. That would be absolutely great if you write it in your own handwriting. So the second word would be Christmas. And I'm trying to make it as elegant as possible. And we are done with the telegraphy. For now. Let's just add some details. So what I'm going to do is I'm using the same byte Ben from Sakura Gelly Roll. And we are going to add the little dots and then format. So the dog that you aren't doing near to this shouldn't be a little bit darker and bigger in size. As you move towards the outer portion, make it smaller. So you just have to adapt your right Ben. And is greeting card looks so beautiful, trust me. So this is my personal favorite. And now what we're going to do is that, let me give you a closer look. So as you can see, the salts are looking really nice with a level up from the base paper. I don't know whether that 3D effect is visible on the screen or not. But trust me, when you are willing to make it, You're going to love the final effect and the final output. So I hope that you enjoyed the keyword center socks greeting card and got to learn something new and creative from this. The God is very easy to make and I think it won't take much of your time. So I would be very excited to see all your projects and let us move towards the next time.
13. Christmas Lights - Part 1: Hey everybody, welcome to the final greeting card, which is Christmas lights. And we are going to again start with a basic sketch. So no need to worry. This is also very easy and simple greeting, God, but it would look really amazing and elegant. So we're going to start with a basic, so good. And again, I have used a symbol, scrape off watercolor paper. As you can see, I have simply drawn a circle and small rectangle on the top portion to replicate or older. Inside these small rectangle, you can just simply draw these vertical lines to show some details. Now just behind these molar light, we are going to draw another circle a little bit bigger than different one. It would be really great if you will draw in a lighter don't initially. And then when you find the entire sketch Beaufort, you can just knock it up. Now again, on the other light, we are going to draw another rectangle a little bit bigger than the front one, and some vertical lines to show the details. But that's it. Now, the watercolors that we will need for this particular reading god is cadmium orange and cadmium yellow. So as you can see in my color palette, I have initially taken some cadmium yellow button. Now we're going to add some cadmium orange in it. So we'll just mix it well with some cadmium yellow and try to get a nice merge of both the colors. So make sure that you do not have access amount of water. Madmen definitely is by painting. Now we're going to paint the entire light first. So I'm starting with defaults token, which is the smaller light, can only do what? Uh, you just have to apply a solid badge. I'm just covering the entire area. As you can see, this isn't a large-scale painting, desires modal little elements and it won't take you more time to paint. So using the tip of my brush, I'm just trying to fill up the border area, make sure that you do not go out on the line. I'm just dabbing some areas so that we get a nice texture on the light also. Now let us paint the second light. So we will need some cadmium yellow this time, we are not adding orange in it. So just simply observe the color palette. On the right portion. I'm taking some darker values of cadmium yellow. Now we are going to paint the second light. If you feel that your brush is dry, you can add some amount of water. Okay, Now I have a good consistency or the color. Now thankfully apply the cadmium yellow on the back light. As you can see. We're just covering the area. Be very much careful while painting and make sure that you do not go out of your benefit line. Now let us just simply punish the coloring part. And we are almost done. I particularly believe in wealth from waste. And it would be really great if you use your used watercolor papers for practicing. So as you can observe that one light is ahead of another light. So we are going to add a little bit of shadow effect on the yellow one so that it looks a little bit more realistic. And would be really great if you keep additional napkin handy so that you can simply dry up your brush. So I'm digging a little bit of cadmium orange and we are going to apply some shadow effect. So let us take some darker values of cadmium orange and just give a little bit of stroke near the light overlapping. So now we are going to outline mode the lights. So be very much careful while doing this. So I'm using my black pen from Sakura Gelly Roll. It is a really good black pen, but it is absolutely fine. If you go for any other good alternator, it is not necessary to use the same. So I'm starting with the topmost portion, and we are going to add these little vertical lines also. So just observe carefully. I'm just making these smaller rectangles. And adding these little details will enhance your entire reading god. Okay, So we are done with the topmost portion. Now let us get an outline to the end deadline. So you just have to move your black pen and this circular motion, just follow the colored area or your pencil line if it is visible. Now, simply give the outline on the other side also. And make sure that your watercolors are dry. Because if your watercolors are not dry, then your ink will definitely spread and you'll be painting will be spoiled. Now to add some details in your life, Let's just add some little strokes of TR, black pen and a little bit of, Oh, well, kind of a shape near the bottom right corner that would represent a nice reflection on the light. Now similarly, we are going to outline the second light also which is bigger in size. So you just have to repeat the same process. Don't need to worry. I'm just fostering up that reduce food that we consume some time. If you are making the entire grading guide with me step-by-step, you can slow down the video. There's an option below. So again, I'm adding some little details by applying some strokes. Now the reason behind trying these little Olin shapes on the right corner is that we are going to add these reflection effect. Sam does taking my light Ben again from Sakura Gelly Roll and we're going to add these little white strokes also. So this would give a nice realistic effect to your entire lights. And as you can see, that this looks really beautiful. So the thing body's ready. Now let us add some details with the red band. You just have to simply make these little plus sign. As you can see I'm making so the one is bigger on the top portion and another one is a little bit smaller. So as you can see that this is kind of a cartoon effect in which we see the light having these plus signs showing that these are glowing lights. And we are done with the Christmas lights. Now let us move towards the second part.
14. Christmas Lights - Part 2: I hope that you enjoyed the bad one. Now let us move towards the B2 for the Christmas lights. So as you can see, our entire painting is ready and we are going to take the entire cutout. So what I'm doing is I have my simple blade scissor and you'll have to just and simply cut out the entire light from the watercolor paper. So make sure that you leave a little bit of whitespace from the black outline so that we get a nice amazing contrasts with the black background paper. And also be very much careful while cutting the entire portion. Because if you will be in a hurry, then you might end up cutting the painting, but also. So no need to worry, you just have to cut DNA that ocean very carefully and slowly. I had just simply faster and up the video so that we can Zoom some time. And the method is same. You just have to leave some whitespace. That's it. And you can see the entire cutout is ready. So here I have my black reading guide, which is of 10 centimeters by 12 centimeters. You might have observed it in your earlier comments also. So now we're going to paste the double-sided tape. So I had just simply taken the double-sided De Ban got added into three parts. And as you can also see, that there's also used watercolor paper. So yeah, just placing the three pieces this way and removed the max to go. So now we have these sticky board and we are going to place the lights somehow on a little bit up apart. Okay. So we are placing it on the center, But yeah, and we have some space on the bottom potion Maybe I'm willing to write the message for merry christmas. While placing your cutout, make sure that you leave the base from all these aids. So here I have my white pen from Sakura Gelly Roll. And we are going to just add these two vertical lines on the top portion of the light. So this basically represents the hanging. And we are using a white color so that it gives a nice contrast with the black background. As you can see, this is not at all difficult. You just have to make simple vertical lines. So since this is looking a little bit symbol, let us add Dubos on the upper portion to just have domain these little girls. As you can see, that's simply follow the bat and I'm making. And you can just mean these little wavy lines to show the loose ribbons. Similarly, let's draw it on the smaller light. Also. You can see how you would load the Bose looks on the light. And you can also add these little wavy line on the left portion. So you can see how guild both the Bose looks on the light. So now let us add some more blood signs on the surrounding but of the light so that it looks even more. Employee. Am just simply making these plus signs on the right side. Again, dry it in the combination of three to four. And there's absolutely on you. Let us add some plus signs on the top portion also, and some on the left byte. So as you can see now, the Judean God looks even more attractive. So the yellow lines are looking at early beautiful with the black bag down. So now it is time to add the message DAG. So we had, I have again, a scrape off, well-developed able. And without random size, we're just cutting that strip out of it. If you want, a particular islet would be, I guess, four centimeters by five centimeters. So we are going to place it on the bottom portion and only do what? You can take any random size. And if you want to take a particular size ticket as five or four centimeters by 1.5 centimeters. Now again, in my color palette, I'm going to take a little bit of cadmium orange and yellow together. And we are going to enhance the edges to simply take your brush and add these little color values on the edges so that it looks even more attractive by Leda and the message on it. So as you can see, this is not at all difficult. You just have to add these little color values. On the edges, the deal brush and try to blend it with the white background. And we are done. So since they'll strip looks really attractive, India went to place it on the black background. You can just simply take some dry brush and dab it on your addition napkin and blend it with the white background. You can see the entire message. Dan looks really beautiful. Now let it dry, followed by. Now once the entire strip is dry, just a Gaussian bell roller and add other friends line so that you can write to a galley lousy illustrated format. So just start with the oldest one, which is as usual, Mehdi. It would be really great if you divide the entire text in your own handwriting. That would make it more at a time, rather than writing in the same way I am writing. So these are particularly my favorite text. So now I'm just taking the double-sided tape and we are going to place it on the backside. Now Assembly they move the back stucco and we are going to place it on the bottom portion. So as you can see, both the light and the message DAG is having a nice 3D effect in it. Now let us just add some more details. I'm just digging my right Ben. We're going to add these little dots around the light so that it gives an island literary effect. So this is a very easy stem. You just have to tap your white pen down the lights and just spread it on the black background. You can make the light a little bit bigger near the light. And as you move towards the outer portion, just dab it. Sam covering the remaining area also. And we are done with the entire God. I hope that you enjoyed making these beautiful Christmas cards. And you can see how beautiful the light and the message DAG looks. I don't know whether it is visible in the screen, but the 3D effect makes it even more beautiful and attractive. Do not mess my final thoughts for the entire class, and we'll see you soon on the next class.
15. Final Thoughts : Hello everybody, welcome to the final thoughts. And trust me, I just love to make greeting cards since Christmas was on the way and I was very excited to share all the reading cards with all of you. Apart from painting craft is also something I enjoy to do the most. And I wanted to share each and every detail with all of you. You can make all the greeting cards and put it on the project gallery or added to the project section. You can also give it to your loved ones or you can also give it to me. I would love to receive it. That getting nobody's feel free to ask any questions or doubts you have related to the class in the discussion section, I would love to answer them. In case you are on Instagram, do dag mean I go by the name should drag auditions. I would love to repost your work on my stories. It would be really great if you leave a feedback for my class as it encourages me to come up with even more creative glasses like this. And my glass can reach many more students like you. Stay connected and thank you so much for joining my class. See you soon in the next class. Bye.
 Rutvik Patel, Artist and Instructor