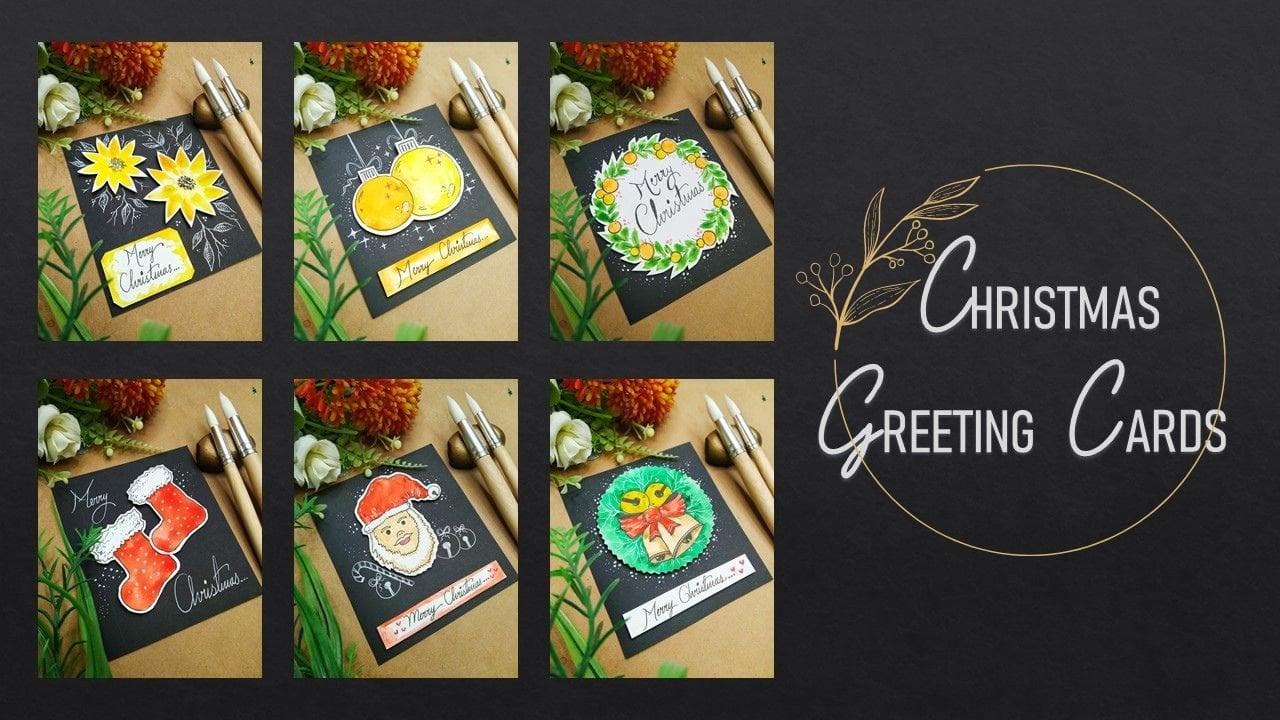
Transcripts
1. Introduction: Growing up, I always used to admire greeting cards a lot. It's a wonderful way to waste someone and convey your message. Upon that came into my mind was, what if V create our own bodyguards and give it to our loved ones? Hello everyone. I am cells don't independent artist from India. I'm also factors and continuing to line up. So I am recently started my Concerto. I don't know my non-linear. I can find my Instagram folder. I go by the name should add additional. In this class, we will learn about how you can make your bodyguard step-by-step. These are the handy and miniature gods which you can give to your friends and family. Really learn about all the materials you will need to take up the project. In the class is divided into several short videos, but you can take according to your dime, convenience and mean gets pulled a very special place and your loved ones heart. I would suggest you to take the class in the sequence as it is designed in such a manner so that you do not miss any step. I hope you would come up. But our wonderful output and I would love to see your projects build free to ask any doubts on stamps. You are stuck. Add in that discussion section. Let's get started.
2. Materials required : Domain, this beautiful lineage and reading gods. They will need certain materials, no need to worry. This materials can be found in any nearby local stationery. Very easy. So now I will give you a basic brief. They didn't need assembled ruler or a scale, whatever you call it. Assembly black pen with a fine tip. The spend is from Saqqara. A simple pencil to draw the rough lines. A size two brush from gamble. We only need this one brush. A cutting plane to get exact gut. But be very much careful while using it. Then we have a light band, but that's fine tip as well. And this bent as SAMHSA cuda for this particular project clearly been meaning to watercolors. These watercolors are from the stone. One is palpable, and another one is blue. As smallest sizes for cutting. Some golden glitter is available with you, are, you can find it from any nearby look at stationary. And then of course, density I using watercolor, we need a glass jar with water. Assemble spray Martin to lose and always keep our tissue paper handy for cleaning axis amount off onto a double-sided tape and does a half-inch deep, you will find it from any nearby local stationery. A ceramic palette for mixing and pouring our watercolors. A simple right page. You can use any light beige as well. This is a Phi XYZ and white watercolor paper, 300 GSM from Scholar. Then we have an E for XYZ black paper. You can find it from any nearby, locally stationary as well. Then finally we have our cutting mat so that you do not damage your tables. Our faith. And yeah, I forgot to tell you about us D if available with you, you can use it instead of the plastic one. So these are all the materials we will be needing to complete this project. I hope you got the brief.
3. Before we start: Before we started the budget, this is a basic V for the stems being followed. God's eyes and getting, letting the rules. Assembling all the elements, bonus idea and final thoughts. Now let me take you to the details and the design of the god. So the beef of cheap, of the God, is it a dang good? And which the land add-on. Let's consider this In which will be flavus. And below that, the happy, both. In guidance, I showed you the full and how the icon will appear after the opening. Now, I will just enlarge the right-hand side diagram to explain you in DD, need auden line shows you that the part where we will end on the right side on the beach, we will be writing the message which we want to deliver to the one we are getting it. What does modern floral element? And MLA to the front page. Now, after opening the door of the god becomes an aids. And to me does, to show you this in Adobe. Yet I have a piece of a BBA. Leave it to draw a folding line and folded to convert it into a cod so that you get a better idea how the God is going to be. Now, this is how the prototype looks according to the diagram which we do in the notebook. I hope you understand this and start the project.
4. Card size and cutting: Now, let's turn to make our mini guides. Here I have my full sized black paper and a pencil. Tinsley have other cod measurements as well, centimeter by centimeter. We will draw the rectangle at the corner of the page so that you do not resist it. Once you draw the load sending me deadline Degas six centimeter point on it to divide it into two equal halves, then draw the folding lane. Now, we had drawn the indirect on both AIG measurement or even simply cut the data guy, I would suggest to you that if you are using a GUDDAT, then always use a cutting mat. And using Aziza, Then the cutting mat is not required. I'm using a blade. I would see that be very, very careful values and get so that you do not hold yourself. And just apply pressure on the catabolism and got the rectangle. You can see that we have our God with us. So we have to give up all do the folding line so that the kind of ready to decorate on the folding line, cutting blade and apply minimum pressure. I did beat minimum pressure so that you get a nice edge. Make sure you do not cut the entire line by applying more pressure on the bleed. Now we can just simply give folder icon and it's almost ready. Use your hand or just scale to make the full perfect. As you can see, our God is ready and we are good to go. But the next day.
5. Painting the flowers: Hello everyone. Now we are about to make monopoly decorative elements, which is blending watercolor roses. Normally need to writing these blobs are very easy to make and you can see how beautiful they look. Though in the plan page of the garbage. We got it. I will show where we will place the flowers and then we will write the Happy Birthday line. So here is the place for the flowers. And here is the blades are happy birthday line. Now, let's get started the painting, but here I have my Brewster watercolors. One is blue, and one is Bob. And dig any color palette. I'm using my simple ceramic palette. Takeout a little amount of color because we do not want to waste it. Vr drawing maximum three roses. And for that, we don't need a lot of color. Then I'll take some view as well. If you do not have strange watercolors, you can use as well. You'll find that as well. These are Watergate class. You can find this from any nearby local stationery. Coming back, I have a simple glass jar of water and my size two brush. It is a round brush. Dig some water in your brush, and losing a boat. The colors. Try to create two values for the abortion, where the color is darker and some lighter value for the color. Now, I'm loosening up the bugler by adding some amount of water to create sudden lighter values. Always keep a digital paper handy to clean up the axis amount of Fonda. No need to hurry. And do it. Well, painting petals, dig darker values of the color and start making random. So it goes in the center portion. You can see how I am revolving my brush. Now take some lighter values. My adding more pigment. And again draw the outer butt. Might evolving your brush around the darker values. And you can see our roses ready. You can see how beautiful this rose looks. Now, which is blue rows as well. And you will need to have a good slowly and take your time. Now similarly, we will finish the blue limitations to this. Choose any color you like. It does absolutely fine. My following the same Mehta. I'm trying to complete the rules a little bit smaller than the other do. After completing the banding bond, you can see how beautiful needles is from each other. While cutting it carefully. Make sure you do not get bad. And cut the outline, leaving some white space. And all three roses. And how Bayesians mile doing it. You do not got the banded bud fashion. You can see how I'm leaving so that it enhances the autos. Now we have the last one, and we are done. All the three roses, Azure AD. The floral elements are ready to go onto the card. Now let's move to the calligraphy part.
6. Calligraphy : So now we are going to work on the second element, which is the Happy Birthday line, which will come just below the rules as we meet. Before we tied. Define a line here to the simple practice bad for you. If you do not have done good handwriting, no need to worry. Did the same by people we used to being the roses. Draw two lines, very light in tone and bad little to each other. These lines are called Deference line, which will help you to develop, composed with good alignment of letter. You can see how you can write by this method. Once you complete your ID and you are satisfied with your calligraphy, then you can simply leave that off lines as much as you can until you are satisfied with the data. Before we write the final Happy Monday, we will draw our rectangle of length and width as five centimeter by one centimeter scale to draw these rectangle. And once we are done drawing, we will simply cut it with the hat. Exact measurements. Now uses as a rectangular beam. So here we have a rectangular beam and at the pavement on the gun is somehow like this. To write the text, again, we will draw a line, reference line to get our text aligned. Now ready carefully, you can write Happy Birthday. Make sure you leave a little bit Donald gap between happy and birthday. So I'm quite satisfied with the text. To enhance, the white piece of paper will just Degas them. Bold blue color paper. That WFD crap of paper. You can use any color. It's not mandatory to use the same. Dig the rectangular piece, put some blue and based it on the colored paper. Leave some blue boundary. And the bees. Now you can see even more attractive and beautiful. And how we will place it on the god.
7. Writing the message: We are almost done and about to finish the god after the front page. When we open that God, we are suppose to write the message you want to deliver to your loved ones. Now again, by our text to be both actually didn't end well aligned. We will draw some resonance line and practice it on the white paper. Draw the reference line, very likely. So here is my black pen and the message, which is lots and lots of matching. You are very, very happy both today and God bless you. And after from you can mention your name. As you can see, our beaches black and black band wouldn't be visible on it. So leave it would be using a white dude I don message on which you backtest the entire message and use your white pen slowly and carefully on the black paper. Make sure you do not make any spelling mistakes. And V are done with writing the message. So how you can write the message on your boat, the big on that writing the message.
8. Assembling all the elements: Welcome back. We are about to finish the project. And finally, we have the most interesting part which is assembling all the elements that we made, which are the flowers and the message. Take your half-inch double-sided tape and cut two smaller portions out of it. Please do small bit on the happy birthday text, which we contend. And one small bit onto the Bhopal rule is the use of this double-sided tape is to give the 3D effect and the level difference between the block and the mode, the data. And leave the tag carefully in the position. Now we will place the rose again and place the rose onto the position. To maintain the 3D effect. Please run on the roses that glue so that, that is a level difference. And vote the bubble and blue rows. Uses simple lipstick. Please some glue onto the rose and place it just next to the appropriate rows. So you can see how 3D effect comes. Now, after opening the God, the left portion is blank. To make it look good, we will please our last rose onto it. Use the blue again. And please the blue rows into the corner. So you can see all our elements are assembled well after the flowers, at least, let's make it even more attractive by adding some leaves to it. So again, we'll use our byte Ben because the blacking wouldn't be visible on black paper. Draw some many leaves surrounding that loses. You can do it pretty carefully and slowly. You can add some calls as well. Similarly, we will draw some more leaves to the rules. We paste it inside the gut, add some calls, and we are almost done. You can see how beautiful this baton looks. I would suggest you to take the bonus lesson as I will give you an amazing idea to make your God even more attractive. And the add-on.
9. Bonus lesson: Hello students. You are most welcome to the bonus lesson. I'm very happy to share this idea with all of you. The exam golden glitter. If you do not have the glitter, normally do body, you will find it from any local stationery. Have a glue stick, open it and have some glue on your fingertip. And date your finger with W and dab it around the roses. Now, dig the golden glitter and use your, another singer, which is clean and debit into that later. Then simply dab it on the verge. Be pleased w. And you can see the effect. And you can also observe how elegant this looks after applying the glitter to it. Repeat the same process wherever you want to add the glitter. Since this backlink looks very nice, I'll add some more later to the Gadhafi's. And with my finger. And we are done with the front page. We also have a blue rose inside the guy. To again repeat the same process. Take some blue and your finger, tap it into the random spaces. Use your clean finger and then dab it on the glue. And finally, your volatility. God, is it Eddie, do be gifted. I hope you are to learn something new from this class. Thank you.
10. Final thoughts: I hope you got to learn something new and creative from this class. Feel free to add your project into the project gallery. In case you are on Instagram. Do tag me as I would love to see you on artwork as well. I go by the name should the Rajan patients, if you like the glass duly of it back as it encourages me to come up with something even more creative. And my glass can reach many more students like you. I hope my glass was helpful to you. Thank you for appreciating my course.
 Rutvik Patel, Artist and Instructor