Transcripts
1. Introduction: Are you ready to
let your creativity go wild and take
control of the art of drawing charcoal Does provide versatile apply that
wherever it's needed. Charcoal offers rich
textures in deep contrasts, ideal for bolus tribes
and dramatic shining. In the first chapter
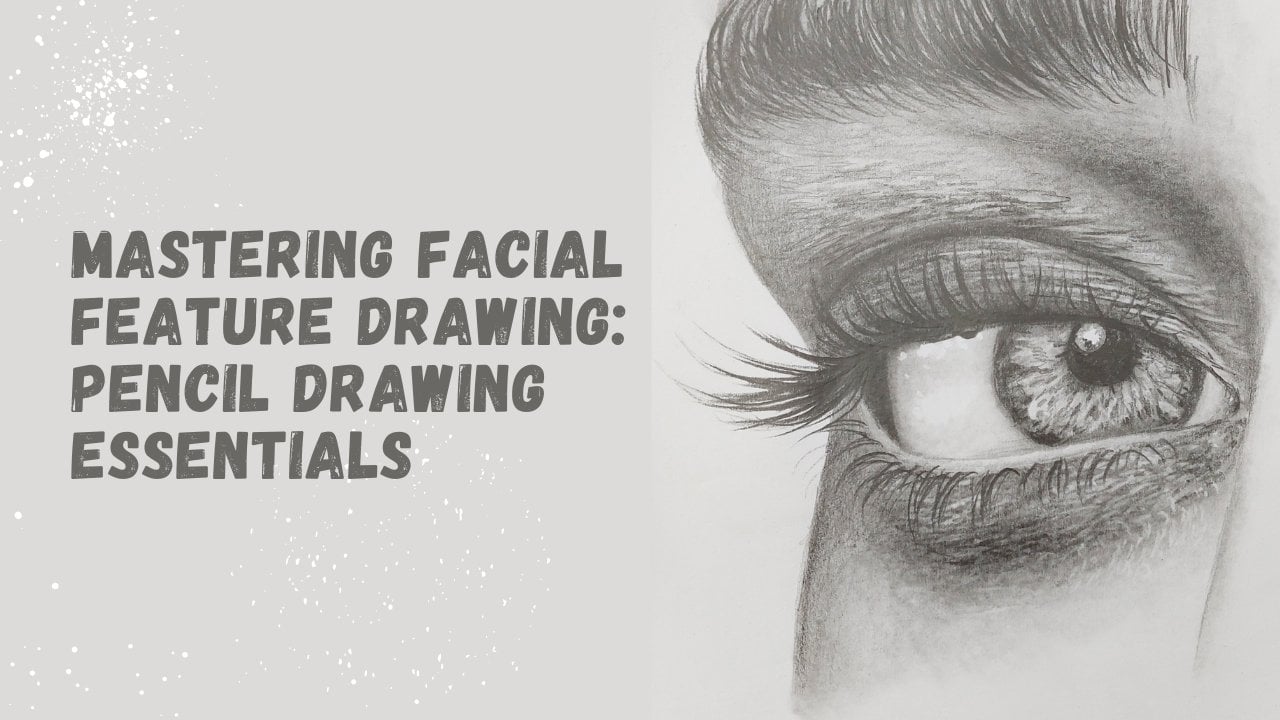
of this class, you'll learn how to draw an
eye using charcoal tools. In the second chapter, you'll learn how to sketch
lips and nose using charcoal. Then in the third chapter, you'll draw an ear. Finally, you're all invited
to join this course to improve your skills in
drawing with charcoal.
2. Tools: Hello and welcome to a new
part of sketching with me. In this chapter, we are going to work on different
parts of the face. And we are going to create them in the real
style and separately. For example, eyes,
ears, nose and lips. All right, now for creating these face parts
in the real style, we need some tools that I'm just going to tell
you about one by one, going to introduce them to you. One of the most important tools are the contas that you need. You need a soft and hard conte. These two are the most useful
tools that you would be needing during your sketching. You also need a
black colored pencil that I've used, a polychrome. You also need one white, which has the same
texture of the black one, but it is white. As you can see. You
need an eraser, a dog eraser, obviously. You also need a fader. You need your fader to
be in a small size. You need Tabu cardboard, which is the best of
cardboard for working with charcoal and creating real
and hyperrealistic styles. You also need a
paper tape to stick your cardboard to the disk
that you're working on. You also need some brushes. For starters, I say only
these three brushes are fine. One of them should be big, which would be almost as big as one parts of your fingers, It is very concentrated. Another brush which has
a very flat tip and it's cut in the summit ways, A brush which is small
and concentrated. Again, these are
all the tools that you need for this part
and for this chapter.
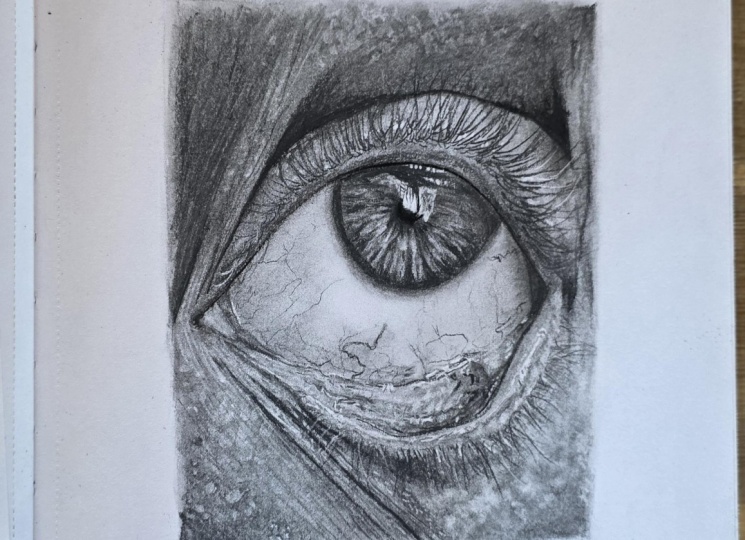
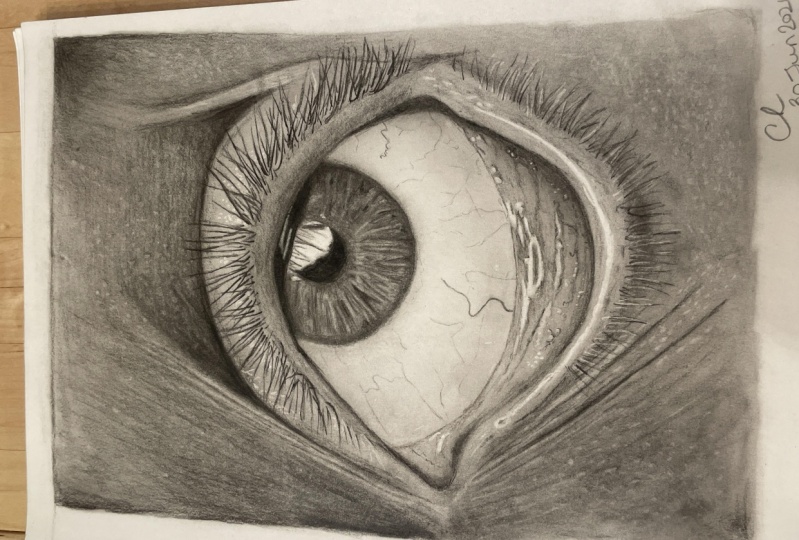
3. Start Drawing Eye: All right, now for
starting that, I'm going to start with
sketching the eyes, because this time we're going to do our sketching
in a real style. It's better that if our sketches are too
complex and complicated, it's better to transfer your primary sketch
by copying technique. I have already blackened the
back of my printed model, Then with use of some tapes, I'm going to place it over
here on the cardboard that I want to have my work on and on the place
that I want it to be. Therefore, I can actually
transfer my primary sketch very quickly into my own cardboard and the rest would be easier. Now I'd be start working from
the main parts of my work. For example, the
iris and the pupil. Your hand pressure,
my dear friends, should not be too much that
it would actually place some deep traces
on your cardboard. We don't want to create any deep textures
on our cardboard. Be careful not to do
that as I'm working. I figured out that I haven't introduced two of our
useful tools to you, but after I finished
this step of my work, I'll let you know
tools they were. I also give you an explanation
about the realist style. Do not be mistaken about
realist style and hyper style. Hyperrealityle,
realist style is very close to reality and very
close to your picture. But if you want to work
on hyperrealisttyle, it's a way that you
cannot actually recognize which one is a drawing and
which one is the picture. That would be called
a hyperrealisttyle. Right now, we just want to
do it in the realist style. It would be very
close to the picture, but you can still tell
that it's a drawing. As you can see, I worked on
all the different parts, the eye lid, the eyelashes. Before I remove it, I just check my primary
sketch to see if all of my sketch has
been transferred or not. After I've checked, I could
see that I forgot this part. Therefore, I'll go
over and it again. Just as easy as that
we've transferred our primary sketch
to our cardboard. Then I'll place my model next
to my work because I should always and constantly
keep an eye on my model while I want to
work on my own sketch. It's very important. Okay. Now the tools that I have
forgotten to tell you about, or one of them is
my brush eraser, which looks like a pencil and one end and a brush
at the other end. The other one is my
electronic eraser, which has an engine inside that is powered
by two batteries. It will work like this, You see by pushing this button, the tip of the eraser would
move and erase the things. Okay, let's start together
and while I'm working, I'm going to tell you
the usage of each one of my tools and how you can use each one of
them on your work. All right? I'm going to use my hard con Tas to create the details
very clearly in my work. Say I will show it right to you. Just let me sharpen
the tip of my conte because it's really important
as well. All right? I'm going to use my Conte to add the details and a very
strong darkness in my work. Wherever I have clear details or very strong and deep
darkness in my work, I'll be using my heart
cont for example. You see over this area
from the top of my work, you can see a very
strong darkness. I'm going to use this
pencil over there. The most of my
darkness is actually for the iris and
the pupil itself. As you can see in the middle. I went a bit darker
comparing to the sights. There goes my dark pupil. I apply the darkness here, pitch dark for the parts which I don't need them
to be faded too much. I'll be using my hard cont. But wherever we need
our darkness to be faded or it's
lighter a little, I'll be using my soft on
the edges and on the sides. As you can see, I'm applying my color very lightly and
like a shade over here. See, I'm placing my darkness as shades and
lighter. Of course. Then I drag this darkness toward the center
of Y iris pupil. I'll guide them from the
surroundings toward the center. I'm using my conte for this, you can clearly see that. All right. Now just like that, I bring it toward the center. And then also from the center, I'll move toward
the surroundings. All right? I'll pick
one of my brushes. I'll pick up one of my brushes. This one, then with a
circular movement of my hand, I'll try to spread and fade the shades that I
have created over here. My dear friends,
the point is that the brush that you use should be definitely 90 degrees
toward the paper. I'm just getting it
a little bit more laid on so you can see
it in the video better. But when you want
to do it at home, please keep your brush totally vertical on your
paper or cardboard. And the way that you
move your hand on the cardboard should be
in circular movements. You see totally circular. But again, I insist, if I'm just changing the direction or the position
of my hand a little, it's only for you to see better. Okay, I'll just fade these parts more and more. Then I also use my
brush to to, sorry, these shades around my
P pool. Here we go. Then I totally faded in the
white area of the eyeball. I don't want my s
to look like it's cut out of the eyeball or
it's very separated from it. Because I don't need
any borders here. I try to fade it totally
into the eyeball, can get one. Okay. Now I move on to my
heart conte again. With that again,
I'll start creating some patterns inside
of my pupils. Basically they are the
textures that we've got here, the textures of the
pupil and the iris. I'll be creating them. My heart. Then again, from the surroundings, I start adding a
little darkness again. See, I'm just placing darkness in some
places, not everywhere. If you do it everywhere, not very attractive anymore. Just as easy as that, we are done with it.
4. Draw The Iris and Start Shading The Cornea: Okay, again, I move to my brush, I switch to my brush, and then again from the surroundings of my
work, I start fading. See again? I'm moving my hand in a circulary movement and
I'll fade this area, they place them in
their own placement and then I move toward the
center of my iris or pupil. Just like that. Then I'll place the darkness around my iris. I'll do it cautiously. I don't want to do too
much or too little. Now, I want to use
my brush eraser. With that, I'm going to create each one of my
light patterns in my Iris. See, we've got some
light textures and patterns in my iris. Therefore, I'm going to
create them with this. Now why am I not doing
it by Edoderaser? Because the odoraser creates a much more stronger
whiteness and light. Comparing to this brush eraser, this brush eraser creates
a very light white color. It means that it's
a very strong, the whiteness of my color
with this is not very strong. It's very useful for creating light details
and small whiteness. That's why I'm
using my eraser and not as I don't want
very sharp lights here. I'm going mellow with my brush one as much as I can see these patterns, I'd be working on
them, just like that, of course, as I told you, at the other end of my
eraser, I have a brush, this is a brush eraser with that I'm
actually cleaning off the extra things and stuff which will be
created after erasing. I'll clean the tip of my
eraser after a while, it wouldn't leave
any dark traces. Then again, I start erasing. All right. After that, again I switch to my hard conte. This time with that, I'll go
in between the light parts, the light areas and patterns. I add some patterns among side, all of these lightness, among all these lights. I start adding some more
dark patterns Right there. Here we go. All right, here it is. Right up to here, our
iris and pupil are made. Now I want to move
onto other parts. For now, it's enough
work on the iris. And I'll get my brush
right from these edges. I start bringing color
toward my eyeball. But still, as you can see, I'm doing it in
circular movements. I'm using a very
low hand pressure. My dear friends, the most
important thing is for you to be able to control
your hand pressure. It shouldn't be too much on one part and too
little on another. It should be controlled by, you should be able to do that. That's one of the techniques
you have to know. I'll just continue over here as it goes. Obviously, the darker
area is on the bottom, above the lower eyelid. And as I move toward the
center of the eyeball, they will be faded very
easily into one another. Just as you can see stay. There might be a question
for you that where does this color come
from on this brush? Well, as you can say, I've worked on the lines which I've got on
the edge of my I, but at the same time, you can actually darken
a part of a paper, drag your conte on the paper, an extra paper, and then you put your brush in it and then
you bring it into your work. Then I'm going to use a tissue
and then I'll apply it. And I drag it on
all over this part. It would be completely
cohesive as it is. Now I move on to the
next parts of my work. I start using my heart conte, I'll create this darkness
on the edge of the, on the corner of the eye. Say I work on the edges of the top and bottom until they meet each other in this inner corner of the eye. And then also from here, I'll do the same thing for
the outer corner of the eye. I'll bring the darkness into my work wherever it's
needed, obviously. Okay. Then with the same darkness, I come down and switch to my soft
county over here. Because I want to fade
this area very much, I want to fade this area a lot. Then again, I use my flat brush, then I start from the
outer corner of the eye, I'll come all the way down. And then over here with
circular movements, I start fading hard. As I told you, this
area is for fading, that's why I used my
soft content on it. It's going to be
faded more then. I'll do the same thing
on this part as well. I'll move on the line
that I've already placed. I emphasize on it, then I'll continue my work here it goes just like that. It goes way over here. Then again, obviously wherever
I need more darkness, I'll use my cot to place them with a very
low hand pressure. It should be done with soft. Then again, I switch to my
brush in order to this area totally and completely okay. All right. So far so good on
this then for here, I also do the same thing
for this middle area, in between these two lines here, All right? See, as I told you, you can drag your cote on another paper or
even on your tape. And then if you put
your brush in it, we can get some dark colors of it and bring it
into your work. Making darker shades should dip it in the powder. All right. I'll try to go over all the parts for the
rest of this tutorial. Let's follow in
the next episode.
5. Drawing More Details Of The Cornea and Iris: Hello and welcome to the rest
of the tutorial with me. Okay, now I'll start with my small brush in order
to fade these parts. Also placing absolute darkness
wherever I want them. Okay, now moving circulary with controlling
the hand pressure, I apply this darkness
and I'll fade it. Also over here I add some
more details to my work. For example, several lines
that could be drawn here. Okay, here it goes, just this way. All right, let's move on to applying more and stronger
darkness for this area. I'm doing it with my brushes still with going over this
part over and over again. I'll make it darker again. Just be careful. You should keep your movement of
the brush circular. It's very important. It's one of the factors that
makes your work look real. Then for this upper area, I also consider some darkness, say just in this way. Then again, I move on to my brush eraser and I'll
start applying some, some light details into my work. They are not too, you don't
have any sharp lights here, but I create each one of the lighter spots
that I see in my work. With my brush eraser, it's a very pleasant
thing to do, you know, just this way. As you can see, I am creating all the light textures and
patterns that I want here. Then I'm going to use
my electronic eraser in order to create very
sharp lights With this, as you can see, I can create very strong and sharp
lights wherever I want them like that. These parts are really
bright and light. I ply it with my electronic
eraser and I'm doing it while I'm looking on my
model so I can place the lights exactly
where I see them. I'm not just creating
them randomly. Not at all. It's okay if your lights are misplaced
a little or moved a bit, for example, right or left, but the base of it should look like your
picture, your motto. Even create some in
this inner corner of the eye over onto the eyeball a bit and moving on. Okay, then again, I move on
to my conte, my dark conte. Again, With that,
I start applying some more darkness in my work. Or you can either use your dark colored pencil that I told you
in the beginning. It can make your work
much more easier if you work with your normal pencil. As you can see, I am
bringing some darkness underneath all of
the lights I've created or even in between them. Because when you do that, your lights would actually pop out and they can show themselves much more better If they
are surrounded by darkness, they would shine more over here. I also have some darker spots. I'll place them there and for here as well, wherever that it's necessary. Again, I insist that you
shouldn't lose sight of your motto all
throughout your work. Let me just apply all these darker spots and
even dark patterns like this. These are some veins inside of the eyeball which I'm
easily going to create. But my pencil just try to create all these
patterns the way you see them in the right position. Be very careful about their direction as you move
your lines toward the iris. They should get
lighter and lighter. These are the two key points
for creating these veins in the eyeballs or patterns,
whatever they are. Okay, I'll do the same
thing on this other side as well. Here I go. And then I also create some
very light veins over here. All right, then let's do it. Some of the lines should
be very faded and light, some others are more prominent as you can see
because they are darker. And you can say they
are a bit bold. Just as you can see, we are working on
all these lines and veins, making them darker. All right? I also add a bit of darkness
on this part of the iris. All right, here we are. Then again, I switch to my brush and I go over all of these
lines that I've created here. They would also be blended
into the whole work. It wouldn't just
look like fake lines on the top of my work,
I want to blend in. Then with my black
colored pencil, I start creating some spots, darker spots in these
parts, in these places. Just like that as it goes. All right, then I'd be
moving to the next part. I'd be starting on this
part of the lower eyelid. But before that,
let me just work on this light in my iris pupil
because it's very strong. It's better to do it right now, doing it with my tronic eraser. Whenever you felt
like the tip of your eraser has got
messy and dark, don't forget to clean it. Okay. Then again, I'll switch to my black pencil in order
to add some darkness here. And also I want to
create a reflection of the eyelashes on this
light area of the pupil. All right.
6. Start Shading The Upper Part Of The Eye: Actually I want to
work on the upper area first because if I do
the lower area first, my hand will be just dragged on it and
it would be harder. I'm going to start from the top, the upper eyelid and
the upper part of the eye parts above
the eye right now. First with my heart conte, I'll start applying
this darkness, which I've got here. This is a line for the
upper eyelid above it. We've got some very
strong darkness. But you should do it
as shades because these parts are perfectly
faded and blended. So you should also apply this color and the darkness
to this area. Very faded. As faded as possible,
but still dark. Just as you move on higher, you can make it lighter. I'll do the same
thing for over here. I'm trying to shade in different colors to create
a contrast as well, in order to get the volume out
of it that I want at last. Then very slowly
again as I move on, I'll make it lighter. Just about changing
your hand pressure, changing the color,
creating the contrast. And don't lose the trace
of your model and work. I'll do the same thing on
the other side as well. The outer and the
inner corners of the eye should look
pretty similar. And then after that, I'll move all the
way down up to here, basically down to here. But you know what I mean? After that, I'll switch
to my big brush. One of the key points that
I should tell you here is that wherever your work
has a bigger space, you should work
with a big brush, for example, for this area, you shouldn't use a
small brush because it may actually cause stains
and spots for you. Wherever you've
got a bigger part of drawing a bigger space, you should use your
big brush for fading it and shading it. But wherever it's a smaller like the parts
that we've done, we had done inside of the eye, we should use a smaller brush. It's all about
whether you're doing the details or the bigger parts. These brushes that I'm
using are actually make up brushes because first of all, you can work with them much
more faster and they give you much more softer
shades comparing to the brushes which are
actually used for drawing. These are makeup brushes and they give you perfect
has, trust me. As you can see, I'm fading my work and you can see
it's all coming together. I'm just doing this with repetition from one
corner toward the other. As you can see, all of
my colors are blending. They are getting more cohesive and in a much prettier color. All right, Then again, I use my soft conte on
this area a bit more, shading it all over again. Then again with my brush, I start from one side. And with our petition, I'll move on the work and make the whole area look like
as one cohesive parts. See what nice and
soft shades it is created for us exactly
when I want it, exactly what we want. See, I just gave my work a
very total cohesive shade. Then from the edges of my work, the corners and the edges, I'll try to work
a bit harder with first with me and then of my
brush to fade them all in. Blend them all. Don't forget to keep your
hands movements circular. Okay. I should also use the
same technique for this area, for my upper eyelid, just in the same way. The same technique, placing my brush on the
eyelid very quickly. Just move my hand
across it and through it and I am bringing the
darkness into my work. As well as keeping
some parts lighter of. Again, I'll use my
Conte in order to add some more darkness in these
parts wherever I see fit. It's not necessary
that you do it for everywhere and
then I drag it up. All right. All right, right from this corner and also on the upper
corner of my work. The same thing, again, obviously I switch to my brush, going over all these parts
and making them blend. See, I am moving on
the darker parts. I'll execute it perfectly. Say sharing can do it
perfectly as well. I'm just saying you
shouldn't even lose hope, even if you cannot do it as easy as that in your
first or second try. But don't give up Try
over and over again until you get it okay. I'll continue this work until I get my darkness with the softness and
smoothness that I desire. So I'll just continue
until I get what I want. As I said, don't give up
can definitely do it. Okay. Then we move on to the last round to the
last step of here. Again, I'm adding to
darkness here and that would be the last darkness
that we apply over here. Hopefully, of course, after
placing the darkness, I switched to my brush
in order to spread it and blend it, just like that. And here it is. Here we go. Okay. Also for here, I'll
do the same thing. The darkness of here is not
as much as the part above it. It's a bit lighter than
the part above it. It's got darkness, but
it's not as much as that. I just consider a very
light shade for here. But with a bit of space, this area should be darker, definitely, because that would
be the gum of our eyelid. Now, I switch to my soft. I work on this
area with my soft, darken this area with my soft okay. Then I switch to my smaller
branch, just like that. Again and again. I'll start shading, I'll continue shading this way. Again, circular movements and controlling the hand pressure. The more that you spend your
time on fading and blending, the results of your work would be much more better
and attractive. Don't forget that fact. Okay, so I'll continue it to the inner
corner of the eye. I'm almost done here with
the first part of the eye, I mean with the upper
part of the eye. Okay. Okay, now for the next system, we are going to start
creating the textures around the eye with B.
7. Detail Above The Eye and Draw The Eyelashes: Hango again and welcome to the rest of this
tutorial with me. All right, as we were going on, I'm going to fade all of
these parts completely. And then after that, I start working on the textures
which I've got on the skin. First, we should
do the fainting, and then we should add
the texture on the skin. This part should be darker, therefore I place all of the darkness that
I need for here. Here it goes very well. Moving this way. Then we switch to
our hard conte and we emphasize and renew the
darkness in these places. My dear friends, just be careful whenever the darkness
of your work will be decrease through the rest of the work
that you're doing. On the other parts, you should remember to add them, otherwise your work would look misplaced and not complete. We also have a strong darkness
over here because it's a very deep area just
above the upper eyelid. I got also some a wrinkle here, and also on this
side the same way. Okay, now we want to switch to our dog eraser in order
to apply the textures. As you can see, I'm stretching my dog eraser several times. You should do the same. It would be softer. When it's soft, you can easily shape it in order
to create your textures. As you can see, I'm shaping my eraser eraser, performing it. And it looks like
a pine or a cone. Then with the tip of that, with the sharp tip of it, I start creating some
circular spots and dots. I'm just tapping
on my cardboard. As you can see, I'm not
dragging my eraser anywhere, I'm just tapping it
on the darker parts. I can create some lighter
textures with it. Then over here I can drag it a little in order to create
the wrinkles on the skin. In some parts, I'm just
doing some tapping. In some other parts
I'm dragging it. It depends on the kind of the texture you are
going to create. Also work on these
parts the same way. All right, now I come
over here in order to also work some textures on this lighter part
of the upper eyelid. I try to add as much
of these lights as I can as I'm allowed to
based on my model. When I do this, I'm basically transforming my work
into skin texture. I just want to give
it that feeling. Then after that I'll switch to my black colored pencil
and I darken this area. Then after that, I'll use my brush eraser in order
to create more text, more light textures which
are not that sharp. I also use it to add more details to the
textures of the skin. See how it's going. In these parts help
create sharper lights over here because it
is a lighter area in general, you see? All right. Now, with the help of
my fader, first of all, I'll dip the tip of my
fader into the darkness, the pattern I've
got on that tape, then I'll use in order to darken the lower parts and
beneath my lighter spots. Therefore, I can create
some volume out of them. You don't have to do
it too much because you're not doing a hyper
realistic drawing. You're just doing a real draw. You don't have to
do it too much. But it's good if you can
do it in some places, I also drag my tissue
in that place. Then I move on to create
my upper eyelashes. I'm going to do it with
a black colored pencil. Just remember that the tip of your pencil should
be totally sharp. Then I'm going to create
the eyelashes over here, exactly the way I
see them one by one. Be careful about your lines
to be sharp at both ends. And be careful
about them to be in the correct position and more importantly,
correct direction. Because the direction of them can actually show the
volume of your work better. The fact that it's an eye, it's not a flat
thing, and so on. Okay, And then also from here, pay attention to the
movement of my hand. My emphasize is basically at the beginning
of the eyelashes, and then I'll just throw them off the
cardboard at the end. Just let them go at
the end of the line. All right, here it goes. Just in this way, just as easily as that we have created the eyelashes
of our work. Say how easy it was.
You just have to pay attention to the key points
that I've already told you. Now I want to work with my
electronic As and create several sharp and strong lights here in the places
that I see them. Some of the eye lashes have
extreme lights over here. Mostly, it's basically between the eye lashes, but that's it. All right? Okay. So this part is
finished and now we can move on to work on the
lower part of the eye, just adding some more
darkness here. Touch.
8. Start Shading The Lower Part Of The Eyes and Drawing The Skin Texture: And then for the
lower part, again, we are going to do the
exact same thing basically. First of all, we are going to apply a very general
dark shades, and then we're going to add
the textures on it again. First, take your flat brush and create these wrinkled
lines over here, which can be seen pretty
obviously with your flat brush, Your powder, your dark powder. Create these lines and
these wrinkles over here, which can be seen vividly. Also, this line for
the lower eyelid. Now you should switch to your
bike brush and then again, as I told you, dip it into the dark powder
that you've got. The place it into your work so you can transfer the
darkness into your work. Or you can actually first shade it with your
conte and then do this. Or you can do this
in the first place. It doesn't really matter
with this method. It might get a bit
longer because my shades are going
to be lighter because of the spread
of the powder. But when I do it
over and over again, it would get to
the color I want. It would be very
smooth and soft. We've got a very soft
and faded shade here. After all, I'm just using a powder and my big brush
to cover this whole area. I'll continue the same way. As you can see, I'm placing the darkest part of my
powder on the corner. So at the same time, I wouldn't have any unwanted
darkness in my work. All right. Okay, here we go. Shading this area all the way. Just remember that these lines would not actually
appear in your work. If your model has got so
many textures like mine, so many wrinkles and
textures on the skin, it's not too much of a problem. But if you don't have
a model like this, try to prevent the
unwanted lines over here like what
I've got there. I'm just improving and increasing speed of my work and trying to shape more
quickly with a faster pace. But I'm just going to
cover the whole area. Working quickly doesn't mean that you cannot work properly. I'm going to use a
smaller brush for this area because
it's a smaller space, especially on the corner,
it's on the edge. Then I'll fade this into
the rest of the work. All right, And then for here, obviously, I need a
lot more darkness. So I apply it with
my brush again. I bring it into my work as you can see. All right, here it is. Okay. Now I'm adding a very mellow and light
shade for this area, which is the placement
of the eyelashes growth. And then I bring the darkness
toward inside of this area. Here it goes. It's not too hard, you know, you just have
to follow the flow and keep one of your
eyes on the models. As I told you before already, don't rush through it. I'm doing it faster so
I can teach you gore. But when you're
practicing at home, do not rush through anything. Take your tongue and work on your sketch until you're
satisfied with it. But at the same time, try
not to get too picky. That can also be actually
not be in your favor. Okay. Again, I move
to my bigger brush, and then with my big brush, I go over all these
parts one more time and making all of
them more cohesive. I'll continue like that. I'll continue all the way. Okay, now for the background
of my work, it's enough. Up to this point, I think
it would be enough there. Then let's move on to create
some details into the work. Again, I want to switch to my dough eraser with
the dough eraser, after I've shaped it, I start creating
the faded textures. With creating lighter
spots and dots here. Just by tapping my eraser, especially in these parts. This is basically the
texture of the skin, natural texture of
all kinds of skin. I'm doing it very
much as you can see. I'm creating a lot of spots very concentrated, close
to each other. And I'll do the same thing
on this side as well. Okay, Then you just
drag your tissue on these parts once they
would be more cohesive. And then with the brush eraser, I'll start working on
textures like this. I'll continue them
all the way up. Then again, I work on
the other wrinkle. I'll continue all the way up. Now all of these parts
have this skin texture. Therefore, I'll do the same
thing for all of this area because the texture of this area is the
same in all parts. Here we go. And after that I'll move until
the very last corner. Okay, now for
continuing my work, I'll switch to my
heart cont this time. Then from among these textures,
these light textures, I'm going to move with my, as I told you before, you can create darkness between the lights and
amongside the lights so you can show the
lights and the textures better and create a
value with the contrast. Say what I mean, for
example over here, I'll just easily do it. Okay, now for the rest of this tutorial
and the last part, be with me in next episode.
9. Lower Eyelashes And Final Details Of The Eyes: Hello and welcome to the last part of this
tutorial with me. All right, we were
actually working on the dark textures
with our hard Conte. As you can see, my dark textures are created
as well as the light worms. Okay, of course, I've got a very strong darkness over here and I'll create
it for my work. I also have to create several darker spots
in these places. Just as you can see here it goes. Okay, then we want to
work on this area. For the lower eyelid, I'm going to use my dog
eraser, just like that. I create a very strong light
in the middle of my work. And then little by little, I'll create a curved
light line in the center and I'll
try to also fade it into the areas
surrounding it. This is basically
the lower eyelid, the inner part of
the lower eyelid. Then I use my tissue, I move all over this part. I can very much fade
it and blend it. Then I get my brush eraser. I'll work on this
light a bit more stronger and consider
stronger light for here. Just like that. After that, I can even use my electronic eraser in order to create very
sharp and strong lights. You've got sharp
lights over here, that's when we have to use
our electronic eraser. I'll continue these
parts and the lights, I apply them wherever
it's needed. Okay, now I'll move on
to create the eyelashes. Again, I'm going to do it
with my black colored pencil. I'll do it with my black colored pencil after
of course sharpening it. And I start from this
outer corner of the eye in order to create
my lower eyelashes. Again, the same rules apply. Keep the tip of
your pencils sharp. Let go of the lines at the
end of them, throw them off. Keep the lines
sharp at both ends. And keep aware of the
direction of your eyelashes. Then I'm going to use
my electronic eraser and I'm going to create some lights next
to the eyelashes, Again, for giving them contrast and making
them show more. Because if the whole area
would just be pitch dark, there's nothing to
see there, right? So here we go. All right, we're almost there and we're almost
finishing this sketch. I'm just adding some more, very light and sharp light
spots for these parts. Okay, then I'll use my black colored
pencil in order to add the final darkness
into my work. Just like that,
little by little, I finish my work. Okay, here it is. And then in the next step, which is one of the most
enjoyable steps of on my work, is to take off the tapes. When you do that,
you can see that your work looks like
it's printed because it's very clean and neat on the outside and it's very
complete in the inside. Here we go, Really enjoy it. The last one goes off. I hope you've enjoyed
it as much as I did. I hope that you
can do it as well. See you in the next tutorials.
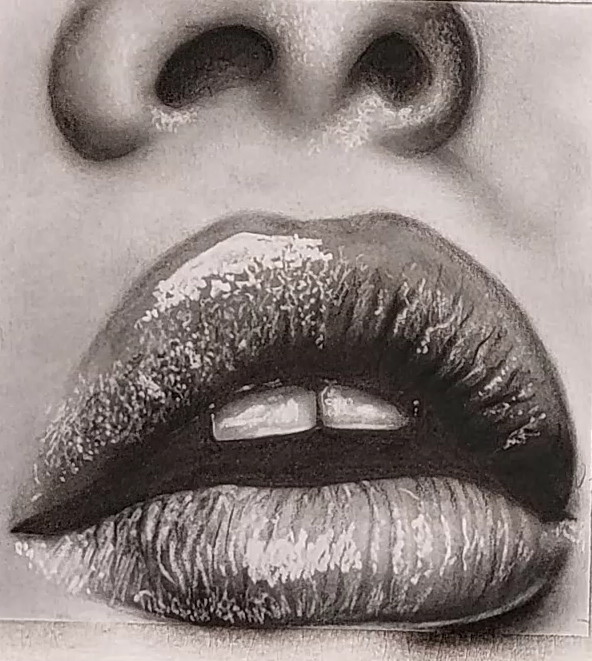
10. Primary Sketch and Start Shading Of The Nose: Hello and welcome to a new
episode of Tutorial With Me. Okay, in this episode, we are going to work on one of the most beautiful
parts of the face, which is also very
important in order to show the face expressions we are going to create
lips together. So first of all, I will darken or
blacken the back of my printed model with
my B six pencil so I can copy and transform primary sketch
for real style drawings. You should definitely
copy and transform your model to your cardboard. This way you should
copy it actually, unless you are a perfect
drawer and sketcher so you can get the primary sketch
exactly as you can say it. All right, now here I'll start working on
the edits of my work. On the primary
sketch of my work, I start first with this little
part of nose that can be seen and from here to nostrils and all
the parts over here. Then I move on to
the lips themselves. Then from the slower area,
I'll come like this. The seventh shape
for the upper lip. For the heart shape of
the upper lip, any rates. So that goes to teeth
just easy as that. After I've created the main and primary
sketch of my work, I'll just stick my model
to this side of my work. Therefore, I can constantly
keep an eye on it. Therefore, I would not lose touch of it and I would
not misplace anything. Now, I'm going to use my soft. First of all, it's
better to start with the nose because
it's on the top. You should prefer to work
from the top to the bottom. I'll just start
darkening the nostrils as I can see them see. Then I'll do the same thing
for this other nostril. I'll apply the
darkness into my work. All right? Then I'll start with my smallest brush from the
inner part of the nostril. I start fading and
covering the whole area. Again, I emphasize that I'm using the smallest
brush that I have. Then little by little, I try to drag this
darkness toward the surroundings very slowly. And little by little, I drag the dark shades from the nostrils
toward outside of it. My hand movement is circular and you should also keep
your hand pressure steady. All right. Now, for
this other nostril, I'll do the same thing. Just the same way. I'll continue until. I get all the parts
that I want dug. I also have to shade
the tip of the nose, which also contains a
bit of the nose bridge. I'll just shade
it the way I see. Then I dip my brush
into my darkest powder. Then I'll bring it into my work from this
part of the nose. And I start shading, so I'm just shading circularly
toward inside of the nose. Okay. This is how
we shade the nose. I'll just work on this
side of the nose as well. We don't want to do
one side and leave the L side just untouched. K. Then again, I faded toward
inside of the nose. All right. Then after that, I'll switch
to a bit bigger brush. I start creating
more general shades. The more general shades you
want to create in your work, you should use a bigger brush. As I've already told you before, just like that, very
softly and smoothly, we have done our nose. I also spread these shades throughout the rest
of my work as well. And then again, I switch
to my soft from here, From the nostril, I try to bring some more darkness
that can be faded easily. Then again, from
inside of the nostril, I apply some more darkness. And also on the outside, on the right side of my work. Then again, I switch to a
smaller brush in order to fade the shades that I've
just created with my. The more we want to
show deeper areas, we should use more darkness. Obviously, when you increase
the darkness in a place, it shows that that
place is deep. And if it's lighter, it means that it's
more prominent. All right. See, this is how it's done. You can easily shake the nose with the tips that
I've just gave you. Then very slowly I'll be facing
the dark side of my work. Then I would not forget about
the sides of the nostrils. And I'll just fade
all of these parts. All right. So just keep shading with
your brush and conte, and switch them constantly in order to get the darkness and
the shade that you desire. Okay. Then I again switch to
a bigger brush and I also shade the surroundings of the nose because we should also have a bit of color there. Although if you
look at your model, it's a very light area, but still it's got some color on it because you
cannot just leave it white. But I've done it very lightly. Then I also get a
brush eraser in order to add the light
details on my nose. I'm actually applying
the light textures on the nose with the use
of this brush eraser. Then I'll apply the lights in my work with my brush eraser
or base as you can see. Okay? And then I can work on this a little in this way. Okay? Now I want to
use by a pencil, I'm emphasizing on
some of the darkness. As you can see for
the last time, I am emphasizing on the
darkness on both sides. Okay. Then I'll switch to
my smaller brush and from this inner bridge
of the nostril, I shade a little bit downward. All right. And that's it. So this was how we would
actually shake the nose.
11. Upper Lip Shading: Now let's move on to
a particular way, the more particular part of our drawing which are the lips, I'm going to use
the same way that I used for the eyes a little. That would be with my heart. I start working on the
dark parts of my work. You see I'm just frame
working the teeth, going all around them. Then I insist that you should do it with
your heart Conte. All right. There we go. I am darkening. The whole area inside of the
mouth needs to be darkened. It's absolute darkness, even
if you catch your motto, okay, now from the darkness, we should drag the
darkness out a little, but very slowly you should drag this darkness outside and
use your brush to do so. As you can see, I'm fading
the border of my work with my brush and spreading the darkness from
inside of the mouse. And then just like that, I bring it upwards
little by little. Okay. Then this lower part of my upper lip is again an absolute darkness which
I'm applying with this. And then later I would
fade it with my brush. First, you should apply
the strong darkness, and then you should fade
it with your brush here. See again, I'll start shading, just like that. Okay, so here it goes. Not so much of different
work over here. Just try to spread the darkness in the slower
part of the upper lip. Okay? Just remember that
whenever you feel like your darkness is less
than it should be, you can always dip
your brush into the powder and bring some of
the darkness into your work. Or even more than just. Okay. Now with this color, I go around my lip
up to some level. With the same brush, I'm just frame
working my upper lip. I'm going on the border
of the upper lip. At the same time I'm fading it. You see, basically I'm determining its volume
and its placement, and fading it and darkening
it at the same time. So here it goes. And then again, I'll
start fading It. See, it's just an
easy way to do stuff. You just have to follow the same routine and
the same process. And then from here, I'll shade it toward
the upside of my work. Then I get a bigger brush and I start applying the cohesive
shades for my lips. Okay, here we go. Shedding all the way through and throughout
the whole upper lip, making it a very nice
cohesive background color. It would be like
this up to here. As you can see, I've tried to keep one part of it
lighter compared to the other part
because I can clearly see a very sharp
light on that area. I also would fade and shade from the borders of the
lips toward insides of it. Say I'm just fading it
And fading the borders. Here we go. Okay. And over here we need
some more facing, which I do with my brush. All right, here we go. Let's continue the rest of our work in the
next episode then.
12. Texture Drawing and Upper Lip Volume: Hello again. Welcome to the next part of this
sutorio with me. Okay, and here in this episode, we are going to create
the textures of the lips. Obviously, I'd be starting
from the upper lip, which I've already gave it, the background shade and color. I start from here, I start applying the textures
of the Lip Mason, my model. Okay, it's over here. I should also give this corner
of the lip enough texture. It is at last considered
a part of the lip. I cannot just leave
it untextured. Then again, with
my medium brush, I start fading this whole area. Here we go. All right, and then after that, again, I start creating some very small wrinkles as
the details of my textures. I'll be just adding
these to my work. Then again, I'll
move over them with my brush to fade them and blend them into
the whole picture. Okay, Now, after the
blending and the fading, we should definitely emphasize and renew some of the darkness. For example, the ones
that we've got over here in these parts. And also here, No kid, here it is. Okay. Then I'll get my eraser, and with sharpening one
side of it, the tip of it, I start bringing the textures and the lights into my work. You see underneath and beside
each one of the lines, each one of the dark lines
that I had already created, I'm going to move over
them and make them light, basically
exactly underneath. And besides each one
of the textures, the dark textures that
I've created for the lip, I should move with my
eraser to create a light. Therefore, I can give it a nice volume with the contrast
that I'm applying here. It's the same thing over here. Okay, then again, I switch
to my brush eraser, and I'll create some
more stronger lights. Not too sharp and
not too strong, but they are stronger
comparing to the ones that we create
with the eraser. Okay, here we go. Then as I move toward this side, the texture of my lip would be as the shape of spots
and not lines anymore. I'll just create it
the way that I see it. I am trying to do
it not more and not less than my printed model. So just like that, very slowly, I'll continue up to
this higher parts. That's how it's
getting done. Okay. Just like that. And even in
these parts I'll do the same. Okay. Now, after that, I'm going to use my
electronic eraser at last, which is used to place the very sharp and strong lights that we've got in our work. I'm just using my electronic
eraser over all these parts, and specifically on
the very sharp light, I've got this edge of the lip. In all these parts, I'll try to create the
light that I want. The sharp lights that
I want, again, I say, keep in your mind that these contrasts are
actually what makes your work be seen
and look better. They make the volume
for you, okay? As I told you, I create
this very sharp light here in order to show the
glass which is on the lip. The lip glass would be shown. So pretty here. These kinds of shines
are usually for the liquids or something like a lip glass that is
actually shining. Okay, here it is. Up to this part of our
work, it's enough. Then again, I switch
to my brush eraser. Again, I apply some
more light shades next to my dark ones. Then again, I switch
to my black pencil. This time I come to this area. I've already placed
some white spots here in order to show
the glitter on her lips. I use my black
pencil to go around them or beneath them to
make them show better. I also consider a
darkness over here, so I can also make my lips more prominent by darkening its surroundings
just a bit more. Here it goes.
13. Drawing The Texture And Volume Of The Lower Lip: Okay, then I move on to
the lower part of the lip. And then I start
with this brush in order to create the darkness. Basically, I'm
applying the darkness for the bottom part of a lower lip, for here. And as you can see, I'm fading it all over. You see the process of the shading and the fading of this area is practically the same as with it
for the upper lit. The only thing that
is different is basically the textures and the amount of darkness
that we use in each part the way that
you should do it. For example, moving your
hand in circles or keeping your brush vertical totally
would actually be the same. As you can see, I am guiding the darkness from the
bottom of my work to the top K. Here it goes. Then again, I switch
to my big brush. Then with that, very easily
I'll try to spread all of my darkness throughout
the lip and I can move my work
faster and easier. You see here it goes. So I'll be shading this
area a bit more too, and giving it all
a general color. Okay, now I'm going to
switch to my smaller brush. And when I got a hold of that, I tried to start creating the
textures on my lower lip, as you can see coming
from the bottom toward the top of lower lip, sorry. Okay, here we go. Just try to create the
textures as much as you can and as much as you
see in your model. All right, then I'll apply
the textures with my brush. This way I'm applying the textures and at the
same time I'm fading them. This would actually
save me some time. Then here, from below the lip, below the lower lip, I've got even more darkness. This is the area between
the lower lip and the chin, which has got a dimple in it. I'm trying to just bring
this darkness from below the lip toward inside of
it. And here it goes. Then again I switch
to my eraser, and with its sharp end, I'll start creating the
light textures of my lip. See Harry Go. All right, then I'll use my
conte or my black pencil to apply these nice
dark textures here. Okay, we're all on the textures and we're almost done with them. It might just take
a bit of your time, but it's not anything too hard. You just have to place
the dark and the light in the correct position next
to each other to create the volume and create
the textures properly. Then again, I'll start fading from below this area, I bring another darkness as a darkness beneath
the lower lip. This is basically the shadow of the lower lip on
this area below it. See? Okay. And again, I'll switch
to my brush eraser. And with that, of course, I'm going to start creating
some several light textures. Don't forget about
the textures which you've got on the
corners of the lips. Those are as important as the ones that you've
got in the middle. I don't think like that. Okay, Because they're
in the corner. We don't have to work
on them too much. Because if you just
work on some part too much and just
leave the other parts, the whole shape and
the whole look of your work would not be
the thing that you want, The outcome would
not be acceptable. Try to remember that
while you are working on your lips or
anywhere else. Okay. And even in the side area, I have a bit of
this texture here, just as you can see. All right. Then again, I switch to my
electronic eraser, and with that I start applying
the shines on the lips. I also try to apply
some more shines over here and also over here. Not too special, I'm just working on the
sharper lines in my work. Also, these parts, I try to
create some lighter spots by tapping my rays on it to show
more glitters and gloss. Okay, now let's work on the
teeth a little bit too. As the last part of our work, you see the teeth are
darker on the top. I start there and I try to bring the darkness
a little bit down. Just like that,
I'll start shading. Then with my brush eraser, I move over it so I
can fade, lighten it. I'm creating light on it, but it's going to be faded
because I'm doing it over the darkness with
my brush eraser. Okay. And then after that, I'll use my electronic
eraser to create the sharp and strong light
which I've got in the teeth. They should be basically white. Right? So what I'm
trying to show here. Okay. So here it is. This is the shape of our lips
with our county. I hope you've
enjoyed it so much, and I'll see you
in the next part. Just forget to take
off the tapes as well. See you, my friends.
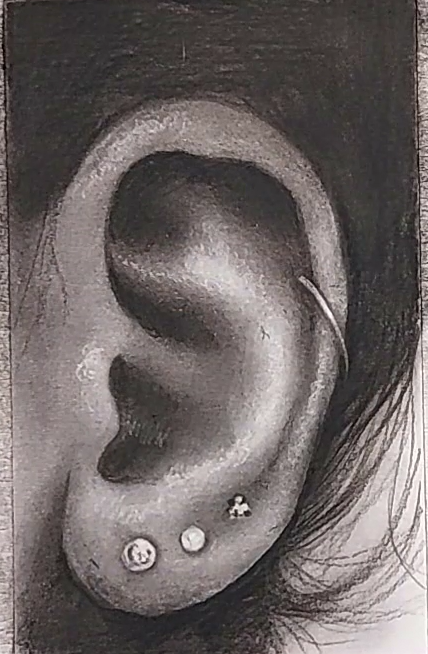
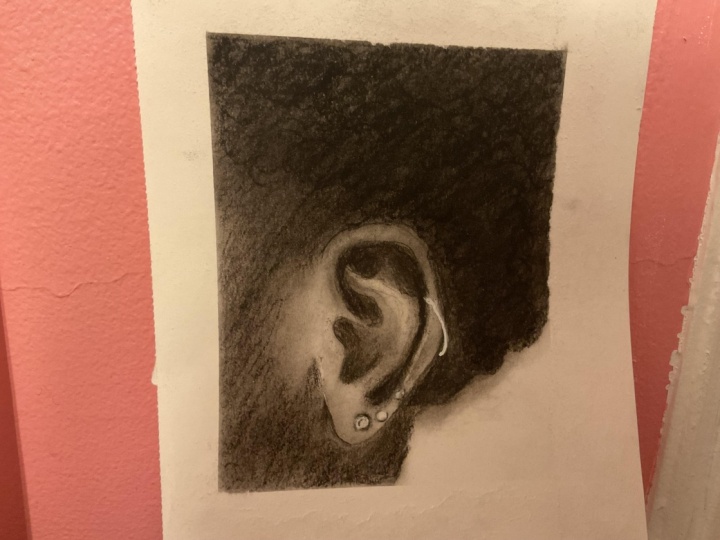
14. Primary Sketch Of Ear : Hello everyone and welcome to a new episode of Face Part
Sketching tutorial with me. Okay, in this episode we are
going to work on the ear, which is a part of the face or basically
a part of the hit. So this time I don't want to tell you how to copy
your primary sketch. I want to show you how you can manually create your
own primary sketch. So first I consider
two lines for the top and the bottom
part of the ear. I also consider the amount
of distance I've got between the side and the edge of the ear to the
edge of the paper. Okay, Then based on that, based on the measurements
that I've got, first I'm going to create a very general shape for my ear. I come all the way
down from the side, I go up from the top, I create a curve. Looks like a snail shell
or something, okay? And I come to the side as well. All right, then with
a bit of distance, with a bit of space
from here I go like this in another curve again, okay? And here goes this area. All right, From here, just like the head of a baby, you see it looks like an embryo. First I create the
embryo shape of the ear. And then I can also see
a shape like a leaf. I'll create that as well. Okay, here we are. Here it goes just
as easily as that. We could actually only create a general shape of the ear with just getting the
measurements from the top, bottom, and the side. We've created a
very general shape, it based on the measurements. Here it has another earing. Here it goes, We have
got another earring. Another one over here.
15. Start Shading The Ear: Okay, now let's move on and
start shading it together. First of all, I start
with my heart conte in order to create the darkness
for the parts that I need. You see from the
sides of my work, I start drawing this line, I come towards this side. Generally I want to create
all the dark areas. I want to determine all
the dark areas of the ear. For example, here we have a
darkness, so I'll apply it. We've got some dark lines. I've applied them as well. Also as it comes in this curve, we have a strong
darkness over here, almost a strong one over here. I've got the lobe, and as it comes down I'll continue as it goes. Okay. And of course I'm
going to work on the parts around
the ear as well. On the edges. I mean, now then you should get the brush and you should
start fading from the parts that you've
applied the darkness. Don't forget, you should keep your hand movement circular. Your hand move in circles, just like that. Then wherever I've
applied the lines, I'm going to also move
over them to fade them. And I don't want
any specific lines or borders in my work. With my brush, I take a
bit of the powder and I start applying even more
darkness into my work. I apply the darkness
wherever I feel I should. For example, over here. Okay? As you can see, I'm
shading and fading simultaneously in the
parts that I, I see to it. In some parts are
obviously darker, so I get more powder
for those darker areas. Okay. After that, I also create a
darkness for this lower area. It should be really faded, but it can be created now in this area of the ear that I can see
a very obvious depth. I rise the darkness of this area to get it
to the color I want. I'll continue the darkness
up to these parts again. I'll continue and I'll move on. Then I also got some
depth in the ear lobe. So from the surroundings of the parts that I've
applied to darkness, I work like this, See, and I'll continue
all the way up. As I told you before, I'm just trying not to have
any specific lines or, you know, borders in my work. I'll do the exact same
thing from the top. It's anything
different. You know, I'll continue until I get down and I'll
do the same way, a step by step. I should continue this work. Basically, I am continuing my work as long as I can
fade all of these lines, specific lines and borders from around my ear and
even inside of it, this fading and shading can
take up to several layers. And several times that
you would do them again, I'll continue all the way down to fade this line properly. Do not forget about
the ear itself. The darker parts should
become more obviously. They are very dark
and deep areas, that's why they are dark. Again, I switch to my cote
and I bring darkness, more darkness into these parts. Deeper areas always
should be darker. Okay. Then again, with a
brush, I start fading. Of course, after each
darkness that I create, I should easily fade
it with a brush, just as you can see that. So basically I will fade the darkness of this whole
place with the same technique. Okay, Then with another brush
which is a bit smaller, I want to move over and fade
the liner parts of my work. See some areas are
darker as spots, but some parts are
like the edges, and I should work on them
with a smaller brush.
16. Drawing Hair And Ear Details: Then with another brush
which is a bit smaller, I want to move over
and fade the liner. Parts of my work see some
areas are darker as spots, but some parts are
liner at the edges. And I should work on them
with a smaller brush. So in the next step, exactly like our model, I start bringing out
some hair out from these parts to say I want to create some hair in these parts exactly like
I can see in my model. I'm bringing the hair
into my background. And then I will create absolute
darkness for these parts. Because I can say absolute
darkness in the work, in the model actually. Okay, so just like that, I'll continue until this area to the front end
also on the bottom. This area should be also dark. It's below the ear. When we actually
darken the background, it shows the ear much better. So of course, I would
be using my brush, even on the dark
background and on the dark parts in order to make the dark color more cohesive
and all look like one. Okay, With the conte powder
that I've got here, I can apply even more
darkness into it. Or I can precede the
darkness a little bit lighter toward the front
of the ear and down. All right. Say what I mean here. I should also give this
area a bit of color. It shouldn't be as dark
as the background, but it should get a color very similar to the
color of the ear itself. For I can also give a color to this part
of my background as well. Again, I will be separating the hair area from
the white background, but at the same time, I'm not creating any
specific border for that, which is very important. Now I'm going to use
my brush eraser. I'm going to create
the lights wherever I can on the edges of the ear, say specifically in the parts that I want to show
are more prominent. The top of the ear, on the edge, the bottom of the ear
lobe and also from here. Okay. Then again, I'm going
to use by brush in order to fade these areas. Okay. Then I get my paper
tissue and of course, I'm going to drag my tissue
all over these parts so I can blend the
colors together and get a very softer
and smoother shade. That's how it's done here. In red goes. Now I want to switch to my
brush eraser again and again. From here, I start
creating this faded light. I start working on it. And also from here, basically we've got a very
shiny and light texture for all the parts which
are more prominent as I already told you before. Okay, a bit here, and also even over here, wherever it's more prominent, it should get lighter
and even a bit shinier. That's what I'm doing here
with my brush eraser. Thank you. Just like that. I've also made the
details for my work. I'm just dragging my
finger over some parts. You can do the same thing
with the paper tissue. That's the same.
Don't get too picky. This area should have
more faded shape, but as you can see
in your motto, we've got some hair
coming out of this area. I'll try to create them as well. I want all the
details to be there. Okay. That's how
I'm going to do it. And then I would definitely
fade them with my brush. I would definitely do
that then from here, from below the ear, just like that, I start working and I also need
some more lines over here. So I just create them. It's very easy to do, you know, you just have to know the
placement and the positions. That's it. I also increase the darkness
over here for this part, also in this ears hole, the deepest part of the ear
should be obviously darker. Okay. Now, let's move on to
create the earrings here. One of the earrings
would be here. I'm going to create them
with my electronic as, as you can clearly see. Because they are, they've
got a really sharp light. I've got three of them placed here as the
shape of circles, of course look like pearls
or something like that. Now, after I've created
these sharp lights, I cannot just leave
them like this. I'm going to use my heart conte. I'm going to give my earrings, my white spots, some high light. And I'm going to
shade around them. They would have a volume. And then I use my
fader over it on its surroundings so it
can be totally faded. See, then for the next one I'll be doing the same of lay. The process is going to go
the same for the third one. Nothing more. Nothing less. Then again, I switch to
my electronic eraser and add some more shining
light on these three parts. I also have a ring ear ring of lay over here on the edge of her ear that I'm going to start shading on top and below this
hearing as well. Because I want to give it
a volume and a contrast. Of course, after creating
those shades and lines, I'm going to fade
it with my fader. Here it goes. Okay. Now we should only fade this
part of the ear as well. And we can say, we are almost done with it. You can just edit your work for the last time before
you finish it, and that's what we
call the touch. And doing the last touch ups can be very important as well. Just as easy as that, you could actually create a
beautiful ear with earrings. I hope you've enjoyed it
and it was useful for you.
 Amelie Braun, Artist & Cartoonist