Transcripts
1. Introduction: Have you always
been interested in Sketching facial
features so accurately? Are you looking for a simple way to create
effective shading, lighting in your sketches with the minimum
amount of tools. I am proud to
introduce the class of facial features as
Sketching with pencil. In this class, you will
learn Drawing techniques, shading, and
lighting techniques. Facial features such
as ears, lips, nose, eyes, and eyebrows. Beginner or professional. This class is suitable for
all Art Sketching museums. Using minimum number of tools, you can master the Sketching
of facial features, sign up now and start creating your own
unique work of Art
2. Tools : Hello everyone and welcome to a new chapter of drawing and
sketching tutorial with me. In this chapter, we're
going to learn how we can draw the facial
features like eyes, nose, lips, and ears. Okay. First of all, I should tell you what equipment do need
for this chapter. You need a normal
pencil and HB pencil, B6 pencil, and b2 pencil. And you also need
an editor Eraser that we've always needed it in all our chapters
and tutorials. The Normal Eraser. And something that
has been added to this chapter is
actually a Fader. It can be in any
size that you have. But if you have it in the
small size like this, it would be better
because you can add more details to
your work with it. And Atlas, I need a brush
which has around two. You see the tip of it is
completely route around. I'm also using this
brush as a Fader. This is very useful for us. And you can actually acquire this kind of brushes in cosmetic stores or even
stationary source. This one I got from
a cosmetic is store, but it works well for me. And in hyperreal technique, they use cosmetic
brushes to do to fading. Because it actually gives
a great softness to our work because it has
soft hair on tip have it. So it actually creates
soft and smooth shading. So these are the equipments and tools that we need
for this chapter
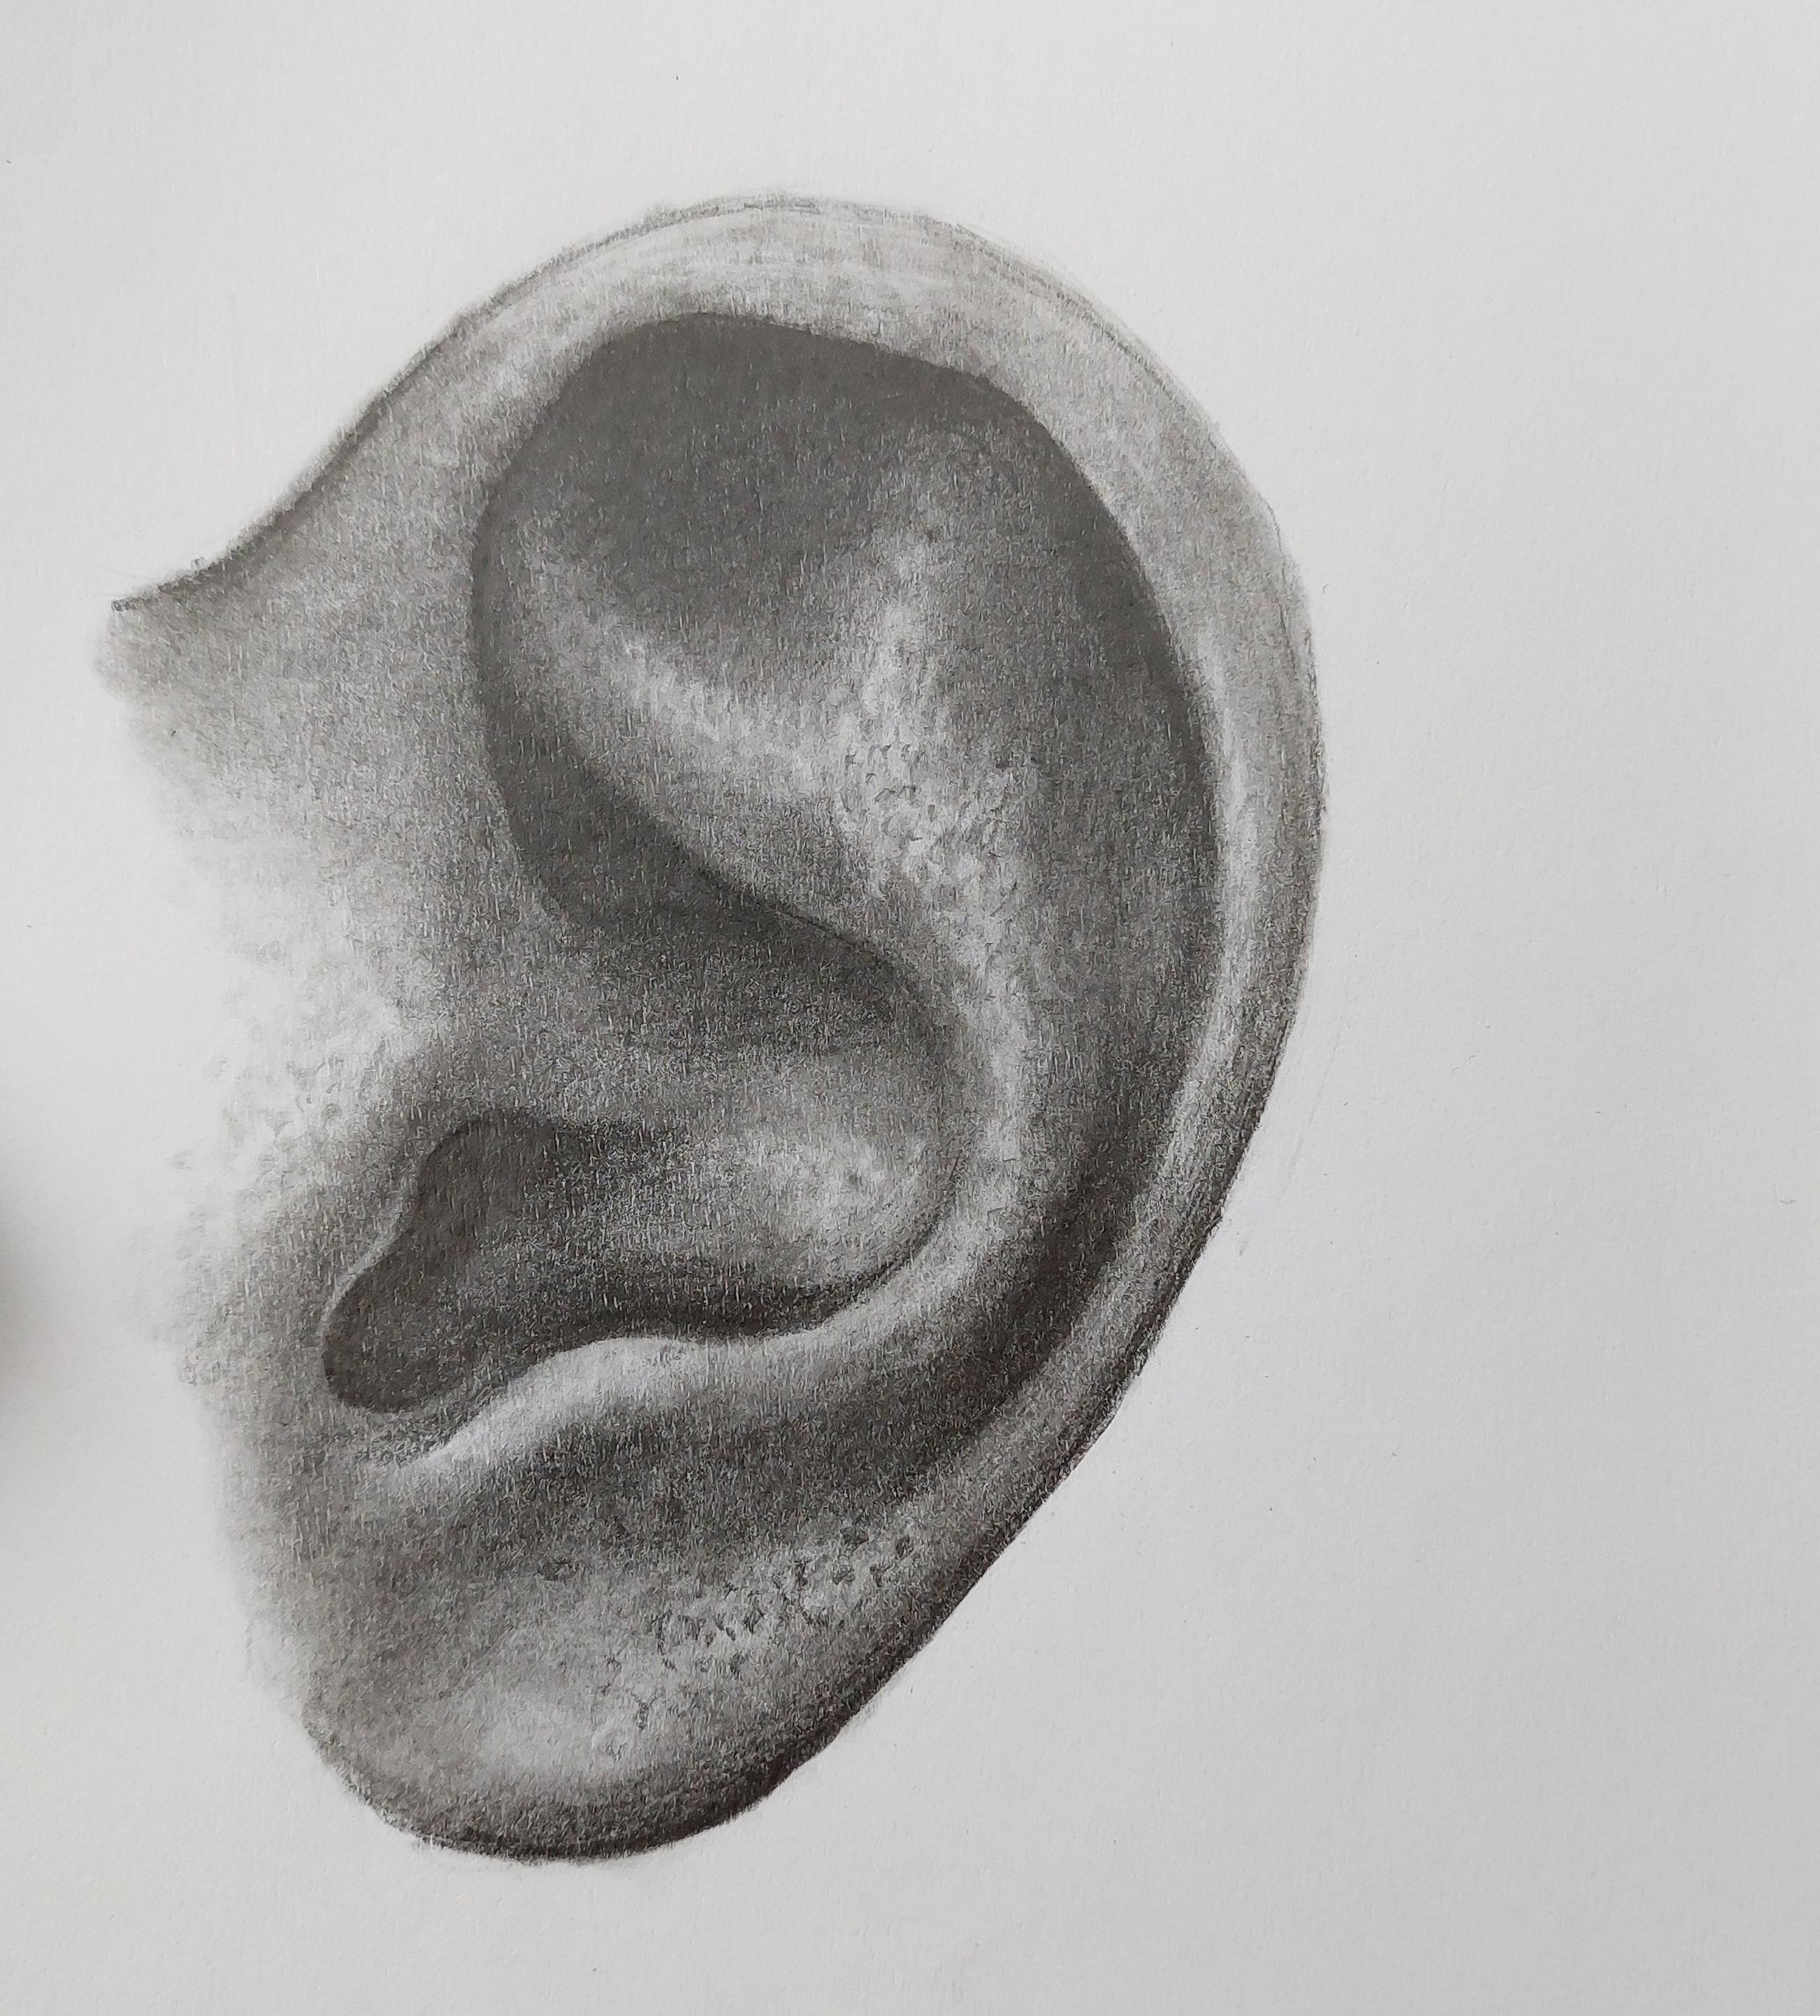
3. Primary ear sketch: Hello again, welcome to the first episode of this tutorial with
me in this episode, we're going to work on the ear. So this would be the
start of our work. First of all, I should apply the primary sketch of this ear. I'm going to do it manually. So you should look at
your sketch very simply. Let me show you with my
green colored pencil first. So I have a curved shaped here, looks like a croissant. And I'll try to create it as similar as I can
see in my picture. So be careful that you
should actually draw your primary sketch with your normal pencil
or your HB pencil. As a matter of fact, it would be applied like this. Just trying to get the primary sketch
without copying my photo. And this would be
the end of the ear. Now, we want to sketch
inside of the ear. I have a shape like
this over here. Then I come down. In this area, I come
back up with a curve. And from here I go in. See, I'm just following the
lines the way I see them. And from here with a shape
of a kind of a triangle, I move up, see, I consider that
area as a triangle. And I create the next
line, bringing it up. Then make a turn and
bring it down again. And I'll continue
all the way down. Coming up in this way. And over here I have
a shape like this. And here I can see
another shape like this, a dark place like this actually. So fav created the primary and the general
shape of the ear. And now I will erase
the extra lines. Be careful that you
should actually create your primary sketch very lightly because when you
want to do this shading, It's very important
that you do not leave any trace of
your specific lines. And you shouldn't
have them actually in the shapes because they
all should be faded. And the next episode, we're going to shade this ear
4. Beginning of ear shading: Hello again and welcome to the beginning of
this tutorial with me. Alright, in order to start this very attractive tutorial
that I love it myself. So I'm going to enjoy the lot. For a starting this, we should start with
our B6 pencil and we should start from the
darkest areas of our work. And you should apply the various strong darkness
wherever you see them, for example, in this area. And working on the darkness. And I come down from here. And just like that, I come down. As you can see, while I'm coming from the darkest areas to
the lighter ones, I'm actually fading my shadings. The point I should
tell you about is that you should not do this. You should not just cut
the darkness like this. That's the one, that's one of the most common mistakes
of my students. You should not actually cut off the darkness just like that. You should gradually
turn your shades, turn your dark shades
into light ones. If you actually pull any borders between your
light and dark areas, it will make your
work artificial. It doesn't look, It looks fake. It doesn't look real. And natural. So do
not do that mistake. I again insist. As you can see as
I'm doing here, I'm starting from the darkest
areas and I'm lowering my hand pressure as I move toward the center,
which is lighter. Okay, so now I get my Fader. And from this top area, a museum hand pressure. It shouldn't be too much, but a medium hand
pressure, very slowly. I fade the shading that
I've already created. Be careful my friends. The Fader can actually make your work very soft and smooth. But if you use it
in the wrong way, if your hand pressure
is both good enough, it can actually ruin. Were you ruin your work as much as is can make it perfect. So I start from
these parts coming down and I fade all the darkness
and all the shades that I've created with my Fader. You see, even with my Fader, I do not leave any
borders in my work. You can see the light
and colors fading. Okay. Now, while you're
working with a Fader, your hand pressure
should not be too much that you would actually damage the texture of your cardboard that
you're working on. It shouldn't just
fill it completely. Your hand pretty sure
should be low, not too low. It should be low enough
and high enough, strong enough to fade the
shading that you've created. Again, I'll use my black
pencil to add more darkness, more a strong darkness over here because we have
absolute darkness here. And just as easy as that, I apply the darkness
and then very slowly all faded downward. Very slowly. I do not leave any borders. As you can see. Again, I'll repeat my process. Okay? So wherever I need
more darkness, I would apply more darkness. So that later. I can fade this
darkness with my Fader. I fade this added
darkness with my Fader. And this area gets darker. Okay. I'll do this until
this lower area. Dressed He's not need to work with the speed that I'm
working right here. I'm just doing it
because I want to save time for you so
I can teach you more. But when you're
doing it at home, please take your time with
it and spend more time on it slower with more attention. This might be a question
for you that how we can actually make our Fader cleaner. You should not use your
sharpener on a Fader. Never, you should never do that. You should actually
drag your fading, drag your Fader on ascending, and make the shadings
go away all fit. Okay? Then I bring a little bit of darkness that I
worked on this place. I drag it a little with
my Fader of words. So there won't be, again, any border or any
strong contrast. I can't even get help
from my brush in order to soften this
part a bit more. Making it more
smooth and softer. Just be careful. If you're using a
cosmetic brush, you should not actually decrease or increase your hand
pressure on your work. Because if you are turning
your brush toward this side, you should not just change it suddenly in the
opposite side. The direction of my rotation
should be the same. If I want to change
my direction, I should take my
hands off the work. And then again, I bring it in the work and you
should not change your hand pressure on your work because it can
actually ruin your work. As you can see, I'm not
holding my brush or anything, any of my equipment totally vertically
because if I do that, you can not see my work, but you should do that. Now again, I get my pencil
and then from this top side, again, I start adding more
darkness wherever I need it. For the deeper parts, I need more darkness so I am
doing the M applying them. So we should also
shade these areas. And also from here. Don't worry about those. A strong lights in the middle of your work will
work on them later to right now we are just working on the general
shading of our work. We're not doing any details, we're not applying any details, or we are not creating
any specific volumes. We'll do that in the last step
and last part of our work. So don't worry about it. Not yet. We're just giving our ear a background color and a
general shape. Now that's all. I've also applied a general
shade for these areas. And I'll do the same for this upper areas too. Okay. So just like that, as you can see, I'm applying my shading in
different directions. Therefore, they would
go smoothly and they will look more cohesive
and they blend together. Then we should also apply
the strong darkness for this area. Like this. As you can see I'm applying some
strong darkness here. Alright? So I'll continue adding the darkness behind
this whole inside of the ear. Alright, now I'll start with
my Fader again and again. I start from the darkest area. And I failed my shading
toward the outside, toward the lighter areas. And very slowly with a
controlled hand pressure, I am fading my
darkness and failing all my shadings in order not to leave any traces of the pencil. I'll continue this way. Also in these parts, I'll do the same thing. As you can see. I'm moving my hand, sir, calorie, because I want all the colors and all
the shades to blend in. And I want all the
shadings to be faded. So I'm moving my
hand circularity and I am controlling
my hand pressure. Again. In these parts we also
have the findings, have them everywhere. We have shades. Okay. Now, I'll continue my work from these edges of
the ear as well. My dear friends. What
we're doing right now is actually doing a background
color and a background words. Because basically
we are preparing the background of our
work in order to add more details to
create the volumes and add unnecessary
shading in the next step. Here, this in this way stun. And I also Fei these areas. And now I move into my work and I work
on it with my brush. I go all over my work
ones in order to make my shavings as soft and as
smooth as I want them to be. Okay. Now, with b2 or HB pencil, you should go into
your work again. And in these areas, very, very slowly and
softly and lightly, you should shade the edges. Do not need to use any
high hand pressure. So just like that, you're going to shade it here. Then before I continue, I use my editor Eraser. I go all around my work
making it cleaner. Then I'm going to
use my B6 pencil and start applying the
darkness variable. I want them strong darkness because I'm
using my B6 pencils, so I am working on the parts which have
a strong darkness. Is you can see these
parts are very dark. Okay. And just like that, I work on all the dark areas
with the same process, with the same equipment Okay. Also from these areas, I would go up again
working on the edges. And I apply the
darkness like this. Then again with my Fader, I work on the darkness that
I've applied just right now. And I'll fade them
because I don't want any pencil trace or any
borders in my work. None. You should really control your hand pressure
and it should be low. You should use a low hand
pressure so you can move your Fader more easily. Okay. So from this top part, I'll continue like that. And I'll fade all the lines. I will leave nothing behind. I won't miss even one line here. Okay? Now with my B6 Pencil, I would again work
on the darkness of this area like that. And then again, I'll
faded with my Fader. So here it goes. Just like that. Now for continue
of our tutorial, you should watch
the next episode.
5. Completion of ear shading and lighting: Hello and welcome to the continuous of this
tutorial with me. Okay. I was saying we should fade all the
unnecessary parts with our Fader. And they're ever, I
think it's needed. I will add the extra darkness. Now. Again, I'm going to use
my B6 pencil in order to create the very strong
darkness in my work. You should just repeat this
process over and over again. You should apply your
colors and faded. Apply the colors faded
color fade until you get the volume and the darkness that you
want in your work. Alright, Here we go. And from this area below the ear that I have
kind of a shade. I will apply the
darkness like this. And the darkness for this
area is very important. So I should add
more color to it, making it darker. Okay? And it would be
like that for here. C. Okay. Now I'm going to work
on this area as well. We still have some
more darkness here. Should be more faded and darker. Just like that. Okay. Now, again, for these parts, I'm going to use my Fader again. Yes, that's right. My Fader. And I'll use my Fader in order to Fader darkness
that I've created. I'm taking my time with
it very patiently and doing it just like that. And I will not leave any kind of borders
are pencil traces in my work and come all the way up. And because I've also
added some darkness here, I should drag my Fader on it. Making them Fader, of course. Okay. Now I want to work on
the other parts as well. So I'll due to fading
wherever I need it. It's very easy. You just have to
spend time on it, so don't rush it
through. Take your time. Again. As you could have seen, I had a bit of darkness here, so I've applied it and then
I fainted my dark line. And then again,
apply more darkness. If you don't apply your darkness enough and in the right places, your work would not
get volume at all. So it's very important
that you actually apply your darkness wherever it's needed and as much
as it's needed. Then I use my
Normal Eraser and I am tapping it on the
lightest parts of fine work. You see these strong
and sharp lights. I am tapping my eraser
mostly on these areas Then I'll come to here, bringing all the way down. Actually with this,
I'm showing that these areas are more prominent. And I'll come all the way down in the
direction of this light. And while I'm actually
creating these lines, the volume of my work, it's showing itself a
little bit more because I am creating the contrast than I need to show the volume. I'm showing that the
lighter parts are more prominent and the darker
parts are deeper. So they are curved in. Okay. So that's an obvious thing. And now it's the time to
show the lights as well. Alright. Just like that, I've
worked on the lights. Now. I'm going to use
my eraser in order to create smaller lights. Because my SOD Eraser
is more delicate. I can use it for the details. And I'm actually spreading
the light on my work. So I'll just continue like that. Up to here. And from here. Again, I use my antidote racer
to create smaller lights. And going into the details more. I don't need for
my model anymore. And I also apply some very
soft and faded lights. Okay, then again,
I'm going to use my brush and I'll
go over my work. So I can even say delights and blend them
with the darkness. I'll do this in order to
make my work more natural. As I said before, they should look cohesive. And then again, I will apply the stronger lights
with my Etude Eraser. This is what my eraser is for. The lights in here, and even some over here. Okay. Now with my HB pencil, I work on some parts to add
some very light shapes. And I kinda add
some lights here. Okay? Now I'm going to
use my Sketching Pencil. For over here. I need a very strong darkness. I'm actually working
on the final darkness in this way very nicely. And just as easy as that. We could have
created actually V, have created a very beautiful
and attractive ear. Just with the help of
pencils and a Fader. Just consider that this ear
is not hyperreal at all. It's just a simple
sketch of an ear. Is just a simple shading
and volume ING for and ear. It's not hyper-realistic
painting. Okay, Then again
with my B6 Pencil, I work on these areas a bit. The strong darkness, the last touches of darkness
would be done here. And I can apply them like that. Alright. Then I will use my eraser to go around my work and
making the surroundings clean. I don't want it to be messy. And just like that,
work is done. I hope you've enjoyed
this tutorial and see you in next tutorial.
6. Primary sketch of the nose and start of shading: Hello everyone and
welcome to episode of Facial Feature
tutorial with me. Okay. In this episode we're going
to sketch and draw and nose. In previous episodes,
we've worked on an air and today we want to work on
other facial features, for example, the nose. For creating the nose. First of all, I'm going to
create a circle in this way. Then I create two other circles in two sides of my circle. One circle in the middle, and two on the sides, one on each side. Okay. So this area would
be the bottom of the nose. I come up up to here. This would be my nostril. And I'll do the
exact same thing on the other side so I can
get the other nostril. And from here, I
come out. In here. I have the outside
of the nostrils, the sides of the nose. That from here I come up and
I'll continue moving up. From here. Again, I move on. And this area will be
the tip of the nose. This is the most prominent
part of our notes. Then I will erase
all the extra lines. So you can see the main
design with three more clear for you. Okay. Now is start shading
this sketch. See, first of all, in noses sketches, we start from the nostrils
and I apply the darkness. The way I said, usually the
nostrils or the darkest parts of the nose because
they get no light. Okay. And also from here. And then I will add some more darkness on this
bottom part of the nose. I'll start with my Fader. And in snide fading, these shadings
from the nostrils, which as I said before, are the darkest parts
of my whole sketch. Alright. Now I should also fade the upper darkness of the nostril toward the
main part of the nose. Basically, I just drag this
darkness of the nostril, a bit of orange. And then I also shade in-between them and also
on the sides of the nose. I fade them toward outside. And then little by little, slowly, I start fading and shading toward
inside of the nose. Okay. I can do this
with my brush. So it can give a very
cohesive shape to me. Okay? Now, if you want your brush to give a good dark
shade for you, you can actually apply a very strong darkness on
another part of your paper. Then you should
drag your brush on that and then bring
it to your work. This will actually bring a very smooth darkness and very cohesive
darkness into your work. So with my HB pencil, I'm going to shade very
lightly over here. And I'll continue that
to the top of the nose. To the bottom. All right. Just like this
because we also need the nose spreadsheet now. Okay. I'll do the same thing for this side because I should
have a symmetrical nose. From here I come down as well. Just be careful
that two sides of the nose bridge should be
in their own direction. The left one should
be shaded toward left and the right one should
be shaded toward right. Be careful amount that these fires because they are the sides of the nose bridge. So they would be
darker and I will make them darker with my shadings. And I'll do the same
thing for below the nose. And again, because this
part is in the bottom, it has more darkness. So I consider this
area darker as well. Very easily. I don't know, darken the center of the nose bridge and
the tip of the nose. Because these parts are
more prominent and the tip of the nose is the most
prominent part of the nose. So basically it's the
lightest area in our nose. I tried to keep the center of
the nose bridge lighter and the tip of the nose the
lightest. Here we go. Then I'm going to use my brush. And I go over all
of these shadings. And just with continuously
moving my hand over them, circulatory movement, I will
fade all of these shadings. As you can see, I'm moving very slow and I do not rush it. Just take your time with it. And I'll continue until
the end of the nose. Then I bring my
Fader into the work. And I go over these
parts with my Fader now, very, very slowly. I'll lose my work for
award to any rush. You should do it a lot of slower than even I'm doing
good right now. Because you don't
want any mistakes. These parts need more darkness. So I'm adding the
darkness with my Fader. And I should do it for
both sides of my work. Left and right. Here we go. I'll come down. And from these parts, again, I start fading more. So here we go. Okay. Now I'm going to use
my pencil to work on the parts which I
need more darkness in These parts all
should be darker. Don't worry about them. I'm going to fade
them later of course. I'm just giving it enough color. So later I can faded and
give it a good volume. Sorry. I'm actually dragging
these darkness from the slides of the nose toward
inside of the nose Alito. And of course, I'll apply shade on the
bottom of the nose. Even the parts
between the nostrils. And maybe even a bit over here on the sides
of the nose bridge. And then again, I'll use my Fader in order to
fade these areas, these darkness and these lines that I have already
created with my pencil. I do not want any specific
lines or traces of Pencil. Again, I insist on it a
lot because it can really, really change your
working style. If you fade them. It looks good if you don't. Well, not so much. And just remember while you're
working with your Fader, you should control your hand
pressure because you don't want a place to
be faded too much and in other place you
won't have any color. So be careful about that too. While you're working
with your Fader, you should be able to
control your hand pressure. Okay, as you can see, I am completely fading the darkness and the
shades of my work. I'm combining them with
the lighter areas, not to create any border
between the color contrast. So from here, I'll
come down a little. So here we go. I'll make my nose more beautiful
from both sides. I add more and better shading
to my work just like that. And for these dark parts
of the nose, again, I'll do my fading and maybe
even add more darkness. Okay. So just like that, I'll fix the nostrils. Maybe even adding a bit
of details to them.
7. Continuation of nose shading and lighting: All right. No, I should work on these darkness toward
outside of the nose. Therefore, my nose can
actually show itself. Okay, Here we go. The background color of
our work is almost done, and now we are gradually
moving to the details. I'm almost done with
the background shading and background coloring
faded to Earth. Both signs do not forget this. And here we go. For this part of the nose, I need more darkness so I can get a good
volume of my work. Here we go. So as I said before, the next step would be adding
the details to the work. Until now we were only
working on the background. And we were actually
doing get primary sketch, a primary shading. Okay. Now I'm going to use
my entered Eraser in order to get the lights
that I need on my notes. For example, the
light over here, the tip of the nose. As you can see most of the time. So I'm tapping my eraser and
sometimes I am dragging it. There's very strong
light over here. And they are all need to
be done with my eraser. Even in these parts, we can have some light. This contrast between
the light and dark is actually giving
us the volume. I can even consider some lights
for these two side areas. And then I can use
my Fader to faint. Disliked it shouldn't
be as strong as the light we have
on the nose bridge. Then I will use my B6 pencil in order to add more
darkness to these sides of the nose so that the volume of my nose
can show itself better. Just like that, just like
what you see right now. Then you should use your Fader in order to
faint these darkness. And do not forget to
do it for both sides. Alright. Well, I am blending the darkness that I've
created into one another. And I'll shape my nose better. Seen very carefully
from these lower areas, these parts below the nose? I create a shadow and a shade
towards outside of my work. Here we go. And I'll the same thing on this
other side as well. Okay. So again, with my B6 Pencil, I will apply the last touches
of darkness on my work. And then I'll obviously
faint them with my Fader. But this time toward insight. Alright. And sometimes I get
a bit of color on my Fader from this darkness
I've created on this part. Just to darken some parts more. And then I'll use my Normal
Eraser on this tuple than nose to create a
stronger lights. And I use my eraser to create some lines over these parts. Then again, with
my normal pencil, I will apply some darkness on these sides of
the nose bridge. You should just
place your pencil on the Paper or cardboard
almost vertically. And you should use the
side of your pencil in order to shade this area
very softly and lightly. And I'll do the same thing for both sides of the nose bridge. And here we go. Here it is. Okay. Here in this this is a sketch of the
nose with pencil. If could be. Actually, we've done it easy. And I hope you've
enjoyed it as much as I did follow us for
more tutorials.
8. Lips primary sketch: Hello and welcome
to a new episode of a Sketching facial
features with me. Well, in this episode we're going to work on
another Facial Feature. We're going to create
the lips this time. Okay, Let's just start creating the primary
sketch of this work. I'm going to teach you a method. You're going to use
your B6 pencil. And you are going to darken the back of your model picture. You're going to darken the area where your actual model is. So you turn your
paper over and you darken the area of
the lips on the back. So you should do this completely. Okay. Then you will fix your model on your cardboard or other
paper you want to work with. Then you use your white pencil or pen that doesn't have
any ink or a color. And then you go all
over your model. You go over it's sketch. Okay? Be careful your hint
pressure should not be too much that it will actually have a very trace or any
texture on the cardboard below your model or
underneath your model. Just enough to leave a trace of the model on your cardboard. That would be enough. Just like that. I will have my main
and primary sketch. Some of the textures
of the lips, which are very prominent, can also be
determined over here, can determine their placement. Just like that. I actually put my models
side and as you can see, my model is totally
copied on my cardboard. You can use this method on
all different kinds of models for facial features or even different designs
and paintings. Now we are going
to start our work
9. Beginning of shading and lips texture: Hello and welcome to the rest
of this tutorial with me. Alright, let's us
start our work. First of all, I should start
with my B6 pencil in order to apply this strong
darkness of my work, some places are
absolute darkness. So for example, over here. And right from here, I am considering the
strongest darkness around the edges of the lips. You see this part is
absolute darkness, but as it came up, it got faded. So I'll just do the same thing. I tried to do the same thing. Okay. Just like that. I tried to work on this area
that I have total darkness. And then for this area, Okay. Then I will apply the
darkness for this upper part. As much as Zion can. Just be careful, you
should not bring any darkness into the teeth. You should not bring any strong
darkness into the teeth. With my HB pencil, I try to determine the placement of the teeth and leave them. And then again, from this
area below the teeth, I start applying my darkness. Okay. Here we go. Just like that. Very easily. All right. So I place my total
darkness in my work. As you can see, this
part is completely dark. And that's what
I've done with it. Okay. Now I'm going
to use my Fader. And I'll go over these darkness that I've
already created over here. I just go over them
with my Fader in order to make these shadings and
this darkness cohesive. And then from here I start creating a base of
later lighter shades. And I'm actually fading
the line of the darkness. Then I'll work on
this area as well. I also have darkness in here, so I would actually fade to darkness and drag
it a little bit upward in order to spread
my shadings a bit more. Okay. Then I shade very faintly. Then from here, I haven't
darkness for around the lips because the lips should be actually separated
from their background. So I apply this
darkness with my Fader. That's right. With the Fader. Just snack that I
apply the darkness. I create my upper lips edge. As you can see, I'm moving
all around the edges of my upper lip and I'm
doing it with my Fader. And as you can clearly see, this side of my lip
is not a line at all. It's totally faded towards
outside of the lips. Here we go. Just like that. I apply the darkness
wherever I need them. Okay. Now, I want to take
my B6 pencil and very softly and lightly, I'm going to create
the shades on my lip. It means that from these parts, I will create my darkness. And over here, we also
have some more darkness. It's the lower part
of the upper lip. Therefore, it's a
bit dark dark hair comparing to the rest
of the lip. I mean. And this darkness very slowly goes up and
it will get lighter. I'll do the rest
of the thing with my normal pencil because I
wanted to be more cohesive. See as I'm moving up, I am using less hand pressure so I can have a lighter
shade until the top. Okay. Then from these side areas
that we need more darkness. I will apply the darkness. So basically, I'm adding more dark colors in these
corners of the lips. Just like that. Alright. Okay. Well, I also consider some kind of darkness and some shades for the upper parts. And now I should fade all of these parts as much
as I can with my Fader. First, I started with these
darker areas of my work, and then I move up to
the lighter areas. And little by little,
step-by-step. I am bringing the darkness
to our the upper parts of the work and fate them
into the lighter areas. So just like that, I will fade all of this
part on the upper lip, all of these edges
on the upper limb, and they would be
cohesive and blended. Especially this area. I actually guide this shades
towards outside of the lip. And I'll face them. Just be careful that you should not lose the main
area of the lips. Should not lose that. While you are you now
fading this area. Now we've done the background
coloring of our upper lip, and then I'm going to use my B6 Pencil to apply
some textures on the lip From this corner. And I tried to create
the textures that I can see in my model has
many as I can see. Because they are in dark shades. I am creating them
with my pencil. And as you can see, I am doing it randomly,
totally random. In this area. I'll do the same thing. Comparing to this area. The textures would be
lighter, but again, I am applying them randomly and as much as I can see them. But they would be lighter
comparing to the right side. And then I will use my Fader to fade these lip texture is
that I've just created. So one-by-one,
I'll fade each one of these textures. Alright? And then again, I start applying the more stronger darkness in some parts like
these lower areas. Well, you know, applying darkness in
these lower areas will actually help your lip to get
a better and more volume. So red confidence you should
apply these darkness. Over here. Again, I insist this work
is not hyperreal at all. It's just a very
simple Sketching and shading of the lip only
with a pencil and a Fader. Alright. So there should be more darkness for
these areas like that. And then again, I use my
Fader so that my Fader, I should also fade
these textures. Even in the textures, we don't need to
have separate lines. Okay? So here we go. Alright. Now I actually work
on these parts. I'll fade them. And I also apply some more darkness for this
top part of my upper lip. Here it is. I'm
almost done here. Came forcing the rest of this tutorial you
with Bain next episode?
10. Continuation of lips shading and lighting: Hello again. Welcome to the rest of this
tutorial with me. Okay, Let's continue together. Again. I'm going to use my B6 pencil. And this time I will apply the darkness that I need
or is specifically. And of course in linear way. I increase the
amount of darkness. I will use a higher
hand pressure. And randomly, yet
more specifically, I create these textures
and I work on them. Okay? Also we need a bit of
darkness over here. I also have some small textures
which are actually here. I can use the side of my pencil, side of my pencils tip to
apply these small ones. And I will also fix this light area like this. And actually I work more
darkness in its surroundings. Therefore, this light can
show itself even better. I use my Fader and I'll do
the fading all around it. So if you make its
surroundings darker, it will show better. Okay, Here we go. Alright. Now I'm going
to use my eraser. And you see, just like that in some parts that
I can see some volume. I'll use my editor Eraser there. Actually, I will drag
my editor Eraser between the textures
that I have created. This way, I can create a
contrast and create a volume. You can even use your
Normal Eraser to create these kinds of lights. Okay, I actually bring
this contrast in my work. Now again, I'm going
to use my B6 pencil. And again, I will go
over these textures on the lips very, very slowly. I get them out of there. Just linear shape. Like this. It's very easy to do, should just pay a
bit of attention. I also placed the wrinkles, the corner of the lip. And then I'll do it like this. I am working with
very small lines. And then Just like that, I will also apply some wrinkles on
this corner of the lip. Then again, I'm going
to use my attitude Eraser and with
my editor Eraser, I'm going to create
some strong lights. Alright. Now, I'm
going to use my cutter to cut my editor
Eraser corner ways so it has a sharp end. And then with that sharp end, I'm going to create these very small lights next to my small
textures on the lip. Even on these parts. I'll do the same thing. And even over here. Okay. Now, for making your work more beautiful and
increasing your contrast. If you have a white pen, you can actually create your strong lines
with your white pen. You can use it in some
places, not everywhere. For example, I'm going to
use my electronic Eraser. It has almost the same
effect as the white pen. If not, you can use that. If you have neither, you can continue your work with your enter the eraser as well, because we're now going to
work in hyperreal style. So there is no
necessity for that. But I can apply stronger lights with my electronic Eraser. So just like that, I can apply these textures. Alright, Here we go. And some are light textures. Over here. I'm trying to do them the way I
see them in my model. Okay. Now I want to work on teeth. I'm going to use my Fader. And from the top very
slowly and very carefully. I drag some of the
darkness down. And in spreaded in
these areas that I can see the shadow of
the lip on my teeth. You can clearly see
that in your model. And I'll do the same
thing on the sides of the teeth and the edges of the teeth because the darkness
there should be more. Okay. I also have some very darker spots
on the side, teeth. And the darkness of
this tooth as well. Alright. Now I'm going to
use my HB pencil And I'll determine
these parts even more. I make them pop more. And I would also
go on these parts that are left from
the site teeth. Again, you can use
your eraser or if you have electronic Eraser, you should use that in order to create a strong
lights in your work, especially in teeth area. Brands say in white
or very light areas. Just as easy as that. Then again from the top, I bring some more
fading downward. Okay? And I'm going to use my B6 pencil in order to redo the strong
darkness of these parts. Just like that. And that's enough
for the upper lip. Okay. We're done with
the upper limb and now we have to move
on to the lower lip. Again. I should just start
with applying the strong darkness at first. So I'm going to start
right on the edges, which are the darkest
part of my lower lip. I start applying
the darkness there. And I'll fade this darkness upward toward inside of the lip. And with a bit of
distance, again, I apply this darkness over here for this area
below the lower lip. And also kind of a shadow
should also be placed here. So would look like this. Now, I'm going to consider a very general
shading for my work. And in these areas, I will work darker. And also over here, these parts should be darker. Considering my model. So just in that way, I'm gonna do it. I'm just trying to give
it a background color, trying to find the patterns. Then generally just connect
the shades altogether. I want to make them
look more cohesive. Then again, of course, I use my Fader and very
slowly and carefully, I'll try to fade the
shadings that I have here for the lip itself and
also for the shadow below it. And I even come
from these edges, from the sides and
corners toward inside. So C and I also fade these lower shading
and shadows the same way. The process is
basically the same. You should just
try over and over practice over and over to get used to it and
to get a handle of it. And now I'm going to use my entered Eraser
in order to create delight areas because
the light areas are more in this
part of my model. My preference is that
first I would create delights and then later
I'll create the darkness. That when I've worked
with the darkness, creating these lights
won't be hard for us. Okay. I would also work on
this lower part of the work. Okay. Alright. That's it.
11. Lip texture details and final lighting : Hello again and welcome to the rest of this
tutorial with me. Alright. Well, I'm going
to take my B6 pencil. And with my V6 Pencil, I'm going to work
on this lower part, the bottom part that I've
had my darkness and I are randomly go to
the top parts of my work and see very slowly and in the
right direction of the lip. I said randomly, but the
directions should be correct. Don't be mistaken about that. And also from here, I want to have stronger darkness exactly as I can
see them this way. Alright. And also from here, I would work on some
textures for the lower lip. Again, I'm considering
the directions are very important to me. And I'm controlling
my hand pressure. I don't wanna go too
dark or too light here. Comparing to my model, I should apply darker textures, but they shouldn't be too dark. I'm just creating them
darker because I want to create that
shine over the lip. And also for this area, I'm going to go all around this light right in the
middle of the lower lip. Alright, and now from the top, I can bring some, again random textures
coming down. And I'll go all around
this shine on the lip. Now. I should emphasize a
bit more on the wrinkles, the textures, and
even some points, dark points or light
points on the lip. I bring some shadings from
this part right below the lip because I want to show
that my lip is prominent, so the part below that
should be darker. So it can be separated from its background in this way. And in these parts,
I'll do the same. Then I get my brush. And I actually go over
all these lower parts and top parts and fading all of
them very softly and slowly. And then again, I'm
going to use my editor Eraser to emphasize
on the strong lights. Part by part. I will apply and create
the light areas. I would also consider some horizontal lines
for these areas. It would look like this Alright, and also the lights
over here should be done. Okay? Again, I should work on this, a strong light over here and consider some
stronger ones for there. Now, I'm going to use my HB pencil for applying
a bit more of the details. Okay. Now, I would also have
to work around the lip. We can even have the shine of the teeth by getting their surroundings
just a bit darker. In that case, they would
show shinier and lighter. And as you can see, I'm going even in the
corner of the lip. Okay. Then again, I will use my B6 pencil in order to
add a bit more of dark, dark areas and dark
textures over here. Okay, up to here is enough. So here we go. I would also have to apply
some darkness in this area. And basically over here so that my sketch will
show itself perfectly. Okay. Now, we should also work on these textures
for the last time. These would be the Touch Ups. I'm going to darken them a little just in case they've
lost some of their darkness. So I'm just adding some
lines over here and there. And dressed as easy as that, we could create
this beautiful lip. And then I'm going
to use my Fader. And I will actually play some points on spots
around the lip. So I can show that there is a skin texture around the lip. It comes to work. Okay. You should just
spend time on it. You should then rush through it, be patient, and go on with it. And I'll do the same thing
on this side as well. Okay? And then again, I'm
going to use my brush to fade and make all the colors and shades more cohesive and
blended into each other. So I move all around the
work and I fade them. Okay, I hope you've enjoyed this tutorial as much as I did. See you in the next episode.
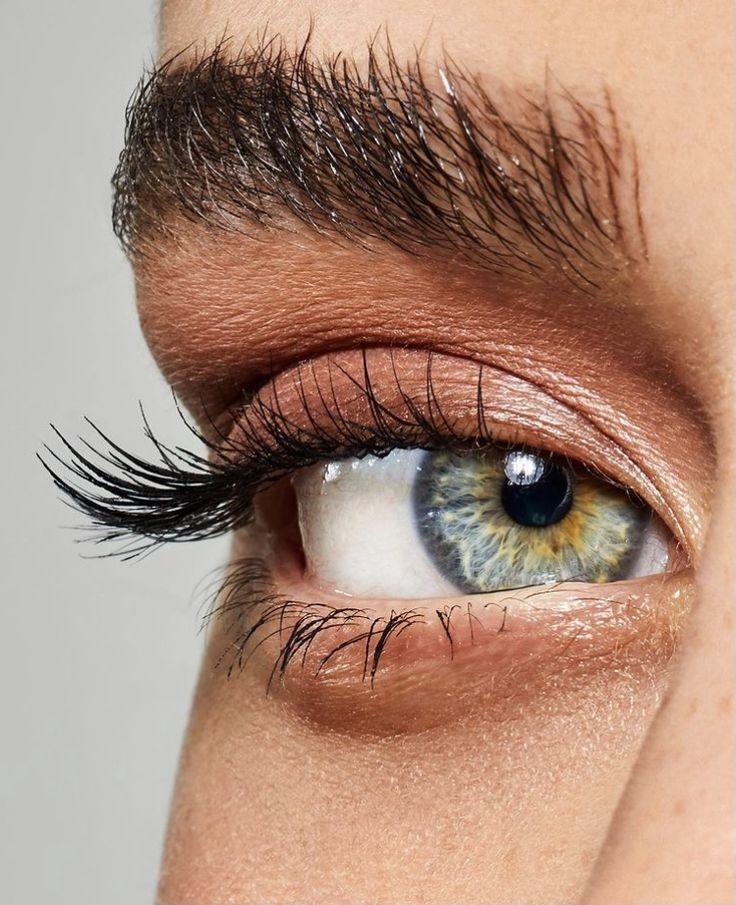
12. Eye primary sketch: Hello and welcome
to a new episode of facial features
tutorial with me. Okay? In this episode, we're going
to work on one of the most important and one of the hardest facial
features together, which is the AI. Yes. Actually the eyes are the most important facial
features of any sketch. Because if you sketch
it wrong or right, it can obviously tell everything about your sketch
to your audience. In order to copy my model and get the primary sketch
of my model on my cardboard. Still I'm going
to coping method, which is darkening or black
cunning the back of my model. And then I'll put it over here. And I move on it so I can get its original design
and primary sketch on my cardboard with a
colorless pencil or pen. Let me just get
eyebrows as well. This should be
darken to like this. And you should actually work in blacken behind all the
parts that you need. Okay, now I can start
copying my model. I start my work from the parts which are the main
lines of my work. Over here. And here. I start copying. I'll do this same
thing for the pupil, the iris corner of the eye, even the light
inside of the pupil. Upper eyelid, the lower eyelid, her face area,
lines of the face. And of course, the
shape of the eyebrow, which just starts here, continues all the way and ends here. Okay. Alright. I can also determine the placement of the
eyelashes as well, especially for this area that they are coming
out of the eye. So later I won't face any
challenges in my work. Okay. After I was sure that my
sketch was copied perfectly, I just take it off my
work and as you can see, it's been copied completely. In next episode, we want to see how we can shape this work
13. Start shading and iris details: Hello again and welcome to this beautiful tutorial with me. Okay, Let's start
again together. First of all, I start
with my B6 pencil again. And I start with this darkness right in
the middle of the iris. I would also tell you the
hints which are important in order to create natural
eyes. I'll tell you. See, first of all, as usual, I apply my darkness very confidently
wherever it's needed. Just be careful. The darkness is
not too much here. And it grows as it comes to the center or bursitis
and Trump the pupil. So here it goes. Now. From the sides. Also create shade upwards. Now I want to work with my
Fader and work with that. So from this area, little by little,
I'm going to fade this area toward the
middle of my iris. One of the problems that so
many of the students have is that the IRS is not
completely circle. This is very important that your iris is totally a circle. You should not created like an oval or
something like that. This is a very common
mistakes among students. So I also drag this darkness to our,
the pupil itself. And even over here, it has some kind of fade shape. Okay? Now I'm going to start with my B6 pencil. And I started working from
the edges of my iris. I am applying some
dark lines from the edge of the iris toward
the center of the eye. Okay. Here this. And over here, I would also have some linear darkness from
the pupil toured outside. And also very strong darkness
from here would be made. Okay. Now, I want to start
with my Fader again. I want to work with
my Fader again. And I will go over all of
my work, totally fading it. See everything
we've said before. It's still true here. You can not leave any
lines and they by themselves should fade
all the dark lines. Then I'm going to use my entered Eraser
in order to create some light texture inside of
my models pupil and iris. As much as the darkness and
the shades are important, the lights are important to. Then with my Sketching Pencil, I am going to try to get this texture correctly
inside of the eye. Alright. Then again With my B6 Pencil, I come to work and I apply the darkness
wherever it's needed. So in some parts we have darker shades and
I'll just do it. I have to apply them
with my pencil. Okay. So just as easy as that. Now for around the
iris, there is a point. Again. So many of our students
are mistaken about that. Even some teachers and professors are
mistaken about that. The point is that
they just leave the iris as specific
line border. It means that they do not fade the edges and the
borders of the iris, which is not correct. So you should not forget to save all the edging
lines of the iris. And you should actually
fate them toward the iris itself and a
bit toward the outside. It shouldn't look like
lines or borders here. Also from here, very
slowly, I start shading. It should have a
light trace of shade. So I'm just going to do it. And obviously as you know, we're just doing the
background colorings mostly. And then I fade this area slowly upwards toward the
eyeball itself. So first I did a background
color and then I added some details to my pupil and iris and basically
to the eyeball. And I should be very careful that in which part of
the eyeball I have more darkness as the shadow of the eyelashes or the eyelid on the white parts
of the eyeball. Okay. So it's gonna
be like this. Also from this side, from this corner of the eye. Okay, Here we go. Then I would also add the darkness for this
side of the eye. This part. The other corners
should also be done. Okay? Then I use my failure again
and fade this area to. I even faded a little
tour the eyeball because I don't want any
borders here as well. We leave nothing as a
specific line or as a border. There ever you
leave any borders, it will actually make
your work look fake. Okay? Now with a
bit of distance, is start creating
the lower eyelid. The parts where the
eyelashes will grow. The base of the
eyelashes is very important in I, Sketching. I see in so many
designs and a sketches that they don't have a base for eyelashes
on the lower eyelid. And there's just a line and the eyelashes are
coming out of there. Now, it's really fake, so you should not forget about
the base of the eyelashes. Then we'd my normal pencil, I would like to shade
this area this way. Okay. And From the corner, I start, actually I continue my
shading with my HB pencil. You should do this very slowly. So the skin of our model
would not be dirty. Or you won't get any
extra darkness very, where you don't need it. Okay. Here it is. I should also have some more darkness on this
area below the lower eyelid. And then very slowly
I bring it up of faded toward the top
of the lower eyelid. Okay. Just like that. Here it goes. I'm actually shading in all directions. So I can get a good Shake. It can get a good texture. Then I pick my B6 pencil in order to add a
stronger darkness. In some parts, not everywhere. And then from the side parts, I'll do the same thing. Then I move to the sites. And of course, after that, I'm going to use my Fader. And I fade the shades
on the lower eyelid. Just like this easily. And I'll continue to
the bottom of my work. Okay. So still over here, even below the eyelid, I should fade this area in a way that it doesn't
look like a line. It doesn't look like separated. It won't look like separated. Which it doesn't now. But again, I insist if
you leave it as a line, it will look separate it
and it will look fake. Alright, then again
with my B6 Pencil, I start applying the necessary
darkness for this area. I should just repeat this
routine over and over again. As long as I guess the amount of contrast
that I want in my work, I should just add to darkness, fade again at the
darkness and Fader again until I get to that point
that I'm pleased with it. Okay. And then again, with my Fader, I start fading. Has it is obvious in this way. Okay, Now for the continuous
of this tutorial, follow us in the next episode.
14. Upper eyelid and skin texture: Hello again and
welcome to the rest of this tutorial with me. Okay. We were doing in the
previous episode, we're going to continue
our fading process. I'm just going to continue
fade this area more and more. And then again, I apply the darkness
with my B6 pencil. Okay. Here it goes. Again with by Fader. I'm just going to shuffle between the Fader
and the pencil. And over here, I use it more. Just a tad darker. And of course, from here on, I am considering
this shade and this shadow which is
created by her nose. Okay. Now it might
entered Eraser. I'm going to create the
base of the eyelash. And as I move up,
there's a very, very light area here. Now. Again, you should call to your Eraser with a
cutter, making it's sharp. And after death, you can create these light textures
for this area. Pay attention to this
movement of my hand going back and forward
with the eraser in it. Even over here we have
some strong lights. And also from here. Okay. Now, if you have an
electronic Eraser, you should apply
some strong lights with your electronic Eraser. And if you don't have
that, it's okay. The S is Eraser will be enough. So solves a necessity, but if you have it, it would look better. And strong shine over here. And this goes for this
part of the eye as well. Okay. Now we your HB pencil. You should darken and shade all around this light
area in the pupil. So its surroundings
would be darker and it would look even
lighter and shinier. So I'll continue like
this until these parts. Okay? And as I've inserted several
textures with my eraser, I'll apply them
with my pencil to. I should actually work
on the eyelashes. But first, I want to work on
the upper eyelid as well. And then we can
create the eyelashes altogether for the top
and for the bottom. Now with my B6
Pencil, immediately, I move on to work on
the upper eyelid, shading it and designing it. So these parts are actually the very dark parts which they go like this. And these parts, these front
parts which are lighter. I'm going to shade them
with my HB pencil. So they look like this. Okay? And then again, I'm
going to repeat all of this same procedure. I'm going to use my
Fader in order to fade these parts completely. So just as easy as that. With a little bit more darkness
for this part of the eye. Okay. Here it goes. Then again with my B6 Pencil. From this area. I'll start my work. And I also add the light
of the work later. Okay, here it is. I'm going to use
the same shade for these areas to,
and very faintly, I move up like this course. And I cover all of this part. All the areas should be covered. And then I get to this area. It's the dent actually
behind the eyes, the curved part above
and behind the eye. So I apply more
darkness for this area. Okay. And for right now first, I should fade all of the
darkness that I've created here. And then I should move on to the next step. Okay? So just like that, very generally and very slowly, you should fate this area. You do not have to work as
fast as I'm doing here. Again, I say that I'm
working really fast over here because I want to save time for you and teach
you more things. But when you're practicing, you should really take
your time with it. Spend time on your details, on your background working So please keep that in mind. Now as you can see, I faded all this area, especially the strong darkness
which we have over here. Okay. See over here I
have a line shape. And this line shape should
actually fade away. That's why I'm moving
my pencil on it. And at the same time, I'm dragging some
shades out of it. The bond to the bottom
or to the top part. So my work can actually
be more natural. Okay. So just like that. Alright, let's apply the darkness. And then I'm going to start
from the upper eyelid in order to apply the textures. And as you can see, my hand is just moving back and forth. And it's quite random. And then with Eraser, it might entered Eraser. I'm going to create
some more details, some lights and stuff like that. So I'm going to work on
the lights like that. Very easy. It's done. And again, even after
applying the lights, I can use my pencil to
create some more darkness as the Touch Ups and as some
details right in between them. I'll do the same thing
for the lower eyelid. So be with me in
the next episode.
15. Upper and lower eyelids and eyebrows: Hello again, welcome to the rest of this
tutorial with me. Okay. Now we are going to continue this with our editor to Eraser. We should create the lights that we have here in our model. I'm erasing these areas
with my eraser Eraser in order to create some
wrinkles on her skin. This can give us a
very good texture. We even have them
on this top area. They are less but they exist. Okay. So it goes like this. Okay? Now I'm going to
use my HB pencil. And then I'm going to darken between these
lines that I've created. I'm actually applying
this darkness in-between the lights so that the light areas would
pop out and they will be showing more. And in this way, I get a good skin
texture. In my work. I even create some
small hair-like this. Then I'm going to
use my B6 pencil in order to apply the
darker skin textures. Okay, Here this and I would also increase
the darkness of this area one degrees. And then I use my Fader
to help this process. Here we go. And I'll
continue up to these parts. I'm actually dragging this
darkness upward with my Fader, as you can see. Okay? And I will also work over
here beneath the eyebrows. And I'm applying shades because I don't want them
to be only some lines. Then again, I'm
going to use my acid Eraser to apply some
a strong lights in their own placement. I can even use my
electronic Eraser to do that. Okay. Now let's start
creating the eyebrows. See, first of all, I'm going to darken the base
of my eyebrow like this. And then like this or not, I'm going to use my Fader to, again shade this area
above the eyebrow. I create this kind
of faded shade. And even over here, then I bring the
eyelid D eyebrows, sorry, on top of it. Okay. Now, with my B6 pencil, right from the beginning, right from here, very slowly, I start drawing the eyebrows. There is one rule in creating
eyebrows or hair-like this. And that rule is Your line should be
sharp at both ends. C, you should create
your lines like this. It should be actually the, your hand pressure
should be low, high, and then low. Again. If you can practice
this separately, creating hair would
be easier for you. So again, I insist in order
to create any kind of her, especially here like this, you should have lines which are sharp at both of their ends. From all these parts. I'm working and I'm
creating these lines. And then I am
creating darker hair. And I making it
more concentrated. I want more of them. And just as easy as that. Very, very easy. Okay. You should only have repetition in the
middle of the eyebrow. Just do it over and
over and over again. The concentration of the
eyebrow is more in the middle. I should do the same thing
over and over again. In the beginning and in
the end of the eyebrow, we have less of them so you can use a
lower hand pressure. But anyways, okay. Now, something that I should do right now is that I should take my brush and dry it from this bottom part of their
IVs started my eyebrows. I start creating
that faded shade from the bottom of the eyebrows, moving all the way to the top. I'll do this slowly. Of course. I don't have too much
pressure on my hand. Then I will use my HB
pencil in order to create the very thin
and fine lines. Because I don't want my
eyebrow to be just cut. All of a sudden. I want
them to be natural. In order to show that natural
quality of the eyebrow, I should create several
thin lines and then eyebrows from the
bottom and top. Okay. And also in these
corners and the sides, I can create very
small hair lines with a very low hand pressure. We've already worked
on the eyebrows. And we want to work
on the eyelashes now, which are really similar
to the eyebrows. Over here, I just apply
a very light shade. Okay. Now let's just start
working on the eyelashes. Just be careful when you want to work on any kind of hair. The CFO of your pencils
should be totally sharp. C, from the beginning
of the eyelashes. You should start and
then drag it and then throw it off the end. Just drag and let it go. For these eyelashes. In the end. I'll do this method
in it for here. I'll do the same thing. The difference that
one eyelash would go from above and the other
one would go below. So again, the same kind
of lines are used here, sharp at both ends. So if you practice them, you can also be more
successful here. Very easily. You can create
natural eyelashes. Okay? So just like that, I apply the darkness over here. Let's work on the lower
eyelashes to again. I draw them. I draw one and the other one
goes right next to it. Okay. Then I also worked on
the lower eyelashes. And for the finishing
of our work, I want to work on the last touches of the
darkness around the iris. On the sides, on the edges
wherever they are needed. And dressed as easy
as that we could have actually sketch a beautiful, I hope you've enjoyed this
tutorial has as much as I did, and I hope it was good for you. See you in next tutorials.
 Amelie Braun, Artist & Cartoonist