Transcripts
1. Introduction: Enhance your creativity and Art of drawing with the
Pencil Drawing Class. In this class, using
Pencil Drawing techniques, you'll be taught how
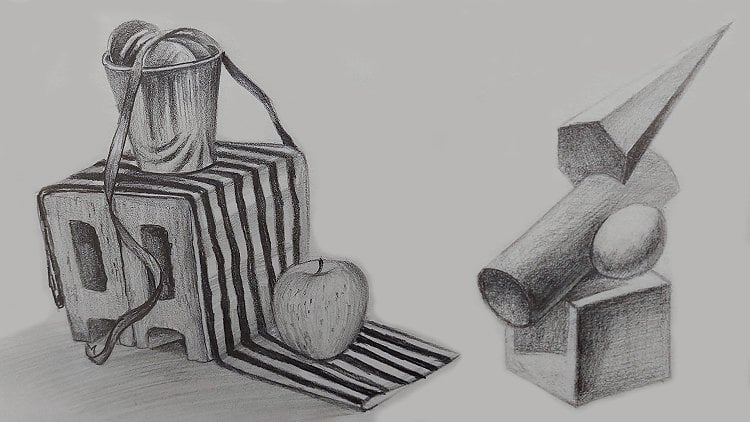
to draw a paper bag. In an angular way. You will learn how to
sketch a cherry using the method of geometrical
shapes and hatching. You'll also learn
to techniques of professional drawing
of a metal faucet. I have taught you this class using minimal tools to help you increase your creativity in drawing and sketching
different objects. I hope you enjoyed this class. Hello and welcome to a new chapter of a
sketching tutorial with me. In this chapter,
we're going to learn how we can sketch objects. It means that we are going to sketch objects which are
shiny, mat or transparent. First of all, I should tell you that for beginning this course, which tools and
equipments you need. For this chapter? You need a b2 is
Sketching Pencil, a B6 Sketching Pencil
and normal Pencil, one normal eraser and
one to the eraser. So let's go and start together.
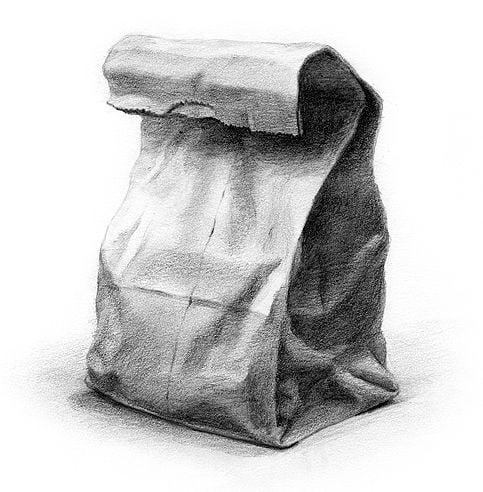
2. The initial design of a paper bag in an angular way: Hello again. Welcome to the beginning of this sketching tutorial
chap there with me. Okay? Now for starters, I've picked this model, which is actually
a paper packet. So it's a paper bag and it's very challenging for a
sketching and shading. Because also the
paper bags are very similar to fabric texture. So when you learn this, you can actually use
the same process for creating the fabric texture. So For Beginners,
we're going to create a primary sketch
for this paper bag. And I'm going to
teach you how you can create your primary sketch. We did an angular method. It means that I
have an angle here. I have a line here
with this angle. So I created on
my paper as well. Then I have another
line with this, with this angle over here. So again, I consider
it exactly like that. On my own work. Over here, I have a line
which is almost a straight. So this was my first line, the second line, and here goes, my third line is
almost a straight. I also sketch my third
line like this over here. This is my fourth line. It's a bit more
horizontal. Just a bit. Okay. And then again, over here, I have
another line like this. So I apply this line as well. Here. I have a completely
vertical line. And then again, on the
same way of this line, I have another line above it. And the same track. Then I have another line on the right side,
which is angular. And I'll created over
here, of course. And also here I have a completely straight
and vertical line. Okay? Just be careful that your primary method of your work should be
very, very light. Because I want you
to see it better. I have sketch should
a bit darker, but when you want to do it, you should create your
primary sketch very lightly. Now, I'm going to
add more details to my work and create
my primary sketch. So I have a line like this
with a curve, comes back, it continues like this, and it comes down
from over here. It will be round a little here, and it goes toward inside, comes out again, comes down
and again another curve. And this would be the
end of this area. In this part, I'm going to finish this side
of my paper bag. And then again, over here, I have another return. It's actually a fold. So I use it and I come
down. And over here. As you can say, I finish
it with this paper shape. Now in this part of
our bag are paper bag. I'm going to create
an ARC over here. Oh, it's a very curved line and at the same time,
it's coming down. If you've placed your
angles correctly, your primary sketch will
come out correctly. So something that
you should train and practice in this method and in this method of creating your primary sketch is
getting the angles correctly. Also determine some
lines which are placed to the darkest parts of my work. Then this part will be closed. And of course, I
come up from here. We have a curve, a little curve. And then again, we
come out and I go up and I'll continue
to this area. Okay, So just as easy as that, I could actually get to primary
sketch of this paper bag. Now, the details of
our Sketching will be left when we want to do the price of and we
want to do shading. So after I've done
my primary sketch, I'm going to erase all the
extra lines of my work. That's why I told you. When you are placing
the angular lines, you should make sure that they're light enough so
you can erase them later. Of course, you can
actually create your work in any signs that you like bigger than your
model or even smaller? Okay. For example, mine is a bit a smaller
comparing to my model, but as you can see, it's very similar to the model. Just as easy as that. I have applied and executed the primary sketch of my work. It makes us a we are
going to do the shading. As I told you before, your primary sketch
should be light. So I'm going to use
my eraser in order to make my primary
sketch very light. So I won't have any extra or a specific lines in my
work because I'm gonna do the shadings and it's
not going to do well. If you have DO eraser, you can also do that. I mean, we can do this
erasing with your eraser. Now, after we have
lightened our sketch, our primary sketch, we are
going to start to shading
3. Beginning of sketching and shading of the paper bag: Now, the texture of
fabric or paper, we are going to
use faded sheets. Something I told you
about the volumes. I'm not going to work with my darkest color and
start shading with that. I'm going to use
my lighter pencil, which is my HB pencil. And I start shading from
the top of my work. I told you why we do this in
the course of volume Ising. The shapes and objects. As you can see, the light is coming from the top of my work. So all the prominent
parts which are facing upwards are lighter. So I'm going to start with a very light shade in this area. And in all of these primary
prominent areas, sorry. And then little by little, very patiently, I place these shading
in their own placement. Then we do is have space. I'm going to start from here. And again, I start my shading. And just like that,
as you can see, I am the sketching
with the side of my pencil while holding
it almost horizontally. You seeing my dear friends. I'm doing this with a
very light hand pressure. And I'm not using any strong hand pressure while I'm applying
the shades over here. So just like that,
I'll continue. In these parts. I will add a bit
more hand pressure because I want to show
that this area has been folded without any lines. I want to show that this part is folded because we don't want any specific lines
or borders in our work. I come in a little bit lower. And again, in this area, I will add more darkness to
my work with the same Pencil. I consider more
darkness for here. And from here, I move forward. Okay, I can increase the
darkness in these parts. And just like that, when I come to the center, I'll decrease my hand pressure. For this center. As you can see, we have a strong
darkness in this shape. So I'll apply it
in the same shape. It's like this part of our
paper has been curved in. So I apply this
darkness like that. Slowly as I come down, I faded and fade it. I apply the darkness, but I'm fading it as well. And from here, okay, and I bring down this
darkness as well. I mean, I'm bringing it lower. Part of this bag
should be lighter because it's been
actually rotated toward outside a bit more
and it got some light on it. So this part would
be left lighter. So the parts which are
facing down our dark here. Okay. And then also I shade this part of my
bag. They paper bag. Okay. Then I want to work on
this part of my paper bag. It's been actually cut industry. And then over here I
should go off and then come back down again
on this same line. So I do it exactly as
I see it in my model. Then I would also have to apply a shade for this cut area. And then these parts, again, we'll be
left a bit lighter To add more contrast to my work, and these parts would be darker. Now, if you want to
know the darkness of the part that you're
working on is enough or not. It's it's very an easy method when you want to close your eyes a bit and
keep them wide shot. And then you can see
them in a blurry way. When you look at your
work in that way, you can actually see where
it needs more darkness. This is a very simple
way and method for determining if that part
needs more darkness or nut. So again, I say try to
close your eyes halfway and then you can see a
blurry shape of your work. Then you can determine if
it needs more darkness. Okay, then I apply some
are shades over here. And also on the left side. I see in these parts, I need a bit more of my shading so I can work on these
parts a bit more. Okay, Just like that,
from these parts. I'm going to shade like that. So I can actually separate
my work from the background. Then I'm going to use
my eraser and I want to create some lights
next to some parts, for example, and links
to these lines and on the parts which are
clearly lighter. That's enough for now. Now I want to use my B6 pencil. And with my B6 Pencil, I'm going to separate
this area like that. And then of course, I'm going to shade it with a very small distance where the various
smallest space like that. Now, I actually guide this darkness over here toward the outer part of my paper bag. A little scene. From here. I sketch this pay per being folded and
curved in these areas. And then I consider as strong darkness
for here as I can see in my model's picture. Okay? And then again, wherever I see stronger
darkness, I apply it. It's a stronger
as it comes down, it will be a bit more or less. See. I'm going to
fade it, of course. And again, I bring
this darkness down. And I'll continue this way all the way through here. Deny a fly the total dark parts. So I know until where I should
have this strong darkness. As you can see, I have a
space between these parts, which can actually give them a thickness and give the
width to my paper bag. It doesn't need to be
very much or very thick. But it should exist
because you can show the thickness and the
width of your paper bag. As I apply into
darkness and as I move on tour the central
of my paper bag, I decrease my hand pressure to get lighter shades
and I'll fade them. This area needs to be
darker, of course. And also from here, from behind the bag. I need more darkness. So I'll continue. And I'll faded over here. I also gave a very light shade to this distance
I've applied here. So it wouldn't be
too much insight. Okay. Then from this area right
below this cut area, I have to work
darkness. I have to Actually apply darkness
and very slowly I shaded toward outside and I make it lighter as I
move toward outside, should be darker,
closer to the line. And as I move out it
till get a lighter. Just this beautiful
as this. Okay. Now little by little, I add more darkness and
more shades to this area. And again, as I move downwards, I apply, Let's shapes. I applied a shapes but
with less hand pressure. Tried to control my hand
pressure in order to create a beautiful
contrast in my work. Okay? In these parts, I
have some darkness. Then with a small
distance and small space, I apply more darkness. This is actually the Ups
and downs which have appeared on the texture and on the surface of our paper bag. We are actually
creating the texture, these kind of shading. And also in these parts, I need lot more
darkness like this, so I apply them. Here we go. Okay. So also from these areas, I'll do the same thing
and even you can see, this darkness has actually
lasted for longer. Part. I do exactly as I see, it's in my model. So if I say it, going on this long, I'll do the same thing
using my B6 pencils still, but because now I go to my
lighter parts of the work, I'm going to switch
to my HB pencil. With my HB pencil first, I go over the darkness that I've already created
with my B6 pencil. So I can make them
blending together and make that Shades more
cohesive and smooth. And go over all
those parts once. And then I come towards the lighter areas so I
can fade them as well. Your hand pressure
should not be too much. And as you can see
in all directions, I'm doing my shading. This is important
to actually apply a very light shade for everywhere for all the
parts of the work. Then I come over here and I
apply this darkness here. There is a dark shade
over here as well, which I work in its own
placement, of course. And over here I have
a stronger darkness. It wants to show that this
part of this paper bag, it has went in and it's curved in Ups and
downs on the surfaces. So normal on our wrinkled paper. I'm just going to fix these
darkness and then I can move and work on the lower
part of my paper bag. You have some small
darkness over here as well. And we'll do them. So try to create your shadings
in different directions. So there will be no trace of
your pencil on your work. So let's continue
in next episode.
4. Finish shading the paper bag: Hello again and welcome to the rest of this
tutorial with me. Okay. We have came up to here. And then again, I'm using my normal pencil to go
over all these parts. Making my shading, I even
apply to darkest spots or small curved parts in their
own placement of course. And I also work on the
darkness of this area. Then I will use my B6 Pencil and I work more
darkness over here. Same idea, friends. Over here we have a folded area. We have darkness, lightness,
and darkness again. So that's why this shading
that comes continues here. It will get darker, again lighter, and
then again darker. It's actually a light part
between two dark parts. And I'll continue
that until the end. Here we go. Apologists continue. And in these parts, we have more faith. We have actually a
very full the area over here on the paper. I come up and then I apply a very light
shade next to them. So they just get out
of being only a line. I'm want them to be
left alone as lines. I want them to be
shapes and textures. Over here. I also have
another strong darkness, a spot of darkness. And then I'll complete
this darkness more. I come down and I guide it down. And from here I'll come all the way down to the bottom
of the paper bag. And then I'll continue. Very faded. Then I want to apply the
darkness of this area. From here. Based on my model. I determined darkness
wherever they are needed. C. Now from here, I come toward outside. And I create kind
of a faded shape of Ups and downs here, apart being curved in and a
part which is more prominent. And I'll continue this way until the top part and the
bottom part of this area. Then again, of course, a stronger darkness
for these parts. Just consider them. And then with a bit of distance, I come down and over here I
have a very strong darkness, as you can clearly
see in the model. And then I come up
again, I apply it. Then again, I come
down then with the smallest space with
a small distance from the bottom of the
bag and paper bag. I drag it towards upside
with a lighter darkness, but it's still dark. And from here, I get to the very prominent
part of my bag, which is very light as well. They also fade this shade
that I've applied here. Then I come out and
from here again, I add more shadings and more darkness to the
bottom part of my bank. And in this area, I should also create a shadow of my paper bag on the surface
that it's extending gone. But right now, I don't
want to work on that. First. I want to
complete my paperbacks, shadings, and then I want
to work on the shadow. Then I'm going to use my normal pencil and I
go over all the parts, creating a smooth shade. For making all of my parts more cohesive and shading color. You should definitely work
on the textures of fabrics and papers several times
over and over again. You shouldn't just do it one time and say, Okay,
I've learned it. You should do them several
times over and over again. So you can get a handle of
it and then you can say, okay, I mastered it. So okay. So determine this area
more with my shadings. Okay. Then I moved
down for this area, I have to create this dark line. This goes behind paper. In another, in some parts
that it gets lighter. But again, I create this area darker and as I move
up, I created lighter. These parts are actually
the sides of our paper bag. That right now I'm not
going to work on it. First. I'm going to
finish the front side of the bag and then I go on to
work on this side of it. As you can see, I'm
using my normal pencil, so I'm creating a very light
shading over all of my bag. This area has a strong light, so I have to keep it
light, but not uncolored. I told you this
area should be kept light because we have
a strong light on it. And over here, I shade this area darker
on the side of it. And then I faded as I come down. Okay. Then I come lower and I'll continue this shade with
a bit more pressure. So I shade this area
and in this way, I'm actually showing
this part of the bag has gone in slide. It has a depth and I have a very strong darkness in
the center of this depth. By keep a bit more light for the prominent area
right next to it. And then again, I work on
this darkness over here. So just like that, I come up and I connect these two parts together so they
wouldn't look fake. And just like darker
spots on my work. I just go over all this light
area that I left over here so it wouldn't be just to white and Wooden pop out too much. But we should give it a light
shading as you've seen. So I do more shadings over here. Therefore, my paper bag, which show itself much
more prettier and better. Then I will use my B6 pencil in order to add a stronger
darkness for here, the bottom of my paper Bank. These areas. And also over here. I'm going to work on them. From here. Also, I come toward
inside of my work so I can show the depth and the dense in my paper bag. These parts are deep because
they've gone inside, so they should be darker. And this contrast between
these darker shadings and the light parts are actually creating the volume of my work. So it goes like that and
I'll continue up to here. So wherever the
darkness of stars, I apply the darkness exactly the same shape and
the same way I see it. This is a depth of
the darkness as, and as I move up, it gets lighter of course. And darkness would
be decreased. Okay? And also in this area, I want to spread a darkness. We don't have very strong
light in this deep area. I just shade all over
it very lightly. And a hillshade we'll
cover all of the side. And then I emphasize on the stronger darkness
and deeper parts. This part is deeper
so I increase my hand pressure and I apply
more darkness to this area. Then this part of our paper
bag is a bit folded to. So again, I implies strong
darkness for the depth part, for the deep parts of it. And then I fade it
toward outside. And then again from
the back of my paper, from the behind
of the paper bag, I create a darkness
and I fade it. You should be careful
about these parts as well. I, you see the full lit areas
and deep areas of the paper are very important because it's difference between their shades
and the prominent parts. Shades actually create
our whole volume. So it looks like a triangle
that my package that my paper bag has been
folded and wrinkled. Ok. And then for the
upper areas, I okay. Very easily I apply my
darkness from here, I have a strong darkness and I give it kind
of a faded look. But still it's a
strong and I fade it. As I'm applying it. First I apply it very
dark and then I fade it. Of course, don't want any
borders in my shadings. So just like that, I move up to upper parts. Then again, I increase my hand pressure using my pencil to create
a stronger darkness. And I come all the way up. It comes all the
way up, up to here. It goes up, the
darkness goes up, very high hand pressure. And it continues up to here. Over here we have a
small lie to space, and then I'll continue my work. So basically you should create the darkness wherever you
see them in your model. I apply a strong darkness. You see we have a kind
of a light trace here, so I keep it lighter or comparing to
the rest of the work. And then I bring the darkness from here slowly and I faded. When I get to delight our part, may very careful about the dark parts which are
fading into the lighter areas. This work is actually
very effective that you get to volume
of your work correctly. We're almost at the
end of our work. I should keep this
area and lighter and I should continue
on this part as well. Here, I shade this area as a line because I can
see it has a line. Clearly. Over here. I have a prominent part, a part coming out, not light. And I'll continue all the
way through here. Again. I add more darkness. And just as beautiful
as that are, paper bag is finished. So just take an overall look
to your sketch at the end. Very-very. You think
you'd need more darkness. You should apply them. For example, I forgot to apply the darkness
for this area. So always after you
finished your work, you should look at
it generally and see where it needs more
shadings or when, where it needs even more light. Up to here, we've just gone
perfectly so far, so good. Then again, you should choose
your normal pencil and you should go over the
parts which you've created. Very rough darkness. And you should go over them with your normal pencil in order
to cover them and make them more smooth and softer than a guess my eraser and I create
a strong light in my work. So I erase this strong darkness. The river, I have a
strong lights in my work. And that's the use of
wire to the eraser, creates beautiful lights
to complete the contrast. And then I'm going to create the shadows of my paper bag on the surface that
it's standing, gone. Right from this line, the bottom line of the bag, I start shading toward the
outside in the direction, in the opposite
direction of the light. I'll do the same thing on
the back two and a base on this side to get the shadows. And now we're done with
this beautiful sketch. So in this sketch, you've learned how to create
your primary sketch with angular method and how easily you can add
sketch and shapes, Matt objects like
fabrics and papers.
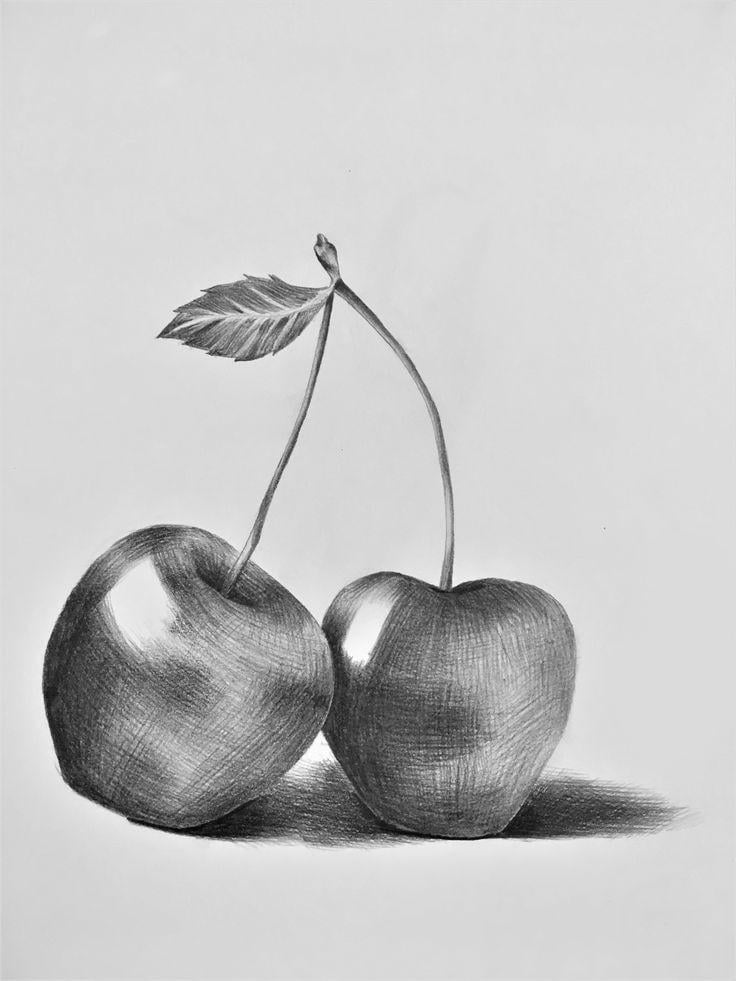
5. The initial design of cherry by geometric shapes method: Hello again. Welcome to new episode of sketching
tutorial with me. In this episode, we're
going to work on the texture of the
fruit and leaves. And we're doing good
with hatching method. So we're doing this Shading
with hatching method. And aside from that, for the primary sketch, I'm going to use a
geometrical shape method. I'm going to tell you how. My normal Pencil, my HB pencil. Just be sure that the tip of
your pencil is sharp enough. And when you made sure of that, you can start your work. So as I said, I want to create my primary sketch with
geometrical shapes. What do I mean by
geometrical shapes? See my friends, each one of these cherries can be a circle, or I can consider this circle
for the inner part of it. Or I can consider my circle
for the general shape of it in the outer part of it. So first of all, I determine a circle over here. I create a circle. Then I move on to create
the second circle. And I also consider
how much they collide into one each other with
the previous circle. So this would be
the next circle, which can be placed
here and a bit of it as collided with the previous one. Over here, I have a
triangle shape. You see? So from here, I'm going
to create this triangle. And from here it goes up. And then it's reached its peak. Here. It comes down again. Looks like a mountain. So this would be the
stems of my cherries. Now, as you can see, I've actually created my primary sketch with
geometrical shapes, but now I'm going to work
on more details on them. For example, I know that my
cherry is in this direction, is placed in this direction, so I create my cherry
in this shape. The bottom of Vi
cherry has a bit, has a bit curved, a bit curved in part and
also completed from here. As you can see, this
cherry is more in front, so it covers that collided area. Then I work on my cherries, a stem which is placed here. Okay. Here we go. I also have a curved shape here. And then I also use my editor eraser to erase all the extra lines of firework. And this would be
my first cherry. Then I want to work
on my second cherry. And as you can see, second cherry is also on the same surface
as the first one. So I start from the top
of the cherry again, I have a curved part here. Looks like a heart shape. And then again from here, it goes up and comes down toward this surface
that it's on. Okay. Goes up to here. This is my second
cherry as you can see. And the second stem as well. Then I work on this top
part of this stems. It has a small part. And then I want to
create the Leaf. For creating the leaf first I consider the shape of my leaf, and I'll create it, and then later I will
add more details to it. I mean, these beautiful
designs around my leaf. First I create a
general shape and then I'll add them. Okay? So now I've done the
primary sketch of my work. Now I will erase all the extra lines
of Weimar of my work. And I will lighten my primary sketch and
I actually clean it. Again, I emphasize on the fact
that you should not create your primary sketch as dark as I do right now. Not at all. The reason that I'm
doing a darker over here is because I want you to
see it clearly and vividly. So I've erased all the
extra lines from my work. And with my answer, the eraser, I make my
work even cleaner. I make sure there are no
extra lines around it. So just as easy as that, I could have created my
cherries primary sketch. This was done with my
geometrical shape method. That it's very
useful for creating objects until you get more professional and you
can do it without them. Again, just as like
my previous sketches. The first thing
that I do is that I lighten my primaries
sketch with my eraser. Therefore, I would not have
too many lines in my work. So when I want to fade by work, they went bother me. That's why I tell
you that you should never create your primary
sketch as dark as mine?
6. Beginning of sketching and shading the cherry with the hatching method: Okay, then you should
use your HB pencil. And I want to tell
you how you can do your sketching by hatching. So as you can see, I'm hatching over here
and there is darker. I'm using more hand pressure. And when I move toward
the lighter parts, I decrease my hand pressure. Of course, wherever your
shades and hatches are darker, the shades are darker. And wherever your
hand pressure is less and there's more distance
between your hatching. Your shades would be lighter
and that will be this. I think the second plot of
your colorings and shadings. I'm going to use my
hatches and very easily I want to create
the shades of my work. As you can see, I'm really paying attention
to the direction of the volume of my cherry
because he trusts are more, more clear to see. You should be really
careful about hatching in the right
direction as your volume is. Okay. And from here, I'll
do the same thing. So I consider this curved area. And of course, the darkness
that I consider for this area and I should work it is much more comparing
to the other part. So I do my head traumas
more and darker. Then I want to use more
hatches and more shadings. And I totally give my shape a great volume
and a great sheet. Just be careful about
direction of the volume. It's very important. If you're going into right
direction, That's cool. But if you go into r9, wrong one, that can
ruling your whole work. So be careful about that. So in the darker parts, I will definitely
hatching shade darker. Now, how can we create the
texture of semi shiny objects? You can create them
by actually creating very dark shades right
next to very light shapes. Or basically, we should have
a very strong contrast. We should have a lot of
difference in our colors. And we should create
different contrasts. Strong contrast by
applying very dark shades. Very dark hatches. Right next, very light areas. So right now I'm just
doing the hatching and I'm not working
on its shine yet. Okay. Continue the same way in the direction of the
cherry, beautiful cherry. Okay. So I also give a shade to this area, exactly as I can see the
directions in my model. Okay. Here it goes. And I'm completing my shades
with more head drink. And then I also do the same thing from the
opposite direction. So I can get it incorrect. Circular shape. And Sarah Kohler volume. Alright. Now I'm going to use
more number of hatches. And I add more
contrast to my work. Not everywhere, but in some
parts of course, you see For example, over here, I have to add more hatches to
increase the shades to get more contrast in the
direction of these curves. Of course. Okay. Then I also start from this area and I'll
continue this work. And I add a lot more darkness in here. Okay? In here, I also have a very strong darkness right
next to the strong light. I've gotten my cherry. And also in the area that the sum of the cherry is connected to the cherry itself. We have very strong,
strong darkness. Here we go. Again, I emphasize on the fact
that I'm shading and hatching the right direction
of my cherries volume. Okay, then I also need more darkness on this lower part of my work and the lower
part of the cherry. So as you can see, I'm creating very
ordered hatches. And the direction
of this cherry. When I say it like that, it means that your sketches and you're shapes should be also curved because you're cherry
is in a circular shape. So the hatches should
not be straight. They should be round too. Because if it's not, it's not going to give you that circular shape,
that round shape. Okay? So I apply
the darkness over here as much as I need and as much as I can
see it in my model. And I'll do the same thing for over here. Alright. Then I will choose my sketching pencil so I can
add a stronger darkness. Just be careful and
keep in mind that the tip of your pencil
should be totally sharp. So right from here, I want to work on the
stronger hatches. Darker hatches, of course. And then from this lower part, the darker shades and hatches. And also right here on the top, you can see strong darkness. So I'll do it too. Okay. Then over here, I add
a strong darkness for this curved area on
the top of my cherry. The place that this term
will be connected to it. They're doing this as
sketching a style with hatches and beautiful contrast. Then again from here, I started working on the
hatches and shapes that I need. The distance with the space, I come down and from here, I start adding darker
hatches and shapes, forgiving more
volume to my work. So I also work on the
lower part of my work. I consider the same
shadings and hatches. Horizontal direction as well. So here we go. And the darkness for here
should be done as well. At a bit more darkness here, right next to this light area. Then you can be done. So just as easy as that. They could actually
complete this work. We could complete the shading of this work with
hatching style. Because basically it's an, a Sketching is style. Okay. I still have more
darkness over here. Stronger ones and tear
it goes. That's it. As you can see very easily. We could work
actually with this, work on this beautiful cherry with hatching and we got
the shading is correctly. Now I'm going to use
my normal eraser in order to create this
strong light in my work. I'm just erasing this area with my normal eraser. Very easily. I'm creating a very light area right in the middle of darkness. So I erase this area and I give the shine
quality to my cherry. Just add a bit more
to this darkness and we're done. Okay? Now we want to work
on our second cherry. Before we do that, we should make sure
that the tip of our pencils are pretty sharp. So when you want to do the hatching lines for
the shadings should be very careful that the hatching would actually go
next to each other, that they don't actually
cut each other. You shouldn't be like this. Your hatches and
you're shading should be parallel to one another. If you just go like that and your hatches will cut each
other, crossover each other. It's not correct adult, they should be parallel
to each other. Now let's move to
our second cherry. So be with me in
the next episode.
7. Second cherry shading: Hello and welcome to the rest
of this tutorial with me. Okay. In this episode we're going to work
on our second cherry. And of course we
are going to create it as attractive and pretty
as our first cherry. First of all, like
our first cherry, I'm going to start
with my normal pencil, with my HB pencil. And I worked from the
sides of my work. And I start hatching
and shading exactly in the direction
that my cherry is. So continue like that. And I'll do the same thing
from this lower area as well. So I shade from
the top to bottom. So I'll continue like that. And with hatches, I start shading from the top to bottom and from
the bottom to top. Anyways, I'll do the
hatching in both directions. And I keep in mind that my
lines should be rounded. They shouldn't be
straight because my whole cherry is
circular and rounded. Anyways. Then I going the opposite
direction, of course. So from here, which is darker, I bring my hatches
and Shading and I faded and leave it toward the light areas of my cherry
eye, continue like that. So I'll continue
my work like this. Just do my shadings and hatches. And also from these parts. I'll do the same thing. So do not rotate your paper at all. I mean, in no ways, rotate your paper because your hand should actually
get you get used to be capable of working in
different directions and rotating in different directions without rotating the paper. So your hand should get
this ability and you should improve it by not rotating your paper while
you're working on it. As you can see, I'm working
on my primary hatches and shades in a horizontal
way and vertical way. So from the lower part, which is darker, I'm going to have more hatches next to each other and of
course darker ones. And then from the sides, again, they should be darker. So I go over them
and emphasize them. And from here, the top
part of my cherry, again, I should
have more hatches. So I'll continue.
Just like that. Okay. So just as easy as that. With the sharp tip
of your pencil, you should shade
hatch and enjoy it. This style of
sketching, actually, the original sketching is
style we'd, hatching for. Shading is very
popular for my friends who do not like to fade
most of their shading. If you don't like
fading so much, you should try this style in this method that you create
your shapes by hatching. Here it is. And I come over here and I apply this hatching on my work into direction
of the volume of my cherry, of course, where
it's more prominent. I would have less hatches
and leave them lighter. And wherever I have the shadow
of the other cherry on it, or basically it's darker. I would have more hatches. And again, I do my hatches
vertically as well. So I continue my work until
I get to this upper area. And then little by little, I should move on to
work with my B6 Pencil. I'm going to use my B6 pencil in order to work on the
strong darkness. First of all, I start
from this area which has been actually placed
behind my other cherry. I should create a very darkest
spot here so I can express the fact that my first cherry is in front of the second one. When I darken this area, it actually shows
their placement according to each other. Okay. I'll continue in my shadings and then continue the same darkness with the same pencil for the
bottom part of my cherry. And I also do my hatching
in horizontal way as well. And on the left
side of my cherry, as you can see, I have more darkness. So I do it more intensely. Because I have the darkness
is stronger and more intense. My dear friends. Just be careful you should
not shade horizontally with the side of your pencil at all in this
style of sketching. Because that looks like
more faded and it will then be Sketching is star it
wouldn't be hatching anymore. So also from the tub, I want to create the contrast with doing
the hedges again. So like that. I just do it. Now from here, from these parts. I apply them as well. Okay. In these areas that I
have less darkness, I decrease my hand pressure. And in this part that is more, again, I increase
my hand pressure. We have a dark part right here in the middle between
two lighter areas. So again, I should do more hatches to create more
contrast in this area. Personally, I really
loved this style that I actually a
sketch with hatches. It has more joy for me. Comparing two
shading and fading. It kinda gives me
a positive energy. And wherever you feel
like you want to just create a beautiful
sketch and do it fast. This method, this is style, is really nice for you
and can really help you sketching style
with hatching. So I completed my work, I applied all of the
strong darkness. And now I want to use my normal eraser in order to create a strong light over here. So with this very
strong contrast, I can Keep this shine in my work. I can apply one more over here so I can add more
shine to my cherry. So now I want to
work on the stems. I'm using my b2 pencil. And from the part that they
are connected to the cherry, I go up and then from the top, from inside, from the inner
side of the stem is start by, had changed and I come down. I just go up and down. And I place more of the darkness on this
side of this stem. And that's it. I'll do the same thing, the exact same process, and the exact same thing for
this second stem as well. Just determine the
placement where I should do my hatching
is and shadings. And I bring it from one side, it would be darker, of course. And I fade it toward the
other side of the stem. I kept both of them darker on the right side, as you can see. A very beautiful sketch
and very easy one. Alright. Now I started
with my B6 pencil. And I add more darkness
in some parts of my stem, as I can clearly see it
in my original model. Even these areas. And also these parts. These parts should be
definitely darker. Okay? Then I want to work on
this upper part of my work. And I apply the darkness for this top part of the stems where they connect
to each other. So the only place left
is the leaf of our work. That exactly as we did hatches for the
other parts of our work, we do the same
thing for the leaf. As you can see,
I'm starting with the outer parts of the leaf, and I start hatching and shading toward the end
inner part of my leaf. Okay. So here it goes. I go like this. Then I will add even more
darkness into my work. Then from the
middle of why leaf, I go again toward the outer
parts and hatch them. I just leave a trace of light area right in the
middle of the leaf. As you can see. And some parts of the leaf
should be definitely darker. So here we go. Just like that. And as you could see, we've worked on the
leaf as easy as that. So I have to now create these a strong glides again in order to complete my contrast and
get that a sketching style. Then again, I use my
pencil and I go around the light parts and add more hatches in order
to get them darker. Now the only part left
is actually the shadows of the cherries which
are below them. So I'm going to use with my, I'm going to use my B6
Pencil, which is what? A via dark has pencils. And I start from
these ending parts, the part that my cherry is
connected to the surface, and I start hatching again. As I move up, my hatches will get lighter. Just like that. Also from
the bottom of this area, I consider the same
kind of darkness and I move toward this area. So just like that. And I just complete my
shadows with the hatching. I also apply some shading
in different directions, in opposite directions actually, in order to complete
the shadows. And as you can see, they should be darker. So I'm going to
make them darker. Just as easy and as
beautiful as that. We've completed our
cherries and their shadows. I hope you've enjoyed
this tutorial as much as I did as always. See you in the next tutorial. And I hope that you've also enjoyed this style of sketching. It hatches. I enjoyed a lot, so I hope it was
useful for you to
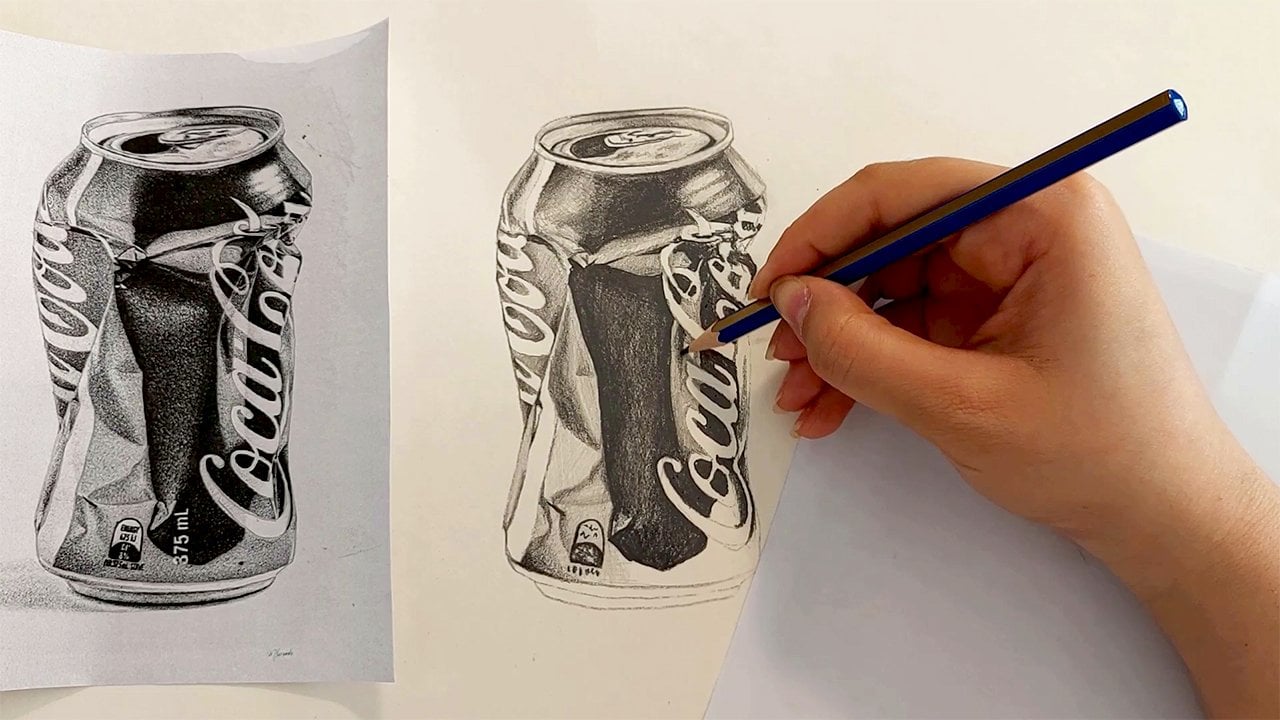
8. Basic design of metal faucet: Hello and welcome to a new episode of sketching
tutorial with me. In the two previous episode, we had two different sketches. I told you how to create
your primary sketch, one with geometrical shapes
and what an angular lines. So you could actually choose
which method you like and you could transfer your primary sketch
to your own work. In this episode, I'm going to
tell you a method which is actually useful for very
complicated sketches, which have so many details, can darken the back of
your model which you have, which you've printed already. So you should turn
back your turnover, your paper, your models paper, and then B6 pencil or any kind of sketching
pencil that you have and darken the back
of your model completely. Then you place your model on the part that you
want to work with. And then you fix
it with your hand. And be really careful that
you're paper would not move. Your printed paper would
not move while you are transferring your sketch
into your own paper. I start right from the top. And very slowly. I tried to move on to lines. See your hand pressure should not be too
much that you leave any trace on the cardboard or paper that you want to
do your actual work on? I'm just Valerie. I just very slowly go over the lines which are my main
lines and I need them. I can even add some of the
details while I'm going over the lines and bind the
darkness I've created. On the other side
of my models paper. I'm actually copying this sketch in this model into my own paper. You don't need to work on and go over all the small details. Should just work on
the bigger details, the main lines and some
more major details. And then later you can add a smaller details
all by yourself. So I tried to keep
my model very firm. So it would move. And just like that, I would add the general
details after the main lines. Okay, so I work on this
area as well. In this way. Now parts by part, very slowly. And we did lots of patients. I continue my work, so do not worry. So your work would
be well detailed. Then I move on to
the lower area, this area and coming
down and both sides. And I'm actually creating
a general shape for my primary sketch. Okay? Just like that, I also work on these ovals based on my model, and I copied them in their
exact correct place. Again, based on my model. So here we go. I also creates some of the reflections over here
on these lower parts. And then I come down all the way down to
the bottom of the faucet. K. I should place it here because I don't want
my model to move now. If it's hard for you to fix it, you can also use
some paper tapes or clips to fix your model
on your cardboard or paper while you are copying your model into your work
as your primary sketch. And I come over
here to this part Okay, So I'm working on general details and I am creating some of the parts
knows each a small detail, but some parts I'm
gonna go over them. You should a specifically go over these a strong lights because when you want
to do the shading, you should be really
careful about these parts and not
to go into them. It's important while
you want to shan't. So I am going over
the strong lights. As much details as you
go over right now. It would be easier for you during the rest
of your sketching. But because I don't want us to spend lots of time on
our primary sketch. I don't want to spend
too much time on it. I just leave out some
smaller details and I'll create them in
this shading phase. Okay? So I'll completed like this. And from here up to this area, I drag my hen all the way down. And as I always say, try to use a colorless pen or one that doesn't
have any ink. You just wanted to
go over to leave a trace of a strong trace, but just to leave a trace of color for the paper
underneath it. So here it is. Okay. I take a look at the sketch that
I've transferred into my work and I check
it wherever I needed. I add to my sketch. I'll take a look
again to make sure that my work is completely
copied over I wanted. And I can even add some
more lines over here. Okay? Now we sweep
away our model. We put it here right next to our work so we can keep an eye on while
we're working on it.
9. Start shading: Now we should start
working on our own sketch. You're going to do the shading. But as I told you before
in previous episodes, we're going to start with
lighter shades of our work. And for shading
the lighter areas, you can use your normal
pencil or HB pencil. And another thing that
I should tell you is that when you want
to start your shading, you should definitely
start from the top. Because if you want to
start from the bottom, as you get up, your hand will actually get a slides on the
lower part and it will make your work dirty and
it might even roaring it. So you should start right
from the top of your sketch. Make sure that the
tip of your pencil is sharp enough and then you
can start your shading. Again. I say your normal
pencil or HB pencil. Okay. First of all, I'm going to
start with my HB pencil and I start from the top
part of my primary sketch. Okay, I keep the
light over here. And from this lower area, I start shading again. I apply Elinor
darkness over here, and then very slowly I fade this linear
darkness downwards. So first I Create and
then I faint. Very easy. And wherever I see
there is more darkness. Of course, I apply
more darkness. So very carefully and orderly. I shade this area
and I come down, which we have some kind
of lines over here. And then with a
very small space, with a very small
distance from the top, I start applying the darkness
and the shade over here. Let me just determined
the lower line as well. And then again, I
apply my darkness, my shades, dark and
light, dark and light. So just those that
I move forward. Darker shades and
lighter shades. So I can get this design
and this shine in my work. You should do this very
patiently and very orderly. So you should not rush through
it at all because it's a complex model and you
shouldn't rush through it. Okay? One part is going to be dark, light, and then again dark. And as your pencil is sharper, you can actually work on the
details better and more. Now, again, on this floor area, I should determine this area for creating these darkness
and lights again. So whatever darkness that
you've already created here, you should bring it down
sideways in this area. And the parts between them
should get a lighter shade. Just as easy as that. Okay. Here it is, and that's it. Now, for this area that I've just left untouched
and uncolored, I want to place some dots
and spots like these. Okay? Then I get my B6 pencil and I work on some of the
lines that I've created, making them a bit more darker. So here it is. And now I got to
darkness that I wanted. We're going to continue
in next episode.
10. Shading of the upper part of the metal faucet: Hello again and welcome to the rest of this
tutorial with me. Alright. They worked on the
top part of the faucet. And then again, you should
start with your normal pencil and shade from these areas
and working it toward down. So you should work on this area, determine this era,
and work it out. Now it a bit of distance as a one millimeters create
the rest of the shading. Now because this
area is very dark, I'm using my B6
pencil over here. This is the first
plot of darkness. So I definitely do it with maybe six pencil
and very dark. And also from this lower part, I start dragging the darkness
from the bottom various slowly toward up sides. As you get to the
middle of this line, you should make your
shading is lighter. You should control your hand
pressure so you can make your shadings light and dark
while you're applying them. Alright. I move up and I work on
this area of very dark. And over here I decrease my hand pressure in
order to get it lighter. Again from this sides,
from these edges. I'll do the same
thing. I work on it. Again. I insist that
your hand pressure should be controlled
because you are constantly moving back and forth between the darker shades
and the lighter ones. So if you don't have enough control on
your hand pressure, it's gonna be
problematic for you. I'll continue to
darkness up to here. I do not connected
to the lower line. And with a space, I come up again and I
go around this area. First, it's going to start
dark and as it moves, it'll get a lighter. Alright? Then I work on this side, and I work on the dark
than silver here. And as you can see, all of my darkness are
going to be faded. Okay, now I want to move on this side and work on
this side as well. I shouldn't. One side of my
work on shaded or uncolored. So I applied the darkness
as much as I see over here until I get to this area and I decrease my hand pressure to faded
toward the lighter areas. Okay. Just like that, I work on
the dark shade and faded. And in this area, I work on it backwards
and make it fader. Okay. Then I work on this, a strong darkness over here. And on the bottom part, it's of course lighter. I even have some
lines over here. But this area is
basically lighter. So I choose my HB
pencil and I move on. The lighter parts of the work. Why do I say you
should use HB pencil? Because we are working on our
sketch without any fading. Equipments or tools
without any faders, we should use different
numbers of pencils. For example, for shading
the lighter areas, you shouldn't use B6 Pencil because it gives
us a rough shape. But if you use a softer
pencil like HB pencil, while you want to shade, the lighter areas and lighter
pencil would be used there. As you can see, you can get a very smooth shade without any Fader tools or equipment. Now, sketching courses, you
should learn something. And that thing is that you can even create beautiful sketches and cohesive and smooth shades without any specific
or special tools. And only with your pencils
without any faders. And then of course, I can use my edit
eraser to create this a strong line
of light. Over here. This shine actually
is what makes the texture look like metal. Then again, I use my basics
pencil and I go over the top side of my light
that I've just created. I applied darkness on both sides of the light
that I've just created. I also create some
curved lines like this, as I can see them in my model. Then again with my HB pencil. I work on these parts. I have applied a
stronger darkness. So I go over all
of the shades that I've created with this pencil. So I can just make
them softer and smooth or they wouldn't look like
a Spots anymore. Okay. Now this side of my work
should also be done. I come all the way up. And from here. I work on the part that I
should have my darkness. I determined this area. Over here. I have a darkness like that. And with a bit of space, I have another Darkness which is repeated over here in
the same shape almost. Then I'm going to
use my B6 Pencil. And I start applying
the darkness from here. And then I apply a
stronger darkness and more darkness from the sides
and the edges of this area. Alright. I also drag a dark
line over here. And then again, a stronger
darkness right on the edges. Then we this space, I create this drop shape. It looks like a drop. And I connect it to this area. And I come down afterwards. Okay, over here, I'll
try to copy the details, the various small details
that I can see in my model. Just try to copy them. No work, don't worry. So here it goes. Alright. Then I should come over here and emphasize
on these lines a bit. Darkening them, of course. And I make it more
intense and stronger. And as I move up, I faded away and
making it very light. Then I use my HB pencil to separate this area
from my background. And in order to complete
that separation, I consider a very light
shade for this area. Okay? Here it is. And for here, I tried to create a soft shade and then
a strong darkness, exactly like these parts. Again. A soft darkness
and then a strong one. And I'll just continue
this same pattern here. Soft and strong, soft and strong. Okay. I apply the darkness as I see in the small
details in my work. And then I work on
its site from here. So in this way, very slowly, I start shading until I
get to this lower area. Again. Light shades
should cover here. And over here I have
a shade like this. So I created, okay. Then very slowly I
move toward the light. Okay, here it goes. So I'll just continue this light shade toward the
top parts of my faucet. And then I keep this
light in this area. Try to not go into that a strong light
while you're shading. It's better not to go in it. And later we will work
on it with an eraser, but it's better to
keep an eye on it. Of course, I shade in different directions so
there would be no trace. And then after dad, I use my eraser
to work on these, a strong lights over here. Okay. We're going to continue
in the next episode.
11. Completing the shading of the upper part of the metal faucet: Hello again. Welcome to the rest of this
tutorial with me. Okay. Now we are going to
complete this sketch together as much as we
can in one episode. So I'm going to get my B6
pencil and I'm going to work on the darker darkness of these parts, the
stronger darkness. So I also have a shape
like this over here, exactly on this
part of my image. So it should be placed in
its own correct location. And metal texture. Delight shades. The lightness are exactly
next to the darkness. I mean that this
strong contrast will actually gives your
work a metal texture. Because you have strong shine. You have a strong
light right next to the darkness so that strong contrast
will actually give you the texture of
metal that you want. So by tapping, I just come down like this with
this dark color. And I also work over here. And just as easy as that. Okay. Now for the next part
with a bit of space, I start from here, I go over this line and then I start fading the line into the darkness
which is inside of it. You can clearly see the
strong darkness here. So first I determined the lines until I get
to this lower area. So I can get this circle
shape over here inside of it. Also, I have a
very strong light, has the shape of
a circle almost. After I've determined
that I start working and shading on this
area with by B6 Pencil. Shading, good, very, very dark. And I'd be very careful
not to go inside of the light areas that I've
determined and separated. Okay. So I work on this dark dust. And as I move toward the light, I decrease my hand pressure. So I can guess my
shading lighter as I move toward this
strong light area. And also from these parts. I'll start doing it. Here we go. Continue up to here. Then I get my integer eraser, making sure the light
parts are really light. And then I use my HB pencil and I go over the darkness
that I've just created. So my shadings would not
Astaire off and they actually become
softer and smoother. Okay? Then I'm going to create small details into my
work, for example, in this area, you see it very easy method that I
can tell you how to create Parts like this is to first
create a strong darkness. So for example, I have a strong darkness over here
as the shape of a rectangle. So I place it then
right next to it. I have also darker lines. Then I apply them right
next to each other. And just as easy as that. So you'll become a
professional sketcher and painter when you can actually see your
sketch or C or model, very simply when you see it, simply observe it
a simple shapes. You can create it faster, simpler, and even better. So again, I searched my
pencil and write from here, I start applying the
strong darkness. These are very small details. And I'm doing right now. As you can see, I
have a rectangle in one color and I shaded. Then with a distance
which is space, I apply fairly strong
darkness here. And then I create a lighter
shade comparing to this part. Then again, here, I have darkness as the same
design and pattern that I have in my model. So here it goes. Okay. So I do my shadings
and I add the details, smaller details
that I still need. And that's it. Okay. Now we've worked on this part
as well and it's finished. And we can move on
to the next part. Then I want to work
on this lower part of this area indeterminate
with this dark line. And then I gave my work
this curved shape. And now based on my model, I apply the dark shades from
one side toward another. And then slowly as I moved
toward the other side, I decrease my hand pressure. Just as easy as that. So here it is. So work on it. And just as easy as that, we could get these details that some might say
they were too hard. But we could have got
them very easily. Then with a space from the top, I start the rest of the shading. And I have a dark
triangle shape over here, almost like a triangle. And a small darker
spot over here. And after that,
the whole top part of the faucet and the
tab would be finished. Okay, Again, I do the
same process here. I follow the same procedure. First, I look at my
work very generally, I determined the darker
areas, the lighter areas. And I see them simply. So I can work on them better. Then. I apply a very general and
light shade for this area. You see this area
is not dark at all. So I just leave a
light area here as the With a one millimeters, I leave that area light and then I worked on the rest
of my shadings. Okay. Then I'll have a strong
darkness for this area. I'm going to use
my B6 pencil for these strong darkness
is a strong dark spots. I have a pattern like this, shade like this one. And from here, I create this patterns and
designs with my dark pencil. Okay? With a bit of this sense, I work on this area trying
to create a darker shades. And then I repeated again
with a small space. And over here I have a circle, spot of the darkness and
a shape like a drop. So try to get all the
details more simpler. Again, I say you should
look at them simply. For example, I said this detail looks like
a circle and a drop. You should do the same thing. If you look at them simply, you can create them
easier and better. Okay? Then I will use my
HB pencil and I go over the parts over here and I add
more darkness to this part. Okay, I have a very strong
light here and I'll keep it. Again. I say I go
over Shading with my HB pencil to get
my shadings softer. Then I use my edge eraser in order to create a strong lights. In this part of my
faucet as well. Again, I darken around it so I can give my work that
shine that I need here. So we've finished the
top part of the faucet, as you can see. And now we want to work
on the lower area. Just let me finish
up some ketchups. Day would be fixed. And here we go. And that's it. So let's continue
in next episode.
12. Shading of the lower part of the metal faucet: Hello again and welcome to the rest of this
tutorial with me. Alright, now for
continuing this, we are going to start working
on the rest of our faucet. I'm going to use my B6 pencil. And I want to determine the
area that I want to work on. On the lower part. Just let me sharpen the tip
of my pencil before I start. Now from here, I will come down and I make a curve line and look, continue it up to this area. I have a light area over
here and then again, a darker line over there. So as you can see again, I'm applying dark line and a light line
next to one another. And just as that, I create these straight lines with a strong contrast
next to each other. And of course, as always, I keep an eye on my models. So I will create this design and pattern
based on my model. Over here, I have
a triangle shape. With a bit of space. I create my line again. I have a design like this. Like for example, there
is a reflection of something on this
part of our faucet. Again. I'll repeat that process and I'm almost
finished with here. Then I get my normal pencil and I give the whole area
a general light shade, very slowly and very lightly. Okay. Here it goes. Hey, apply their shading in their own placement
very orderly. And then for this area
below this patterned area, I want to work on the
rest of the faucet. Okay. As you can see, this is a very light area and that's why I've created a very light line. And as I told you before, in the rest of the parts, you should start with
applying the darkness. So this area is no difference. Therefore it, right
from the beginning, I want to start first on the darkest spots and
dark areas of my work. Okay? Then write firm here
with a bit of space. I should just start from here. And I should apply
these dark lines. So next to them I can
create the shine. Okay. Then over here again, I go a bit sideways. Yet I apply this darkness and I just keep some light
parts inside of it as well. I don't totally go dark. And it's not because I wanted
to create them randomly. As I told you before.
I'm keep going. I keep going back
to the model and see wherever I have light
or darkness or any details. I can apply them
precisely into my work. So again, with this space, I have a darker shade here
that I create a slowly. From here, it turns back, turns around and I've kind
of a dark line over here. Okay. So we apply details
of the work as well. So the darkness with going
their own placement and the lights would be in
their own placement. Okay. Then I want to work
on the next part. And from here, I want to work on this pattern, on this design right over here. And also over here. So this area would
be left light. And again inside of it. Every other part will
be dark and light. And I also go over it
with a very light shade. So it wouldn't be uncolored and it wouldn't be
too much inside. And then again right
from its sides. I want to apply
stronger darkness. These parts are
absolute darkness. So without any fear,
without any hesitation, I am going to shade
this area completely. It very dark color. Then I come to her,
decide toward right. And as I come to this part, I have a line from here. Coming up. Again, I preserve the light and I darken
this area completely. Okay. Then again,
we'd a bit of space. I apply the darkness
surrounding the slight. Little by little. I'm completing my shapes. This is sketch my take
a bit of time from you, but it worth it. And you shouldn't
rush through it. You should go and shade
every little detail. You should go little by
little in your work and create every small detail in order to make a
magnificent outcome. So design do even slower
and more patiently. Okay. Now I'm going to use my HB pencil or might
normal pencil as you know. I will work on these parts which we've
worked with lighter shades. So I'm just dragging it over all the shadings
to make them smoother. And better. Also drag my pencil on
the lighter parts to creating a very light shade in order to separate it
from the background. Now, I know leave
any parts to white. So little by little,
I move downwards. I should complete both sides
of my work as I come down. So both sides should
be developed. I shouldn't just complete one side right down to the end and then
leave the other side. So I give it a light shade over here because it is a light area, as you can clearly
see in the model. Then I want to work on
the lower part of my work Of course, as usual, I work on the dark
parts of my work. And first of all, of course, I'd be shading these three
ovals in my work because genuinely they are the darkest
parts of the whole area. The sides would be darker. And as I move toward
the center of the wall, it gets a bit lighter. I just have a light line of shine in the middle
of this overall, I tried to keep it and
Nazca to darken that area. But in general,
these three ovals are the very dark areas. Okay? And of course, I use my HB pencil and I go over these parts to make
the shading softer, smoother and more cohesive. Alright, just doing some
complimentary work over here. And I fade it here. Okay, Then I move
to the second oval. And after separating it from
the rest of the background, I shade all of this area. C. Very easy to do so
because it's socially dark. So just like that, I'm very slowly. I do this. So my dark shade would be very soft and
organize an ordered. I should be really
careful because I don't want my shadings to
get out of the line. So I get my B6 pencil and I
go for the darker shades. Of course, as always,
as you can see, it's darker on the top, inside of the
overall, of course. Circle. Can be both. And I give it a general shade. Ride down to the bottom. And then again, I use my
HB pencil to shade in the opposite direction because
I didn't want to leave any white dots or spots
inside of my work. Okay. Then I get to the third and
the last of all that I have. Here it goes. And completely and slowly. I shade this area and cover it. And I should create absolute
darkness inside of it. Dad, I'm going to use my B6
pencil in order to do that. Okay. Then I want to work
on the next area. I start from this upper parts. And then with a bit of space
between these two parts, between this darkness and the bottom part and
the top part of it, there should be as little space. And then in-between,
as you can see, I'm creating a Spots by tapping and creating the
shades and darkness. And very easily I finish it. You should just be very careful
to follow the patterns in your work while you want to
create these small details. Okay? So first I'm going to
complete this side as well. And then I can work
on the lower parts. So I determined the light border here and then I shade
the risks of the area. Okay. And with my HB pencil, I can even make
this shade softer. I would also add some more
darkness to this area. Then from here, I will create softer and smoother
shades for my work. Of course. So here it goes. Okay. Then also from here, I tried to continue the shades and even create some more dark
patterns like this. And then again with this small space from the oval
eyes start shading again. And I also have some more
darkness in this upper parts. And these are some very, very small details
that actually, these are the ones that make your work unique
and spectacular. So don't forget about them. And just as easy as that. We could actually create
this area that might even look too complex
at first sight. But it's just all
about to details and controlling your hand pressure and paying attention
to your model. And then for this area that
we have a twist and turn, I just consider
some random lines. And I'll do the same thing
from the other side, should complete these lines. Okay. So here it is. Okay. Now let's follow the rest of tutorial
in next episode.
13. Continue shading the lower part of the metal faucet: Hello again and welcome to the rest of this
tutorial with me. Okay. Let's continue
this tutorial together. And this time I want to start from this somewhat and
finish on the right side. So first of all, you should start
with your HB pencil, makes sure the tip of your
pencil is totally sharp. Then from this upper part, from here, we'll
start our shades. And just like that,
we come down. And I'll continue all the way down until this part. Okay? Now from here you see we
have a shape like this. So right on the side of it, I come down and I'll
connected to this line, almost all connected
to this line. Okay? Now from here, I create a very light shade and I moved toward the inner
part of my work. I fade it actually. Okay. Then from this linear area
and this part of my work, between my sketch
and my background, little by little, I apply
my darkness and I fade it. Okay. Just like that. I come down as you
can clearly see. And then I'll
continue this until this very last part. Over here. Again, I move up and I make
my lines cleaner and neater. I keep this light area. I determined the
part where I should have this a strong
internal darkness. But as you can see, and again, as I say, try to determine
different parts of your work. Keep the light parts by going around them and work
the dark parts. Of course, we work on the
lights later with our eraser, but it's better not to go
in it from the beginning. Okay. Now over here, I
create a faded shade. And then from here
I want to work with my B6 pencil in order to create
this strong shade better. And over here I have a line. And right from here, I fade it. Okay? Then again, I make this shade more elegant and neater
with my HB pencil. And again with a
bit of distance, I start shading
this area is light, so we should keep it light. And this area at the time
determining right now is a very dark part. It's absolute darkness actually. As I told you before, I'm going to work on this. I'm going to work on this part. So based on that, I can work on the
other details better. Okay? So just like that line
comes to this area. And then in general, in this part we have
absolute darkness. And of course, because
it's absolute darkness, I'm going to use my
B6 pencil and I go over the very dark areas and
I shade them completely. Just try to keep this
light part in the middle. Light and unshaded. And then very easily you can work on these
very dark areas here. And just as easy as that. Okay. Over here, again, I would
have a very strong darkness. I pass through
this area and also over here I apply
my strong darkness. And I of course keep this
light area for my work. Because I have to
keep the contrast in my whole work in order to showed a metal texture that I want
have to show the Shi'ites. Okay. And then in this area, there is another
light in the middle and there is a strong
darkness surrounding get. And that is what I'm
going to apply over here. Okay. Here we go. Then you should pick
your HB pencil. And with that, you should
go through all over these parts once in order to make your shades
smooth, ER, and softer. As usual. I even go over these parts
to make softer shapes. Okay, so it's gonna be done
in all of these parts. And here we go. Okay, now I want to work
on the details of my work. I mean, very small details
of my work, For example, first I want to start
with the details of this area of distance from
the edges of my darkness. I create a line
and going through here says should be almost as
the width one millimeters. So not too much, of course. And then I'm going to
apply medium shadow. I mean, an average
shadow on this area. It shouldn't be too
dark or too light, as you can see. Again, I emphasize
on the fact that the best method to do this
is to look at your way and you look at your
work simpler and easier. And then you can
actually work on that. For example, if you
look at this area, it might get too
complex for you. But if you look at it simply, you can just have a
shade underneath and then bring out your very
small details on top of it. So when you learn how to
look at your work easier, you can actually
work any kind of complex sketches and
designs that you see. After I'm done, I again
go over it once with my HB pencil and then I will
use my eraser to create Some light details. For example, in these parts. Also here. And all of these parts. Okay. Then again, with my HB pencil, I try to do the rest of the shading on the
smaller details. I come up all the way
to reach this area. And as you can see, I'm working very faded
in all of these parts. Here it goes. Okay,
now I want to work on this part of my
sketch right from here. I'll consider the rest
of my work to be done. As you can see, I'm working on details now. I've determined some of
the lines in advance, so there won't be
any troubles there. But for creating this
smaller details, I have to pay more
attention to my model. So as I said, so over here, I start with
applying the bigger shapes. Then I can work on the details, on the smaller details amine. Alright. I keep this part of the light and I just give it a
very general shade. So I'm generally shading
this area with my HB pencil. Then I switch to my B6 pencil. And I apply the
darker spots in this general shan't in order to give it more volume
and more shape. And come up then with a
bit of space and distance. I'll do the rest. So I'm exactly applying the same design and the same pattern that
I can see my model. This is very important that you keep one eye on your model. Then again, little
bit of distance. I create a line, initiate it. And again another one. As you can see, I'm creating
a pattern in my work. And it's exactly as I say it. Then of course, I will use my editor eraser to
create the shines and the lights in the
middle of our shadings. And it's done over here. I come to this part again. I keep the very light area
and from its surroundings. I apply my shading, my darker shading of course. And for this area, I would do the same thing. I have a light here that I keep. And then generally I shave
the rest of the area. As you can see, I'm shading
lightly, but still. You see this area is
very, very light, so I will not use the
same shade on this area. Actually, from here. I tried to apply the same shade and the same
pattern as I see in my work. And I go up just
as easy as that. Whenever I tell my students that you should do
it as easy as that, my students tell me
that it's easy for you. Teacher knelt for us. But the point is that it's
actually really easy. It's so easy for me. If you pay enough
attention to your work. You can clearly see to patterns. And even the primary
sketches would be made in the simplest methods that I can actually use the phrase as easy as that and just like that. So I also tell this to all of my
students not to look at your designs and your sketches, too complicated or too
difficult for yourself. You should just go for a little bit easier
and take it easy. Creating these
beautiful paintings and these sketches is actually
like solving math. Some of us work on different and harder equations
to get the right answer. Let's go for an easier
and faster way. The thing, the method
that I'm teaching you right here is the easier method. If in this kind of sketching, not look at your work, work, you know, easy and simple. It, it would get too
hard for you and you might actually get
repelled by it. So the first thing
that you should know is that you can create your sketches in
the most simple way and the easiest way possible. While I was telling
you about my students, I was working on this area with my B6 pencil, applying
the darkness. Okay. And then I'll continue
up to this area as well. Okay. Now I'm going to use
my simple Pencil. I'm going to use
my normal pencil, the a tree pencil. And I start shading these areas very slowly
and very carefully. I consider this shade. For this area. It's a light shade.
As you can see. We have a very
light area that we don't go over with our Pencil. But this area which is next
to it is a bit darker, so I'm going to apply a
very light shade on it. Should just follow your work by what you can
see in your model. Okay? One side of this shade is a bit darker than the other side, as you can clearly see. So I consider it in
my work as well. Here it goes. Okay. So it is just like that
up to these parts. So continue in the next episode.
14. Extreme contrast and ultimate detail: Hello again and welcome to the rest of this
tutorial with me. Okay. Let's continue our work. We were on these parts and
we were actually shading these areas right from here and here we're applying
some darkness upwards. Now for this part, I want to create a
shade like this. So I'll work on it and
continue up to these parts. See my dear friends. I'm actually only
paying attention to the geometrical shape
of my darkness. For example, I can
see a triangle here. So I create a triangle. Over here. I can
see two circles. So I create two circles, one bag and another
one is smaller. That I actually guide each one of them
downwards like this. So very nice Lee, and simply I come up, Okay. This is actually kind of
a reflection of the phone or the cell phone dad
had got this picture. So I applied the darkness
the way I see them. And then I color upwards. Okay. Then I continue to
the rest of my work, to the rest of my sketch. This area would be lighter. And it goes like this. I'll continue upwards. Okay. In these bars we have various small geometrical shapes that I'm not going
to overdo them. I just simply make them and
move on into next steps. I'm just creating
these small details as much as I can see them. And I do not get
fixated on some of them specifically and
leave the others. I also shade over
here, I'll ports. Okay. Then I'm going to use my eraser in order to create a very small
light over here. And then again from
its surroundings, I create a shade. So delight will actually
show itself better and more. Because when you darken
its surroundings, it will show more. So that's the end of this part. And here it is. Now I want to work on the
upper parts a bit more. I have another light
over here as well. Then I'll consider a
very strong darkness. For here. We also work on these
geometrical shapes here as well. Then I moved to the
right side of my work. So it goes like this. And I'll continue
up to this area So I also want to work on
the details of this area. I have some strong darkness
here that I try to apply. And over here, I create this drop shape that I can
see, clearly see that. And then I used a very
light shade for this area. Over here. It looks like this. Okay, now let's complete this area as well so we can move on to the right
side of the work. So I do not want to work on the pattern over here
specifically to much. Considering those
kind of darkness, we apply the Shines because
we don't have to work in that much details in
this style of our work. We continue like that. So here it goes. I come for the next
part of the work. And I start to do the
shading as I want. And we work on the various
small details in this way. Now, area, I have
a shape like this, that over here it
looks like a cross. And then it's generally shaded
and dark and light this. Then with the small
distance from this area, I come down and I work on here. And again over here I have
kind of a phone shape. And then I'm going to use
my B6 pencil in order to create these small details in their own placement,
easier and better. Because as you can see, we have a lot of strong darkness here. Keep in mind that the tip of your pencil should
be very sharp, especially when you want to work on these smaller details. Okay. Now I'm moving to the
next part of the faucet. And from these parts, I try to create the
shades and shapes. Actually create the
shapes with the shapes. And I give a general
shade to this area. Just give it a very
light shading. As you can see, I'm applying this shade very slowly and very softly and very lightly because I don't want any
Ralph shadings over here. And as I told you before, here, I should have a general
light shade for now. So that how it goes So because I have a
strong darkness here, I again switch to
my B6 pencil and I start working on the
darkness of this area. Then I tried to keep
these circular lines, as you can see, which goes like this. Okay? Then again, with
a bit of distance, I create a dark shade like this. And it comes into a Y shape. It goes up and again, over here, I have some very
small dark lines that over here we
can see a pattern. You don't actually have to copy these small details and small patterns exactly as
you've seen your model. Because you're not working
in a hyperreal sketch. Just trying to create some
circles if they look circle, or just get the general
shape out of it. So do not push yourself too much and denote fixate on them. Just take it easy
and move forward. Okay? We also have a light here and here I'm going to create
more shadings in this area. Continue this darkness
all the way down. Okay. Then again with debits of this, since from this lower
part of my work, I create another shade
connecting to this area F there. Then I will
switch to my HB pencil. And of course, I go over the
darkness and the dark parts to make them softer and
looking more cohesive. Here it goes a little by little. We're getting to
the end of this. And I hope this was
really useful for you. I have up to here you've
enjoyed as much as you could and you've learned how to create the
texture of metal. Okay? So we've got to simple
sketches and simple textures, the beginning of this chapter. But for texturize objects, we could actually use a
complex sketch like this one. Based on my own experience, most of the students have troubles applying these
kinds of small details. So I hope that by discourse
and by this chapter, this problem has
been solved for you. Okay? So from here I have a shape
like this, goes back again. I have dark shades. Then again, I'm
going to use with my basics pencil in order to create this
very strong darkness. Here it goes. So I'm going to use my HB pencil
as well in order to make this shading of this area
all cohesive and smooth. Er. Then I want to work on this ending
part of the faucet. We're almost finishing
our work here. I had too much darkness. I had to use my eraser in
order to take some of it off. Okay. So right from here, I'm going to shade, and right below this, I am going to create this oval. Let me first create this oval. Okay? And then I determine the area that
I want to work on, which is actually this
area is the label area. And I also have a
light over here. First, of course, I
determined the lighter areas, I separate them,
and then I start to darken in their surroundings. Now from here, slowly, I try to work on these
lights and shavings. Okay. Here it goes very slowly. I move up and I place all the
shades wherever I see them. So here it goes. And then I get my Sketching B6 Pencil in order to greet the darker
darkness, of course. And I'm going to create them
as the spots of darkness. Okay, So that's it. And let's finish our
work in next episode.
15. Completing the drawing of the metal faucet: Hello and welcome to the last part of this
tutorial with me. Okay. We're going
to start together and I'm going to start with my HB pencil and
write from the tub. I start shading right
from the surroundings. I determine the area
that I want to work on. I can separate by sketch my
faucet from the background. And I'll do that by considering a very light shade
for these areas. So here it goes. I tried to create all the darkness that
I have on these parts. And I'll do the same thing. From this top part. I come all the way up. And again, I said I'll do the same process on
this side as well. I just tried to
decrease and increase my hand pressure based on
what I see in the photo. See over here. I had some coming
outs that I use my eraser to erase
them, of course. Then I get to this part. I'm not want to work
on it right now. Android from the top, I start applying the
darkness that I need. See. Over here, I have a light area that I'm
going to separate, of course, and determine
this area for the lights. From here, it comes
to this side. And from here it goes up. You see, I'm working
on this part. It's a curved light
created here. And this area is a part that I should totally
work on its darkness. And on this side, I'll continue this until I get to the bottom
of this area. Then we this small distance, again right next to this line, I create another line on the
same way and the same level. Okay. Now, again from
this bottom part, I determined the dark area. And then very slowly I fade
this darkness. And so it is. And as I get to this area, I do not create any shapes because I
have a very light area. Now for this part, I tried to create a
very strong darkness, linear deck darkness,
but a small one. Then with a turn, I go toward behind the faucet. So I finish this area as well. And now the only thing
that I need to do to finish it is to shade this area. So first I get my B6 pencil and over here
you see I have a light, so I of course separated and then apply a very general
shade for this area. It's not too dark and
it's not too light. It's just a general
background shading. Then I go over on it again and I apply the parts which
are definitely darker So just like that, I work on the strong
darkness with my B6 pencil. Now, I also determine, and I also consider a very strong darkness
right next to this light. And I have here. Then with my B6 pencil, I can plate this area
with my dark shades. Okay. It goes like
that over here. So I'll continue. And I also apply the
darkness over here. As you can see, these parts
still need to be darker, so don't be afraid to add your darkness wherever
it's really needed. You should create
your dark shades. Exactly as intense
as you see them. If you don't create your dark
shades as much as you want, our, as much as you should. You can not get
your textures and your volumes correctly and well. Okay, then I'm going to shade
this area very lightly. Again. Right from here up to here, I have dark shades,
very dark shades. Okay. Then I come
all the way down. And from here I go opting in, continue my work. And here I have a
shape like this, which goes just like that. And as you can see, while I'm doing this shading, I'm carefully keeping the light areas
untouched and uncolored. I also have to apply a very
strong darkness over here, Just as I can see
it in my model. And keeping in mind
that I have to leave these parts light right in
the middle of the darkness. So right from here in-between, I still tried to shade. Here we go. And then also from here, I apply some kind of light
and darkness like this. I tried to create them. Again, I say as I
see in my model. Okay, Now I reached to
this totally light area. So when I want to
attach it to this area, I have to fade my darker shade. I'm going to use my
normal pencil and shade this area from the darkness toward the light and fading
it as I get toward the light. Lighter shades. Okay. Then again, I start
from this side, a very light shade
would appear here. So I'm using my normal pencil
in order to create that. Here it goes. Okay. Try to keep in line and tried to control
our head pressure. Ms. Lee, It's generally light. Over here. I have a darkness
as a shape of a triangle. So of course, I play it. I apply it, sorry,
its own placement And also over here I have
kind of an L shape darkness. So I've got to work in that to here it goes. Okay. So just as easy as
that, I'll continue. And then of course, I'm going to use my
eraser to work on this area to making it
totally light and white. And it would show
itself actually more. Then I want to work on the
rest of its small details. Over here, I give
a general shade. Here I have a very
strong darkness. And very, very, I have this
kind of light circles. I go and darken all
their surroundings. They would actually
show as well. It can not see a light spot
in a light background, so I have to darken
their surroundings. And creating all this strong
and weak shadings here. And stronger and lighter ones. Here it goes. It's like that. Then again, I use my
normal pencil to give a very general shale to the rest of the parts which
are untouched. So I'm just using my normal eraser to give a very general shade
to all of these parts. I'll do the same thing
for this area as well. Some parts definitely
should be darker. So our economy bit. And I also go over
this area as well. It should have a more
general shading. Okay? Now over here again, I work on a general shading. As you can see.
It's almost light. So it's more on this
side and on this corner. And as I move up and
toward a center of it, of course you can see that
it's getting lighter. And then I start working on the alphabet and these
letters and numbers. So I can create this
label on my faucet. And as it goes towards
the upside of the label, the clarity would be less. But you do it as we see it. So if it's unclear, you can also make it unclear. Again, I'll take my eraser and I applied a very strong lights
in their own placements. Wherever I see them. I use my eraser to create
the strong lights. So our work is almost done here. I should just do some
more Touch Apps and creating small details,
very small details. For example, over here, I should work some
more darkness. And doing the same
for this area. All around this rounded
circle. And here it is. Makes sure that you erase
around your work with your eraser to make
a clean outcome. And I also go over this part
with my normal Pencil again. I forgot to apply. I have actually forgot to apply
these shadings over here. I just figured it out now. Okay, so just as easy as that. So easy piece of cake. We could have actually finished
this beautiful sketch. This chapter was about
texturizing and this was actually the most
complicated sketch and model of this chapter. So I hope you've
learned all of them. And you've enjoyed this course
 Amelie Braun, Artist & Cartoonist