Transcripts
1. Introduction: The carers crew technique and painting, especially paintings in the style of rail and hyperreal, has received a lot of attention from audiences and art lovers today. Learning this beautiful technique with Laura, relatively simple and low-cost tools is possible for anyone with little sketching knowledge. To Keras crew technique is one of the best suit makes to correctly is start painting and enter the fascinating world of visual arts due to its attractiveness and defect that the students can easily communicate with it. In this technique, the student deals with the spectrum of gray and black colors. From the beginning. They're not involved in coloring and color techniques. And this causes the students to focus on lighter shades and decompositions often work to high contrast that can be created in black and white paintings using cough and cold pencils is one of the attractive features of this type of fainting. The doubles the beauty of your work by learning to care risk screw technique. And students can create beautiful works. Now, join us in this course to get acquainted with the general principles of Keras group and to learn how to create different textures, including the texture of the leather and animal hair.
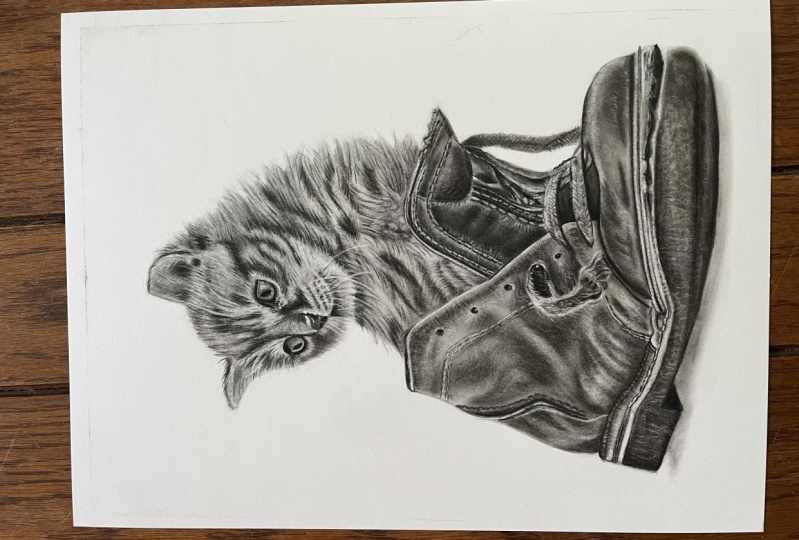
2. Basic design: Guide line drawing and cat head design: Hello and good evening to all my dear students. Well, my friends today we want to work on this cat sketch. For starters. The friends on have a past the other courses of a sketching, they know that we are using guidelines. One of the things that we can do is to create a vertical and horizontal guideline and then transfer them to our cardboard. And the other thing that we can do is that just create a placement of the approximates, placement of the geometric shapes. Like we can show the head with a circle, the ears with the triangle, and so on. But because our goal is to create this cat with a hyperreal method and width, actually a technique of Korea skirt. I recommend our command you to use your ruler and create very, very strict and definite guidelines. I decided to create my vertical main line, vertical main guideline exactly from the corner of the eye and this below part. Again, I insist that in our primary sketch core sketching course, maybe we don't do the, do things like this, but since we are working on a very precise sketching, it's better to use the guidelines. I create my horizontal main guideline beneath the cat's head. Of course, we have to use some extra lines. For example, you can use an angle line for getting the correct angle of the cat's head. For this, you can just continue the guideline that you created. And then from the corner of the eye of the cat, you consider an angle and create a line over here just like this. That of course, when you want to create these lines on your paper to the space and length of that. Lines are very, very important. So first we're going to focus on the upper part of our cat, which is its head and ears and so on. So first we're going to create them and then infer wanted to continue in any parts, recreate the lines too. Okay, first we create our horizontal line. In this same position, same angle. It doesn't matter that you create your guidelines very dark and emphasized. If I'm doing that, it's for you students to see these lines clearly in the video. He also create this line. The thing that we do for spotting the placement of the cat's eye. The measure, the LAN, which is actually 6.1, is I can sit here and recreate the placement of the line and we should see that how much it went up. So these two lines were meant. Now you can match these points together and of course, continue that. Just like this, you can, you are actually determining the placement of the cat's head. The thing that we are doing is that first recreate the par savvy can. And then whenever we needed more guidelines, we will create them. So the cat's face starts about here. These measurements actually help us to find a placements. So I start from the lower part of the cats shin to find a placement of the things that we want to show in our sketch. And of course you can see this too. Let me just put it because here I can see it better. I'm sorry. Okay. Now, pay extra attention to the angle of the cat's face. But of course, because of the line that you've created, you can easily figure that out. Now it measuring this bond, this part, you can easily decide that rare is the back of the cat's head. I determined that part and it's face will be end. We're just approximately determining its placement and say it's here. So we continue this and it connects to the next area. Now, we can determine the power for the cat's mouth. Okay. So this part is the cat Smith. You see about this little cat, kitty cat. Domain pores are in its face that we should determine the placements of things. The thing that how much the mouth of this cat is being gone, how far could determine that? And we will move onto its nose again for creating the placement of it. You see how much we can go to the right. And the other hand, we can also check the measurement of beneath part of the nose to this lower line. So we can see the beginning of the nose is here. And it can get to derive more than this. It's enough to this part. And again, on the other hand, you can measure them matching of the nose with the line. Pay attention that VR using so much of this corner ways line that we've created. Because if this line is actually playing the role of one of your main guidelines for creating your cat's face. It's very important to create it fit completely and definite correct measurements. Comparing to the other and lines. This is the shape of our cat's nose. To so cute. Then you found a placement. Next thing you can do is adding the details, so don't worry about it now. Now we've determined the placement of cats. I maybe it's better that we determined the part for this side of the cat's face too. So first we measure this part comparing to the, comparing to our first horizontal line, and then we will bring it to our work. Then v have created top of the head. Then we've given you have noticed the placement of it, shaved ahead. And you can also determine the placement of the ears in this very same step. So we both measure this part comparing to our horizontal line and vertical line. Sewer going correct? Just by looking at it, but it's better to measure it just to be short completely and reshape it, make it to a circle. And in this area we have a curved in part and the prominence part in front of the cat's eye. You can determine this by 12 and complete this area which leads to the eyes and this wide part that came to DI it actually determines the placement of the eye. But I may actually high is lower than this. It's in this prominence part lower than that. But we're just determining the shapes. And then we will work on creating parts of the face. Just like this. For not having so much errors or mistakes in our work. It's good to check distances and measurements in different positions. In this area. To eye of the cat should be shaped. So there'll be careful about the things that stay should be in the correct position. Also evolve D, I think it's good up to this point, so we continue that.
3. Basic design: drawing the upper part of the shoe: All right, my dear students, as a continuum of our work, we continue this part because we have lifted here, we completed, and then we'll move on to the next parts. Again, from this side, I determined the placement of the highest part of the shoe approximately, of course, but I'm just finding it according to the guidelines that we first created. K. This is a good point that we've already chose. Pay attention my friends, when we are determining these dots, you don't need to put a ruler and just connect these dots together. These dots are actually just guides for you to show that in which direction you should go. Because so much, so many of our friends do not pay attention to these curves and arts we have here. And these are so important because if you don't consider them, you won't get this sketch the way you want it. Now they have came to this behind part of the shoe as good to continue this line to the bottom. And for this, I should determine this distance, which is the end of the shoe, and it's on our horizontal line, which gets sued here. In the beginning of our work, we do not create that prominence part. They're just creating the main and general line. And then later we'll create that too. This is the back of our shoe. Let me check this area as well, which is completely correct. And after we've got here, now, we can determine the placement of this prominence part, which is on the shoe that is starts from here. These are actually am the details of the volume that you're creating. So these are on the second step of your work. These will make your work look better. But the more important thing, the first is the, is to create the general shapes correctly. And then you can work on the details just like we did in here. Determine the direction, and then you can add details. That's in here. You can see this prominence part completely. Of course, a bit, a bit more insight. And if you pay attention during the whole way of it, coming down, the thickness of it is not the same. We have also another line here which is related to the tailing next to it. We have the shape of this sailing from the inside would just put its placement. Now. This parts are darker. So we can get to here, reaches the end of this tailing part. In this area, the direction is changing. So when we continued this up to here V, I'll also change the direction of it. Pointing the end of the shoe. We can work on the bottom of the shoe, but I recommend to complete this shoe itself, the upper parts of the shoe, and then we come back and create the bottom of it. We are determining the placement of these tailing lines. In your ending phase of the sketching, you should definitely come back and create the parts that You just determined the placements and create them more precise. You can determine where it's shaded, varied has light or exactly. I don't know Adele placement of the holes in the shoe that the shoelace will go through them. These are very small details, but they're also so much effective in your work. All right. Now the placement of shoe laces so easily you can determine them with a small measuring. It has a very small distance from this line, a little more up. And from here we come down and we can show it's thick this and that. That's how much it came down because it has a disorder shape. You can create a line on it and you can measure this, this dense. Comparing to your horizontal line. You see that a very small line, you can get an unclear area. Clear. And you can easily transfer to your work. And this is the disorder part for its tip that we can work on it later, more precise. The thickness of this shoelace should be determined to and you should show that it came out of this hole. Okay, up to here our work is complete. We move on to the next part, which is the front part of the shoe. If you remember, I told you that this area's exactly on our horizontal line and we didn't not to work so much on it. You just need to guide these lines toward this side. Which is again, another hole on the shoe that is far to shoe lace. And in the part that age reached to this leather part, we create that angle and cricket shape in our sketching for not getting lust of the touch of this measurements. For not losing any measurements. We just determining this part and the angle. Okay. I've got a correct it should always check after you did something. And the last shoe lace which came to the which came out from the last hole of the shoe. We're craning get here now for determining the direction is spare to create that leather part as well, but the same time. So we can see what part this shoelace is going to be folded or bend to it. If you pay attention on the model. And this side we have a cross from these vertical, second vertical guideline that we've created. So again, we can check it here to exactly if it continue this line. It gave, it gets to the same point as we have in our model. Try to remember that when you're getting the measurements a then in most of the times it's just for checking your work. Meaning you should get to general and big measurements for your general shapes and for these little small details. You can just create them and then check it with your work to see fewer write about it or not. A little bit closer. Just like this and it would be okay. Now we're done with our shoelaces. It came down to much. The beginning is here. Now it's more current. From here. There is a dark part that we can see on the shoe. So is suppressed it with one line. Okay. We've created this part of the shoe already. It's just needs this line for separating the areas from each other. Now we can move on to the tip of the shoe. Meaning here. The best thing for this is said is that you measure this part which has a very long distance. First you should mark the parts that you want to determine. Because again, I say there's a very long distance. This is the bottom of the shoe and pay them even beneath it, they have a shading. And the first line that I've created was the first mark was for the part that shoe is torn off. And this is the first part for the first line of the bottom of our shoe. Now when you've marked those parts, you can easily create your shoe. I forgot to measure this side. So then we transfer this as well. Exactly from that line that we've already determined. We create this arc shaped and curved shapes of the tip of our shoe. And you see there is another even curve here. There's even another curve here and we continue. So these two lines can meet. So we can keep the shape as we see in the picture. This was the part of the shoe which was torn off. So it should focus on that so much as we get to the tip this part and we'll get thicker because actually tearing is more. And this is the line which separated this yellow part from this below part beneath it. Now this should be the inner part of the shoe, actually separating the tearing side. And from here again, we have a connection to this part. Now, first of all, you should continue the line so it won't go further from this upper part. Then you determine the thickness and you create the bottom of your shoe. Because you've already determined where it should get to. So just connect these two parts together. Now we should create this part together. For this first, I will measure this area and I will mark it, which is here. Now you can determine the lower part comparing to that. And of course, the upper part will be approximately determined, meaning above the yellow part. So you can continue this slide. According to the curves that it has in your model. Do not create a straight line. Again, look at your models, see how it's curved. Of course, here there are some shapes. In completion is steps and in details I will create it later. But for now, the important thing is to create a general shape and general volume correctly. And then later you can add the details whenever you want. And this lower part of the shoe, who'd be add to the continued importance of the parse, add the hat. I've If shape that area. I can also create this line which connects the, connects the upper part you see to the bottom of the shoe. You can create this connection, complete this curve that is more curved comparing to what they've created at first. And I'll say this prominence shape, which has just been created by detailing. There's not much left here. It's all it's all needed back over our shoe. In this part.
4. Basic design: Completing the linear design phase: Okay. My friends, we were at the bottom. We were working on the bottom of the shoe. And the end of it. I want to find this part in my model, the sizes, the measures, and then I can transfer it. This is its part to swans more I ticket with my horizontal line. And also from the vertical line which is in here. I measure it. So about the slump. And here. And the placement of this would be completely determined. Determined its placement. You can easily create the lines and connect these two parts together. Okay, Now, we need to consider that how much it came up. If you take the pencil completely horizontal, you see there is a curve toward up. Now for recognizing this, you can also create a very horizontal line at the very bottom of your shoe, just like this. And then you can, you can know that how much it was curved and toured up. And see the part where this darkness ends. I consider that part. In here. The darkness should end. By the darkness. I mean the shadow beneath the shoe that I will create later, I just marked it for now. And also this part, She's the heel of the shoe and it's kind of separated from the rest of the bottom of the shoe. So I continue this line very lightly and I measure this far so I can see where I will get to this darkness, which is exactly this point. So when we put this mark, we can create here just like this. And also I can create the heel of the shoe. Comparing to this part, according to this line. We can create it. And of course, this far that we have determined that I told you, it's going to show also darkness, meaning this darkness. You see this is the shadow of the shoe on the ground. That's almost a starts from here in this shape. And it's continued up to here. Okay, Now, the connection of this part should be made to it came a bit toward inside and then it went up tailing lines of the inside which are actually considering a separate line in our work. Okay, In the other line that we have is related to this yellow part, yellow wallpaper part, which needs to be separated. It's actually in here that phase separated. We can add the details later. It has a thickness like this and it, as it comes down and forward, the thickness of this will be decreased. And there's a lighter line. Of course these parts should be separated like this. The lighter line is related to this part of our shoe that comes here. And because we haven't separated here, is start from the tip. It's this line. So it start from the tip and recreated because we haven't separated before. Like this. Okay, then later you can add some details to it. For example, this tailing line which is here, you see, you can determine that from which part of our shoe it got crossed. You can just chooses placement. And you can show these parts more specifically. And of course, the tailing lines which are for the inside of the shoe. For example, these lines or this one. That's as much precise as, as much more precise as they are. You are work will be easier while shading. Just another point that I should say about the cat again, because the rest of the sketch, you'll be able to complete it yourself for the cat's face and cats body. You can see this part, this is dark. These parts are dark. And also these shades here. You can show all of them by determining them from right now. And it can be not in a border shape. You can show them with these kind of little hair. Or if you felt like it's hard for you, you can create it with borders. And during your working incomplete and more. But determining these darkest spots will help you that when you want to create shadings on your sketches, your focus will be only on the technique of your shading and you would not worry about the sketch. It doesn't distract you anymore. You know, for every dark, dark color will go. You see, you can get all of these designs on your work. Should come more down. Okay, my friends, I just saved. I want to save your time. So adding these details will take so much time. But try to show as much details as you can in your work so we can move on faster and better in next steps. And I'm sure you can complete the rest of your sketch all by yourself because there's nothing hard about it. You just need more time and more patients. And of course focus. For instance. I'm just creating some, some of these darkness is that we have to create. Just to give you an example, I'm doing it and you should be able to go on and complete the rest of your work yourself. It would be easy. You just need to pay attention to your work and to your models simultaneously and be focused. Okay. So please just complete here is sketches and dark end up back of your paper completely. After you figured out that your sketch is complete, then you will post your paper on the cardboard. You go over the lines and you will have your sketch. And that's why, because we want to have as less erasing as we can so our work will be clean. Okay, So after transferring sketch to cardboard, we come back.
5. Drawing the cat's eyes and nose: Hello to my dear friends and good evening. We want to start our work, which is creating this very little cute cat and kitten with Keras grew technique and our commitments. I want to start from the cat's face. So I'll zoom in so we can see better. Do not forget that you should put a very clean sheet of paper underneath your hand so you won't mess with other parts of the sketch. We use different equipments, but two of the most important of them are the hard and soft count fabric. So pencils. So I want to start from the cat's eye. And I'm using my heart pencil for creating its darkness. My friends, that thing which is so important is that you should keep the tip of your pen cells always sharp, especially the hard pencil, because we mostly use it for creating lines. So it should be completely sharp. As you know. Day hard pencil is a very adequate for creating lines. And the soft pencil is actually better for the parts where you want to darken as spot completely. Also into degrees of darkness that these two pencils give us. The darkness is almost the same, but maybe to soft pencil may look like it has more darkness because it's softer and it leaves more powder on our work, but to darkness of them as actually the same. So we create a parse that we can with our hard pencil. But for the iris of the eye Cat, I prefer to create the darkness with my soft pencil. If you have an Paris current pencil to and you want to use them instead of these two. You can use b3 of Paris instead of soft pencil. And you can use HB or B pencil instead of hard pencil. I personally prefer the flower castles pencils. And but if you have those, it's not necessary to buy new equipment, so you can use what you have. Now this part, because it's very dark. I still prefer to create this upper part with myself pencil. And this part that the lines will get finer and thinner. I'll go back to my hard pencil. Pay attention my friends that we are creating this work in A3 size. It's almost as small. And as big as you get your work. Creating these light lines and shadings will be easier for you because you don't have to go that much focused and details. This isn't size A3. All right, now in this step I will use a small brush, for example, size two. And now you want to fade the lines that we have created and create the color of the cats I I spat or a bit of darkness that I've put in this upper part. Inside of the cat's eye. Have so much details exactly like the human's eye. That can have so many details that after I've created the background, I will create those details in my eye. In this step, just fading the darkness that I've created in their own placements. I take a bit of the coal powder. I'm using the pipe and create a color soft coal. I go for the inside part of the eye and I gave it a color. Not too much and blow the extra pad or off your work. Always remember that during our work to the end. Never forget it. These bars that are like hair, you don't need to move your brush in circles, terry ways. If you've paid attention in the steps that we were working on the skin. We always said that the brush should move in circularity ways. Plus when we were working on a hair, we could say that it's better that it's better to move the brush. In plenary. Raised. Should have literary movements. Recreate the lights in cats. So before adding to darkness and color to it, it can have great lights. There are some very small lights that we can use our mono 0 editor Acer for them. The strong glides will be created by electronic eraser and these small ones will be created by this. And in this is, we slowly start to create some shapes for inside of the eye. Some shapes that can be seen easily. Because I was holding the array surfers. I've created some of the shapes with my eraser. And then we can use our carbonic can't pencil. And we can complete these lines. Of course, having this carbonic content is not necessary. If you control your hard pencil well, you can easily create these lines. Or you can use very, very small brushes like 0 rush. And that would help you too. So you can create all these shapes with your brush. All of them are possible, even if none of the above are in your position, you could always use your fader for that. So everything is possible. You should just know the way you use it. The lines that we've created around the cat's Iris. Iris will be faded with my brush, and then I will take a larger brush and go over here so the darkness will be spattered. Because these lines should show so much. The shape of this kittens is almost done. Some parts need more darkness that in this is that we can emphasize and dark in them. Always spend time and work on your dark, dark parts. Again after you've ran over run over them with brush because if these diagnosis will be too much faded, the attraction of your work will be gone. We still have work to do on the eye of the cat. But for just making a progress in our work was work on the other eye for a bit as well. And then we will continue with both eyes. So we will fade to parse that we've already created. With our brush. From sides. Coming toward the center. We try to create a volume and a prominence of the cat's eye in this very same step. In this eye because it's been more in the bank. We cannot see dat much detail. Just as much as we can see these darks and lights. We create it. This far got a bit faded and we went to erase. So it will come out of that faded shape. Departs many thigh which have Darkness who create them a little bit with our brush. Up to here, we have a general shape and background colors from the eyes. Now for moving go faster, I want to create knows two. So then we can move to the hair of the face for creating the nose. Who will come to the parts which are so dark, which are actually its nostrils. Because I'm working in a very, very small size. My advice would be to use the hard pencil or creating these very small darkness is. But if you had a bigger space, you are working on a bigger size of sketching, it's better to use your soft pencil, but because here I don't have that much space. I'm just gonna go with my hard pencil because it's easier to control to darkness with. Okay. Now with a brush with a medium size, you work with the powder. You take of it powder. And we create the darkness of the shade for the cat's nose. So the parts that we ran over them with our pencil was actually darker. But the other parts like here, that I have a black color and they're dark, where we'll create them like this. And also you can determine the placement of its mouth to get a very small shading just to get the general shape of our cat. And this a step in the process, we need to create the hair of the cat. Denote. Press your hand too much on your work. Generally in creating the animals which have hair. Try to control your hand pressure. And you shouldn't just put too much pressure on your work because it will ruin your work. And because you can not go on that video, eraser knows very well. Now I'm working on the price which are, which include borders. And they can be done with pencil. And also create some lines that we see. Of course at DND. And these slides should be edited and some Neolithic will be added to our work. But it's good to have attentional than lights in this step. And for shaping our work, we can just create them a little. Now I'm using my sanding and sharpening my electronic eraser. And then I will use it for creating very fine and thin lights. Just like this. Okay, my friends go on up to this part so we can move on to the others. Just creating the hair on the face.
6. The subcutaneous of cat hair: Okay, My dear friends in this phase that we want to create the short hair related to the face. I will use this kind of brushes. This is size two and the tip of it as being caught. It's suitable for our work or very soft brushes with cotton tip again. So we don't use the soft brushes with a long tip for creating short hairs like this. So I'm just using this brush with to cut tip. We start creating day hair. Pay attention that you issued go into the same direction as the hair. Is correct that it might get a cohesive darkness in the spots and things, but the most thing that you can do about it will be the phase of erasing and using your erasers on it. But again, it's important that you would determine the direction of the hair correctly in this phase two. So your work will look better. Sata, hard thing to do on the SAT are too dark. We will go over it with our pencil to if it was needed and if that park was so dark. So softly and smoothly occur over a field, these parts with the hair. And of course, you pay attention to the direction of the hair. Parts are light, for example, here beneath the eye. It's right that these are light, but you should give the background color to it. So when you are using eraser, you will have a contrast in your colors. If you keep these parts white, eraser to it will have no effect and your work would not be shaped. Now, work on the stark part over here. Below the eye. My friends H parts that I'm working on it and I do not declare which Cole I'm using. Be sure that I'm using that Crito color soft or extra soft coal. Japan drove it, of course. And if I worked with anything else than that, I will declare it and I will tell you about it. But if I don't say I'm using that, but further we might have you might use also a D-flat coal powder that I will tell you about that too. And the most important thing in this course will be that you will learn the technique and you know the difference between the equipment's and techniques. Meaning that for example, if you know the difference between the flat coil and a pipe coal, you would know that the flat goal is darker and they don't look so gray and they're used for those parts. So you'll be acquainted with the usage of the equipments and you can see it can go instead of what other equipments that we're using. So I'd say it's more about the technique than anything else. Learning the techniques, learning about equipments and so on. You see like this, we are various slowly creating the shapes of the cat's face. Mostly now we are working on the dark parts. And we're moving on to think in this phase, which is so, so important, is that you keep the correct directions. And be careful that the movement of your hand should be liberal. And you shouldn't, you mustn't actually move their brush and circularity ways because at the face of our cat is small and it has short hair. I'm using a very small brush. If you've chosen another model, which is actually also a cat or a lion or something like that. And it has these kind of hair, but it's a bigger size. You can also use bigger brush. Again, I insist, should really, really pay attention about these directions. Then it came down. Of course, the direction will change. Even if you pay attention to the model, you can see that change in the direction of the hair. Alright. I will take a bigger brush. So I will create these gray colors in this between, shaped them a little, and add to the darkness of this part. In the first part, as you've seen, recreated sketching and directions. So in this phase, it is really easier for us to parse, which will have a moderated gray. I'll just give a background color to it. So later we're using our array so we will shape them. Let us work on the other parts of the face as well. Like, for example, the nose. See, when we come to the nose of the cat, to directions are facing toward insight. As we go up from down, the directions will change. Now there, coming to the center of the nose also encounter more calm that from the other side too. So these shades will connect. Alright? Now, in here, if you pay attention to shadings, are completely changing directions and are going up. To parse that we have longer hair and you can use soft brushes. There are two. For the parse that we had longer hair. Those brushes can come handy. As you can see, the hair of this part are all going up. Let's even the hair which is pointed upward, have its own curves and shapes. And they needed to be done. The lights and shades are so different and they're separated completely. Be careful not to drag that much darkness into those parts. So then later you cannot create delight. Be very careful about that fact. This side of the cat's face. It's better to use a smaller brush because we have a very small space to work. All right? Actually the thing that we're doing is actually kind of a background. And me have so much to do for creating the correct shape of the hair. To correct shape of everything. Actually. In some parts, we need to bring gone to flat coal powder into our work that we'll do it after the background phase. And I will tell you that's enriched parts, you can use it. He also have a dark spot here above the eye that here we have a bigger space so I can change my brush and get a bigger one. Okay, Just like this, we should feel all the face of the kitchen. The same process and same rules. So when I say it's all about the technique, I really mean it. If you know how to do a small part of the face. If you know how to do the hair. There is just needs time for feeling. Nothing special. But you can only master these skills. Good practice, practice, and practice. Trying to keep up the good work. Okay, here we go into port, which is related to this part of the above. If you look at your model and pay attention, you see these parts are some kind of line and dots for a shaping that area. In this very first step that we're doing, the background color, we create them in linear rate ways. Just create lines. We see with putting my brush and picking it up again, we just shade them. This part, does that have strong darkness or create that to let all of the heads will be shaped. You will notice that rich places you need more darkness and you can work on those parts more. Because we have a strong light here and it's so white, I do not take any powder on my brush again and read the darkness that has been left on my brush. I just give this part a color. It's a light area because it's a light area we created like this. But again, you should pay attention to difference and a variety of directions are so much in here because the direction that you're doing for your background color now, it will really help you during the phase that you are using your eraser or using your completion shadings. Creating them, I guess, will help you. This part is also a gray area that should become fated. Why we're using eraser, but now we're just doing it as a background, background color. But because It's wide area and I have so much space, I can use my cat tongue brush. And it's a soft brush as you can see, especially these light parts. You see the brushes that I will tell you is for getting your work done easier. It doesn't mean that if you don't have this kind of brush, you can not complete to your work. If you have enough technique. You can create your work with simplest and limited equipments. But I will introduce the commitments that I've used before. And some of them will really make your work much easier. This cat tongue brush has a benefit that is so soft. So it will take the extra powder of the work, meaning that not too much of the powder will go into the cardboard. And how does it work in our benefit? Well, when we want to use eraser, it would be so much easier for us when there's not too much powder in our work. Now, I'm working on the shadings that we've created, spattering the darkness. In this step, you can also move to the ears and determine their placements. So the background of the head of the cat's head, there'll be generally over. And a next step, we can work on the details of the head. You see in these parts that it has longer hair. We can easily use this brush for it and create that hair shape. But for the face because their hair is shorter, we should use smaller brushes. To point is that in creating darkness is like this with your cat tongue brush because the amount of powder that these kind of brushes keeping their tip is very different than the ones that are in normal brushes. So you should be careful and ng-controller watch here doing with the cat tongue brush. Just like this. And days parts should be done. The part above the year, which needs so much details. So now it's not the time for creating those details. We are just working on general shapes now. So we just want to give the area general color and a general volume we're going to create. And at the same time that we are getting the general volume of the cat's head. We have also created previous stages for creating the textures of here. Now I am going for inside of the ear. This era is also the same because most of it is like shores and light hair. So I prefer to give the whole ear a background color and then we'll come back and work on it more. Shouldn't be so uptight about getting various smooth shade because all of this bar, they should get darken and they should get so much eraser on them. So you don't need to create any special shine or lines here. One of the reasons that some students are attracted to create animals for their first work is because that you can actually get stays, shadings easier and you can easily keep your work more cleaned. A sensitivity is not that high as, for example, creating phase or other sketches with so much details. So this would be much more easier for you. For grading cleaner and better shapes. I've darkened the inside part of the ear. Now we can say that they have done the background color of the cat's face. That in next stage we will complete it and emphasize it. Or NAC said we will do the background of the body and then we complete our work.
7. Creating darker layers of cat hair and face shadows: All right, my dear friends, as I told you before, they've created a background for the cat's face. I wanted to do the body two and then come back on the face again. But I figured that maybe if it complete deface first, it would be easier for you. We're just going to complete some parts as up to a point that we can. In these areas, the dark, this is less than it should be. And I prefer that before I create the texture, my eraser and start that, I would darken the area more. Now I'm using a darker coal powder, which is actually the flats coal powder. Create a color. Flat cool. I got to cube of the coal. And you can just make it into powder with different equipments. You can do it with sanding or Kotter or any other different equipments. But pay attention that with which equipment that you want to create your powder from the coal, you should get very, very small, small part of the coal. You shouldn't leave it in big pieces. If there are any big pieces in your powder. It will take takeaway to a smoothness of your work and it may ruin your work. And you see, even in this phase which I'm creating the stronger darkness, I am paying attention to the directions of the hair. So when you're doing this, you should be careful about creating them in the same way that the hair ongoing. So when you want to create the shape of the hair for the eraser, you want. Face any errors or problems. You pay attention. This brush, I'm using size two brush and the normal is the tuple. The normal tip of the brush is like this. But look at this one. Some of this has been gone during working. And this is another size two brush which has almost no tip. It's gone. Darrell loan size boards and width using them in time. They will be look like this. And even you can use this kind of brush. So you shouldn't throw away to brushes that the tip of them will be sanded away and they're gone. Because in some parts, day may come in handy. Dandy will actually help us. For example, this one will be a better choice for here. If we have used a brush with a longer tip, it might not be as useful for us as this one is. Same time that we are creating these shapes. You can create that hair like to after using a brush or eraser and pencil. If during the correct direction of the hair, it will actually help you a lot with creating the last touched and land starches and getting the better shape. We can so lightly drag these up. Because this part is generally dark and dense. We've kept it here because we have a wider space. I can use a bigger brush. You see I haven't blow off the extra powder of my work yet because I'm using it. And I'm actually during thing these. Leftover colds toward up, so it can shape these parts a bit more. You just need to know how to use the same set. Look useless. This area, neck area, which is B, actually a different story from the face because the herring here are longer. We can dark in this part too, though it should come back to the body separately and work on it later. But for just getting this upper shapes better, we can create some of the dark dense of the neck. So these upper parts will look better. And we know exactly what we're dealing. Cre animals are not a hard work generally. And it depends on what animals you're creating. But in some like cats or other things like it. According to the hair of their body, you should be very careful about is smooth thinness of the hair data here, creating. If they look as smooth, your work will be really magnificent and beautiful. Of course, you can do this with your soft brushes too. But the problem is that venue we want to use our soft brushes. Your work will get a bit faded, especially to dark spots. So I prefer not to use a soft brush over here. Or even if you want to use them, you should use them as a combination with the other brushes. Okay. Later we can get to complete shape and form of it. After using our eraser. I'm just darkening this whole area a bit more. Thank this. Now we have a very fine and elegant darkness in this part that because I don't want it to get lost and go away. I preferred to create it with my pencil because it got a bit into the white area. From this side of the cat's nose is the same. This inner part of here is a bit dark. We use our flats coal powder for creating this. Worksite this, that the background of your work is white. If it got dark from blowing of the extra matter of your work. Or are there things you can easily use your deaf eraser and clean the surroundings of it. So don't worry if you see around your cat only get messy. Can always erase it. This part because it's the outer part at our area of our hear whispered to complete the hair more because it's a light area. So after we want after we create the hair with eraser, they don't have to go back to the darker spots again. This is again, the neck of the cat. And because we are coming down, we can you work a bit on the hair which are here. Just a little, not so much. Say this part. The head and a neck has been separated, but it should be shaded very slowly and smoothly. So then you want to drag the upper here into this part. It won't get so awkward and not good. So I will shade this part's a little with my cat. Don't brush again. Makes it look more smooth. Just like this. And we can use the leftover powder for creating this shapes in the hair. Say up to this point of the work. If you pay attention, you see that the cat's head is actually giving you that feeling of the smoothness of the hair and the cat's fur. See it. It's looking a bit fluffy. Can look more cute than this. And we are done with the details. Yeah.
8. The subcutaneous of Cat body hair : Okay. And this estab, we want to work on the cat's bodies hair. For this, it's better to start with a brush. And we determined the placement of our darkness. When the placement is determined, we can easily feel delight parts with our soft brush. In the parse rich are so dark. I am directly transferring the piped coal powder into my work. Try to create the darkness is like this without any border. I mean, it shouldn't be separated fit a line from the rest of the area. Because in that case, fading the darkness and blending the colors altogether will be so hard for you. And the fading might get so difficult that will ruin your whole work. So the darkness that you're creating, you should create them faintly and you should put a space for fading them. In this phase, you can just create bigger and stronger darker spots that you see and do not move to the details, not for now. You can work on them later. But just try to give the whole body at general shape. And in here that is coming from the shoe toward up, you should determine this border. To separate the shoe from the cat's body. We can complete this area of the smaller brush. Because that was a bit big for here. This areas is smaller. Okay. Beneath this part we have a darkness to you see in this phase and in this section we're actually creating a stains of darkness. Were darkest spots. We're just creating some darker spots all over our work. But even in creating these spots, as I told you, you should pay attention to the direction of the hair, for example, here the middle of it may not be so important, but at the size and the edges, you should create that direction of the hair. Definitely you should do that. And here recreate a line and then we will scratch it, stretch it, stretch it to its surroundings. And we have a darkness a bit lower than that, and even a darker spot here. And of course, in this step, we will fade it like this. We'll shape all of them like this. That's why I will not blow off the extra powder from my work, not yet, because I'm still using it. We are engaging and working on this area. You can use a soft brush and you can shape them into direction of the hair a little. As you can see. The soft brush will give us a smooth texture to our work. But you can note, gets a real hair shape in your work with your soft brush. That's why we use other brushes and of course eraser. Because this gives us smooth touch but doesn't look rail and hyperreal. This part is lighter. We keep the light color. And of course, there should be in pieces. And we can easily and we can easily fix any problems here. Okay? Now, I take off the extra powder from my work. And we will move on to the next part so we can add to darkness. For example in here, that we've forgot to create it in our primary sketch. But it doesn't create any problems or errors for us. You shouldn't lose sight of your model. For example, places like this ever forgot to create in primary sketch. We can do. Now. Now, there's a point about sketches like this. Are generally animals as sketches. Your freedom is actually more comparing two sketches like humans face and other things. Because in some kind of sketches like this, you don't have to create every detail, every spot, every part that the hair was separated exactly like the model. Because even if it's not like that, your work would not change so much from the model. And it doesn't make that much difference. Of course, I've always said you should try so hard to simulate your model. And you should do your best to create something exactly like your photo. Because in other case, data only so hyperreal. But if you misplace some parts, don't worry so much EarSketch would not get ruined. But let's try for the best. That's why I said it's an easier is sketch for beginners. As you can see. I'm adding the darkness is, and I'm shaping them into direction of the hair, which is at the top or at the bottom of it. So it won't look just plain and it would look like it's it has some border or lines around it. And think it's better to change my brush and get a smaller one. Because we're in an area which has a smaller parts to create. And write. For recognizing that where we are. See this one, a k, I start from the top. These bars that are smaller, you can completely shaped them as you want. In some words, darkness is not that strong. And you should just create a shape and separate the parts from each other. This part in the middle we have a strong darkness that it came out in different directions. After we've created, it can easily recognize this shapes. This area, some of the hair I have gone in this way. Here we should use eraser so we can get the correct shapes for the hair. The parsec is separated from each other. We create them as much as we can see in this phase. And again, for the background of this part, we can use our soft brush to directions are a bit toward up. And in here, there are some very small darkest spots. Very small like this. We're just doing them. Not permanently because we should shape them while we're using an eraser. Just to get a general shape, we're doing this right now. Okay, in these parts, the hair should be in this shape. You should use eraser on all parts. Some parts dado need to get a white. So we should give them a texture with your eraser. And even after creating that texture, again, you should shade that area. We will work on them more. After we did the shading phase. And later that we added our eraser, you should figure out that in which parts we should shade again so we can get the extra light from our work. In this part we have a complete darker spot. You see generally a technique which is in your work. And with using that he can create some sketches very well. Is that finding your darkest spots and darkness in your work. Before doing anything. You add the darkness, especially parts like this which are completely dark. When their placement is determined. It will help you so much for recognizing the placement of the lights. And your whole sketch will be in a good shape. We have a very small darkness in part 2. Here we go. Maybe in this shape. All right. You can see that the border of cat's body is spontaneously determined. You don't need to spend more time on that. And we have as small darkness here at the bottom. Of course, it's not that much dark as v have created on that upper part because I can see some light hair in it. Right? It looks like a great kitten even right now. Now there is a small part lift in the middle of our work that we need to do to background for it. Now for here, it's better to separate this part. Darkness coming this way. Now that we've created the background sketches completely for not losing them, we can use our 0 brush. And we will go over these sketches with some lines that are 0 brush. Let's say because we're not too sensitive about it, we can work so easily. These bars should be worked on more and we should add more details on it. But because we're just creating the background for now, it's enough for this step. Again, on this middle part, we should create some colors and shapes that are 0 brush. And then we'll move on to work on the details of our cats. You see in a sketching huge determine the parts little by little. For example, like here. In shading phase, you do not look for anything. And you can easily recognize the lightest spots and dark spots and you just create them much more easier. You see is not need to get so uptight about it or taking it so hard on yourself. It's easier than you think. You just need to get to work. See what I mean. They have a small darkness in here. Exactly in this arc here. Alright? And darkness around here. Who can give color to our work, can complete a background. And again, we can use our soft brush to do this. During it, a background color in these parts because we want to get more her hair shaped like I'm just going to use my brush a bit just to shape them to look like more like hair. So it still gets more cohesive to the rest of our work. Because yes, although it's a background color, but we don't want to have a separated parts even in our background coloring. You see from the burners that you know, the hair are going to be separated in pieces. You can do the separation of the areas from those points. Okay. I think it's enough for this section and create a background up to this point. And in next stage, we will pray details.
9. Lightening the cat hair: All right, then my friends, as you can see, we have came all to this point and vicious created the shape of the hair of cat's body and face with our brush. Up to this point, we haven't used eraser or pencil. Now I'm going to use my eraser like this one. Prefer Lee, It should be a smaller, or you can use a normal eraser, but I prefer the small eraser, especially for the small areas like next to its eye. So I'm using this mono 0 and so the racer and a start creating the hair in different parts. Pay attention to your moles so much in this phase, my friend, because both the direction and the length of the hair are so important. For example, the parts that you do not see long hair. You shouldn't creates long hair. And it makes your work. If you create long Herbert, they're not supposed to be. It looks so unnatural. Okay, Now we're creating texture. So one of the most important points in using the eraser, either here or any other place as when you're creating hair or creating various small and fine textures like this, is that if you're working into clean areas, the tip of your eraser should be completely clean and sharp when you want to create whiteness. And another important point is that you shouldn't put pressure on your eraser. You, I mean, they hand pressure is needed in some parts, but it's in here like this, which are so fine and so thin to hand pressure might make them look thicker, which is not what we need. If he see that I will sell between our work, I'm just paying attention to my module. I'm looking at it. So the direction of the hair that I'm creating would be correct. Sli you see, as I told you, this, cat a sketch or animals like this, he might say, it's slow, died important. And maybe it's really is not that important that each hair should be in its own place. Or the designs of the face or other parts should be exactly the same spot. But we do our best to make it look really similar to our model because we are simulating. And we learned from that to try to make the simulation well, okay, I'll drag the tip of virus or another paper so it should be clean completely. In today's parts, the hair are a bit longer than the central parts of the face. And you can use eraser more easily. My friends IT. And other parts to the size of these works as smaller as they are. It would be harder for you to create them and the sketch them because define lines, the things and the details that you will have to create with your eraser or your pencil will be harder. Or if you work in, for example, 50 centimeters of 50, 70 centimeter is better. Maybe the shading will take too much of your time, but adding and creating details would be easier for you. I prefer to choose this small size for you because I wanted to learn the techniques in a hard way. So later when you use a bigger size, you will be so easy with that. Just pay attention if you're working on a bigger size, you should take the brushes bigger that I'm using in this. But if you learn to heart techniques, other ones will be easy for you. You see the tip of our pencil, sorry, the tip of our eraser. It's sharpen, is still sharp and it's not flat yet. And when you're working with it, you will get a thin lines and fine lines. You can use this eraser, but the minute as you filled it's not sharp enough. You should use your cutter and sharpen it more. You see, if you do not have hand pressure, you can create these hair very easily and very finely. This part needs more darkening that. Now we're just going to apply the eraser on it and then we will bring on a dark shade on it. Multimedia case. Using your race or even in the parse that needs more shading will actually help you to create your texture. Actually, you are creating a texture and when you add a shading on it, it's different From the shading that is in other parts. And it creates a new texture for you. If you look closely in this area, hair of the cat's nose is going up to its forehead. Now it's time to sharpen my eraser to us like this. Or you can sharpen it and corner raise. But for not wasting our eraser, I prefer to work like this because all around it will be sharp and you can use it. But if you're using a normal editor Acer, you should create a tip like that. Meaning it should be like a triangle, like a pencil. Kind of. Now we can create the light for these parts. Of course, we need to apply eraser on our parts several times to get the result that we want. In each step, our work will be more shaped. And in this area, if you pay attention in this direction, we have some lights and some various small hair. Using the eraser in creating the animals here is very important. It actually adds up to this, smith says, and it will make your work look more natural. In these parts, we need more darkness. That after creating here with our eraser, I'll definitely work on the darkness and get the shades that we want. Getting the correct volume from here. The spot Sunday here, which help sketch to get more beautiful. I will definitely show them. All right, This findings. So the cat's eye, which came from next suits I, it has some light toward up that after sharpening my eraser again, I am going to create these here. I mean, that this light that we bring up to here completely separates that darkest spot from the part next to its eye. And this farce held us not light, but for just creating the shape of the hair. I should apply some eraser on it. This is a very delicate a step and section. Because when you create these hair, this very soft texture that is, that has been creating little by little. It just gives you a great feeling. You should definitely try it. You see this part of the cat's head. He's got a very beautiful shape. Creating a sketches like this has a very special benefit, which is actually its leaves you so free for creating the textures. Simulation is so, so important. But these kind of his sketches at the same time as you're creating a simulation. You can also enjoy watch you are creating so much because you are more free to move your hand in. So many places you're freer, you're more free. And mostly these kind of sketches are very good for the beginner students because it will make them more friendly with the brushes are cone to plain souls. Their coal is who will help them so much. I always use the word become friends, Lee, and friend. Because in my ADL, when you're using your equipments and get to know them, you are actually becoming friends with them. And you can get the best result out of friendship with the equipments. Under hair which are in this part behind its head. There something that you should consider that day here in here are in several layers. You should create them layer by layer on top of each other. You shouldn't just create one layer. Leave it. Of course, these parts that came out of the head. We should create them later with our pencil to. Now that we've created one layer, I start from a little bit more below that, and I add another layer. That of course you can add the darkness between these layers. So you will reduce one part of a work. One set will be reduced. So after I created one layer, I will add darkness with my soft brush so I can easily go over it that my eraser. Now I've added the second layer. Then again, darkness, and I'm adding darkness. And then again, I'm going for the third layer. It's very easy and very enjoyable doing this layer by layer and a step-by-step, I actually let you create that layer shape of the cat's hair. In these areas to hair got toured up. Mostly. There is a darkest spot here that I will add it with my brush. In this very same phase. There is a very small darkness here. It can recognize it by looking at your model easily. And we have hair here that is coming out just like this and it's going to be shaped. You see exactly here the separation of the hair has been created and also the shape of them. In this area. He should be very careful about the shape of the hair. And of course, there are directions. And just wanna give a general shape to this area. And then I will add the darkness which comes between them. Okay. We worked on this photo of the head, except for the ears. So work on this lower parts of the cat's face. And then we'll move on to the other parts. Here we need more darkness. Therefore, I'm going to add it with my brush. Dark areas are the places that we should go over them and lead. So by our pencils too, so we can get darkness that we really want to see. And dairy circuits the darkness of the area to itself. It can drag it into your light parts. So drank your eraser on a clean paper. So you can continue with your work. In this part. For getting the erases that you're applying clean. It's better to use your eraser in one direction, meaning you shouldn't come and then go back the same direction, up. You should just drag it once from up to down or down to. So. And sometimes you should even abrupt it. In the middle. Summing. You drag your eraser up to a point, you take it off, and then you come back to see you, my friends for here, you can use your normal eraser too. Because we had a wider space. Just it's important that eraser would be so clean and so sharp and you should control it. Well. In order to create these hair for this part. In this part, the hair should again come on top of each other in several layers so we can get the shape that we want. Now we are just creating the first layer and pay attention to the curves. In the percent, the hair or indifferent shaves. Or for example here. Here are so thin, so fine. From the cat smells toward outside. And what we had which eraser erase or that you're working. You should pay attention to two of the very important points. Meaning that the first one is that a should get a background colors so smoothly. So you can use your eraser easier on it. The second one is that you can choose c adequate eraser for the, for the adequate place. Meaning that he should know which eraser is suitable for which part. And it should be size-wise correctly, it should be sharp, it should be clean, and so on. Here we have a light a light line. On the other hand from the outside of it. Have a shape like this. And I kept it so light. So I'm going to use my cat tongue brush. I'll shade it so it will not be debt white and eraser that I'm using can show itself in here. Of course, beneath the eye, it has a dark shade that we haven't created yet. And later we should do that. There are some hair here that actually come, gets complete. The, after we add darkness. You haven't worked on that part. It's a bit too, is indeed continuous of the hair of this part. And in here, which we have different directions. See my friend, the point of the tip of eraser being completely sharp and completely clean is so important that in this very small area, I've just cleaned and sharpen my eraser for about four or five times. So at a hair of these parts are very, very small. So as you got a touch of touch with the eraser in here, and you've got a very small line. It should be enough and you should take the eraser from your work. First, I will darken this area more. We have seen her from inside to the outside. Very small, very short. And of course they're not too white. So we will run over it with a very light shapes, so it will look more natural. We also work on these parts and create some textures. I would say that this much focus about something that is not that important in which direction it goes. And in whatever direction I create day will work out. But you will see that in the result of your work, comparing to the works of people who didn't have focus on these kinds of stuff. You can definitely see the difference in the result. Again, in these parts, you can create the textures. Setting several layers. This last layer, which should come to outside a bit from the cat smells. You should definitely drank some hair from the light parts to the dark parts. So the dark parts would get shaped and they don't look separated from the rest of your work. And here we have a darkness that has been faded throughout our work. And the power set we have forgotten. We can create them like a stamen spot, but not with too much hand pressure, we should create that two spots. Those false smoothly. And you will fate that more. And you create some textures on it. Meaning toward inside. And this five, which comes on this dark spot, should get eraser, should apply eraser bit like this. Now, we can move to the ears and we can complete them more. In the airport, I think we have too much light. So I'm going to use my cat tongue brush. The size, the size eight. I'll darken this part a bit more. Because this swatch slide is not really what we need even in here. Because we want to create light hair. And this flashlight is not good for our work. And even it's better to create some dark is Spot sends things with our brush or normal brush. In our work. Of course, we've created this darkness from before. And this Vd beneath these hair, these more darkening. I'm going to use a bigger brush. You should pay attention below about the background of the hair you're creating. If it's dark, you can get help from them. Now we can say that the background color of the ear is almost complete. Let me drag it down a bit so you can see it better. Now we can start applying eraser on our IR day hair next to the ear with the curves that they have, a wave that they have. Pay attention not to create the hair too long. Whenever it's needed, you should just cut it and make short hair. Totally depends on the model. The hair and dads are coming. And to the top of its ear. They should be slowly center. Just like this will make the hair thinner. And of course there's some here that came in. Your create them as well. And next to them day here that we have in this part that actually they are in the category of the hair that had should be done in layers. But just for the first stab, we're just going to create these line. The upper part of the ear. Thinner hair. Pay attention to the shape of the hair was twisted or curved. You should determine all of that. In your work. Show that you see this part of the ear. Ear is very herring side. After creating the hair, you need to add darkness to some parents so they will look more in depth. And if it was needed again, we can use our Eraser. Fluffy kitten is looking better and better. Each minutes per minute passes by the light area in here. That it got shaded a bit. So I'm using my eraser to take away a Spartan layer from warm, from my work. And there is a shine on it that we created with our electronic eraser and our brush eraser. In this area behind the ear. We also need to create some lights. This hair. You drag this hair toward inside. Smoothly. We create these hair. Okay? On this side, we can see it's Harry shape less. So we can create. More generally. We darken these parts. We get the general shape of the hair. And of course, this inner part of the head should be darker. This outer side of the ear should be lighter. So the depth of inside of the ear Show more and better. To sync this. Okay? You should move up to this part, create the hair up to this point and work on the darkness a bit more. And then we'll come back and continue.
10. Complementary stage of cat head by drawing dark hair and placing the final lights on the head: Okay, My dear friends, as you can see, I've worked on my darkness. In these parts. I've emphasized the darkness and increase them. And again, I create a dye hair with our eraser so that darkness will be shaped. I worked a bit on the eyes too. I've created more volume for our eyes. These parts got darker. I've worked on the iris and I darken them. So the shine of the, I will show more. And this, in this step, we are going to use our hard pencil and our carbonic pencil for creating a sum here in our face. But of course, before doing that, we can also go to our eraser and create the long hair, which are some of them are in the whiskers. And some of them are here. You can say above the cats, I can say it's the cats eyebrow. We have several thick and long hair here. And we have them in whiskers to this side, of course needs more darkness to get shaved. But for now we created, then we add a bit more darkness to it. In here. Forgetting the volume of this part. It should be darker. And some hair here. It's enough for this part, for this stage. And in next stage we can work on them more after we've sharpened are hard pencil. You will take it and we start working on the dark parts. You should keep your eraser next year hands. So an addition of using the pencil, you would use the pencil tool, sorry, you use the eraser to so you can get the correct shapes. Here are spending too much time for the cats hit because it's one of the main parts of our sketch and painting. Remember that you should always work on all of the parts of your sketching with so much focus and concentration. But there are some key points to your work. Some main parts of your sketch. For example, here, it's the cat's head. When someone is washing your work. The first thing that comes to the site will be dead cats hit. And it will be showing more. So it's gotta be great. For the hair which are lighter. We can create them with our carbonic pencil because the darkness that it gives to the area is much more less than the one with the hard pencil. For example, the hair for the corner of the eye. And this part, which is so lighter. And I'm creating it with a very light hand pressure so it can shape a bit. And I can just get the hair shape correctly. And creating the hair again, just like using the eraser, you should pay attention to direction, but it shouldn't reduce your speech in creating them. Pay attention to that. It was enough for this part of the face up to this point. Here we have some more. Long hair. The hair that came out of this area tried to create them. Definitely We do your carbonic pencil, or if you're using your hard pencil, you should do them. So finally, and it should be very, very sharp because hard pencil is darker than carbonic pencil. And a reason that I've asked you to use carbonic pencil in here was that we have lighter and thinner hair over here, so shouldn't be worried too much about them. Darkness. And what I mean, you see these areas. We add some small lights in the same direction of the hair. So it will look like here. N-bits on this inner part of the ear will darken it more. And then we'll create some hair over here. Now, part of our cat's ear. Recreate a small border. You can take away the extra darkness with your dough for a CR. Pay attention that we do it only in the times that our background of the sketching will be white or light. So you can use your dough for a CR. Otherwise, I mean, if the background has a color, darkness, it was Gray, was black triangle to use eraser. Because using it, in that case would not give you a great result. And when you're creating the background, your work may look like a saint and it can ruin your work. At the same time that we are creating darkness. We get some of these hair toward out. It's like they came out of the head. In these areas. We shape our hair. They mostly have same direction. But pay attention that even that you're creating same direction to these hair, you should create them in different angles. So different directions, sorry, same directions, different angles. Just like this, the upper part of the cat's head has been shaped. In this part on the cat's nose. I can see a darker spot over here that I create. And in the lower parts, there is a stripped texture. It's some dots around it. And because this texture is so light, we use our carbonic pencil to create that. Came my friends. If you didn't have this pencil, you can use any other counties pencils which are light. Or if you've gotten just two kinds of pencils which was, which were hard and soft. You can use your hard pencil. It a very, very, very low hand pressure. Instead of our carbonic pencil. Well, sometimes in your works, you can use graffiti pencils to boss. I do not recommend them so much that you use them everywhere. To normal graffiti pencils that I sometimes use in my carers career pencil is that is Lama graph is Staedtler pencil that sometimes Use be a service, sometimes fit my Cont and coal because the lower numbers, if you use them, will not look. It will not create a cohesive look for your work. And it may or may not get a good result out of it. I created these parts with my pencil while I was talking. Because it has a very, very small takes Sure. And comparing two that are size of their work is small. You may not use your brush to get these textures very finely or very easily. It's better to use a pencil. K. Now I will add to this darkness a bit more. So the volume of the I will be more. And also we can shape the area around it. Like this. These bars said, just went down. We need to work on the placement of they hear not every verb, but the parts that are lines are too much inside. We just fade them a little. Just a touch, okay. Because if you put too much pressure with the pencil, the smoothness of your work will go away. K. Again, I'll go over the light parts beneath it. I recreate this darkness. So finally, with the combination of our hard pencil and our carbonic pencil V-shaped this area. You don't need to feel all the parts with your pencil. And just the parse that you see darker, stronger darkness, or the end of the hair that needs to look dark. Because using too much pencil may decrease the smoothness of your work. So do not use it too much. You can see that with creating the darkness and the volume of the cat's face is showing itself more. And these bars that need more darkness that we have worked on that Vidar carbonic pencil before. Now we're just giving it extra darkness with our hard pencil. In this bar, which we created a light hair. This lower part, we need to add more darkness to it. And a darker layer in this part. I add another layer over here and try to change the directions more in this upper layer. So these two layers will get more separated from each other. Just like this, come more to down and add a new layer of hair. Pay attention to the length of your hair. It shouldn't be too long or too short because it can make your work look a natural. And induce parts between when where we need dark shadings, we should create them. Like here. Just like this. We should do this in all of the work. Using your pen cells, using your erasers, and placing the darkness. Different steps so we can shape our work. In this bar that we have a light texture. We can use our electronic eraser to shape it. First, we will sharpen it on the sanding, and then in this area, we will add the lights that we can see. And this part beneath the eye. Now we can use our carbonic pencil. And we can shape these areas more. This area also needs more darkness. In here that we have some separation. We can so slowly separated with our carbonic pencil and a hair which are in this lower part. The start of them, I mean, the beginning of them are dark. And of course they hear which are. And the beginning of our cat's whiskers. And you can take the powder, coal powder. And you can create these darker spots. This lower part may show less, but still we can see that they just create that spot shape. So the area will look like what we wanted to. All right, my friend, I think you've got the general idea of the process and you just need to, I repeat these steps several times so we can get the result that we want. And we can have the volume that we want. Let me just create the cat's whiskers. And this is step two and a nexus set. We will work on the cat's body. So these are the whiskers that are coming out just like this. The whiskers are coming out of different places and in different directions. In this side. Then it comes to a light area. We can not show them completely. Instead, really bring innovative gray color at the end of them so we can shape them. The ones that they come to undo body. We will work on them yet. First we should do the body and then we will work on them.
11. Lightening and drawing the dark hair of the cat's body: Okay, My dear friends and this sectional, our work. We want to move on to the cat's body and create day hair of its body. With the same process and same technique that we've created on the face. The only difference that is obvious in the hair of cat's body is that they are longer than the hair existing on its head. Soda hairs of this part are longer. Redeem your brush. He should do this separations. There are small but they need to be done. The parts that need to be darker. You will use more powder. And do you also spattered powder around it? Don't rush through it. If you want to get a good simulation, is slowly. Figure out the placement of darkness and then darken them. After creating these darkness, you can go to your eraser and run it over your work once. So it will be better, will just explain you one part of it. Because there's not much difference from the other person gravity down the head. And you'll do the rest of them. Because I'm doing the background, I'm going to use my normal eta, the eraser. And these parts have different directions. Like this. The hair of these parts are sintering finer. I prefer this mono 0 racer so I can get same your hair. Like this. Even in the darkest spots, there are some shades that we are going to create them into direction of the hair. And it will help our work so much. In these parts that we've created these shapes. Even in here, there are some separations that with bringing image of darkness into our work and creating a shade on a part that we have brought the darkness. We can give depth and volume to these parts. I think it's completely clear individual. Generally, our whole area needs some disorder hair that make our work look more natural. Recreate them as much as the model allowance right now. But at the end of our work, we should definitely come back and add these sorted hair. So our work would not seem to in order, so it would not look unnatural. Now we go on this part and recreate the hair of here. You should just leave the hair plain white. You should come back and give volume to these white parts that you've created. And for that, you need to shade a K because I don't want to move the work so much and rotate it. I'm just going to go around work myself. But you can rotate your work while you're working. And you can just drag your eraser in the correct direction on your work. Now in here, the direction is changed. And these parts Ds here, our shapes very small. In this part, we have that darkness that we've created are determined and the surroundings of these kind of areas are very important. So I'm just going to shape them, at least in the direction that we are working right now. We just needed to get a shape of itself. K eraser needs to be sharpened. That again, I will cut the tip of it with my cutter. And just like this, I create the hair. In these parts will separate the hair according to the general shape of our area. This part. And also here, it should be shaped more. This lower part. If you pay attention, you can see that there are in a very beautiful shape. They came from inside to the outside. So smoothly and softly. But first we should shade this part does outer part. So we can show the trace of our eraser on it. For the parts like this, maybe it's better to drag your eraser from outside to the inside. Or if you want to drag it from inside to the outside, you should do it very slowly. So it will get a great and beautiful shape. And it doesn't look like a white and light stain on your work. Of course, you can eliminate that white stain with darkness, but why should we do something that we need to edit it or fix it later? When we can do it correctly from the SART. Preventing if a mistake is way better than fixing one. You see these darkness is that we've created between the parts. And it's actually separated the parts very easily for us. And now we're applying a little eraser on our work. We can easily shape it. Here we have a darkness that we do not have in our model. We do not have it here. We have in the model we do not have it here. It's here. So I will add it now. No pressure. You see the darkness that we've created are getting their placement little by little as we move forward. And we haven't applied our pencils on our work yet. And until then we do not have the general and complete shape of our work. Don't forget that. You see, you should pay attention to the direction of the hair. And of course, the curve that they have. Because the curves in some parts they are showing you the prominence. For example, here. When we curve and bend to here, we are also showing the shape of this area, which is prominence or not. Okay? For saving time. I will do the rest of it fast and come back.
12. Expose and draw cat body hair with a brush and pencil: Dear friends in this episode, I've just fast forward it, my video. Therefore, you would get to know this, uh, steps faster because they take a bit more time from you. Just want to drag the hair around the cat's body and a little bit out. And then after that, if shaped them, we're going to use our edit eraser to work on the hair, both around the body and even in the middle of the body based on the rotated shape that they have. According to our model, we would work on all of them. And obviously, we will sharpen the tip of our eraser and we try to create the hair that, that sharp tip. You should pay attention that when you're creating the hair with your eraser, your eraser should just go and it shouldn't be going and coming back. It should just go in one direction. And there ever live for God to bring our darkness in that previous episode. Then steps, we should first bring our darkness here and then later we will work out eraser on it so we can get the great shapes of the hair. You see, like now. They've brought this darkness into our work. And then now we are going to work on it with our eraser to give that hair texture. And you can even use your 0 brush to add the darkness and some volume in these bars. And as I said before, with a very sharp edged eraser, we will add the hair right next to these darkness. Pay attention to the direction of the hair being created in the model. Because if you create the hair in wrong directions, your work will actually, your outcome would look so unnatural. So be careful, the direction of the hair is very, very important. You see with some simple, several rotations and twist and works. You can just feel that softness of this hair texture. And you should be careful that when you're creating your background color on your foundation, you should just created so soft and smooth. Therefore, when you want to use your eraser, it would just create this self texture for you. If you create your foundation and your background color over and over again on top of each other. And when you are going to use your eraser, you might not get the result that you want, and you might not get the lines of the eraser as clear. And as well as you want. We continue our work with our mono Zero Eraser. As you can see, I'm going from the light side to the dark side and vice versa. But just throwing my eraser off at the end of it. Ever we've used our eraser. Maybe some, in some places we need to add even more extra darkness in order to show the ups and downs of those parts more and become the front part of the cat by little. And in here, you can see some longer hair. Should definitely build off the extra powder and loved the extra eraser from your work. In this area, we have more darkness in our model. Therefore, I've created some more darkness in here. And then with my eraser, I blurring the hair here. As you can see, I'm adding the darkness in some places. So I work with Git, similar to our model. You see in these kinds of models that you have too much hair. We don't want you to create each hair like here model exactly. But did general shape of the hair and the general direction of the hair is very, very important. So you can get the shapes of the body correctly. Well, they've almost ran through all parts of the cat's body with our eraser. But in order we, in order to make these parts more complete, maybe you would have to repeat these steps. I mean, adding the darkness and using your eraser several times to get the result that you want and make your work more complete. You can even add darkness with your face there and do your pencil powder, of course. Are your coal powder. And right next to where you've created their darkness, you can use your eraser. You see we are completing the separation and the division of each parts hair with these darkening and erasers. So a need to step that we are doing this division and separations. We are also adding some more darkness. So I work in these parts. We would pay attention to that part of the hair a little bit more. We darken them. Just a bit more. So later when we want to use our eraser on it, it would look better. Some stains and darkness which should be added to our work. In here, we have a special rotation into hair that we'd given volume to the hair around it. We are showing that rotation and twist little by little.
13. The stage of shaping the peripheral hair of the cat's body: Okay, my friends, we have applied dairy, sir, up to this point of our work. Now, we want to add some details on the sides of the cat's head. And then we will shape it again with our eraser. Now, I'm using a brush size 2, which is actually have a short tip or any other brushes. Just it matters that it has a short tip. So you can create the hair shape and just want to shape some parts like this. We do not want to do it so much. Just to make these hair around its head look more natural. The only reason so don't overdo it. Of course. Day here on the cat's buzzy seal can be worked down by eraser, but for saving time, We'll move forward in our work. And then later again, I will work on the hair. Pay attention to the directions and do not worry about getting your lines to dark. Because always you can use your eraser and shape all the hair. And wherever you thought it's darker than you thought, you can use your eraser on it. Of course, definitely, you should repeat this work at the end of your whole work. But for now, just for shaping these edges of our work and you will know how to do it. I decided to work on this part in this system and you will know the process. And at the end of our work, if it was needed, you will do it again. Okay, here we should have a separation between these hair. And I think this should come out more. So this white area would be more. So I'm just creating the shape of the hair. And then again, I will use my eraser here. Now it's better Given the parts which are light. Because the background is light and we have to do to separations some Hale. I will choose a gray color for the hair that are coming outside. And then we will create some here, some light hair on them. So those can shape, can give the gray color that we have created a better shape. In here, you don't see too much hair coming outside. Dare just several of them that we can create with our pencil. In here we have less fluffy kitty. Thank this. And of course in here, it's the same. Let me take it a bit upset. You can see it better in this area. So this fund, our work with brush is enough for now. I will work on the lights a bit more and then I'll come back and we add depends. So.
14. Drawing the hair around the cat's ears and also drawing the details of the snout and continue drawin: Okay, My dear friends in this section that we have applied our eraser, one's completely and got the shapes. Now, we want to work with our pencils and working layer on our hair. And then we'll move to the shoe. For creating the lines with pencil. You can use your heart pencil, or you can use your carbonic pencil for the lighter lines and hair. If you have a compare is. You can also use content Paris, HB, which is almost the same color as the hard pencil. They can give you almost the same result, but the hard pencil is better. In the set V have been created. Our darkness with the coal powder. We are going to create the hair shape like with our pencil. Pay attention that the tip of your pencil should be completely sharp in places like this. In this stage, you can even bring some hair on the eraser that you have already created. For example, in here, the beginning of the hair are beneath these white parts and the endings are here. So you can create the end of the hair very freely at that side. Plus in here, you should be careful that the beginning of the hair is beneath these. And if you want to work on them again, it should create the hair with your eraser and leave it at that. If you pay attention to these directions and shaves, you can easily have a very good shape to the hair of this cat in here. To hair or lighter. So I prefer to use my carbonic pencil. That in addition to having that contrast 31, it doesn't make too much darkness. And it should be. And to correct per portion, just a shape our work. I want to create some of these darkness is so fast for you so you can know what should you do. And of course, when you see one part of the work, then you can complete it on your own. In this area, day hair are so fine and so thin. So I'll just create them. Just the trace of them actually, just the touch in here. The hair are darker. Again, I insist. Day hair should be sorry, the tip of your pencil should be completely sharp. No matter what kind of pencil you're using. The sharpness of the tip of your pencil is very important, especially in some animals like cats. It is very important because it's actually the way of the hair that makes them look fluffing cute. If you didn't have that carbonic pencil. You can also use, for example, BH, Sorry, B8 pencil. But you should sharpen it so much. Then you can use it. K, You should come back to the darkness of here. Just the parts that are darker. We will work on them a little bit more. And we use our pencil on it just a little. Because we have worked on it before. And you know, the process. I will not spend too much time for it. Here with creating some dots. You can make this area looking more similar to the model. And of course, creates some lights that it will get out of that only darkness. Then, now it looks like now the parts are related to here, related to the whiskers. And actually the beginning of them. Work on them a little with our pencil, just creating a shape and a form. They do not work on them too much. So it won't get so busy here. We don't want it to get so crowded and BZ for having lighter area. Comparing to the model, we need to use our race and even a bit more. Pay attention to the direction of hair in your model. See that if you use your eraser and the work, now, using the eraser is actually making a prion appearance of some lighter layers on your work. And it shows these hair more concentrated. Considering that I have used my eraser over here once. Even create an, I used a brush over here. Just to get that gray color that we want. Every still need to get our eraser on it a bit more to get the shape that we want. And at the end, even if he saw, you need more lightening. You can use your electronic array surfer creating that. For example, this area, I think it's slider. Now let us work a bit on the body's hair. For example, these parts. In some parts, even if you add one or two hair, it can actually shape your work. And you do not need to work on it so much. But in some places, it's not as easy like that. You need to spend time and observe the darkness is in your work and just show them in your work. In this model that we have chosen. And we are working on it. Most of the hair are in light colors. And this light should be shown by eraser. So our shapes will, more will be created by using the eraser. Put if you pay attention this far, it was completely white, but we have added darkness over these parts. Even in this bar, we need some more darkness. So there'll be a separation network. Again, we have this part here that for separating these parts, this part need to have some darkness. But because this darkness doesn't have that hair shape and it looks like more like a shading. I didn't use too much pencil on that. In some parts if you feel like your area should be dark but it shouldn't be that black. If you control your hand pressure while using your pencil, it will have a great look. For example, in here, it needs the shading like this. Definitely need to fade all the parts with your fader. For example, here. We created days. You don't need to go over them so much and fade them. The last layer doesn't need fading at all. But if you needed to work on your work a bit more, just a touch of the brush on your work will be enough. Now, we've separated with our pencil, meaning this part needs more eraser and the shapes should be more determined. See a step-by-step. Each time you work on your sketching. These bars will show themselves more and you can easier and determine that deform that you're showing is actually what exactly? Because h here that you create has some light parts and some, I don't know, darker parts. And you should show that, for example, a part of hair which is here, this lower part should be darker and on the top it should be lighter. Like this. And of course, the hair which is here, we can show the direction of it on this dark area. This part, this part of our work is almost done. And here, although it's beneath our work, but you should pay attention that it should have that hair shape like, it doesn't mean this part is only dark and black.
15. Complementary stage of cat body hair: Okay. To continue with our pencils, we are coloring these areas. Sorry, we're applying pencil in here. In some parts, we just leave the darkness be between, sorry, leave the light in-between the darkness that we are creating. And the thing about we are having this focus is that when we are creating darkness with our pencil in their work, we can take away the color from with our eraser too. It's possible, but it not leave, it doesn't leave good shape for us. And it can really mess up our work. So when we are creating the darkness, we should be very focused and which part we should create it in. You see here, we have created a darker spot and we had created some hair with our eraser on it. But for getting this, getting the best out of this, we can use our pencil and create some hair out of it. So we will combine the part with the lighter and darker altogether. And vice versa is possible. Because we want the shape of that area to show itself completely. Also here, we have a darkest spot. We can't say it's a dark hair, darker spot. And if you pay attention in the model, this area have shading, meaning it's not completely white. So when you want to work on your hair again, these white hair will show themselves. And of course, these hair here. Because we are working on this right side of the cant day hair which are existing here. In this side. You can easily create them with a very sharp pencil. I can easily show them. I think my pencil needs to be sharpen. Bonds for sharpening your pencils, you can use two ways. Two techniques. One of them is using cutter that you've definitely know. And one of them is using these kind of sharpeners, which are good for thick pencils like Paris gun pencils. All right, now we pay attention to our model, and according to the direction that we see in the model, we create them over here. Pay attention that the variety of these directions will help your work and do not try to create them all in one direction. Doesn't work out well for you. Because at the surrounding of your work is white. You have to create these hair all with a gray color or black color. And the ones which are lighter, again, you can, you should create them with a pencil or brush. So you can keep this shapes. So slowly. You can work on these parts. And these here are going into their own placements. All right, this side of the cat's body is been shaved up to some point. And then we can go and work on middle parts, more parts of the hair. That is actually a special place, which they're hers are looking twist sit in here. And around this central point, they had gone in different directions and they're shaped differently. And for showing that he should create separation this area from the center of this as spot. You will have darkness toward the outside in each direction. Here we have a lower layer and a per layer. I'm going to use a small brush. Brush. We want to darkness to get a spattered in this area. Well, I think I need to sharpen my eraser because the edges of the sharper, my eraser out of that sharp shape. And I'm working with the edges so they give color to our areas slowly. And they're actually taking color. But anyway, we are shaping this area are slowly. Now we're going to work on these lower parts a bit more and add darkness here according to the parts that are coming From down. Who would have darkness there? In this area? Of course, we have Darkness which mostly delight parts above it are important. And of course in here we have some lights and hair. And in here are in different directions and are actually separating these two parts from each other. Just like this, you should do the whole area and there's not much left. You just need to add darkness of it to these parts. And these inner parts rich in these areas. This darkness should look more. You should complete all of these parts and you can work on them with your eraser once more. And in the next step, we do not have anything to do with our cats anymore. And we will work on the shoe. I hope you've used up to this point, use our tutorial up to this point and we are going to move forward.
16. Starting the subcutaneous and make volume of shoe: Hello my dear friends and k. Become back to continue our work. We can say that our cat is almost done, but at the end, we will definitely come back to the cat because we will want to work on the shoe and it may affect our work on the cat just to check it at the end and give it any finishing touches. Now, in and in this part we are going to work on this part of the shoe, get the volume of it and get the textures of it. And we continue little by little. First we'll start with hard cone pencil and recreate the parts which are lines. As usual, we place a clean paper under our hand. And our model would be next to us. And we start creating. This inner part is a part that it has a strong darkness and we can create it with our pencil. This darkness is not just a line, it's thicker than a line. So we are kind of coloring this area with a hard pencil. Just like this. I can also see a line over here that it's better to created right now. These lines more than they look like lines and just create an area for us. Little line. They are just in the role of separating parts from each other. That's why I'm not so sensitive about this above my pencil being so sharp because they because they're going to be darkened and faded. In this area. That the shoe has a shape like this. They have a strong darkness over here. And we have determined this part and there's one over here that we do no work on it with our pencil. Not so much. And we try to create it with our coal powder, mostly k. We can create this inside area with our coal powder. There are just some lines over here that we can show with our pencil. If you want to separate these parts here and here, that needs to be dark and from inside. And this part over here, two dark lines. Here. We have prominence part. And here I can see a triangle being shaped like this. And next to this line that we've created before, there are some wrinkles here. I can just create them like this. In addition to this dark color that we've created here, we can create another one below that then because my pencil wasn't so sharp, I'm using my pencil, Paris pencil. You see, if I change my pencils and I change my equipment, is for you to get to know the commitments better and their usages. And you can, you'd know that you can work with different pencils if they have any special effects that you need to work with them, I will tell you. For example, here, you don't need to have Periscope pencil. You can use the HB pencil instead of the hard pencil. And you can use B3 Paris colored pencil instead of your soft pencil. Generally they have, of course, there are differences, but we can just use them instead of each other for places like this. In here because we've just determined area and we haven't created this tailing line. Now we are designing it with our count pencil. Now we can work on this inner part 2. And we can show its territory. Because this part is almost completely black and dark. In here we have two tailing lines, which are for the shoe. These tailing lines are very small. And we just create a line and because they're too small, if we want to emphasize on them, we might lose some of the details. So of course, with our pencil. So we're just going to create a design on a shape for the tailing line of this part. And adding the details and creating some more shapes will be left until after the shading. Of course, you can work on this part too. See the point that we are an easily using our pencil in this area is that the darkness is really a lot in our work. If we hadn't have this much strong darkness, we wouldn't take the risk to show the darkness with our pencil this much. And we've created all of them without brushes. K. For now, we'll leave our pencils here and we move on to our brushes. I said from an inner part with a medium size brush, for example. Brush size 10 will be okay. In this area. In addition to fading the pencils, that pencil lines that we've created, we bring a little bit of our coal powder into a two. He can see that when we want to create a part.
17. Volumizing the leather part in the middle of the shoe, above the straps: Okay. My phallus, as I told you before, I'm still darkening this area and I'm creating the volume for here. Just continue this way. For creating the volume of this part. This part needs to be, need to be darker. The parts are behind. It should be lighter, but it should be light gray. So it just give it a color. These parts are so much care of Dan and so they're dark. Here we see a prominence part. And this actually makes our Licklider. Let me see the model better. All right, here we have a darkness. And I'm using a bigger brush because it will pick up the pace in our work. But you should pay attention that our goal is not just SUV. Faster. We add the background colors with our big brush as much as we can in big areas, biggest spaces like this. And then we add our details on them with our smaller brushes. Okay, to parse that we need to be lighter, would just keep them white. Enter first, and then slowly we drag the colors out of the darkness to the parts that are gray and a are going to show the prominence. I took a smaller brush. I'm dragging the caller's also from the other side that we have darkness. We bring the colored into our light part. So this shape will be made here. And at the same time in this step, we should try to create that texture of our shoe. We should show that it's made of leather. In this phase, if you didn't get the complete darkness that you want, it's okay. Now I should just get the volume of your work correctly. And if you had to add more to that to get the darkness that you want, you can do is in the next phase that you can increase or decrease your darkness. Then we got to this part, this upper part, we can create a darkness in here. Again, I take the powder. I'll move forward to this side is slowly. Sorry my friends. I should rotate the work and little so my hand obeying the correct angle for creating this darkness. From this upper part that we've actually put the dark, darker spot, we drag the shadings down. We're just getting the colors to come together. Like this. In this area, we have more darkness. Of course, I've made my full tool in black and white. You see? I made my photo in black and white and I'm working from that. Now. I'm doing the darkness as with the ones that I can see my photo. If you work if you're working with a photo of it colors, the darkness might be a bit different from the ones that we're doing right now. It's easier for you to change it in black and white. These parts needs more darkening. This line should be created with the pencil. Before we drag a big brush on this darkness, I'm going to use a smaller brush and I go over the line. And then I'll move forward to a bigger brush so I can give a background color to these areas as well. And I said from the dark side, the inner part. And come down here. Now we are just creating the general shape. So do not engage with the details of your work, not just yet. Just try to give a general volume to your area. Again. Go over this part once more and create this inner part, small VM2. There's a gray area here, so the light gray, but still we should create it. Then it will darken the parts that need more darkening. For example, here in this area, in the middle part, it's darker, meaning here. We create this darkness and we continued our port. Again. We take a bit of our powder and we add it over here. This upper area. Like this, we create a gray background color. And then we will add the darkness according to what we see on our model. In this area, we have more darkness to scientists or AI to, up to this point, we've gone so good, So far, so good. And then we will go to these other parts here. We'll add this parse to get color. There is no problem because we should definitely later work on these parts with our pencils and erasers. And this area that we've created with our pencil, We're just gonna faded a bit. Faded in the opposite direction to the left. I hope you can see it very well. Again, I take a base of powder. The pie would call Crito color powder. These lower parts are a bit lighter, so dark in the upper shadings. So this area will look more of light. In this opera parts from the corner of the tabling line. There is a layer of darkness. To cite this. Now we come down and we work on this area. Here again, as you can see, in this part, we have a fading toward left. And this has a strong darkness. There is some darkness in this part two, you see, we're just determining the placement of the strong and big dark spots. And then we will go to the details. Even if you have a little amount of darkness. There is no problem when you're determining its placement, you are creating a general volume. And then you can come back and complete those darkest spots and darkness. Here from behind this area that we had. We will have some darkness. Just like this. This lower part because it's a saner in finer. I don't do it right now. I work with a smaller brush than that. I will shade this part more lightly. Will move to a smaller brush. For example, size two brush. The upper part of this triangle shape that we see here. There's a darkness that for creating the volume of this triangle shape, we should dark in the upper part. And here we have a darkness to who should connect this darkness to this prominence part above it. Just like can see like this. And next to these parts, we will darken our area of it. We take the extra pattern of her work with blowing get off and giving their arrests of the areas that are left on colored. Give them a bit of gray color. And we create the volume. For now. We've created the general volumes. And for now these wrinkles over here, they don't have so much of them. Malian. You take are 0 brush with a bit of coal powder. And next to the lines that we've created from one side, we start creating darkness. The direction of the darkness that you're creating, that it's above your line or on your line is totally dependent on your model. I want to get involved too much in the discussion of creating textures, but for now we'll leave it at that. Then later we will talk about it too. You should get the area general shape and then we'll move on to the textures.
18. Completing the volume of the leather part in the middle of the shoe, above the straps: Okay, my friends. In this area, in black and white, photo to darkness, the dark parts were difficult to recognize. So I've put my colored model in front of me and with the help of that, I completed this area. Now we continue in shading here. And K, the ports which are lighter, makes sure that you keep them white at the beginning of your work, meaning control the amount of coal powder that you're bringing into your work. And then when you have a spattered your coal powder in the dark parts, take advantage of the darkness that has been left on the tip of your brush and also that has been lived on the side parts. And create those light parts gray, make them gray. Now we move on to this side part that again, this side was not completely clear in our black and white model, some going with the colored model. This middle part is darker and the side parts are lighter. Meaning that the parts which look lighter in here are to parse that the leather got a bit sand is away. Because we are working on a place which has a smallest space. We are using a small brush for even creating the background because I don't want to, I don't want the darkness to be spattered so much and it gets out of hand. This upper part because but it's beneath the top part. It should be dark and a bit more. We will make these parts gray. We tried to give the background color of all the parts above the shoelace. Kinda separate these two parts from each other. Of course, these words, and it's so much work to be done. And we should create textures on it. But now we're just creating the background and we do not bond to focus on details right now. But in next phase as we will start creating the textures, of course, this part should be darker more than it is. Actually in this part. Our focus is to create the volume of this area. And it's very important to get the background color in a correct way so we can have a correct volume. Then export that we want to work on is this upper part. We create the background of this part two. We should do this in this phase, which has so many details. But in background color, we just tried to show the general shape of stuff. This upper part that shows the thickness of the leather. It's a lighter gray, which we give it a little bit of color with our brush. Now, too much. We just don't work on it so much and leave it alone. Again, this part should be colored. And the first is that we will work on it with a bigger brush so it can fail this area more quickly. And then we want to add the details. We can use our smaller brush. For now I'm using my size 10 brush. Play friends. I insist in most of the courses, I insist that as vertical as your brush with the LNG, the paper or cardboard, it's way more better. But now when I'm filming it, I tried to place the camera in a way that you can see the work from above. So I should take the brush in this angle so you can see what I'm doing here and you can see better. But when you are doing this, as much as you have the brush more vertically on your work. The shades are going to be better. They're going to be more clean. And everything it would just work on better. Here we have almost strong dark this and we just directly transferred to coal powder in our cardboard to create this darkness. And as it comes to the right, it gets lighter and we have a medium gray. It's not two lines or it's not too dark. Try to show the differences in these areas. Recognize them and show them the differences between colors. Because this contrast and this difference in colors is the exact same thing that, that is creating the volume for you. Alright? This upper part that we have here, There's a prominent spot. We should just add the darkness for a year. We should create the volume of it. For this, we start from a corner. I chose this corner. And just so easily add is when you want to work on a curved part, try to keep your hand in the angle which faces the inside of the curve. Let me rotate it so you can know what I mean. Because when you create the shadings from inside of the curve to hand will move in its natural way, and this will make your shadings be softer and smoother. You see this is an arc here. We have a curve here. And when we're shading this, and when you put your hand inside of it, you can easily go from dark, darker spots to the lightest spots. And on the other hand, the movement of my wrist is like this. And it's exactly in the natural way of your movement. Or if you want to, but if you want to do this in this way, I'll positive this direction opposite of this angle. There is movement will be in the opposite of its natural movement. In case of India terms of anatomy. But you can do that. It's not impossible, but it's better not to do it this way. It's easier and you get better shapes and shapes. So easily you drag these shadings toured up. Take, take off the extra powder from our work. And we just guide these shadings is slowly. So we can get that prominence shape. Then you have degenerate volume. Then you can work on the colors. Again later. You can control the amount of darkness. Just try not to make it a darker than it should be. If it has less light, you can create them later. Don't worry about it. As long as we are here, let's work on the shoe laces too.
19. Creating the subcutaneous of shoe straps shadow: All right, Now for creating the shoe lace says, they don't have hard work in front of us for creating its background. First, we start with our HB Paris com pencil or our fabric can still a hard pencil. We start with them. And again, I insist you don't have to have both of these pencils because what they do is so similar to each other. I usually prefer the fabric castle pencils. But you know, if you have it can change them. Also in here. That lower shoe lace like this to parts of the shoe have darkness. But they tension that, that darkness is not completely in one color and snot that much cohesive. For example, here, we have a space which has lines. So just create this line here. And of course, the tip of the shoe which separates from here. It shouldn't be too much linearly, but we just create the area a bit. If forgot about this part, but we know it's in the continuous of India continue of the two lines beneath it. So we created here the area that we have left here. We should just strong enough to make a stronger. Now we take our coal powder and we darken this inner area of here. They get a smaller brush because we have a small space over here. Pay attention, not too dark and all the parts in the same amount. So some parts are darker, some parts are not that dark. I believe in this brush is so big, so I'm just going to shade this lower part. And then I'll change it again. This ending part of my left side is completely dark and completely dark in this area. And at the same time, you should fade the line that you've created for the shoelace in its own place. That of course, if you pay attention Benezet, they have some darkness. If you look at model closely, this part, when it comes to write, the darkness of the area will be decreased and it looks slider and that leather texture will show more. It also fade this line in its own place. And as you can see, they have given color to this area. And of course, they've created at small Liam and its depth. Again, and we should fade this upper line as well. So it will blend into our work. Well. We take the extra powder off our work. And then I'll use these parts from this sides, this start darkness. We do not completely dark and these shapes, because in the middle of them. In some parts we should have some blight. K. Now, I need a smaller brush. So I can show this part of it a smaller here that we have stronger darkness. I increase the darkness. Here, I should put more powder, but I leave the upper part gray. And again, on the right side we have a stronger darkness in the parse that have gotten too much darkness more than we wanted. Don't worry about it because this is a leather texture. It has so much takes chars and we should work on that brush again. And that leaves you to lighten the parts later more than they already are. Or you can create these literary shades. We can use a darkness beneath it. Pay attention that you shouldn't drag too much brush on this area. Because here you want to create texture on it. That if you drank too much brush on it, creating texture will be difficult for you. So now I'm going to use my soft brush in here. So it just gives this part a gray color. And I try not to move my hand circularity. I just want to give it a color. It got a bit darker than I wanted it to be, but doesn't matter that much. Because when we want to create textures, a little war kinda so much and we use our erasers and definitely we will get to the color that we want. Now this shoelace that has came from this upside down. Well, let's work on it to as long as we are working on the shoe laces. Well, I think before we want to work on this area with our powder and separated with powder, it's better to work on it a little with our pencil. And we separate this border completely from this part above it. Just like this. It's very easy. Alright? Now is start and we create strong darkness, which is here, because this part is so dark, we do not use the soft brush for here because it doesn't give us a clean sheet for these kind of fights. Because in here the darkness is more important than its texture. The C, you should have categories for yourself. Sometimes using a brush or a pencil or an eraser and a place have some benefits for you and have some disadvantages for you. You should figure out yourself that which part of which aspect is your main aspect for that part. So according to that, which equipment you should work. For example, in this area, I think darkness is more important than texture. So I'm using this kind of brush, my normal brush. Although I told you it's better to create the background color, these kind of parts with your soft brush so you can add textures later, easier. But again, here, the darkness is more important. So I'm going to work with this kind of brush, not the soft one. From here, we kinda have lighter area, lighter colors. So now I can change to my soft brush and I can use it to little over here. You see, even when I create this soft brush on the dark parts that we've created, it takes a bit of coal that we have already applied on our area. So it can't work with it too dark that it's OK. Now we're just going to create the color. And if it was needed again, we'll go over it fit. Normal brushes again. My dear friends, you should definitely rotate your work every now and then for getting the correct angle for your shadings. I don't do it so much. So you have a great look on the work and you can see how my doing, except the parse which is really needed. Let's whenever you felt like your hand is not suitable angle, in a comfortable angle, you should rotate to your work so you can get good one to work with. Up to here, the shoelace is enough, then we will move on to the next phase. We do the whole shoe. I don't work on that other shoelace, Not yet.
20. Shaping the stitches on the shoes and creating more volume and light in the leather part of the midd: Okay, in this phase, we are going to create some textures on this part of the shoe that completed a little bit more. And then we'll move, move on to the lower parts. For starters, I want to use my eraser a bit on these areas. So the separation between this upper part of the edge of the shoe will be separated from our kent course. This has a texture that first be separate. This, this inner part has some darkness advocate use our eraser on it a bit. Actually. The outer edge and the inner edge is dark and this middle a hinge, is kind of light. Just like this. To parse in which we can see these darkness lists. You can use your brush on it. Here, 0 brush. So clean and it's so much cautious. These areas have more elegance in itself. It's not white, it's kind of gray. But for separating these areas, we use our eraser ones and then we take the tough powder on it. And because it has so much thickness, I'm using my normal eraser. This above part. It actually looks like there's another layer which has been separated that is actually a distance between these two. It's like this area has been come in two layers. And in here as we can see, a separate tailing lines sewing line. From this area. There is another layer that has been separated from. The other two are created. Again that we need to use our pencil around it a bit more too. And you see this upper layer should be done. He cut too much, so I'm going to just reduce some of it. Now in this area, we will separate it from the cat's body. You see in this phase, you're completing your cat too. At the same time as you're completing your shoot. There's such a shape like this in here. Thus complete this part and then we'll work on it again. On the other hand, on these sowing lines, we create some like next to the darkness that we have created. Here doesn't need to work on each one of them. Because it doesn't have so much effects in our painting. The thing which is important is that the sewing that HE or shaping would just get a natural shape. We have these kind of sowing lines in this area as well. Could just say to work on the size of these parts comparing to the others, meaning that you should use a perspective method. In this area that as you go further, these lines should be smaller. See what I mean. In this area. These lines are way bigger than that area. If you remember, we've created very big designs for this part. So you just have to create some lines over here that they can show. It's assuming line. And of course here, very small sewing line in the middle of here too. Now it can create it. It's actually here. It's very, very small. And who take our brushes on them and little. So it will blend into our work. Then under right side we have some very little sowing lines to of course, these that they've created up to now. It's not all of them. They have so much to do with them. Now. We're just getting the general shapes and you're just adding some lights that will help too. Volume Ising. Nexus seven will complete them. Not complete now. So don't mistake in it. Right now. These bars that needs a border, for example here, it's better to work on them with a soft brush, which we cut the tip of that. It's for example, size two brush. And choose this brush necessary. You can use, for example, your 0 brush to. But I will recommend this one. Because 0 brush has a smaller tip and you cannot just take too much powder on it for creating this wide area. But this is, I think more suitable. Be careful that and a border that you're creating should look cohesive into your background. It should blend into your background. And it shouldn't look like a separate line from it. Into terms of shading colors, it should just blend in well. Here we need more darkness. And from next to this shoe lace, our area should be dark and more. Now I'm just going to darken this area with my smaller brush. Just like this. In here we had a line that we're just going to fade it a bit more. And here is a bit thicker, then they need to be just gets a brush1 them to make them the correct size. And now we will use our eraser, which now needs to be sharpened. Who will sharpen is a bit like this. We create some of the textures on the leather in this phase two. Here's a linear theory tanks sure, being seen here. We should create them with a very sharp eraser. And we're going to create very thin and fine lines. Pay so much attention to the directions of these lines. It's very important to inner part has a line like this. And of course here, because of this curved part Rich has been here. Hey, have a shape like this. In addition to these wide lines, there are some darkness in between them to that actually as categorize these white lines. So in some parts we create darkness in between of these parts. Lead our count Paris pencil. This was for here. Now we'll move on to define their parts. More elegant person here that we have created the pencil parts in the very first stages. Now we need to use a little bit of our eraser and create some light in our place. Using the eraser will actually give us light lines. If you want to make the whole area lighter, we should use our Dilfer Acer, which we do not need right here, right now. You see so easily this shape of leather is being shaped. It needs just a bit of attention and focus. For example, I need to lighten this area so I will use my dough for a server to eliminate that border over there. Or this prominence part over here. Like this. Like this. We'll just create the light parts that we need to. And I should work on these parts a little bit more. Toward these directions. Some parts you need to put pressure on your eraser and sometimes you don't need to. Ever, you need a sharp light. You can put pressure on your eraser. But in the other parasite you just want to create some light lines. You should not use any pressure on your hand and you should just drag your eraser on your work without any extra hand pressure. We think this area can be wider like this. Of course I can see on this part there is a saying that we can show it like this. Of course, in that black, white model, it's not so much clear that how much it came forward. So I don't go forward too. Just as much as I can see. I'll create them like this. Now we can use, of course it's better to use this pencil, our carbonic cons pencil. And we can create some texture over here. And these parts. Then these are actually the wrinkles of the letter which has been created by using leather. And of course in the swing lines borders, we can create shapes like this. And this upper area which is darker. These wrinkles don't show so much but and now we have less darkness. So instead of creating wrinkles here, I will increase my darkness. Maybe even a little wrinkly are some wrinkles facing outside that might be good. Do the same for the textures which are in this site. Next to these textures. You can add more darkness. Now like this venue of darkness. Not so faded, but you can add some darkness to your work and your brush. Also from this side. From this side you can add some wrinkles to your work. Like this. Our areas kind of being shaved. And these sowing lines, you should just separate them from left and right. You don't want extra autofocus and extra attention. We just want to give volume today's parts. The slowly step-by-step. You can create some lines, the right side of these, but you shouldn't get thick lines over here. We created at the creative complete lines at the left side, but at the right side we're just creating some kind of shape. Can be better that we can work on these sowing lines with our fader. So at the bottom of it and at the left of them, they have lines, but at the right of them, not so much of a line. Just want to create some darkness beneath them so they can get the volume. We want to complete the lines for these parts, redo the same. These are the opposite of the small sowing lines because these have more darkness at the left side, sorry, this have less darkness at the left side of them. Comparing to the right side. Of course, we should darken this part more. We can add some lines again. So finally in here, just like this, with complete all the swing lines we shape them and the texture of leather.
21. Completing stitching and detailing around the leather by increasing the light and dark in the leathe: All right, my dear friends. We're using our heart pencil to make these lines bolder and making them darker. You can also use periscope pencil to the darkness of this edge, which is actually the edge of the leather, will be placed by our pencils. And then like this with a small size brush, for example, a size 2, you'll actually fade them toward insight a little into parts where you have this swing lines of the leather. You would use your eraser on them, not irregularly, part by part. And these whiteness will be created by our eraser. But if you want it to be completely realistic, we're going to place a darkness right next to them with our pencil. So for each part of this as swing line, part by part, we are going to place each darkness for each one of them. And when in some parts the swing lying is not caught. We will bring more shadow floret will create this darkness on two sides of these light parts and also between them. Just be careful you shouldn't just do it all in the same way. Try to use a bit of variety in creating these darkness. And as you, as you've seen, we will use our brush to fade them, combine them into whole work a little. And because of our brush, a real might lose a bit of the light. Therefore, we can use our eraser on it again. Then we would use our carbonic pencil to add some slight darkness. And then we would move on to creating this second suing line on this part of our leather shoe. You see how much it is. Darkness will actually give dimension to your work because you create the lights, but it's not really complete. It's not meaningful. But when you add the darkness right next to it, it will create that meaning for you. And on this side, because we have a bit of a curve, the darkness that we place next to the swing line will actually show that depth. And it will make it more realistic. It will show that the letter has some curve and it has some depth in that area. But of course in this area, in the front part of the shoe that we are creating is not completely clear. And sperm, and it's a bit more faded. In the lower areas, it's a bit more clear, so we can use our pencils easier. And we will show these suing lines one by one. And this part goes a bit into the perspective. I mean, as we go toward the back of the shoe to the right side, the swing lines would be smaller because there is not a very long distance. It would be very, it would not be very clear. Again, on this lower layer, we will bring more darkness, this border area. And we will use our pencil to spread our darkness a bit more. We'll create that difference into height that we want with this work. Depending of course on what we have in our model. And in some parts are darkness is too much that we are going to bring it completely directly into our work with our pencil. Now, I'm going to look at work on this edge of my shoe because It's a bit, you know, the strings are coming out of it a little. So first, I'll bring the darkness in it with my pencil and then we would work on its lights. You see, if you place each darkness and each light in its own placement, you can create a perfect texture for your work and also a perfect volume and shape. We will darken the edge even more. We will actually spread to darkness in here, the darkness that we've already placed with our pencils. We can also bring some more powder into our work. Make the whole area a bit darker. And then I'm going to use a bigger brush for fading the darkness that I've placed here. Again, I take some coal powder into my work. Therefore, I can get the darkness into the level that I want and I'm seeing in the model. Because this part also has a shadow to dogmas of the shadow will make it even darker. In these parts. Again, we will add to the level of darkness and we bring some more shadings on the edge of the shoe. Therefore, wherever we want to use our eraser, it will have a background color so we can show the lightness of the eraser on it. Now we want to work on this area with our eraser a little. So I'll take my eraser and I create some as strings coming out of this area a little. All right. I'm going to use my small brush in wherever I need a border. Okay. Now there are some spots over here that they've added as we've seen them. And then again with browse our eraser on them. This strings that are coming out of this part of our leather can be add by carbonic pencil. And part by part. We are using our small eraser, our carbonic pencil, and our small brush to give a general shape to this area. Because this would actually make your work become way more better and way more realistic. And it would be unique. It would be different from other people's work. Always paying attention to the details will actually help your work in this technique. Again, with the carbonic pencil and with my small eraser. We are adding some more small details that we have here. We're putting with actually applying lines and dots to give the texture that we want even on this site, areas.
22. Creating a leather texture in the leather part of the middle of the shoe, above the straps: Okay, My do friends in previous step, because actually creating these swing lines were already explained. I've date the previous phase without any explain nations because you've already known all the process. We've completed the swing lines and the added some dark nurses. And in this phase we want to complete the leather texture. And for Chris, completing that, we'll look at our model and a very, very risky wrinkles in our model. We will create them with our small eraser. Like this. As you can see in here and as we've done in that front part before, of course, leathers have their own categories. This leather that we have here is kind of an old leather. So it has so much wrinkles. Then you generally learn how to create leather. You can apply it in different ways. But it's not bad to have read on, have a redone practice on different kinds of letters to see how they work out. I'm adding some dots over here with our brush eraser to get the texture because it's not that wrinkly. And in here that we've created some lines who is still need some wrinkles? Maybe in some parts we have to create these wrinkles so lightly. And, you know, we just need to we don't have to create some intense wrinkles. Just create them lightly. No emphasize on them. Most of the parts that have sewing line or the parse that the letter has been vented or stretched is exactly in those parts that we can see these wrinkles, except the wrinkles. Some parts of the leather has its own texture. For example, here, we can see some textures in our model, so we're just going to add them to our work. Some of these textures are not just like a line and they look like prominence. The par said you want to make that prominence. You should use your deaf or a syrup beneath and below your line. And just take away a little bit scholar and create a small light. And we create some over here. Like this. Easy. Prominence parts can be seen more in the parts which we have sowing lines. And these upper parts, you can not see too much lines or textures of the letter, so we'll just leave it at bay. They don't work on it so much. Generally, I think this area needs more darkness, so I'm just going to add a bit of shade to it and darken it by friends for creating the textures. Rich every sketch that you're working on. If you have the colored model, it's better to refer to your color model and get help from that for creating your textures. Because if your main photo, main model has been colored and you've made it black and white to yourself. There's a high possibility that you cannot find all the textures in your black and white model. Now, in this phase will come back to next to the lines that we've created with our eraser. Because some of them we need to add a bit of darkness beneath them are next to them, so it can show the wrinkles better. I'm doing this with my carbonic pencil, but you can also use your pencil, the H? Yes, be a pencil, sorry. If the area was light, we would do that with our brush. But because it's a dark area and it's leather, it's better to use our count pencils for that. You see next to these lines when we bring darkness. And these wrinkles will just get a better shape and they look more natural, more real and more blended into our work. Well, we move on to the light areas. Pay attention that issued at takeaway. Your pencil off your work at the end of it. So it's full get kind of faded at the end. These textures over here, working on them to create the wrinkles like this. Then of course in the lower part of the shoe, these textures are more and we can work on them more. But anyway, we have to complete this area and then move on today, other parts, as you can see, this area has been shaped very well. We'll create the darkness and the light as much as the model wants us to do not overdo it, do not do too much. Meaning that if you add more details, of course it will. If you add more lines, of course, it will show your work better, but also it looks older. So do not overdo the textures. I'm saying it again. And I'm going to take away a bit of color with my eraser over here. And I'm just going to create some texture that is kind of a leather that has been sanded away. So I'm going to use my eraser. We will shape the two pyruvate about this space that we want. Because I don't want to completely erase this part or clean this part. Here doesn't matter that the tip of my eraser is not clean as you saw it. I just wanted to create some texture. Nothing more than that. So I don't need to clean the tip off by racer. Also in this area. And as we come down a little like this, dot shaped texture around here with our cursor is creating texture depends on your side. Meaning that for creating some textures, which equipment is better? Now, I've created with my jaw For a CR, but maybe if I wanted to do it another time, I will use my brush eraser. So there is no obligation for you to use your Dilfer a sir, it depends on your creativity, on your choice of equipment. Because creating textures is kind of a creative thing. Generally, that which eraser we can use to get a better result. As you can see, vendor creating the texture of the skin day, have Derek going to use different equipments? You might have seen this in different works. So each person, depending on their own side, depending on their own creativity and choices. Can change their equipments depending on the area as well. I want to use my fader on here a little. I try to use different equipments in creating the textures. So you will know the usage of each one of them in creating the texture. But it doesn't mean that if you don't have all these equipments, you can't work. But of course the equipments at home using are really simple, like it means, for example, you'll find the fader in the pencil case of any painter and artist. Alright? Because our area is a bit messy and not so clean, we've tried to bring on the same shape. I want to show it's dirty and messy. Just like this. I've placed some dots in here too. So kind of, you know, more they're here and there's a strong light over here. Like this. You might need some light that we will leave them for next phase, I want to add lights so I work. Another thing that has been left from this letter is this top part of our work data. We will do it the same way as we did for that lower part. First, I'm going to use my eraser on it a bit. Just going to play with the textures and shapes. So I can get that sanded leather shape here. First we get the lights with our dough for Acer. Just like this. When the light was shaped, we can use our brush eraser and when we create some lines in it. Because if you pay attention to your model, you can see some disordered lines shaping this area. So for getting that firms, for getting this part more similar to your model, we will do this and we create some lines in it randomly. Of course. In addition to these lines, you will see some lines related to the leather texture in this area and ITS start creating them. Some things like this. Some of them are darker, some of them and not darker. Some of them are more emphasized, some of them are lighter. Just try to keep the main direction of the lines. That is very important. They said you can see the letters texture more and more bold are the parts that are more end in sight, for example. So if you wanted to create leather texture in other parts, it should less than your hand pressure. Okay. See, the letter texture of that part is showing more and in this part, it's really showing less. So. Going to play with your eraser in that part, because we don't want to show too much. And of course, as we are working with our eraser, this this part behind it should be lighten that there are some textures, shapes here. Lois completed in this very same phase. It's like some strings are coming out of the leather. And this edge, like this. Now, next to the lines that we've created here, we want to use our pencil a bit more. All right. We can use our hard pencil too, because this area is darker. If you felt that after creating the textures, you felt like you've done extra textures. And you've ever done that. Or the contrast and differences are so much, he shouldn't worry too much about it. You can use your brush and you can actually take away some of the textures that you have created. The extra ones, of course, for making these parts bit more prominence. Knows all the parts, some pairs. I'm going to use my eraser to create these prominence parts next to these lines. Just like this. I faded a little bit. Be careful that you shouldn't overdo the fading as well. We shouldn't fade too much. Maybe there's some sowing lines left here that it's better for us to show them. They creating these sowing lines. It's not a really hard thing to do. At the same time it actually add C or work attraction. Do not forget about the details. It's actually these little details that makes your work look way more better and makes it unique. All right, In these middle parts, we can also have some textures. I'm going to use my brush eraser. For example, here or here. It might not look that much like the leather takes chairs. But for not leaving it. So plane. We will work on the shadings and lights over here. You have a sketch that here creating texture on it. Try to have textures a, either in all places or no places at all. Because if you create textures in that part, and then you leave the other parts without any texture. And there are plain. Your work will lose its attraction. It, it looks like it's complete in one part, and it's incomplete in the other part, so do not leave any part untouched. Our work is almost done here. It's, I think it's in a good shape now. Just adding some dots here. Of course, we can also add more details to it, but I think it's enough for this phase. And you've learned about the textures of here. Then we'll move on to our next step.
23. Creating the subcutaneous of the front part of the shoe: Okay, My dear friends, in this phase, we want to work on this part of our work, the tip of the shoe, and wanted to create the volume of the shoe over here. If you pay attention, there are some powder drag to these parts. But because our shoe is kind of leather and it's dark, we do not have to keep our areas so much clean and we should be so uptight about our coal powder going anywhere. So because we didn't have that since sensitivity, there are some spots of coal powder on our work, but they don't really affect our work. So first I've created this parts with my pencil and then with my coal powder. This area Nixon, who will shaded separately. And then we work on it with a bigger brush. Or we can use is something like shap loan or something a framework for here to keep that that part's cleaned out. I've already told you in the sketch in the girl and flowers. Now, I'm going to use this big brush with these kind of hair, which my brush was sized. 30. Tip of the brush should be this long and it should be so concentrated and field. So it take powder with our brush and we start creating the volume for the tip of our shoe. First, we create a light layer of color. These brushes are very, very good and suitable for a very wide and big areas. Then you felt like the color that you're getting from your brush is getting lighter and it's really finishing. You should go to your powder again and take a bit of it. I'm going to create a line for this part with our hard pencil or carbonic Paris pencil. Hb pencil. Really your choice which one to use? I prefer to use my heart pencil. Because we don't want to go on to the details of these bars will just create the line. So we can separate this area and determined this area. And we'll just do the background shading for this part of the shoe. Again, for getting this, for not losing this front part of the shoe. And we don't misplace it is better to determine them in this very phase. Let me show you on the model. You see this part of the shoe, this slide, I'm going to create this line just separating these parts of the shoe from each other. This is a lower line. This will also help us to see that rare is the upper line. Spin placed in this area we have a kind of a prominence part. And from here, we continue the line. And comparing to that, we're going to create the upper line that we've lost the debate during our shading. So you're just going to create it again. We pay attention to the shoes curve in this part. And so easily we will find the placement of the line. Next to this line. Of course, we have more darkness so we can work on it a bit more with our pencil and add to the darkness of it. Then of course, this darkness doesn't come to the end, end of the line. And loss in this area to darkness will be less. And in here we don't have that much contrast in colors. The fade line that we've created toward upside. Be careful. This fading should be definitely two are the upside and it shouldn't come down. Because in the lower part we have that tear in the shoe. It shouldn't create it. That's only here, but when ever you have a line that needs to be faded, you should be very careful about the direction that you want to fade it. A fake deadline in, you should think about how, how it's this volume is being created. You have some friends that just look at their model and create something and sketch something. But if you have an understanding about what you're creating, your work will be much more better and cleaner and definitely you can get a better result out of your work. They shake this part less. I mean, definitely the dark shading because we need more gray color and gray shading more than what we have. So I take a powder and from this side that I've already put darkness, I start from here and I add up to the darkness toward up. Again, you should be careful about tip-off. Shoe, the parts which have shine and they have less color, you should just leave it be and let the shine remain on your work. If you take the tip of the brush like this so it will move less. You can work easier in some parts, especially in the prosthetic gets a bit smaller. We work on this part completely and we create the gray color that we need. So then in the next phase and next session, we can show the spot sense things which are in this area. So first we should get the gray color. As and normal and medium gray color that we can see in our place. And then we'll move on to this spot. Sense things. But enough said you have a gray color. Background, gray color should be matching the light color of your parts. Now at the darker ones. Then we have spots in our work and can give more volume to it. All right? Our shoe is almost done. I mean, in case of background coloring, now, we can choose a smaller brush, for example, a brush size 10, and start creating some of these spots over here, for example, here we have a darker area, they have a darker spots that we are going to create. So we should dark and adhere. Practically for creating these spots. We should make our surroundings messy and dirty. But we should do it in an order. And we should do it by the designs and shapes that we can see in our model. So it can show us that this is an old leather. I can work on these spots over here at the top, the add darkness silane. We create them more. The curve shading a bit here. As exactly as we see in the model. This part should be darker more. I'm using my pipes coal for all of these my soft pipes coal powder because this area is kind of a gray color. If the darkness of this area was more and it was more black, I could use my cube coal, which gives us a very good black color. But because your eye ones in gray color, I'm using the piped coal. If you have paid attention. He can see that the brush that I've chosen for creating these spots is kind of a medium size brush is not too big and it's not too small. So it, this medium-size brush, we can have a medium speed in our working and we can get the correct size of the spots which are existing here and we can completely control them. I think this area got a bit too dark. So I use my eraser to create the lights I want I mean, you can get the darkness. The amount that I want it to be, not more than that. Now on the tip of the shoot as spots are lists and the area is wider. So I can use a bigger brush. So I'm using my size four brush. This area is white. We have a saying here like this, which continues toward up. And it gets one in here. You see it's creating gray background and adding the darkness on our gray background, we are creating these spots over here. Here we create some kind of dirtiness in one color. My friends, when you're working on a part like this, that you're working on a generally, you should not engage yourself so much with the details. Leave them for the next phase of your work. Because if you want to create the wide area and the general shape and at the same time you want to add details. You can not do either of them correctly. So you should divide your work. Involved phase. You should create the general shape, the background color, the biggest spots on your work. And another phase for creating your details and shaping them. Right? Now, this area that's kind of the primary shape that we wanted to, we can work on this small area over here too. And then we will go for creating the lights, the spot, the smaller spots, and creating the details. Of course, we haven't worked on the shoe laces too. We just grade the background for them. But because when you are working on the shoe, your brush might go on these shoelaces to them for the time after we're finished with the whole tip-off the shoe and then we will work on the shoe laces because you might showing your shadings during your work. Also in this area. Just like this red color here, this area because it's a small area we are using our small brush, brush size two. Just like this. He haven't created the lights of our work. And with creating the lice, definitely some parts would look way more better. They have a little light here and it should get down with our pencil a bit more. Maybe we forget to work on this place later, so we're just going to shape it now because it's a very small area.
24. Drawing the subcutaneous of shoelace, strap holes and border lines: Okay, My dear friends in this phase, before we give a background color to this area, we can work a bit on the volume of this shoe lace which came out of here, and also shaped these areas. Then we will work on the background color. And we should also determine these holes on the shoe. So when we're giving color to our work and to create that leather texture, these will not just fade away and get lost in our work. So we don't want to work on these parts are completely, but we create the shapes. We give it a volume. So later we won't face any problems that, oh, we lost our designs and sketches. We will work on their parts, which can be done by the pencil. In this bar that the shoelace got twisted has kind of a strong darkness. In here. We can see more darkness. Some of them that are showing so much and there's so much more insight. To slake this here is the place that we have some sewing and tailing lines. You can show them like this with separated lines. Just for now. Even the line that we have that has been dragged down here like this. So wherever it needs to be done by pencil, we should go over the ones with our pencil right now in this section. But of course, after you do the shadings for the background color, you should again come and work on these parts with your pencil. So they will look more determined and they show more. But for preparing our work. Before background coloring, you should do this. Because if you don't, you might lose some of them. This outer area because it's not too dark. I don't get it black, but this inner part is so dark. So I will just color it black, just leaving a layer of white color next to it. And part of the shoe that needs the work of our pencil is this part which is actually showing the prominence part of the leather. And there was also suing line. And here we can see a prominent part as we come down the darkness of this prominence where I will get less. In here we have the most thickness of the darkness. And from now on, from this part on, who will have just align. Now I'm going to use my hard pencil for creating this part because it's sharper around my work, is a bit messy because the whole background is white. We should use our eraser Later for it to clean it. So don't worry because our backgrounds not dark. So we worried about what might happen, what spots in my left it might leave if we use our eraser. So don't worry about it. After creating the background color for this part of the shoe, I will again clean the surroundings of my work. For not losing these. We can create its shape too. But as you can see the model, these siblings and tailing lines, her kind of curved. So we just create the same shape as we see in the ending part is just a straight. Some parts needed to be darkened. The only part I needs to that we need to darken it more is this lower part, which is actually again the sowing lines that we create them like this. The course which are the more indifferent, will look more lighter, but these parts which are going in the back are a bit darker. And for not losing the shape of our texture and sewing line. We try to create the shapes as exactly as we've seen the model. And then we will create a dark line just above them. Here we go. He should pay attention that as much as we go to the behind, these look more smaller. Because of the perspective banners. Now we can create some darkness above it. We're watching another part in my work. That's, it has some sewing line, but it's so, so light that we have even forgotten to create them in our primary sketch. But it is starts from here. It comes up and from this lower part is starts from here. So we don't have any problem in creating them because eventually and eventually didn't create the primary sketch, but we can do it drag down. Think it's right here. Yep. And then I will connect these two parts together. Now the thing we're gonna do is to give color to this part of our shoelace. We're just going to give volume to it, are going to shape it a bit. And then we will work on the background color of the rest of our shoe. Beneath part of the shoelace, which is so much darker, we give it color. First of all, we're gonna do this and then we will work on the other parts. We let the extra powder of our work completely. And these parts which are actually so little, I'm going to use my 0 brush for fading gap is of the pencil and we have created. So again, get a kind of color to our work. We will work on this part. He gave it a color. We don't make it so dark. So later we can create the volume of these shoe laces perfectly. In a year, we have a line that has separated the thickness of the shoe lace, the color area. This parse are going to be continued. But because first we've got to work with our eraser and create the strings coming at the, coming out at the end of our shoelace Hill. Leave it for now. And as I told you before about the shoelaces, first we create the letter textures. And after that we've got kind of sure that we don't want not to work on the leather texture more. Become back to the shoe laces and we create, takes shares of the shoe lace. Because if you move on to the shoe lace right now, before we start the leather texture, the texture of the shoelace will be gone at the end of it. Before using the bigger brushes. Fade all these lines once.
25. Creating the shadow of the middle part of the shoe: Okay, My dear friends, we continue our work creating the volume in this part of the shoe. First we take a size ten brush. I want to create some dark spots. And then I will go to creating bigger darkness. Patient in that, when you're creating darker spots like this in your work, you shouldn't create a border for them, meaning that you should give them a place to fade in their surroundings. First, we create the purse which have more darkness. And then we will move on to the darkness which are a bit less. Pay attention to this stretch direction of the darkness. In the area that you're shading. Just like this, we created darkest spots. So the parse that have been curved in and they have depth will show themselves. And the parts which are left light, they're actually showing our prominence parts. In this part, we have darkness from here. This upper part, like this. There are some darker spots over here which have more darkness comparing to the other parts. Of course, all of this part at the bottom is a dark space. It should be a bit more darker than this. And if you pay attention in this area, we have a wrinkle that for showing good. We should have a layer of darkness over here. Also in here. In this smaller areas, at the same time as you're creating darkness, he will give a bit of color to our lighter areas. Definitely add darker spots should be darker. And the lighter spots that we've kept should be darker to. In these parts, you can shape the wrinkles slowly and create them. You see, wherever you see the lines we create the line. And at one side of the line will create a darker spot. And at the other side we will keep delight. In this part. We also have a darkness that of course a spatters toward up. It should be stronger. The darkness should be stronger here. Up to the point that this wrinkle of the leather has been separated. We can see this darkness from this side, meaning the left side of it. The area on the left side is a bit lighter. First wrinkle and it's the second wrinkle. It should be lighter in this area. But for now we're just creating the dark spots. And of course the background color. And there's another wrinkle here. Try to keep the light parts of your work light and do not give color to it. If it's very strong light and it's as strong as the cardboards itself. Try not to give color to it. In these areas, it's better to complete our colors. See, in this area, because there are so ups and downs in our work. I will use a medium size brush. I don't use a very small or very big brush, so it can get out of my control. A medium-size brush is perfect for this area because you are going to create medium volumes. And of course, it has some details that in next step we are going to work on those details. But for now, the medium-size brush is okay. But in Civ off your work, you should focus on that very same step. For example, if you are creating the background color now you shouldn't focus on the textures and think about all I can create the details, I can create the textures. It will make distraction for you. So which step that you're working on, you should keep your focus on that very same step. Keep that in mind at the same time and we are creating the shadings. We also get the colors a bit darker. Parts. Just like this. As you can see, slowly increase the color of our work. When you're increasing the tounge of your work, trying to create only the darkness. He should pay attention that in which direction these darkest spots are going. And you shouldn't feel the parse with a medium color. Meaning that he shouldn't darken some parts more than they are going to be. We're just getting our color that we want almost we can just leave this part is Bn. We go to the upper parts.
26. Complete the first layer of the shoe body: K. We are so continuing on creating the volume of our leather shoe. And little by little, we create the shadings between these a strong darkness too. Between these darker spots, there are some lighter shades that we are going to create because we want to separate these parts from each other and the shoelace will be it's an indirect in its own placement. We just use our Eraser little bit over there. And of course, the part beneath the eraser, meaning this part of the shoe, needs to be dark and more. If you see in some places, instead of using my brush circulatory, I use my brush linearly. I mean, it's not completely linearly. It's a very, very small movement, circular movement in the direction of the line. I move a circle, Ari, I do this. So these leather textures which are pointing downward, will be in the same direction. And when we want to use our eraser on that, the direction of the lines that we were creating would be in the same direction of the letter textures on this shoe. And k. Now we move on to this part. We connect this part too. The upper parts and the lower parts. You see, it's not a hard job creating different textures. You just need to pay attention to your model and see it very carefully. And you would actually apply what you've seen your work. For textures like this, it's very important to do the darkest spots analyses, lightest spots in their correct position. So when you want to show the lights, they would be in the correct direction. And actually putting the darker spots and alighted but lightest spots next to each other is exactly what makes your work look better and natural. This part continues up to this upper part. And above this line that is going to show the prominence. I will add a bit of darkness so it can be separated and give us, give us that prominence shape. And we should fade this part too. You should fade it to our light area that we have. Like this. Now slowly, you can shape your letter here. It's completing these areas. Is completing the shading. Still get that letter takes share pretty well. Slowly and little by little. That kind of shine that we can see on a leather things is going to be created on your work too. And we'd age ups and downs and the darkness that we have in the parts which are going down, curved in, and the light switch are coming out, you're actually creating the ups and downs and the wrinkles on your leather. Be careful not to lose that gray color and do note dark skin everywhere. Or make them all black. It should keep the gray color. Should work on these lines more. This line should be darker. And of course this line should be darker. In this lower part, we need some kind of work. That way. We want to complete the details until you had to complete that board as well. If you feel like this brush is big for you and it's hard for you to create your response. You can use a smaller brush. But for now, because I want to pick up the pace here and create the shadings faster. Because I want to save your time, teach you more. And I don't want to bore you. I'm using this. But of course you can use your, you can choose a smaller brush but not too small for a big area like this, because it kind of makes you some stains and it will look really I should add a darkness over here. I just determined is placement. And later I will create that sewing line over here. And I want to work on this part up here that I've created the darkest spot. I didn't create the color around it. Now, I want to shape this arc that is being seen here. I can give a color behind this area. And then we come here. We expand our our dark shading. I don't take extra powder on my work. I'm just using the darkness that is already exist on my work. Easily moving forward with that. Okay, Now I think it's not bad to take the powder a bit around here. All right. This prominence part is slowly showing itself. Will darken these parts behind it so it will look more deep and more curved, dane. So dad part, the light part would pop up more. In the lower areas. We have some cohesive shapes. Some just going to feel this part. And with the reputation and the circulatory movement of our brush, we give moderate gray color to this area. I don't want it to be too dark or too light. Some somewhere in between. If you pay attention, in some parts, I will change my brushes. For example, in that area in here, I was using the brush size 14. Now again, I've changed my brush. And I2k, brush size 10. And get a hang of this after a while and after a bit of practicing, you would know that rich size of brush is adequate for which area? This area has a light inside. And then I use a smaller brush and I create some spot sense things in this light area. Here's just say spots. Because any say stain, it looks like something that we don't want it to be there. Also the part around here that I want to show. Depth here. You want to show it's a bit curved in recreate darkness like this. Difference between the colors in the light areas and dark areas should be kept. Definitely. I mean, you should definitely keep this dot contrast because it's the main feature of your work. Even right now without adding any details yet, that using our eraser, it looks really smooth and really good. In this step, we're just going to complete the darkness a bit more. Your surface will be completely field is effective on the textures of your letter being completely shaped, meaning that you shouldn't leave any white parts around your work. Even if there are little dots. You should feel all the surface of the cardboard. Some part sliders, some parts darker, but still you need to feel all of that. In this part we have some darkness that slowly create a dark spot. In the center of darkness. You should pay attention. This darkness should be at the center of that and try not to create any border for them. So a next stages, when you want to fade days, you'll have the space around them for fading them. I'm going to take a bigger brush. And maybe it would be good to use this big brush that we've used on the tip of the shoe. So. We get a powder and this, and this. And we start to create a general shading for a year because it's a big area and just a spattered a darkness around our work. You can have this as the background of this part. You see practically in this stage, we are doing one thing, but in two different ways. You can do this upper part as the same as you did the lower parts. But because I want to show you that both ways are correct and we both ways, you'll get the same result. I've decided to use my bigger brush for this phase so I can show you you attack the same results. Don't worry about it so much. You see these big brushes. This mako brush that we have, Dare tips are actually softer than the normal brushes that we use. That's why they give us a smooth or in self their shades comparing to our normal brushes. Now that we've got the background color to create days darker spots, and directions that we see are good and suitable. We continue the darkest spots. Involve the work. We should keep a very smooth light and be careful about not giving that part extra color. And in here, you can use your eraser and you can clean this part behind your work. Like this. To literary shapes are in different parts of this. Can be seen. Just going to create them like this. We will just show it like this. Little by little. We give color to these upper parts too. I do not move as it is upper part just yet. Because I should work on that part separately and with more attention. Who will work on the smaller parts with a smaller brush? It's better to do that. So this upper part above the shoelace, just gonna do it like this. Create a darkness for it. And in here, the darkness is like a spot. It's been separated, it's fader. And of course, it gets connected to these parts that I told you it needs more attention to. This part, which you have to pay more attention to it. When you're creating the darkness. As you come down to the edge of the shoe would be more. And as it comes down, it gets faded. The darkness is more. Come down from this edge to darkness, get back from the edge. The edge is lighter and darker. This will be a bit far from the edge. Just like this. And you have created, you can use a bigger brush and fade. This area will come down until we get to the shoe lace. Exactly like this. Next step, we'll come back and recreate this latter part of the shoe. And finally, in the last step, we'll create the textures on the shoe.
27. Adding layers of dark shades and also adding volume to the shoes: Okay, My dear friends and this is step into continuous of our work for volume being the front parts of the shoe. We are going to work on this back part of the shoe. And we will apply the darkness of this area with a kind of a big brush. After applying them, we start fading and spreading the darkness in here. We also add some more darkness to the lower part of this back part. And we tried to create those folded areas and some wrinkles of the old leather in here. And we're going to use these darkness to show them. Obviously, when we are applying the darkness, we are creating borders wherever we want to fade them. Where were we don't. Then we use our eraser to create this folded area, this wrinkled area, which is related to a, connecting these two parts of the letter together. And then we would applied the darkness between these two parts in order to get the depth of this area becoming more. And then we separate these layers from each other. And we will fade the areas which should be faded. To get the shape that we want. Then we will rotate our work and I will erase and clean this back of the work with my Dilfer Acer in order to get the extra dark this out of my work. And wherever I need light on my work, I also use my eraser to apply that. Then I move on to this upper area and I will just add some are shadings in here. And wherever I have dark shadings, I'm going to fade them. I also add some more darkness on this upper part. And I fade it a little. Now for these parts which we have borders and we have very strong darkness, I'm going to use my hard pencil in here. And I apply the darkness in here and then I spread it with my brush so it would shape completely. And they're ever in this back area, we have borders, but there are light. I'm using my fader to create those lines. And I'm trying to shape this area. And you should erase around your work completely because these extra powders, if they will, stay on your work, might be problematic for you in the future. Now, I'm going to use my eraser to create this sewing line on this leather area.
28. Completing the volume of shoes: Okay, My dear friends, we continue with creating the volume of our shoe. As you can see here. For creating the volume, wishes spent time for it. So the volume that we create is not so simple and it snows in vom flat way. It has some wrinkles on it. It has some ups and downs on it. So it should show the leather and the volume of the shoe at the same time. So you should go slowly. These shadings should create that shine of leather texture of the shoe. So shadings am in works that the texture of our staff are important. For example, are they fabric, RDA leather or whatsoever, you should create the shadings as the way that at the same time as you create the volume, you should show its texture. For example, when you're working on a fabric. Again, you should show the textures as the same time as you're creating its volume. And it's the same for leather. Because you want to show what's this shoe or whatever it is, what are they made of? So we should pay attention to that. And darkest spots and lightest spots that. It also shows the texture of the letter as much as it's showing the volume. And we haven't even created the wrinkles that we've done in the tip of the shoe we haven't created yet. So that would complete our text string. For your shadings get becoming a good shape. You should work on them several times with your brush, meaning that you shouldn't just leave them as they are. The brush should move around our work. And just enough to not leave any white dots and spots. And it can get a great shape. You see this as suing line is darker in our model because it has a bit depth next to the swing line. In these upper parts. Dad, we have gave it a color to it. Not completely, but you gave color to it. We're gonna work on this opera part of it to just gonna give it a color. Of course, the edge of here. We should go on the edge with our eraser and it should be a bit more cleaner. So we can actually apply the final step on it. Well, how about creating textures? The thing that you should pay attention to, and it's very important in your work, is that you should be so patients when you're working on the textures and you should not rush through it. You should spend time on it. And it should then just create something. Get to the results so fast. As much energy and love as you spend. And of course, time. You would get a better results out of your work. Paying attention to the darkest spots. For example, here. We have some darker spots that later when we want to create textures, we should work on these darker spots too. But anyway, I'm just going to create these darkest spots. In step. You see these ups and downs wherever you create them, they connect to each other and they're related to each other. They're both related. These two dark products are both related to this prominence part that we kept light. That actually it's too light right now. I'm just going to add a bit of shading to it. So it won't look white in. It just shows that it's a prominence part. We don't want it to look white. Okay, my friends, I think I need to repeat a very important point here. Of course. My friends that have came up to this point and they are working on this sketch. Definitely have passed our premier courses and basic courses. But because it's a very important point, I repeat again that for creating these darkest spots and for creating darker colors, you should, You don't have to put pressure your work. And you should not increase your hand pressure. If you have enough powder on your brush, you will get the darkness that you need. Actually increasing your hand pressure and putting him pressure on your work. Especially in works like this, will definitely have negative effects on your work. One of these negative effects is that when you want to use your eraser and your work, you'll face so many problems. And actually you can't lighten your area as much as you want with the eraser because when you put pressure on your hand while you're working with your brush and you're adding darkness, it will actually get extra powder into the textures of the cardboard. So if you'll go into the cardboard and it won't look nice for you. Another negative effect is that it actually destroys the texture of your cardboard when you add pressure to your hand. And there will be extra powder in the cardboard. It's will ruin your cardboards textures and it might leave some, I don't know, white dots. And it will, it can actually ruin your whole work. So do not do it, please. I seen these areas is still have more light than we need to. So I'm just going to fade this part of it. Takeaway delight that has been left here. And generally this part of our work should be darker, still too light. So we will lose lines or wrinkles that are supposed to exist here. That's why I'm just going to linearly shade here a bit. Not circulatory lane, sorry. Now, in this area, the shapes are completely done. Bus I feel like the lights should be decreased the bid, and they should be more gray. So from the bottom I start shading a bit. So the lights will be upper. And of course, the amount of light will be decreased in the lower parts. Except that part which has so much light in the bottom. In other words, I just make this area look more cohesive. And there is a part in this center here. It should get shaded more. We actually shaded here, but it's very minimum. So we're just going to add some shadings over here. Little by little, we give color to our parts. Pay attention that as we come to this way in this area is actually lighter. So the shapes which are darker, for example, here, it's the shadow of the shoe lace, which makes this part darker and we fade both sides of it. And as we come down, uh, we lighten the shades. Of course. There is a bended part over here that has a darkness that we can actually create that darkness with our pencil. You see, if you look more closer and focused, there is a line here that you can see. So separate this area. This word will be completely separated with a strong darkness. But as we go down, we have less darkness. As you can see. Look, why do we recognize the placement of the darkness? We can easily and so fast put the darkness in their own placements. And so we can get to the result faster and better. Relieve the shoe lace for now so we can later get onto it and completed. But for now we're just going to leave it and gave color today's bars before. But the side parts wherever it's needed. For example, here, we need a line that as we are going to create with our pencil, it needs a bit of darkness. And then we will fade it with our brush. And we create the risks of it with our brush and our powder. All right. This find has some darkness that is actually it's the top of the shoelace. Tip of the shoelace. Just create a background color for here. So later we can create the shoelace here. And the strings that are coming out at the end of the shoe lace, they give this area a little shape 2. Now we will use our small brush, for example, this rash. We shouldn't use a soft brush here. Now, we've created all the volumes in our leather shoe. Now we want to go to the textures and add them part by part.
29. Creating leather texture and construction around the holes of shoelaces: Okay. In this step, as you can see, the only thing that I did was placing the darkness of this holes for the shoe laces. I've created this sewing line with our eraser and I've applied my eraser on the edge of that area. I didn't add anything more. So we can continue in this dataset and we can create the textures altogether in this face. For the beginning do is start with this dark part. The holes for the shoe laces. Just work on them a little bit more and shape them considering the ones that we see in our model and the parts that are needed, we're going to go over them with our eraser. So we can give these holes a volume. And I want to show that they are holds actually. You can choose whatever eraser that you want. You can use mono, 0, etcetera racer, or you can use your brush eraser. It totally depends on you that which one you're more comfortable with. For the strings that you can see here, some little lines. Of course, the Mono Zero eraser is a way, way more suitable eraser for here, but you can use that too. And for the parts that you need, these lines, not to be that light and not to be that white. You can use your brush eraser. That's better for the parts that you do not want to show the light that much. And just like this, we will shape the light areas in their surroundings. Of course, later we'll come back to them more and adding the textures and create their shapes more. But for now I'm just going to add some things, some little things a little bit lighter like this. And of course, a continuous from this side to as it comes down to here. Now we will move on to these suing lines that we have created. Even in previous phase, we had these suing lies. We created them. I showed you how to give them volume and so on. Just the thing that you need to know about here is that in this part, we have less darkness that we had in previous section. So I'm using my carbonic pencil and I'm adding darkness above these parts, just like you see. So slowly we can give them volume and get them out of this flattened two-dimensional way. The ones which are here are a bit shorter because of the perspective. And yes, they're shorter. And these betweens are looking more. And as I go to the end, because I am actually entering and different angle, different perspective. Day gets shorter and shorter. Test like this. And beneath them because of the shadings and shadows, there is a darkness just a little, not so much. You shouldn't create a line all around them and create a border. In some parts you need to just let go of the shape. You know what I mean? You don't need to create all the lines around them. They shouldn't all be parallel and connected to each other because that will actually ruin your general shape. That way it looks natural. And of course, it looks less similar to your model. Like this. It's easy now in this setup, we are going to fade these lines here, especially the lower lines, because they shouldn't show this much. So we will just fade them. And like this, we created a sewing shape. Then of course, some parts, you can see some strings coming out of them. That if you want to be so uptight about you're sketching, you should create them like this. Let me zoom in for you so you can see better. You see if you want to be too sensitive about your work, you can slowly create these as strings. So you can create some fabric textures that have created this sewing line. There forever. It's possible, okay. Wherever that these swings are big enough for you to show these textures on them. The parts where are too small and are not showing that much. You shouldn't work on them. Because if you do so, I surely your swing lines look too dark and there's nothing would be left of them. So pay attention that you should create these kind of textures only in some parts, not everywhere. Now, we want to create our leather texture. I want to start from this top part here and slowly I come down. If you pay attention in this area, v have Takes sure we have a curve. It's, it looks like the letter has been curved in here. So we create a line. For now. I'll just create a line with my eraser. The upper part should be a bit lighter. You can use your brush eraser for that, or you can use your buffer. A surfer that if you're using Dilfer Acer, you should control your hand and be careful that you just take the shadings only from the part that you've determined. It's very slow taps and hits, you just get a layer of color out of it. And in the lower part of here, as we can see, have dark is with dip the tip of our brush into powder just so little, not so much. And we are going to create a light darkness over here. So we can show that one of these parts are prominence and the other one is curved in. And we have created to darkness for here who will move on to the parts which we have created light on the top. And we just work on them a little so it can get a good shape and it can blend into our work like this. In part a is kinda going toward up. And it connects to these oper shadings. This is shit. We can shade all of these parts just like this little by little and work on them and shape them. Generally in shading, the point is that you start from a general shape and then you go into details. Meaning that first you create a general shape of that area. You give it a general look. And each time you work on each part separately, you will add some details and you'll create the volume is specified to that part. And you just shape it. Okay, Now slowly I start with my eraser from the part that I've created, a light and whiteness urges going to create some lines in here that are texture for the leather showing that this letter is old, it's been a bit broken and bended. Then pay attention to the direction of the concentration of these lines and the direction of their lines. And of course the length of the lines. Because the direction of the lines will actually show the viewer and show the viewer that in which direction you are leather was a stretched or rented. And as we are coming down here, we'll keep the same direction. You can easily figure out the direction of the lines by looking at your model. It's pretty obvious. You should rotate dairy serine your hand so you would find the sharp edges of the our eraser. And if there were not sharp anymore, you should cut the tip of it with your cutter. Always works slowly and step-by-step. We create these lines in all this area. Paying attention, this is a direction that's the direction of the lines has been changed. And this areas lighter than it should be. And because we want to create texture right now, we should get the darkness of this part to the level that we want it to be. These parts only to be a bit more darker. Right? And in here, if you pay attention and can see that the lines have have been dragged a bit more down and to the surroundings of that hole. As much as you have patience, you can show your textures better. I'm going to work as much as the time allows me. But if you learn the process of the work, you can create the textures all over your work with the same process. There's one way to create them. India can just enjoy the results of your work. So don't worry about it. If you learn to do as small part, you can do the whole thing. In some parts of my work. I need more darkness. For example, here it needs a layer of darkness. And of course here it should be darker. You see this shape should exist, meaning that you should create a textures. And again, you create the darkness and again, and you create a takes tray again. If you think that he should place is darkness is from the first and say, why should I create the textures twice? It's a wrong idea. It's like creating the hair that we place a darkness. We create textures. Several times we darken that. And again, we create the textures in hair V. It actually creates the volume of the hair by xin here it actually blends to texture into your work and makes it look more natural and more cohesive with your work. So you should create a texture, add some darkness, and then again create the other textures. After I've completed the volume of here. And the texture got the darkness that we want to. We can move on with our work. Now. Again, I start and create some very fine lines. In the some part, I create them more concentrated and crowded. And in some other parts, I don't do it. So this difference between the parts to a mount of them will actually make your work look more beautiful. Try to vary and you have variation in the length of the lines, as you can see in your model. And another point is that this eraser line in here goes so sharp. But in our model it doesn't look that sharp. So we use our brush URI, sir, to take delight out of air, to submit. Now that can start and create this small lines that are existing in here. As I told you before, you can create the lines with different ways that one of them is using very sharp and find pencils data in here. We are with a, we are using our carbonic pencil. And of course, you can use your B8 settler Loma graph pencil. The coal one. Instead of this. You can use that too. Because they almost give us the same result. The reason that we are using this pencil is that it has a same kind of same kind as cont pencils and coal, but it's way lighter than them. It's not as dark as they are. And definitely it's not as dark as our hard pencil, so it will help us for creating lighter lines. Be careful my friend, you shouldn't overuse your pencils to and wherever that to see the dogmas of pencil, you should only and only creates lines in those places. Otherwise, your work may look unnatural. And pay attention that you're creating a leather textures. So you should be so cautious about the differences that can be possible in the leather textures and you create them here. Your have seen leathers which are old, definitely. You've seen them before so you know how to work with it. And of course, you shouldn't lose sight of your model. And like this, you can create the darkest spots and dark lines. I will complete this part for you and I'll come back so we can continue together.
30. Continue to creating the leather texture on the front and toe of the shoe: My dear students, we will continue with our texture creating and it is suing lines of our leather. In here we have created to placement of this sewing line, but we haven't created to textures yet. So I'm going to work on it with our eraser. Because we are working on this area, it's better to complete these sowing lines too. You can also add the darkness of the second layer, which is next to this first layer. You can create them in this step. And really dark in our previous darkness. Until it's enough. Then we will go over our dark parts with our small fader. So in other words, we can just blend these dark parts into our work. And they don't look like just separate lines and they don't show too much. All right? It's enough up to here. Now, according to the dark parts of our model, we will add some dark parts to our work. I'm going to use my fader for this part of my work because the darkness behind these sowing lines, this lives are not that much data. We can create them with a pencil. So I prefer to create these darker spots with my fader. There's some over here that we can make them as stronger and we can use our pencil for them. You see these suing my eyes because they're in front of the other ones. Because they're more in front. They look more clear and they're more insight. In parts which I'm assuming lungs got abrupt, said it may not look that much linearly to you, but we should separate them somehow so we can show that it has a good shape. And actually the separation of these parts will actually affect so much of these sowing lines. Like this. We easily created these sayings, entangling lines. There are some birds in this area. That's if you want to work on this shoe lace, we will find out and figure out these dark parts. Let us work on this shoelace a bit. Hello Scott were just want to give a back ground or work with our brush eraser for here. So we can apply the darkest spots which are on the latter part of the shoe. There is a bent over here. I'm just going to create some texture over here. From this upper part, we come down like this. We give it an angle and it continues like this. These are the strings of the shoe lace that came out of it. We work on those inner parts when we are creating the texture of our shoelaces. But for now we can create the darkest spots and complete the darkest spots which are next to this area. That those inner parts not yet like this. And of course they'll line which is here, should be bolder. The lines which are like this. Definitely when you are working at first, at your primary is Sketch and so on. You create these lines. But when you work on the background and the shadings, the, these lines get shade it. Maybe they leave a trace, but they will get faded. So after you've completed your whole work, your whole shadings and textures, you should come back to lines like this that have very strong darkness and work on them again. If they were clean at the end of your work, you shouldn't drag your brush on it. Just like what I did right now. By issued a drag your brush on it very, very softly and gently because we don't want to fade our line. We want to keep its darkness and shape. We just want the extra things off of it. Here again, we have such thing like that. You should create a line and let it be on our work just as it is. Of course, for this part, the upper part of this line doesn't have the color daddy has to it has to have I will create a border for a year. We drag the darkness toward upside and shape it. Just think this actually the curve which is in the place of connection of these two parts, this area and the lower area of that will create that curve. If you pay attention, we have lights layer in this part beneath our line. We create these inner parts of the shoe are so dark. I think it's better to create some darkness with our pencil for these areas. And so it get darker and it actually shows the depth of this upper area very well. I'm using my soft pencil and of course, I'm not darkening all the way through the end of that side. Because as we come to this part, it gets, as we come to the middle and right side, it gets more gray. And this line should be dark and as well, it's actually the border line which separates this outer part of the shoe, the tip of the shoe, from the inner part of the shoe. I can do the same for the upper part. For having a more darkness and to separation of our areas will be showing better and. The depths of this area will be shaped by blow of extra powder you have on your work. A very small brush, so softly and without any extra pressure, we're just going to spatter them in their own placement. But sometimes when we are working with our brush, our goal is to fade the darkness. And in other parts, we want to just spattered a darkness. For now. We're just going to spatter to darkness. And we don't want to fade it. We don't want to make it lighter. Our goal is to spatter the darkness that we have created here. So be careful that if your goal is spattering, you shouldn't have so much hand pressure so you can keep the darkness of that area. According to our black and white model we have here, this bar needs to be darker because we want this upper part, upper area, and lower yeah. To look more cohesive. We're completing this. We are actually determining the placement of these shoe laces more and we can more easily work on our shoelaces in our next step is to create a darkness for these parts. You see, we're creating the darkness for these parts. Day depth of here has been completely shaped. Do not be as scared. Scared of using your pencil. Yes, we should be careful. But I see some people who just want to create all the parts, all with a brush and powder. Bots be careful that the brush and actually dip powder will give you a smooth darkness. In some places we do not need that softness and the smooth this, we need it, we need these things to be more wild and not soft. So try to use all of your equipments. Create departs which need to be more done. Also in here, we have a linearly light here like this. We have darkness next to it and a light that is connected to here. K. We went a bit far from the part that we were working GAN actually. Let us come back to this part over here and we continue our texturizing from here. Of course, I remember a very good point in here. When you're creating the texture, textures and your texturizing. When you shape the parts which are more general, there are more big and you're, I just go scheme your work. You can work easier instead of bad way that see I should finish this part and then move on to the general shape. But it's not. Wrong, but I prefer that I would just start from apart. Then I will have a general scheming over my work, check all of the parts and see some parts that can be texturize well. And then come back to the very small details. Because if you create those general textures, the work will be easier for you because they are more insight and do your work and just get some better shape generally. And you will also enjoy your working. So I think it's better that way. I'm going to create some darker spots over here with my fader. Pay attention that how much these darkest spots should come up. According to your model. And these lower parts are actually have some as sowing lines that next to them are some darker spots that will leave them for the time that we are working on the lower parts. For now, it's better to concentrate on the leather textures for creating them. This area should be a bit more lighter. So I'm working on it with my eraser so I can create a lighter area. They spars of work, our syllabus on touched and plane. So for not leaving it so plain, I will go over them with my eraser bits more. And we create some leather lines on it. And we be careful about the direction of the lines. For example, we have a curve in this direction, in this part of the shoe. So the leather lines should go in the same direction as the curve. Because in anything that you're working on with it, you should pay attention that you have some general texture lines. And you have some specified texture lines that may go in different direction from what you are expecting them to feel have textures in here. As you can see in here. Actually the direction of textures are kinda becoming different. We need some darkness. That's we are going to use our small fader to create them in this area. You see I consider to powder that I'm taking. So lead cell, meaning that I don't want to have so much powder on my work so I can not control it and it gets out of my hand and it gets too dark. Because little textures are enough for me for here. In here we need more eraser textures, which are so small. These are very small details that I'm going to use my mono 0, etc, to create them. And again, I tell you if you're using your normal eta, the eraser, you don't have a mono eraser. It's okay, but you should be cautious about the tip sharp of your eraser. You should keep it very sharp because mono eraser, Mono Zero Eraser has a smaller tip and it stays sharp for a longer period of time. And if you're using a normal editor racer instead of this, you should be very careful about that. In here I need some more darkness. So this prominence parts show itself more. And we just fade this darkness in this lower part. At each layer that you are creating. And you look at your model more. You will consider the shapes and volumes more. And if you want your work to be great and you should add to these volumes layer by layer, meaning data. You shouldn't say, I've created my texture. So for not ruining them, I would not work on the volume anymore. He shouldn't do that. It's kinda lazy. So wherever you felt like you need to add some darker spots, you need to create more volume to your work. Even if you have texturize that part, you should do it. For example, here I think this part needs to be more darker. And I feel like if it's darker, It's we'll show my volume better. It will help my work into terms of volumes. And of course, creating its texture again, doesn't have any difficulties. And you can easily create this texture on it again. Because when you figure out the process and you know how it's going to be done. It will be very easy for you. And you can come back very fast and creates your texture. Very fast. Event in minutes. As I can see next to these sowing lines are a bit more lighter. And there is light layer with the distance and then texture the shape, this part, it shaped this side part. You see, even though that we're darkening our work and it takes tours are left beneath our work. It's not like that we say all of the textures that we created are going to be eliminated and gone. If he, if you are adding darkness, day will be left there. They might just get a bit more gray. Okay, for not to bore you. And I'll get too tired from these repetitions. I will do these, and I'll repeat some shadings and textures. And whenever it's needed. And you should create the textures into whole area of our shoe. The way we have learned it. Because these textures are all in the similar way. David created in a similar way and a comeback for the shoe laces. And of course for the tip of the shoe. I'm going to use my brush eraser for them and my eraser for them more. Because this part is a bit fader. And Madurai surmise, gave a very strong and light lines. So I prefer to use my brush racer. Sorry, you might do for a CR and my brush eraser for this part. We're going to use them more for here. Do these steps of fast and next.
31. Complement the lights and leather texture of the shoes: Okay, My dear friends, in this step, we are going to work on the rest of the leather parts of our shoe. These fires between the shoe laces, which is actually a leather part which has been left out. We're going to shade it a little. And then later, we would add some more light onto them with the use of edge eraser, brush eraser. Because I've explained once the general rules and even the details of creating and this kind of the leather texture. I fast forwarded this part of the video so you can just review them with our eraser. We are going to create a leather texture with some this ordered lines. Obviously when these lines will get right next to each other and their direction should be the same. And maybe sometimes even they would get they would meet each other. But they shouldn't be completely parallel and they shouldn't be in a very specific order because that would not look natural. And in this area, wherever I can see wrinkles, wherever I can see ups and downs, prominent parts. You should just create some lights in order to these wrinkles would show themselves. And from the said you've created lie to you can use your eraser to create some more textures coming out of that light parts. So wherever you have light areas like this, you can just guide your eraser from the light area towards the darker area. Because in this way, the texture that you're creating will just blend into your work way more better and easier. We look way more cohesive. And on these prominent areas, as you can see, I'm using my mono Zero eraser to create my leather texture lines to the area coming out of it. I'm going to cover all of the other parts on the shoe with this texture. You can do it anywhere on your shoe. And obviously, the leather texture might be so many different in so many pictures as you can see, which is completely natural. This kind of leather has some very, very small details in it. And I believe if you learn this kind of texture, you would do others as well. Because sometimes you might see even bigger textures. Or sometimes like here you can see lighter, smaller ones. Now we're going to apply some more darkness with the use of our brush. And even our carbonic Paris got pencil. And we just add some darkness to the light that we've created. And this side, on the contrary, of using eraser, It's better for you to create the textures from the darkness toward the light parts in order to get the textures better, get the better outcome and results, and just make them blend in well into our work. There are also some stains and spots which are needed to be applied by the brush. If you just bring your fader into your work and you get the darkness that you want. I mean, it's, it might not be very strong darkness. Fader itself would be enough, but if not, if your lights are darker and just get some kind of powder on the tip of your fader. And then here in front of the shoe, on the top of the shoe, first we applied a light, and then we create the general texture for our leather shoe. In your model, you can see that this tape of the shoe, your model is a bit more faded and it's not really clear. So it's not as clear as the back parts. And in here in order to keep the leather texture and create dad not focused and that flu shape. You are going to use the eraser to keep that flew. And also keep your textures. And for these, but you can just shape your eraser and then get the lights that you want. You can also add some more details with brush eraser. And then we're going to use a small brush to add this spot sign stains on the tip of the shoe. Just apply the darkness.
32. Start drawing the shoelaces: Okay, My dear friends in this phase we want to work on the texture of the shoe laces. Of course, if you zoom in to your model, you'll see this texture very clearly. But we don't need to duties textures exactly as we see as in exactly we see it as in the picture. Because work is a smaller size. But if you have bigger size fork, you could have create more textures on your shoelaces, but because now we have a small size here, we're just going to create a shape of those textures and not every one of them. I've darken this area with my brush and my coal powder here. And I think this middle area, I'm going to divide it to four parts with my eraser and slur part that we've created with shading, tried to create the volume of this area, but you shouldn't worry too much on, you know, I'm creating clean shadings because if the shadings are in a stains and spots is even better for us because we want to show that this shoe is old. Now this part above here is kind of a shape of this leathers shape that there's texture. You can say, just separated like this. He also show this part like this. K. Now we have a general shape of our work with these dividing things. And now we can create the shapes that we can see with the edge of our eraser. Just creating some texture shapes. But the agent with the edge of my eraser. Of course, in some parts, we need to come back again and add lines with our pencil. I'll tell you about it when it's time. Because this area is very small and fine. Well, we need to sharpen to PVD eraser as fast as we can. So the lines that we are creating would be so small and so fine. See, actually our work is so small that we cannot completely see me simulate our work. Because we cannot show every little details on it and a few on to create all of these shapes. So similar to your model, it's better that you create a work in a bigger size than what we are working on now. And of course a small area. And in this small size, we are doing our best to create the textures and details as much as we can and we do the simulation as, as much as we can. And the most important thing in here is that you won't lose the volume of your work when you're creating textures and you create a correct volume. Next to some of these textures that we've created. We use our pencil a little. I say again, you can use your B8 Lama graph as the layer pencil, or you can use your Paris gun carbonic pencil, B2 or B3. It's totally your choice. These are not to create clear lines in every part. Just need to create a darkness and dark lines. So when you use your Raj or when you want to add other textures, these line will actually blend into your work. Try to make very thin and fine lines. So it will look cohesive to your work. Even in these parts that are like this. You say so easily. We can create shapes like this. It's very easy. You just need to pay attention and you just need to have patients. This part which is related to the leather texture here. This area needs more darkness that I, using my part pencil for creating that creates some dark lines in our work wherever we need them. For example, if you look closer and focus, we have a darker spots in here. Are in these middle parts. There are some more darker spots like this. There is one in here. There's a darker spot in here. Then we should create, and then we should fade it that we do to fading with our small fader because we have a small space here, smell so widen bake k and for shaping this area better. So as slowly. Without putting our goal in fading this area which is run our brush over it so slowly. And then we will add some stronger lights with our eraser in some parts of our work. Okay, we don't need to do it in all of our work. We don't need to show this texture everywhere. To select this, you'll see so easily we have shaped our shoe lace. You can do the same for this upper shoelace.
33. Continue the process of creating the fabric texture of the shoelace: Okay. Hi. So okay. So
34. Completing the shoelace section: Okay, My dear friends, as you have seen in a previous Fidel, we've created to take Cicero's, this area which was less clear. Every created down with our lines first be worked on it with our eraser after creating the volume of each shoe lace and then we worked on them with our pencil. Here, reached. The texture was more clear. We've created the texture with corner lines, corner raise lines. And then we completed its volume V that our coal powder. And then we've created the lights with our brush eraser. So now we can have this very natural texture. Now we want to move on to the last part of our shoe lace, which is this one that came out of here and has some strings on it. First, I will work on the parts which are below this. And they are so dark. Just going to create a texture. If you pay attention, the shape of textures like this is one line. You can see some shapes on the same line, facing up and down. And in these areas there are some darkness of this texture. But they look so disordered and random. And in this area, because of the strings, there are some darkness. But again, it's randomly, It's not in a special order. And this lower part, as you can see, the model actually in one straight direction. And it's created this inner texture. We're just creating the general darkness first so we can later complete. It. May mean some places we need to use our electronic reserve, for example, here we have a very strong light, that's a dot. But again, it has a strong light. But anyway, at the end of our work, we should come back and check all of our work to see very, very have any strong lights and it needs more light. We can use our electronic eraser and give light to that part. We work on this inner part a little with our brush or a service without taking too much darkness out of here. Just very slowly. We are just going to shape the textures that we are showing here with our eraser. Because if you work on this area too much with our eraser and we want to create texture. It actually takes away the color of our area and V just lighten it too much. So it just gives it a slight touch and slight texture. When tip-off your eraser, Gods, black and dirty. He should drag it on sanding or on a paper and to clean it. And if it got out of shape for sharpening it, you can use your cotter Or you can use a dragging it on a sander. Or at last, you can use a sharpener for it. But in case that you're using sharpener, you should be very careful that and puts a separate sharpener for this work. Because sharpening eraser will actually make your sharpener less sharp after awhile. So if you want to put a sharpener for sharpening your eraser after a while, may just be out of order for you and it won't work fill for you. So again, I recommend the first two ways, using a cutter or sanding. Now these are the parts which have strings coming out of it. And it's better to use our integer array. So for this part, because we have more control, I think this should be shaded a little bit. The priors on this here and this shoe lace. For that, I get a medium-size brush. And from here we start creating the darkness. Because we have a darker area in here. Actually the amount of darkness that you want to create. You can easily figure, figure it out, the placement of it to amount of it. By looking at your light parts. You see they help each other. I think to cultivar, color of our work is good. And now we can create the lines that are exists in, in it. First, I'm going to create the dark lines with my pencil in these parts. And of course, let me determine the part that we want to work on. Here is lighter. And there's some very small dark dots over here that needs to be done. And in some parts you can see plenary shapes. So finally, so elegantly, it tried to create our texture. Phrase upper parts that we're not allowed to use so much pencil. Because they operate is fader and we're not allowed to use pencil on it. So we don't go into it. And then we'll come back to our Pen Eraser. And we create the lighter areas with our eraser. Like this. In these areas that are kind of faded. Our preference is to use our brush eraser. And as we come down, we can use our eraser as well. Just like this. We will create both volume and texture in this part of our shoe lace. And we show it. It's really not a hard job, it's easy. You just have to work as slowly with so much patients. And definitely as always, you should not lose sight of your model. We're just playing with the shades, the lights of it. With that you can easily create both texture and the volume. Now in these strings to inner side of it needs more darkening. And of course, the same process that we have went over them with our eraser, they need more darkening too. There are just so plane right now. They'll get better. All right. Well sad with create the shape and we created these shadings. We come and do to completion. Shapes. Pay attention that a fewer shadings are fade. And you shouldn't overdo them while you're using your eraser. Even if that happened. And you got too much light on a place, you can easily get your brush and fix that part. Repeat the shadings if you want. One of the benefits of erasers are that when you're using this eraser, if you don't have too much hand pressure, you can get a very normal lights, medium lights. And they are good for parts like here that you want to have a fade scenery and fade view and you don't want the lights to be so Bolden sharp. It's so useful in these kind of situations. We can work on this part for awhile. And complete darkness with your fader. Shape it better and so on. But the general shape of our work is like that. The processes like that. First you should get this medium volume and medium texture. So then later you can, you can complete it. Just the thing that I always insist is that when you are creating the Takes sure. You should also remember to keep your volume, meaning that you shouldn't be distracted with creating texture so much so you will lose your volume that you've created, especially when you're using erasers. And these little strings that came out of this shoelace. We can show them so little with our eraser. Just don't overdo it, okay? Okay, Our work is almost done with this part. Now in next part we want to work on the bottom of the shoe.
35. Training to arrange brush hair and volume the soles of shoes: Okay. My dearest friends. In this stage, that is actually our final stage of the work. We want to work on the bottom of our shoe. I took up this brush to work with it. You see if you pay attention closely, look at the tip of my brush. Some of the some of its hair came out out and it's not really in one length. All of them are not in the same length. And when I saw that I figured maybe it's better to explain to you too. If you want to work on the brush like this, which some of its hair longer than other. It can actually make a stains and the spots on your work. So it works like this. Which you have so much a Spot sends things. It might be okay for you, but for the other parts, for other works that you need to have your work flawless without any stains. It's who'll be problematic for you. So then you can get a scissor and just cut off the hair that came out of the tape. Meaning that he shouldn't just cause all of them. You should just cut the hair. Dad came out of the tip, which are longer. And at last you can just drag it on a sanding so you get a better tip. K for creating this lower part of the shoe. First, we want to give it a general color. In these middle parts, it has some light color to. Now for creating that darkness, you can start from the very bottom. Actually it's the shadow of the shoe. And you can just created with your flat coal powder that you direct, leash it, transferred to your work. You can create this shadow just like this. You should assess batteries so slowly and so softly. In this lower part. Bottom of the shoe. See I do not take the extra pattern of my work. I'm dry, transferring the powder completely into my work. So basically four parts which are completely dark. You need to do this. Now. To part behind our shoe, the hills. It's actually not that dark. So it's better to use a smaller brush so we can control the amount of powder that we take. Little bit of darkness in here that actually blends into the darkness of its shoes heel. Now we blow off the extra powder of our work. And then we'll continue your work on the edges of the shadings that we've created. So it can show a better shadow here. There's actually one other layer of shading that will do it later. Have shaped this area, we move it forward and create another layer. Now in this upper layer, you can create this line which has separated the bottom of the shoe from the part above it. And it's unnecessary line in your work. We're just going to make it into spots. As you can see in the model, it's in a literary way. It's not completely a line. Dumb mistake. And these two, just like this. Now, I'm working on this lower part of the shoe. And we determined is placement with much more focus. And we shade it. We can also use the powder which is still exists seeing on our work. Well, in so many places we do not use the existing powder on our work because it looks like it's going to it's a stretched out and it creates a stains and spots. But in places like here. And that leaving and creating a stain sunspots are not only they don't create problems for us, also, they can help us and they will look better. And that's what we are going to create actually. So you can easily shape this. Because these springs are actually going to help our work. Took a bigger brush and I'm using a bigger brush because it's a wide area. And it's dark, means lonely, angry should be so much careful about it. I'm also going to use evocative my piped coal powder in my work so I can have a smooth or shade. And as I go this way, my shadings will be lighter. I don't just try so much to get very clean and organized shades. Because it is not because we should create a spots in the background of this area after we did this shading. In. Now, we're just going to get the darkness that we want. The amount of darkness that we want, we should create it in this section. And we will create the volume of our work in our next phase with our pencils and with our eraser. And give love our shoe color too. You see you can create a very the smooth shading here and we can get a very clean shadings. But we didn't have to spend time for this. So we didn't know a start time on it because we don't need any clean shadings here. You're going to create a spot sun it later. So we will do our work correctly and we will pick up the pace of it. In the purse here that I have more darkness. I'm using my soft pencil for it, using a smaller brush with spatter it and kind of faded. On the other hand. I can actually create this shade over here that later we will work on M two. At last. Came my dear friends when there is any any powder on your work, whether it's a cold pad or our pencil powder Renu on to drag your powder off your work and blow the powder of your work. You should just blue so strongly so it will getaway of your work completely. Or it shouldn't be like that. You blow from this bottom part and it goes and sit on the upper parts. But there's a little problem here that you might accidentally spit on your work. So before you blow, should be very careful about that. Maybe now I'm explaining, you would laugh, but it's really problematic thing. But it happens to everyone almost once or twice in the area using these techniques. So I'm just telling you from the beginning, be careful about that. Now, we gave this bottom of our shoe a general color and general shape. So in our next IS say, we want to work on It's textures and volumes. Now I'm going to my heart pencil or HB pencil. Whichever one that is more comfortable for you, you can use it. No difference here. Now, we will actually create a strong darkness that we see here. We can use our heart pencil for these borders and the surroundings. And then we can feel inside of them with our soft pencil. So it will be easier and faster. Now, because we have already determined these parts in our primary sketch. It's now really easy for us. And we'll just move on so fast. Now this inner part is completely dark. And here, of course, this dark area continues with a shape like this. I am darkening inside of it so strongly with my hand pressure. So here you should have had pressure because it's completely dark. Right? Now. I'll take my soft pencil and I darken the other parts, which I have a wider space for them. So our easy thing to do, just like this. And the other hand, in this ending part, I can see some lines so that we can show them with our pencil for now. So later we can complete it. As we can see this part as been separated. We can see a line. These lines are so light if you pay attention, you cannot see very dark lines and emphasized lines here. There is a separation with these lines, but they're not so dark. Also in here we have lines. This is kinda have that suing line. But for now just to get the darkness of our work correctly and give it a correct shape. We're just going to create this line very slowly with a pencil. Lightly and slowly. That of course in here, this sewing line came up to here actually shows these sewing line which has different thickness. Or maybe the thickness of the swing line is the same. But it's because of our viewing angle. In some parts we can see the screen tail, Sorry, sing line, thicker. Any other angle. And some other parts we can see them. Well, you know, center. Just like this, who separate this area. We can even work on this lower part here. Can give it a shape with our hard pencil. Just a little note so much. Then of course, as we come here, this line exists. We have is suing line here like this. And then toured up areas a small role in parallel to this line, which of course this upper line is darker. These parts are darker. You see when you're creating these lines, if you pay attention. I don't create all parts of the line with the same hand pressure. Some parts, I need to do it more. And for other parse, I need to put less hand pressure in the parse that you can and let your hand go. More free. Should pay. It's okay, but some parts needs to be done with so much cautious. And do your pencil should be very sharp for that. So be careful about those parts. Have to create these upper parts. All right. Now we will go to fading are extra lines because our areas not very widened beak. We work on these pins, civil areas with our small brush. Then we will blow off the extra powder from our work. And we'll move on to the other parts. Because the other parts in this area are almost approximately light. And because of this lightness, we should blow off the extra powder from our work and then we will shape the other parts. You see these lines that I'm creating here are not that sharp that view we'll create them with our pencil. Now. I'm just creating these lines with the extra pattern that I have on my work. One of them was that line that we've created. And the other one is this line which is being abrupt it in some parts and slot continuously drawn through the whole work. These two layers lines. And this language not should be so much insight. And even fading these pencil lines. I also fade the slower part that haven't really created the line in this front areas. Then you take the powder of your work. You can easily see the parts which are not completely field. So you can shape those parts again and feel them. Now we want to work on these ending parts to fade these lines. Of course, in this between, we should show the sewing line which is in here, but we will go on a step-by-step. We'll move forward too fast. Okay, my friends do it up to this part.
36. Adding darkness to the soles of shoes and creating shadows on the floor: Okay, In this stage we want to complete darkness of this bottom part of the shoe. If you pay attention, of course, there was a line left here that I've created it. Now I'm using my piped call powder and very slowly, I'm giving color. Today's prominence part of the bottom part of the shoe. You should pay attention a bit more. And at the same time as you're creating darkness, you should get the volumes of this bar to see, for example, in this layer, if you look in the photo, in the middle, it's more prominence. And you can just make the middle part look, look more prominence. To select this. As you go forward, our darkness will be less. So we do not shade it so much. Just create a gray background because we do not have, you know, whiteness in the bottom of our shoe. Just shade in surroundings. These lower parts that are so lighter and a should be shaded so much less. We just guide the shading from this downside a bit toward up. And I didn't take any extra powder. I'm just using the darkness that already exist on the area around it. Because this bar doesn't have that much prominence and it's kinda flat. The color of its different parts are not so much different from each other. We can use our eraser around the whole work to get it clean, so don't worry about it yet. I'm just grading the shadow of the shoe on here so softly, so smoothly, as long as we are working on this part. Well, the shadings like this are actually going to give volume to your work. If dimension. When you see 3D sketching, if you pay attention, you can see they have some shadings like this, so they look like three-dimensional. Of course. In addition to that dark shade that really pops up and it's really showing we have another shading all through our shoe. Just like this. I'm sorry that we are moving all around our work and are working on different parts. I just want to explain all the things that are needed to be explained for you. So you won't have any problem creating your work. Some pies doesn't have any special points, so just move faster on them. In these parts we have more light gray and we shouldn't just work too much on these darkness. I can put a strong darkness here. Kinda separate this part from the bottom of the shoe. Maybe these shadings look linearity to you. But shading this area in a literary way is because of that. Our area is very small. And on the other hand, we want to show the prominence of these curved parts. And we don't want to just fade them away, just want to show them. So that's why we have to shade so slowly and so smoothly and softly. And we do not feed all the light and white parts over here. So that's why we are shading linearity in some places. Okay, I think in here, the darkness of this part is way more stronger in our model. So I will just add some darkness with my pencil. And you should pay attention that these darkness that you're creating with your pencil. They don't need to be a completely faded. We do not want to fade things here. They're just want the extra things of our work, extra powder of our work. You do not need to scrape all the parts that you've created with your pencil. These lower parts that are placed in darkness. We work on them too. And we guide these dark parts toward up just a little bit, not too much. And also it can guide these tore down. So these edges would not be that much sharper anymore and they get more, better color. Be careful at this part should be open because he wants to show there's a tear over here. We complete these parts. You give them proper background color. This far as have, you know, more light. But even though they're light is more, they have a color. So just create a background color for them. So in next stage, we will create the lights for them. Okay, my friends.
37. Creating light and texture of the shoe sole: Okay, My friends. Now you want to work on these parts and we want to create the textures of here with our eraser. As you can clearly see in your model. These parts are not so clear there fade in your picture. They're not focused on. Big tried to do the same. Give that faded, faded shape to our work. We don't use our eraser so sharply and we don't create any sharp lines. You can complete the lines of here with your brush or your fader. I'm using my brush eraser in this stage because the lines that this one creates or not so sharp lights. And for this stage of our work is way more better. Various slowly wherever you see the light. So finally and so elegantly you will drag your little transfer your light in these areas. And wherever your work wasn't faded in your model, it was focused. You can use your mono 0. So you can get clear light lines, more clear lot lines. Wherever you feel like it needs a line. In these ups and downs, you can create them very slowly and very small with your pencil and your fader. Because we want to do the textures here. And in this phase just finished with this part. These upper part have very less light and it's generally darker. But again, just for not just to leave it plain. We will run our eraser over it just a little, not too much like this. And this lower part we have you have dots but they're lighter. Is actually both a line and dots next to each other. Because when you look at it, you can see those white dots. But you can see them that they're following a white line. So just like this, you would think that these details are not very important and you shouldn't put too much on it, spent so much time on it. But you should know that the difference between a hyper-realistic work and ArrayList work is exactly Indies very small details. So maybe in rail works, we don't do this much details or we don't spend that much time in making it a more similar to our model. Plots when we are working in hyperreal technique, it's very important that you spend so much time on your details and textures and just get a great simulation. Even in some parts. For lighten the area more. You can use your electronic eatery serve for some parts. Just to get some lights which are as dots. Okay. We don't want to do it so much because our area is kind of faded so we don't work on it so much. If we do, our area would get lighter than it should be. These parts are way more darker than they used to be. You should just add a bit of light here. You shouldn't be this much dark. All right. Our work is almost done. Now. This part looks like the way we want it. Now you can create some darker spots with your fader and complete the dark, darkness from your work. That it doesn't look that much plane. Of course, in these parts, I feel like we can decrease the darkness a bit more like this v-shaped, this area. And then we will move on to this side of our work. And we can add some textures over here too. We'll see in this area, there isn't any, you know, ordered textures. But at the same time, we have a light gray in our work. In our model. Actually. So randomly we create a string texture here. Just think this. Of course we haven't cleaned around our work, not yet. So after we are done, I will tell you how to clean the whole area so you can get the borders better. In here. To give it an arc. We have created the border of this sewing line here. This is for the bottom of our shoe. We just need to create some of the shapes of suing in the parts that can be seen and some parts that can be seen or actually in the dark that we don't work on them so much. So make this part more gray where we'll use our carbonic pencil a bit and reshape it here. In this bar that is lighter. Would just determine these. But in this area, the swing lines are not completely showing. Just show a trace. And at this ending part, we also have a line here. There's a light line here, which looks like this. And in the textures of here, we should create some dark lines as well, and they should look faded. We have a light over here. The slide here. It shouldn't be seen like this. And in here, again, we have some texture that is kind of faded and it shouldn't show so much. So we are using our brush eraser in this area so we can get that swing line shape. In this part of the shoot. Again, I say because it's kind of faded in the picture. We don't want so strong lights, we are using our pressure is there. You see the background color and your background color, your background volumes are correct and well, you can easily just create textures with the touch and so easy. So there's a darker spot that we will add to our work definitely like this if complaints at this texture. So it's really easy because we had a great background. Now I need to just add a bit to the darkness of this area. I want to use my heart pencil on here so my line will be shaped completely. The upper part of here. Like this. And this inner part of here needs a darkness to, and I prefer that here I don't create a continuous and straight line, just some lines randomly and give the rest of the shape to it with our brush. Because this part should come down in front. So I'm just going to create this darkness with my brush. Came a little too much that I will use my eraser to get the darkness out of it. But as we go to the end of the shoe, to the back of the shoe, I should create the darkness more. Just like this. Now I create a border here. I will use my brush eraser so it won't look too literary. Now, from this upper part. Meaning here, we should have a bit of darkness. That for you should work on a darkness a bit to show that this part is curved in and it has depth. And also we create some lines over here. An important point that I want to tell you why we are working on this part of the shoe. Because you're continuously spattering the powder on your work in sometimes you might lose some of the lights that you've been created for. For situations like this, you should shape your dough for research. It shouldn't be sharp at the tip and its parts that you want them to be lighter. You should use your eraser on it. Take a one layer of color from your work and you'll get the shine that light died you want. And again, you should not overdo it and over use it. Because if you use it more than you need to, it might actually have a bat result. K. That's better. Now, we'll move on to our edge eraser. And in this area that we've just created, its volume and V-shaped it. I can see some hair, so kind of hair that we can see in our model. Try not to press so much on your work. I mean, do not express your eraser so much on your work. So you can have just very small, fine and thin lines on your work. We haven't shaped this area yet in here because the photo is more zoomed and focused on this part, we are using our ectoderm because it's not that much faith in our model. It's focused. The prominence part here we created in this upper part would be like this. And of course we work on its volume to the swings which are in here are more gray and DLB in dark areas. To see. As more as you look at your work, you can find more details and you can create more details. For example, now the bottom of the shoe that I told you, you don't have to work on it. So uptight SLI and it doesn't need to be very clean shadings. We're going to work on that to create some very good textures. So I'm using my delivery sir to create some randomly takes tours. Disorder textures does, is actually our background texture. And on top of it, we will create that string like or hair-like shapes that we had. You shouldn't use your eraser too much. It shouldn't be that much that actually takes of your shadings because we still need darkness. The next step, we can work with our eraser. When I'm saying that we can use our eraser, our goal is not to make our area completely light. We just want to take a bit of our premier texture so we can show the details on this part. You should use it very gently. And for the right amount. You shouldn't use it too much. In some parts we have, you know, bigger details and structures. And sometimes we have smaller ones. If you felt like some parts are lighter than they need to be, you can shade your area a bit more, and then you'll do that again. You create the textures again. You should keep the general direction. And then you can create these textures fest. Should just pay attention to the direction of the lines. And be careful about the lines that you are creating. They shouldn't be too much parallel or too much in a special order because that would make your work look unnatural. Now from this side to the front, It's better to put the acids eraser away and use our pressure Acer because this part is kind of Fader and it needs less a strong lights. We don't need our areas, sir, to be so sharp or so clean in this area because even if the tip of the eraser, I have a bit of darkness on itself. It's better because it doesn't take that much of our coal away. And it's better for us because these parts are faded. We do not have any strong lights in here. Some parts we create lines and in some parts will just create some spots. I haven't used my deaf or race or in these parts. So I'll use my eraser here to give it a good background. Just like this. As mulch patient as you are and you spend more time on your details and textures, your outcome will be better and you'll be more satisfied with your result. We want to dark and this part a bit more. I feel like it's too much white. Generally, this white area shouldn't be seen like this. Look at your work from far away. Because when it's zoomed in, you might feel like the textures are way more than they need to be. So when you're looking to close out your work, you might think that I've created more textures that I need it to. But if you zoom back a little and look at your work from a distance, you can get a better and a general, more general look for saving your time. I'll complete the textures of here with this same process, with the same equipments, and I come back.
38. The end of the work: Okay, My dear friends, as you can see, our work is almost done here. I've cleaned around my work with my eraser. I shaped it into a pipe and try to take a big eraser so you can clean all the area. And it should get erasers should be clean itself. So it won't make any spots or stains clean all the parts around your work with your dollar Fourier, sir. And these here, these a bit redo because why we were using our eraser, they may have been affected. And it's very easy. You just need to get a small bias 0 brush maybe and create their shape. Again. If they need doing eraser, you would do that again. And I recommend you to check all your dark, darker spots and lights. At the end of your work. For example, I like my shoe to be darker than this. That I will darken it more and it's okay comparing to our model in this way, but I like it darker. I hope you enjoyed this tutorial and it was useful for you. Thank you so much and wait for our next courses.
 Homa Choopan Tayefeh, Drawing Teacher