Transcripts
1. Introduction: The chiaroscuro technique in painting, especially paintings in the style of rail and hyperreal, has became very popular among the audiences and art lovers today. Learning this beautiful technique with relatively simple and low-cost tools is possible for anyone with a little knowledge and being familiar with this sketching principles to carry screw technique is one of the best techniques to start painting principles and enter the fascinating world of visual arts due to its attractiveness and the fact that students can easily communicate with it. In this technique, the students deal with a range of gray and black colors. And from the beginning, they're not involved in coloring techniques. And this issue causes the students to focus on the lights and the shades and composition of the work. To high contrast that can be created in Kiara screws sketches using cont and cold pencils is one of the attractive features of this type of painting that doubles the beauty of the work. By learning the Chiara screw technique, the students can create beautiful works. Join us in this course to learn how to draw eyes and nose using a pencil, coal, and brush at a professional level to learn how to create a skin texture, water droplets, and the effects of traces of water on this skin. Tutorial that takes you to the level of the professionalism and chiaroscuro technique. Follow our tutorials and enjoyed attractive design and the sketches you created.
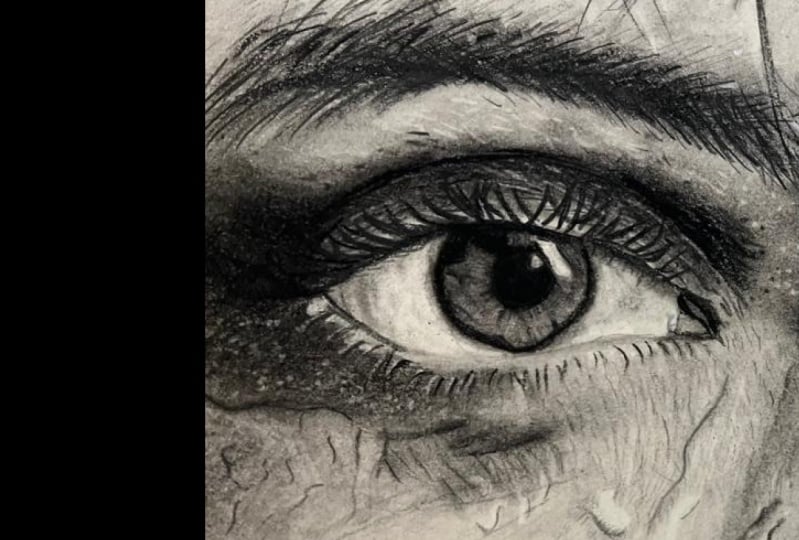
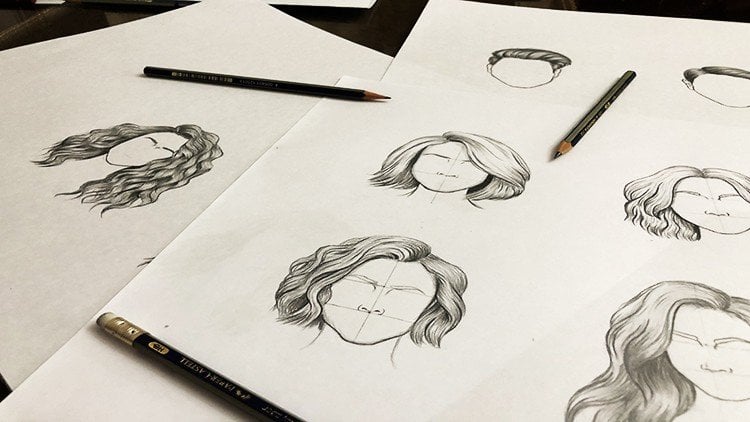
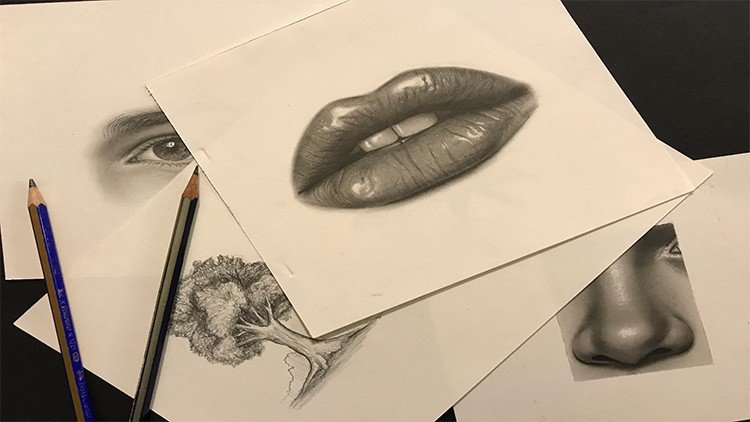
2. Drawing the right eye with a pencil: Hello to all of my dear friends and students. Might dear friends. And this stage of tutorials, we decided to choose this sketch for our work. It's a bit harder. It's a wet sketch, as you can see. And as you can see, in addition to that, you work on the eyes, on the eyebrows and other parts of the body. You can create the way that water flows and detects chairs which are here and behind the eyes. And there will be a very great result for this. And when you've learned some hints, some points in this sketch. For example, the drops of the water, the parse that water has been flown down, or the parser, which are just wet, you can easily create other's carrots similar to this one. But the first is that many wanted to create a drawing like this. You should transfer all of your details. Interior sketch, I've decided a Fabriano cardboard for this and I've transferred my sketch with all the details in it to my cardboard. Now we want to start to work on our sketching. If you have seen our previous tutorials, I always decide to start from the most center part and the most effective part of the face, which is the eye. You should definitely put a paper underneath your hand so the other parts of the workbook wouldn't get messy. And sketches that you've created should get a spattered are messy. So your work with be clean. Because the fat or oil on your hand or sometimes a sweat can actually mess up your work a bit. I'm using my soft count pencil for feeling the iris completely. I'm using the favor pencils fabric. So pencils, if you have a Paris gun, is good, but you can use a B2 or B3 for doing the same thing with Paris gone pencils. Now we want to work on the parts around the iris. I zoomed in a little so you can see the details better. Of course, before this, they've done another face tutorials that we have already explained how to create the details of the face in that previous tutorial. Plus anyway, our goal here is to create a wet face. But again, we have some explains things on the eyes, nose, eyebrows, eyelashes, and other things. It just gives the necessary explanations. So if any of you missed our previous tutorials, you get to know our methods and techniques more and better. Then we change our pencil and we go to our hard pencil. So we can create definer deta details. And we can just create them cleaner. We start from the dark part dead we've created and we just guidelines toward outside. Actually inside of the Pew hill. Of course, you can use your brushes for this too, but because the darkness of our work is too much, I've decided to use the pencil right from the beginning. There are some little lines. In the work that before, after the shadings are being applied, some of them will be gone and you won't see them. Botsman, you have a background of these lines. It would help you that after the shading you can create them again and get the shapes you want. So it has a shape like this. There is a light here, and a little above that, we have another darkness which connects through the other part. Usually around the IRS. When you want to create that. When you don't want to create a linear shape and you don't get sick border. It's necessary to guide some lines toward the outside. In this Vd because we have more darkening. We work on this barred more because it has more darkness. We say usually the lights shouldn't have been framed. But because this part has a very strong darkness, it's better to separate this part. And of course, above this slide, we should create a separation. As you can see that I'm doing here. In this part actually to eyelashes has came through. We don't work on it yet. But after that we have faded the iris and the pupil a little bit. Then we will move onto them. Safdar, we've created these lines. We start them from one line inside of the pupil. So because when we want to fade, this pupil with our brush is we'll get thicker. That's why I started a bit from insight. But before we move on to the fading, I want to show some of the other popped up lines here. In here we have some lines that we are going to create. These are some showing lines. I should first make my pencil more sharp and then get back to work. Be careful my dear friends. When you are creating the details, especially when you're working with a hard pencil. The sharpness of the tip of your pencil is very, very important even in working on the background or your subscript. It's very important for you to get a cleaner results. So always pay attention to that. And you should never let the pencil powder will be left on your work. In this part, we have so much eyelashes coming inside of the eye of it just created them in our sketch, but we did not want to work on them yet. Now we just want to create the main line, which is this one. This is the main line for the eyelid. And as I've told you before, if the darkness around the eye is sorry if the lines and darkness are not a lot around your eye. You don't have to create them with your pencil. You can use your brush to create that. But in these parts we have strong darkness. So I prefer to use my heart pencil on these parts and create them. And we've created this inside part B. We've got to work a little bit on the outer part to the line beneath the eyelashes. Now in this sketch, you can create the eyelashes more specifically. And in the very first stages, you can create the eyelashes and show them. Because actually the darkness of the eyelashes are so much and they are not really separated from our eyes. One of the elements about the wet faces is that the hair and the eyelashes and the other parts of the other parts like these, are actually stuck together. So you should show that wet, wet shape on the hair and parts like this. Now of course, in this sketch we don't have so much water on the eyelashes. We have more on the left eye and the eyebrows, but we have solid the eyelashes as well, Not drops, but you just want to show that they are wet. Try to find the sharpest parts of your pencil and create your lines. We DO sharp parts. The pencil should always rotate in your hand continuously. Don't forget that. As I told you before, we're going to determine the placements of the eyelashes. As we have created in our sketch. We're just going to darken the MLA bit, make them bold and create the shape of them. In this dark parts that the shapes are not so clear. You should try to create the thing that you can see. So don't get too picky about these, okay. Just try to create what you can see. There was one eyelash here that I've had for guiding, for getting to created on my sketch but just added it. You see, we create the eyelashes with so much mass in it. And of course, all of them will get faded and lighter during our shading phase. And again, we should create them. But it's important that now that we are shaping the whole area, generally, we show these parts as well. Of course, in this parts, we have just created the eyelashes. Now specifically because they are not really clear in our photo. These parts should be done with a very low hand pressure. The other part is a bit darker, but as it comes down, you lower your hand pressure. And I think it's kind of enough working with a pencil up to this stage. Now, you see four sketches like this, which are so dark. We need to use our pencils more to get the correct darkness that you want to. These are some dark parts over here too. In this triangle shape. Alright, up to this sage. It's enough for here, we want to work the same things on our second eye and we'll start shading the eyes.
3. Completing the iris of the right eye: Alright, for starting the shadings and fading. I start from two people from the iris and drag our brush on our pencil that they've already did. It. Don't pressure it too much. We don't press it too much on our work. We just want a thin layer of our work. And generally we should go over all the parts that we've used our pencil on it. So it can be more cohesive. It can look more cohesive. And our work, we should definitely redo our work with our pencil in next steps. But for the first step, it's enough up to this point. We also drag the brush once over our eyelashes to I'm using my size two brush, which has a used tip. So we generally go over the places that we've used our pencil on them before. And we blow up the extra powder from our work. And for the places that are a bit thinner and finer, I will use my 0 brush for these kinds of parts. It's soft brush, but the tip of it has been cut out. And it's a small size, of course. And also these upper parts that we have already determined by our pencil would go for them as well. As the same time that I'm fading these parse, I will actually allow the powder to spatter around my work. Some, sometimes in some places, you should then let the powder spread out to other places. It should just stay on the line that you've worked on it all with your pencil. But in these parts above the eye, It's okay just to spread them a bit out in, and in actually helps our work. And we actually shaped these little lines with our 0 brush. The parts that we need to be very careful about, a spattering paint and a colors. We use this a smaller brush. And we move our dark parts so slowly, so carefully. And then we move on to the other parts which have the char less peaky. We don't have to be too careful about them. These parts are a bit lighter. So it can work lighter. We can decrease our hand pressure. And once in a while, I will drag my brush on an another paper. So I will take the extra powder off it and it would be more cleaner. I'm using a bit of circulatory hand movements. So the colors will actually go into the work. We should be more careful about the lighter parts. We get less darkness from its surroundings. I have not used any coal powder up to this point, and I just used the darkness of my pencil and a powder that it has created on my work. So I could get to this color. Now, you can use your erasers. And in addition to creating more lightness, you can create some shapes in your pupil. Can easily create them like this. Very slowly and very carefully. The same time. In some places like this, we may not have too many lines, so you shouldn't create so many lines. And instead of this, you can use your brush eraser. And if you want to, can just create a lightness and create light in your work. Generally. You can also use your deaf or a surfer. This it's up to you. I decided this one. You can use another array, sir. These parts are the lines which might not be so fine and thin. Now be go back to our heart count pencil. And we add some of these darkness and lines again are even some dots which are existing here. We should go over them again to select this. Whenever you felt that there's something left out. For example, here there's a darkness in this part. The darkest spots which have spattered out here. Be careful. It's actually the details that gives your work some kind of shine. And it makes it stands out. When you pay attention to the details. The outcome of your work will be much more unique and it will pop up a lot more. We create the shape of this light on the eye. That of course, at the final steps, all we will add the lightness and lights with our electronic eraser. So don't worry about it too much right now. In some places, we can see the lightness continues into the dark and actually shaped them a little. So we do the same. All right. For this is that it's enough work on our pupil and iris layer. Come back to it. You should just guide some darkness toward outside, so make it more look like natural. But before that, we should actually give a little color to our wide part of the eye. I'm using size six brush. To do that. I start very slowly from the darkness and I try to create that globe like shape of the eyeball. Be careful, as we have said in previous courses. You should always, always and always drag the shades and darkness from the dark parts, the lighter parts in the parse that we get close to the pupil, we should be careful that it shouldn't suddenly get too dark. It should come out of the pupil little by little. And you can give these shades of the eyelashes with your brush. Just give them a color. So we can have actually the shadow of the eyelashes on our eyeball just to give them a general shape. And again, we'll start from the inner part of the eye. And we guide the eye darkness toward outside and bind the inner part of our I mean, this dark part beneath the eyelashes. And we start from the coroners and we get to the center because it's an eyeball and the corners of it should be darker. And when we get to the center of it, because it's more prominence, it needs more light and it's definitely lighter.
4. Shading the eye with brush and charcoal: Don't forget the circulatory movement of the brush. You shouldn't move your brush linearly. No sense at all. So do not forget it because we want to create some faded shades. We don't want any particular lines. We spatter to darkness as much as it needs to be. And then we will move on to working around the iris and creating delights of the eye. And we take the shadings a little bit toward upside. So it can make a great outcome. This inner side of the eye, the corner of the eye, the inner corner, which is gray. We've colored to these parts and little. So these parts have lights. First we should create the light and then later we create the shadings which exist in that light. It's not bad to give a background color to our eyelid. The very same step. If you pay attention for all of these ups and downs and textures on our eyelid. Below these lines are darker and a ball of them are a bit lighter. So that's right, that we're just creating the background color, but yet we should keep the downside of the lines darker and the upside of them a bit lighter. Just like this. We are working on a part of the skin which has so much darkness on it. Try not to leave your brush without darkness and powder. And you should give that darkness to your skin very well because in the background coloring phase, if the colored as you're applying will be less than it needs to be. In the next phases you will, you may actually face some problems. And it might be way harder for you to add that darkness to your work. Now, I'm taking a bigger brush and a bit more of my pencil powder. And I'm creating this darkness at the corner of my eye. You see for the parts which are this dark, you don't need to take away some of your pencil up either on another paper. You can direct, directly, transfer, transfer, sorry, transferred to pencil Pilar that you get into your work. Just like this, like what I did here right now. Believe fading the upper part. For next step. For now we just drive the shadings and little bit upward, not a lot. Before we finish our work, we want to create some of the lights on our pupil and iris. Sorry, I meant this white part of the eye, the eyeball. Now I'm using my electronic eraser for creating that. Let me just clean the tip of my eraser. Because we want to create sharp lights. We have to have a clean tip for our eraser. K. This should take away the powder that has been created on our work while we are using the eraser. So once in a while, we create the lights just like this. It's very easy, very good. And also the lights which are exist in this part. That of course, you can use your mono Zero pencil for creating these lights as well. I've just decided to use my electronic eraser. Again, you can see that the inner side of our eye needs to be more darkened and it doesn't have to color than it needs to have. So we add more darkness to it. Especially in these corner parts. Because as we come to the sides, it gets darker. It's the eyeball. And again, we create the shadow and a reflection of the eyelashes on our eyeball and pupil. And we can do the rest of our work with a smaller brush. So we can create the form and the shape that we want in our eye. Wherever we need to use our electronic re-associate, use it. And in general, in sketches that are showing something wet, we have to use electronic eraser a lot. And you would notice that we can do the same thing that we do with the electronic eraser, with other erasers as well. Meaning that it has a focus, that it has a concentration actually, that we can create this much light with it. And we cannot create this much light with other erasers. So in some places, it's necessary to use the electronic eraser, especially in where the sketches. And in some places we can see some veins in our eye. That then we're going to use kind of paper for it. Of course, you can use a very sharp and small, fine, fine tipped pencils for these parts. But I'm just going to teach you different ways to create your work. Even if you couldn't have some tools to not get too picky about your lights that you've created in this phase because definitely you should work on your lights over and over again more than once so you can get the color and the shape that you want. Now I'm going to work on our pupil and iris. From the sides. It should come outside a little. So we can have that faded shape around it. Gone so far and we move on to the next phase.
5. Creating a dark volume under the right eyelid: Okay, My dear friends for some parts like beneath the eye, which has a so much darkness and a special darkness. You can use darker powders, for example. The flat coal Krita color powder that you can also use them for upper darkness is two for the upper part of the eye. Because we definitely should make that part darker. But here we just take the flat coal powder direct Lee, and we just put it on our work. Just be careful. Try to control your spaces and try to stay in the right path. To not go further than unique to be. Try not to press your brush on the paper Samaj. And for getting the darkness more, you should use more powder. Because if you press your brush into your cardboard so much when you want to create the lights in these parts, you would definitely face some problems. Now, I've decided as smaller brush so I can control my darkness and I can control the exact parts which needs to be darkened. Here we have a strong darkness. But if you pay attention, and in these parts There's a linear shape that completely separated these parts from each other, so we can easily determine these lines with our pencil. In this very phase, we actually do the parts that we can with our pencil. Of course, it comes down to here. From above this line. We start and we guide the darkness toward upside to powder, a flat coal, Krita color, Crito color, flat coal. It has a very, very dark color and it doesn't give you a very grey, good color. So you should use it only in the spots that you have very strong darkness. It doesn't get so good, faded like the piped coal powder. As so we just use it when we want very, very dark parts, almost black parts, or very, very, very dark grays. So when you have a light gray, you should definitely not use this, this kind of coal. That's why it's the coal that you can only use it in some specific parts, not everywhere. Little by little, we are giving volume to these parts. As long as the darkness as a strong, you can use your pencil for creating the lines. And of course here, there is an eyelash which came down all the way down to here. In next phase we are going to complete this eyelash we just created right now. So we can have the placement of it and don't lose it. If you're going to shade. And there are some lines here that are dark enough for us to create them with our pencil. Definitely we need more pencil lines that we can create here. But for now that we are doing the background colors, we just go with these very primary lines. That would be enough. From here down the darkness is not that much anymore, so we do not use the flat call a powder anymore. And for the continuing of our work, we will use our piped coal powder and leftover darkness will be done with that. Just control the amount of powder you take with your brush. Because we don't want it too much, we don't want it too little. And we of course, drag and guide the darkness toward downside. Almost going. The cheeks. In these parts also, very slowly. And you can use your count pencil. Very limited and very slowly. Just as you can see, I did just enough not to lose these textures, you know. Then we go over it with our brush. Little by little, you spatter the darkness and you try to give color to your work. And at the same time, you should pay attention to the volume that you're creating. In this very same step. Let us complete the darkness above the eye as well. Make them a little sorry. Make them a little combined a bit and a little, make them a little stronger. For that, I'm using my flat call powder again. And pay attention. You can you're not actually supposed to work with all of the powder that you get into your work. Some of it may be extra so you can easily blow them off. Because I've seen it that sometimes some students was a take the powder directly into your work. And when they get the enough darkness and they have some extra powder left. Day will, again, one to use that powder in some ways. But you should just blow tough if you don't need it because it might not get your work darker, but you will actually fade away the layers that you've done before. We're just creating the background right now. So later we can create the lights over here. And as you can see, it's giving our work a very unique shape and color, which I love. Just like this. Who will move forward one step.
6. Continue subcutaneous texture of the right eye: For filling this lower part, we'll have our piped coal powder. As you all well know the pipe called as we're using, it's better that it's soft or extra soft coal. It would be much better for our arc, which is Create. And both these shapes in these parts a little bit. And then with a bigger brush and we'd call powder. We will shade over them a little. Not too much, just the little as you can see. Also on this side. Well, we tried to keep a very, very bad background color of the texture that is beneath and underneath this shapes. Just try to keep a trace of them. In this part we have a very strong light, but in order to shape that light, we should definitely first shape a darkness here. And it should be a medium darkness, not too much. Just to create the lights later. Also as we come down here. K, my preference is to change. My brush, gets a little bigger brush and of course, a cleaner brush. Just like this. Well, some of his sketches like this, which actually you have so much texture in your work. Well, one of its upsides is that you don't have to worry too much about the textures and the shadings. If it gets a little messy, it's okay because later you should get your work messier than this. To create some of these textures and some of the shapes that we want to. I'm just going with a bigger brush to feel all these spaces. And of course, from the corner of the phase, I start from here, top corner of my face. And I'm using my pipe coal powder. And I'm starting shading and think about the spots that I should create right now. I just want to do a general background color. And in this step, I'm trying to focus more on the volume. Always when the students think too much about the textures day, we'll forget about the volume. You should always, always remember that the priority is volume rising. Because at the end, when you don't have a volume to your phrase, as much as you work on the texture, it doesn't show anything, it doesn't look good. So your, your priority should be. Creating the volume of the face. Even after you've created the volume, you've done the textures. Again, you should work on the volumes again because usually when you create textures on your work up to some levels, the volume will be gone. So it's necessary that after everything you should work on your volumes again. Do not forget that under any circumstance, darkness in the model that we've chosen is so lot, is so much sorry. And so you can easily and freely use your pencils and your colds. You can bring so much powder into your work, you can use them for creating textures. And of course the volumes. So don't worry about it. It has a lot of darkness. You can freely use your powder. We will feel our area. So we would have the background color. And later would work on creating some spots on our skin. Some are darker, some are lighter. You see the parts that had various stronger darkness. For example, the corner of the eye and the face. They've just create them darker. And the other parts should be lighter. But even when you are creating the lighter parts, is that you should compare them to the darkness that you have a baby should, it shouldn't be too light because your whole work is dark. So pay attention to that. So up to here is enough for this step. We will move on a bit further and who will work on other steps?
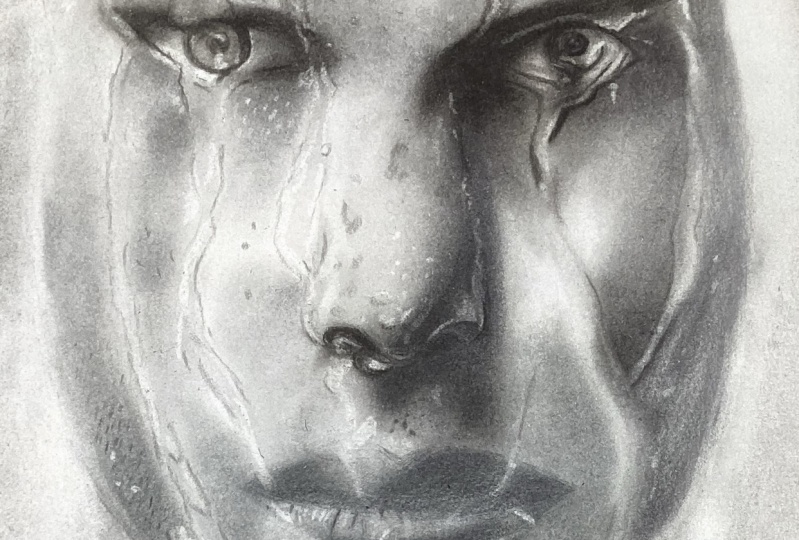
7. Creating the volume of right side of the face: All right, my dear friends, NADH, that came this far. Before we go into the texture of this part. I prefer to shade these parts next to the nose and above the eye and gets a background color for them. And then after that, we will move on to creating the textures. So the first is, as we've told you before, we should put our focus on creating the volumes. This part has more darkness. First, I'm using a medium sized brush. For example, size 8, which I'm holding right now. I just add a bit of darkness to it because the part next to the nose should be separated. And I would drain slowly. Move on these shades. Then I will use a bigger size brush. For example, I've chosen the 20 sized, but before that, it's better to bold some of these drops which are here. And as we've said before, we're going to use our fader to create the placement of these drops and just go over them one. So while we are shading, we do not lose them and their placement. So after we've created the volumes, we can come back and work on them. And of course, now that we are holding this fader, we can also work on this outer part of the here, this outer line. You see, of course we've shown some parts of it before, but we will just go over them once more to be sure we do not lose them over the shadings. K. We're just determining the parts that we've already shown in our sketching. And the next textures will be left for later. So we get our big brush again. And we need a little bit of darkness to feel all this area. You see, this area is filled, but if you pay attention, if I zoom in, there are some spots left over here. So later when you've came back and you wanted to create the textures, you can easily find them and shape them. Work on the texture continuously. You should take a little bit of your powder and put it on your work. Not so much. Be careful about that. In the parse that you have less darkness. The very important point is to add the color little by little, slowly. So that simultaneously that you are creating your volume, you can also control the amount of your darkness. Sometimes you might see that I've got the brush in a corner raise. But you should know that the correct way to do this is to hold the brush like this. Just vertical on the paper. I just hold it sometimes like that. So you see what I'm doing because I cannot change the position of my camera. So I would show the show you that way. K. Now we have determined our dark parts and this part that I've left out, if you pay attention in the model, it has so much light. But because we want to create textures in it, we are going to give it a little bit of color because we, that we cannot create textures in that much light. So it just give it a little background color, so little. And as you can see, there are parts that the water is dripping off, dripping down. We didn't give color to it. And because I want to talk about this separately and teach you separately. But the parts which we have drops of water, we have a given a color and we will work on it later. Thus far it needs more darkness. Repeating is very important in shading. You should repeat yourself as much as, you know. The whole area will be filled and it should be cohesive. And when we say cohesive, some students think that you should give all the parts one color and then you'll change it button. No. Even in the first various steps which you're doing, the background color, you should pay attention that which parts are darker, which parts are lighter, and have the appropriate amount of color in their own parts. Okay. Now, for this part, I'm having a smaller brush to create a background for it. It's important to start from here and come outside slowly. Actually drag the darkness toward outside. Very slowly. Here again, we have a big drop-off water that we have determined its place. And here we have a combination of dark textures and light textures. So we just give it a general background color. So and texturizing steps who just use our erasers and creating our darkness. Actually the color of his skin should be completed by then. Of course, these parts have two linearly ways in our darker, when it's literary, your hand is more free to shape it. There's another line over here that actually we should use our pencil on this area over here. But later, for now it's just, we want to create the background colors though it's enough to separate it like this. You will go for the details of it later. Again, I say in this sketch, this model generally has so much strong dark deserts. So we should do to shadings over and over. So we can have the tractive look that we want. And generally in Kiara screw, the models that have more darkness are more attractive. And we've forgotten to give color to this inner part of the eye. Of course, this part should be darker. It is right now, but actually I want to create this darkness with more pencil so I can create even the spots in the eyes, darker spots in the eyes. So I will work on it later with my pencil to complete it. But for now, just the background color is okay. Now we want to work on the volume for the part above the eye. You just spatter the darkness in here. The best thing in this times, when you want to create an arc or either a curve. The best thing to do is to rotate your work and at the same time rotate your model to for creating this darker shape. I tried to use a messier brush. And from here, I tried to create a volume above my islet. I would not go on this part so much because here we should have work of a pencil a bit so we can determine the areas, separate these areas. In here. There's a darker spot over here, exactly in this corner area, which is create the placement of the spot. So later we can add those very dark spots and dots with our pencil and our fader, whichever would work, both. The part beneath the eyebrow would be very well colored. And there is a light here, but again, it has a very light, light gray color and there's no way that it's white. Because I've seen some of my friends in the parts that they have very strong lights. They do not give us any color and they're afraid to shade it a little. And that will just make your work look RAW and not finished. So you should create, you should give color to all the parts. Some are very light, some are not. In Keras grew our colors are actually blank white and gray balls with different degrees. So you shouldn't lift any part, you shouldn't leave any part. White. Should just give it a very, very, very smooth and slight color. That's it. I think it's enough for the background color. And now we can work on the other parts.
8. Subcutaneous of eyebrow: In this part of our work, my dear friends, we want to work on the eyebrow a little and just give it a background color. And then we will move forward to the other parts. As you can see, I've transferred the eyebrow with all the details to my work. So when I'm actually bolding these sketches, I don't go and search or look for the hair of the eyebrow. Now we are applying these hair with our hard pencil, which are lighter. Or we are actually going to do them and apply them with a less hand pressure. Or you can use your Paris con pencil or any other brands or pencils that are less dark, less darker than this hard pencil. So whatever brand you are using, the color of them, the degree of darkness that they have is important for us. Again, I say for the lighter hair, it can use other brands or other pencils like Paris gone pencil which are lighter. Or you can just use this very hard pencil. But you should lessen your hand pressure. Now we get to this part of the hair. The lower one. Well, my pencil is not sharp enough so I just drag it on the sand or a little bit. So the tip of it would be sharp enough for me. Now, I think the sharpness of the tip of my pencil is appropriate and is enough. And we'll move on to create other parts. Well, has actually equality and option that it's completely and generally a darkest sketch and model. And that actually makes you more easier way using the pencils. Because when your work is generally so light, it's hard for you to use your pencil a lot. Events sometimes we have to create hair read our brushes because our model is too light. But here because the model is dark overall. So we can easily use our pencils on it. For now, we're just showing our hair as much as we've shown them in our primary is sketch. And then we will give it a shading, a background shading. And then again, we will work on the details on it. And this part, if you pay attention to the model, this part of the eyebrow is so busy and so dark. So you can easily add hair year and make it darker. Rotate a pencil in your hand, continuously. Find the sharp edges of your pencil and work with them. And whenever you felt that the sharpness of your pencil is not enough, you can use a cutter or a sander as I'm using to sharpen your pencil. Tip of your pencil is short. You can't use sender anymore and it's better to use a cutter. And of course, there are some sharpeners that are useful for sharpening the content cells and you can use them to. But if you don't have them in position, you can use a cutter or a sander. They would both work as well. Our model has very, very concentrated Basie and dark eyebrows. Pay attention closely, can easily see that there is a point that you should pay attention to. Because sometimes I see it happens that the students, the hair that as students are creating, depending on the area in the space they have. Their hair are so thin and so fine. But you should pay attention that when you're working in different sizes, in different scales. For example, if you're doing a kinda work like this, it's a Zoom in model. So the eyes would be bigger and the hair would be thicker. So in some places you don't have to do their hair just so thin. I just determine the placement of the hair generally. But now I'm paying more attention and do it more exact. I'm putting them in a more exact place. Again, I sharpen to typify pencil and I will continue. Okay. And in days parts, even we have some hair. I should rotate my words so I would have a very easy position and comfortable position for my hand for creating the hair. Because it's very important that the position is your hand is so comfortable, especially when you're doing the hair. I mean, it's important in all of the work, but hair is more important. I do not feel all these backgrounds completely because some of them just needs to be filled with shading. And we're just creating a general shape of our eyebrow. So then later, we can create the shadings and we can work on the details, give it more color and complete the shape of it. This upper part of the eyebrow, as you can see, have so much strong lights in places that you want to show a very strong light. Or for example, there are flexion of water or something like that. And it's a big area like here. It's better to keep that area as light as you can and keep the whiteness as much as you can. That of course, when you're doing the shading, there will be some darkness dragged into that part that you can immediately clean it with an eraser. But I mean that we do not do it on purpose. We do not color it's on purpose and we tried to keep it light. Let me measure this part a little, See how much the darkness should be dragged up and down. And yet we should feel these parts. Okay, My dear friends, I will complete the hair of the eyebrow and I come back so we can go to the next step, which is actually fading and shading the eyebrow.
9. Completing the right eyebrow and creating the right volume of the forehead and upper eyelid: Okay, My dear friends in the universe, previous step, you have seen that we've created some shapes for the eyebrows because they were so dark of if applied day harried are dark pencil and it didn't have to be. First do it fit brush and then do it with the pencil. So we just started with the pencil in distance that we want to complete the eyebrows and give it the needed shadings so we can have the correct color for our eyebrows. And of course, the wet part above the eyebrow. We take a bit of powder and we come on our pencil lines into parts which are darker and we just create that very dark shadings. And of course, depends on that we've drawn in previous. This step is very effective in darkening the parts of the eyebrow. It shows you where you should dark in your eye, Brian Moore. And on the other hand, the color of the pencil will darken your work as well. So too will help us much. To beneath parts of the eyebrows are generally darker. And as it comes toward upside are actually departs, which we can see the trace of the water. And we should actually create some of a hair, hair. Then we want to show the trace of the water too. But we're just now creating a background for it, a background shape for it. So a next step that we want to create delights for the water. We have already determined the placement of the eyebrows, the hair at the end of the eyebrow. We apply the darkness and a background to it to them. And actually it's not one where we will drag the color toward upside in these parts. You should definitely be darker, but it should. But because we know that the eyebrow has continued up to this part. But we know there is some lives. It's showing here, so we didn't work on it with our pencil. So later we can easily use our eraser to create those lights on it. There are some hair which are asked of the district of the eyebrow should do them more protective lay bit more cautious. And parts beneath our eyebrow, as you can see, is too light right now. So it needs more darkening and darkness. So we're just going to use some of the darkness that already exists in the eyebrow. And we'd drag them slowly downward. With this, you simultaneously are creating the volume of the part below the eyebrow. And you can, all, you are actually showing the eyebrow in a more realistic way. It looks more cohesive into your work. Of course, our work needs more darkness, but we just gradually give this darkness to our arc and make it darker. We cannot apply all the darkness all at once. It would be natural, it wouldn't be good. And there is a border between the drop of the water that is been here and the darkness. Try to keep that border because we shouldn't lose this difference in the colors here. Now, another thing that you can do is that there's some hair here in this upper part of the eyebrow and they are so thin and we cannot create them with our pen cell yet. We just determined the placement of them with our brush. Problem solved. You can use your 0 or toothbrush of 25 series brushes or you can use as 0 brush about our brands. Or if you have noticed that it's too hard for you to create these things with your brush. You can also use your Paris con pencil too, because it's light. And yet you can create these lines with them. Despite of the eyebrow has been stretched out more. So that's because we wanted these lines to get faded. Well, we didn't use pencil on them, but now we are just dragging them a little bit higher with our brush. I think it's enough up to this part. I'm just going to give a very little background color to this area above the eyebrow on the forehead. And just to know that in the first step, we are not going to dark in our work so much as you can see, I've used powder, but I've taken Sumatra That's out of it as a vibe brush. Our goal is mainly to create that white spot above our eyebrow. That is the result of water being there. Our goal is to create data spots. So we're just gonna give it a very light background color. And then we will later work on it again. This phase has a loss of textures data, of course, for creating them, you should put enough amount of your time for it. Okay? This part has so much lighten it. Therefore, we would not work on this part. So image we will keep it white and we'll move on to the other side. Be careful that the parts that you have so strong light, you should drag your brush on your work so it's so much cautious. So you did not take too much powder on your work. Of course, this is a model that has so much texture and we do not worry about creating a very flawless skin. But any way you should just be careful about that. So I said my goal is to give a one side of the face a background color. So we want to work on the lights and the water would be easy and comfortable for us. And then when we are done with one side of the face, we'll move on to the other side of the phase, other side of the face. And generally the forehead of our model is lighter comparing to the other parts of her face. The parts which are related to the eyelids are a bit more darker. So now that we've almost finished the eyebrows, we can complete these darkness more. This part is generally darker, and on the other hand, there are some darker spots in these two parts, but we generally are going to dark and detailed place here. Light is just a bit in this part here. And the rest are more dark. For darkening some special parts. I'm going to use my flat coal powder.
10. Creating a shiny texture on the eyelid: You should be very careful with using this powder because the darkness it gives you is so much and fading it and erasing it would be so much harder. So be careful with creating it. So I applied as a spot here for creating the textures. You should put away your fears in creating the spots. Because the students are used to create a flawless skin with a very smooth collar, no spots. But when they come to faces like this, which has so much textures, they are spirit to create some spots like this. So try to put away these fears and if you should move your hand more freely in your work and create these spots. Although these spots may not look good at very first site. And you say, Whoa, this, or just a sponsor now work. But when you're going to create further volumes and further textures, they will actually help you to make your work look way more better. So do not fear and try to create whatever spot you see in your work. Now, I am taking my heart pencil and I want to create the shape of the water that exists here. Because the shape has changed a little because of my shading. I pay so much attention for not losing the same sketch and shape I have in my model. I'd be very careful here in shaping this. Now that we are working on it. We can create the whole background of our work and then we will move on to creating the details. But for you to see how work is going to being processed and how it's going to be progress. I tried to work on a part of our textures. So the shape of our work will be more alive. And then trial and after that, we can move on to the other parts. Of course, there's no need to create all of the textures here, and then we'll move on to the next part. It's all right Just to give a warm part of it texture and making it more natural and, and live. And you feel like, hey, it's great outcome in it's beautiful. It's kind of an inspiration for you to continue your work better and you'll enjoy it more. After we've created this darkness with our pencil, I'm just fading this very line with my brush. And there is need to be need to be spattered a little to the outside and inside. You see this bar that has been left a bit wide. But if you pay attention to the model, we do not see any white parts. So it should be more of a light gray, not white. And of course, the line of the eyelid, which has lost a little bit of darkness as a result of brushing and fading and shading your colors over here. So we should go over it once more with our pencil. In the works that we have so much dark, this like this one. It's necessary to use our pencil more and have more darkness of the pencil. In your work. You shouldn't drag so much. Rush on your work and try to keep that dark pencil line in your work. Do not fade it so much. And in parts again, because we've done so much brush. We also ran it once more with our pencil, of course, until the end of your work, you should do this work again and again. So you can get a result that you want. We darken this upper area as well. Up to hear that from now on we get to a lighter area, almost lighter. We spatter the shadings. From here on it goes to the shadings of the knowns and we do not want to go to that right now. So we just completed downward. Do not go to the nose so much. Now, I want us to have in drawing a mill time with our electronic eraser. For that, you should sharpen your eraser and then we will come to our eyelid. We've created these lines and we've given this eyelid a general shape. But now we want to start and create some lights on this eyelid and shadow. And of course, the water which has been on the islet. The best eraser for this is the electronic eraser. The one that I'm using here has a very small tip, which is also like Mono Zero pencil eraser. But you can do this with normal electronic erasers as well. We're just going to make a difference here. And it would be awesome. Trust me, it looks way more better when we're done with our eraser. You should create lines, very short lines and dots. At the same time. Actually, it's the combination of these two dads is creating the texture of your work. The parts that are going to the corner of the eyelid, the end of day eyelid. We shouldn't create so much light in it because it's going to lighter part. Pay attention to your model and see how much of these lights do you have and where. Try to keep your eraser vertical on your work as much as you can. Again, I say sometimes when I didn't do this, it's because I want you to see clearly what I'm doing. When you are using the electronic eraser. You should try not to have any hand pressure. Because as these eraser lens on the cardboard, it will take away the color that you want. But if you would have and when pressure is that, the result would be that the dots or lines that you're creating with B so thick or so big. You can of course create some very smaller dots. Then I'm doing here, even if you continuously sharpen your eraser. But we are paying attention to our model and we're saying that what is our model telling us to do? We are doing exactly the same. In some parts. They are big, in some parts they are not. So that depends definitely on your model. In these parts, there are some lines that we can create them with very small electronic eraser or you can use and create them with Armana 0, your'e sir. For now we're just sharpening an eraser again. And then we will move on. And we also create the lights which are existing in these below parts. We are going to do them so carefully. You can even create some lights with your electronic eraser off. And in that case, it just plays a role of a small eraser. You can easily use it. So it's a very functional.
11. Creating light inside the right eye and around the eye: In these fights, we can definitely use some eraser and complete this shapes. If it's your first time using electronic eraser, It's better for you to work on it in some other place first. Because to electronic eraser has an option that when you put it on your work, it will move so fast on your work because of its mater. And you should just keep your eraser very tender and heart in your hand. So you should be familiar with using this eraser and how to handle it. So it's better that if you haven't used it yet. So we're on another place, you work with it a little. So you know how to handle it and how to use it. And then you will can do it on your actual work. Cane these lower parts, because we haven't done so much. Textures, we can now use our eraser so much. And it needs more darkness. Of course, the upper part needs some darkness and lines 2, but we can create some nights. For example, here we drag some shadings into this bar, which has been lighter than it should be. One of the usual conflicts among the students is that when they create a texture, they are always scared, afraid of that texture being gone and fade away. But the truth is that you may have to work on some textures over and over again. I've said it in previous tutorials too, but I'm going to say it again. Sometimes you create a texture, then you put some shadings or lights on it and you may lose that texture list of it, of course. And then you have to go over it and create those textures again. But to not look at it as redoing something, it actually makes your work more professional, more natural, and more beautiful. I'm using my Paris gun pencil for creating these lines. You can also use your hard pencil as well. No difference just using this one right now. The Darkness should be more color and more bold. There are more lines in our model that we are creating them. Also in this ending part of the eye, which is totally darker. And this upper part can be done with colored pencil. Because it has a very strong and definite darkness. This darkness will completely gave volume to this part here. Volume n dimension. And so we'll drag our brush on it just to make the darkness more cohesive with our work. We don't do it so much or read so much pressure. Slowly and smoothly. K. Now we have almost a good darkness here. To inner side of our eye is a little bit wrong and it needs more darkness to it. The darkness is as much as we can easily bring our penciling TR work. So don't worry about it. These edges are darker. And lines and dots which are in the inner side of the eye as a result of the kind of makeup and may have resulted this. Alright. And we will create the inner side of the eyes darkness like this, and we spatter it. And then we'll move to our small brush. And we create the lines that we see inside of the eye on the eyeball. And try to create these lines even if they are so dark with your brush, not with your pencil. Because it has kind of a smoothness that's even using your pencils can take that a smooth away. So try to create them with brush even if they are dark. This inner part, ship B, little bit white. These pirates of the eyeball needs more color on it for that. First we clean our brush and then we will add some color to our work. For us. That actually when we want that light bar w are creating shows itself. We have two darker this part a bit more. The light cannot be shown where there is no darkness. And with our electronic racer, recreate the light which exists here. The light switch are inside of. These are going to be created like this. In this part the separation is done, but it shouldn't be this much light, so we have a layer of shadings over it. And of course, the inner side of the eye that can be darker. There are going to create these various small veins and lines in our baking, create them with our brush. Or we can use a pay per phenol for creating them. That's, I prefer that because it's thinner and better. But I will explain it to you in another step that how to create it and how to use it.
12. Creating shiny texture right side of forehead: Okay, My dear friends there for creating and shaping this upper part. First of all, we use a small brush, for example, size two brush. So slowly. Paying attention to your model and considering your model, it give a little color into some spaces and give them a little color. We do this for the parts which have so much light. And then read our electronic eraser. Of course, we should pay attention that the area around here should have a get enough color that day needed. That here we have enough color around it. So you start from apart, then you can easily spot and consider. And you put delights in their place as for creating the area you want. It's not a very hard work because it doesn't have various special shape here. And if you misplace a little, comparing to your original model, doesn't make that much of a difference, you know, because it doesn't have a very special shape. See, if you let go of the pay per mil or you take the eraser in your hand. Not so hard to erase cell will actually walk home the cardboards itself and it slips away from your hand. So be careful about that. Now we move on to the lower parts. And because these parts will actually be fade away a little, even if you're so accurate. Sketching. You should be very careful with this in, with your eraser. In this step so you can create the shapes that you can see your eraser. One of the things that we always insist on is that you should know how to do the sketching before you start Kiara screw or any other techniques because it's very important that you all know how to sketch things. So it's not just that you can copy everything to your work because sometimes like here, the sketches that you have done, the primary a sketch will be gone during the shadings and then you should know how to sketch with you or even eraser. So first I'm going to finish this upper part and then I will move on to the lower parts. Here there are some spatter the spots next to these shapes. Now we create them. From now on, we will move on to some parts of the eyebrow itself. First, three are bad to sharpen our race in a little bit. And then we will move on with our work. You don't need to create these lines exactly one by one as you seen the Waddell in the model. But as I told you in previous tutorials and in previous episodes, that you should convert a dark bars and the light parts from your work to the model and do them in a correct way. Because we are doing a simulation here actually. You can already see that how their lives are becoming one with the work and they're becoming cohesive. And you can just slightly see that a feeling of being wet. Your drawing. Even in these lower parts. There are some stains in spots. Spots actually there are some lights that are telling us that the eyebrow is wet. Ending parts which are more dark. We do not see these lights as big drops of the water it, we just see some dots, some light dots. In addition to your electronic eraser, you can use your other erasers for completing your work. For example, the eraser for completing the work that you've done with your electronic eraser is a very, very good option. You can take the edges of your eraser work that you've done here and you can shape them. Of course, we need some dark lines between these parts to, that should be radon, actually. Some lights which are needed between the eyebrows, hair, which are actually in order to create the separation, not the wet feeling. For completing day hair, you can also use your Paris gun pencil. Our goal is more about these hair that are coming up and through this slide. Because the lower hairs are darker and you can use your hard pencil for doing them again, but these are lighter. Try to create the hair in the same direction as the lights. So day would be in their correct position because I'm just creating darkness and I don't care too much about the hairs individually. I do not care so much about the sharpness of tip of my pen. So but if you want to create individual hair, you should be careful about sharpness of your pencil. There's a very small texture on the, there is a very small texture on the forehead. Then we just create a background of it in the same direction of the hair. But later when we've completed the skin, we should work on it more. These lines that you see above the work that needs to create some hair. So don't think about that. Are shadings are not good because it's the placement and the position of the hair which has came into the face.
13. Drawing the inner corner texture of the right eye: Okay, My dear friends, in this part we want to work on the textures of DI and we want to continue them and make them more complete. First, I want to create the textures inside of these shiny parts. In these parts, in some places, if you pay attention, you can see some linearly textures. Meaning that As the same time as those dots and shines are like spots and dots. You can see very faded lines as a back shade. But you can see them anyway. In this part, we need more shading that after recreated. We can apply the light easier. So I'm gonna take my piped coal powder. Now of course, if you pay attention to the modeling this area, you can see a lot of lines and dots that it's necessary for us to create them with our pencils to you see here up to the dropout water that is here, it should be darker. Create a color. And even in this step, we can just shaped this drop of water, can give it a primary shape. The parts which are as the same as the skin color, recreate them. And just like this, our area will be filled, almost almost failed. Of course, you shouldn't forget that the continue of this line, which is here, is coming all the way down and through here. And of course there's a separation here. This is the tree, so water dripping golf. So we just apply the darkness next to it with our fader or, or our small brush and we separate. This part. Is seeing this lower part is not completely separated as linearly way. In this area actually, that light is creating the separation between these two parts. You can create a dark line here at the back of this trace. Not so much sin enough like this. In which a step that you're working on the skin, you should be careful about the textures that drops and those very main parts that are existing as so, you would not lose them because if they we ignored in your sketches, a nexus w might face so many problems. And especially with finding the placement of these things. And you may have so many conflicts and problems with them. Definitely the people and friends that are not so good in the sketching is that they should be very, very careful. In these phases here. Some sketches like this, which are, you know, a wet phase or a busy phase. You should pay so much attention to the details because it's actually these details and textures that are making your work look unique and different from other works. Of course, Sarah bit harder, but you can do this, you can pull that off. In these bars are some spots that we can create with our pencil. And the pencil which are using here. We can both use a Paris can pencil or a hard pencil. But I'm using Paris count pencil because it has a more controlled darkness. Comparing to the hard pencil. If our darkness was not that strong, that we would use our pencil on it. You can use your fader on it. Meaning that you can take a bit of your coal powder with your fader and create those darkest spots with that. But because the darkness here are almost so sharp and strong, we can easily use our pencil and bring the darkness directly into our work. And our hands cell, which is actually a functional in these types of work, is actually B8 gravity pencil, Loma graph settler, which is a pencil that generally among all the graphite pencils are more similar. Coal and cons pencils. Comparing to the other graphite pencils, it's better. Because when you use graphite pencils on your work, you cannot use your coal on it anymore. Of course, even with a pencil, when you want to use it, it's better not to use it in your work. First. Second, it's better that first you do all the things we do coal and then use your B8 graphite pencil on it. Again, we are about to use our electronic or a cell a little bit more and create these shapes. Just like this. We would create the lines that are existing here. Be careful that although your can create the lines with this eraser very easily, but sometimes some, some of my friends have problems. So for lines, you can also use your mono Zero eraser as well for creating these lines. And be careful when you are creating textures. When it got so cohesive. You can use your pencil in some places and spatter to darkness so you can have a better shape in your textures and in your contrasts.
14. Drawing drop of water and completing the texture of the inner corner of the right eye: Okay, we should shape this part with shading. So we can show this arc and K here and here. And of course, I'm going to use a bit more of my pencil. Also this part. In fact to darkness and the light that are less in our work, we're actually adding them. We are adding more lights or more darkness, darkness in the parts that were needed. In these parts, we do not work too much with our pencil. We just have a trace of it on our work. So little. So it's an impression. And a small brush. Just this much is enough. Then we will move on to our small fader. And then we put the tip of our fader in coal. And we just create these textures in our work. The textures here are mostly linear in some places. They are just like dots and spots and there not too much. Be careful not to overdo these textures here. And we need to put a little light next to these darkness in this upper part of our eye. We should also do the same thing. It's needed for us to do it. Now that we have the eraser in our hand, we can create some contrast. Be careful that at the same time as you are getting the correct direction of your skin, you should pay attention that the angles should not be all the exact same way and they should not be boring. So when you just change the angle just a little bit, It's helpful. So you would have different angles in your skin. I will rotate the eraser in my hands so I can get a clean part of the eraser. The most of these parts are dark textures. But because that, because of that, we want to have a contrast in our work and make it more natural and beautiful. It's better to add some lights next to some of them. Of course, in this ending part, we can say that our skin is just kind of fade. This part, the textures of this part has been faded. So I'm using my brush eraser that it will take less color away out of our work. And it will actually help us to create that faded look of this skin here. So this dark spot was too much, so I worked on it with my eraser. So it can have a better look on it. As I told you before in the sketches like this. And that they have different textures. We have so much textures gonna do. Not be afraid of doing the shadings because we can always add that. And it's just going to look great. Now in this part, I want to make the area lighter that now I will work with my Paris count pencil. And I will just create some of these darkness in here. In this dark part. That takes chairs need to be worked on with pencil. Because the depth of the darkness is more and the darker spots that being seeing on the skin are more. So in these part of the skins. We just need to use our pencil. This part recreate some small lines and some small dots. So we can create a texture above our eye. In this part we have some actually disordered hair. That first we need to complete the texture of here. And then we can work on the hair. In this part, which is darker. We can use our pencil more freely, but we should still be careful. We should not lose sight of our model. In general. In all of the darkest spots and all of dark areas, you can work with your pencil more easily and more freely. It's a very obvious fact that you've been learned by now. A few have been with us in previous tutorials. Now, it can create some hair that are not too bold and daring, small over here. You can just add them into your work and give it more life.
15. Start creating the linear texture under the right eye: Of course, we need to add some little parts of hair in here. They're not too big. Boas should just add them. I should sharpen my pencil and create the rest of the hair that has been left. You see in this part which has came down, there is one hair here, one or two next to it, coming this direction. And like this soul done, It's very easy. Just need to pay attention and have patients. Of course, it's needed that the darkness of the hair will be or redone again. Because we should work on them at the end of our work again. Edit some shades, fixing some of them. So we will definitely come back and check them later. Don't worry about them too much right now. See, whenever there is a line, there is a layer on our eyebrow. You can create the shapes of the lights in the darkness better. They will be shaped better. K this part can be a bit lighter. So I'm taking away the extra darkness between the hair with my brush eraser. So the shape of this eyebrow not being too busy in those parts will be done. And you can just continue these lights with your eraser. Just like this. So we've come so far so good up to this point of our work. Now, we can go to the textures beneath the eye. You've created that takes shares up to some point. We just created the general shape of them with our shadings. We just got to volume of our shading. Now it's necessary for us to get these textures more specific and just work on them individually. For this. And the first step, I'm just going to show these separations. And I'm just going to show that we're gonna do each one specifically. Be careful my friends, to darkness beneath our eyes can be more than this. That now I will do that. And you should do that in your home to, and then you should act actually add more textures onto it. But for now, I'm just going to create this line because there are so many lines in this area. So I'm just going to show their placements and positions with my eraser like this. The shape of the textures are vertical. In this part. They're not completely vertical. The Arabic croquette and A coroner, coroner wise. But the general shape is vertical. In this part, we have the continuous of the textures beneath me. I do not create them in so much order. You should reduce the distances or increase them. So it would not look very unnatural when you're completing this area. In here. We can also have another line in this way. So we can separate this part. Actually after you add the darkness next to them, you would get completely informed about how this separation worked for you. I will take a small brush because this part needs to be darker. So I'm just going to use my 0 brush and add some darkness here. We're just creating some shades next to each line, each light line actually. So we can have kind of a volume next to each light line. You should pay attention that in rail and hyperreal sketches, only lines do not work for us. We should use these lines and the contrast to make our volumes. So we do not want any Raul lines. Also in this lower areas, we should do the same. Each light line we have, we are going to create darkness on the right side of it. So it will show the wrinkles for us. So the darkness would be on the right side of the light. We're just going to create a general shape here. And then you can adjust the amount of darkness or lined in them later. First you should get the whole idea, the whole structure, and then you can work on the details. As always, we see a liner here that we create. It's kind of a drop of the water, but it's not completely shaped. So we're just gonna do the exact same thing that we're seeing in the model. The model is telling us it's like this. So we're just going to create that exactly the same. So we will use our eraser once more and we will add the light that we needed a vector here. Well, you can also add these lines with your electronic eraser, but because I want to show you the variety of tools. And if you don't have electronic eraser, what can you use instead of them? I just try to show you the usage of the use of different tools in different parts of our work. So you would know if you don't have anything or if you want to use a different tool, what can you use? In this part, we have kind of a border between edit textures of the eye and the water, but it's not so much separated, so I'm just going to give it a background color. So at the same time that we are creating the textures. Here, we will complete the lower textures as much as we can. It's just that the lower part is, as we can see now, our model is definitely brighter and lighter that we see. In these upper areas. We have some lines in this direction which are at the end of this area, which is creates a very, very small texture with our eraser here. It's very small. Just like this. In these parts, if you pay attention, is very, very little, but you can use your pencil very, very, very little. Just remember that.
16. Creating fine lines under the right eye: Okay, My dear friends in this step, we want to create more textures beneath our eyes and make it with more details and create them more carefully. We can create very strong textures with our hard pencil and the ones that are medium. You can use your carbonic pencil. And in the parse that we have very faded textures, we can use our fader or our brush to create them. Pay attention that even in areas which we have vertical textures, we have definitely some horizontal lines to the layers that are coming toward downside. They are actually lighter. So we just create some horizontal lines, lines without any hand pressure, just going to create them. And for creating the other lines, we try to use our fader or our 0 brush. The water drops which are here. We can create the darkness around them just like this. With so much cautious, you should not put any pressure on your pencil so later that you can, when you want to shade the drops, it doesn't leave any trace of our pencil around it. We can also find the spots of the position of some lines on our face. Comparing them to these drops of water. If some of the lines were misplaced a little just a little above or a little under. It's okay because we need a general shape and direction of the lines. And because this sketch is full of textures, you don't need to get each line in the exact same spot. Because here we have more darkness. We are going to use our pencil more freely. And now I prefer to work with my fader for the rest of my part. When you are using your fader. Well, there is a possibility that when you've misplaced the line, you can easily take it away with a brush and put it in the right place. So you shouldn't worry about it too much. After determining the general shape of the lines here. In this area, we will work with our erasers and we will add delights. And after that, we can create the darkness which are here. They haven't given any volume to these parts yet. Now we're just creating some lines. Because after creating the volume, you can definitely see the texture that exists here. At the same time. And we are working here. We complete these small drops over here as much as we can. So later, we will add the lights and they'll be completely shaped. From this point. On the direction of the lines is actually in the same direction of the curve on our face. So a went up. Even in some parts, we can have pencil darkness to induce. Parts at this side of our phase, have some spots that we need to put our coal and our pencil directly work. You see, if you showed a general direction. You can add the lines between them so easily and more freely. And even in some parts, create them randomly. You can create the textures very randomly. Again, I will take some of my piped coal powder with my fader, the tip of my fader. And I will create the lines in the same direction of the skin and continue them. In this part. We have more light and less dark texture. But generally, we're just creating the direction for these textures. We will add some spots and stains over here with our flat coal powder. These are actually the stains that has been created because of the makeup coming down at the side of her eye. You're using are flat coil. Some parts, it's just like dots and some parts, they're very small lines. You can easily see it in your model. Just like this. If it was linearly, we would do it with our brush. But because it's spots and dots in the first step, I prefer that we will use our fader for it. So we can have the shapes better. And then later, if needed, we can use our brush and add some more darkness in some parts. But for now I prefer the darkness will be added with our fader. I will push my fader into my cardboard in some places more than usual. So I want this darkness to get more into this sketch and more into this area. And in these parts because we have more darkness, I will take more powder. And in these parts, I would just spatter the darkness randomly. And later on, we can use our eraser, our electronic eraser to create some lights on it. In these parts that we are showing. Some parts are definitely bolder and darker and that we are creating right now. In next steps, we can use our eraser and create some spots and dots with our pencil so they will be darker and a would give us a better shape. Do not leave a, any places raw or uncolored or untouched. And just create a trace of texture everywhere you can in all the parts. All right. Now I want to use a small brush and create these shapes and complete these shapes here. And I would get more powder into my work and actually add to the darkest spots more, give them more life. If they're more natural, look like. This part should get darker more. You've seen some places. You just don't need to do the shadings in CR coloring or you should just fake them. You should use the movement of your brush and a spatter that darkness in your space that you have. The part that you have. This part is a place that needs to be darker. So that later on that we are adding lights here they are, the lights would actually show themselves. So this part generally should get darker. It just creates some shadings over here without being afraid of getting them to clean. Now we want to work on the volume of the textures that we have been creating. I'm going to use my small brush. And we'll consider the lights that they've created and will actually guide the darkness from that Bart toward the upper sides. Well, it shouldn't be all the same amount in all the parts. And parts that we have. More light. We do not, we do not have to drag this shade so much upward. We just want to spatter the shadings a little in that area and that will be enough for us. We will do this until we have the correct shape of the volumes. And on the next step, which showing the lights can actually go one step forward in creating the wet texture of our face.
17. Creating volume and exposure to the eye texture in the lower right eye: The parts that we've used pencil on them actually needs more darkness. Maybe we need some need to add some darkness in them so they would be in a better shape. Now I'm using my brush to add some over here. You pay attention in your model. In these parts we have more darkness comparing to this part. So we are allowed to spatter darkness more. But of course, after using our erasers, we should definitely check the darkness again, adding and creating more textures. I actually, generally, when you're creating textures, one step or twist step is the minimum for doing that. There are not enough. He should do that at the darkness, at the lights. Create the shapes, create the volumes in different steps. So you can get close to the texture that you wanted. So one or two sieve is never enough for creating a good texture. Always remember that. It's very important. The light parts need very little volumes and we should create some volumes in them. So do not think about it like that. It's too light and we have an alphabet. We do not have to create any lines or volumes. But you're wrong. He should create some darkness in that too. But it should be very little. You should create some lines in it with not very darkness. He pay attention. There are some lines in these directions too. Now I'm using my 0 brush that I cannot cut the tip of it, most of the tip of it. And of course, while I was working with it, most of the hair on it as being gone. Because the first of my working and just call it the tip of it. And it got even most of the half of it. But you should only cut the hair of this brush, the 0 brush. If you see my other brushes that are a bit short, it's because they've been sanded during my work. I also have a brush too. Does I will cut the tip of it and I will use it then. So do not worry about it, and you should not do it with any of your brushes. Just your 0 brush will be enough. Up to some point we have to lines in our work. Now I want to work on the lights a bit more. There is a mutual thing in all these textures that departs above the texture has been. Lightened. So if you want to even go with our model, we would create the light on the top area of our textures. We can say all the textures are similar in this, in this part. Just pay attention that how much we can create the light so we do not overdo it. Be careful. If the darkness was so much in your work that you couldn't create your lights with your eraser. You are free to use your electronic racer for that. While you're creating the lights. You should be careful about creating the textures. And actually give direction to the lights wherever you think it's needed. I'm just creating the general lines here. In this light areas. We have a lot of light lines which are not major. And I will add them in the next step. All right. Now let me use my electronic array, serve it. The light on these drops can be done very small. And finally, and also these lines which are on our texture, just like this. And the parts which are too light, it's better for us to create our lights with our electronic erasers. So we can show that a strong light that exist in that area in the parts that we are getting close to. Darker, darker parts. If you are going to use your electronic eraser, tried to keep it close to the lines that we've created above the lines that above the dark lines that we've created. Unfortunately, I cannot use my eraser in a way that you can see it while I'm working. Because if I do not take my eraser, my hand vertically, the lightest spots will be bigger than they need to be. So I will work on them and then I will take my hand away so you can see them. But you should not lose sight of your modeling this part and this step because it's very important that the light side you're creating should not be more than they are in your model. Be careful about that. As we are getting to this part. The concentration of the lights are getting more and more. And as we get to these vertical lines, there are some textures that look like they're at the end of here. In these parts, which is create some dots. And the rest of them will be done with our eraser because we don't want, not want to have extra light. But anyway, this side has more light and we are more free to use our electronic eraser. I should sharpened tip of eraser, make it cleaner at the same time. Enough. We will move on for creating the rest of our texture. You should not put any pressure on your work. So the textures that you are creating would be very thin and fine. There's some dark, sorry, lightest spots in these areas in our model. If you pay enough attention to that, one of them is nearly here. The other one would be here. And here.
18. Learn to create fine linear textures under the eyes and drawing the right eyelashes: And between these darker spots that we've already created, we have some light dots. Also here. Now that we are holding our electronic reserve that does create all the necessary a strong light spots that we have here. In this beneath part of the lower eyelid. We have so much lighter spots that we're seeing. We can add some lines with our mono eraser. And it's better to create some dots and spots with our electronic eraser. These are our eyelashes. But anyway, we can do two spots to the light switch our existing here. Now. We need some white, sorry, light lines in here that we are going to create them with Armana 0 or Acer. They have the general shape of our texture right now we just need to make them more visa and concentrated. You see some, some of the students will be scared of these kind of textures, but did not. Because each concentrated textures that you have, you should start from the general shapes and then you should move on to details. First you should create the volume, then you should create the big textures. And then at the last, you can actually add at this little textures to the big ones. If you have done the big textures correctly, the details and the little textures with actually come to your work very easily and very good. And there will be well shaped. In this area. It's just in one color. So in some places we need to get some of the darkness of and the best thing for doing that is our brush or a CR. That without even getting so much darkness from our work. It can shape this area. Now because we want to complete the shape of our eye. Let me create the eyelashes. And I can see in my work, for example, one of them is this long eyelash, which exists here. Which of course it's not so visible in our picture, in our model, but reduced. Create what we can see. The darkness of this line should be added to. And you can see the eyelashes coming from here. Of course, you've paid attention that when the face will get wet, the eyelashes, we'll stick together. And they will, in some places, you can not see any eyelashes. And in some other parts, you can see some eyelashes stuck together. And of course, in faces and sketches like that, actually. Realizing where the eyelashes are a bit hard. But we're doing the best we can. As much as we can see. K in this area. I did not see so much. Maybe it's more the beginning part of the eyelashes being seen and there is solid, cannot be seen so much. So we can see eyelashes here too. We do know sketched out of the reality, we do not go. So why learn it? Should pay attention to our model? And it's, I think it's good to work on this upper eyelashes as well because they got a bit pale. And we need to work on the more again. In this area, the eyelashes has been completely went into the dark and they do not show themselves K in here because it's not so clear. They did not work on it too much, just determines some eyelashes. So we can have the difference between the eyelashes and the areas next to them. And as I told you before, we need to work on it with our eta, the eraser too, I mean, or Candace area. In these bars that the light is not that a strong. I'm going to use my eraser and my brush. I'm sorry, sir. Of course, we should work on these parts. And the next is set with our electronic eraser because the lights here are too much. It should be done in next step. Now, right now, we'll just add a bit of texture here. We their editor Acer. These parts, as I said before, there are some lights at the end of this line. So at the same time that we are creating the horizontal lines will continue this vertical lines. We'll cut the tip of my eraser, little like this. So it would be clean. And I will continue this corner. Raise lines. Okay. Now, if you pay attention, you can see that in some parts we have less darkness in our work. In these parts, you can use your fader and you can add some darkness into them. Or another thing that can help you in this kind of situations is actually the is paper cone that I will later make it for you and will tell you that where and when you can use it. In these far side, we've created some corner raise lines. We can also give volume to these lines here. Actually these lines should be in a very fine line, but they should be cut in some parts. We can use our pencil in some perceptive created these textures so we can get a better shape out of it. Now as you know, parts just in some of them. You see, sometimes you will face these kind of textures that when you look at them on an angle, they can be seen horizontal and an another angle they can, they can be seen vertical. So in these situations, you should create the first texture, texture that you can see and
19. Completing eyelashes and fine textures of the right eye: We've created the horizontal textures, and now we are creating these vertical and coronaries textures on top of it. And this part, they should be more corner rates. We're actually creating the difference in direction of the lights at the same time. In this lower part, we create more darker spots. You should be careful about the textures that they shouldn't get. One. They shouldn't get identical, and they should have differences. So be careful about that. It's very important. Actually we picked this model so we can teach you how to create a wet faces and wet textures. But at the same time you are learning how to create different textures. And I think it's a very good model because we have different things to teach you on this. And of course, it's very okay for advanced the students. We come back to these light textures. We just add some lights in some parts so we can have the separation between the areas. You see. This area is actually being shaped very well. Now I'm going to use a little bit of lines with my fader in this part, just not to leave them untouched and draw. For example, in here, the lines are coming to the right side. The important point is for this area to get concentrated with textures. Yet The directions are important in the right direction. You just need have to, you just need to have enough patients for creating even the hardest textures. So it's just about the time. And your patients, you see when you're creating textures. And actually some students might get so easily and so soon disappointed. And they will get tired because they don't get the results in a short time. Day will get tired and disappointed and they will say, I cannot do this. But with patients and with so much work. Even if you have messed up a texture, you can always edited and fix it and make it better. In creating textures you are using different tools, faders and brushes, erasers and so on. So a day don't need a very neat background, meaning that if you have actually or accidentally create a spot on your work and you think they are, texture will be ruined. You shouldn't think like that because you can always edit it and make the work as you want. You just need to have enough patients and enough attention for working on the textures. Do not give up easily. We're going to use our pencil over here. So these spots will get enough. Darkest stains. Shouldn't get too picky about that. Putting each dot NIH spots on the very exact same place as you seen your model. Because sometimes it's not even possible. These parts have light, but they're faded. So we're going to use our brush eraser to create parts like this. Pay attention that you should first create some spots with your fader and your brush, and then you should use your pencil on top of them. Those can help your work very, very much. But if you use your pencil first, again, you should fade it. And then again you should use the pencil is actually an extra work that you don't need to do that. So first use the fader and the Bosch, and then later you can use your pencil on them. In these parts. If we add some pencil into these darkness, we use some pencil on these dark parts. It will be very attractive and very great. And nothing like a pencil can give life to this kind of darkness, making them look more natural. K, this hard work is almost done. We can work on it even more and we can create more volume, create more textures. And you should definitely do that. But out of the time of this video, because I want to save time for you. So you can work on this more and more. It will get better. So now I'm going to move on for doing other parts to as much time as you put, it will get better texture.
20. Completing the texture created in the previous step by adding darkness: Okay, My dear friends. One of the other tools that we can work on here on these textures, and it can help you a lot. Is The Loma graph is settler 10. So it's very important that it should be eight. And they have different kind that it's better for it to be coal. It has to kind of B8. It's coal or its graph it, for our work, It's better to be coal digraph at ones have actually more shiny tip. And the coal lungs are not damaged, shiny. And it's better for us to use the coal ones. If you want to use a carbonic pencil on the parts that you want to use. A pencil. You can use your llama graph, B8 Staedtler pencil. So it's for the part that you want to use pen. So by you don't want to go too dark. You can work on it. And actually you can use it and work on each line that you've created, can create the borders for them. In some parts the directions are vertical and in some others we have different directions. So I'm going to show them to you up to a point. And you would do the rest of that and you would complete it. So generally for creating this texture, if you want to have a review. First, we've used the 0 brush that we have cut the tip of it. For the dark parts, I will use a hard pencil for the parts which are dark but not too much. I'm going to use I actually used the B2 or B3 carbonic parties can't pencil. There are different you see they're different from black. Paris count pencils. The carbonic pencils have less darkness than the usual Pencils of carbonic, sorry, of Paris. And another one that I'm using on top of it is actually dead Lama graph b a to Staedtler pencil. And you should use this kind of pencil. I D actually last steps, meaning that you have used all the tools that you have. And at the last steps that you have, you would use your Loma graph is Staedtler pencil. The very last steps. As you can see, the lines that we are creating with this pencil are actually finer and lighter. And then the lines that we've created with other pencils. So that's why we use it at last. You want to create very small details and they're not too bold. So we use this kind of pencil in these parts. Just want to create some random lines. Try not to create very strict lines. Of course, these lower areas has not been completed yet and we should work on the more. And not going to work on this part with my llama graph pencil yet. First I should complete the textures over here and then I should work on it with my llama graph pencil. We've created some shadings over here for this five, which is actually the trace of water dropping down, the amount of darkness and shadings are less than a shit bay. But for not losing the lights, I'm just going to use my eraser on it. Even in this part. You should give color to these parts. But always for the parts that are so light that they're so close to white color. You should pay attention that you should use your eraser on that part. Several times, even when you're doing the background colors. And you should keep the light on it. When you don't use your eraser. The shadings will come on top of each other and it would be very, very hard to create the light that you want on it later. The continuous of this slide. Here is actually a drop here. We created with our eraser. Okay? Now we will use a medium size or small size brush. It's better to use the small one here. It's better to use a number. Toothbrush or 0 brush. We're going to take the coal powder. We start from here to create the shadings. This part has actually a darker shade. In these parts. We have lighter parts. They do not get this border part darker, but there are some darker spots. They're not completely dark. You have just some spots in here. You will add some darkness to it. I've used some shadings in here. So I'm just adding some more color on it. And adding the shadings that needs to be here. If you pay attention. This area has a border in our model. Despite of other areas that we'll say we shouldn't have any border in our work. Here. We should have a border that comes from the left side and it gets actually faded to the right side. Actually, this part should be darker than the rest of our skin.
21. Creating the subcutaneous of drops of running water on the right side of the face: This contrast and difference in the colors and the shadings. And actually we'll make the volume for us. It will show the prominent spot on the volume of this water dripping of our phase. And the light is actually be different on it. And it actually creates some textures for us. Pay attention that in creating the water texture to drop off the water or something like this, that is a trace of water dripping down the phase for showing the materials of the water. And the most important thing is to create a correct lights. The reflection that the light half at that the light has will actually help you the most in creating the texture of the water. You can say some tutorials for just creating two drops of water. But it's very good, but you cannot use it everywhere. For example, here we have a trace of water coming down from the face. And for year you can now use drops here. You should just pay attention to the model that you have and get the lights correct, correctly. So you would have to correct texture and a current volume for it. If you pay attention. This side of the face as actually a border line between the water and the skin, which we are creating it with. Our brush, will bring the darkness to our work as much as possible. And after, we've used our eraser for creating the texture, if it felt that we need more darkness, we will add them later. We don't want to go too dark. Depart like here, which the water is actually better than the face. You can see the contrast is becoming less. Here is darker. Even you can create the borders with your fader and your 0 brush. You can come over them ones. So this border will show itself and we created completely, right? I think it got too much. So it'll take a bit of it. Considering that this part of the phase has so much textures. Getting the extra darkness of your work will be so easy and it actually helps you in creating the textures. This, even in this part, the extra darkness that I added actually helped me and I created some kind of texture here. I should create and the rest of the parts that I'm creating. You should continue to darkness up to these lighter parts. So the shine of the water will show itself. Just like this, we will darken this area more and more so we can get the color that we want. Okay? And Okay, now I want to use my small brush to get this borders more bold and work on them a little bit more. Make them show themselves more. You can also use your fader for this already set. You see that line that you create. From the inside, it should be completely faded. But when, uh, when he wants to come to the outside, it can create a border just like the one that I'm creating right now. Even in this part, we can create a border. It should be very slight. Don't overdo it. Be careful about that. Now, for this upper part because we want to show the lights more precisely, we should dark in this area just a bit more. So when we add the linings, they will show themselves. Very good way. In here we have the border. For now we haven't used are erasers for our work, except the one that we used for creating that middle line. But in next step, after we've created the volume of this part of the water, we will definitely use more eraser on our work and it will be more Good for you to notice. I just zoomed out a little so you can see more general look. No overview of our work here. Of course, we can create this later. There are some of the textures. But now in this step, I want to use my electronic eraser ones and create some lights here. We'll move on to our work and from this very top side with cert and use our eraser on it. In here. We denote have very strong lights. It's just the little over here. And in here, our life has a thickness. Here. It went up that the enter part of it should be darker. And it came down. And in this part, again, I say it's been thicker. And if you pay attention in some parts, it has some arc and curves. So I will add some curves into my light with my electronic eraser so it can get closer to the thing that we see on our model.
22. Completing running water drops and water gender: Okay. This is up to here, and here we need a little bit more darkness. All right? If you pay attention in this area, you can see dots in your model that we want to create some of them with our brush eraser. Because actually these dots in the spots a Domino's have is very special and a specific shape in some parts there are dots in some other parts there are little lines. So I'm just going to use my brush eraser and just give it a shape. And wherever I felt like it's a more clear for me to see, it has more specific shape. I will work on it with my mono 0 racer. There's something that I should tell you again here. My friends. And the size of our work is a medium size. Some of my friends like to create big sizes and large sizes for their works. If you want to create the same sketch in a bigger size, you would have to create different textures, actually, not different textures. You will have to do the textures differently. And it's actually easier for creating the textures in a bigger size. You can add more details when you're working in a bigger size. And of course they would take more of your time, but it will be easier for you. So both of the words, even small sizes, bigger sizes, they all have their ups and downs. There are hard things to do, but there are both enjoyable. I'm doing this without putting any pressure on my pencil. Be careful about that. We do not want any hand pressure, do not want any bold lines. Here. We needed a bit more darkness and the shadings next to it are a bit lighter. So I'm going to use my eraser again for lightening these parts so the dark, this would show itself. On the other hand, we have said that the textures are not very visible here because they got combined with the water that is coming down from the face. They got mixed. So in here they have a little bit of prominence. Next. So this water and we will work on it a bit more specific. As you've noticed, I've changed my eraser. I'm using my eraser for getting better detail z over here. We will create the lights that we can see now our model in this area. And there is a line here behind the water and it actually showed the border of the water. Are area's been shaped up to level, but definitely it has so much work to do to get to the point that we wanted to be. Now for almost completing this part, I'm going to use my fader to work on the edges a little. So the texture of the skin will be more complete. And in addition to the light parts, we will have the dark parts as well. Also in these parts. Next to this slide, even if you pay attention in your model, you can see a little bit of darkness. It looks like a border. It's not completely order. Even you can show the separation of these parts with your fader. Now we've gotten the shape of this up to some levels. Non-compliant labor, it's good. And in next to. So we want to work on the rest of the textures on our face. Now I'm going to place some darker spots over here. So a Nexus though, we will add some lights in their research so we can get the correct shape of it. So just like the upper part, I prefer to create saints and spots in this lower part as well, just like the same way we did on the upper part. And because a darkness here is very strong, I'm actually creating these lines and spots with my flat coal powder. My friends, you should not be afraid of creating this Watson stains here. Because your model is actually screaming that I should have a spot and stay here. So you should feel free to create some spots over here. First you should place the baker spots. And then we'll move on to the smaller dark parts on our face. And there are some big dots here. Then I'm going to use my fader to create them. When you have created general shape of that spot and stain, you should go over it with your brush so it will get a spattered up to some point into that area. Again, I'm going to use a bit of my flat gold powder and spatter it all over this part. And then to continue with that, though, I want to darken this part here. I'm going to use my piped coal powder so I can get more gray color out of it. It's better to take a bigger brush because it's big area. And we should darken this area up to the drop that we've created here, and we should give it color. In here the darkness is adequate and it's enough. I think. You should always compare your work to the model. See if you have enough darkness or not, especially in parts like this. Okay, My friends, you should add the spot Santa say's do this part and we will move on to the next ACIP and create the textures.
23. Learn how to make a paper funnel and use it to create textures: Okay, My dear friends, as I told you before, you can use a paper for creating paper cone. So you can create the textures that we have here. So I'm using a paper here. You can use a newspaper actually, from this very straight line, straight side of the paper. We will make it like a cone. Just like an ice-cream cone. It's very simple and easy. From the, again, I say from this trait side of it, you'll see the tip of our cone should be completely sharp for that. You see this inner layer inside of it. There's a very smaller inner layer. We will take it and we will pull it out now completely. But as much as we can. If you pay attention to the tip, you see the tip is completely sharp now. Now we will take a tape and we will fix this. But before fixing again, I will pull the inside layer once more. So it will get as sharp as I can and now I will fix it. With this. You've actually created a kind of a fader for yourself. And the tip of it is very sharp, is correct that you will sharpen the tip of your fader, reduce sanding, but it might not get as sharp as this is. Now. After you've done that, you can put a pencil or brush in it so you can hold it easier. Now we'll complete some textures with the two lead we've created ourselves. So you can see how you can use it and where you can use it. And you can see how this simple tool can help you to create very fine textures. I have put the tip of it and my powder, and I will take the extra of it on another paper. And I will start from the parts which are darker. So if there is extra darkness on the tip of it, it will be taken off. In fact, this tool is working for use as similar as a very light pencil. It's not too dark. And the only important thing here is that you should not have any hand pressure on your work when you're using this. Because when you don't have any hand pressure on it, the lines would be finer, thinner, better, and it will work for you more because if you put pressure on your work or you will use it several times, the tip of the paper will actually fade away and it, it lose its sharp dense. So if you lower your hand pressure, you can use it more times and in better ways. You will add the lines and dots and anything you've seen this area. You can definitely add the darkness in our light area with this tool. It's very simple, but you can work on, you can work with it a lot. In this step, you should let your hand move more freely. Just be careful about the amount of darkness that you bring to your work. So it wouldn't be more than normal and more than we need in the areas that we need to darkness. For now, delight in here is actually in one color and we need more darkness, more shaped darkness over here. Let me zoom in for you so you can have a better look. The texture of our model that we've picked up is very, very concentrated textures because we're actually showing both actually both the skin texture and the water texture. And even there is the texture of makeup on our face. So the textures are so concentrate it. So when you have makeup on your skin, for example, like I shadings and eye shadows. If your eyes wrinkly or you have any other textures, it will show them more. So we're actually creating a combination of three different textures in here. That's why it's so busy, yet so beautiful. Generally we try to add to those spots which we can see on our face. And the lines that we have in our, in this area. At the end of our work, we might use a little of our white pen to create some of these lights so we can have more shine in our area. But for now, we prefer to work with our cond and cones, pencils and Coles and erasers. We create the textures. And then at the end, we might use a little of our white pen for very, very strong lights and to give it a very strong shine. So we can have the textures completely done and then we will add the light to it. You can see how much this tool can be useful for us. Because the lines that it's creating our very, very small and very thin and fine. And they are less dark, then the lines that are pencil will give us. So for example, you want to create the texture on these parts and these below parts. You can use this tool for creating textures over here. First, we are creating general directions. So we can see the textures are going in which direction and how they are shaped. The parts which are darker, we're going to take our column to it with more powder on the tip of it. And in here we have very strong darkness that's will be connected to these darker spots here you see the part that we've already created. If you look at your model, you can see very, very small but allows moves are his spots and dots. And all around the face. The tip of the cone has lost a little bit of its sharpness. But because of these dots and spots are a bit bigger, it doesn't make us any problems. In fact, in the picture that we've chosen. And there are different things that are showing the textures more. One of them is that this I is kind of wrinkly. And it has so much ups and downs beneath her eyes. And it's very clear photo. The second one is that the presence of the makeup in this picture, which has actually made the texture of hair, skin more clear. And the third factor is actually the skin being wit.
24. Continue creating the right cheek and lip texture: My friends about this paper cone, I should insist on it a little because some of my friends might actually be mistaken here. Depends on that we put a nasal or anything that we put in. It is actually just a better way for you to hold it. It should be a long pencil that will help you hold your cone in a better way and you can work with it easier. We can see the dark texture here. And as it gets at the tip of the cone gets a bit dirty. And vg on to work on the light parts, we should clean it up or we should change it and use another cone. Now I'm going to use my brush for creating some spots over here. And for now we just need to create more stains in our work. And now I'm going to use my fader from making these dots bigger. Because it does that. The code has given us as less darkness. So I'm just going to make them more bold, more darker and more bigger with our fader. Just gonna go over them one layer with our fader. And at last, I think we can use our hard pencil in some spots for getting the correct amount of darkness that we have in our work and unimodal very lightly. Of course, it is. Area in our model is a bit more gray. Before we create a takes. Sure, I think it's better to make this part more gray. Of course, Fair Work on this lower part and dark and debt that the upper part so much. And as I said, I'm going to use my heart count pencil for even darkening some of these spots more. Let's see. It's very important that you would add these darkness is layer by layer. So, uh, you would keep some parts lighter and gets some other parts much darker. But again, you should not forget that through the end of your work, you should work on your lights and your darkness. And to end of the work, you should definitely add more darkness. Right now. The upper parts of the eye needs more darkness. Because we would have to keep in mind when we are teaching you this. Well, I have to work on the sketching. And I will tell you if I cannot put it in the video and I will work on it later, I would definitely tell you what, what have I done and what you should do. But again, I say, do not forget that. All through your work. And up to the very last point, you might have to work on the darkness and the lights more. I'm going to create some lights over here. This slide is actually creating the necessary separation in this area. The water reaches here is actually at the end of these drops that we have here. So we'll create delight in the same tray. And they have different directions over here. In here, if you pay attention in your model, we have the lines in two different directions, so we try to do the same. Even in creating the lights should have some kind of variety and have different directions. Again, you can easily spot that with looking at your model carefully. Even in this area. We are seeing the lights in two different directions. And in this area we need some more light. But comparing to the opposite side, it's less. So lightly recreate as skin texture. And we'll connect it to this part. At the side of the face. The lines are coming this way and in the lower part, the corner raise lines are actually going down into the left butt. When it's up, it's going to the right. And we will use our eraser between these darker spots. So we can have the difference and the contrast in our work. We don't know what any white parts. We just want lights and dark. We're going to use a little bit of our electronic eraser in some parts who are going to make some lights which are more stronger. Now it's more useful in this slider area. I'm just going to drag it in this area and move it randomly and creates some lights because they don't have very special shape. And order. Of course, when I say it's random, It's not that it's not that March, we should pay attention to our model and see the area that needs the lies. And then we will work with our eraser on that part. Okay. I think this part of our work needs more darkness, although we have dark and that before, but I think it needs more and it should be more gray. This will actually help us to get one layer of these textures in our work. And we have the correct color. The color that we need.
25. Completing light and dark textures of cheek : Always remember to blow off the extra powder out your work. You should pay attention, my friends, that in these kinds of areas which have a gray color, we always use a pipe coal powder. Of course, up to this level, you've already recognize that in which parts we use, which coal or flat. But I sometimes just say it again and review it. So you could definitely remember it. Okay. Now the darkness is almost up to the level that we wanted. And actually there's a layer of texture beneath it. We will walk on the strong glides again, so we would not lose them. And as I told you before, in these kinds of textures, you should work on them over and over and over again. So you would get the result that you want. I'm going to use a fader or my 0 Raj. So in addition to adding delights, will create the darkness of these lines. Simultaneously. I told you before. You can use a paper cone for creating some parts of the textures. So you can cover these grounds and create a darker spots that you want. I'm going to create the lines more freely so it can look a bit messy. And I could have my darkest spots. These parts of complete darker spots, dark stains. On the other hand, the continuous part of these lines are actually showing the textures of the skin. I'm not saying they're completely parallel, but they look like it. And be careful when creating new textures. The connection between the textures are very important too, that you should be in the right direction and they should connect to each other correctly. And as we've always said, we do not want any separated borders. For example, in these parts, this drop of water reaches here is going to determine it. In these parts. And some places we have more darkness that the curved texture of the skin is been shown more in these parts. So we will add a bit of hand pressure for creating those curves into the skin. And then after we will create other lines around it without the hand pressure. So no place for left untouched. The inside part of these drop, which is here, has some kind of stains to and I can see some lines coming this direction. And also next to these lights of the water, we need some darkness so it can separate it from the area around it. And of course, the amount of light in this area is not too much. And the drop of the water should seem so small. And there's another part from this water which has been dripping on the face. I can see a shape like this in my work. So we can add some light in it. But because it's so finance small, it might not show that much in the photo, but everything we see, we tried to create it. And these parts needs a little bit of darkness. With our paper cone, we're just going to shape the darkness around. This is our light areas. So it's better to work with your cone. K R code is getting ruined. So I'm just going to work with it and this part and then I will change it. In these parts, we do not need a strong darkness in too much darkness. But some parts of these gray color needs to be shaped in some places, both on the skin and on the part in here in the water. As more time as you spend on it and look at your modelling created textures definitely would get better textures. There are some lines which have bigger textures and they have more curved parts, which have actually more depth. I try to show them in darker lines. Alright, up to this point, we have done a part of our work. I'm going to add to the darkness of these areas a bit more about this stretches. We've covered all of the stretchers up to this point, the streets of the skin. And I'm just going to create some lights over here. And they shouldn't be so much concentrated. They shouldn't be all in one place or all in one direction. You should just create these lights in different directions, in different parts so it would look more natural. You can work on, is, can still work on this textures more. And you can create more shapes and more volumes in it. But I'll just leave it to yourself. And because it's the repetition of the same textures and there is nothing new about it. You should just repeat this and create the texture and shape it. So I will complete this takes Sure, and I will come back for you. So in the next step, we will work on a new part of our model and work on it. And you should do to complete this part and where ever, you feel like you need to create a state Zen spot with pencil. Do it for example. Like these parts in here you can, if you pay attention, you can see very small dots. Complete all of these part and we will come back.
26. Creating the texture of the inner part of the right cheek with the eraser: Okay, My dear friends, the textures of this part needs more work because we need to add more lines and add lights into that. And of course we will work on it with our white pen later. Not now, but for making the whole area get a good shape. I've decided to before completing this part, I would move on to the other parts that little too. They've completing that part for our next steps so we can get to the nose sooner. As you can see, the color of this area is adequate. It's good, but it needs to be more completed. L would take string. I've decided to first put the darkness that I want, just a layer of them with my fader. And so slowly and finally, the dots which are bigger, we will create them with more hand pressure so they can be seen more. And the ones which are smaller or lighter, we'll create them with a lower hand pressure. Pay attention to the directions that you can see in your picture. Of course, you should pay attention to the difference in variety of directions, of course, meaning that all the lines that you create should not be in one direction. They should have a lot of variety. So I just cleaned bit of my tube of my fader because this is a bit different from the figure that I used before. And it will create stronger darkness. And it's necessary for putting each dot on each line in their exact position and spot. It should just get them accurate enough and you know where to put lights were to put darkness. Wonder why you are keeping the volume. You can create very good textures. For now. I'm putting Lincoln's, my focus on dark dots and spots. There are some small lines in this direction in here which actually continue to the lower parts. Depending to the direction of the scans, a stretch. These textures are being made. And of course, the face being read is also affecting our textures. To be seen more. Maybe in a natural circumstance that the skin is dry. The textures of the face and skin would not be seeing this much as you can see right now. But when the skin is wet or it's oily, the textures will actually show much more than usual. In the parts which are lighter, we will create the lines, but a lower concentration. And it will just create a background for our textures. The primary background for our textures. This tutorial may take lots of your time. But I try to work the textures in the video, not out of the tutorial. So you can see for creating these kinds of textures, you would have to spend so much time on it. Because you cannot take, actually have some kind of these textures in like five minutes or so. It may take over four hours for you to create the textures. And of course it will be even more for you. But you should not take any limitations about the time for yourself. If you want to learn the textures and apply them very well, you should definitely spend a lot of time on it. That's the key to a very successful outcome. We can say that this part is almost done. Now we want to work on these upper parts a little bit more. And they've created a general shape here. In this part, we place the stains. Don't get too much to the parts which are next to the nose. Because after doing the shadings and working with our brushes on them, we should again come back and work on its texture here. You see, we consider a general direction here, but it doesn't mean that some of the lines would not go out of that general direction. In some places, we even create some lines in the opposite direction because the textures have meeting points and connections. It's not like that. We just create some parallel lines and boom, we got the skin texture. It's not like that. We will have some different directions that they would more, they would look more natural and they just look all the same. Of course, this is the primary background and after you added the lights, you should work on this part more. These parts have more light, so we do not pay, spent so much time on the darkness. Well, I'll just get it out of that untouched Look and being white. And then we'll, we'll, we're going to use our electronic eraser. I'm going to sharpen it very good. And then we will use it after the tip of it. It's sharp enough. Analysts start from this side for creating the light texture. And of course, we do not need to use our electronic eraser in all places. In some places the lights are linearly so you can use your editor, sorry, sir, or your mono eraser as well. Now in this part where we have strong lights, I just want to create them with this electronic eraser. You see the variety that I told you that you should have with the darker spots and then lines, you should have the same variety when you are using your erasers to meaning dilution, create a all the same lines in one spot. They're all shaped. Know, we can different we can create different lines and dots. We just try to keep it in the area and do not get so far from it. That will be enough. Also, we can create most of them like dots. And then with our mono 0 array survey can just create, actually connect these dots together and create a line.
27. Continue to create the texture of the inner part of the right cheek with an electric eraser, pencil : You see even the lights as much, little as they are, are actually shaping our textures right now. As we come to these darkness, we will actually lower the concentration and the amount of these lights. My eraser lost its sharpness. So I'm going to sharpen and again with my sanding. And then again, I'll come back to my work. Now we're going to work. And some of these lines, again, if you're a tronic eraser is not this sharp and this is small. You can work with usual eraser too. But if you're working with them, if you're working with usual electronic research, it's necessary for you to sharpen the tip of your eraser more often. And these are stains which are caused by the drops of the water just came through here. And these dots which are here in this dark spot. If you pay attention the model, you can see a little light. And it's not like that. We say there's not any lights in this area. We will continue with these parts. Will just complete the lightings here. Okay. Now we will move on to our next eraser. First, I'm just going to clean this area. So I will take the things that I've created with my eraser. Now I'm just going to create some texture in here with my brush eraser, as I told you before, when you are creating the textures, either it's wet, it's wrinkly or whatever is skin that has texture like this. It doesn't matter. You should have different types of erasers in your hand and you should just constantly use them, change them, so you can get the result that you want. Now, I'm going to work on this place with my brush eraser. And I think this part can be darker in my opinion. So I'm going to use my fader and create some darker lines in this part so I can have a generally darker texture in here. Now in some places, I will spatter these dark lines next to my erasers, next to my light lines. And we should of course use our other is already searched to right. Before I use my eraser, I should tell you one more thing. That in here you can work with your pencil in here. Your Llama graph, a settler be a HB pencil on the parts which are a bit darker. And pay attention that these lines that we are creating with this pencil will not get faded too much. So use it in the places that you think really needs. This should be very careful using that. Now this, I've just created this inner side of the nose and the darkness which exists here. And I want to show them more. So you can see the drops of water better. And of course, showing the light's better. And whenever, wherever we felt like our area needs more lights, we can add these lines to them. That was why I have not used my integer Acer yet. And first I started checking to darkness. Just like this. You can shape your area little by little. Now in here, because it's a bit curved inside because of the nose. There's a kind of a shadow here so we can add more darkness to it. He should continue creating this takes chars. So you can gets more similar to the textures that you have in your model. And in these parts, because we want them look more natural, you should just create a little bit of shade beneath each one of them, not all of them, some of them. So that would make your work look more natural. Even next year lights you drag your fader a little bit next to them. So you can have kind of a little texture around it.
28. Lightening of right cheek texture: Okay, in continuing making these textures, because we want to create smaller texture so it can be more similar to our model. You should sharpen tip of your small eraser and create very fine and thin lines near each other. You should take your hands off the cardboard. So del lines would not be all connected to each other and they should be part by part. Like this. Especially in the parts that we want to go from the light parts to the dark parts. We will continue these lines and rule. Let them go. So it will create kind of faded delusion for us. Even in some parts, I apply my eraser in two different directions. So you cannot see and the lines strictly connected to each other. The only thing which is very important in these kind of textures creating is actually the direction of the lines. So they would be in the correct direction and we'll be right. We also need this kind of work in that lower part over there. Exactly the work that we're doing here should be done over there as well. We move on like this. See, as I told you before, up to this level, after we've created the lines in here, we should still work on this part. The texture is not something like that. You would created completely with working on a part about half an hour or an hour. And you can just say, oh, well it's well shaped, it's complete and then let it go. Now, each connection that you create, you should work on the textures again, for example, these parts need more stronger lights. And in the stepdad they've worked on the nose. We would add some lights over here now I won't work on it very much. But even in these parts which are separated from those side parts, that needs to be rushed once more. Even these parts need more work on them. Meaning that you should come back again, check the darkness, creates a stains. Work with your electronic eraser and do it all over again. And K You see that we move forward. We will get one step closer to the thing that we're seeing in our model. And feel like the lines here are so big. So I tried to create some thin lines over here. Okay, my friends, so the procedure is the same, tried to work the same procedure in all these parts. These parts need more light so they will show more. Who would work on these parts again. And we will come back. And in next is, if there was anything to add to the textures, I will tell you, but up to this point, do is. And so in next though, we'll work on the background of the nose.
29. Drawing the darkness of the tip of the nose with a charcoal pencil: Okay, My dear friends, before, before I start completing the texture of this side, I've decided to create a background of the nose together so we can move forward on our work a little bit more. For it. This will start from the tip of the nose and we create the darkness which is related to the nostrils. I'm creating the borders about the nostrils and the nose with my heart and with my hard pencil. And then again, I try to feel inside of it, myself pens up, but if you want to fill in it with your hard pencil, it's okay to, I see some students that get a stress about which, where they should use which pencil. See. The hard pencil is useful for the power set. You can see dark lines in your work. And the soft pencil as it sounds, it's softer, it has a softer tip. And it's more useful when you want to create some stains, some darker stains in your work like the pupil of the eye or this darkness of here. But it doesn't mean that, for example, if you darken the pupil of the eye with your hard pencil, it would make so much problems in your work. No. It's not problematic for you. In my you might just get a little lower degree of darkness that if that happened. You can drag your pencil on your work once more and get the color that you want. But generally, soft pencil for this stains and spots, which are completely dark. And hard pencil for the lines. Here we have a drop of water that has been separated like this. Now in here I'm going to fill in this part with my soft pencil. As I told you. And k just like this. And I'll just fill these parts with my hard pencil in here. This part has a curve which is actually related to the water that is dripping off. The nose. Can also show these parts With our pencil because it's so dark. So we can easily create this darkness with our hardcoded pencil. Just like this. Now the right side is not allowing us to create darkness so much. So we denote good there. But about the drops that are actually on the news. About them, we should start creating the placement of the drops that we see on the nose, the big ones. So I'm going to use my fader and show the parts which are supposed to be the drop so water we just created next to that. Be careful about where you put the darkness. You shouldn't put them in the wrong places. For example, in some places you see the darkness is behind the drop of water. And in some other part you can see it's in front of that. So be careful about it. This part has so much darkness. And again, we will use this darkness and just drag it up part. There are also some drops of water over here is shaped them. A create a spot for them. We determine their positions so not lose them when we want to actually start shading. And of course there is a drop over here and a little one here which is so spatter. So we do not need to create it so much. Just create the position for it. So later. With adding the lights, we can easily show them. He's far as on the tip of the nose, which we do not work on them so little because it's not a separate add. A drop of the water will move on to the part which we see here. Generally will bolt the lines that we've already created with in our primary sketch. We can work on this with our pencil. And also here, K in these parts, all of the drops are almost shown in here. We do not have that much of water dripping. In these bars are actually showing the price which the darkness and the lights are being separated. And generally, our area's been shown. There is just a strong light left here at this top part of the nodes that will created just like this. There's a very strong light here that will create later. Okay? Now we can work on the shadings. The first thing that we do is that we spatter the things that we've created with our small brush. I'm using size two brush. This side of the nose, as you can see, has more darkness. Also, we take a basis of this darkness and take it towards the outside.
30. Shading and shaping the volume of the tip of the nose: Okay, My dear stand ends. For continuing with our work. After we created the stains on our nose, we will work with our fader and add to the darkness of the nose. And in this step we want to more, we want to work more on the volume of the nose actually. So we do not spend so much time on the details and we're just going to work on the general parts for now. I start getting the darkness from this area. I'm actually going to guide this darkness, drag it towards outside just to get the volumes correctly. And of course snakes. So there's a strong darkness that we have here, which we have put on the nostrils. We are actually going to use a pipe called powder to drag this darkness toward the outside. So we can also keep the smoothness of the skin. Just like this. As we had this in our previous work. We're just going to work on it and we're just going to move our hand circle Larry to create the color of the skin. This behind area. And it has a very dark shade. So first, we're gonna give a color to this gray part which is here and just shape it a little. And we'll move on to the part behind this line and create that dark shade. So the volume of our work will be seen better. As I told you before in the previous part, savvy, we're working on the skin. This work comparing to the works which have very smooth and clear skin, we do not have to be so picky about having a clean and clear shadings here. Because of the textures that can be seen in this skin a day have so many stains and spots. So creating them will actually make our skin look more real. So if we want to create the skin so smoothly and so clean, alternately, we have to create some stains on that. So because we want to move forward fast, we're just going to create a stains from the beginning that we are creating the shadings. So we do not get so picky about being so clean and smooth because it needs the saints. As we come to the right side of the nose, as you can clearly seeing the model to area is definitely lighter. So we should get a lower amount of powder and you should just control the darkness. Okay. I tried to take my hand in this position so you can see the procedure of shadings being made. But as I told you before, the best way to create the shadings and a correct way is to take the brush in your hand vertically. But and I do it sometimes, I'm sorry, but I tried to take it out of the vertical position so you can see how the shadings are being done. And you can see that better. Okay? Because the best way to shade this area is to take your hand and get it in this direction. The hand should be in the inside of the curve. So the better way to do that is to rotate our work like this. And now I'm just going to have the correct position of my hand to shade this area. Knows only this part, but wherever you have a curve and arc, that actually is look like a semicircle. If your hand is inside of the curve and our q can create the shadings so much easier. Okay, this part of the tip of the nose here is lighter. But of course we haven't got our need as color bus. Even. We try to keep the contrast, even when we're doing the background color. Contrast that needs to be in our work. When you're working, you've definitely have seen that the tip of your brush, we'll be sanded and some of them might might be left on your work. You should definitely take them off your work because if they stay on your work and they can be moving around while you're shading. And they can actually create colors in places that we do not want them to. So it's natural that the tip of your brush is being sanded on the cardboard and leave some parts of it by you should remember to take them off. The light is coming from this side of the face more so considering that and this strong light which is on the nose, is actually more to the right side of the nose because that's where the light is coming from. And for the lower part of the nose, I think it's better to take a smaller brush and show more details for that. I think this brush, a size two brush, is compatible for this part. The area beneath the nose as obviously darker. And pay attention that when you're working with a smaller brushes, your area would get darker sooner. And keeping the area more clean with your smaller brush is harder. So when you want to work on a smooth and clean skin or any surface and you want to create it with brush. If you're using a small brush, you should be very careful about that. And you should pay so much attention because they can easily get out of hand. And you should keep it clean. Here, it's not that important, but I'm saying in general, I'm just giving this part a background color and this area should definitely be darker. So the add some darkness to it and we drag it towards this side. Because we aren't creating a background color. We do not go too much into details. You just want to create the color of these areas fast and get the correct color and the correct volume of our model. And then later we can work on, and we can work on the dark endings of some parts more later. Of course, we can do it in coloring the background as much as we can. But if you see some, some parts need more time to spend for creating the darkness. We will leave them. For the second step of our shading and coloring. We continue and we dark in our area more. I'm going to choose a bigger brush and give color to some parts of bit faster. So we can pick up the pace a little here.
31. Shading subcutaneous of the nose blade volume: Okay. As you can see when the brushes bigger, it covers more surface. But the point is that you should be very careful about the details of your work. That the parts which are two Ys and too light. For example, this line here is very light, so you should be careful with your brush so you don't accidentally gets over it and get too much color inside of it. Okay. We will lower the hand pressure. The gray color would be more Smith. And from this side of nodes, we will fill this area little. As you can see, the volume of the nose is being shaped little by little. And the saints were to be left here. And you can keep the position and the placement of this big parts of darkness or the big drops of the water. Okay, we can continue up to the darkness beneath the eyebrow here. So we can think, we can add these two darkness in this various step. The darkness behind the nose in this side, and the darkness beneath the eyebrows. So the volume of our nose will actually show itself very well. The darkness on this part of the nose is like this. So I'm just transferring the piped coal powder directly to my work. In this part. This darkness will actually shape and volume of your nose. When you're adding the strong darkness in your work, you will actually figure out the parts next to them, how much darkness they have, and how much you should create darkness next to them and the parts around them so you can get it more similar to the model or the picture you have. These areas should have a little background color too. It's just too much white. You see I haven't rotated my work yet because when my work is in this position, I can see the details a little better when I'm working on the curves and arcs, but definitely it depends on yourself too. But generally, there's a rule that you can create better shadings if your hand is The toward the inside of the arc or curved data you have. But if you're feeling uncomfortable, you can have it in other positions. So I need to darken this nostril on the left side of it more. Now for adding this darkness which is stronger, I prefer to use the flats coal powder. You should add the darkness very carefully. I did not get too much into the eyebrows because I want to create it later. And I tried to drag the sides of it toward the side of the nose. Now I switch to the pipe coal powder so I can fade this part easier. And from this side I don't go too much to our eye. Just a little. And just fade this darkness to our DID little and I don't move too much forward. Alright, add the details. Later on that I wanted to create a DEI, work on it more. Now I want to work on this part of nodes to which we have a strong darkness. We will add it and apply it, and then we'll move forward. Because this part has a very strong darkness. Again, I prefer to drag my, actually transfer my flat cold hardware directly into this part. When you want to get a smooth shade from your flat cool pattern and you want to directly put it in your work. It's important that you do not take the extra powder off your brush. In normal situations, when we take the powder on our brush, first, we'll take a little bit of it on another paper and then we'll varying gets to our work. But here into places like this, you should not do that and you should completely and directly bring depositor to your work. You should just be careful that you put the powder in place that you really needed to be. Because I've said it before, but I'm going to insist on it now again. That creates a color flood. Floss coal powder has a very, very strong darkness, but it doesn't give us a very good gray color, it just gives us a very smooth black color. And wherever that you need a gray shade, it's better to use piped call powders, the soft or extra soft, so that you can get a better gray color. The texture of the coal are like that. They give you a very smooth gray color and you can have different degrees of darkness with it. From too dark to a light gray.
32. Completing the darkness of the nose volume with charcoal and a brush: K. The diagnose which we have here is almost enough. Now, we can use a darkness on the brush. So we can use a darkness left on the brush and use it a little bit on this great gray area here. Because this area also is kind of a stained. It has saints of darkness in it. And the pattern of flat powder will actually help us to create these stains. You see, you cannot control it too much. So you can get a very light gray. The gray in here is very dark that you can only use in some places. Okay, the price that you have darkness. You can use this. And combining this and mixing this with our piped called Hadar, we can give a very good color to this area. Here got too dark, so I don't get any extra patterns so I can spatter this darkness which I left here. I'm going to shade up to this part which I have water dripping off the face. We'll move on with this. These parts are darker. You see? Let's just left here. Before the line that we've created in our primary sketch. We didn't came exactly to the point of that line because we needed a space to actually fade this color into that line. Just like this. The sides of the nose has a bit of shading to our inside of the nose. They need more darkness and more shades that I'm using. The flats coal powder, which we already have on the cardboard and drag them to the side of the nose so we can have a better shaped volume. And of course, these parts need to be more stained and a spotted. We need more spots in stains here to be clear. Right? You should pay attention that in these parts, these parts should not be completely without color because in that case you cannot show your lights. The only part which has completely white color and it's completely light, is actually the tip of the nose. So we just leave that part up to this point. We already got the correct shape of the nose and the volumes of the nose and the parts around it. Now I'm going to use a bigger brush too, shaped these shadings a little bit more. The pattern that I need in this part of my work is actually the pipe. It's called powder. So lightly, I'm creating the volume and I'm shading. I'm not putting any hand pressure, nice strong can pressure. And I don't want very dark shade. So at least not for now. Okay, now we rotate our working in so we can check it and see on the point of the view of the volumes how it can be seen. If it did, it's more shadings who created. And if not, we'll go to create the textures. I think maybe these parts need a bit more darkness to get a better volume and better shape. Which of course, the darkness in this area orbit take strides. So we're just going to give it a shape with creating very dark. Now completely lines, I can say shadings in a linear way. And of course these parts need more darkness. But before applying the darkness related to the textures, we need to work on the lights of our work once more. And we see what have they done? In which part we need more light. Actually, we should determine the position and the placement of the drops of the water and add some darkness at some lines and Dell. We will move on to the rest of our work. So let us work on these shadings bit more to go around and add the edges and signs of these parts. So we can go for creating the lights later. I take a bigger brush and I shade this upper part of my work. Just says you can see in these parts because we want the upper part of the nose to be shaves more in these more shading. And of course, even in this lower areas, we need darker shades. Can see the darkness. Their continued like this, in this shape. And up to here. It's like a croissant. As much as you put the darkness in their own placement and actually, they would be more the shape of your nose would be better. I don't know, shaded and more than this for now. And the next is I'm going to create the lights on this part. And then in the next step, we will create, will add to the darkness and create the textures.
33. Creating light to create nasal textures: Okay, My dear friend, and as you've seen in previous step, they've created a background color and we've created the volume of the nose together. Now, before we want to complete the shadings of the nose because there is water on her face. It's better to create the lights first with the use of our erasers. We just create them once. So we would have depositions and the placement of them. And then we will move on to creating the rest of the shadings and the textures of the nodes. For doing that, we start creating the lights. Now because so many parts of the spots that we've created are actually gone and they're not visible anymore. So we are going to use our brush eraser. And we just determined the placement and positions of the light. It's like that with this eraser, we are sketching the position of the lights. Or in some parts which we have a stronger lights. You can use your mono 0 or your usual eraser. Makes no difference. Pay attention that the Mono Zero eraser is edit eraser but with a smaller and sharper tip. If you have that, it's very good. But if you do not have that in the parse which I'm using my mono Zero, You're a CR. You can use your eraser but a sharper tip. The parts which we can see, the drop soda water. First we'll find the spots for the bigger lights and then we will move on to the smaller ones. And wherever it's needed or just have a measurements from our model. So I can be sure and positive that the position and the placement of the lights are in the spots that I think they are. Because here's a bit of the lines from our primary sketches left on our work. And if you pay enough attention, you can use those lines to, but some of them might got lost during the shading, so it doesn't hurt to have measurements. And here next to the nostril holes have to create some lights but not too strong. They shouldn't get so much light. You don't want to get so bright and light should just create these traces of the water dripping. And of course, with creating this drooping waters, you can also work on the textures that you have on your skin and create them to. For example, in the parts like here. This part beneath the nose, this area is a bit lighter. So I will add to its shading smart. And there are some light lines over here, some sharper lines which are in this lower area. Each light that we see, we will put in its place as we can see. And if we thought that there's too much light in some place, we can go over it with our brush once more and take the extra light away. So don't worry about it too much. These are the lights that we've all already created. We just have to add the darkness next to it. The Darkness, which is related to the nose on the right side, beneath the nose, should add to the darkness. So this area will get more separated like this. Now let us work on the very obvious lights on this upper parts. These lines are very have lots of borders. So it's better for us to create them with our electronic array, sir. Of course. Because the light of our area is so much right now. Who would have to go over these parts with our erasers later again, but for keeping these shapes and for keeping these lights, it's necessary for us to create these lights in this step once. And then after shading again, we will work on the lights again. K, This is up to here. And there are some lines in here. The lines which are in the prominent part of the nose has too much light. So we have the possibility of creating these lines with our electronic eraser. They are so strong. But should pay attention that the lines should not be completely straight. Actually in the curves of the nose. These designs are a bit crooked and curve 2. Let me shade this part a bit more. And then we can work on the light's better because the shading is so little and the texture that we create would not actually show itself. So we should add to the shadings in this area for now. Because we have the general area of the shadings and the lights, we can easily add to the darkness in the parts which we are needed and just keep bringing, bringing them forward up to the part that we want to. And the darkness of these areas will be less because we are dragging it forward. But if it's needed later, we definitely create them again.
34. Creating intense light and subcutaneous of the drops on the nose: So slowly we will get the placement of the textures and the amount of darkness will be increased. This will actually shape our work a little bit more. And so we can create the textures of our work little by little. You also need more shading in this side. We need to add to the shadings here. Pay attention to the degrees of the darkness and alights. All of the parts should not be darkened all in the same degree. You should keep the contrast, even when you're doing the background color, you should keep it. Actually the contrast is the base of our work here doing Keras crew paintings. Okay. Now we will move on to delight, which we need to create more of them. Become parents a little so we can see if we are applying the lights in the correct spots. Which is correct. I'm just gonna create this very strong lied to hover the nose. In some parts we don't need to get these strong glides. We need lights but not this strong. So I'm going to use my brush racers for those fights so we can get the appropriate amount of light in those parts. In this bard again, we need lights. I should dark in this part a bit more so we can apply the light on it. If you don't have a darkness, you can add any light and take the extra things off your work. Always remember that. Now that we have the brush or a serine, our hand. Thus work on the lights, which are not too strong. And the tip of the nose see these parts are light but they're not too strong. You see when you are creating the lights with your brush eraser, it gets the lice are getting a bit faded. But when you're working with electronic eraser, the light that you're creating has completely specific borders. And they're so sharp. And each one of these erasers can be so useful and helpful in their own place. Actually continuing the light from this side as well. Again, I'm going to sharpen my electronic erasers and we can get some pretty good dots from it. We can see these dots on the tip of the nose in here. Because in our model that does our big in some parts, I'm not trying to create them so small. The possibility of creating them smaller is on the table, but I am not doing that because in these parts. You might have bigger dots. And we're going to create some faded light in this part. And in some parts we need more life in our work. We'll just make the texture of the nose a bit busy so it would not look all the same. We tried to create the different shapes which are on the skin of the nose. If you pay attention, you can clearly see them in your photo. So we're just creating them on her nose. The more important thing is the direction of the stretches of the skin. If you take strip the skin was so clear you should show that. But in here, the texture of the skin is not showing so much on the nose. And I'm working on the strong light parts on these drops of water. But we should work on these at the end of our work to complete the lights with our white pen, as I told you at the beginning of the work. But for now, we're just going to use our eraser to go around it. And the creation of the complimentary lights and the final lights will be left today, last episode. Now if you pay attention, we're trying to create drops of water which are on the tip of the nose. We are actually placing some darkness so we can determine the placement of them and we can shape them better. I'm using my carbonic con pencil. If you do not have this, you can also use the hard cone pencil. But you should use a very, very low hand pressure for them. Or you can use your llama graph be a pencil. And again, I say the nomograph pencils should be in cold type because lemongrass pencils have two types, graffiti and cold ones, which you should use the coal ones. Now I'm going to use my 0 brush to fade the darkness that we've created in here and the spatter them a little bit. And we take just a little powder and we make this part kinda messy. And beneath, apart. And these light stains, we're just going to create a darkest thing. If you can see it in the model. Everything you see in the model, you should apply it in your work. We just try to guide it towards upside. Now I'm going to change to a little bigger brush. I'm using the brush size two so I can cover more area, cover more ground. I tried to create the darkness and spattered him as I can see my model. The same pattern. Of course we haven't created the drug completely it, but we're trying to.
35. Work with an fader to shape water droplets on the nose: So I try to shape these areas and work on the texture rich exist in here. If you pay attention, you can see a light over here in the model. That's not so completely clear that it's a tracer water or it's the texture of the skin. Anyways, we see the light, we apply the light. Now we need to work with our fader because the dropout water is so small comparing to the rest of the area. I'm using my fader to create a darkness behind this drop and create the shadow behind this drop. So give it a great volume. Also I do for the second drop. If you pay attention the model, the shadows of these two drops are connected to each other. That's what I exactly dead. We're just going to fade and makes the shadings that we've created into our skin. And we try to give a shape to this drop. And this side. We had our fader. So we should show this look of the wire dropping. And in these parts that we see the water, It's not like the drops of water because in here we have the water flowing through and dripping of the nose and it's not so concentrated as a drop of water. So I'm going to shape this part's a little bit different, but of course, because they're in the dark, they don't show themselves so much. But anyway, research, MVC wherever we need, darkness, will create them with our fader. Okay, I need a thinner fader. Smaller tip. I'm going to use a smaller fader so I can control it better and easier. And in these areas, in addition to the textures that we've created, we need some darkness next to the lights. And also in here we need to apply the darkness, which is next to this water coming down, dripping into the nose. Also decay curve and arc that the nose has in this part. It can be shown with this contrast of colors very well. Generally the area around and nose needs to be darker so it can get a better shape. You can also use a paper cone instead of the fader, which I've already explained for you. As I told you before, creating the textures depends on a personal creativity. A texture can be made with a pencil, with a brush with the fader, read a paper tissue or anything else. It depends on the person who is making that texture. And it doesn't matter that which tool you're using. The more important thing is the results of your work. And as you can see, the color of this area is getting closer to degrade at we have in our model. And the drops and a drips of water are actually getting a better shape and volume. And again, it's becoming more similar to what we have on our model. Now we are working on this drug. They applied the darkness behind it. If the drops were a bit bigger, we could work on them with my brush completely. But because the drops of water are small in some places we cannot work with all of them with our brush. In some places we need to use the fader. Take a bit of powder so I can darken this back area where evil. And I can fade it well. To not get too worried about the darkness of these areas because we're creating the textures later, we can easily control these darkness. The darker spots that you can see in this side of the nose. Just like this, you create them. You see these very small and darkness that you're creating are actually showing the direction of these water drops. There are small but they're so effective. Okay. For also determining the placement and volume of this drop from this side, we're going to complete the color of the skin so it can shape the drop better. From behind we take the shading suited down and to the up. We give a little color to the inner part of the drop. And we'll leave the front part more and more untouched so we can create the light in this area. Just like this. In these drops. In the lower ones. We can also add some lines using our electronic eraser. Also in the ups and downs and this things that if considered, if you place a lightest spot next to them, they will be shaped way more better. Let me get my model closer to me so I can see the textures better. In this area. Actually, this water which is a dripping.
36. Completing the texture and drops on the nose: Is in the continuous here. It's not so clear in my photo. But of course, I will check these later from the file of my photo. But for now, I have a printed picture in front of me. I'm doing my work according to that. Okay. As you're seeing, the tip of our nose is Alice being shaped? These lights needs to be fader in some places, a sulfur creating that. We will go on with our brush eraser a little. And in here we have a very, very thin drop, a water that I'm going to create it with brush eraser. It's actually necessary to create it with brush eraser because it doesn't have very specific placement. Just this light which exists here is actually showing that there is a concentration of water in this part. That's why we're just going to create it. So faded. In these lower parts when we have more darkness, we do not have it correct shape of the water which is flowing through this part, is just obvious for us that there is a skin texture here. Therefore, with playing with our eraser, just create some shapes in this area because they're not clearing our photo to. On the other hand, we're going to spatter these lights to the right side a bit more. And this part, which actually the nostril has been separated from the tip of the nose. We can see a small light as a result of the prominent part on the tip of the nose. And this side, it's very, very little. But we should show it. All right, slowly move on to the upper parts so we can complete the textures on these areas as well. Okay, For that, it's not necessary to create each one of these lines exactly like we see on our model. But we are using our brush eraser and we are creating some lines in the same direction that we've already created with our electronic eraser. And these parts, you're just going to create some lines with our brush eraser, some theta lines. But they should be in the same direction. Don't forget this. On the right side. They come down to the nose with a curve. But from the left side, it's the same. But it's less than the right side because the light on the face is coming from the right side. And of course, the light on the tip of the nose is actually showing that a delight is coming from the right side of the face. That's why you need to be careful about the direction of the light that you're creating. Now we've created a background for the lights. Now we are going to work on the parts which have a specific shapes or in the parts that we need a specific shape of the light. For example, here, there is a shape like a drop again. Beneath it, we have a strong light. Therefore, we need to use our electronic or a CR. And this shape is actually going to guide us to create some other lights lines and put them in the right placement and positions. He should move forward with so much patients. And of course, you can create a general texture for this part suddenly and leave it alone. But if you want your work to go on so precisely and so clean, it's better for you to work on your sketch step-by-step and going with their rules so you can get the result that you want from your work. Generally, each sketch that you want to learn. And if you move on the steps correctly and you would spend time on them. Each, a sketch which is a similar to that would be easy for you to create. But if you do not pay enough attention, you might not get a great outcome from your sketch or you can not create any sketches similarity that event. It's smooth as skin, a wrinkle the skin and red skin like this or any other surfaces. So once you should spend so much time on learning and creating all the textures, going through all these steps one by one. And spent so much time and creating the textures in a way that can have the best result for you. Which tools you should use, in what places. And you should pay attention to all of this, at least once completely. So later on, you would have less problem. You would put and spend less time on this similar sketches to that. Okay? In these parts we're just going to add some skin textures. Even on this side parts. We need some textures, even in these very, very dark spots. Just like this. And again saying if you pay attention in this area, you can not see any ordered lines or you can not see a specific drug or water. But there are some vertical lines over here that can actually represent the water dripping down the face. So again, we apply whatever we see in our photo. I help my explanations on the steps would not be boring for you. Because in this sketch, I don't want to work on sketch out of the time that I'm making the video for you. Actually, I want you to follow me through all the work and you can see everything that I'm doing and you would not forget any steps. In fact, it's MIB arrived that if you sit on a point of view, you'd say the steps are being repeated and we know we figured it out and we understood how to create drops out to do each step. But unless you won't see them several times, you won't apply them several times. You can not get this work done very well. So do not be satisfied. So soon. Watch this with so much cautious and see the different textures. Apply different textures. So you can get ideas from them, you can get inspiration. And again, I say, the procedure that I'm doing here is not the only procedure to create a wet or a wrinkled texture. Everyone can have their own procedure and some of them, even most of them might have a good result. But I'm going with this one right now. Okay. My friends take a break and then we'll come back and work on the rest of the textures.
37. Drawing the left iris with pencil: Okay, Hello again to my dearest friends. Faith came back with the rest of our sketch. On the previous episode, we are working on the texture of the nose. And we've moved forward to this part up to a point, but it gets connected to the left side of the face and it's the skin. So for doing these bars, and we have the connection between these two parts. I think it's better for us to create the left side first. And then we'll move on to the textures. Because if you create the textures in here, after that vein, you want to shade the area next to it. The possibility of your brush going into these parts that you've texturize will be so high and you might lose some textures. So I prefer to create the left eye as we did on the right eye and work on some details. And then we will work on the textures of the nose, which are going to the left side of the face. So I will zoom in for you on the left eye and we start working on that. Okay? Practically, you should DO as the same as we have done under right side of our work. The procedures are same, but I'm just going to repeat the explanations as much as I can. So it would be a review for you too. I'm using my Faber's soft pencil to feel this inner part of the pupil completely and just make it black. Generally, I'm going to work on the parts which needs to get dark and with our pencils. In this step, we will leave the parts which we have lightened the eye and we do not feel them. Now in the print that I have, these areas are completely dark and because there are kind of big area comparing to the whole, I'm just filling them with my soft pencil. And here we have some lights. So I'm not going to feel these parts with my pencil. I'll wait. So I can create the details with my hard pencil. Also from this side, I can create a little darkness with my soft pencil. Although in here we can see it's so linearise, so it's better not to work on my soft pencil anymore. And all around the pupil, if you pay attention, you can see a layer of darkness. Also create this dark layer with our soft pencil. Although because it's not so thin, it's thick. But you should try not to come out of the border line that you've created in your primary sketch. Because when you want to fade this part of your work into the whole area, you might get a little out of this line. So after if you get too much close to the border when you're doing, when you're working with your soft pencil and get a bit out of it when you want to fade your pencil darkness. A might ruin your work a bit and make the pupil look bigger. You take two extra pattern of our work. Do not ever forget that. I've switched to my hard pencil. We need a very varied apart here for a very strong light. This is actually a big reflection on the eye. You should pay so much attention not to darken this part. The eyelashes that the shadow of them are reflecting on the eyeball. It can create some of them like the ones which are here. Then mountain of them are not so much the number of them. But again, we're going to create their placement. So we can show that we have a reflection of the eyelashes on our eyeball. So pay attention to that and we will keep the lights between them. This is very important too. Now will want to work on the other details. Again, I say I'm working with my hard pencil right now. You can see some lines coming out of the iris in some parts. In some parts they're a lot in some they're not. If you pay intention, the models, I can see these lines over here. So clearly, maybe the number of them are not too much, but as you can see, they exist and you should create them. These are actually some muscles which exist in AI. And they're coming from the iris. This part also needs to be dark and you should apply all the darkness with so much caution. We can also create the line for our eyelid. Why we are using our hard pencil. Because now I don't want to rotate my work so much so you can get a good angle. I have to rotate by hand, but you can easily rotate your work and get it in the right position and a comfortable position for your hand. These parts, we have a strong darkness and the lines can be easily applied by our pencil. Also on the eyelid. In these parts, above the eyelid, we actually have some textures which are so, so dark. Now we'll come back to the parts of the eye itself. There is a very thin line here. The inner corner of the eye is shaped like this. It's a specific shape. As I can see, it looks like this. And we will determine the price which have a specific colors. And next is that we want to complete them. Just like this. Now in these parts.
38. Continue the left eye with a pencil: We can, we can create the eyelashes or just leave them for the last final step. But because it's a very busy and concentrated a sketch, we can create some of these eyelashes like this. So the placement and the position of the eyelashes would be determined and we do not lose them in all the other textures. In this area. The eye is so busy and we should give so much shading through this. And the eyelashes that we are creating now should definitely be redone later. But just to create a position for them and not losing them and making our work more complete. They can just create them right now. Because we can also see so much light between these eyelashes, which are very important in the completion of our work. Creating these lights. Because the thickness of the eyelashes are a lot and it's not so thin. We do not get too picky about the eyelashes being thin and fine. The only important thing is that we can get the ending and the beginning of the eyelashes thin and fine. So they would not get a false shape. These parts will completely get darkened and black. And the important thing here is the placement of the lights between them. That's why I'm creating them. We do not want to insist or get too picky about the eyelashes their own on this part. Now, in addition to this, let me rotate my work a little. And of course, I should sharpen my pencil so we can work on the rest of the work of the sketch. Okay, After that, we've sharpened pencil a little. Because one of the most important things in creating these lines is that our pencil is sharp enough. Now after we've sharpened our pencil, we'll come back to our model. And we try to create these lines above the eyelid. Just try to shape them. Because these lines are very fine and thin. We have to work with so much cautious and we should be very careful in this step. I'm just going to advice you to use the hard pencil. You can use your Paris current pencil because it's thinner. But it doesn't give you the correct darkness, the appropriate amount of darkness that you want. Because if you pay attention in your model, you can see these parts are so dark and the carbonic pencil would not get your work dark enough. So it's better for you to use your heart pencil. I'm just going to suggest this one. But of course the thickness of these darkness are different. But we're just going to determine their placement up to a level. And then later on we can complete them. We can see the darkness up to here, ultimately, as we can see in the model. The lower parts of the, I don't have a very dark lines. Maybe. There's just very, very small and light tone over here. Slightly. You don't want to overdo these parts. And again, these parts, I cannot see any darkness that I can make with my pencil. So only we're going to. And give a little darkness to this outer corner of the eye. And that'll be it for the lower lid off course. When you've applied almost all of the darkness that you could use your pencil on. We'll move on to work with brushes. Just bomber thing. We need to add some more little stains into the pupil. Was just complete this. And then later on we can work with brushes. Just need some little things over here. All the shapes, all those things, all the ups and downs that you can create video pins so we try to apply them right now. Generally using a pencil in the correct place and occuring time. Actually give more alive to your work. Try to use your lines and create them in the same direction. To show that it's a circle. And it would be like an eyeball. So it would not look on natural. Okay. I think it's enough for the background of our work. Up to display. And on the next ascent or going to work with a small brush, for example, size toothbrush and try to fade and spatter all of these darkness around our work. For the power set, we need them to be completely black and try not to put so much hand pressure on your brush. And just apply a medium pressure to your brush. So you can just makes that darkness into your work and just let it flow with the rest of the work. And leave the great amount of the darkness in your work and do not take any of it off. And as you can see, I'm using a brush that in some people's opinions might have a ruined tip. It's actually became like this during work. I didn't cut the tip of it as I use it. They got sand the way, but do not think like that. If they send it away and now they are short, you should throw them out and you cannot work with them later.
39. Completing the iris of the left eye: You would definitely need a new brush with correct amount of hair is say, this is a new brush, and this is an old brush. For example, I've used it for a year or so. But each one of these have their own use in specific situations. So do not throw away is a brushes dat the tip of them actually got Sanders away. Because in some parts like days, you can use them and you can have a very good result. Okay, up to this point, I've used to amount of darkness that I could see in my work. I actually, I've used amount of darkness that I already had and I didn't brought any extra powder to my work. Not yet. But now, it's necessary for us to get a little bit powder into our work. And we'll give a bit of color to this area. Is parse, need to get this gray colors. All of these parts. You see, even when we want to give color to these people, you can spatter the darkness in the same direction as the circle. So you can create some lines that actually helped the texture of the pupil. Like this. We will take a little bit of the powder and it will darken the lower side of the upper limit. Because in this area we have so much darkness. I'm going to use the flat goal pattern. Although I've used my piped call powder for my pupil. But in this side because he had a stronger darkness, I've used flat coal powder K. Now we should come back to our p.stance bill again because we have time to work on the islet later, but we need to work on the pupil a bit more so it can be more shiny and it can get a better shape. In these areas which are light in our work. We need to add some lights with our eraser. The lights which are linearly. We can create them with our mono eraser or usual at an eraser. And the purse, which are light like stains and spots, we can use our brush eraser for them. Now I'm just creating some light lines with my eraser. You see these works might not seem too important and they might seem small, but they can definitely shape your whole pupil and create a different shape for that, you should definitely zoom, zooming this levels and steps. And you would definitely apply them. So you can see the difference between before and after. And after you've used your erasers in some part, you should come back with your pencil and check your darkness. Now I think we can move on with our work and later we can come back to complete the darkness and the lights of the pupil again. Okay. After we've worked on the pupil, if you have remembered from the other eye, we're going to shade the eyeball. And for this Ghats, we'll start from the corner of the eye. And because the area above the eye has so much darkness, we do not have to take so much powder to our work. At first. We just try to get that powder a little down and get the darkness from that. And when you've created the general shading, now, I took so little powder and recreate the color with our powder. And this side we can also come into their pupil. But be careful that when you're working into the people do not drag this darkness so much towards the outside because the amount of darkness is so much in there. And it might get your work Missy. I'm using circularity hand movements so I can give it the shape like a Bible. We should also shaded from the inner corner too. Just be careful that this shade on the right side, on the right side of the eye is definitely lighter. And it got more light into it. K I just gave a background color to this area. You would definitely work on this upper part of the eye led. Of course, I didn't got any extra powder. I'm just using the darkness which already exists in our area. I'm just a spattering. The darkness that I've created with my pencil all around here. Okay. Just complete a background color that we've created on the upper area of the eye. So later on we can add the darkness and complete the shape of the eye. But before that, I want to use my eraser.
40. Completing the left eyelid: So I'm going to create some lights on DEI. The lights which are so strong, for example, light which is here. And it's sub bake. Comparing to the other parts. It's correct that the darkness of the eye is not complete yet. But creating the parts which are completely dark or completely light like this will actually help you to figure out the amount of darkness and light you need to create and put them in the right places. And of course this part definitely needs the light. Now I'm going to use a brush, my brush eraser to take away anything that has been left on our work. One to work on a clean sketch. I'm going to use my 0 brush and fade these parts around the pupil. In this fading issued guide one layer of this darkness who are down outside. Just like what I did. Now under next step, we want to apply some darkness above the eye. Well, we should use a bit of air flight coal powder. Take a bit of my plants coal powder. And without taking so much of its color, we'll drag it and transfer it to our eyelid. Because we need a strong darkness here. And try to keep the darkness in the area that we need. And pay attention that you do not create any extra darkness in the power set. We do not need it. Especially because we are using a flat coal powder and it's too dark. Also, from this side we're going to move the darkness and the eyelid. And of course, from the middle to the end of the eye, we should use a bit of this darkness on the eyelid itself, because a darkness in this area is too much. We also have darkness in these parts more, but we do not drag it too much downward. We are using a flat coal powder and we want to darken an area like this. Something that you should always remember, is that when you're dragging and transferring the darkness with your brush, is that you should not push the brush in your cardboard so much and you should not have so much hand pressure on it because I'm pressing and pushing the brush on your cardboard or anything on your cardboard will actually send the cardboard the texture of the cardboard itself. And if this pressure is more than usual, you're actually taking the layer. Does you actually wanted to put on your work? It means if you take one layer of the powder on your work and then you press your brush or anything on the pattern that you've already put. It may actually take some of the powder from your work instead of a spattering gets. So remember when you're doing things like this, darkening areas like that do not use so much hand pressure because the other parts are lighter. I do not want to use the same coal in those parts because it will give us a naughty, good gray shade. So via spatter these black colors as dumb as much as we want. And the parts above the eye can be shaded with our piped coal powder. And in these lower areas, we need to drag some of this darkness too. K we've almost completed the darkness in this area. Now, we will leave the lower part for later. I want to complete this upper part first. If you pay attention in these parts, we can create some lights and you should just figure out the placement of these lines. Be careful about that. You should not create one line is straight and connected to each other. They should be part by part. Because if you connect them to each other, it would be unnatural and it doesn't look good. So you should create these lines, light lines part by part. First we are going to create the lights with our editor racer as much as we can. And then we will create the rest of them with our electronic eraser wherever we needed. A needs stronger light. Even the parts that we haven't dark and yet we can create some light textures and then later, we can add the lines that we want beneath them. These parts vendor coming toward the inside of the eye, we have a stronger lights. And later again, we can create more dark lines with your pencil or your Paris gone pencils. If you feel like you're seeing lighter lines. For example, like the lines which we having these parts. I'm using my pencil for creating them. Pay attention that these dark parts are not supposed to be only lines. In some parts you can add to the darkness or reduce the darkness beneath the light lines for giving each part especial texture. So it can give us that feeling goes skin more than usual. And this inner part of the eye we should shaded. Because this inner part of the eye should be darker comparing to the part above it. But the darkness is not too much. So we're going to use the dip piped coal powder to create these shade and shade this area. Now with the use of our brush, we can create a border for that. Okay, we'll come back in next step and continue the AI.
41. Create volume behind the eyelid and start drawing eyebrow hair: Very well, my friends. I've just rotated my sketch because I want to shade this part above the eyelid and I will move on to the eyebrows. As I told you before, I'm going to shade, I shaded these bars with our flats coal powder which has more darkness. But in the continuous hour, we want to work on these part here and spread the darkness with our piped coal powder will start from the dark parts. I got a bit of my piped called Padron, my brush. And we'll start from the part we have already created. And I just kind of connect these shadings together. Pay attention that the dark, the very strong darkness that you have would not go away in creating these connections of these two colors together. Even some darkness is like here. Some darker spots like here. Should be don again, and we should bolt them. And they bit more. We'll complete this darkness toward the upside with my coal with my piped coal powder and I will move on. Take the extra powder off your work. You should definitely do this. Bringing the darkness little by little in your work. If you just bring all the darkness suddenly into your work, will actually make so many problems for you. As if you spread it all the darkness all at once. And you would have some very stains in your work. Although in this sketch, creating some stains would not make that much problem for us because our skin has so much textures and creating some states may not work, make any problems for us, but we try to do these steps as we should do in a normal situation. So if you even had is smooth the skin, you would know how to create the shadings and the volumes and the textures. We did not get too much into the details because it next is that we are going to create the lights and then we will mark on the shadings and the details more. I've picked a bigger brush and I'm just going to drag it more slowly toward the upside. The movement of my brush is circularity. And as I told you before, try to keep your brush vertical on your work and I don't do it now. So you can see the work easier. You should do it. We add to the darkness little by little so we can get to the gray color of the skin which exists here. Okay, this darker color up to a point and because we want to create the eyebrows will not drag the shadings more upward. So we're just going to work on the eyebrows a little bit, give them a background color. And then later we can come back again because we don't want to lose the eyebrow hair. And then we can come back and shade the eyebrow. Two are going to create these hair on our work. Which you have already determined in our primary sketch. As I told you before, and as you've learned up to this point, I'm going to create these hair with my heart count pencil. Some hair are so thin. So you can create them with Paris gone pencil, or you can leave them for next step, the ultimate step of your work. And in that is viewed at these very thin hair into our work. This part also have hair which has gone away during the scattering. Try to rotate the pencil in your hand continuously so you can use the sharp side of your pencil. There are some hair like this which are coming from the inside to the outside and you should know is create them and start them from outside today inside. Because at the end of the lines we will take our hand and that actually shows the direction of the hair. So try to keep that in mind. Some hair are thicker and some are thinner. For now because we're just creating a general shape of these hair. We didn't get too worked up with the thickness of the hair unless it's so obvious. So it work on it. This part of this sketch has a very, very strong darkness that after we've created the hair, we should completely at that darkness with our coal. And then again due to face meetings, should pay so much attention that into parts which add to eyebrow does not have so much hair. When it comes to a part that the hair are not so concentrated and it's not busy. You should pay attention so much in those parts because you might just create some hair in there accidentally and you lose the correct shape of the eyebrow. For example, when we are getting into these parts, some parts needs to be untouched and without hair to try to not create extra hair. So I'm going to sharpen my pencil, sharpening it with a cutter, and create the rest of the hair. You can also use the adequate sharpeners for content cells. Or you can use your cutter. So you can sharpen the tip of your pencil completely and have a better thin lines or any other thin details. It's not only for the hair. In the sketches which we have so much lines, there's a thing that will prevent you.
42. Drawing the left eyebrow: From getting bored is that he would have much more pencils in reach for yourself. For example, in disorders, you can have two or three hardcore pencils and sharp and all of them at the beginning of your work. So when you are working parts like this, you do not have to stop your work. Sharpen your pencil, use it again. You can just switch the pencils easily. And venue wanted to arrest. You can sharpen them all again. This is something that I do in this sketches that I can use my pencil so much. So I would pick up the pace in our work and I would work faster. Of course, sharpening depends, can be enjoyable for yourself. You can even enjoy things like this, but it depends on your personality and your likes or whatever. Of course, if you want to sharpen your pencil with a sharpener, It's very easy for you and it doesn't take so much time from you. But I'm saying this for the people who want to sharpen their pencils with the cutter. It'll leave the tip of these hair for the next steps because they should continue way down. For now. We'll just create the shapes, the lines that we've already determined in our primary sketch. And we do not want to feel this area so much. We will leave the feeling to the step after we've completed the darkness. Well, we've almost got all of the lines that we've determined in our primary sketch. We can complete these parts of it more and then we can do the shadings of the eyebrow and creating the correct amount of darkness for them. I should have measured this part because I haven't completely created it in my primary sketch, so I needed it. This part also needs to get busier. But we can complete this part after we've created the main darkness, main darkest spots for our eyebrows. I'm going to take a medium-size brush, for example, size six. We take a bit of powder kohl pattern. And we try to go over the parts which have a strong darkness and create that darkness. It's better to take the flat coal powder because it has more darkness in it. Pay attention to your model to see in which parts you have a stronger darkness and which parts you do not have. And you shouldn't just feel the parts which are need to be untouched. Of course, it's cool and you can use your eraser and take away that darkness. If you have made a mistake. But it's better not to make a mistake and do not create it from the beginning. It's much better than do it and try to fix it later. Up to here, the darkness is almost as strong. And as we move on to the end of the eyebrow, almost up to this part, we have strong darkness. Because I'm bringing these darkness with my flat coal powder, I pay too much attention and I am so I'm having so much cautious for not getting into these shadings, into the gray shadings. Edges come a little bit forward and I leave the other parts for another set, which I will continue my work with my pipes called pad or a bit more. In here that the eyebrow has less darkness. We're just going to fade the lines and the hair of the eye brown one by one. And we're going to drag the brush and each one of them. And because we want to create a shading above the eyebrow and next step, and we don't want the darkness to spread too much, should just drag our brush even to the end of the hair. Just once would be enough. And please, please I again, I insist remember to take off the extra powder from your work. Determine the hair which was not being faded. I'll go over them with my brush ones. In this part, the background doesn't have that skin color yet. First we should create that skin color and then we can complete day hair. And continuing now our work for getting this eyebrow completely into our sketch. We're going to take a little bit more of our powder. And it will add the shading beneath the eyebrow in this area so we can get to enough amount of darkness. And the eyebrow will actually make scenario work. Has a darkness over here. This parse, the darkness should not go so much down, but the area beneath the eyebrow should get a color. Shouldn't get too much, but still. And the darkness of this area will be completed like this.
43. Drawing the left side of forehead: Maybe at the time of this tutorial is a bit long, but pay attention that I've said, I'm showing all the work and I'm doing all the work in a way that you can see it. And after turning off the camera, I try not to. Anything is special. So you would see age, is that age trig. And each time you have to spend for a kind of model like this, because some of my friends might think that they should create a work so fast and get the result. And for example, for work that I spent ten hours emit, they want to create it in two hours and then they will come and ask, hey, I did exactly what you said. So why I didn't get the result that you got? It's actually because you have to have patience and you have to spend time for your work to get the result that you want. The variety of your tools at the time you spent is are all important. That's why I do not cause of the video. And I would say, okay, go work on this part on yourself. I just want you to see each step and each work that I do. You will get acquainted with all of them. Now, before completing the whole eyebrow, I want to shade the forehead a little bit. So this part of our work will be almost complete. Before that, I'm going to determine the placement of these hair over here. Of course not so special. And in next steps you can just do it and create the position of these hair. But because we determined the position of these parts in our primary sketch, it's not bad to do it right now. Now, for this part, we can use a big brush because we want to cover a big area. I'm going to use the brush number 13. And powder that we want to use is actually piped coal powder. We put it in the powder and batteries completely. If you do not have a brush like this size, you can also use other brushes. But try to choose the biggest brush that you have and pay attention to that. The tip of your brush should not be selfed. This is the only important thing. And the psoas slowly. We try to go from the corner of our work to descend, drove it. And vigorous, slowly come forward. When the darkness and the tip of your brush has gone away, again, you should take the powder. You would take the extra pattern of your brush on another paper. And then again come back to your work. You see, I'm just filling this part so clean and so cohesively. Then again from the beginning. And this side we will come one layer forward. So I can cover and fill all these part slowly. The top parts of the four heard are actually darker. So that's why I'm going to start from this side this time and just drag it down in here. I don't have sorry, I don't have any choice. I cannot take the brush in my hand in another way. Just have to spatter to color and give this part very good gray color. And I should just take the brush in my hand in a vertical way. To background color for this Spark is good, but we're just going to add another layer to. Now to darkness for this part is enough because if we pay attention to the model, this area is light. But on this side, actually on the left side of the face, up to this part is a bit kind of curved in our forehead and it's darker. So I'm just gonna make this part darker. I've told you before. The hair of the brush may come up, might actually come off on your work when you're, especially when your brush is brand new. So do not be afraid and think that your brush is not good. So I took a smaller brush. I'm taking the brush number 16 to add the strong darkness we have on these aside parts. Now when I take a smaller brush, I have more control on the spreading to darkness around here. Wherever I feel it's darker. I will use this brush and darken it a bit more, give it more color. Now, on the par set, I have hair on my face. There are some shading and shadows. For example, in here because the hair all are concentrated. The shadings are more before the other parts. We should create one shape for each one here. So I'm just going to create a general shape for this part and later I can work on each hair itself. Now here we have the curve of the eyebrow. So I'm just going to shade it a bit more so we can complete the shadings of the eyebrow and the forehead. Sorry. We can complete the shadings of the forehead and then we can move on to completing the eyebrow. Okay. I drag these shadings sort upside like this. And these Barnett we have hair. I'm just going to create the shadings for them after working on the hair.
44. Create a dark texture behind the left eyelid with a pencil: Okay, My dear friends, we come back to continue our work. As I said before. After and giving a color to our work and creating some volumes. Now we want to work on the details and textures. And actually completing the eyebrows. In this part, as you can clearly see in the model, there are some darker spots that you can create them with appends. So it's both spots and hair that we try to create everything that we can see. In some parts, the darkness over here are kind of a result of the shading of the skin. Maybe I think it's better to zoom in a little so you can see better. Okay. I think that's more visible for you. In these bars. Pay attention that because of these darkness has been kind of faded during the shading. I'm using my pencil on them to actually add to the darkness of the more. I'm using my soft pencil for creating these. Because I want a strong dark color. Do not create this darkness. So in order because we want to create texture in it, and it needs to be a bit missing. In this part, the thickness of the darkness is more. Now when we shaded this part v have a reduced these darkness. And actually these darkness helped us to shade the parts above it. But of course, it got away from itself a little. So we're just going to complete these shadings. As I told you before, for creating these shades. I'm actually for creating this darkness. I'm getting help from my soft pencil. And here, as we said before, we can see spots and stains. Now it, they use a hard pencil. We can work a little on our spots and the saints that we can see on the skin. On the parts where the lines are lighter. We have to use the count par is pencil. For example, in these parts. And the lines or less, but the darkness are more. Also in this parts because we can see some stains in our work. I'm going to use my pencil on some part of it and then we'll leave us alone. And we haven't created as the eyebrows over here yet. After completing the textures, we will create the eyebrows hair. We have to create some small hair over here too. But we should do it again after the faded this area. Pogge's wanna do that right now so we can create some textures, get them into the work. When we use a brush. And a next steps, we just create their work. Which are on the top of our work. So we wouldn't have to work on the layers which are underneath. Now, even in these textures, we need more dark lines that we create them. This dark lines are actually coming toward the downside of the eye. And when they go up, we cannot see these darkness very well, except the eyelashes, which we should work on them later. Now it's necessary for us to use a medium size brush. Now I have the size six and my hand and work on these parts and we don't want to fade them completely. You do not want all the darkness to fade away. We just want to, want them to combine and mix into our work. We just spread the darkness that we've created a little. And also the textures defined textures that we've created. You see the darkness of the pencil is definitely more visible comparing to the other part and other kinds of darkness. And it can dark in our area as much as we want. Now, at the same time as we are spreading the darkness, we try to create the textures that we need in these parts too, is like that. We do not only fe to darkness, we spattered a darkness. And then we will actually create some textures, powders. If you pay attention in the model, we have kind of a feeling like this up to here. And a little bit here. We do not overdo it. We just use days pencil powders as much as we need. We do not overdo them. Our work as almost got the shape that we want. And again, try to take off the extra powder from your work.
45. Erasing the texture behind the eyelids and drawing the eyebrow hairs: So I will complete these shades later. And the parts that we feel like it's needed, we will work on it with our erasers. You see in apposition of the other parts that will say Does skin should be so smooth and so clean and clear. In here, we're just doing our best that recreate a stains n spots to create a better texture. Now, you can use your mono Zero eraser or your editor racer or your brush eraser. Create some textures on your skin. Pay so much attention to the directions. Because the direction of the light that we are creating should be kind of in a same way that we create in the skin. And the stretches of the skin itself. When you are using eraser, you should not be afraid. And wherever you felt like your eraser was too much on a place, you can add some shadings into it with your brush. And some parts were just need to create a trace of light. And it doesn't need to look like a line or anything. These parts are one of those parts that you just need to create a trace of light for that. We'll create textures in these areas little by little, and we complete them. So slightly we need darkness in this area to here is the part that is actually the beginning of the eyebrow. And if you pay attention in your model, you can see more darkness around here. That's why we added some see my friends to amount of darkness that you see is really dependent on the way that you've printed your model. Because I don't like to work from tablet or a mobile phone. I prefer to have paper around my eye actually in front of V and create my work depending on that. Now the darkness around my eyes like that. So try to get your printed picture with the right amount of darkness. So when you are working, your work will have appropriate shape. It's because we want to work on the eyebrows. Days parts need to be more colored. Now, we can work on little details here and create the beginning of the eyebrow on this part. Making the eyebrow more visible. I'm using my carbonic cont pencil in their parts which they hair are thinner. I'm just going to reduce my hand pressure. And the parts that we have thicker hair. We can use a hard pencil or if you're using a count Paris and pencil, you can use the type B of them, which are so similar to our hard pencil. Because the eyebrows are wet, have a special shape. There's a bit of this order and some places that actually when you add the lights next to them, it will give us that wet look. The beginning of the eye is not so busy. But when we got to the middle of the eyebrow, to the center of it, it's more Bayesian concentrated and your hand is more free to create some lines here. Just like this, we're going to create some eyebrows. In here. We do not have any special shape of the eyebrow. And error just want to show some hair but on the power set are coming toward the outside. We would be so careful in creating the darkness for them. Try not to get so BZ around them. In these parts There's some thick hair that actually, in addition to the thickness of our hair, in some parts, two or three hair sticking together because of the water will actually look like being wet and looked like being a thick hair. But it's actually the result of the hair sticking together. It even exist in normal eyebrows without any actual amine dry eyebrows. But when you're working on a wet eyebrow or red hair generally, this might actually show more. You see, even if in this step, although we've created all the hair, you should pay attention to your model. So you would not misplaced the darkness and you do not feel some parts more than they need to be, so you won't lose the shapes. There are some light hair over here to that. I'm going to create them with my pencil. In the next step. For now, I'm just going to complete the darker spots with my hard pencil. Because next to these we want to create some light for now to give us that wet look. And for us to create the lightness in the right spots, we have to have enough darkness.
46. Completing the left eyebrow: Okay. After that, we worked on these parts and we created the big hair of the eyebrows and the thick ones. I've sharpened my pencil so I can create some finer lines and thin hair. That day still do have strong darkness. Decided to create them with my hard pencil. And then the ones which are so thin. I'm going to create them with my carbonic con pencil. Now in these parts because, uh, someplace have some strong lights. I do no work on all of them. First, I tried to work with my eraser and determine the parse with the lights. And then we will move on to this strong darkness. Now we can see some hair coming this part, this direction. And this part is not this empty. So fill it's a bit more. For now, the thickness of our eyebrow is a bit less than the models eyebrow. But if you pay attention, we are trying to move on step-by-step and feel all the parts step-by-step. So we would not come back again and do the parts. Actually overdo the parts. Now I'm creating the thinner hair with my carbonic cons between these hair. Because at the same time that is creating concentrated here. Concentration here. The hair that it's created are thinner and lighter at the same time. Also. It's the same for this part of the beginning of the IRL. You should create some hair like this. And at the same time that you're feeling your area, you're actually getting the shapes that you want. Lines that we're creating with our par is combed pencil can be lighter in some parts and darker in some other parts. And of course, we can create some lines here beneath the eyebrow. Again, just created in some prices everywhere. Because we might see some here below the eyebrow. And of course we haven't created anything in here because there are some thin lines over here. There are actually a continuous of the eyebrow hair because they're so small and thin. We would create them with our Paris pencil. And attention my friends, if you do not have one of these tools, it doesn't mean that you cannot create these parts. If I'm talking about different tools. That's because I want you to be acquainted with different tools and know how to work with h one of them. For example, here you can even use your hard pencil, but if it was too hard for you, you can also use your llama graph B8 pencil. And actually create these very fine lines with that. So there's no pressure to having all of these tools know what I mean. This part is a bit darker and the hair here is more concentrated. Test like this. Okay. Now if, if shaped eyebrow and two very good level, that now with adding the lights, it would be more complete. But if there was extra work needed on the eye Braille, based on the thing that we have on our model, we're going to move forward and create some lights. I'm going to create these lines with my eta dairy, sir. Or if you're darkness was so much and you couldn't take them away with your edit eraser. You can use your electronic research for creating these lights. And just create that red texture in your work. K. In these parts we can see some strong and big lights. I'm going to use my electronic race or in these bars so I can have stronger lights. Okay. Now I think it's necessary for me to clean the tip of it. And then again, I create delights. Up to some point of our work. The eye rash is almost shaped. Now we can work on the other parts of our work and move on to the next steps and adding day ultimate lights.
47. Completing the darkness of the forehead and draw the hair with a pencil: All right, my dear friends, I've sharpened by electronic eraser so I can create some light points in my eyebrow between day hairs actually. So I can create that a wet look on my face. Of course, some of these lighter spots that I seeing here are related to the actual hair. So first we should create her, then I'm going to work on them later. This part needs more darkening. And in this step I want to work on the hair which are coming on the forehead too. So the forehead would be almost complete. And a nexus that we can move on to the other parts. The textures for the lower part of the face, and we can actually apply them. I try to create the appropriate color beneath these hair. As we did in the previous step. We created some in previous one. But we said we want to complete the shades in this stage. And we just want to complete our shades. So after we create our hair, we do not be so engaged about creating the shades and the correct color beneath the hair. That way we can work on the hair better. This part of the eyebrows on the right side of the face is a bit darker because it's the skin, Adam, and I don't want to apply too much darkness all at once. So I try to take the powder little by little and apply to my work again, listen by little. Work as almost done. Here we have a strong darkness. For the Shea. Actually the shadow of the hair which is here. You see a smaller brushes are mostly better for creating the shades because it's like more amount of powder will be contained in them. And we can bring more powder and more darkness into our work. These parts are lighter so we do not go over it so much. Um, k depends cells for creating the hair are at the heart. Pencil and Paris carbonic pencil that I've sharpened both of them. And now I want to create our hair to here in this part are actually so light. So I'm going to use my Paris cone pencil so I can control it even more easily. In creating the hair, you shouldn't be too picky about each one of these hair. Meaning that it's not going to be problematic for you if the hair is just one millimeters to the right or left of their correct position in the fossa. You got to have a simulation, but you shouldn't get so picky about it. And you should reduce and increase your hand pressure. So you would have different thickness in your hair. And the hair on this side are a bit thicker and more darker. So I prefer to use my hard pencil for them. We didn't get to BZ. We just go as we can see in our model. Now in here, There's one hair coming down like this. The hair retrieve created their position in placement here. We should be very careful about the directions of the hair. If the hair is a bit of paper or a bit lower. Then we have in the photo, It's okay, but the directions are bit more important. The general shape of them should look similar to our model. And in creating these hair, we cannot just give extra twist in them because these are like some wet hair that are actually stuck to the face. Here we see a concentration of the hair, which is create the placement of them so we can create them with our hard pencil. First, I'm going to complete these hair, and then I'm going to work on the hair which are on the other side. You can see that some of these hair are actually coming into the eyebrows. So that's exactly what we're doing right here, right now. And are some here like this in this direction, they're actually coming into this light part. The concentration of the hair is almost enough for here. Now, I'm just going to create the herring. These parts can see them in my model. And just create a mark here. Up to here we can have this concentration of the hair. We start creating these hair. It's completely and semi-circle. It has different shapes. They have different shapes. And in here they just have a special thickness. As I said before. The wet hair will be actually darker in the parts like this, which we can see. A lot of them. Because we need a little light among all of these. We do not just feel all this area. We leave some spaces for lights. But of course, it needs to be more busy than this. Now we've created day actual hair with our hard pencil. And now when we want to get this area busy, we will work with our Paris count pencil. In here. We haven't some hair coming this way. We can also work on these and show them like I'm showing you here.
48. Completing the wet hair on the forehead: And there's another hair coming into the eye. And this part has been separated like this. And it looks like a hair is coming this way in the middle of this lights and direction of it is not clear that VR has it been coming from, and it's so light. Now we have the hair that we wanted here. The concentration is almost in a place where he wanted it. And I just want to work on them a little bit more so they would get a more natural shape. Also they hair return in this part at the top of the IRL, very small hair we're just going to add to these small hair. Also in here. There are some small here going up that we can see more concentration in these small herring here. Just going to show these hair more. There are actually eyebrow hairs. We're just going to create them in the way we see them. You see even showing this little hair can make your work pop-up so much more. Although they're little, they're so effective. If you've seen, it cannot work with your pencil in these areas, you can also work with your brush. Get it into powder, and very slowly create a Takes sure that shows the hair. We don't want to feel this part so much. And I think the hair we've created here, I think it's better to go over them once by our brush so that it will get a more natural look. Try to create color on them. You can work with your brush in the parse that you think they need to be darker or they need to get mixed up into your work more. In those parts, you can use your brush. And we are about to create some shadings in some places. For example, here, beneath his hair. We can show the shadings that'll actually get connected to this shading next to the eyebrow. Even beneath these here, we can add some more shading and shadows actually into continuous of the hair that we've created. But this work, we're actually trying to get the darkness more and tried to make it more similar to our model. That's why we are going over these parts with our brush. This area is a bit too light, so give it a color. And of course, the texture of this area needs more work obviously. But after we are going to complete, after actually we have completed. The hair we will come back and work on It's textures. You see we go over the pencil that we've used with, go over it by our brush. But it doesn't mean that we are going to fade all the parts. And this part and the middle is a bit lighter than the other parts, so try not to darken it more. And here you can see more darkness. You already did some darkening over here. We're just going to add a bit more to it right now. Before I add any lights, I'm just checking my darkness again and adding the parts which they need. So then when I'm working with the lights, if you do not have enough darkness in these parts, you cannot, you cannot get the shine you want from your light. If your background doesn't have enough darkness. It's like adding light to a white paper. You cannot see it. The model that we've chosen, in addition to it being so attractive, it's a dark model. So we are going to do lots of shadings. It can be darker than this, but I think it's enough for now. Now we want to create some light textures and some strong glides. In here, we're just going to play with our array sir little bit. So because we've worked with our brush so much, we can work on it a little bit more. Now we can take our electronic eraser sharpener with our sanding. In some parts. The goal is just to clean the tip of our eraser node to sharpen it necessarily. We can create some of the lines both with our mono eraser and electronic array. So right here, I created some lights for you with our electronic eraser. And now I'm going to switch to my mono 0 racer. And you can see, you can easily create lights next to these darkness with your mono zeroArray, sir, as well. Because these parts are so light and they have lied to stains. I think it's better to use your electronic eraser only. You see the light is, it's giving us, it's so sharp and it's so strong. And in some parts you need lights in spots and dots. And in some places you need to add some more hair that we will add them later. Now that we are creating these kind of light takes chars, wherever we can see them. We will apply them.
49. Creating lower subcutaneous of left eye : Okay, My dear friends, in this stage, we want to work on the part beneath the eye and we'll create textures. And then we will create the textures and the lights for the eyelashes and stuff at the same time. And we are working and creating a texture beneath the AI will take a medium size brush, for example, size 10. And with D-flat coal powder, we will actually spread to darkness toward this direction. Of course, the thing here is that we're not actually spreading the darkness. Actually. We are getting the darkness from the coal that we are using. It's not that we're spreading and fading all these darkness. Again, we take more coal and I just created the placement of these eyelashes a little bit so we would not lose them. Pay attention to your model and do not work Sumatran it. For example, from this part today, inner corner of the eye to the right side, you should not bring this darkness. And after creating strong darkness, let us to work on those parts with our piped coal powder. We're just going to work on this dark area as much as we can see in the model. And in here, as I can see, my photo is a very strong darkness that we are going to create it with our pencil. It looks like actually more there for the water which is drooping on the face. On the other hand, there is another darkness here, which is also a border, but it's actually a thinner line than the other one comparing to the other one. Also, the texture of the eye which is here. These are the lines that we can create them with pencils and our bit thicker. So we're just better to determine their placement. Then we will get the power on them and we will shape them. A small textures over here as well that we can not show all of them with our pencils. We're just going to create the placement and some of them and the parts that are needed. We can now work with our pencil in all of the textures. Actually, these are showing more the texture of the face. Now, use our brush to fade and mix these lines. You just go over them a little so they will be kind of faded. Then we will use a big brush, for example, by size 14. And we will guide this darkness and drag them up to the part that we need. Because actually we're actually creating an area and a border for our darkness. So we'll figure out how much we should drag them down. And as we come down, it gets a bit lighter, so we just spatter less powder in these lower areas. So later we can use our eraser to create some textures. And this area, in these parts we can see some stain of darkness. So easily recreate the darkness in here. And the shape of a stains and spots. As you can clearly see, the volume beneath our eye is actually being shaped now. For this inner part of the eye, as I've told you before, we're going to use our piped called powders so we can create a better texture for this part because it's lighter. I'm going to use the same big brush that I have. And we will make this part gray with so much cautious. But you should just create this gray so smoothly. So when you want to create the lights in them, you can easily create the textures and share the lights. In this part we have a drape haul water, but I didn't go to it, so I would not lose the border. Just going to create a color for these areas. And now because I want to complete this part at the same time and shape it. Again. I'm going to determine the placement of this water dripping down the face. So I'm using my 0 brush for creating this darkness. Because this part is going to be brushed later. Who will definitely reduce its darkness. So don't worry too much about it right now. Also, we will work on this side of it with less powder because next to it that border should be light. But just to create a border for here, we'll add some darkness. It do not overdo it so much. And I think here we have another drop. And if it's so hard for you to create these parts with your brush. You can also use the tip of your fader. If it's so dark. You can use your pencil. If they're not that dark. You can use a very small brush like 0 brush, or you can use the tip of your fader. You can also show the textures in your work a little bit with your brush. But of course, this model has so many textures that we should create, but you can create just some of them. And little with your brush. I might have said this several times. For creating the textures. It's important for you to spend so much time to be so patients and to be so careful and repeat these textures over and over again so you will get the result that you want. We've just determined a little bit of these lines over here. And in these lower parts, wherever you can see a very big drop of the water, you can just determine their placements. So when we are doing all the shadings, we would not lose their positions. It's 90 percent like this. And the lines which are here are actually going into the skin psych or part of a scan. So anything to the 0 brush is more appropriate for this place. And even if you like to create them with your fader, doesn't make so much difference. The procedure is the same. The lines that we've created here on this part of the skin are actually determining these areas more the areas that are showing the structure of the skin. So we're just going to determine the placements. So after we did this shadings, you would create these stretches so easily.
50. Volume the left side of the face: And it's not like that. We say if the there won't be available, you cannot create this area because it's so obvious and clear and do can determine all the directions in your skin. And you will just continue with take string in that direction. Just like that. We have given a general shape to our face. In this step, you can actually create a general background color. For whole of this part. We can start from this side of the nose and give it a very great gray color. And actually, after creating all of the shadings and colorings in this part. Our next move will be creating the textures in here. And of course, the friends that have been with us up to this level are actually familiar with creating the volume way of handshake being circularity movements. The movement on our hands should be circularly and in darker parts, we're going to use flat gold powder in lighter parts we are going to go, we depict coal powder. Some of my friends might use as smoke, but it's very hard to work with them if you're comfortable with working with other tools. So K for you. So I prefer to use the Kohl's because they're a bit heavier and they do not get so spreaded in our work so easily. I'm just going to rotate this part so I can show you how you can shade this part properly. I will take the flats coal powder because it has so much darkness and I'll use it for and this corner side of the face. And I started from this very corner of my paper. And I will start darkening my work. Because the amount of darkness in my work is so much I would not take away extra darkness from my brush. And I will directly transfer the powder into my work. And I will spread it and spatter it with my circulatory hand movement. So I can get better shapes and better volumes. They're using the smoky tools. You should be careful. You should put something beneath your hands so it won't get messy. Again, I'm going to work on this part more and adds a bit more of my flats coal powder. It needs to be darker. As we come to the right side. It would be enough for us to work with the piped call powder. We will spread and spatter deprived coal powder in the same spot that I worked with my flat coal powder. And a slowly, I will drag them to the other parts. And I will create a good darkness. I've got too much powder and my work. It may take it off. Okay. I think it's good. But as you can see, I'm not getting to engage with metalworking and be so concerned about being this escaping so smooth because it's actually as useless work because later on, you should create some textures on your work. And he would just destroy the smoothness so you should not care about it too much. Even right now. I just chose a bigger brush, size, 30 because it's a huge area. And I can give it color again. And on the other hand, we will make it more cohesive too. You've seen that works like this and at the sides of the work or like this, which have so much darkness. Doing. Using these tapes will actually help you so much to have a cleaner and better looking outcome. At the end, when we just take off this tapes around the work, you can see how clean your work will be. It's very useful for the parts which you have strong darkness at the sides of your model. And these bars are completely being shaped. The shape of the checks and other parts are showing themselves very well. We're going to create very good volumes in here. We've shaped this part and later with our big brush, We'll move on to our other brushes, which have stiff tip. Because when we are using that other big brush with a softer tip will actually have less darkness in some parts sad we want. Comparing two when we are using these kinds of brushes. They'll give color to these parts more. So we want to create textures. The darkness of our skin will be enough, and we will be just focusing on creating the textures will also give color to this area. Because these parts are not white. And I think our area is almost colored enough. So we can start working on our textures. We will come back and work on the textures.
51. Creating skin lights on the forehead: Okay, My dear friends. After that we've created the left side of the face. We want to start creating the textures. And we're going to start from this top part, from the forehead and come down. If you pay attention, there is not so much texture in the forehead. So I'm just going to create some dots with my brush eraser. And the way that you're seeing it. So we can show a kind of a skin texture on it. We don't get them so concentrated and make sue each other. As it goes to the left side of the face. As you can obviously seen your photo, the concentration of these textures are less. I will just do a part of them. But because it's something that doesn't have any special hint, I will do the rest of it later because there's nothing new into it and the procedure is completely the same. But for now I'm just telling you how to create these textures with your brush erasers like this. In some parts you can see more light. So you might have to increase your hand pressure to create stronger lighter or there is a larger area which is lighter. Like here. In here. I don't get the eraser off my work so much. I'm just dragging it on my cardboard so I can get these light textures on my forehead. If he felt like the darkest spots between these lights are less than you see in your model. You can use a tip up your fader and create some spots or dots. For us, it's not less, but just to make you sure, make sure that you will understand. I will do it for you. And I'll get darkness from this parts around debt. So we would not have too much darkness in our work. You can see that with a simple movement. If actually apply the texture of the skin. Applying the skin texture, we cannot say that generally it's the easy thing to do. You should pay attention to your model and see the different textures in different parts of the skin of your model. And just compare them to each other and see that how they are done because the textures of the skin are different. For example, if you're creating a texture on the foreheads like this, it doesn't mean that it's the same on another model or on this model, but in a different part. So we can have a variety of textures and it depends on the model and of course, your sense of creativity. We would not overdo these parts so much because if you create too much tanks, chars, they might seem unnatural. Tried to keep it in the middle. No2 minimum and not too much. These parts are too light. I'm mean I meant that it was too cohesive, not too light, was all the same. Now of course our hair in this part to that, a few one to be so picky. In your model I am sketch you can create those hair to various small hair. Okay. I can say that in the most of the forehead, we've created and showed this textures. The pictures with good quality and good resolution like this, which we are working with. You can see the textures of the face so much and you can show them so good. But there might be some photos of models that you cannot show so much takes sharing your work because the quality and the resolution of your photo is not that much. So you would not see the textures of the skin. So creating the skin textures will depend on your photos, equality and resolution so much. And in some parts, if you felt like it's needed, you can use your fader, your small fader, and create some lines representing little hair in some parts. But again, I insist try not to overdo anything and do not create them too much. Because the thing that you're seeing in your picture, it's so light. And in your sketches, if you cannot get them as light as you see in the photo, it will actually ruin your work. And it will destroy the whole shape. So do not overdo, do not overdo everything. So I'm just going to complete the forehead and then I will move on to the other parts. Okay. I think it's almost enough for this step. Again, I will tell you that you can work on these parts more than this. But I feel like It's enough for now. As you want to teach you how to create these lights and textures. And because the procedure of it is completely the same, I'm going to add some more later. When we are working on wet sketches like this. The appearance of a strong lights like this are so, so important because it's red and it would definitely have so much a strong lights and showing them in a good way is very important for the outcome of our work. I just sharpened my electronic eraser at my sanding and I will add that lights over here. If you felt like you cannot create these lights with this erasers, you shouldn't worry. Because as I told you at the beginning of our work, if some of these lights were not as light as we want and they're not as strong and we couldn't make them any chance. We can use our white pen for creating them and it would have more shine and it will show better. Okay, up to here, it's enough for us working with electronic eraser. Now, slowly want to work on the textures of the eye. And then the texture is left on the nose and the left side of the face. Generally. For shaping this part. First, we should give it lightly color. So this part of the eye, because almost completed the shades in our eye. But these parts need more color. I'm using a small size brush size 2, and I am giving color to this area very slowly, as you can see. I'm just giving a color to the lower eyelid. This part, the inner corner of the eye. Beneath it will going to add a little darkness so we can get a good volume from this part. Will darken these areas and part inside of the eye. The eyeball also needs darkness that it should be shaded. And there is actually one or two shadows of the eyelashes on the eyeball. First I'm going to drag this darkness downward to create some shade. And then I'm going to use my pencil. But right before that, let me use my 0 brush and give a better shape to these shadings. And actually show the shadow of the eyelashes up to a point with our brush. And now, because some of them are more clear, I'm going to use my pencil to create them. Just like this. That of course we can see, we should add to the darkness of this place. Now it's shaped. In this part we also have the shadows of the eyelashes on the eyeball. And because it's so, so fine and thin and we can now create these curves with our brush or pencil. I'm going to use my fader on the left side of the eye and the right side of the eye create the shadow of these eyelashes on our eyeball. And on this side, it's the same. It's actually a reflection and the shadow of the eyelashes. It's too faded and we should not work on them too much. Be careful about that. There are not so completely clear. I'm going to use the fader for this inner corner of the eye to create a shape and a volume for here. As you can see, it got a shape. And this lower part doesn't have too much darkness, but it needs more color to it. And again, I'm going to use my size two brush and darken this area just a little bit more. Actually, when you're darkening these areas, you can show the lights in your work stronger and better. We'll actually show themselves. Also in this side. I'm using a darkness which has been left on the tip of my brush. I haven't taken any new darkness and I didn't take any coal.
52. Completing eyelashes and whiteness of the left eye: If you pay attention to your model, you can see a literary darkness over here that I created like this. All right, Now, considering that we've dark and this part more, now we can add the lights which exist on the eyeball so it can show its shape better. There is a light over here. Again, the tuples are areas sir, should be sharpened. And there's a very strong light over here. And in this part we can see lights to in the other parts we don't see any strong lights in the eyeball. But there are some parts under eyelid that first we should add some darkness then work on them. But as long as you are working with our electronic eraser, it's not bad to create some lights in some parts of the eye. Most of the eyelashes which are in this direction. As should get lights. It can create them read to your electronic eraser or your eraser. I'm using this one. And I've just created the lights for some of them now. But definitely we should go over them with some darkness later on because it shouldn't be too light. And the upper eyelashes also need some light. But I'm going to rotate my work so we can have a better position for our hand, a more comfortable position for our hand. So we can give the lights in the correct direction. So we can have a better outcome out of it. But of course again, should sharpen the tip of our eraser. The friends which have usual electronic erasers note with a smaller tip. You can use this or you can even use your mono Zero eraser for that. Don't want to stress out or worry about anything. Let me show you with my mono 0 eraser so you can see it's possible. And we can apply them with this too. Even we can edit some lights that we've created before and gave it, give them a better shape. Of course, at a lower eyelashes need so much work. And in this upper eyelid, the skin texture is not complete. Two should work on it and shape it. As you can now compare the left eye to the right, I can definitely see the difference. Now I'm going to use my heart pins sill. Or you can use your HB Paris pencil. I'm just going to use my hard pencil to actually complete the shape of these eyelashes are hard cone pencil is darker, so it's more appropriate and better for our work on this part. Generally our eyelashes a should look more alive and better. When we have models like this, which have big eyes. And the textures are shown very well in them. To edit these parts. The eyelashes, which are coming to the inner corner of the eye are so thin, so fine, so being more careful and in this area, some of them are even going to into the eye a little. But again, we should create them so fine and so thin. In this area we have a darkness like this. Because the amount of darkness is so much I've created with my pencil and with a strong hand pressure. The texture which exist here actually contains a lot of lines and dots. And so because we want to make this more similar to our model, we will add to the lines and dots in these parts a little bit more and a sparse. We have various strong darkness. And in this part, as you can obviously see, has gone into a very dark area. May cannot see Sumatra of the textures already eyelashes. Only some lines in days parts between the darkness. And it's just showing a shape of the eyelashes. Now, we can come back to this lower part of the eye and work on it more. So again, I'm going to rotate Mark work. And we are going to work on Day lower eyelashes and the textures beneath the eye. Now for creating these eyelashes, and again, I'm using my heart count pencil and adding the darkness next to the lives that we've already created. Days eyelashes have actually make up. And because of the water that has been running through a phase and eyelashes, the darkness is kinda spattered. It's like add a makeup is coming down. So to eyelashes, seems so bold. So do not to be so picky about them. But as the eyelashes are coming to the inner side of the eye, as we are moving forward. Day get thinner and finer. I do not wait so much on each eyelash one by one because it's not necessary. And we don't need to get so picky and so careful about each one of them. You just need to be concerned about the general shape of the eyelashes on that area. And they will get the correct shape. In these parts, the eyelashes are a stick together. And if created a shape, because it wasn't a light area, I've created those eyelashes with my Paris gun pencils. So and darkness with me, more controlled and it would be lighter and cleaner. And now again, I've switched to my heart pencil. In this area, this darkness has more thickness. And of course, the stains which are here coming down, which I think is the result of the main Cup coming down from the eye because of the water dripping through it or something like that. These fires, because we have so much stains and spots, it needs more darkness. Therefore, I'll just move my hand so easily without being too concerned about creating a stain or spot. And I will create these darkness all around here. Because I want to add to the darkness of these areas a bit more if you pay attention, I'm using a small brush because I don't want the shadings to be so smooth. I want to create a stains in my work. Even. Maybe sometimes we need to add some darkness with our pencil in these parts. So the shape of this area would look more natural. We also add darkness to this part. Not so much, but as much as we need. This area is generally lighter than it should be. Say ni is a darker shade, so it can show the textures on it in a better way. If you pay attention, we have some lights between the eyelashes. And they're not in a special order. So we're just kinda randomly apply them. In this Bard. There is so much of them. And in some parts it not that much. And of course, and eyelashes are less and then they should be right now, niche should be more concentrated on these parts, should be more easy. But before we add to the eyelashes, we are going to create the textures of this VD. Add all of the darkness we need at all the lights when it, So I get a shape and then we'll move on to the details. Now I'm going to use my brush eraser. And we need some textures over here. This part is completely dark.
53. The textures under the eyes and subcutaneous of the water droplets on the left side of the face: That if we want to complete the darkness of this vd even more, we're going to work on this part a little bit more with our soft pencil and darken this area even more. Now for getting the darkness complaint lane to our work, we doubt pushing the brush too much into the cardboard. Little drank our brush on our just enough to combine the darkness into the rest of the area. Now we have some light spots in this area that we are going to use our brush eraser to create them. Even between the eyelashes. In some parts, we can see some lights that we can work on them with our brush, your'e, sir. Actually, we should work on them with our brush eraser. Just like the things you see I'm doing. Because edit textures are generally too dark. But when you pay attention, you can see this darkness is not all at the same level in all the parts. Some parts, it's less than some parts, it's more. In this part we can see the lights a bit more. Also in the lower area. And from this part on, a connects to depart, which is more gray. And the shape of the textures will continue downward in these parts. Of the textures. On the area beneath the eye, if you pay attention, are actually in this direction coming down. So we can use our HOD re-send for an eraser for the light switch exist in here. You see the direction of the texture should be shown completely in our work. And they shouldn't be all one a straight line. In some parts they might be separated and caught and then assorted again part by part. That would definitely make your work look way more natural. We had a drop over here that we've lost it to hearing all the shadings bus, we can create it again. And for creating it, I'm just going to use this eraser so we would not lose it again. When we are creating textures of this skin will add some light and another light here. Now we will use our small brush or are small fader. You will add some darkness in this area too. And if you pay attention in your model, we can also see the texture of the skin, even in these drops of water. We need a little darkness. Behind the slide. See, the drop of the water has been shaved. Of course, there are so many drops existing in our work. And at the same time that we are creating the texture of the skin, we should shape those drops to. Actually the lights of these drops are going to connect to the textures of the skin. Even in India, draw Paul Doe water, we can see a reflection of this skin texture. And you can definitely see the shape of it. And in this part of the eye when we are coming from a dark side to their light side. We can even use some dark lines for making these darkness look more natural. You see your lines should be so, so thin and line. As much thinner and finer day are, the shape of your textures would be more natural. Just be careful that they should not look so parallel to each other. Try definite different curves and we'll get this thin from each other. They will get close to each other. And some parts you can add some darkness or keep them a bit lighter. You can see this shape and you can use a pencil in the parts which are next to the dark spots and dark sides. So in the light of spots, you should be very, very careful with using the pencil. I think it's enough pencil for now. So I'm just going to take my 0 brush and fade these lines a little bit more into our work. So if you look at your model properly and in a correct way with so much attention, definitely creating textures would not be a hard and difficult job for you. In this area. The textures have a rotation and a curve, and you should be very careful about them and pay attention to them because to curve under rotation of the textures are actually showing the rotation and the curves of the skin. So if there is any turns on the textures, it means a turn of the stretches on the skin. Now, as you can easily see, these areas getting more shaped, you should give a color today's parts as well. And we add to take stairs and this part, which we can see the water. And for that, we can created with our 0 Rosh. Or we can also use our paper cone for creating that. Both are good for this part. You can use whichever you think is easier for you. The directions are very important. The number of the lines are not important. First, you should pay attention to the direction of the lines and then you should pay attention to the concentration of the lines in each part. This inner part needs more darkness, but because now I'm creating the texture, I will complete this and then I will come back and complete the darkness more. And again, I say pay attention even the textures that you see in the drops of the water are in the same direction as the texture of the skin. So they have a little turn here. Between these, we add the lights too. Pay attention in your model so you can see where the lights are more. As you can see in the model. The sides have less light, but the middle part have more light. Generally. In this area, we should see some lighter spots at the sides. There is actually showing the border of this water dripping down to face. On the other hand, this inner side of here should be darker. So I'm just going to take a little bit of powder and I will darken this area more. The part beneath this drop, which is here, has so much dark this that we can easily use our pencil beneath this drop. And faded a little spatter to shadings a little with our 0 brush. Also, this apparent drop. It gets so much shading. And in here it has a strong darkness. Even this part above the drop will complete the darkness and we will fade it. And as you can clearly seen the model, this area still needs to be more dark. L take the smaller brush, for example, size 2. And I will apply and a spattered is darkness on my work. Up to the point which we can see this gray color at the end of this water. We'll just going to continue to darkness up to that point. Also is the same for this drop. Actually the darkness of this shrub is less than the other one. But again, this still need a very small dark line here. It's kinda like it's showing the surface of the drop created and we will spread it, then spread or it. I'll lower displays. And I think it's necessary for putting more light in here. So we can get the correct shape of this drop. Now that I'm paying more attention and can see even in here, we have a shape like this, meaning that we have a darkness over here. And on this side. Because the darkness is more Rican, show it. We can show the border with our pins. So and then again, using our brush to fade that line. So we can get the volume of this drop. So it can say it's kinda separated from the other areas. The upper side of it doesn't have a very specific border. Okay. Is allele. And little by little, as you can see, the shape of these drops are being shaped better and better and they will look more natural. Of course, there are some details left around them and the whole area. But the drops of water or almost shaped. You'll apply the lights in their own placement. And we need another light coming down from here, like a drop of the owner, but it's too faded, is just like a trace of water. Little drops dripping down. There's just a little darkness next to it, so it will be separated from the other parts. And again, I say generally it's a bit faded. We can also add to the lines of this area. So this drop will show Baker. And of course the part beneath it should be done with a disorder. Textures should be shaped like this. You see creating a texture is a work that needs so much of your time. But when you're doing it correctly, you can also enjoy it. And at the end, you can see the outcome of your work and you understand the value of the time you've spent on it. And at the end you can see it would be so different from a person with just creates a general shape and leave it there. And do your work will definitely be unique. I'm going to shape these areas with our brush eraser and create some textures here. Be careful about the direction so you would not make any mistakes. Even accidentally. In some areas of this part, we might need some light dots. So I'm just going to add them like this.
54. Completing the texture and darkness of the blade of the nose: Okay, My dear friends, in continuous of our work, we can complete the texture often nose or we can work on the left side of the face. I just need to tell you one hint right here. I'm doing this a sketch from my print that I have here. But the prints that I have is a bit lighter than the original photo, which you can see here. Considering that I'm working from the print picture, I'm going give it lighter, but you should determine for yourself that which picture you're working from. So you would create a darkness as much as you need because I've been working from the printed picture. I keep the darkest spots and darkness as much as I can see under printed picture. If you pay attention in your model, we can see that in this part we need more darkness. Do not be afraid to create any darkness and darkest stains in this part because in the original model you can see some stains. Over here. We will give color, more color to this area, more darkness. And of course, when we create a volume, sorry, when we create tanks shown that, that takes sure will show itself better. We should actually take away delight of these areas a bit, making it darker. After we've done this, we're gonna use our brush eraser. First. I'm going to claimed a tip off with that bank cutter. Just made some cuts. So I will have a clean tip. And they use of this array, sir, we tried to create some textures on this part of our work. Of course, we would definitely need some electronic eraser too. So we can create a stronger lights bonds because we've already created some textures on the forehead. We tried to connect these textures to our forehead. Pay attention to the stretches of these textures so you can see the direction of the skin. In some parts we have dots, in some parts we have lines. And you should do as the way you see in your model. If you wanted to work it from the original picture that we have on a file, we shouldn't we should have done this whole work one or two degree darker. But you should pay attention that at the beginning of your work, you should pay attention that on what degree of darkness you want to work on with. So you will go from Watts picture from the original fine or the printed picture. If I wanted my work to be darker, I should get a darker printed picture. Or I should have org from day tablet or my phone to see the original picture. But because working from a tablet or a picture on a phone and on a phone might actually hurt your eyes. And say, it's better not to do that because you have to look at it a lot and get so close to it to see the details, to see all the textures. And it might really hurt your eyes because you have to spend so time on it and so close. Generally we try to create some textures in the parts that we think it's a bit Raul and not takes driest are detailed. Try to complete these textures. And k would add a bit of a skin texture on these parts too. This part needs to be dark and a little bit more comparing to our work, to our model. I zoomed in a little bit more so you can see the textures more clear and better. So when I'm doing the shading above this part or lower this part, I have to move the camera a little bit more and I hope it's not disturbing for you. Okay, in these parts, we also have some small textures in the shape of dots and lines. Small lines, of course. Now we should create them only when it's closed off from the face and scan and quality and resolution of the photo is good. The textures would be seen way much more. In this phase. We have good quality photo, a really good camera, and it's a close up. But in addition to that, the face being wet will actually show us more details and it makes the textures to be pop up more. In here we have actually two reasons. Right? There is parse got away from that Raul lie, looked at they had we've also created just a delight parts. They have dark parts to retrieve would work on him later. We also going to work on this part a little bit. It's a bit wrong.
55. Final completion of nose texture: So try not to get too much of the darkness from your work. And you shouldn't just lose all the darkness you have in that area. So don't overwork video eraser. Now we will move on to our fader. We will take a bit, a little bit of powder with the tip of our fader. And we start completing the textures and creating very fine and thin details and darkness. Just next to these lights. In these bars we add, actually applied the lights, but we haven't done any darkness next to them. So I'm just going to complete this part first and then we'll move on to the other parts. And, uh, you don't need to have this darkness next to each light. If you have it in some places randomly. I mean non-randomly. Actually, you should take a good look at your model. But anyway, I'm saying that you shouldn't do it next to each light that you've created just in the parts that you need. Just like this. Now we are going to work a little on this part at the tip of the nose, but so, so little. Just to give a shape to these drops that we've created here. The water dripping down just a little. This does that we've created here are not showing drips of water. So we do not work on them so much. But we try to add some darkness in the places that are needed. Again, I say try not to overdo anything in creating the darkness or in creating delight. Both can harm your work. You see a very, very small shade is actually shaping the area and creating the texture that we want. And we don't need to work on this part so much and creates so many shadings. You just have to know where to put them. In these parts, you can also put some darkness, especially in this part. And of course in here. Here you see underneath the eyebrow. In addition to creating the textures in here, we should create some small HER2 like this. And on this side of the eyebrows as well. We create these dots and spots. We can work on the rest of our job with our fader. Creating the texture and spattered in this dark area. And even so, so little in a way that you would not take so much of the darkness of our work. We can use a little bit of erasers so our texture with look more natural. Next, so this light part here, because I think the shape of it is a bit on natural. It's needed for us to work on the shadings a bit more. In here, we should have more disordered textures. They should be more random. K. Up to a high level. We have shaped these as textures. And we are going to use some Lille. We're going to use our eraser to create some little lights so we can have a stronger lights in our work. We can say that our nose is almost done too. We can work on it more. But in fact, practically they're all in the same procedure and they're saying.
56. Creating texture next to the nose on the left side of the face: Okay, my friends, we are going to continue with our work. It takes rising this part because I want to save the time. I've created a small lines next to the drops of the water with our can't hard pencil. And the ones which are lighter I've created with my Paris pencil. And I've actually darkened day whole area of this left side of the face. Because if you pay attention, the left side of the face is generally darker than the right side. And so when we want to create the textures, they would show up. Now in this far that we have enough dark this. We start with our eraser to create more textures. Tried to create your textures in one or two steps. If you do that, you can create the textures with your brush eraser very easily. But if you've gone over your cardboard bit brash so much, It might be even so hard for you to create a tasters with your eraser. Because that would actually make your work harder. To work with the eraser and shape your work. And you should keep your pencils closed, SIR cells. So our ever you thought it was needed, he would become plating the texture. The texture of the skin in this area is not so much clear. There are just some stains then as spots which are coming downward. And in some parts because of the water which is on the face, we can see more shine in them. First we just try to create the stretches in the direction of the skin texture and where ever felt it was needed. We're going to use our electronic research or our mono 0 racer. And to get the lights stronger. And the texture of the face will be shown much more in that part. And if you've paid attention, you can see that we're not creating these textures all in one straight, a continuous line. And we have cots over them because that is what makes it look more natural. And the parts we can see here behind the drip of water should have more shadings. So we can show the textures in them better. So I'm going to darken them a little bit more. Also in these parts. You can see that in these fires we've already applied the erasers, but it's not completely shaved yet. And hearts inside of this drooping water, they also need more color. And from this side, in this upper part, you can, you can not see so much border. And this part needs to be lights and a bit. As it came to here, we can see a very little more there. This little and arrests of it doesn't have any border. And from this side, we are creating a small part. But we should change our tools continuously and work on it so we can get it into shape that we want. You should be patients in here so you can get the result that you want. The result that wakes your work. Unique comparing to other people. Behind these lights. We need to create some darkness. So who shape this area better? If you pay attention here on this gain, we can see some lines that have so much darkness. I'm going to use my Paris cone pencil to create these lines in a literary way. Okay, I think the lines are enough up to this point. You should then get it so busy. These are actually the textures of the skin that have a shape like this. These are actually a fallen makeup. They're not wrinkles on the face. So from the darkness, they're coming out. And we are going to create this with a brush dipped into the powder. In this part that is striped, textures are less. And in here again, we can see more dark sayings. And this part we can see more darker stains. Furnace just creating this things. So later we will go over them with a bigger brush and combine these things into our work and take the extra patter a firework. This area has so much darkness up to this part here. We try to create this stains and add to the textures of the skin in these areas. You see I'm not working on the details so much. I'm just creating some stains in different parts. Now I will take a bigger brush so I can create bigger savings. Because we've created a darkness, but darkness alone is not enough for us.
57. Create left cheek texture with eraser: I would not combine these things too much in my work. I just put the brush, creates some things and takes up brush-off. As I said before, I'm working on those things that we've created and spattering them with a bigger brush. But even in a spattering them, you should pay attention to that. It should be in the same direction of the scan. We're not going to insist so much to have a circulatory movements for our hands. As you can clearly see. And our phase has the shape and pink, stained and messy as we wanted to be. Sometimes creating stains in your phase. And creating textures will be harder to keep the skin smooth and clean. And scans like this are from this type, which are hard to create textures and stains on him. I can see something like a drop of water here, but I'm not completely sure that it's a drop or not. But I'm applying the darkness as the shape that I can see them. And actually from drop, I mean stretched that water is dripped from that direction and came to this way. You can see something like this. But because our model is so dark, I am not completely sure about this being a drop of water or not. I'm just applying the things that I can see. Of course, there are some small drops around our work, for example, I can see one over here is small one. And we can create, and another one over here. And another here. In this upper area. In the parallel direction, we have a smaller drop and a bigger one. Beneath that. In here. We apply some lights. So we would not lose to parse that we've created for the drops. Okay, now the placement of these drops are completely determined. This parts have more pull cadet textures instead of being stripped and have lines. So I tried to use both lines and dots, mostly dots in here to create texture of this part. As we come to this side, the literary texture of the skin will be more. Try not to keep the eraser in one place for a creating a variety of textures and the movement of the eraser, rotating the tip of it. All of them can be useful. You can create the linearity textures with both a brush erasers and Mono Zero eraser. As we go more inside these literary textures and actually the lights of them should be less. So I'm not doing this with my mono Zero Eraser. And I will keep this in this very same area. As it goes down, I will switch my eraser and I'm going to use my brush eraser so I can take less color from my work. Just like this. In some powers we do not need lines and we just need some spots, sense things. So it's so much cautious we move forward. And in these parts I'm going to create these textures. And as I move upward, I continue with creating these lines and stains. Of course, there are some darkest stains and spots and dots which we should create it. Create them with our Hansel. Should definitely broken them too. As you can see. Now, we are just using our eraser. Later on, we can use our other tools for creating the darkness. In this side parts, a few, pay attention to the textures of the scan. They are more going upward. You should be so careful about this variety of skin textures so you can get them right. We'll add some lines on this part. For example, here we need another darker spot to a very strong darkest spot. But we will add it to our work in the next step. Having variety in the texture is one of the most important things that we should consider. In any textured a skins. You should definitely work on them and be careful about them. As you can see, we are doing some of the textures that can be lighter with our mono 0. Because it gives us a stronger light. Even the darkness we have here, we can use our eraser on it. So although it's so dark line, but we can create an texture of the skin on it. And we should fail all this part with the same procedure.
58. Continue to create textures on the left side of the face with a brush eraser and pencil : Okay, My dear France into continuous of our work for completing the textures of this area. We're going to use our electronic eraser. And first create the drop all water, which is here, and create delight for it. And another smaller one here. And of course, these bars also have darkness that we should make them more in here. So later, we will continue them with our other erasers. Like the one I'm using right now, will shape them like this. And we can actually determined directions. Pay attention to that. In the parse that the directions, the direction of this skin stretches are changing. First issued, determine them, and create them in the same way. You should be very careful about them. And of course, the parts which are here needs more work between these textures, we need more work. And after we've completed the lights, we can come back and work on these parts. Just like this, recreate these parts. Try not to create any borders here. Of course, this part that comes up as more darkness. But as you work from the outside toward down and from downside toured up, you should create these lines and you should create these connections. So we don't want any border to separate them. You actually want to connect them. There is a drop of water that is now completely shaped, so I'm working around it with my Lamar graph called B8 pencil. Okay? The continuous of these textures which we've already determined their directions. We'll be done with our eraser, but we're not going to make them too wide because they exist in a dark spot. We're just going to add to their lights in some parts so we can keep the shapes and form of the textures. And you should be careful again, I insist that these textures would not look so parallel to each other because that would make your work a natural. That's not what you want in a surreal painting. In this part, the textures are showing less. So in these parts, it's not so much linearly textures. There are just dark or light stains. You see, he should just follow your model. When your model is completely clear. You should pay attention to your model and see how it is. And in some parts, in some sketches, you might find models not so clear. So you might use your creativity and create the shapes as you've learned before and your knowledge. Mud, There's some sketches like this one, which is the quality of the textures and the photo is very high and you can see the shapes of textures completely fine. And these parts again, I say the textures are more like a stain, not linearly, but as the sides, when we come to the center of the face, we might add some lines here. But at the side of the face we just have a stains and spots. Not so much lines. Just because we don't want our model and sketch to stay Raul and untouched. We're going to work on these parts with our erasers so lightly. To say, sometimes when you look at some textures, you might think they're too complicated. And you think, Hey, I cannot do that. But if you make your decision and you would say that you want to do it when you get into work and when you start, you would definitely get used to them and you'll actually understanding, understand them during working on them. Actually, the more complex textures are easier because they are not in a very special order. And you don't have to be so specific and so picky in all the parts. So don't be hard on yourself because you would get the way of them. This, this order in the textures will actually help you. It's not, i's are i arouse or any special compartment of the face. So if you misplace a little on some parts, it will ruin your whole work. They are disordered textures. I've determined the darker parts with my pencil and now I'm back to the eraser. As you work on these areas with more patients, you definitely get a better result. Just pay attention to the shapes. How much darkness they have, what shape they should get to get more similar to your model. You say, we're not doing anything is Vishal, we're just using our brush eraser and walk on this darkness here, get around it and create some shapes. But for creating these shapes, I also have one eye on my model. So we can get a general simulation to the model that we are looking at. In these parts, again, I can see some linearly textures and shapes. When you're using your erasers. And you want to have a very thin and fine lines, you should not have any hint pressure. Because if you have hand pressure, it will actually make the trace left by your eraser thicker. And it might get a stronger light in some parts, might help you and be useful for you into parsed, I do need a stronger or thicker lights. So to trace of your eraser, left will be thicker. But in other parts, try to control it and lose the hand pressure. And again, I'm going to create some spattered spots and Sainz, the dark ones with my pencil. And here I am using an the HB Paris combed pencil, which is actually doing the same thing as the heart count pencil for us. Even in these parts. We can see more darkness that we can work on them a little with our current pencil and create these dark lines. But you should have no pressure on your pencil. So the lines would be so thin and fine. Just create the shapes for you. As we move in closer to the inner part of the eye. If you've paid attention in these parts, we've created the lights, but we haven't shaped the darkness. In some parts. You can use your pencil or your llama graph B8 pencil. And you can actually create these darkness and spatter them. We just need a trace of darkness around these areas. So we would not have any hand pressure. As less hand pressure is you have it's better. As we get closer to the upside of the lower lid. We can see in our model that these lines are being seen more. Okay? As you can see, these darkness might see. These darkness might seem so small or so little, but they're actually shaping your work and making it more similar to the model that you have. These lower parts might need less pencil lines. You might need to work with your 0 brush or your paper cone to create some very, very small and thin lines in the lower areas. These parts also still need work. As I've told you before in this model so many times. In these types of models which they have so much takes chars, but cannot say DO wet. Look on this face has so much work because as they show the drops, they're done. But am as a takes chars are so clear on your photo. You may spend a lot more time to create them.
59. Completing the darkness and lightness of textures on the left side of face: So we will fade them to the right side. Considering the direction of the light on our face. This will actually makes your darkness into your work. And at the same time, this prominence parts and the curved parts will get more volume. When you're fading these parts. In one side, you're actually creating a prominent part or a curved one. Of course, with this doing, a little bit of your light will be taken away from your work. So it would be necessary for you to create some more lights later. As I told you at the beginning of our work, there's some parts of these lights that maybe you want a, get the result that you want using your eraser. So at the end of our work, we might use a just a little from our white pen. So we can give a better shape to them and give them more light. You see in these parts the days shapes are completely done. And in the lower areas that takes chairs which are here, comparing to my model which has this amount of darkness. I'm not going to make this part so dark because in previous steps I've told you to. The amount of darkness you use on your work depends on the degree your model. Meaning that if you're working this sketch from the original file of the photo on your tablet. It's way more dark and then you can see here. But if I wanted to create and this work with that amount of darkness, some of the textures might not show themselves that much. So I've decided to go with a lighter model, with a lighter photo. So I can show more textures and I can show them better. You should pay attention to the shadings and next to the drop. So water. Creating the water. When you've learned how to create textures and transfer the feeling of water, It's very, very enjoyable and satisfying. In some other models are there would be some drops of water that has been splashed. They would look so beautiful. And at the same time they are not a very hard work to do there. Very easy. You will add the lights and complete them like this. To edit array sir gives more light to our work comparing to the brush or eraser. Wherever in our work we see a light that we see. It's not as strong as the electronic eraser. And it's not to minimum as minimum as a brush eraser, we can use our mono 0 or better, our edit eraser, k. We might have some more light over here in this part. Try to keep the lines that you're creating for this part short. They shouldn't be so long. And here we create some light saints and lines kinda randomly. Because I have, we can say they're all lines in some spots. We just have stains of lights. That makes to these darker spots, it will give a better look to our skin. Should move your hand all through your word randomly. So the textures that you're creating would not be all the same. Day, would have variety in themselves. These lines are lighter in the model, not the darker model on talking about my printed model. So because our model is lighter now, We're gonna go with that. Only some of the textures on this side of the cheek has been lived. These fires are so dark, so I prefer to create some stains with my soft pins. So in this part, of course, we've created enough darkness with our coal powder, but for getting that look of a scheme being prominent in some parts and curved in some parts and textures. It's better to create a kind of texture like this. They look like small balls and small dots. And I'm doing it with my soft pencil. As I told you before again, when I say I'm using my soft pencil, I'm saying that what pencil or what is the best for doing this job? You might work on this spot with your heart pencil. And it might be okay with you. Because sometimes I see students doing something with soft pencil. And then the teacher would say, Hey, no, you should have done this part. We do a hard pencil and they will erase it. And that actually ruin their work more. Of course, in your work, It's very important that where you should use which tool and which pencil, but it's not that important that you should erase it. You can work with different but similar tools. So I tracked it, brush on my work so smoothly, so lightly. I don't want to fade all of them. I just want to mix these textures into my work and I don't want to take away their darkness or just take the stains away. Because if you put pressure on it, it will actually take away all the pencil that you've done into your work. So it would be like previous part which you haven't used your pencil. You can't just embarrassed that I think it needs to get more faded. I might use a little hand pressure just a little. Now, I've actually changed my pencil to the heart pencil. And I'm creating some more textures and his spots in here. I tried to keep the lights between them and do not cover them or feel them up. Just like the other side of the face, the right side of the face that we've created Dodson spots. We're gonna do the same for here to the darkness and that polka dot txt trough, this scan should be done like this. It's a very, very simple work. And at the same time, it gives more life to your work and it makes it way more natural. As much precise as you will be in your shapes, you can get better results. So I want to create some lighter dots with my carbonic pencil. And another point that we can work on it a bit more here is that in these parts we can add some little lights and make them show more. And this part of the skin. And then we would add some darkness behind them so we can show that they're actually prominent. It's better to use our hard pencil for that. You say this is actually showing the ups and downs of the textures of skin in the parts that we have more light. It completely depends on your model. And I can see these shapes in this part of the model. It shouldn't be too light. That will be enough. Now in this part, I will go over these dots that I've created. So, so slowly and slightly so just to mix them up in our work. And then again, I'm going to use my brush eraser and create some lights between them. So they will show more. So we can get closer to the ultimate shape of our work. As much patients you'll have. The textures will get more similar tier model. Okay? I think you've got how to create the textures and the lights and the dark bars up to this level. After completing the textures, you should come back and work on the lights more and more. For example, on this part of the eye, we need more lights or wherever, wherever you see, you need more light or more darkness. You should go over them and shape them so your work will look more natural. So next system we will work on some parts of him more to edit some parts and use some white pen on our work.
60. Completing the lights using a variety of erasers and white pens: Okay, My dear friends in this last episodes, I want to tell you about the ultimate lights that we are going to create, that you can use your erasers. All of the erasers that you have. The brush eraser, the electronic eraser, and your editor, a CR or your mono Zero eraser. And also you can get help from the white pen. You might have different types of it. I have Jelly pen Saqqara, but I would not actually advise you to use this pen in all places. You should use it under parse that you've already worked with your electronic racer. But a, you would see it's not enough light, for example. And these parts, we need more and stronger lights. Just try not to give it that faded color, create the whiteness. Just leave it there in your work or in these darkest parts. You can just create some white dots. You should not get to engage with using it so much. For example, in these bars you can create some dots for actually increasing that glitter look on the eyelid. We've already created it with our eraser, but for increasing it, you can just tap your pen on your work and get the shape that you want. And whenever you felt like it's too much, then it needs to be just take your hands on it so quickly and take it away. And if it got dried and you couldn't just take it away with your hand. You can just go on it with a brush and take it away. You can add some dots in here too. If you again see it actually giving this glitter more shiny look. It's far the eye shadow of the model. Now a departs beneath AI. I think it's better to work on them with our eraser first showed a takes shares more. I thought it is textures look a bit. Raul. And these parts, you see, it's one of these models that how much work you put on it. Because the clarity and the quality of the model is so high. You can still see that there is still work to do. And you can work on it more and more and give your model a better shape. I'm just randomly creating some dots here. And with so much variation, we don't want all the dots and spots be in the same part. Or they get too concentrated. It gets more similar to the model this way. Creates some lights on the eyelashes. Because actually the tip of it looks like a pencil. You can also create linearly lights with it. In these parts are lights are almost good. I think even this far it needs more darkening. And I'm comparing it to my model. In fact, we are going all over our work so we can check all the parts. And if any of these parts needs editing, we will do them right now. Okay, We will move on to the lights in here. I think we've created these parts with our areas served very well. We've got to enough lies, but if you'd like to, you can just complete them with this pen. Just be careful as I told you before, do not overuse your pen. You should not use it too much. Some of the parts that you may need to work with your white pen, our lights like this because these are very, very strong lights. And you might not have kept enough light on your eyebrows or on these parts which are almost completely white. The tip of our Penn got a bit messy because we've worked on it, dark parts. So we will clean it and then again, start working with it. Especially in the eyebrows, you can use them. Fortunately, we have a good lights in. We have kept good lights in our eyebrows in previous steps, but if you couldn't, you can use your white pen to work on these parts. We can work on this left eyebrows. Well, so again, we create some lines with our pencil. I just because out of my hand a little. Okay, I think it's enough. In these parts. We've created the lice that we've needed. Maybe we need to work on the eyelids a bit more and create that and dot glittery look more. Because we've used our erasers and created those light lines, but it doesn't have that shine. That has been resulted by the glitter eye shadow makeup. So we can increase that with our white pen. We need more shine mark liters here, especially here on the eyelashes. Even on the lower eyelashes, we can see these dots. Not as much as the upper eyelid, but we can still see them. And as you can see, I'm just randomly adding them to get a general similar shape. So the tip of my pen got so much of the darkness. So I will clean it on another paper and then I'll bring it back to my work because we don't want our work to get messy. Okay. Just like this, you complete this phase, you complete the lights. And we'll go to our final step, which is actually getting the tapes of around work and finishing the darkness is if they're not complete.
61. Final explanations and completion of work: Okay, my friends, this is one of the most attractive and enjoyable parts of her work. Because in this is that you'll actually take these tapes of around your work and you can see you're very magnificent work, which is completed so slowly in a way that you would not ruin your whole work. Should be very careful. In his part. The tapes are stick together. Omega is actually almost never happens, but I try to get them away from each other. Okay. Now I'm going to use my cutter to separate the tapes and I can take them off more easily. Here we get back on track. You should just take these away with so much cautious and you should be so, so careful. This is the most enjoyable part, but you know. And also be careful because you should be very careful with the corners of your work. Here we go. And this side, you see in some parts the cardboard might get scratched and taken off with it. That's why I am telling you to be so careful and just take these tapes little slower. That's exactly what's happening here. The tape is getting a bit of our cardboard and scratches. It. Just try to take a slower. So this would not happen to you. Now the upper parts or the lower parts of the work, if that happens, it's not that important because you might get them into a frame, but you should be very careful about the corners of your work so that would not happen. Here we go. All my God. Okay. Finally taken away and tape actually a scratched a small part of the Card bird at the upper side, but it's not that important. But it's better not to do that. Maybe you don't want to get a frame for hair work or anything. I don't know. It's just better to be more careful, but it might happen. Then gets so frustrated. Alright, an hour down. And it's the final look of our work. I hope you've enjoyed this tutorial and you've used it. It would have been helpful for you, dear orcs and send them to me. So if they have any problems, we will fix them together. Thank you for watching and see you.
 Homa Choopan Tayefeh, Drawing Teacher