Transcripts
1. Introduction: In this course, I
will teach you how to cover cute little out of wood. I will guide you step-by-step
through the process. You will learn how
to do basic cuts, how to sketch your out, how to cover it and
turn it into a pendant. By the end of this course, you will have a lot of
skills that you will be able to apply to any other
woodcarving project. It is a great hobby and a way
to make your own jewelry or figurines that you can sell or give us gifts
to your friends. Join me in this
exciting adventure.
2. What you need for the course: First of all, you're going
to need the carving knife. I always use flex card
detail knife can 13. The length of the blade is 38
millimeters or 1.5 inches. I advise you to use a knife
that has a similar blade because it's rather thin and small enough to
cover little things, pendens, jewelry, figurines
and things like that. Additional information
to this course, I will list other options
for carving knives. Next, we're going to
need a piece of wood. You can use any hardwood for this poplar, Apple
beach mahogany. Ok. I suggest using black
walnut because it has a nice grain and
it is easy to carve. I wouldn't suggest going
for something soft like password because it doesn't
hold details that well, it definitely doesn't
look good as jewelry. But of course, if you
didn't have anything else and you just
want some practice, you are still welcome to try. You will also need a soul to get a piece of
the required size. I find my wood on eBay or Etsy. You can also find it in
your local timber store. So meal. You will need just
a small piece with dimensions of five centimeters, which is two inches in length, three centimeters in width, which is an inch, and
three-sixteenths, and around two
centimeters in thickness, which is approximately
seven eighths of an inch. Position your project in such a way that the grain
would run vertically. Next, you will need something
to sharpen your knife with. You can use a
sharpening stone or a leather strop
with some compound, which is called chromium oxide. It's normally green. Or you can use any other
sharpener that you have. This is how I sharpen
it using a stroke, I apply some paced than they
press the knife firmly to the surface and move it one way a few times,
and then the other. Next we will need
some sandpaper. Get yourself a selection. Smaller number means
rougher sandpaper. You can use it in the beginning. Then for smoother finish, you can use something
like 400 or 600 grid. If you want to turn your
little owl into jewelry, you will need something
called an eyepiece or islet. Ice group. Choose a small one. Mine has an overall length
of eight millimeters. Also, you will need a
cord of some sort to hang your pendant or
you can use a chain. Also, you will need pliers
to get your eyelid and place the needle of some sort to make a
hole for that islet. It's always a good idea to seal your project with some oil. I'm using row linseed oil gloves for protecting your hands. I'm using a simple nylon gloves. And finally, you will need a
pen or a pencil and a ruler.
3. Sketching an owl: So prepare your little piece
of wood and grab a pencil, pen and the ruler, we're going to sketch
out our owl on the wood so that we know
exactly where to carve. We'll start with
a central line to keep our carving symmetrical. And then find the middle
along the length as well. Now, if you look at an owl, you will see that its head is a bit like an upside down heart. Let's draw this shape on top. I'm going to go over
my pencil line with a pen so that it doesn't
rub off in the process. The next prominent
feature on the face, or these two photos that
look like a wide letter V. The ends of the feathers
will be in the corners. Now let's draw round
eyes in this spot. Here at the bottom of
our inverted heart. Let's draw a beak that
meets at the middle line. Now the body and wings. And lastly the feet. He used the middle line
to keep them symmetrical.
4. How to carve wood: Before we start our owl, let me show you a few ways to cut wood on the spare piece. We're going to use a lot of
something called V cuts. You're basically creating this little v's with your knife. Carving at first from one side and then towards it
from the other side. Push your blade through the wood that's approximately 45 degrees. Another important cuts
is called stub cut, which is done by simply putting a deep cut through the wood. It allows you to carve up
to a particular point. For example, here,
I want to make sure that nothing
happens to this feather. When they cut towards it. My knife will stop at the stock cut and it
won't go further. You can deepen your
stop cut as you go. A different cut that we're
going to use is a pocket. When you carve wood towards you. Note that I position my thumb firmly under the piece of wood. And another cut is a pushcart. Here, I push the
blade away from me, which is a good in a safe cut. I don't let the blades
move around freely. Notice how I directed
with my thumb. Take a spare piece of wood and practice all these cuts first. And remember when
carving, stay safe, Don't rush it and use
controlled movements.
5. Carve an owl - head: Now we're ready to start. We're going to use a
mixture of cuts that I mentioned in a previous video. I start with a weaker that separates the head and the body. Then I make a deeper
and deeper until our owl has the back of the
head and some shoulders. I draw this line all around the owl and follow
it with a knife. I add V cuts as I go slowly
and without rushing. Keep your project firmly
in one hand and carve with the other while having enough
support for your wrist? Here, at first I do is stop cut to make sure that my knife doesn't travel any further and doesn't harm
this long feather. After that, I slowly
turn it into V cats. As with the previous cut, I make them all the
way through the side. It's always a good idea to try
and visualize your work in 3D and to imagine what it would look like
as a finished product. If you need help,
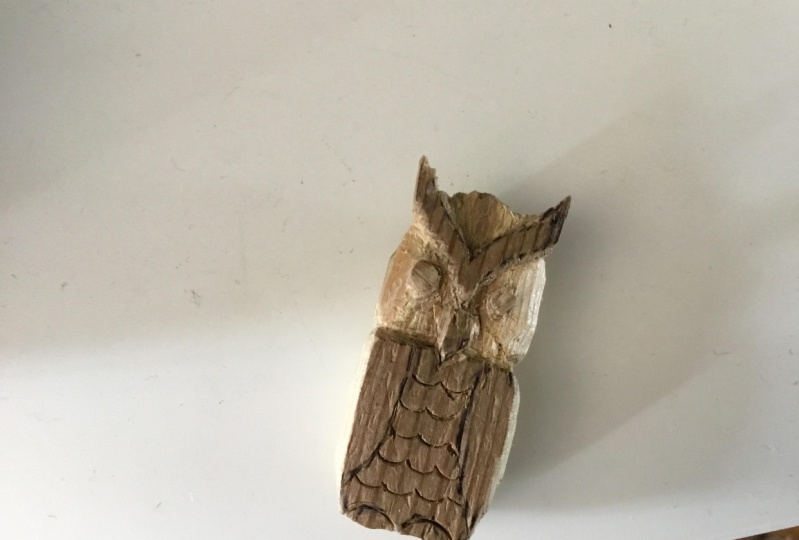
you can look at some reference photos online or at the photos of a finished owl that I attached in the
additional information. I'll make a stub cuts
on the other side as well and follow the
outline closely. At this stage, This is
our primary task to remove all the unnecessary wood around the outline of the owl. And I follow the cuts
all the way to the side. This is what it looks
like at this stage. Here, again, I cut straight into the wood in order to
define the feather. Be extra careful here, especially if you have software would don't apply too much
pressure on the knife. As wood can chip and
break quite easily. Stopped cuts here slowly
turned into V cats as well. If you look at an owl, you will see that the
feathers are quite slim. So we need to remove
all that thickness. I mark it approximately
with a pen. The further is about one
centimeter thickness, but you can measure it by I. Here, I came across the grain, so the wood is quite crumbly. This could be a tough part. So make sure your
knife is really sharp. Keeping your knife
sharp is very useful in general as it minimizes
the risk of injury. It might sound
counter-intuitive, but it's a fact when
your knife is sharp, you don't apply an excessive
amount of pressure on it. Therefore, if you
slip by mistake, your knife is less
likely to cause harm. At the same time, Let's remove the sharp edges and make
the head more rounded. Don't take off too much at once, as it's very easy
to miscalculate your actions and accidentally
carve off too much. But don't get upset
if it happens. When I just started carving, I spoiled quite a lot of wood. This is normal and it all
contributes to learning. Just keep a few spare pieces
of wood ready, just in case. Here's how we can
make it more rounded. Imagine the middle line on
the head and carpet is if it's a ball moving slightly
inwards at the bottom. You can see that I'm using
a pool cut a lot here. This is probably the most
common cuts in carving. Don't be afraid of
cutting towards you. Just remember that your
movements should be controlled and you should feel where your life is going
and where it stops. Let's round the back of
the head a bit more here. Now, let's define that further. At first I follow the
pen marks with a knife, and then I slowly
curve towards it. Given our furthermore thickness. I use just a small part of my
knife to have more control. And I do it from the
other side as well. Be mindful of the eye, as it said, quite
close to the feather. In the same way I define the eye by curving
around with a knife. Makes sure your position, your hand and wrist comfortably and you are safe when carving. Start curving slowly
into the woods and remove more and more
around the eye. You can see that the
eyes are set quite deep. So you can give the
same depth here. The eye sockets are quite hollow and it's the
best way to show what owls are well-known for huge and slightly
spooky eyes. It is going to be deeper
next to the eye and then it will gradually come closer
to the surface by the edge. Sickness to the feather
on this side as well. I take some wood off on this
side of the head as well. The forehead is going to be
slightly behind the feathers. Push the top edge
back. All this time. I use top cuts to
reinforce the feathers. It is a very important step
and you shouldn't skip it because that's the only
way to ensure their safety. Keep making the
forehead rounded. I curve a bit just
behind the feather, making it stand out. In the next lessons we
will make it quite thin, but you can start here as well. Rounding the cheeks here. I repeat the same process
on the other side. First-day make this
lysine motion with a knife and then
carve wood around it. Finished the other eye. And we'll continue
in the next lesson.
6. Carve an owl - body: Let's finish our face curve under the cheeks or eye sockets. The rest of the body is
going to be under them. So you can take off
quite a lot of wood. Don't forget the stub cuts that must be familiar to you by now. They will define the
cheeks that are above, not only the body, but the
big two, but only slightly. At the same time. You can
define the beak as well. See how I push the knife
with my thumb here. This is a very controlled
pushcart that allows you to curve upwards and the
waveform you thumb doesn't let your knife go, flying and destroying
something or injuring you. I am given the shoulders to
our owl by using v cuts here. There is no particular rule of how deep you should come here. Although I noticed that beginners very often
make shallow cuts. Don't be afraid to give more
definition to the buddy. Head normally sticks
out quite far. So you can give your cuts
here quite a lot of depth. Get rid of all sharp
rectangular edges in front and at the back. After finishing curving
around the outline, this is the second
most important task your owl can even be
without any details. But if it is perfectly
rounded and has big eyes, it will definitely
have the resemblance. As you can see, I mostly
use postcards here. Take care when you drive the
blade towards the thumb. You can give your fingers
extra security by putting some plasters or
safety tape around them. Define the head a bit more. You can make the groove between it and the buddy quite deep. And let's add some
more general roundness to every squarish edge. Especially pay attention
to the sides and the back. It is easy to overlook them because they
don't have corners. Every surface should
be slightly convex. Treat this process
of roughing out the body as a meditation
and a great practice. Your hand gets used
to making cuts and feeling the wood while
your mind relaxes. Finished the rough, rounding out the buddy and
then we'll come back in the next lesson
and carve wings and feet.
7. Carve an owl - wings and feet: Now we're going to carve wings. See how the go round the body. Let's draw them with a pen. At the back leg should come
together like a tail coat. I'm going to define them
with a tip of the knife. Slowly follow the
line to the back. The wings are going to be
slightly above the buddy, so give them some thickness. The shape of the wings can
always be modified later. So in the beginning,
you can make them a bit bigger and then see which
shape works for you. Here at the back. We will add some furthest later, but it's always easier to start with a general
shape first. Make the chest a
little bit lower. You can take some
of the woods off to make the beak and
the wings thicker. Car with the tip of the
knife in the corners, constantly reinforcing the
outline of the cheeks. Making these edges rounded. Getting rid of rectangular
shape is not an easy task. You will see that we
will try to achieve a roundness on every
stage of carving. After that, once again, I go round the body and remove all the flat or square surfaces. Now let's do the feet. We will be using
the same technique, follow the line with a knife, and then curves slightly towards it and give it some thickness. Here as well. You can
make feed bigger. Then they will be later. To account for any
possible mistakes. You might find that
the symmetry is lost. And therefore it would
be easy to bring it back by taking some wood
from one food or the other. The stomach will be
slightly convex as well. It will point inwards
at the bottom, going slightly behind the feet. At the same time, it will
point inwards on top by the big push gut works really well here. Let's add some cute
little feathers to the wings at the back. See for yourself
how many are going to fit the five or six. I carefully kept them out. This is when it's really
rewarding to carve hardwood as it allows you to do
really detailed work. Woods like bus would be less
forgiving at this point. I copped out the spaces between
the feathers on one side. Then I will do it on the other.
8. Carve an owl - tweaks: Some minor tweaks left. I give the feet more definition. I carve out some good on the side so that they don't
merge with the Buddy. More depth to the eye sockets. You can really make it
as deep as you want. Give more thickness
to the face feathers. Also, I make the ends of
the feathers more pointy. Don't forget to be extra
careful at this stage. Even the hardest wood can snap if you apply too
much pressure to it. Another minor tweak that
you can skip if you want. I don't like flat
edges and surfaces. So I'm going to soften
the outline of the eyes. This is a purely
aesthetic choice. Here I make the beak
more pronounced. It is situated below the
cheeks or eye sockets, but above the chest in a
sort of middle ground. Here, I also soften the
outline of the feathers. I smooth the rectangular shape. It shouldn't look like
a printed letter V, but more like a fluid and
gracious bird in the sky. One last thing, I decided to make the belly a
bit wider and the wings a bit smaller so that I have more space for nice
ornaments and feathers. One of the main things
in woodcarving is that you can always
remove unwanted would, while it's impossible to add
more unless you use glue, which is not ideal. It doesn't mean that
you can't use glue. By all means you can
use superglue or epoxy glue to save your piece. But as a wood carver, you
should strive to have everything contained
in one project. So normally, every
time I failed at it, I would simply start it again. When you reach the
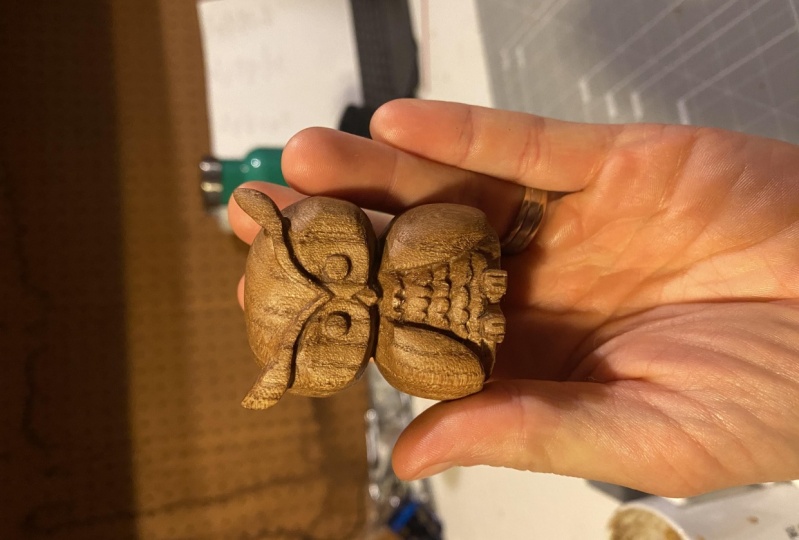
desired shape, our lives almost done. We will have one
last thing to do and that is carving
feathers on the belly. Let's do that in
the next lesson.
9. Carve an owl - feathers and toes: Let's polish our owl with some sandpaper and make
it nice and smooth. This way we will
prepare the surface for some nice decorative
feathers on its belly. We're going to make this kind of feathers that go down in layers. Grab a pencil and
let's draw them first. It's going to beat four
or five wavy lines. Then I will go over
the pencil lines with a pen so that it doesn't rub
off easily when carving. You can probably
guess at this point that we are going to
follow these lines with a knife and then take off
some wood under these lines as if the top layer of further slightly covers the next
layer at the bottom. Now let's do the feet. It's going to be very easy. Simply put two lines
on each of the feet.
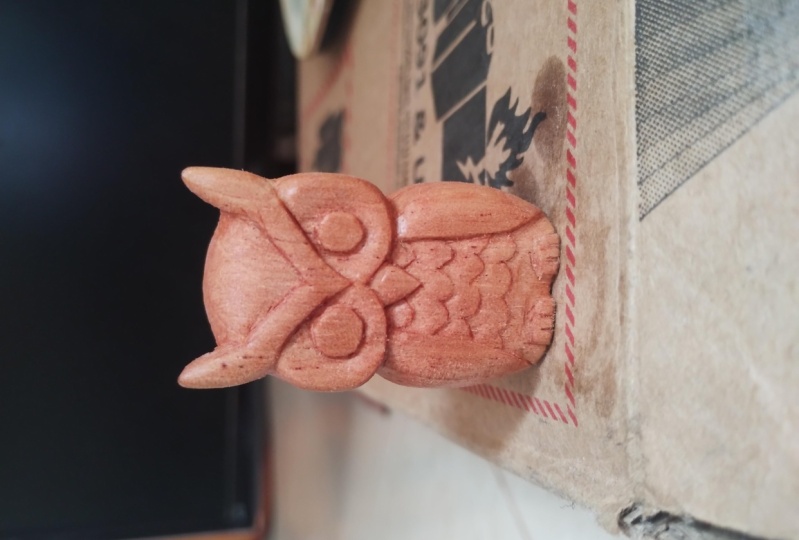
10. Carve an owl - finishing: Our owl is ready. Let's cover it with some oil. I'm using linseed oil. It helps to preserve the wood and it makes it more
resilient and durable. Also, it changes the color. It makes it darker and
highlights natural grain. Wipe it with a cloth to
remove the excess of oil. After that, you can leave it as a fingering or turn
it into pendent. I'm going to show
you the process on a different marker central
point on the head, first with a pen,
then with a needle. This is where our little
ice crew is going to be. Use pliers to help you put
the ice grew in place. Then I'm going to take some
code and hang my pendant. If you want to learn how to
make a sliding not check my PDF with additional
information for the link to the video. I will leave this
hours figuring though, I quite like the
way it turned out. I hope you liked this
project and you enjoyed it.
 Werewolf Pixel, Woodcarving and whittling