Transcripts
1. Introduction: Hello. I am jam sheets from art school online, and I'm going to teach you how to make a spoon in this training course. Middle of making Allah Smalls is the same on. After the end off this course, you will be able to create your own spoon with your desire shapes. In this training course, we will teach you how to make this all estates off. Making this moon will be done manually on there is no need for any kind of electric Apple Ian's No history is needed to get start. I hope that you have enjoyed this training course on make beautiful teams.
2. 1 necessary tools: Hello, everybody. We are going to introduce the materials and tools that we need. First tool is the chisel. Chisel has smaller sizes than conventional, and once in this training course, two different types off Japanese sakura carpenter carving chisel are used on. We will introduce them to you later. Next tool used is the frame on Blade off. Afraid so afraid is you. Ship on the blade can be flat on the spiral. Here we use a spiral blade. Well, next material is would here we used a lot. Would Howard Way will introduce a war Rieti after table with wheat and thickness off the food are 53 centimeters, five centimeters and two centimeters, respectively. Qatar Paper glue and a pencil are the three most used devices in this course. The thickness after paper glue should be about two centimeters. In this training course, we try to make a wooden spoon so print it's designed, which should not be ready big on a piece off paper. The next tools are sheets off sandpaper with different greed sizes off 80 and 220. The next tool is a clamp, which is used to fasten the boot to the table aunt has different sizes and types. Linseed oil is the last material which is used to polish on what approved the food and is not harmful to the body.
3. 2 best wood: in this section, we're going to introduce the different types off boot. This food is from Platinum Street, which has a high density beauty on beautiful rains. The next boot is from the walnut tree, which we use in this training course. Make sure they re toughed it. Boot is larger than the beat of the design. Another would is from you English treat, which is orange, yellow color and has a high density.
4. 3 safety: one off the most important aspects off food. Qari is the use off suitable glasses on gloves. It is necessary to use suitable safety gloves in this training course. In this training course, the chisels are really short on. They may cause the injuries if they are used carelessly. Therefore, it's necessary to were the gloves that fit your hands, not big your or smaller ones.
5. 4 fastening blade: first we put difference are on the table, then we're losing the two screws at the beginning. On the end, off the Fritze, the spiral blade is used here. However, you can also use a flat blade. If you use a flat blade. The Franz part off the blade should be in the direction off the handle, our Fritze. Then fasten one side off. He's firmly with suppliers. In the next step, press boat ends off the frame off the Fritze to get closer to each other and then put another end off the blade in the frame on fascinate with flyers, the blade should not be too tight on lose, so that if you press the blade, it can move easily. Therefore, in this way, the blade is fastened on the frame off the friends.
6. 5 Draw spoon: in this section. We try to cut the design off the spoon on right on the route. So refers. Put the paper on a piece off boots on, cut it with Dick Qatar A. Slowly and carefully, - we glue the other part of the design on the boot. As you can see in the field, we use the pencil to draw the lines around this spoon. Try to use pencil because it can be corrected if any mistakes are made.
7. 6 fastening clamp: we use a clamp to fix the root on the table, running on the thickness off the boat and its crew. Replace the screw on the clamp on, place it between table on this group, tighten it firmly with the hat. To the extent that the piece of Buddhist tight and does not move the food should be placed on the stool phase after perfectly flat table.
8. 7 Buy: in this section, we introduce some off the tools we chant prepared from the Amazon website. The first tool is a clap on. There are different types off them, and we used to models off them here. The next tool is the frame off the Fritze. Lindsay Oy is for quoting the boot on is edible. As you can see in the movie, you can search for the device in the Google Search section introduction.
9. 8 Cut main: in this section, we try to cut the spoon from the food by using a Fritze. To this end, we start cutting from one side. As you can see in the field, you should hold your hand, particularly on Cut it carefully. You can rest while you are working. After cutting to the end off the handle off this moon, we remove the blade on the start, cutting its from the other side. Parts, which did not much with each other, can then be filed to make them smart. Cutting speeds depends on the thickness and its softness off the booth. - We used the wall not here, and it takes about 10 minutes to cut it. Therefore, we have caught the whole spoon and prepare ourselves for the next steps.
10. 9 carving inside: after cutting the shape off the spoon. It is time to car inside this small for this purpose. First we attach the spoon to the table to fix it, - then remarked the inside edge off the spoon with a pencil in order to car. It's precisely and symmetrical. Then we begin to cut the food with a large bench on cabinet couch. The most important point is with Carling should be in the direction after graph. If carving is done simply, we have chosen the right direction. Otherwise, we should change the direction of carving while working with gouges. Never hold your hands in front off the chisel on. We should work on its carefully and cautiously. Be careful to carve the bowl off the spoon from the center and not ahead. After carving half off this spoon, we unfastened the food from the clamp on, fascinate from the other side of it, and we do the same for the end of this boom. Scarring is continued until we reach the desired depth and thickness for this phone. - After currying the inside off the spoon way, start carving small bench and cominat couch or the same chisel in order to make this phone smoother, be short rest while you are working and work slowly. Then we have caught the inside off the spoon and paid ourselves for the next steps.
11. 10 caving back: after cutting the inside off the spoon, it is time to care of the back off this. As you can see in the field way, use the back bends couch. Here we start caring around this moon. Be sure to wear gloves on board cautiously, while working with this geezer, woodcarving should be in the direction after grow. - Try not to press the blade because it makes the blade blunt. So we used the flashes and for this tip off their school, - as you can see in the feet off course, you can work with the same chisel. Then we use the bench and covenant gouge to care of the edge off the back off the spoon. Symmetrically, we care of the neck off the small carefully. It has a certain thickness and has good strength. - After carving the overall shape off the school, we begin to carve the details using the curve chisel. For this purpose. We take the spoon, and we caught the back off the spoon carefully. - We should always choose the right direction off curry. If the Carling is difficult to do, we should change its direction. Be sure that the thickness off the back is the same for all parts. When the back off this spoon is caught, it's time to make the handle off this one. In the next step, we talk about it.
12. 11 caving handle: in this section, we try to caught the handle off this womb with a curve chisel. For this purpose, we first mark the thickness off the handle off this room with a pen or a pencil, and we draw the final shape. Then we attach this room to the table with a clam, and we begin to cut the ages on the center off. The wood is slowly and carefully with the chisel. When working, be sure to use gloves. Try to cut the layers off the food. Tinley on Do not miss the mark line and make it perfectly smooth so that their handle does not have the slope and be stride to the end off the spoon. In this part, we should use the direction off the cut so that the final surface has good accuracy on smoothness. After currying the back off the handle off the spoon, we'll start caring the edge off the spoon and we caught The edge is precisely until early. Pay attention to the direction off the cuts. Try to have a teenager neck for this one compared to the panel off the spoon. In order to make it's more beautiful, - we take all the steps patiently and without hardy, the sharper the cheese up this motor and softer the surface will so choose the age off the chisel. Wisely, - we try not to have a sharp edge in the spoon, and it should be a bit round. - In the end, we start filing this spoon to make the final shape off the spoon.
13. 12 polishing part1: in this section, we plan to use a sheet of sandpaper to make the Sufis smarter on. We use the course off fine sheets off sandpaper to make the final shape, the smaller the number writing on the back, off the sheet off sandpaper. The sheet of sandpaper will be courses on voice versa. First, we start with sheets off sandpaper with different greet sizes off 60 or 100 on defiled the whole spoon with patients hold to polish the inside. Off the sport. We use a finer sheet of sandpaper so that we will be able to polish inside off the spoon more easily. For this purpose, we use circular and back and forth movement. - As you can see in the movie, we should take all the steps with patients on. We use this motor sheet of sandpaper to make the surface more beautiful. As you can see in the movie, the special sheet of sandpaper is typically on. There is the sheet behind the sandpaper. We continue polishing the roof until there is no impression off the chisel on its
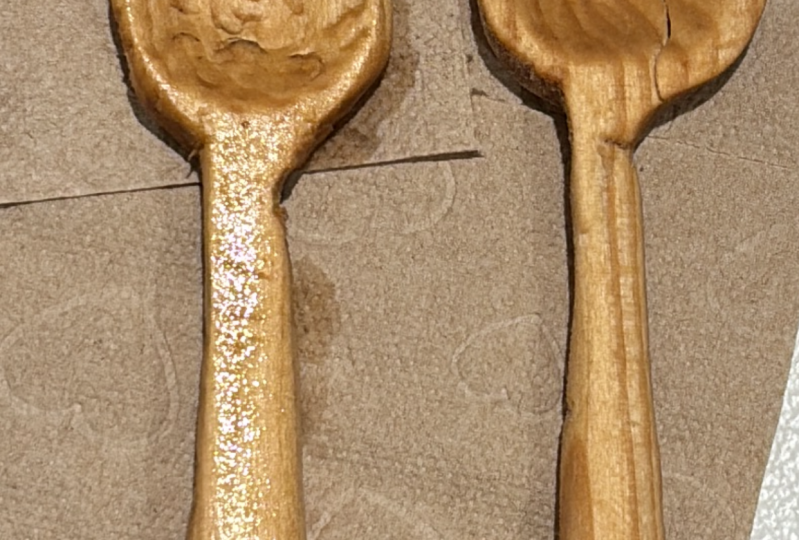
14. 13 polishing 2: the last step is to polish on water proved this form for this purpose. We use linseed oil that is edible. After polishing and killing the wooden spoon, be a Sprinkle oil on the surface and handle after spoon on the spirit deeds on the whole surface off the wood after the end off the work, live their small 10 minutes to fully absorb the oil. In this step, this spoon has been completed and I hope you have enjoyed this course.
 Art School, Became a better artist