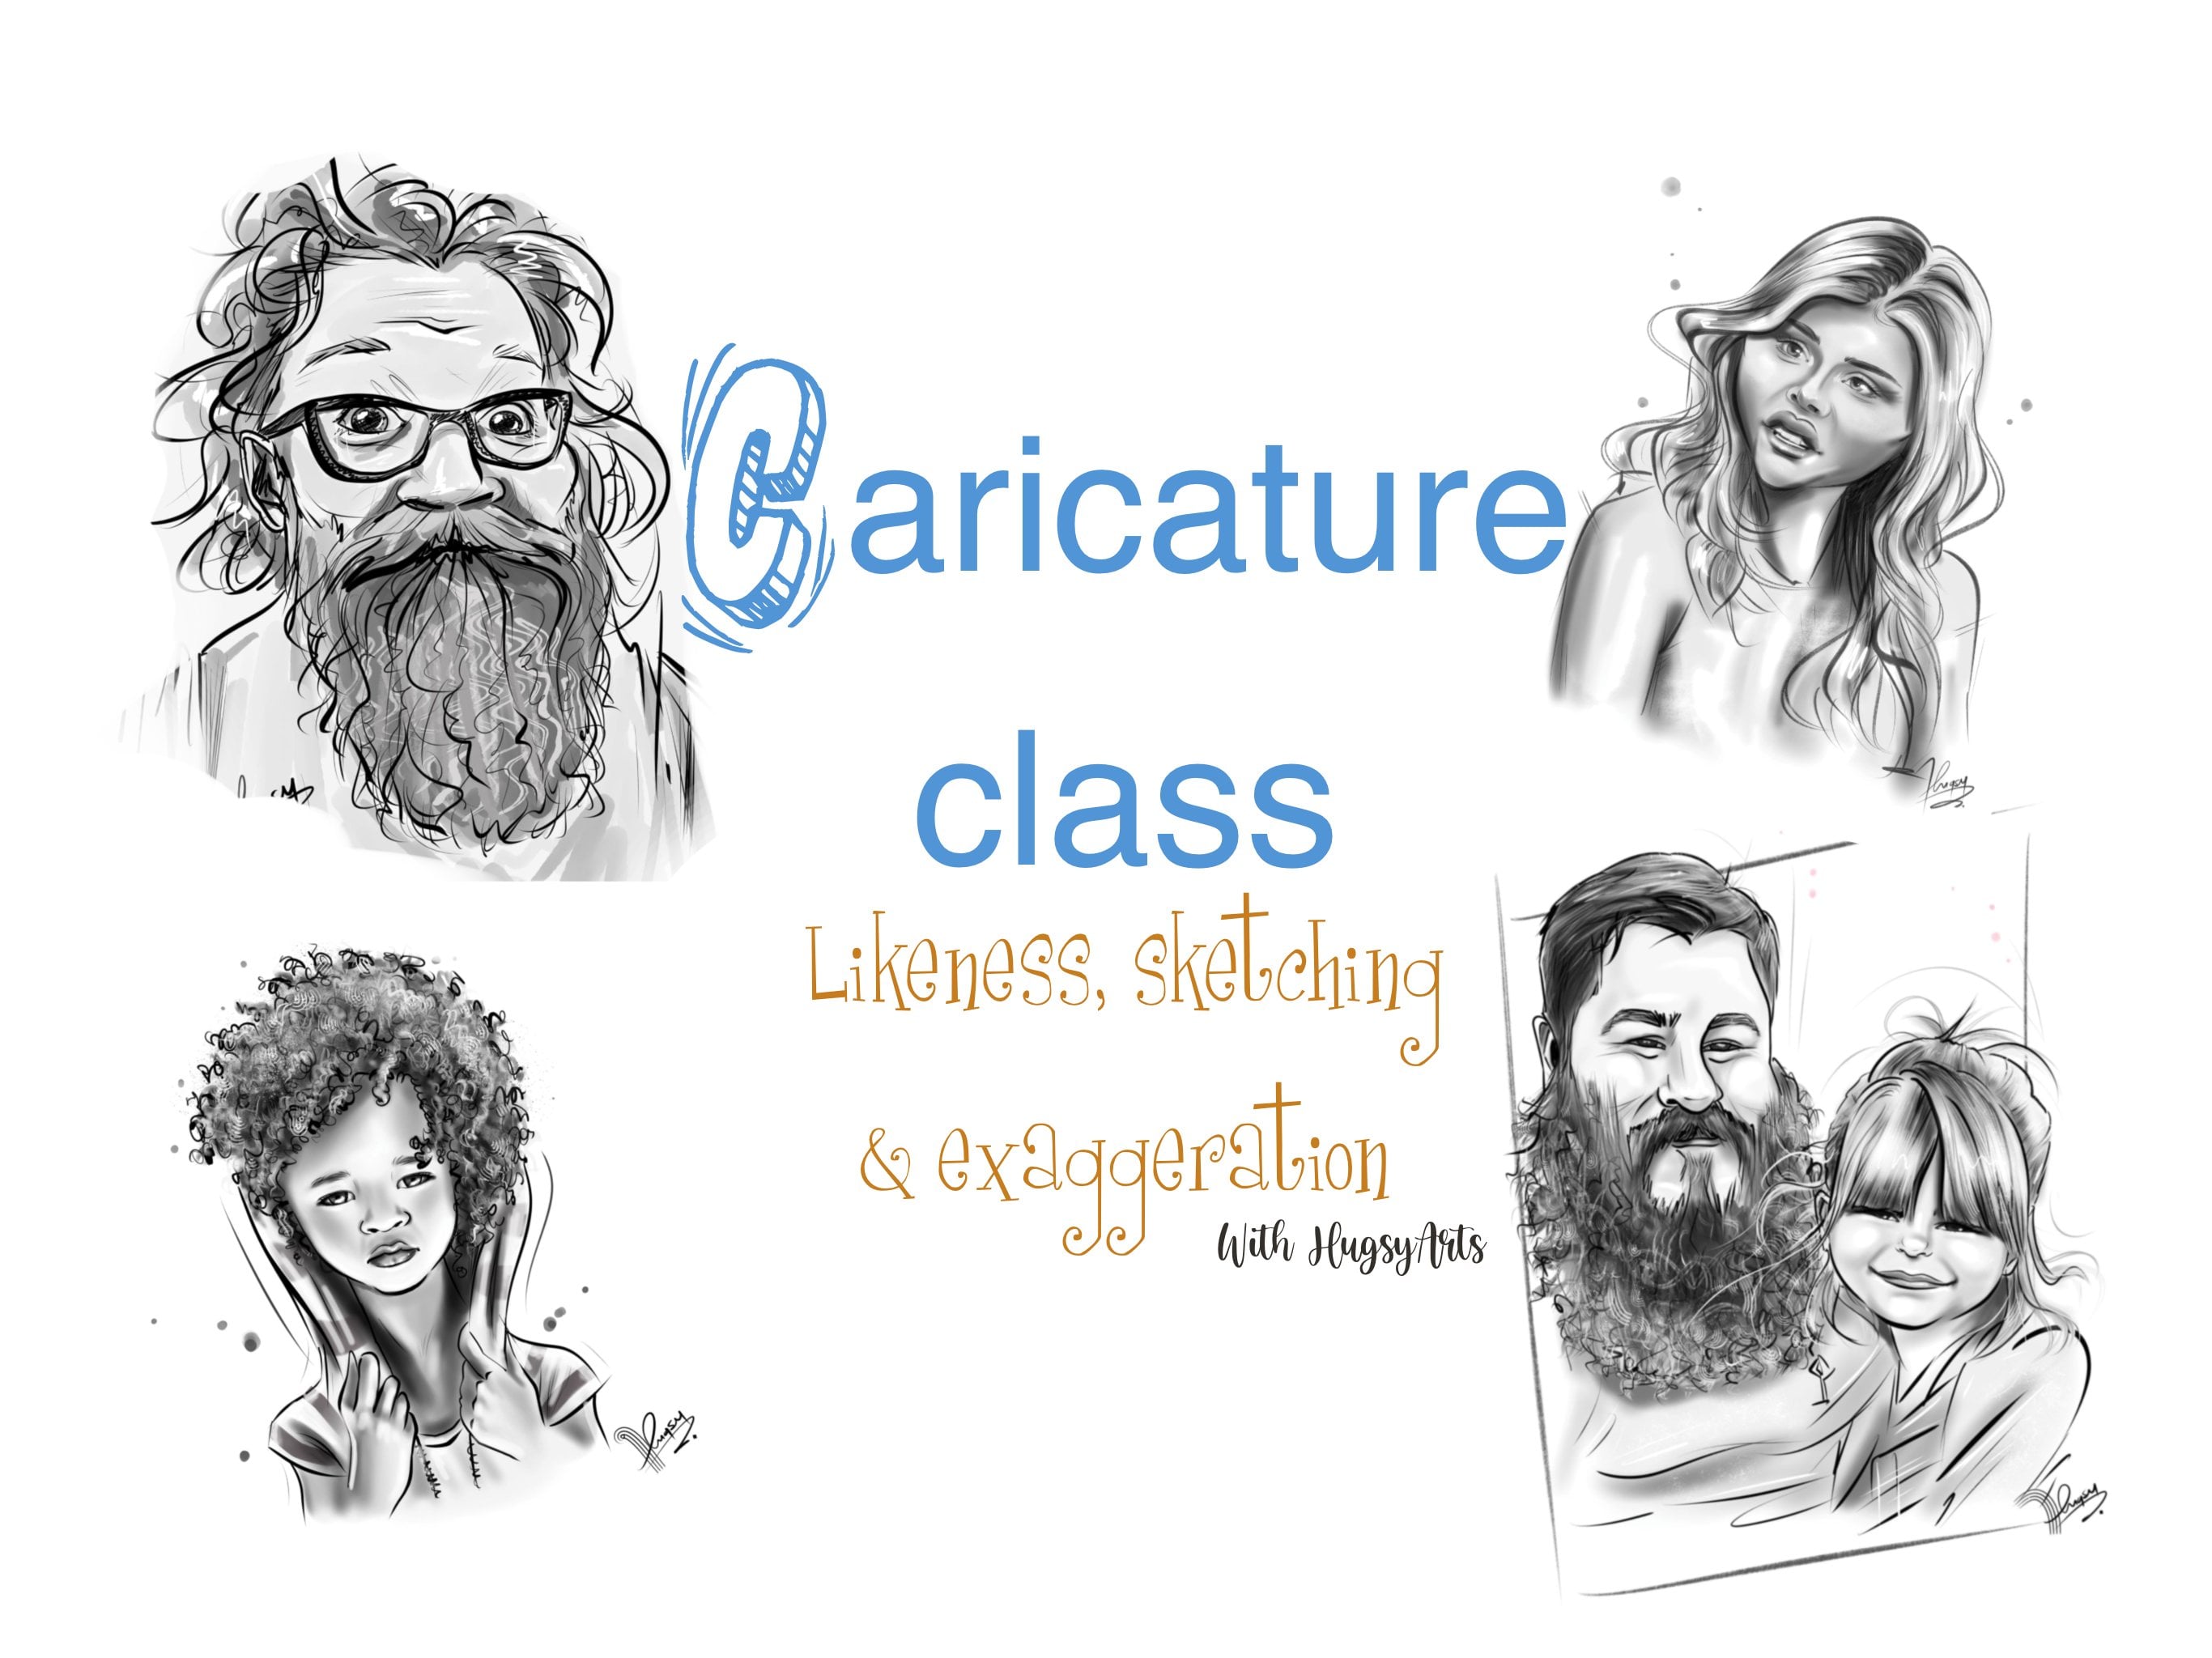
Transcripts
1. Introduction : Hello everyone, and
welcome to my new class. This is just a quick intro into what my new class
is gonna be about. It's about how to
see in character. So I hope to see a
character artist. How did they make those quick
split-second decisions? Where they decided what
to exaggerate and how to make it look like the subject
and still look attractive. So we're gonna be going through some little generic
tips and tricks, which helped them
speed up the process. A more Program your mind
into C in a different way. Ignoring the details until last and getting the
fundamental shapes, the basic shapes, right? That's your main priority and
the main goal when you're dealing with a short time space to get your drawing completed. I'll be introducing
you to this guy. This guy will help with when it comes to drawing your
bodies and you've got to do them off the
top of your mind. There's no references to go buy, especially if you're just in
the middle of a theme park. And to lean on paper. This guy, this is
the way you sort of imagine in your head. You're imagining this guy. I'll be going over that and
some resources like so, which will help you
on your journey. There's no brush pack
with this tutorial, but I have left a link to
my character brush pack, which is not essential at all, but will help if you're
using the Procreate app. I hope you enjoyed my class. By the end of this class, you will be seeing subjects
in a different way. You will hopefully be seeing
them as just basic shapes. And you will know exactly
what to pull, push, and exaggerate. Your character. Journey starts now, and
I'll see you in part one.
2. Detailed summary of this class : Hello everyone, welcome to this new class on how
to draw a character. Forward slash cartoony style
portraits or cartoons, illustrations,
whichever you prefer. Now there's a lot
to this and I'm going to try and
break it all down. Get it all in this tutorial. It's taken me use now
to grasp how to do it. It's not a quick, easy magic. Better knowledge
that you might know. And all bang, I've got it. But there are definitely some, some tools and tricks
and tips that can speed up speed you up on your
process to getting it. I just want to
share a few things. Just doing this introduction,
there may help. A lot of people are
nervous doing bodies. To be fair with digital
art these days. You haven't really
got to do the bodies. But if you're keen on
learning it all from scratch, then you're going to
learn how to draw the body and being character. Quick, ten-minute,
five-minutes sketches, low, even front of people. You're going to need to know in your head how that body works. So unfortunately there's
no quick magic fix for that is just going to have to study it and go
down that road. There's no quick easy way. I mean, there's tips
on how to do it. But when you start with a little child sat in front of you crying, I don't
want to be there. You've got five minutes
to do that drawing. You're not going to be
dragging references up or tracing photographs. You haven't got time
for that character. So that's why this is basically about this, this lesson today. So this brings me straight
into my first sort of thing, which I find there's
a massive help. That is, you've probably seen these, never really imagined. You would purchase one. But there's a reason that all artists have one of these little wooden
guys sat on their, on their side or
this studio side. It's not so that you can move it into the position
you want every time. It's more so you
learn the parts of the body and you sort of
memorize it in a different way. So that when push comes to shove and you've got to draw
a body off your head. You memorize these
segments and it helps, helps you break it down and
keeps things really simple, is perfect for character. Where we don't want to go
into the realism side. We don't want to go anime. We don't want to go
down any other role. Depart from cartoon. That's what people
want when they want characters, they want fun. This little fella will help
because you learn the parts. I mean, it also
stems from the head. And then you've got the
alignment of the shoulders. I hope you will see
this by the way. Just checking. Yes, you've got the
alignment of the shoulders. That's your first step, which corresponds down to
the alignment of the hips. And you've got your torso, and then you've got your
midriff, your legs. You notice it's quite accurate. It looks nothing
like a human being, but it's accurate the
way the sheets shadow falls on it so you
can see it's shaped. You draw one of these and
put some clothes on it. It looks like a human. So it just, it just gives you a different way of memorizing the body and seeing
things in your head easier when you imagine it
in this wooden man form sort of helps your brain to process positions
and things like that. Aside from the fiddly
little details like, Oh, he's wearing a t-shirt
with Levi's jeans. He's got Nike trainers on. Where am I going to
do that? Note, tick. It's got Adidas. Forget the details. You get the fundamentals right. First. You can do a squiggle,
fear night tick. It don't matter, it
will look brilliant. Person will be happy with it. And yeah, so I recommend one of these. I think I picked this up. I was about 10£10, something like that on Amazon. It's brought mine on
personally has helped me see bodies in a
different way now. And I'm confident that I
can just go into any sort of pose and just jot it down. So yeah, that's, that's the first thing I
wanted to show you. The other thing, a
lot of people asked me, how did I learn? And I mean, I've
learned off so many. I've now learned enough. Sort of personal friend of mine who is teaching me
and one-of-a-kind. I'm just going to share it, share everything I
learned off him. I'm going to share with everybody because he's
more sort of old school. It's not as technically up with it as I feel really lucky and privileged to have met
him and his guidance. And I'm sort of grabbing
that knowledge often. I'm going to soak it all up and I'm going to share it
with everybody else. I'm one of the books he actually
told me to get was this. So as you can see, it's an old book
by Preston Blair. Absolutely brilliant. That is very old. This book was made
in the fifties. It's from an old sort of USA
top, top Disney animator. And he is the master
of animation. And he teaches you that
cartoon vibe from scratch. There's books quite
hard to get. All of. This is the original
which I actually found on a place called
world of books.com. And this is an
original second-hand, but it's an
immaculate condition. And the original is
a lot better than the new reformed version. The new reformed version, I haven't actually
physically seen it, but I've heard
this a lot smaller the pictures inside and stuff. So do try and grab it
secondhand or not. It's full of useful things. I don't know if you can see
this ritual and zoom out. I just wanted to
show you some bits. It gives you so much
info on animals, hands teaches you so much. From the beginning. It is packed and I mean patents. So 120 pages of this
guy, he's a genius. It's good because sometimes
it's good to step away from the iPad or put their
procreate down. It's not trying to do it and just sit there and listen and read and soak it
in and you'll find the next time you go, you're
going to have a goal. You are, you've got all that subconscious
knowledge to help you out. So that's the book recommended. So to start off, I'm
just gonna go over a few tips which will
help in part one. I'm just going to finish
off this introduction. Assume that back in and search. Finish up this introduction. I will then dive straight in, mainly with just tips which
will help you on the way. And then we'll do some
drawings of some people. I've selected a whole
load of random, random faces off the web. And I'm sure you, i y approach getting the likeness but keeping
it fun and cartoony. We don't want to go down to like lifelike Road where they end
up just basic portraits. And if you don't get them spot on, then
they're a bit dull. Plus, when you've got
510 minutes to knock sketches and going out
in front of people. That's not the way to do it. So there's sort of generic
things we can do to cheat, which can help aid us on our way. I'll,
I'll go over that. And so yeah. Well, so they're
going to say brushes. I'm using my character brushes that I've
just selected a few, put them in my recents
from that brush set. And we're going to, we're going to dive straight in. So join me in part one.
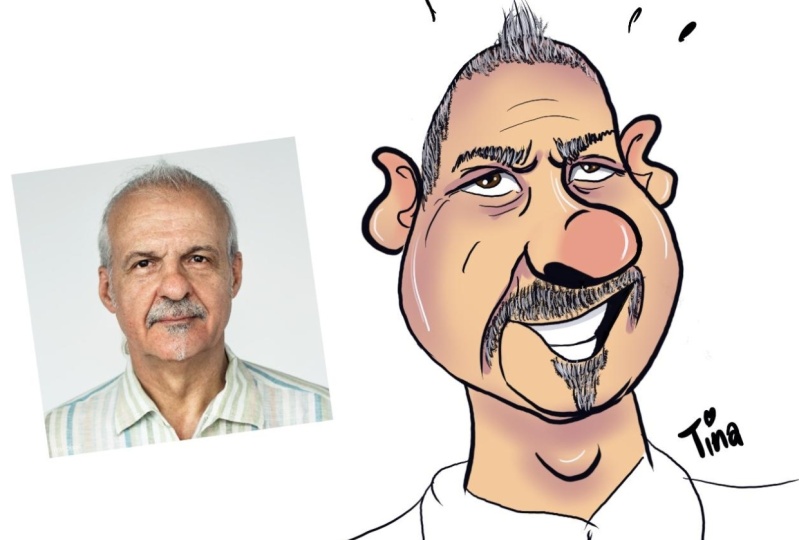
3. Learn what to look for when seeing a new face: Okay guys, Welcome back. Welcome to part one. So like I said, first off, I just want to go
over some sort of little tips and tricks that will aid you in your
character journey. Now, the first thing is
people talk about seeing, how do I see what to exaggerate, how to exaggerate it, et cetera, et cetera. And there's a few little
things to look for. First off the bat. So if I just bring in
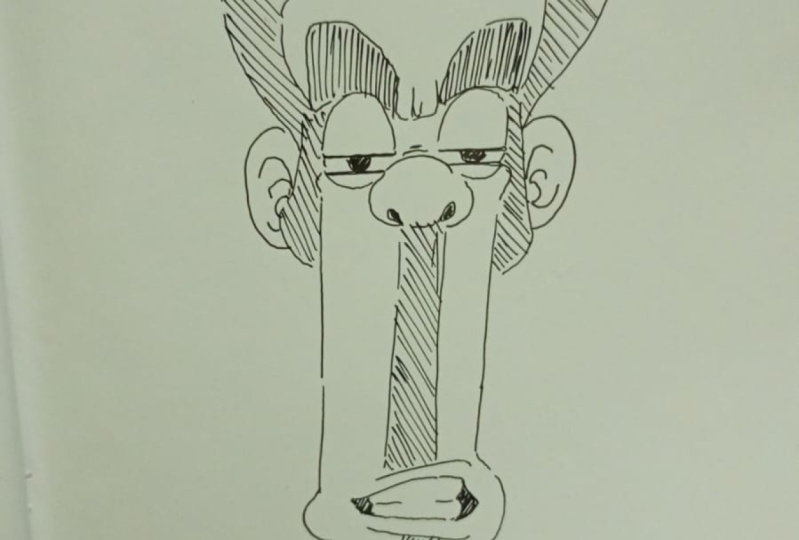
some random person, let's do, let's do this guy. Why not bring this
feller in here? I mean, looking at his face now, to draw that, OH, you can see that he's
got larger ears. We can all see that. But what else? What can we
do to make this look fun? One trick characteristics use is to turn everybody's face
to a three-quarter view. Which is probably sounds daunting if you're
not familiar or, or used to do in
three-quarter views, but I'll show you how it's done. It's super simple. And it's a nice little cheat because you can get
away with a lot. It's kind of a generic,
generic thing. A lot of characteristics do it. A lot of them will do a
side three-quarter view or just turn it a
bit of an angle. You can get away with a lot. When it's front on like that. You've got to be a
lot more precise. And it's not so much, it's not so easy on the eye. So we can see this guy. And the first thing
I'm looking at is just grab a marker
pen for a minute. Is the shape of his head, has the first thing
I'm checking out is the shape of his head. Now, is this head round? Is just how long is it like? Triangle is what we
call the heart shape, which is sort of the
natural beauty shape. What sort of head
has this guy got? A little head, big jaw. So can you pick
which one of them? Because he has got a bit of a funny head shape because the one side slightly
different to the other, which makes him unique. If I was looking at this guy, I'd be saying, okay,
number one, males, most adult males,
most adult males. We're going to be
shrinking the head. How am I going to be
pushing out the jaw, the jaw, the bottom area. So if you imagine you
had a squishy ball, like so let me just
get shot of all that. Imagine you had a squishy ball. If we're going to be
shrinking the head. What that actually means is we're going to
shrink the head. But we got to squeeze
it somewhere. It's got to go to that bulge
has got to go somewhere. If we're telling a band there. If we're tying a band
than the bottom, then we got to have
a bigger head, ie children where they
have a bigger head to grow into and smaller at the bottom. You see that's that
the cuteness factor. So there's a few
different things. But for adult males in
general, generically, any old bloke who come
and sit opposite ear, you got five to ten minutes
to sketch them out. Kinda bear in mind
that all had big jaw, big nose, even if their
nose is not that big. These are just little
characters secrets. Okay. We can do is biggie is after. That's more of a detail, a lot of people will look
at characters and go, Oh yeah, he's got big
ears, but that's details. We're looking at fundamentals. Fundamentals is the fact that he's an adult male and the mass is going
to be in this area. How far you push these, these things is up
to you and it's gonna go down as
your personal style. That's gonna be, that's
gonna be your thing. I tend not to push it too far. And I go for the cutesy, cutesy look where I'm trying
to make everybody look, look okay, and look, I don't want to offend people. Whereas there's other
characteristic there. Who are the people
going up there? Know what, know what
they're getting. They're up for a laugh and they wanna be ripped a bit so they want to laugh every
time they look at it. So yeah, push it,
push it all you want. So these are all little choices which are going to be up to you. Another thing I like to
do is forget about this. By the way, I'm just
showing you over the head shapes can work. I've done about 12 lines there. And if that was on that
guy's wall, you notice him. You get what I'm
saying. Head shapes important is the fundamentals. What else have we got? What other fundamentals
have we got? A lot of people, when you ask them most of the most
important thing, i character or they would
probably say the eyes. And I get it. I do get it. It is important, but head shaped for me is more important. You can quickly
lose the likeness. If you got a completely
different head shapes. Just look at people when
they put on a lot of weight. You don't recognize
them anymore? No. So I mean, you can get
away with a generic set of eyes on most people. If you've got the same head
shape and some little details like the ears, that
was an awful sound. You can get away. You can get away with it. Yeah. Whereas if
the head shapes all wrong and the eyes
are exactly Perfect. Still not going to recognize familiarized link
with that drawing. Let's see, There's a
few tips to look for. So the one thing is most
people bought an eyeball, an eyeball on the standard face. So if you're looking for
someone who has close set eyes, they're going to have less room there, less room in the middle. So then you know that I use a little closer than the norm. So that's up to you then to push it even closer
if you wanted to. Okay. Happy eyebrows. I mean, again, it's
details but you can see has got them noses. I mean, I like to do it at
three-quarter view so you can you can get away with a lot. With this sort of
three-quarter view. You can push it. As far as you want to. You can see this
fellow has also got deep set eyes with heavy lids, which is something else
we'll go into as well. Let's just drag another
one up because this is more about me. This is all off the cuff. By the way, this is no script. I'm just going with the float. And I'm trying to remember
everything as I go. A bit of a challenge. But that's how I
like to do things. So let's just get it out there. And if I'm not happy with
it, I won't delete it. I'll just make an improved
video another time. All in the meantime,
I'm learning as well. Like art is a journey
for everybody. I'm learning as well. So there we see a younger, younger boy, nine,
10-year-old boy, sort of shape as he
got on his head. Is it round? It's not round as it hasn't got the
adult male chin. As you can see, the shape of his face
and I thought it was you can see the shape of his face is like this. Okay. So that's the sort
of the heart-shaped face, if you will, the cutesy face, which you tend to
draw most women with, because it's actually heart-shaped face
is sown of beauty. So now you know, so yeah, you can see this
boy's head is sort of like this or the mass. The mass is at the top. That I use a low set, little mouth, nose, eyes. That's it. I mean, that's the shape. Years the hair comes out. And this is the head
shape for this child. Now showing you front
on here in a bit, I'm going to show you the
side three-quarter views, which I do all my drawings with. I'm just showing you
how I see faces to start off with before I
show you how I draw thesis. Okay, so that's just, I'm just showing you
what I see when I look at a random face. Let's get another one. Are we doing for time? That's ten minutes,
so I'm going to break it into ten minute chunks. So join me in part two. We're just going to
continue on this, this process of learning
to see the shapes.
4. Learn how to see face shapes part 2: Welcome back. Let's get another, Let's get another
subject though. Okay, Let's do it baby. Why not? Just do a little cheeky, choppy babies in general? A general rule of
thumb is they have big heads and they haven't
yet grown into it. So to go for extra cutesy, cutesy stuff with babies, you can generically push the features down.
Push the chin up. You can see there we've
got this bottom shape and then we go into
this big head. Yeah, and then we've got i we can enlarge the eyes
with babies as well. The nose we can sort of push up near the eyes because
that's another, it's another cutesy
little trick. If I draw that straight
on at cost, I have yeah, So that's the head shape
for a baby and I can't even move it over
to show you now. So let me just
draw it over here. So we've got the lower, lower part of the face. With B. It's not a normal straight
across the middle. Like your normal,
standard average human. We can just push everything down and make the
eyes a bit bigger. Even. You can push the nose up. There. I'll be showing you
how I use Liquify tool to refine things as well
as super quick to use. You could use it on a
live event or a live gig, wedding, whatever
you're gonna be doing. Let's head shapes.
This is about so, yeah, had shaped
masses at the top. And you do babies. Have a look at
another one a lot. I don't really want to get drawn into how I draw
them at the moment. Let's do the feet,
Let's do this division. Let's do what we see when
we look at a person. So this guy sits
in front of you, wants to draw him. He wants you to draw
him straight away. You can see as a cracker
is easy to draw. It's got this big triangle head going down into the pointy chin. That's the shape of his head. You could do a lot now
and it would still look like him because you've
got the head shape spot on with that big triangle face. So you do the two eyes. We've got some big
square eyebrows. Nose. The years got this
hair coming over. I'm trying to make
this look awful. I promised you I am because I'm trying to show you
that when you start to see when you start to
see people differently, that just with a few lines, you can get a resemblance. And you can see there that I kinda got a resemblance
of this guy, which I knew I would because
he's got a perfect face for character in just a few loans. I haven't even tried. So that's how you see people know them all
experienced at this, you get the more detail
you can start adding. You know, you can, you
can add the stubble. You're going to add
the way as I use, slope down and blah, blah, blah. You can add the
larger knows, I mean, you could see it's a big
brush and not rushing, sorry what they call
him a Roman nose. Thus details. This is just a little
lesson on seeing faces. Let's do a girl. Details will be important.
Of course they will. Tattoos, piercings,
glasses, birth marks, freckles, you name it. They're going to be important. And they allow a lot of bad characteristic to
get away with a lot. But still, if you've got the fundamentals
and the details, people are Muslim mesmerized and they're happy
with the drawer. And you did for them. Head shaped, stereotypical
young woman, heart shape, heart-shaped
face, bigger head. Because we're going for that,
going for that cube seesaw, look big. Lower place dies. Lower, wider, SAT, navigate
through clubs with the eyes. If you do big eyes and you
put them too close together, it no longer looks human
or fun or cartoon. It just looks wrong. If you're going to
make the eyes bigger. Spread them out. Spread them out. A little cute and cutesy Betsy. But nose looks so. See detail. Some sort of perfect eyebrows. Eyelashes are gonna
be important for you. We'll, we'll go over that. We shall. Eyelashes are definitely going
to be important to mouth. I like to do all my
characters smiling. But in terms of just
getting a likeness, we can see the
middle line there. This that's the first line I'm looking at when
I look at a mouth so we can see that that's the
sort of lying this leads, it gives off and
then hit top lip comes and it will push
that as far as you want. That bottom lip comes
down there like Sue. Okay. Lids. But some Yeah. So this is how I
sorted by the way, I don't know why I'm drawing,
sketching with this pen. I should be using
my pencil really, but I just want it
to be clear for you. So the button or
heart-shaped face come up. And we go out. And my moon and out
at the top here, which should give us
that beauty, luck. And hairline is important. Tried to imagine distance there. The distance there, the distance they were bearing
all this in mind. We're not being too accurate. We're just saying,
Oh wow her eyebrows or if they were up there. Oh wow, her eyebrows
are facing that way. That's details. That's
up to you to see that as as easy to spot here. Don't worry about hair. The hair loan got the hairline. Like so you can do whatever
you want with the top part. You can do whatever
you want. You can give me loads of body. Wherever you want. Do whatever you want. Just get their hair long and
write the head. It is flavor. So sort of a generic thing. A generic hack to do in young ladies,
heart-shaped face, eyes, larger and wider, nose, pushed up towards the middle. And I like to do
everybody with a smile, which I'll get into
my promise I will. So Mr. not office, add another one just to show you how we're looking at
things. Which one should we do? Which one should we do? Let's do this one. Okay. Now I'm doing this
because I've been looking everywhere for years to
see how to characterise, see what they see and what
they're going to exaggerate. And it's just not out there. The information
is not available. Just quick check at the time. Okay. We've got two
minutes of this part. So the information
is not available. And it's quite sad that some of these old-school character
tourists are either a, they're not technically savvy. You got to know them personally to be a student of theirs. Or B, they don't want to
share the information. They wanted all for themselves. They're like, No, I've worked
so hard to get where I am and why should you just be gifted the information
that is no magic information. But these tips
sometimes I'm telling you is day hopefully help a lot. Just a little runt
their head shape. So we can look at two ways. We can look at the
shape of a cranium, which is the best way to do it. Or we can just follow the shape, silhouette of her
head with the hair, which is another way to do it. If you're going down a
more realistic road. I know sanders that looks
at the silhouettes of things. For he draws them. No, not really good
for character. Character is which
I'll show you. But yeah, so we draw
an elderly woman. Well, we can see a head. We delve towards the man, the male anatomy
where things drop. So let's say we've
got a head up here. We still go to a bit of a
heart, but things drop. Yeah. So we wanna
make her look good. I use their eyelids. They come down on the
oil, it's come down. Eyebrows, come over. Nose. And the mouth will
be lower. Down. The lower you put them out. So you can make people
look a bit older. So that's just a bit
of a mouth there. Again, forget about the drawing. I'm just trying to teach you. I see. I draw everybody smiling,
which I'm going to show you. I'm just trying to show you to see properly like a characterise
the hair, brushes out. Pushy, Pushy, wishy,
washy up there. Again, if you've got
our hair loan right. And don't worry too much about the rest. We should we've got
she got this sort of shape face going on, hasn't she? Okay. So I've learned to look at faces and see the basic shapes, which is what I'm
sharing with you. Now. You will get it as well. They guarantee it
was just the case of it's just a case of changing the way you look at people and sort of
ignoring the details. I mean, I'm in a
position now where I'm quite familiar
with what I'm doing. So I can look at
this lady and I'm spotting the details
straight away because because I've already sort of quickly scanned and seeing the shape of
her head and stuff. But for the start when
you're first learning this, I'd say ignore details, ignore the nose or
ignore, ignore, ignore all that. Norbert F max. For your first job is what's
the trigger, the head? Well, she's a young lady, so let's give it a
heart shape head. We haven't got long. And you're halfway there
already because you've got acute C head shape,
eyes bigger, wider. I know I'm repeating myself, but maybe it'll help it sink in. If I do. Right, we
go over ten minutes. So I'm going to cut this part. See you in the next part.
5. How to sketch our what we see using some generic professional tricks: Welcome to the next part, guys. So for this part, I want to show you briefly how I go about my
three-quarter view, the process or you take for
nearly all my drawings, whether they're sat in front of me or they've sent me a picture. Whichever it's the same thing. They could be facing this way. Or they could already be in a three-quarter
view, which helps. But whatever it doesn't, it's not the be-all and end-all. So let's do that
there and let's get a picture and let's do, let's do this guy because
he was first step wondering why I've
added him again. I don't know. There we
go. He was already there. Okay. So let's put
this guy there. Tune her off unless I
have a goal, right? So let's get the
sketching pencil. Sketch for days. Or six b is what I use. I'll use the six
B when this time because it looks like
it's a bit darker, so it might be easier
for you to see. So head. What I'm doing. You've
all probably seen all over the internet or
you're drawing a thing there, you draw a line there. Line there. You draw a line there alone. Yeah. I mean, but there's
a way to do that. Don't do that. You're gonna lose perspective. Sketch a roughly. I'm not trying to do a bowl, but I am looking for roundness. Roundness, signals,
vitality and mix. Your character look
better straight away. If they really gone and
really thin or whatever, then we won't do that. But let me just, let me just show
you I'm better at the actual drawing than
I am on the explainer. So we're looking for is thing we already know we're going to go smaller, head, bigger bottom. We worked that out already. So let's bring this part
down and back up to there. Okay, So this is
pretty much how most, or nearly all of my
drawings of people start. Now. I'm not going to go
straight down, straight across. I'm going to imagine, imagine the Equator
going around the globe. I'm just going to go a bit
higher up there actually. I'm going to wrap it
around so you get a nice, a nice perspective
and angle going on. Eyes, I'm going to draw is one eyeball there, is
other eyeball there. Because some heavy
eyelids going on. We're going to use that
and that just pop that. Don't pop that down there. That can come around. Remember, we're looking for
a cartoony version as well, not an accurate version. Okay. So heavy eyelids. So we're gonna go we're gonna go with some
heavy set that's like like so knows, we could do what we want. We're in a three-quarter
view. Remember? I know the eyes are a bit off, sort that out later. I always do nose. We can push it as far as we want to push it in a generic
generic router. I think I will do
them I use now. I'm just gonna do with them. Looking at us know, sort of slants up
boards, doughnut. If he was drawing
them in that pose. But imagine the
smile would look. You could do a sort
of generic smile. I'm going to do them
with a sloppy smile. If you had a big bottom lip like an overbite or an under banked. This is where you
sort that bit out. Whichever whichever is it, like a big overbite. And he's very slight
down the bottom. Or z, more masculine
with a big jaw. So whatever, like that. I know it looks
really beautiful. Like to do them U4, but I'll add a few little lines in a
minute to age him up. So let's get a bit
of a chin. There. May be even bigger. And I'm still following this, still following this Luxor up to our small head
around their ears. So, and then let's bring that head back around and
make it really small. Make these all you. But
I was even more bushy. It's quite a feature of is a bit of heavy set around here. You can play with
that year a bit more. So I've drawn him in my sort of standard
three-quarter view. I didn't tell him it, but I don't think
it took that long. I would only seven minutes on this part of the video,
so it didn't take long. And this is the basis of where I'll now go over this with ink, which don't take too long.
It takes a few minutes. Or you could, if you
prefer this look, you could just continue like
this or color in whatever. But this is the basis
of where I would start and so on, so forth. Liquify is your friend. If you see something
that's not spot on, we're on procreate. We use any tools that we
can make our life easier. Push it, push him. All you want to push
that knows even further. Want to see we've created the elderly guy. We've given him. Useful, a useful cartoony look. From there on in, I'm going to sketch in my body. So this is, this is a
different thing altogether. For my body's. I like
to do like a mini body. So I'm sort of going
about that distance. That's the distance I want
maybe a bit more for my body, so my body aligning
the boat here. Now there's a thing
called a line of action and that's to my head. And by the way, on the iPad Pro, it's picking up me touching the screen and I'm
not even touching it. And go and switch into rubber. Anyway. So line of
action is running, sat down, is jumping. We could put a line
straight through one leg as a line of action. We shall give him movement. Standing there like Mr.
strong with his chest out. We can do this. So we're sort of go
from our line of action and take it
down there like he's standing there, proud, chest. Okay. I'm thinking of my wooden doll. Hips. Hips could be their legs. Go. Let's just shrink them up a bit. Because my legs are gonna be
a bit longer where they look like they're going they're
coming onto his waist. And you can see that once
I put some clothes on him, got him in kinda dynamic thing. Now when I come to inking this, I'm gonna be looking
to alter things. I'm going to think
like that needs to go up there that needs
work with I know, but this is the base
starting point. That's also another
thing to look for is like perspective view. So if here's one foot
stepping forward, we can make this a bit bigger if he's stepping
forward or whatever. But again, I know you're
looking at details. I'm drawing that
little wooden man I showed you at the start. And I'll draw these
little t-shirt on and stuff afterwards, which is really not important. Okay. So that's started. I would then go on
and I would ink mine. A lot of people
you haven't got to do this, not important. I love each and every
one of these ink pens. They're all awesome. News. Whatever you want. If you have my set, I'm gonna be using the sketch texts,
which is awesome. Now. Thick and thin lines. Awesome in character off,
let me check the time. 12 minutes we've gone over. I tell you what, we'll
start the next part. We will ink this
up in that part.
6. How to create attractive line art: Welcome back. So let's
go thick and thin. They really give you, they give a cartoony
volume if done correctly, or can look messy if done wrong. So I'm looking at the
heaviest shaded areas, which we know is the guys
in by their under his nose, ears, maybe maybe
under his jaw there. And there is chin. I'm going to be making
those lines thicker. That's what I'm
thinking in my head. Okay. So that's actually a very thick it's because
I'm zoomed in so much. It's a bit thick, so I'm just going to slightly
change his nose shape because I'm seeing
it differently now. I'm looking at it again. Now we can get those eyebrows in there like that. We just saw these ideas out. Don't they? Make sure they line up? If you can see both? Pupil. Pupil. Why is he cut it out and
show you in a minute? Heavy set eyes. And I like to just add
a few little cross actually parts for
the really dark bits. Mouth. We know we've got a
crooked mouth going on. So we can only imagine what
it would look like smiling. This is generic and
this is what you need. If you're doing character. Shin got up there. Come in this part of the
eyes and we're going to come into that little head. Am I going to get is
larger ears in like so. I've never met this guy. I've never seen the guy before. I'm doing this off the cuff because that's where you're
gonna be faced with. When you're having
people just rocket. I'm on a picture and I promise you your
confidence will grow. And you will not be
scared and they love it. They're just a bit of a show. Showing off his stuff. Just adds a bit to look at. It looks like you tried
harder than you actually did. Now, we look at this. What do we want to give them? We can give them a little shirt. We can give him a shirt like so. Hands. So I'm not sure. Let's give him some trousers. Yeah. So that's quickly or
roughly how I sketch it in cross hatch in
the darkest areas. Just to add a bit of
a cartoony effect. We haven't got to do that,
of course is just my thing. I'm just showing you what we do. We just quickly
draw on this guy. How we would It
didn't take long. Let's look at the
time on the clock. Five minutes in for the inking. And that's without our sketch. And that's with our sketch. Probably change the angle of this foot so you can see
more of the bottom of it. Don't be too precise
with character or the body is not
that important. Make it look fun, lively
and that will do. You can go back in with liquefy. If you want. You can change
certain things if you want. So the world is your lobster. Don't take long. Just crack on and have a go. You can even pull part
bigger if you wanted to. Like is he is or is Chin had even smaller guy. That's how I sketch and
ink one of my characters. Just from seeing
a random picture. We can then go in
if we want and add some shading just to give us
some three-dimensional form. Use whatever you want. Let's just use this for now. Sketch brush. Just to add a bit of a 3D form to it, like so which is
our characters, do? They do it with a
soft charcoal block? Just to add a bit of definition. This is basically the
same thing because I've designed this to
be the same thing. So it's kind of shaped the
same as the charcoal brush, and it comes out random too. So bear that in mind if you really wanted to, you can then add
your highlights. I always do my always like this. And then I'll just put
my white bits there. And it's kind of a
generic thing that we do. Gray hair. We can sort of swing
a couple of them out. Now. If you color in it,
that's a different road. Again, obviously you
wouldn't have gone in and shaded like that with
a gray color pen. You would have colored
it and done so. So I'm just going to
quickly show you. In fact, most of the time,
it's ten minutes now. So I'm going to break this up. And this part, I'm
going to spend the next part showing
you how I color these, which I know a lot of people
are quite excited to see because I haven't
really shown it before. So, yeah, hopefully,
you'll see how easy my method is in just
basic coloring.
7. Colouring, how to use eye catching colour choices: Okay, let's go straight in and
I'll show you how I color. So I'm gonna be going
on a layer below. And I've got a
preset color there, which I use more or
less for everybody. I just switch it one
way or the other. Depending on top person I do him this guy looks pretty good for this color, so I'm
just going to stay there. Okay. A few options. Where's my round brush
gun and why is it gone? Put that back there
and let's put that back there right now. It should be back. Okay. I've lost something
there. No. No. Okay. A few options coloring. You can either use a clean brush which I have got ankle
around the edges. If you're looking for
pure neatness and its commission for somebody who's not sat in front of you. This is the best option. Is super neat and tidy. And this brush is
a pleasure to use. Super easy. Thick
and thin for you. A little detailed areas. So I'm going to keep
changing your size. And had done. Other than that,
what I use a lot is the last sue tool, which I like. And you're just sort of outline your different parts like that. And you drop infill. Assess for the body. I'm going to go underneath with what color should
we have? Less of? That. Blue jeans. Really dark and dreams see
that little trickier look, see I'm actually
in the purple hue, but I've gone so gray. They still got that
bit of blue there. Get a nice authentic
color for your jeans. Be as neat as you want, guys are not gonna be too
neat for this part. So I'm just showing you, bam, you're going over
color in as you go. Or you can just do
what I'm going to show you and do it
in different parts. So the alpha lock
the layer. Later on. I'm gonna do this ****. White. As you can see, an actually on white, sort
of an off on, off purple. Let's just do his shirt. So it's just really
roughly just to show you. Okay. I'll get rid of that. And shoes. I won't even bother
with them until the end. So what do we do next? Phase? Alpha lock. Let's add a bit of pink. Notice redness, life
to those cheeks. Grab the pink color
slightly towards the red. Slightly more saturation. Unless use a nice soft brush. Let's see. Now that's gone. It's getting quite
annoying to be fair. I miss the soft see. That's just dashing
some red flashing some red wherever
you feel needed. Around his nose, on his chin, bit just around the
top so his eyes maybe go a bit deeper
for some parts. Break that up. But redness on his hands, just glazing over
nothing, nothing special. And I don't want to add a
bit of just not redness, but just a bit of
saturation on his head. Maybe a bit more than that. But a saturation in some areas like so. And I want to go a bit
lighter in other areas. Bit lighter, they're
lighter there. He's got a bit of a
grayish tint going on for his beard stubble
of five o'clock, shadow. Just going to add a bit
of that in like so. Okay. Enacts lips. You can color pick if you want. If it matches color picket by all means. And color them in. Probably a bit too
pink for my liking. Lipson teeth and
just go and sort of gray like a
really light gray, not quite white eyes the same. I use the same just
glaze and that in what color is always this? That brownie, green, hazel. Color them in a little bit
of life over there as well. Key here is very dark, but it's loaded with gray. So I'm going to get
the base color in. I'm just going to streaking. Going to streak in
a few white bits. Like so. Same with the top of their head
is a little bit gray. So we can just add
that in. Like so. Okay. That's it, isn't it? That's it. I mean, we're pretty much
done for glazing in color. Let's have a look at the
time, see where we are. Seven minutes. I'm not going to rush this
bit because a lot of people have been asking me
how I color and this is it. So multiply mode layer above. I like to get, get
your skin color, your local skin color
towards the red. And just keep a bit
of pink in there. You won't go far wrong. Use whatever brush you want. Wherever you're
comfortable with. I'm just using a normal
brain round brush for my round brush, which I like, gives a nice, nice finished things
and I don't know, it seems to add that
cartoony sort of vibe. You can add a bit of depth,
depth to proceedings. So I'm going to go super dark
for the eyes for this bit. Across there. Across there. Okay. The shirts, of course. We can add a bit of
shadow whenever you want. Sure. I'm in my head. I remember him the
shape of my mannequin. She's got this shape here, darker down there as sort of
shape of a standard body. So I've just shaded
up in their legs. Imagine the legs is like
cylinders and the arms. Just imagine them as cylinders and shade them accordingly. So that's that. Maybe
we could either a bit more just in the darkest areas, just for a bit of extra
depth if you want. For the purpose of this, I think, is this accurate? Light? I like to use screen. There's lots of different
modes you can use. I like to use screen. A couple of modes. You could use his ads, which is super powerful. Probably too powerful.
If we look at ad, you wanted to add like a
very under saturated light. I mean, it's basically white. Obviously you can tune
it down afterwards. It's a bit too hectic for
my personal preference. So my personal preference
is screen overlays. Good to again,
minus turned down. Quite accurate thing. But while I like to use this is screen and I like
to use a dark color. So I'm going into the dark hues. I might just trying this
on either minute screen. And this is what I like doing that day in a bit
that they have here. We've got light up here. We've got some lights in
the bridge of his nose. Some come in there and
this just breaks it up, sets it off on your way. So you can also,
if you wanted to, you could just exaggerate the edges for that
character vibe if you wanted to, of course. Okay. I want to go really white
for a lot of this shirt. Now started off with
that purple color. You've seen the furanose
effect on shirts. Start with our purplish color, and then you bring in the white later when you're
doing your lights. Really gives it a different,
a different vibe. Now it looks like a white
shirt and a purple shirt. The genes. Again, just thinking of them
as like cylinders. Might add a bit
more blue to them, color them genes actually. Just in certain parts. You can do that at the end. See you can add to what's
called subsurface scattering. To me, get extra poppy
from your shadows. You want to just glazing. You want to just glazing
some supersaturation, which will make things
pop even more for you. Okay, So I think
we're just about done on the color and I sort
of call it a day there. Another nice trick is, I mean, there's
opposites with colors. So there's colors which
work well together. So if you're using warm
shadows, use cool lights, and I don't mean it's got to be orange
or red for the shadow, and blue and green
for the light. I mean, you can have
a cool red as well. If you take it more to the gray. You see. So there's lots
of little things that go around blast color theory and that takes a lifetime to master. One thing we forgot
to do though, and add our teeny tiny
little light highlights. So I like to put
a dot there and I thought I thought Okay, So you just just sort of breaks some
certain things up. And that's about it,
folks, that's about it. So that's my process
for character drawing. The time 15 we've gone
way over on this one. Okay, That's okay. I'm going to conclude
with the next part.
8. Recap, and some useful professional tips and tricks: Hello guys, welcome to
the final concluding part of my character course, which I hope people
got a lot from. I mean, these are things
has helped me so much. There was just one more thing
I wanted to show you that blue and orange opposite on the color wheel,
therefore complimentary. So when it comes to just add in a dash of color
or something at the end. Blue works well, That's
why most characteristics, or just splashing a bit
of blue at the end, it sits well with the
orange or the pinky tones. So that's why it's one
thing to bear in mind. Backgrounds people are not
that interested in to be fair. When it comes to character. If they've asked for
something in particular, then that's up to you to you'll pick up little
things as you go on. Did he want a fishing
rod in his hand? And therefore you would
have done him sat down. Lots of lots of things
people might ask for. But when it comes to
just quick sketches, the most important thing
is don't be too offensive. Don't want to upset anybody. And you want to give them a piece of art so
you want it to look good. Let's grab all of our bits
and bobs from our drawing. Show you something. Show you how we go
from what we've done. So if you remember, that was our original sketch, don't really look like
our final inked phase. And that's the beauty of it. You see things progress as
you go without even noticing. But that was our
initial sketch of what we thought this
guy looked like. Wink, wink them and
we come up with this. We've pushed certain
bits of your memory. If anything, I'd like to maybe
bring that down a touch. In fact, see if I can do that. Bring the most donor touch. Because that's alpha locked, That's why it didn't work. That's why I'm not
sure what we got to shine is going on the first bit, is it okay wherever I can go? Liquify, showing you try
and bring that knife down, a touch to make him
look a bit older. Sit better. Maybe not. Maybe, maybe not. Not quite sure. But that's the
beauty of character C. We still know is this fellow. Whether we stick
with that, all that, we still notice this guy because we've got the
fundamentals right? The shape of his head. Okay, Let's have a little recap. Trying to think if
there's anything else I can tell you while we're here, group them together. So if you remember,
we did this lady. We don't want to draw
her looking like that. We want to give her
a smile, don't we? So this is where we start
with what I said earlier. What's going on? Really? Just typical. Typical when you're in
the middle of a live. Yeah. So we sort of sketch out that roundness and we
were looking down. Again. We're looking for some sort
of shape rather than a bowl. It's easier to do it that
way. And then we're doing. In her eyes in so we
can do a lower eyelids. That's not a problem. You can do it. Oh, a lower eyelids cutting,
cutting over like so. We can also bring up this part which would be
a smile sort of thing. So we can give her
a smile like this. But I didn't this bit. Yeah. We can give her smile. We know her eyebrows
sort of start low. So we're going to
stick with that. I'm going to stick with that. But we can now give it a little smile. And all of a sudden it turns
into a happy character and something that people
want on their wall. When you do this, when you
do smile lines up like this, make sure your top of your
cheek comes from there. Okay. You don't want it to
come from down here. Don't look right. Make sure
your comes from there. So see what I'm saying. Instant fullness, their head wrapped around. And just like that, I had some wrinkles. A few eyelashes because
all women love eyelashes. My lashes. And you can see it's more flattering than
our initial JOB. Yeah. This is what I mean. So that's it, folks. If you haven't got my character, I do recommend it. It's all I use now. It's all are used. There's some awesome brushes now let me just quickly
show you some. It comes with the
tutorial anyway. So let's turn everything off. So I can show you how
these brushes work. I mean, this one base here. I just want to knock
in some texture on some hair. Check that out. Yeah, curly dog has clumpy for showing whatever
brilliant, brilliant brush. This one again is similar
sort of scenario. It just goes a little bit
bigger and it's a bit wetter. So you'll get a lot
of mixing, mixing. No two strokes, the same JOB. Same sort of thing is
this explains it on my, on my thing anyway,
another thing which I do tend to use quite a bit
is a bit of skin texture. So if I show you, if I open up our guy and we want to just add a
bit of skin texture to him. We had a better light mass. And we just sort of glaze
this in like by there. You can see actually adds, adds a lot of
texture to a piece. So it makes it, it
makes it really fun. And that's a bit of
realism and stuff too. So, yeah, guys, one last thing. Get a signature and
sign all your work. Because there's people
out there, scabies, scavengers and they will steal anything that you can not
nailed down and telling you. Yeah, Sonya works yours. And more importantly, enjoy it. I hope this helps
guys just remember. When you're looking at people, shape of the face is first thought that
goes through your head. Before we start looking at
how close the eyes are. Let me just recap before we go because I
got a bit of time. Shape of the head. First
thing you look for, we can exaggerate that. We can exaggerate that. Hairline is important.
In this case, it doesn't matter, you know, it's coming down over his eyes. The space between eyes is age will determine
whether you push this nose up or push it down. If it's a youngster,
push it up. Okay. I'm pushed that chin up. So we've got a cutesy cutesy
sort of thing going on here. Bigger eyes, but further apart. So you've got room
to accommodate on the skeleton for
those bigger eyes. Otherwise it won't look
believable. Hey guys. So delete that, turn it off. I like group. And let's see if we can
just swing him around. So he's a bit bigger. Here we go. Guy got hugs. And yeah, I think
it'd be pleased with that and it'll
go on his wall. So thanks everybody, please comment and share with
me your attempts, your efforts and
stuff, your progress. Joined my group, facebook, Procreate, learn and share. And that's all learn
together and share together. We don't want to
keep all the secrets and tricks to ourselves. You know, this is something that after a 100 joins,
you're gonna get two. Don't keep it to
yourself as, as greedy. Share the love, share the love. Take care everybody. And I'll see you
in the next class.
 HugsyArts, Aspire to inspire