Transcripts
1. Introduction To my caricature class: Hello everyone and welcome
to my new class character. This is part one of possibly
a three or four part series. Part one, we're
gonna be covering the sketching and
getting that Logan us. Which a lot of people
completely scared off, they actually fear it. You see a lot of things
on YouTube which show you the Loomis method. There's tons of methods
out there. None. A really simple and
quick to pick up. I mean, you could get there
with a lot of practice, a lot of things to
get your head around. So I'm quite excited about
sharing this class with you because this is a method that where you don't
really hear much about it. I'm gonna be using
the triangle method, which is summing the
character characteristics like Disney theme
parks and stuff use when they got
up quickly gonna likeness on a bit of paper
in double-click time. They all tend to use this
same triangle method. I was going to just focus and do a whole character
as a one-off Sleep, try and squeeze it
all into one video. But I think best to
break it up into bits. We're going to sort
of have the sketch and the lightness in part one, maybe part two, we'll have
the color in the shaded. Part three, just some, some frills and
some little quirky little pen movements and stuff. It can set it off and
give it that fun feel. I think it's best this
way because it saves me sort of missing key points. Get more done on the sketch. And unlike nurse,
especially this part, this is the most important
part because a lot of you are probably take
your own coloring and shading to the table anyway, you probably know
how to do that, but finding the likeness
is a little bit different. So we're gonna get started. Hopefully at the end of this
particular class part one, you will be excited, just as excited as I
was when I learned it. You can go up, go away. It works on antibody. Where the sign in front of you or you've got a photograph. It's good to work with. Hopefully at the
end of this class, you could share in the resources and the
projects of your attempts. So we've got all join me in part one, book
a straight into it.
2. Learning and using the triangle method: Goes, it could go with part one. We will be going straight in to introduce you to
the triangle method. I'm not even sure if it's an
actual thing. To be honest. I've discovered at
myself somewhere off from old Disney
characterised. And I can't find nothing
about it on the internet. Last way, the world
needs to know, because all these methods, these conventional methods
of finding a likeness, portrait painting, this stuff, it didn't really
sit right with me. Way too technical. And especially when you
want to just do quick, quick doodles, haven't
really got time to be doing sketches and stuff. So hopefully this
works a treat for you. Let's get going. First, we're going
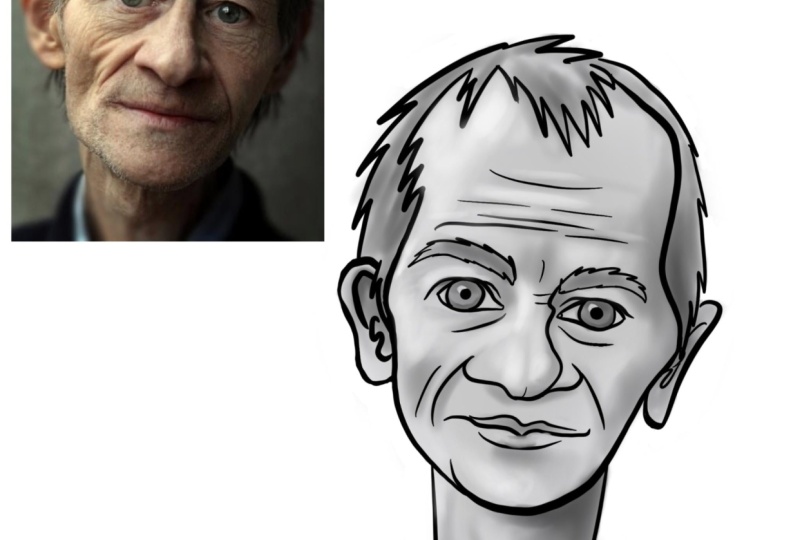
to grab a fault. Now, found a photo of quite
an interesting looking guy. And I figured the
perfect person. To start us off. You can see he's got quite
an interesting looking face. And he's got sort of features
which we can play with. And I just want to show
you, I mean, you haven't always got to
exaggerate everything. You could use this method to just do look for low
portraits if you wanted. But I'm gonna be showing
you what we can exaggerate, what you can get away with. Whilst it's still
keeping the likeness. There's a photograph
now, the triangle. This is the triangle from the corner of the eye
as a big thick exchange pen. Recent from the
corner of the eye. The corner of the other eye, the top of your triangle, the tip of the nose. But you get the point. This a triangle. Every single person off
99% of the people on earth are going to have this triangle is going to vary in shape. The more you practice
this technique, the more you will see
the triangle on people just casually walk
in past day to day. You see some people have white
eyes, a shorter triangle. Some people might have
a longer triangle. Bigger knows,
everybody's triangle is going to be
slightly different. And I do mean slightly. See our fellow here. He's kind of got pretty
perfect triangle to be fair. Which is strange because there's nos does seem rather large. That's the first key
thing that I look for. I've shown you this week, because this is the
best way to practice. As you get better,
you won't need to do this on the images. You will just see the triangle. Work out for yourself and
put your own spin on things. This is the best way to learn. These are triangle. The next thing we want to
find is sort of the mouth. The mouth area, the muzzle. The muzzle just stick
with the muzzle. So we just pick a
different color here. Pink. Muzzle is going
to be this area, this loan here at the
bottom of his chin. Okay. Everybody's going to
have a muzzle area too. Even if they haven't gotten
increases like this fella, they'll still have still have an area or some
angles around the mouth. So that's our next
area at the focus with being said, we
could just go in. We could just dashing a
little low in on the most. Because this is the best way
to practice this method. You can start putting
your own spin on it when you get up to speed. Next, most important
thing which we need, the gauge is orange. There is my opinion, the most important part. And a lot of people won't agree. They'll sort of say, well the most important,
the argues, isn't it? The argues or the
mouth or the nose. They are very important, but the head shape, for me is most important. To get an alertness. We can see if we just
quickly just quit the day. We can see that we've got a basic head shape
of this fella. Let me just grab a copy of this. Paste that out. We've got everything we
need to know right there. Now, there's an old method
called the grid method, which traditional AIS tools. And they sort of
just paint him in each square to give them idea that equals
square by square. Where they're doing
hyper realism. Sometimes this is very similar and it's working
along the same lines. Color, blue, color
in. I always start. You can start wherever you want. I always start on the
nose and on the nostrils. So we can see that its
nostrils corresponding. The triangle can
note a triangle. They're not sort of
stuck in the triangle. They flare and outside. If I were triangle window potentially as an area which
we can push exaggerate. Most important thing
is we just look in, just looking at the angle there. Anyway, angles, right? We can bring them
there in a bit. You haven't got to
be too precise. As long as we stick
to our triangle. Let me stick to the same angles, will still bear
resemblance to this guy. Bottom of his nose.
Bring that there. Maybe even more. Push it. I'll show you more in a minute. Anyway, more in depth
in how I actually do a play with the
features using liquefy. You can, you can do it
here as you get better. But I just go straight to B6. Yeah, it's the best
way to learn this. The one thing I can see is not 100% happy with that knows, but we'll sort that in a minute. The muzzle call some lines, not everybody going to actually physically
have the loans. This guy has just
quickly sketch. We know his mouth goes just
got his chin in there. Sticking to the lines
and the angles that we have got nose, we can see what comes up there. Now is the fun bit. I use the window to the soul. On an everyday person. The average person I should say, there, I will stop there. And the pupil will speak. Bang in the centre. The corners of their mouth. If you're going for the
perfect normal average human. Thus what we got,
if you're going to be playing with features, given them a bigger motor, bigger nose is going to
change other features. This is what we need
to bear in mind. Let's just get his
eye and we can see his eye actually comes in inside of his nose. Comes in there because
there's nostrils are quite flared which will
exaggerate in a sec. The top of his own, he falls outside the triangle. Again, it's an area we
can push if we want it. We could go up here, cartoon it as much as you want. As long as you get
in that angle, that shape is going
to bear resemblance. Get your scope down
there like so. We know we're coming into a boat because of
where he is on there. Just bring that down. Just below our triangle. Simple. Bring that around. Backup. So where the corner of his
eye is simple as that. It's got a bit of a crease
in my benefit crease in their same on this side
is going to be various. Everyone's going to have
slight differences. Nodes, perfectly
symmetrical. Same thing. Start in, well inside again. So what we're gonna do, we're just going to bring
the I don't like so just bring the only backup where it ends there and
he's got a bit of a crook crooked eyelid going on. Bring that over there. He's
got some big bold pupils. Now this is another
important factor is some people have paid pupils, which you need to convey your picture
called negative space. Some people that have
little tiny irises. So you need to just
make sure that you look in at negative
space as well. Let's just, banks have
been there for now. Like so. We'll go ahead and just
finish off our brains. Nothing heavy. Lines are not apply. We got what most
people would consider. Main features don't on a sketch. Join me in part two. We're just going
to be completing this head will go
straight into how we can exaggerate certain
areas and how I do it using Liquify.
See you in a minute.
3. How to exaggerate : Guys, welcome to part two. So continuing on from
where we were fellow here, we've just sketched in, this is of course
the sketch layer. Just sketched in some features. And then we can go
ahead sketching the shape that we have
for his head right there. So just sketch it in CEOs. They sort of come out there. Like so. Neck, smaller neck. So we're not too bothered
affect the body. We're just looking for
that facial likeness. Hairline sort of
comes in a bit there, but he's very thin on top
with a bit of a tuft. Were just loosely sketched. Tuft at the top. I'm mainly doing is sticking to the curves, which I know is the shape
of this guy's head. You got better. You will see these curves
instantly without having to follow the actual
gotten the drawing guide. What's going on with the eyes. And then comes up, they're a bit more wrinkles. I think we did a
decent position and I can have a look
at our picture. Just move it slightly over. We can have a look
at our picture. We can see we've got
a slight resemblance. Didn't draw that straight on. I did. That's good. That's funny. Okay. Obviously what you're doing. Good outline. Don't do what I've just done. Sketch straight over. Not the way to do it. We're
going to do because of that. Just really quickly.
Just quickly trace over these bits a
minute so I can show you why. Keeping keeping the angles is the best way to
learn actually, until you get up to speed
is doing it this way. Okay, so I've got that and that one is all
on its own layer. So it doesn't matter when
I manipulate the rest. Soap liquefy. I have a set so the pressures on max, distortion, momentum off. Don't push big. You could stretch big areas. People small. You can get in, not so crannies. Looking at this guy, his head
his original head shape. We looked at the
one we had there. We can see heads kind of like a, it goes in at the bottom
and sort of goes out. You can have a bean at the top. That's an exaggeration. We can play without
swallowing gonna do is suck it in even
more at the bottom. Suck it in as much as we can. As long as we're still
keeping angles safe. We can push this part, especially the cheekbones
out even more. Bring it back in at the top. Still sticking to that
shape. Initial shape. Give them a bit of a
larger, longer head. We can give it a bigger
ears if you want. The distance between
his top lip on his nose is considerably less. Bottom lip to its chin. We get an exaggerated slightly. Push it up. Nostrils. Nostrils can come out. Come out as far as you want to push
things that you can come out of old still lands on
the bottom of this triangle. Such a good tool, this liquify. We know loans around the mouth. We can because we've
widened the nostrils. We're going to have to
widen the rest of it, the rest of his muzzle.
So let's do that. Let's worried that out. Stick in that green line underneath which
which was our guide, which I messed up at the start. But there you go. Just loosely stick into it. Going to come out because we've
made the nostrils bigger, features interact
with each other. We can make his mouth
bigger, muscles, bigger. I mean, it's always a
pretty close together. The CSO of this room for another RUN between what we see, pushing it with this go. So we've already got closer. You see already a funny face. Just exaggerate a slightly. If you're going to sort of
just go off this and back on. You see you got a little kid. You want to push the nose up. Going to affect other stuff. If you're pushing that holds up, the IEPs are gonna
have to go out. You pull in the nose down. It's going to pull the eyes in everything that the
rocks with each other. If you pull in the mouth up,
it's actually the opposite. It'll pull the chin, chin down. You see? When we're young and babies, we have these big giant
head switch we'd grow into. If you are doing babies, kids, it always looks better
with a much smaller chin. Much smaller chin. Sometimes it will
just liquefy it up. It'll give you a more youthful
look. The older we get. The opposite happens
where the math gets closer to the nose and the chin comes down in
the opposite direction. You've had a little
play with him, is how you let's be honest, I didn't do as always
perfect in the beginning. We can see that angle is a bit more sides
worried looking, maybe this one
maybe a bit better. You can get that on your
final inking stage. C, we've quickly sketched
out some bits and bobs and we bid a
resemblance to the guy. Lips are sort of quick, sharp and pointy,
kind of like that. And he's got this kind of
middle bit coming out here. We can sort of play with bits. But you've got to be careful
while you're playing with otherwise you'll lose
that resemblance. I've drawn this fellow
a few times to be fair in practice
in for this video. Obviously done it a lot better. But the beauty of
character is Yukon. You can get away. You could draw someone's 7
thousand times and you might, might be different
70 thousand times, it will be different
7 thousand times. But every seventh, all 7 thousand of them will still bear resemblance
to the character. If you stick to the principles. Again, you can make it
as playful as you want, as real as you want. It's got options. Limitless, new Could. You haven't got to use
this method for character? Would use if a cartoon
in portraits, anything. Obviously, this is the stage now where I'd be turned
in my layer down, up being kid over, gonna show you exactly know, but obviously this is the most important
bit and I will just have another double-check. Make sure that my
sketch is good enough. I will start with the eye. If you want a bit
of a hurry to win, a bit of a quick job. What you can do is
this ball in there. Maybe not so much on older
people because they symmetry. Tends to go even more
the older they get. Certainly on OLED, on younger people,
especially young females. You can we've done
that on a new layer, three fingers down copy. Three-finger, don't paste. Flip Horizontal. You go to always done from
most commissions and stuff. I would do it this way. But for now, I suggest getting
the practice in drawing. So you see his troops
down look so backup, pupil, big heavy top lid. When you want to do in law,
not always remembered. Very a pen pressure thick and thin just makes it look
a bit more attractive. This is the sketch. We don't need to draw
the whole thing there. Just this just this part. Just get your hair
in wherever you do. Yes, just rushing now, told myself not to get
involved with the line art. This is gonna be a class
all on its own hearing. I just want to show you how you can make final adjustments. Even once even once you've done your final sketch, something out there and they, I haven't learned them or use
up, great, but whatever. See, we've just doodled out a quick sketch using
the triangle method. I mean, it's better in
resemblance to the guy. We can still go back
in with the Liquify, change certain things, especially around the
idea is you can go small. If you need more troops. The tiered up there, you can get it more angle on the nostril. You can get it flare out. If the mouth is the
wrong the wrong shape, which according to these no. You can get it. You wouldn't just pull
it wherever you want. Liquefies your friends. You'll never make
a mistake when, when you've got the master
of using it, pull it. They'll pay, making
them a bit more longer. Makes up a bit. But yeah, I mean, we've been at my
bedroom resemblance there. Now the thing is,
it's because of the fundamental building blocks, is why we're bearing
a resemblance, is because of those triangles. We've moved him slowly put. Triangles are still
in place. Look, see. If they're not,
we'll change them. But we still got the corners of the eyes at the top
of the triangle, which still got straight down
to the bottom of his nose. That's the fundamentals,
the bits you should really leave alone when
it comes to exaggerate. In other words, you're
changing too much, you will lose his ambulance. We can see how it
moves, comes down, but that's something we
could have played with. Loans flared out the
same angle as his. Just a bit wider because
we widen the nostrils. Yeah. There's one wanted to show you obviously know you color it. Whatever you do. Best brush ever put onto Etsy. If you want my brush
pack, hugs you. 2022. Some awesome brushes. Just something on behalf. Hello. Anyway. This concludes part two. Just finished off
a quick sketch. I mean, I think I had
this converse open long before we actually started recording the
Thirty-five minutes. We've got a lightness. It probably took what? 1010 minutes
together, alertness. What we're doing Part Three, we'll use a different image. I will sketch them as well using exactly
the same process. All right, see you
in part three.
4. How to draw females: Welcome back to the next part. You see there, part 12. We quickly sketched out
using the triangle method. Quickly sketched out this dude, played with a few features. It would be more interested in what we're gonna
do now for this part, we're gonna do the same
again with a different face. Let's grab someone. Can we use honest use
this girl, she's funky. She's a girl. Girls
at different men, different jaw shapes,
softer features. Just throw the lady here,
open up a new layer. But Green, get my ink. First of all, let's
see a triangle. You look at it like,
what can you see? Go really wide eyes
which are emphasized, enhanced with the
law. Eyelashes. Corner of the eye. The
corner of the eye. First one. I might actually
go a bit further because of the eyelashes. Want to do it. Tip of the nose,
tip of the nose. There we go. They don't mean fundamental triangle.
Remember the old guy? This sort of shape going on. Everybody's different. And this is the important parts. This lady is this sort
of shape going on there. That's most all Sheep. Ladies muzzle shape,
their shape of her head. Sketching, copy, paste. Everything we need for
this lady right there. That's just quickly
dive in on a new layer. Change my pen color
for the sketch. I start on the nostrils. Let's just move
this over a touch. Sweet. You still
keep the lady in sites like to start
on the nostrils. So again, I'm looking
at the angle. If we get the bottom in their
nose nose ring going on, but that sort of angle
going on look C, whereas the other fellow
was sort of like this. A little bit angles. See that angle, that angle. Angle, angle. All about the angles. Get a little nostrils in. No matter what we do know, it's gonna pay resemblance because we will be
sticking TO triangle. Let me just put that in there. I want to give a bigger smile. I take this and we
get a run with it. She's got a really
big smile like so, which is going to
affect her cheeks now. They're gonna come out like so. Look, so we're coming back
a little button chin. If there's such a thing.
Lips kind of like so. I don't like that. Always said earlier about
the inner I should meet. We can see more or less
there with this lady. We could start roughly just in a touch for touch
there for that one. I'll use they're gonna start. She's coming in. So the triangle for
the starting point of our either the argues
are not that important. You can just do some
cartoony or if you want it. If you wanted to
just really to go cartoony way surprises me that a lot of people
think I'll use it the most important you
can put any set of, I'll use all these fundamentals. It was still bear
resemblance to this lady. Long as we get the lottery
is most important. But yeah, let me just show you that you
can use any sort of value's going to be just doing a more accurate
version here though. If you wanted to,
cartoony Disney, once we're over, swoop
down, swoop backup, set. It doesn't always give them
more of a smile if you want, did with this part. Laughing. Wherever you want it. You sort of go up and then
slant out, don't they? So we're going to do that. But then slant, we're
going up to meet. This is a situation. B, copy, paste, flip. That already done. Drop-down. Small eyelids. They're always on that one. It was actually covered
blue here on that side. Goes straight. This extra thick. Obviously nobody knew
about exaggerate, and yet this is more
just practice purposes getting things right, the better you get you
can make your adjustments now rather than liquefy. But for now, just about getting
the fundamentals right. Chin in there. That we know that
this is a head shape, big hair, command street thing. We got too big. Not really exactly sure why they
are called to be fair. Bunches and bunches up there. The rest of her hair so
of waves don't look so bad and resemblance already. We've just doodle that out
and we'd be in a resemblance. Just move this Dropbox. Oops, wrong button.
Didn't want to do that. Still going it, come back. Come back there it is. Just move this over a touch. Sketch layer liquify. See what we can
sort of play with. We can see she's female. Number one, she's young. Small chain, small noses. We can push this up a touch, bring that in slightly, whilst trillion subroutine
our head shape. I mean, you can't really give people big noses
unless you don't like them. So you can make a nose
if anything smaller. We can even bring
it up slightly. Now you can see
that we've actually coincide the triangle. We're gonna counteract
that by just go smaller. Stretch it out. It always she don't look this
proportionate. It's allowing liquid
runs. Look at this line. The bottom to the top, we're going up at
an angle like so. Let's make sure we enhance that. I'm happy with the enhancements there when it comes to
color in this lady. And we were just sort of remember in our
head certain parts. As you get more
experienced, you'll see it. We know she got some
great eyelashes. They're just scoop them in. Scoot a quiz. I'm not going to bother
shade in this one. You'll just copy paste works on. Most people. Scoot that over there. That little nose. Remember sticking to the
angles which we've seen. So it wasn't like
this, like that. Remember remembering all
these little things. Lips quickly, quickly followed. Before we meet the bunches. We'll do that kind of flow in the flow of a wavy. This is easy as that folks. More you do the
better you'll get. Turn the sketch layer off. Bear in resemblances. Of course, we still go back in, tidy up anything and
I'll show about. We're also looking for the mass. I'll person, if they got
big hair, make it bigger. Because he's making bigger, big beard may get bigger. We're looking for
mass, mass areas. Putting this header a bit. Join me in the next part. We will sketch someone else.
5. How to draw younger people : The back goes. We've sketched out a couple. I've introduced you to the
triangle method that I'm using. I used it here. This lady sketch here. Use the old triangle method. Somewhere. Even used
it for this one, which is completely different, more of a cartoon. But again, bear in resemblance than those
cartoon I showed you. Just quickly, very quickly
sketched in the body. Used to hear this lady. Bit more accurate on this one. Bear resemblance more accurate. It's more of not a character
or this one more cartoon. You can see already drawn
the girl we just drew. This next girl gonna do. What I did of the father
and his daughter. Okay, so let's have a
look at one more using the same triangle
method just so it sinks in charge someone a bit
more tricky because kids, especially just
normal looking kids. They're going to be
the most difficult to draw up to you shortly. A bit of that off. It's up to you. Not go too
aggressive with the kids, that you kind of go give them
a big noses and big chins. The parents won't like it. Sweet degree. Drawing. Use whatever you want. Corner of the eye to
the corner of the eye. If you look at it,
you could probably start to see
triangles on people. If you see pretty normal,
normal looking triangle. But it's shorter.
Because she's younger. The nose gets squashed up
with the RUs, come out. We'll play with that to
give it a useful look. Nostrils flare out, but we're not gonna
be pushing them out. Muzzle, this sort of shape
and comes right back in. Little chin. So head shape. Remember I said
earlier about kids having bigger heads
which they grow into. We can see that equals
wrote up off the page. Let's copy that I haven't
drawn. Copy that. Paste. Move out the way. We can just finish off our head. We covered in hair anyway. See the shape of kids faces. Everything is kind
of squashed down. The big head spaces. Implant the Drawer. Let's start with those
nostrils all squashed up. I would probably personally
make my decisions. Now. We're gonna stick with
best way to learn, which is this way and using Liquify to get your
brain around that. Let's just draw those
nostrils in. Like so. My wife couldn't
stay more this side. Weekend. We can use I can use some teeth. Remember the negative
space or negative space? However you do them. I'd like to just put a
little little gum line in shade in a bit afterwards. Chin. These lines straight to
the pupil. So to the nose. Pretty bang on this. So we'll be starting the
there's gonna be the insoluble roughly going to
be our pupils comes out. But I'm gonna try and do
some more Disney toys for this one more cartoony. Going to swoop, swoop over, swoop down like so. Just dropped down like that. Comes down below the triangle. Into the triangle. Just bring that up like so. We will mess around. We'll
be doing exactly the same. Sorry lashes go in there. Quite Street Blues
for the school. Possibly take them up, up touch to be fair. So cartoony or easy to sort
of get away with mood. Literally works. Works for everybody. Comes swoop, so comes down. As long as it was account
number before I cut picture off. Somebody like this. Drag it down a touch. Just wanted to show you a Disney I'll use how do they work? Well, particularly
with children? You can see they're Harris
working quite nicely. Gonna move that. We'll look at liquefy, see if anything needs change it. I would imagine. Because
squash it up a touch there. Maybe bring that up. Moreover angle in a bit, maybe bring the hair
line down slightly. This is where we have
a sketch layer than what a bit wonky lines. Then of course, it
comes to our lineup. My magic G sketch. You know what I'm gonna do? Three, finger swipe down, copy, paste, flip to always done. See things better. When you get your final ink
might be a bit clearer to see negative space. You get the idea. I'm
just trying to quickly, quickly rush this
head and I was like, sweet and have a look
if there's anything that doesn't need modification. We've made sort of a
cutie cartoony version there with completely
different IDs. Still bares resemblance. So this is a good trick to know these cats meow is because you can get
away with a lot, especially when
you're short on time. You I'd like to
see you doing it. Leave the cell opposite. You're getting the cat. When you use, as
long as you've got that triangle in place, the certain angles we spoke about, you'll bear resemblance. We can even play with them. We can see more of a dome
still trying to go in place. Yet. Look at the angles there
we can use and our base. We can just liquefy things
into the correct position. See, there's sort of a street and then it goes up
if you wanted to be precise. The Disney ones, I don't always get just treat
them like a touch, not even bring
bring them to more. However they are on their butt. Most kids loved the
cartoon you always anyway. With kids in general, you want to be thinking
is to wash it all up this way with bigger
heads at the top. Rather than pull it
all down that way. We've smaller heads. We do it. We've done a cartoony picture of this lady or a young girl. Bares resemblance with
completely different OUs. Again, something
else to just bear in mind that you haven't always
going to get the bang on. See, when you put
a bit of showing normally starts
bringing it to life. Thus, for the next lesson, the color in the shader. Join me in the last part.
We're just going to be going over some of the things
I might have missed. Some groups, some
important parts, maybe on some of
my older pictures. Just want to go over everything, make sure you've got it down. Then we can we can conclude sketch and then
likeness, tutorial.
6. Final recap and advice: Guys, welcome back
to the final part. For this part, I'm
just going to be going over some important points. Less jewelry and emojis, making sure you understand
some suit and things which I may have missed off. If we pick this fellow here. Remember what I said earlier,
the most important thing for me for a likeness, the part from our triangle and our ankles is the head shape. See this guy's head shape. Let me go. See this goes head shape. Get a super long. That's the guy's head shape. Everybody's going to have
a different head shape. You got to look
where the bulk is. The bulk of this fellow you'd see is the top of
his head, his hair. You could sort of
make a point of squashing up the bottom, making it even thinner
and squashing it up, expanding the top part out. Even more. To exaggerate his head shape. Academy, subtle, but
it really works. If you if you had a big nose, the other big nose there, which you want it to be
the main focus point. Then sucking the sides, make that nose, rather than
drawing the nose much bigger, a little bit bigger,
and sucking the sides. To put the emphasis
on that knows, if you give them a smaller head, you can't just
leave it like that. It looks all the
anatomy is wrong. You need to pulling window. If you're pulling somewhere, you need to push somewhere else. You're going to have all
the mass in the middle with big huge features and a
little head, a little chin. You can big heads let the kids
and the baby's big heads, a little tiny Chin's,
little tiny features. If you get what I'm saying. See if I phoned another woman. I haven't shown that this a bit. Let me go back to
our original guy. This fella. You can see
we were stuck it in. We're sucking in his the
bottom of his face here. That's the smallest
part of his head shape. But we were adding here. We wouldn't just suck it in
and we were adding as well, which enhances it and keeps likeness and keeps
the anatomy uncheck. Give them a huge nose. Remember to keep the angles. Correct for his
smile, his mouth. Keep the angles correct. Give them a huge nose, make his cheeks in a little
bit even smaller? To emphasize that, no, So the focus is know that nose. I'll use a close together. We could push that. If you want to go crazy with the exaggerations and just
saying, this is how it's done. It's still kind of
looks like this guy, but we played with a
few features there. Heads big, Narrow Sea. The more you play, the more cartoony and fun it will be up to you to decide
what your style is. I would like to be a
bit more pleasant, bit nicer the people. So I won't push them too far. I mean, it's pretty hard
to draw who ugly anyway, but it just literally
just enhanced two. That's about it really. Given a slight
Disney princess I'll use I'll say it once you get used to it
and get practice in, you'll be doing it just from a reference
photo or from life. You'll be seeing
that the triangles automatically without
having to draw, draw it out for yourselves. Great, it's a great tool
to get tuned in the brain. All right everyone, So
thanks for taking my class. I hope it helps, hope you're excited
about it as I was, I couldn't wait to get going when I first learned
it ages ago. And yeah. I hope you enjoy and please do share your efforts
and attempts with me. I've tapped me on social
media, hugs, yahoo.com, hugs yachts, or in the
projects on Skillshare. And I'll look forward to
seeing your progress. Thanks a lot. In the next class, I should say, we're gonna be
doing the color and I think we'll do next
coloring and shading. Because that can bring, that can bring a
characters to life. This is not actually finished. This one I haven't even
done the shading on a clothes or added any light. That's quite an important
business, difficult. One way I've done the color
in this one was finished. Obviously when you add the
lights and the frills, really make some pulp. Yet still being cartoony. Thanks for taking
the class goes. Speak to all soon.
 HugsyArts, Aspire to inspire