Transcripts
1. Introduction: [MUSIC] Have you ever looked at those ugly black plastic
TV stands and wish you had a beautiful bespoke stand that matched your furniture, or are you just cheap
like me and buy used TVs off of Craigslist and they just never seem to come with a stand? No. Well either way, this beginners woodworking class
on designing and building your very
own wooden TV stand can offer you just that. [ [APPLAUSE] I will take
you step-by-step through the planning and
creation of a strong, sturdy, and graceful
stand that will be the envy of all your friends. I'm so called wood girl and I'm a creator in sunny Los Angeles. I've been building and crafting wooden objects large and
small for over a decade, and I am obsessed with passing on my love of
carpentry through accessible, fun, and engaging
classes that will help you tackle whatever
project you dream of. I've been featured in
Family Handyman for my one woman kitchen
remodel and I've been teaching on
Skillshare since 2019. I hope you'll join me on a journey of
empowerment and skill building as we create what we've imagined project by project. This class is aimed
at students with a rudimentary understanding
of woodworking. Access and experience using
power tools is recommended, but it's really not required. Some basic tools are necessary. Eye, ear, lung protection, sander or sandpaper, gloves, paintbrush or sponge brush, cloth or shop towel, miter, jig or hand saw, drill, drill bits, clamps, a pocket hole jig,
forcener bits, and I can do attitude. This is a great quick project you can accomplish
in one weekend, perfect for those
with limited time. We'll go over the following, planning, materials
and supplies, measurements and
cutting, assembly, a test run, and
finishing your TV stand. So why don't hop on
in and get started?
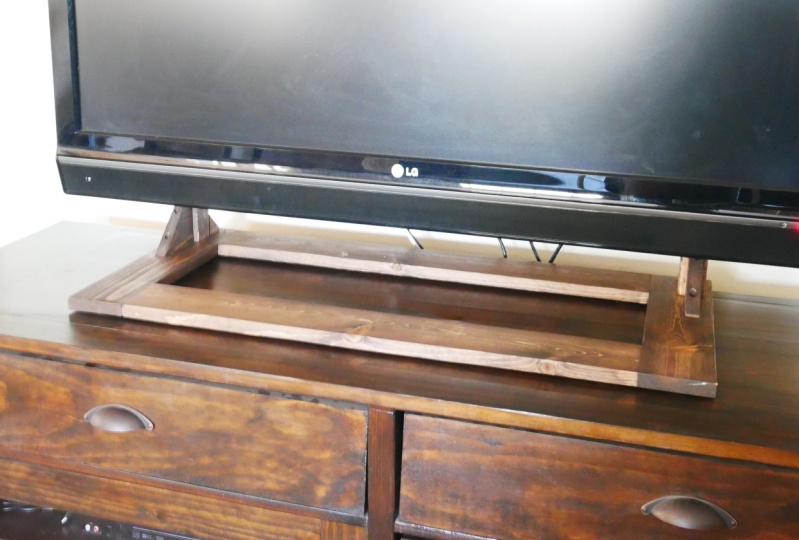
2. Planning: In order to make a stand
that fits your exact TV, you're going to need to do some careful planning and measuring. Please note that we all have different TVs and
media tables so my measurements are
specifically for my stand, yours will vary. First of all, measure the
space where your TV sits. There's no use making a
stand that is so big, it hangs over the sides. For me, my media table measures 20 inches deep and
five-foot-long. I will plan on making my
TV stand 15 inches deep. Next, let's measure our TV. Mine is 45 inches long
and 30 inches tall. The distance
horizontally between the two mounting holes
is around 31.5 inches. My stand has to be
at least that wide. I'm going to make my stand
about 34 inches wide. This will provide a good stable
support base for the TV. If you have a much smaller TV, you'll want to
adjust your width to around two-thirds of
the width of your TV. Next, we're going
to measure where the holes land on
the back of your TV. Most flat screens already have pre-threaded mounts on
the back for stance. Make sure these are the
holes that have metal threading on the
inside, not plastic. From the bottom of the TV, my first mount sits
at seven inches, 15 and three-quarters inch above that is the second mount. There are six and a half inches above that to the top of the TV. I like to draw out
my design so that I have a clear picture
of how this will look. I'll have a rectangle
base that is 34 inches wide by
15 inches deep. These will be made with
one by four boards. We'll have two-by-two wood
that attaches to the base and extends an inch above the
final top mounting hole. We want the TV to sit about
3.5 inches above the base, so leave clearance for that. From that 3.5 inches, we'll measure up seven inches to the first hole and mark that. Then another 15 and three
quarters to the second hole. Let's add another
one inch above that. If we add 3.5 inches,
seven inches, 15 and three quarters
and one inch, we have the length
of our two-by-two. For my build, this
is 27.25 inches. For the base, since we're
using one by fours, we need to deduct the
width of a one by four from the front
and back measurement. If my base is 34 inches wide, I'm going to subtract
seven inches, which is the total width of two, one by four boards
that are the sides. Remember that nominal
boards are generally half an inch less in width
than their stated size. My front and back one by fours, will be 27 inches long. The sides will remain the
depth of the stand, 15 inches. We'll also put it in a support
beam across the center of the stance arms
to add stability. We can cut that to
fit during the build, but that will be made from
a piece of one by three, or one by four, less than
about 32 inches long. The last piece of the
design will be the supports that keep the two-by-two
arms of the stand stable. I like to put one on
both the front and back of the two-by-two's
for maximum reinforcement. We'll do two 1.5 inch long triangles made from leftover
two-by-two for the back. For the front, these will be
triangles made by cutting 3.5 inch pieces at a 45-degree minor from
leftover one by four.
3. Materials and Supplies: Here are the materials
and supplies needed for this class. Aside from the safety and power tools listed in the intro, you'll need one
eight-foot length of two-by-two wood, pine is fine. One eight-foot length
of one by four wood, a 32 inch length
of one by three, or an extra piece
of one by four. You will also need the bolts
that came with your TV or ones purchased to fit
the pre-threaded mounts. If your bolts are short, like the ones that
came with my use TV are just three-quarter
inch long, you will need to upgrade
to longer bolts. I suggest one and
three-quarter length bolts. Additionally, some felt pads to protect the
bottom of the mount from scratching your media table and allow you to
scoot it around.
4. Measurements and Cuts: We've already done a lot of the base work for
our measurements. Now it's time to
break that design down into a simple
to follow cut list. For our two-by-twos, we'll cut two pieces
at 27.25 inches long. We'll also cut two 1.5 inch
pieces on a 45-degree miter. For our one-by-fours, we'll cut two at 15 inches
and two at 27 inches. We'll also cut two triangles at three-and-a-half inches
from the one-by-four, which will be cut at
a 45-degree miter. We won't do the cut for
the support beam just yet. This cut list will be in the class resources for your use. Pull out your miter, jig, handsaw or circular saw
and make these cuts. If you need a refresher on cutting wood with
different saws, please check out my
earlier classes which offer a much more
thorough overview. I'll be using my
miter saw as this is the easiest to use
for these cuts. Make sure your safety
gear is in place and mark your two-by-two at 27.25 inches. Make your cut to the
waist side of the line. Mark 27.25 inches once more
and make that same cut. Next, mark 1.5 inches on your two-by-two and move your
miter to 45 degrees. We're going to cut
a triangle with the long end being 1.5 inches. Do this again. Next,
pull out your one, cut two pieces at 15 inches, then cut two more
pieces at 27 inches. Finally, mark 3.5 inches
on the one-by-four and cut a 45-degree miter
with the long end being 3.5 inches. Repeat.
5. Assembly: Now we're on to the fun part, assembling our TV stand. The first part we'll put
together is the base. For this, I'm using
pocket holes. I use this handy
Kreg pocket hole jig which ensures a
good sturdy joint. An entry-level 1 is around
$25 and is worth every penny. Get one and open up your
building opportunities. Next, we'll be placing pocket holes only on
the 27 inch pieces, which are your front
and back pieces. We'll put in two on each end. Check your jig that it's
set for 3/4 inch material, then check your drill bit
and check that the color is set to the depth
for 3/4 material. Take your 27 inch 1 by 4
and line it up in your jig. Put in two pocket
holes, evenly spaced. Hot tip from me, place the ugly side
of the wood as your pocket hole side,
it won't be seen. Drill your two holes, then flip your wood
to the other end, making sure you're
on the same side and drill two more holes. Do the same for the other
piece of 27 inch wood. Now set your wood
on a flat surface, lining up the top edge of the front piece with the
top edge of the side piece, pocket holes facing up. Here's where clamps
can come in handy, but you can also just make
sure to hold the boards really tight and go slow with the drill so that the pieces don't
wander away on you. Place a screw in each of
the holes and drill slowly, stopping every few rotations and reversing before
going forward again. This helps keep the
wood from splitting. If you set your drills torque at around 12, this
will help as well. Screw each one in, ensuring a snug fit. Now, place the back
piece pocket hole facing up against the opposite
end of the side piece, forming a football goal. Do the same here as before. Finally, place your
other side piece against the front
and back piece, lining up the tops and
repeat the process. Now you have a solid
rectangle base. Before we move on, do a
preliminary sand of your base. This makes it a bit
easier to work with. Next, we'll make some marks
on the top side of our base, which is the side
without pocket holes. I'd like the triangles
support in the back to be 3/8 inset from the
back edge of the base. We know that the back
triangle is 1.5 inches deep, so add 3/8, 1.5 To come up with one and 7/8. Mark that from the back-end
of the base on either side. This is where our
two-by-twos will be placed. Go take a final measurement
of the distance horizontally between
your mounting holes on the back of your TV. Make sure you're measuring from the very center of the hole to the very center of the other, minus 31 and 3/8 inches. Take whatever your horizontal
distance between holes is, and mark centrally on the
back portion of the base with equal amounts of wood left to
either side of your marks. You'll just have to do either some really
good calculations or keep adjusting
until it's right. Since my base is 34 inches long, I'll have marks at one and 5/16 from either
side of the base. This is the mounting
holes distance. Now take your two-by-two
and make a mark right down the center
at 3/4 of an inch. Do it on both the front
and the back of the two-by-two so you can line
it up on either side. Now, line that mark up with your mark on the base
with the back-end of the two-by-two set against that one and 7/8 inset
line from earlier. Draw a line around the
perimeter of your two-by-two. Pull out your two-by-twos, check your measurements
of your TV again or keep your TV close for
testing the markings. We're going to mark where the bolts are going
to thread through. First, make a mark at 3.5 inches from the
bottom of the two-by-two. This is the clearance
between the TV and the base. Here's a quick and dirty
tip from me to you. Take out some painters tape and place it starting
at the bottom of your TV to just above
the top mounting hole, mark on the tape where those bolts are
mounting holes set. Now take that piece of
tape to your two-by-two. Start the tape at
that 3.5 inch mark extending along the wood,
keeping it centered. Now, mark the
center of the holes through the tape onto the wood. Do this for each two-by-two. Now you should have
an exact replica of your whole spacing. Pretty cool, right? Alternately, measure really carefully and
make your marks on the wood. Now, drill holes
all the way through your wood at the exact
center point you've marked. Do this first with a
very small drill bit. Here's where we pull
out our forstner bits. Forstner bits are
fantastic at making flat bottom tolls
so that you can recess the bolts and screws. If you don't have forstner
bits, no worries. You'll just need to buy
some extra long bolts from the hardware
store in order to account for the extra depth of the two-by-two
wood behind the TV. Match your bolt
head with your bit. Hold the bolt head up to each forstner bit and find the one that is slightly larger. This part will depend on the length of the
bolts that you have. If you have one and
3/4 length bolts, place a piece of tape at around 3/4 inch
from the bottom of your forstner bit not the
pointy tip, the flat bottom. This will be your depth gauge. I want to insert this bolt
3/4 of an inch into the wood. If you've bought a
different length bolt, I suggest in setting
it somewhere between 3/8-7/8 into
the two-by-two. You'll just need
to make sure that whatever depth you've inset, there are enough threads
left coming through to the other side to
thread into the mouse. Place your forstner bit
with its pointy tip, exactly where that tiny
hole you drilled is. This will center
the bit for you. Now, drill down until you
reach your depth gauge. Do this for each hole. Now you're going to do the
final hole and the two-by-two. Get a drill bit the size of your threaded bolt body and
drill directly on top of that tiny hole all
the way through the two-by-two. Now test your bolt. Does it insert snugly
but fully into the hole? You might need to widen
it a bit, if not. Now, I chose 3/4 inch depth
because I'm going to add little wood squares as supports between the two-by-two
and the back of the TV. This just ensures a
tight fit and sets the TV just a bit
away from the stand. You can also just use a decently thick washer if you'd like. If you want to use wood squares, take your scrap two-by-two and
cut off a 1/4 inch sliver, then drill that same
bolt sized hole right through the center
and make four of these. Next, take your
two-by-twos and washers or wooden squares and line them
up with the back of your TV, testing the fit of the bolts threaded into their
respective holes. If all seems right, you're ready to move on. If not, make adjustments now
while it's easy to do so. Finally, we're
going to attach the two-by-twos and the triangle
supports to the base. We'll start with
the back triangle made from the two-by-two. First line up the right angle of the triangle with that
one and 7/8 and set line. This will leave 3/8 at the back of the base behind
your triangle. If you've got a steady
hand and great aim, you can slowly drill a hole from the bottom of the base into
the middle of the triangle, then slowly screw in a screw that is no
longer than one and 3/8 so that you don't poke through the top of the triangle. Otherwise, you can do so from the hypotenuse of the triangle, ensuring that the screw does
not extend past the base. For either of these, you might want to take your
forstner bit and drill out a tiny bit in order to sync
the screw head out of sight. Just make sure the
additional depth doesn't make the screw protrude. Do this for the
other back triangle. Next we're going to attach
our two-by-two arms, place them right in
front of your triangles sitting in the perimeter
you drew from earlier. From below, drill
and screw right into the center of your
two-by-two counter, sinking the screw head. Make sure your screw is long
enough to clear the one by four as well as enter the
two-by-two a good amount. Now we're going to attach that back triangle
to the two-by-two. I suggest angle nailing into the two-by-two from the
top of the triangle. You can do this with nail and hammer or brad
nailer, either way. Put in several and make
sure it all feels secure. Do this for the other side. [NOISE]Don't be like Brittney. Make sure your two-by-two
arms are facing the correct way with the counter sink holes facing the back. While we're at it, how about putting some glue
on those supports. Next, we'll attach our
front triangle support, place the right
angle against your two-by-two in the center. We're going to screw
in at two points, about an inch down
from the top of the hypotenuse angled into the two-by-two and an inch up from the bottom
of the hypotenuse, angled down into the base. You'll be using longer
screws here in order to get through more material and
into the arms or base. You'll want to counter
sink these just a bit, so do make sure
that your screw is the correct length to not pop through the
bottom of the base. Do this for the other side. Lastly, we're going
to go ahead and cut to fit a support bar spanning between the arms in order to provide extra stability
to your stand. Measure the distance between
your arms and with either a one by three or one by
four, cut that amount. I would make sure
to place it out of the way of the mounting holes as well as where it won't cover any connectors on
the back of the TV. Higher up his best, definitely closer to the
top mount than the bottom. Place two pocket holes on either end of the
wood and carefully screw the support bar equal
distance from the base. Now you're almost
done with your stand. Take a look at your work. It's pretty cool. Way better than those cheap plastic stands.
6. Test Run: Before we finish this stand, we need to do one last
test run of the fit. You don't want to bring
your completely finished stand to your TV
only to find out that something shifted
during assembly or one of your measurements
was just slightly off. Now, is the last chance
to make any corrections. You'll want to put some
pillows on the ground or set your TV on the
couch face down, leaving enough space beneath
for the stand to extend. Line up the arms with the mounting holes and
threads your bolts through. If it fits, set it up right and make sure everything
looks right to you. If not, make
adjustments as needed, whether be widening
the hole in order to give a little wiggle
room to the bolt, reaching the mounting hole, or replacing the back
support stretcher with a different length to either a very slightly increase or decrease the distance
between the two arms. I ended up putting a
small sliver of wood as a spacer with the
stretcher support, as well as widening
two of my holes. If you need different
length bolts, go get them and try them out. If you need to add
more washers, do so, make sure you're satisfied with the stability and
fit of your stand.
7. Finishing: Now it's time to make
this thing pretty. Start by detaching your
stand from the TV, saving the bolts and
washers in a safe place. Sand your stand starting
with 80-100 grit, then moving to 120 then 150-200 for a super
smooth finish. Wipe your stand clean of all sawdust and either paint
or stain it to your liking. I have a very thorough
class on finishing your wood projects
that is linked in the class description
if you want more. I'll be staining mine to
match my media table. This is a conus stain and I like to use a sponge
brush to apply, wiping off the excess as I go. You can add coats to
increase the depth of color. I let the stain dry for an hour. Then I came back and did
one coats of polyurethane, apply with a sponge brush. Let this cure for a day or so. Then place those felt pads on
the bottom of your stand at the front and back and
sides so that the stand can be scooted around without
marring your media table. This can also cover
screw heads that might scratch the surface
of your furniture. Now take your
beautiful stand and attach it to your TV once more, ensuring all
connections are snugged before setting it up
right where it will live. Stand back and admire. What a beauty, you did that.
8. Final Thoughts: Man, I am so proud
of you, you did it. Now you are either in possession or know exactly how to build a beautiful bespoke
wooden TV stand that matches your
furniture perfectly. That's part of what
woodworking is all about making the things that
you wish that you had. I hope you've enjoyed this class and feel more empowered to take on whatever project
you dream up next. I encourage you to continue
building up your shop. Source power tools and
wood from Craigslist, pin inspiration photos
on a Pinterest page with pictures that inspire
your future projects, and please post a picture of
your finished project here. I really do love to see what
you come up with and also [NOISE] if this
class was helpful to you would you consider giving
it a rating and a review? Doing so helps others
find my classes and lets me know that you're picking
up when I'm laying down. Thank you so much
for being a part. Now let's go build
something else.
 Brittany Joyner, SoCal WoodGal