Transcripts
1. Introduction: Hello and welcome to beginner woodworking
class number nine, building a modern slat bench. I made a new friend who asked
me to build him a bench for his office so students
could sit and chat. And he especially
requested that there'll be a center console for
students to place their papers or
cups or whatever. And I was like bench please. You know, I want to
tackle this project. I am super-excited to make this easy build with you
today and I hope you'll join along as we learn step-by-step how to build a
modern slat bench. I'm so cow would girl and I'm a creator in sunny Los Angeles. I've been building
and crafting what an object's large and small
for over a decade. And I am obsessed with passing on my love of
carpentry through accessible, fun, and engaging
classes that will help you tackle whatever
project you dream of. I've been featured
in family handyman for my one woman
kitchen remodel, and I've been teaching on
Skillshare since 2019. I hope you'll join me on a
journey of empowerment and skill-building as we
create what we've imagined project by project. In this beginner friendly class, we'll learn the following. A general bench overview
with bench applications. Designing our bench materials
and supplies needed, making your cuts,
finishing our bench, and finally
assembling our bench. This class is for anyone who's interested in learning
how to make a bench, no prior experience
is necessary, but some tools are needed. Drill, drill bits, driver, sander, sandpaper,
painter, stain, optionally a hammer, nails
and glue or Brad Naylor and some sort of Saul be its
circular jig miter or hands-off. What are you waiting for? Let's dive on in
and learn how to make a modern slat bench.
2. Overview: Benches are a great
way to gather multiple people and be
efficient with your seating. The great outdoors, indoors and all of the
spaces in-between. The basic bench is a
super-simple build, but we're getting fancy
today with a modern look. You have the option of putting
it back on your bench. But for today and for
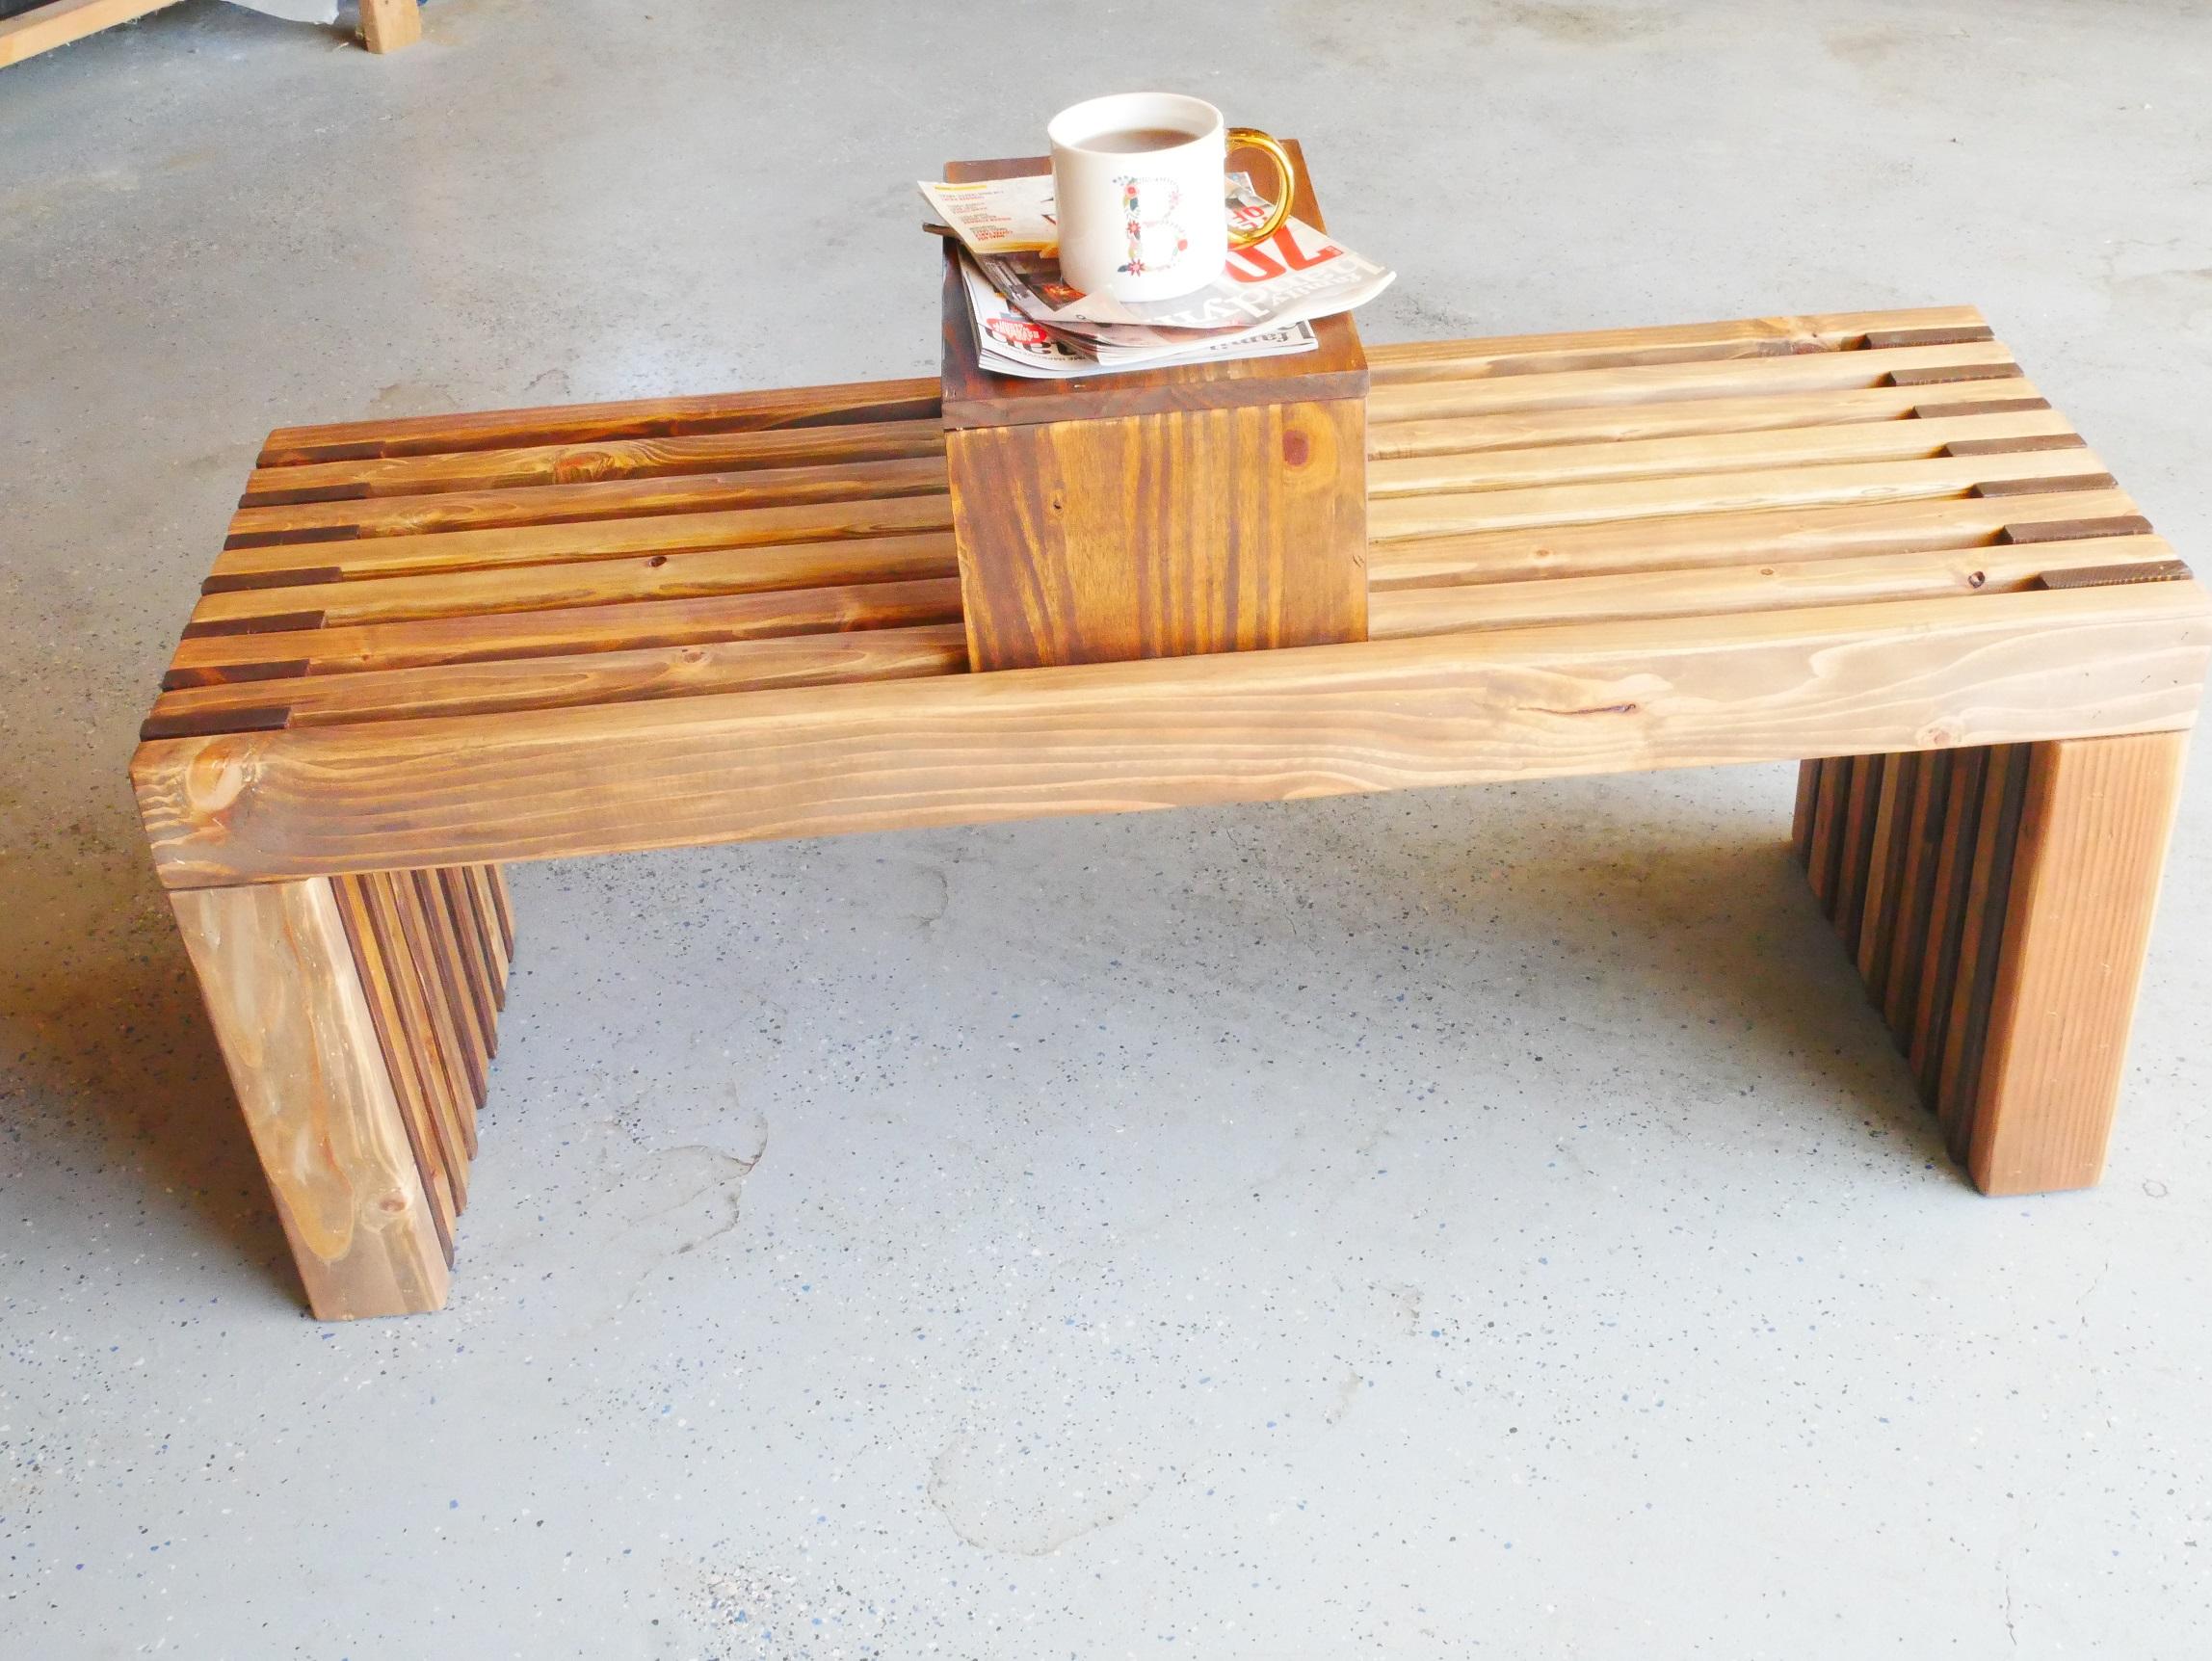
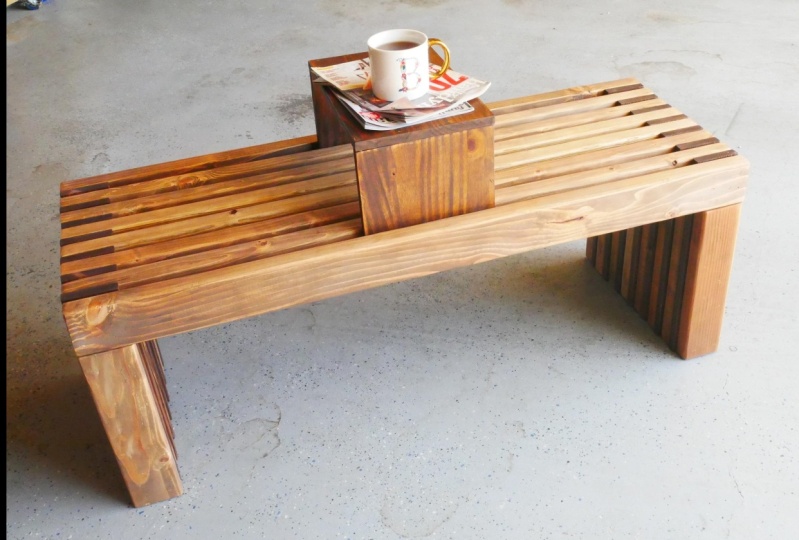
simplification of the build, this will be a backlit bench. This bench is
customizable as well. If you don't want the
center console, skip it. No worries. If you want it to be deeper, you'll just keep layering
slats until you've achieved your
desired dimensions. If it will live
outdoors, perfect, consider making it out of redwood or cedar
and coating it with spar urethane so
that it holds up to the elements indoors. Consider budgeting for a
cushion to sit on top. We're going to go with a two tone look today with stained, but you can achieve a
similar look with paint or even with using different
types of wood for contrast, and coating them with a layer of clear polyurethane so that
the wood tones really shine. Much like the simple
table we built way back at the start
of this channel, the basic bench is a
super useful build you will come back
to again and again, modifying it for different
uses and spaces.
3. Design: Before we dive into our build, we have to tackle the
all-important design of our bench, checkout your space and
make some measurements. Since this piece was
commissioned by a friend, he already had specific
dimensions in mind. But if I was measuring, I'd go to the area I
wanted the bench to be and figure out how much length
I had to work with. I'd make sure that
the depth didn't encroach into the space
more than I wanted. But you also want to make
sure that it's not so narrow that it would be
uncomfortable to sit on. Perhaps take a measurement of your favorite chair
and how deep it goes. It should be fairly standard, around 18 inches, so I wouldn't detour
from that too much. For my friends bench, he was interested in
this center console to rest papers and drinks. If a standard piece of
paper is 8.5 inches wide, then we'd want the console
a bit wider than that. I figured about ten
inches would be good. We'd also want it
raised enough above the bench surface
so that it didn't hit the thighs of the person
sitting on the bench. So I calculated about
six inches and tacked on another inch for it to attach
to the slant board below, since we don't want to attach it from the
outside of the bench, marring the flush front
will attach it just behind and in front of
our front and back slats. Now, the way this bench is
designed, It's crazy easy. It's basically sandwiching
one by four legs between football goal
two-by-fours, one after another. The end result is a
slat top with spacing in-between and solid sides of
two-by-fours and one by 4s. For my bench today, I've landed on 48
inches as the length. This allows for decent space for two people as well as the
center 10-inch console. I'm keeping that
standard 18 inch height. And for the depth, my friend
has requested 17.25 inches. The design will be uploaded
to the class resources, but here it is for
you now to get an idea of what it
will look like.
4. Materials: Now that we've
designed our bench, we can get an idea of the
amount of wood we need to buy. By making this bench
48 inches long, we can maximize the
two-by-fours we use. Simply cut your eight
foot two-by-fours in half for all of
the slats up top, with the curve taken out, it will be slightly
less than 48 inches. But for simplicity sake, I am a okay with that. If we know that our bench
depth is 17.25 inches, then we can do some
simple math with alternating board thicknesses of 1.5 inches and 0.75 inches. Remember that nominal
board actual thickness is less than the name dimension. We would just add 1.5.75
until we reach 17.25 inches. Remember that the back and
front will be two-by-fours, so there will be one more
two-by-four than one by four. If you're doing a different
dimension than me, just make sure you start
and end with a two-by-four. Alternate those 1.5.75
thicknesses until you get close enough to your
desired depth and let that be your final bench depth. I've calculated a two-by-four
slats and 71 by four legs. But for the one by four legs, we need to multiply times two
to account for each side. So 141 by four is at the height
of the bench, 18 inches. The two-by-four slots will be about 48 inches or half of
each eight-foot, two-by-four. We also need two-by-fours
cut at 14.5 inches. A two-by-four is 3.5
inches wide and it will be sitting width wise on top
of each two-by-four legs. So we subtract 3.5
inches from 18, the height of the bench
to get 14.5 inches, we'll need the same amount
as the slats eight, but multiplied times two
to account for each side. So 67 two-by-fours
at 14.5 inches. We know that we'll
need for eight foot two-by-fours for
our eight slats. By dividing the number
of slots in half, each eight-foot board
will get us to slats. For the two-by-four legs, we multiply 14.5 inches by 16, the number of legs eight on
each side to get 232 inches. This comes out to a little
less than 19.5 feet, so we'll add 38
foot two-by-fours. This is a total of 78 foot two-by-fours for
our slats and legs. For the one by four legs, we multiply 18 inches times 14, the number of legs, seven on
each side to get 252 inches. This is 21 feet, so a little over 2.58 foot, one by 4s, which will
round up to three. We'll need a total of 31 by
four by eight foot boards. Now for the center console, we're going to use
a one by ten board and we need to
seven inch pieces, which will be the
back and front and 1.2514 inch piece for the top. We get this amount
by considering that the 10-inch board
will be placed to the inside of the back and
front two-by-four slat. So we need to take the
width of the bench 17.25 inches and
subtract three inches, the thickness of
two two-by-fours. This leaves us with
14.25 inches in total, will need 28.25 inches. So grab a 46 or eight foot
board from your store, depending on what they offer. The cutlass will be uploaded
to class resources, but here it is for you now, outside of our wood, as mentioned in the intro, will need some sort of assault. I'll be using my miter
saw because it is by far the easiest solve
for this build. But you can also use a jigsaw, my circular saw,
or even hands-off. You'll also need a sander and sandpaper and either
paint or stain. Finally, in order to
attach our boards, we can use either
glue and screws, which will require
a drill drill bit, driver, glue and screws. Or you can hammer a nail
requiring glue as well. A hammer and nails
or abroad Naylor. Nails or screws should be two
inches long and optionally, you can additionally use one and five-eighths
for some of it. That's it. Super simple, right?
5. Cuts: The cutlass will be uploaded
to the class resources, but we'll go through
it here step-by-step. To start, we're going to
cut our center console. Take your one by ten board to your soft choice B at Mitre, jigs circular or hands-off, carefully measure and
mark 14.25 inches. Line up your saw blade to the outside or waste
side of the line, just like we've learned
in previous lessons. If you need a refresher
on making cuts, I go much more in
depth on this step in my building a
simple table class. Since the one by ten is deeper
than what many saws cut, you can either use your slider function on your miter saw, a circular saw where it doesn't matter or make the
cut on one side, flip it over,
matched the blade to the cut and cut the other
side, meeting in the middle. Make your cut. Next, we'll cut to pieces at seven inches from r
one by ten board. Measure and mark seven
inches. Make your cut. Then measure and mark the
next seven and cut as before. Set aside. Now we're going to cut our slats from our two-by-four studs, measure and mark 48 inches. This will bisect your
eight-foot two-by-four now measure 48 inches
from the opposite side. Occasionally, eight-foot
boards are not exact and it would be good
to prepare accordingly. My measurements ended up
encroaching on one another, making this not a
true 96 inches long. So I made both Marx and
cut in-between them, lineup that blade
and make your cut. Then measure your two
resulting pieces, ensuring that both pieces
are the same length, slightly under 48 inches. We're going to make
eight of these. So you'll repeat this
cut three more times. Be sure to measure
once more and match all pieces after you've
finished these cuts. If they're off more
than a tiny sliver, find your shortest piece and cut the rest of your slots
to match that length. Set these aside. Next up. We'll cut our two-by-four legs. These will be 14.5 inches long. So measure your board,
make your mark, then go back to cutting to the waste side of
the line. As usual. We'll cut 16 of these. It's important that these
are all the same height, so measure all of them
when finished cutting and make adjustments as
needed as before. Set these to the side. Finally, we'll cut our
one by four boards. These will be 18 inches long. If you've had to adjust
your two-by-four legs to be shorter than
they intended. 14.5 inches, measure
the total of the two-by-four leg with a two-by-four slat place
to top width wise, whatever this
measurement is should be exactly what your one
by foreleg measures. If they're different,
you might have a wobbly bench or have an
uneven sitting surface, or be stuck with an
annoying sanding job. Later on. We'll cut 14 of these, measure them all for consistency at the end and set
them to the side. That's it. You're done with your cuts. Just a few more steps. And pop has got a
brand new bench.
6. Finishing: We're doing things a little
out of order this time around because once this
bench is fully assembled, it will be quite difficult to paint or staying
between the slats. So before we go to assemble, we're going to sand
and finish this piece. To start pulling your sander out and attach 60 grit sandpaper. Two-by-four studs
can be pretty rough, so we're going to remove the
bulk of the birds first, sand each two-by-four until you've got a fairly
smooth start. Now take 120 grit
sandpaper and attach, go over all those two-by-fours, further refining the sand. Now, do the same with
your one by 41 by tens. I finally switched
to 240 grit for your last sand and go
over all of the pieces. Everything should
be nice and smooth. Now, can I just say sanding this project took for whoever this was probably as time consumptive as the actual build. Prepare myself. Take a moment to clean your
wood from all the sawdust. You can use a tack cloth
or just a damp cloth. Now would be a
good time to clean your workspace as well so that the sawdust remnants don't straight into your
finishing job. Now how are you going to
personalize this bench? Will you do paint, stain? Let the word do all the talking. You can even paint
an image on top if you're so inclined,
it's up to you. My friend was keen on
a two tone stain look, and I liked that too. I would like for the
two-by-four slats and two-by-four legs to look
more like one piece. So those will be the
same color stain. The one by four legs
will be the other color. For the console. I'll match the one
by four so that it contrast with the slats. Once you've made all
your color decisions, pull out your stain or
paint, paint brushes, Sponge brush, or rag,
and get to work. I begin with wood conditioner. I don't know that
this works incredibly well as I've had mixed
results in the past. But since we're
going to be seeing the end grain for a lot of these pieces and the end soaks up stain much deeper
than top grain. I wanted it to be somewhat even. Conditioner is supposed to
make stain apply more evenly. So I gave it a try. I brushed on the
wood conditioner to the end grains that would
be visible as well as the outer facing
sides and tops of wood that we'd be
visible on the bench. Since I'm using stain, I'll be using a rag. Make sure to wear gloves, many stains or oil-based and you don't want the cleanup
from that mass. If you need a hugely
in-depth lesson all about finishing
your projects, I suggest checking out my class on finishing your wood projects. It'll help, I promise. Stain or paint your wood
with your chosen colors. If you're leaving your
wood own natural, take this time to
coat your pieces with polyurethane or spar urethane if your bench will
live outdoors. Now, you are so ready to
assemble this beauty.
7. Assembly: As you know, assembly
is my favorite part. I am jazzed about this step. You have the option
of either gluing and screwing or glowing and
nailing the bench together. I'll be doing a mix of both. Pull out your drill and
match your drill bit to the shaft of your
two inch screw, as well as one in 5
eighth inch screw. If you'll be using them. We're going to start from the
front of the bench and work our way backwards
on a flat surface, placed the front
pieces faced down to two-by-four legs with a
two-by-four slat up top. Next place, one by four legs on top of
the two-by-four legs, lining up on all
sides top and bottom. Once things look right, put a bead of glue
on your one by four and hold in place
while you pre drill your holes and screw
in at the top of the two-by-four slat
and into the legs. Make sure to hold the
two-by-four slat and two-by-four leg in
place so that they don't wander away as you screw, place three screws
into the slat and four into the legs, somewhat
evenly spaced. Do this for both sides. I counter sunk the
screw into the wood by over driving it
in order to not insert more of a gap
between the pieces of wood with a protruding
screw head. The way I ended up doing
this was where a one by four was being screwed
into a two-by-four. I use the one and
five-eighths inch group when it was a two-by-four
into a one by four, I use the two to 2.5 inch screw. One and five-eighths
reaches into the one by four from the two-by-four
when you've counter sunk it, but not nearly as secure
as the two inch screw. If you're nailing, you'll
assemble the same way, glue and all, but then
hammer in your nails. Similarly to the
screw placement, I would add at least one
extra nail into the legs, however, next measure between
your one by four legs. Find the exact center
and make a mark. Then measure down one
inch from the top of the two-by-four slat
front, make a mark there. This is where your center
console is going to line up. Skip this step. If
you're not doing a console and move
to the next one, pull out one of your seven inch one by ten boards and place the 10-inch side at the one inch mark on
the console board, place a mark exactly halfway
across the ten inch width. Note it won't be five inches since this is a nominal board. Now lineup that center mark with the center mark on
the two-by-four slat, while also keeping it in line with their one-inch
mark from the top. Glue and screw placed
one on each side of the console piece into this
lat and one in the middle. Next up place to
buy four legs and a two-by-four slat on top
of your one by four legs, making sure everything
lines up flush. Continue to glue and screw
or glue and nail as before. You'll repeat this until you reach the end of your boards. Before you place the
final two-by-fours, we're going to place the end
piece of our center console. This will be done
just as before. Make your halfway marks on both the two-by-four slat and the console on the 10-inch edge, place it one inch down from the top of the
two-by-fours flat, line it all up and glue
and screw it into place. Finally place your
last two-by-four legs and slat on top
of this assembly. Here, I'm going to use glue
and nails so that I have less visible attachments
on the back of the bench. I'll glue and then use
my Brad Naylor with two Inch Nails and
secure the back-end in place are very last step is to place the top of
the center console. If you have one, take
your 14.25 inch piece and line it up flush
with the edges of the console front and back. Glue and nail it into place. If it's a bit wobbly, you can say in the legs
a bit to even it out. You can also place felt pads that will help even
out the balance. Finally give it two to three
coats of polyurethane. I like to do so with
a sponge brush, making sure to wipe
up any drips as I go. Let it dry between
coats with what is recommended on the
can and you're done. Can you believe in that
short time whether that little effort you made a
beautiful functional bench. I can't wait to give
this to my friend. He's going to love it.
8. Outtro: You did it way to go. Now you have
successfully designed and built a modern slat bench. I am away proud of you. Make yourself a cup of
coffee and take a seat. You earned it. If you've made this bench, I would so love to see it
in the class projects. Know that I'm rooting
for you and I'm always thrilled to see
what you come up with. If you're so inclined, if this was a helpful
class for you, please consider
leaving a review. While this platform does not allow teachers to
respond to reviews, I assure you I read
every single one. Your comments both
helped me to design future classes to
better fit your needs, as well as help other
people find my class. So it really means a lot to me. And thank you for sticking
around and taking this class. So enjoy sharing my love
of building and knowing that you're building with me
inspires me to keep going. You're a rockstar. I encourage you to
continue building up your shop and dreaming
up future projects. Once you learn the
basics of woodworking, the sky is the limit. Now, let's go build
something awesome.
 Brittany Joyner, SoCal WoodGal