Transcripts
1. Intro: Hi everyone, I'm so K Wood Gal. And in this basics of
woodworking class, we'll create a laundry
pedestal from start to finish. I thought it might
be fun to bring in a friend who's interested in woodworking and we'll
create the build together. That way you can build step by step alongside a
newcomer to carpentry. My friend Colin has
been wanting to build a laundry pedestal
for his new house to get the machine off the ground and save his back from
bending over the dryer. He was game to be on camera. So everyone give Colin
a round of applause. Colin, have you done
any woodworking before? Not since puberty. In today's class, we'll go
over pedestals and their uses as well as considerations for your build design
of the pedestal, materials and supplies needed. Making our cuts, assembly, finishing with paint or
stain and final thoughts. This class is aimed
at students with a rudimentary understanding
of woodworking. Access and experience using
power tools is recommended, but totally not required. I haven't used the
miter saw before, but I trust you to show me
how not to kill myself on. I will. Some basic
tools are necessary. Eye ear, lung protection,
sander or sandpaper, gloves, paintbrush or
sponge brush cloth or shop towel mitre. Circular jig or handsaw
drill drill bits, nailer or hammer and nail
glue and pocket hole jig. So without further adieu, let's get this party started.
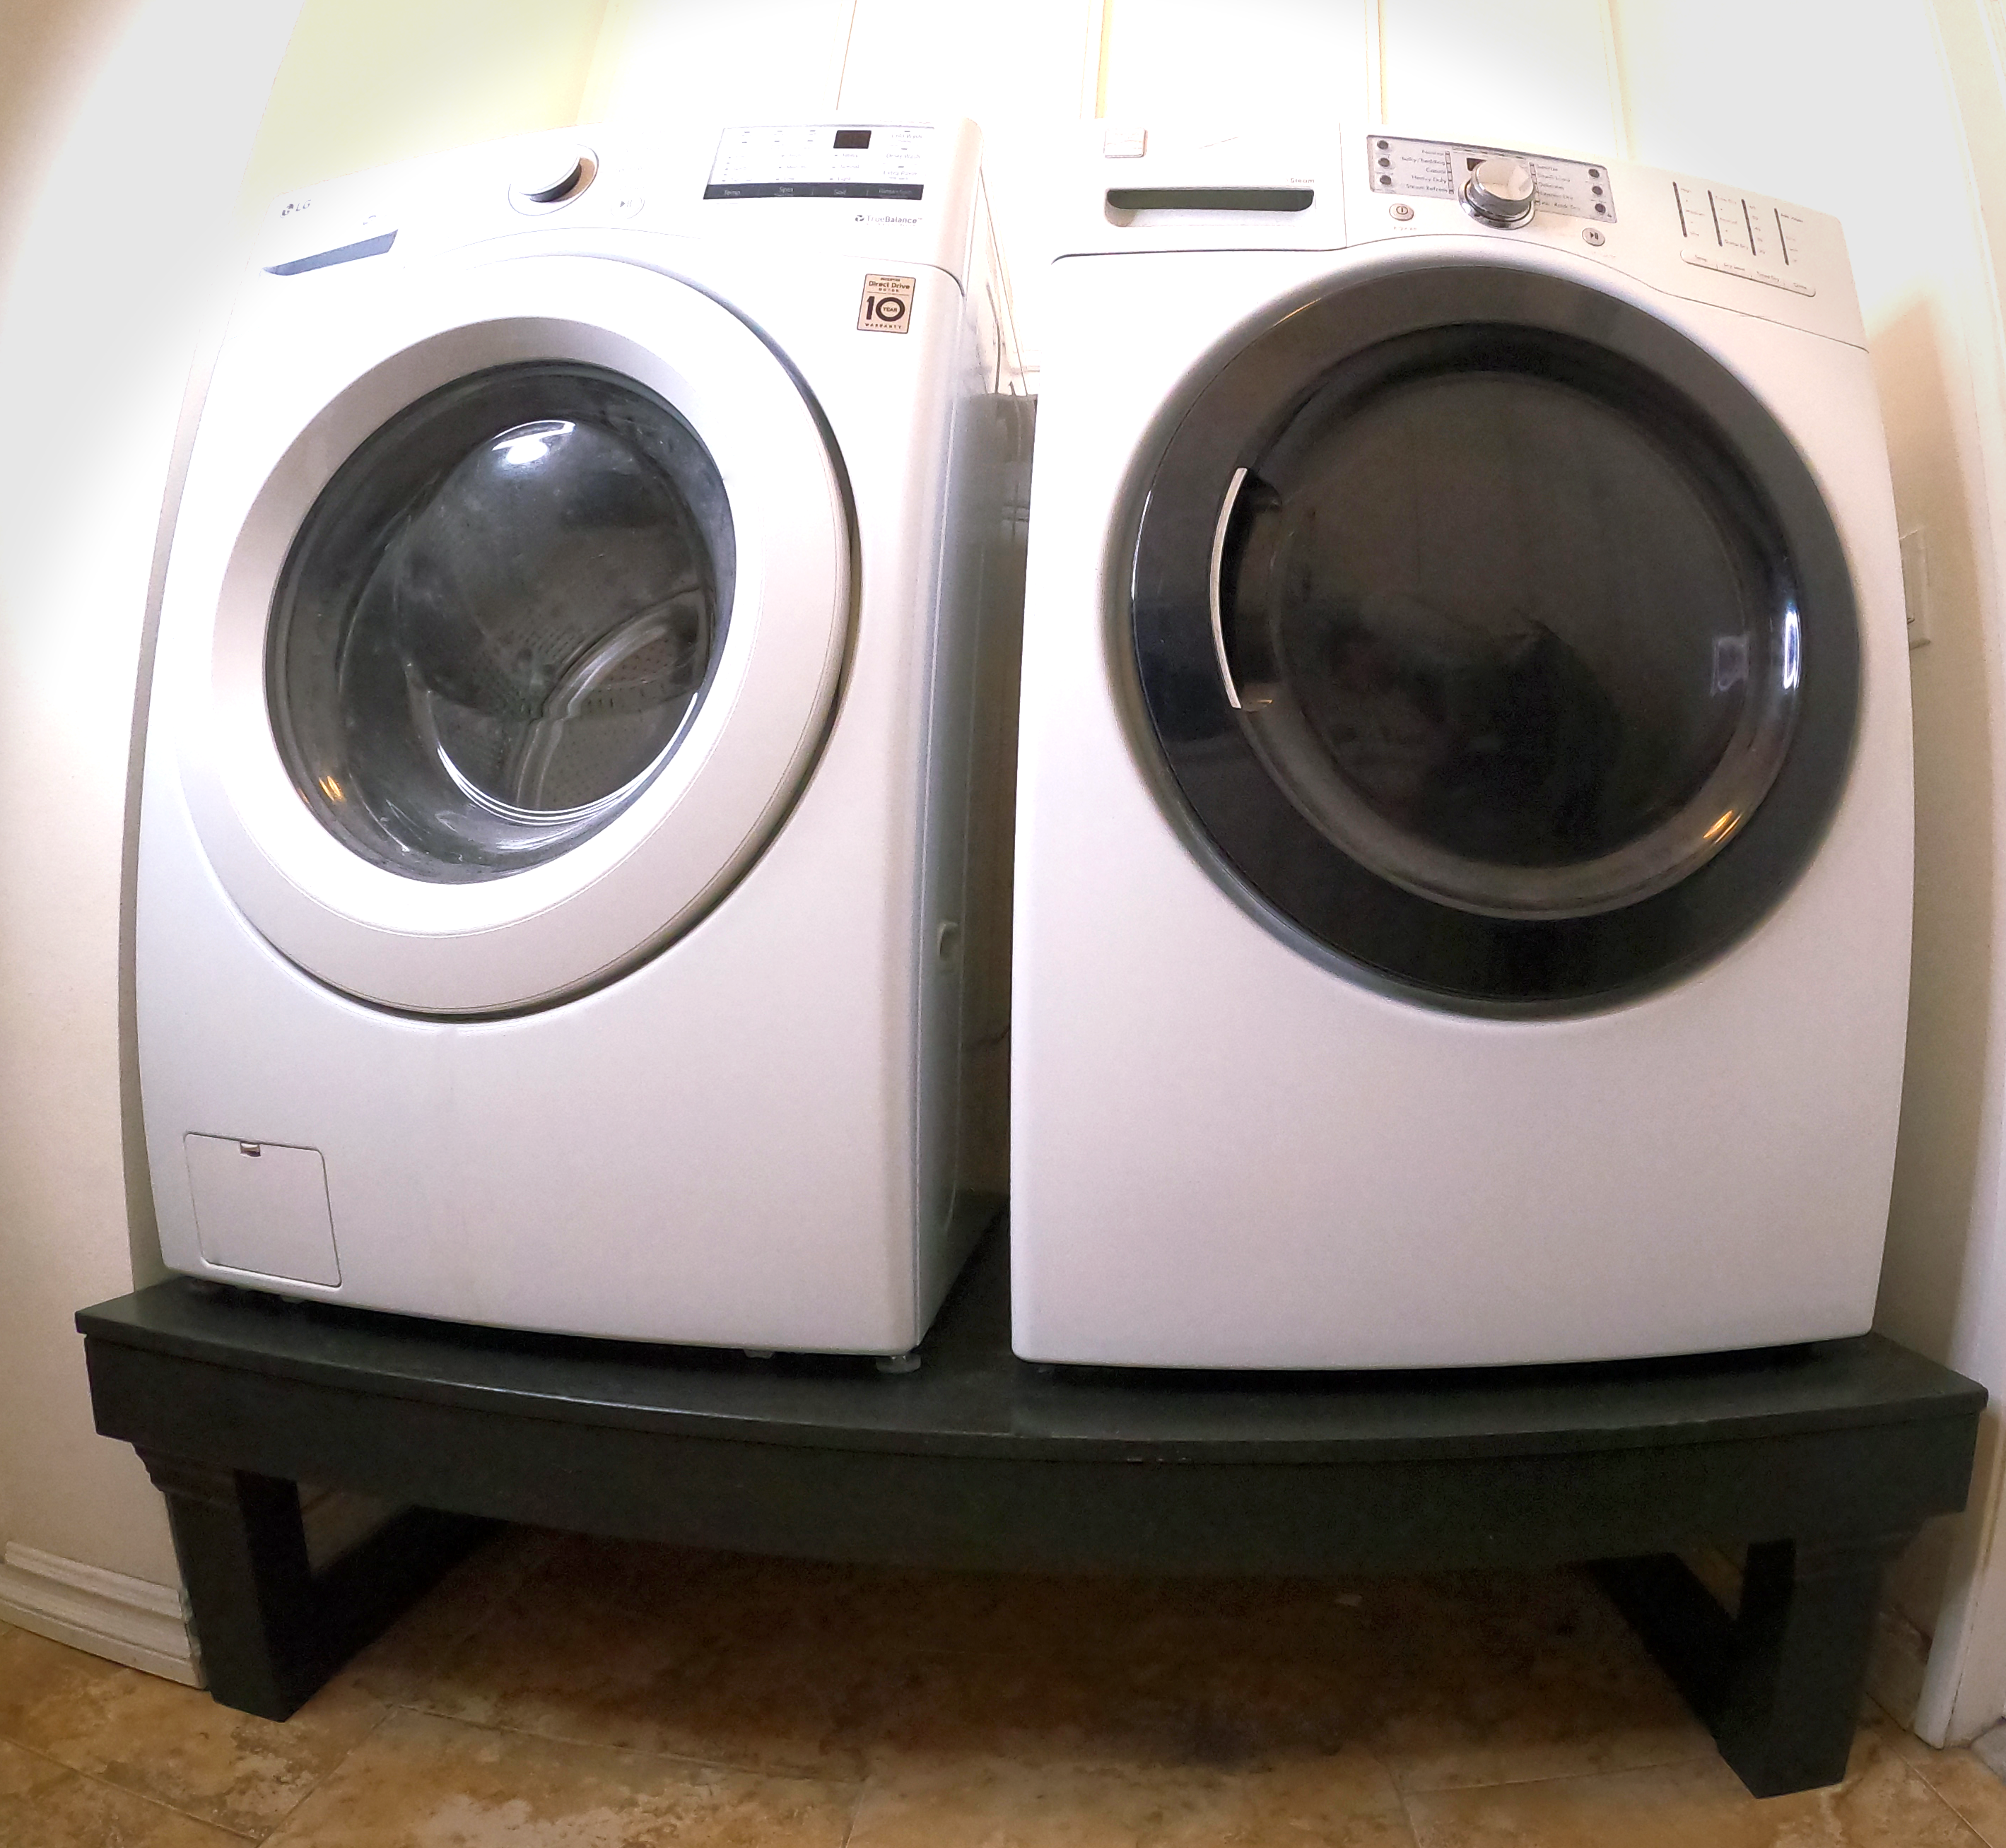
2. Overview: Laundry pedestals are expensive. Last time I checked just one
pedestal for a dryer was $280 and that leaves you with a small drawer that
you can't do much with. Building a pedestal is
not only economical, it allows for open
space below to store your laundry baskets
or other sundry items. Even better, when you
build your own pedestal, you get to personalize it how you want. You can add molding, you can choose fancy legs, you can play sorting labels, and you can paint or stain
it however you want. I'd like to see the big
box stores beat that. Don't you do it? Take some
time to look online at different wood and
laundry pedestals to see what kind you might like. Next step, we'll measure
our space in order to know what will fit and how
to design our pedestal.
3. Design: Before we can make any
designs or buy our materials, we need to measure our space. I took the opportunity
at a birthday party at Collins House to sneak into his laundry room and
take some measurements. If you have cabinets
above your laundry, you need to know the
space between the tops of your machines and the
bottoms of the cabinets. You cannot build any pedestal any higher than this
for obvious reasons. You also want to know the
width and depth of the space, being sure to account
for any trim on doors that might impede
with the pedestal. Finally, measure your
washer and dryer. Though these come
fairly standard, they can vary within
an inch or two. Be sure to know
these dimensions. Now if you've done
some perusing online, you might have an idea how you'd like your
pedestal to look. Perhaps you want it enclosed
with doors or drawers. Just know this will
eat up vertical space. Do you want it more like a
table without a bottom panel? Will you use two by
fours or beef your four by fours or
even molded legs, which are expensive,
but oh, so fancy. Let's get to work
designing this. Bad Boy Collins
machines are 27 " wide, 39.5 " tall, and 30.25 " deep. His space is 63 "
wide, 36 " deep, and 55 " from the floor to
the bottom of the cabinets. With these measurements in hand, we now know our limitations. We'll leave a bit of space between both the
washer and dryer, as well as some
space on the side, so our platform is not going
to fill up the entire width. This also ensures we
don't have trouble fitting it in with the door
molding getting in the way. The width or the length of
the platform will be 60 ". We'll make it 33 " deep. So there's a bit of space
in front of the machines, but it doesn't span the
entire depth of the opening. Here's where we need
to do some math. If the vertical space we
have to work with is 55 ", and the machines
are 39.5 " tall, we're left with 15.5
" of vertical space. This isn't a lot, but we want to use every bit of this
space that we can. We'll make our
platform 15 " tall. Since this is fairly short, we're not going to do
a bottom platform. It'll be more like a table
with the top and legs only. I'd like to use
four by fours for sturdier, more substantial legs. I'll use two by fours
to brace between the legs at the sides and
spanning the width at the back. I'd like the top to look
thicker than it actually is, since it's just a sheet
of 34 inch plywood. I'm going to trim out the
top with two by fours, which will also provide us with more places to
secure the legs. The legs will be recessed
behind the two by four trim, so they'll extend up to the
bottom of the plywood top, making them 14.25 " each. Our beginning depth is 33 ". We'll subtract 3 " for the
two by four trim because both front and back two by fours
are 1.5 " thick each. We'll subtract another 7 " for each four
by four leg each. Four by four is 3.5 " thick. This leaves us with 23 ", which is the length of
the two by four support between front and back leg. For the side two by four trim, we don't need to subtract
the leg thickness. So we'll have two
pieces at 30 ", which is the 33 inch depth minus the thickness of
front and back two by four. We'll do a total
of five at 30 ", giving us the two sides and three pieces to act as
joist underneath the top. For the back, we'll
have a 50 in two by four to brace between
the back two legs. This is our 60 inch
width minus the 8 " for the leg thickness and 3 " for two by four thickness
trimming the top. Our last support will be a vertical two by four
that will nestle next to the third joist and sit on top of the
back support brace. This will be 12.75 " long. I estimate about five feet of molding will take care of
additional trimming out. We'll be using this to trim the top of the legs
for a decorative look, but it's totally optional. You can choose to cover
the exposed face of the plywood with either
edge banding or thin trim. It's up to you if you want trim, add another five to six feet of 34 inch wide pine
screen molding. This is usually a
four inch thick. Now let's gather our
materials and supplies.
4. Materials: For Collins Pedestal. We're going to buy the
following one sheet of 34 inch plywood. Use
cabinet grade here. Eight feet of four by 4582
by 45 feet of molding. Case molding is good for this. An additional 56 feet,
four inch thick, 34 inch wide pine screen
molding or edge banding. 2.3 inch wood screws, 2.5 in pocket hole screws. Our tools will include what was mentioned
at the beginning, eye ear and lung protection. Sander or sandpaper, gloves, paint brush or sponge brush, cloth or shop towel. Circular jig or handsaw
drill drill bits. Nailer or hammer
and nail glue and a pocket hole jig to
counter sync your holes. We're using a Forsner bit, but you can also just
use a counter sync bit. I had calling go off
on his own and buy primer paint and
polyurethane paint color. Did you end up choosing black? He also got some wood
filler for finishing later.
5. Cuts: Okay, here comes some fun. We're going to cut our pieces. These cuts are all
pretty straightforward and there's not that many
pieces to this build, so you should be able to
breeze right through. We'll start with our top. You can use a circular
saw or jigsaw. Just making sure to utilize the tips I've given for making long cuts in building
a simple table. Be sure to get your
safety on with a mask goggles, and
hearing protection. We'll be making our
very first cut with the circular saw because it's too wide to fit on my table saw. But then we'll make the
second cut at the table saw. We'll make our marks at
33 " wide by 60 " long. Let's make that 60
inch cut first. The first and most
important thing that you need to do
is make sure that both sides of your wood are fully supported on
an outfit table, a work bench, your table
saw, whatever it might be. So that as you're
making the cut, they're not going to
flip in or out on you, cause a saw to bind, fall on you. None
of that is good. You just want to make
sure that it stays in place on similar height tables. As you make your cut, make sure there's enough space
in between the two that your saw
blade isn't going to hit the tables
that are there. So you go and you check where your line is and I can see
here the tops of these tables, there's no way it's
gonna hit that. We've got probably a good what? 7 " on either side of that. There's no way that the saw
blade is gonna hit that. Don't put too much because
you still want it good and supported near where
your cut is going to be. But you need enough to make sure that that blade
is not going to eat into say if you've
got saw horses, if you're doing
it on saw horses. Then the third thing
that you need to know is the depth of the blade. You don't want to have it
be so much more go down so much more than the
thickness of the wood because then you're
not having as much blade support as you need. You only need to be just beyond the thickness
of the wood. Flip this guy up right here. Pull the blade guard
up so that you can set this flush onto your wood. And then you're
checking right here the blade and you can
pull it up or down. Let's see if we get
this right here, just past the
thickness of the wood. Does that do you see that? Okay. And then you're going
to tighten it down, make sure that that's
not going to move on. You you can set up a jig to make this go alongside a two by four and keep
your cut straight. I find that to be a bit finicky and so I'm just going
to eyeball it here. But I do have that
in other classes. How you can set that
up for both the jigsaw and a circular saw to set yourself up to have a
guide that takes it along. And it goes right
alongside this and you just push it up against there and it's like a
fence on a table. Saw. It's the same
kind of thing, but you've just made
it onto the wood. You clamp it down, take it off. When you're done with
any of these cuts, we have to make sure that
we account for the curve. The curve basically exists to account for the
width of the blade, whether it be on the minus saw, the jigsaw, the table
saw, whatever it is. Whenever you have a blade
that's eating into the wood, it's never going to
be so paper thin that you're not missing any of
the width of the wood. It's gonna take out
some that's just going to be waste. That's
the saw dust that you see. Yeah, that's coming
up. Try to get that blade just to the
right of that line. One of the things that we're
going to be doing to account for safety is what you've
already got right now. You have your eye protection on, you have your lung protection, and you'll have your
hearing protection as well. But not now because you
need to be listening to me. Are you listening? I am listening. Okay. Most
table saws are going to be equipped with a safety switch. And this has it right here. It's a cover so that it doesn't accidentally get turned on. You have to lift it up
before you turn it on. It's not right now because
it's not plugged in. But then it's easy
to just hit it off. So if at any point
you feel any kind of binding of the blade, or you're feeling just
a little bit insecure, just immediately reach down, Keep on supporting
your playwood so it doesn't ricochet. Turn it off. Hold it. Let me come to. You can set it on either side
of the blade that we need. And the way that
you would choose that is by making sure
that the largest piece of the plywood or sheet of whatever it is you're cutting is going to be the
most supported. So you see there's more of
a wing here on the table. We want to have the
largest side of it there, which means we're going
to move the fence over to the left side of the blade.
That just makes more sense. If it's a smaller one, it
doesn't really matter. It's kind of easier to do the right side for a
right handed person, but just make sure you
have as much support as possible to that end. We'll have an off feed table
here or have a helper in your Woodshop to help get the plywood off the table
as it's coming off. Because you don't want it to
come and flip up off of you. And it's really hard.
I do it by myself. Sometimes it's
really hard to run around to the other side as the blade is going and keep
it supported, to pull it out. It's obvious. Don't
put your hands on a blade. What are you doing? No hands on the blade. The other thing you
need to know is, don't start up the blade whenever you have
the wood next to it, you can set it while it's off. And you can have the wood
right next to the blade, so you know exactly
where it needs to go as you're
setting the fence. But then before you turn it on, pull the wood away
from the blade, turn it on, let it
build up speed. And then slowly push
the wood through the table saw and let it
go all the way through. Before you turn it off, set the fence for
the 33 inch cut. Align your mark just to the left or right
side of the blade. Depending on which side
your fence is set. Set the blade to the waist side of the line and make your cut. Make sure the wood is held
securely against the fence. Anytime you're using
the table saw, turn on your saw and
slowly feed it through. Keeping your hands
clear of the blade. Set your top to the
side and move on to the miter saw or jigsaw,
depending on which you own. We'll cut our four
by four legs each at 14.25 ". Make your mark. Set the blade to the
waist side and cut. It's very important
that these are the exact same length so that there's no wobble in
your pedestal trim. If necessary, the myer
saw is great because you can easily make your cuts and
you make them accurately. And you could do it fast.
Yeah, and you're repeatable. You saw how long it took to
do the tablesaw table saw is great and you can't do
that on the miter saw. But for this, for your
every day, two by fours, your one by 44 by four
like we're doing, it cuts through like butter
and it's accurate and easy. That's what I love about
the miter saw, how, how was it the table
saw is great because like trying to do something that huge on another tool
would be terrible. But yeah, this thing is just
like you're in and out. So there's one thing
I do want to point out for everyone building
along with this, it's hard to get wood that isn't cracked or with
knots, or worked. I spent probably an hour
and a half at Home Depot yesterday just trying to get the best wood that I
could. And it was hard. I had to go through a lot of stinkers in order to
find what we did, and it's still not amazing. So for example, with these you
see there's some cracking. There's knots that are in there and you don't ever
want to end on a knot, first of all because
it's a little bit unsafe when the
saw is going down, because the knot can come loose and fling
back in your face. But also you're not going to
be able to screw into that. You can't screw into a knot
because it's really hard, you want to screw into
the meat of the wood, it's just going to splinter out. So for example, with this one where we have a knot
that's right here, That's fine in this case because we're going to make
it at the bottom. And we don't need to screw in on this side, we
can just screw in here. But the top, we want to be able to screw into it from the top of the laundry riser and not have any knots
that are in the way. Okay, if I find that the mark
is going to end on a knot, I'm going to start the
cut a little further. So I'll cut off the end
of it so that I then extend past the knot that
was going to be in the way. And cut past it
so that no screws are going to be
entering in that area. For the two by fours,
we'll cut two at 60 ". This is the front and back trim. Next we'll cut one at 50 ". This is the back support brace. Then we'll cut five at 30 ". This is the two side trims
and the three joist. Finally, we'll cut two at
23 " and one at 12.75 ". These are the side
support braces and the vertical support brace. We'll cut our molding to
fit after we've assembled, so don't worry about
that right now.
6. Assembly: Before you begin your assembly, I would suggest going ahead
and sanding the two by fours. And the four by fours, they
can be really, really rough, so take 60 or 90
grit sandpaper and just go at it until they're
a little bit smooth so you're not filled with
splinters as you're building. And it also takes
off some of the work later or have your
minion do it for you. And now we're onto the best part of woodworking, the assembly. We'll start with the frame,
which is the front and back, two by four trim, the
side trim and the joist. We'll be attaching
the joist with pocket holes and the
sides with screws. Today, we're going to
use a pocket hole jig. Have you ever used
a pocket hole jig? Is that a type of dance move? A jig, nope. Not only have I never used
it, I've never heard of it. You're going to be a changed
man from here on out. Calling the pocket hole jig is a fantastic invention
that allows you to have hidden holes that
make joints in your project. So if you have this here, instead of having a screw to the outside that's
going to be visible, it's hidden underneath the wood. You can place it
underneath your furniture. It's a really great
strong joint that you can use and they're really
easy to use as well. You don't have to mess
with complicated dovetails or mortar an tennon. It's just a very
easy joint to make. The way that it's set up is you use this special Jeg here. You set the depth, we'll
go into that later. You drill the holes
into the wood, and then you place the wood onto whatever it is that
you're making the joint. And the screw goes in
here and it's hidden. You see you don't see it.
You can even plug this up so that if it is on a
surface that's visible, it's going to be a smooth
flush surface that gets filled and you don't
have any screw head. Okay. The pocket hole,
Jeg basically works. This is the depth gauge that you have based
on your material. So on the side here
you see this is for two inch 34 material, 7081. You set it depending on
how thick your wood is. And since we're going to
be doing two by fours, we're going to do 1.2 That's
nominal measurements. A two by four isn't
actually 2 " by 4 ", it's one on a two
by 3.2 So you would set the width of your wood here. This moves up and down with this little dial here and you have to loosen it up pretty good
before you can move it. And this just goes up and down, so we find the one on a two. We do the set screw
nice and tight. Then the only other thing
that we have to do is set our special pocket
hole screw here. We have a really nice guide
that you line up for, again, the width
of your material. We're going to set this
here and we want the tip of the screw to hit the gauge for your width of material
1.5 This is referring to the end of the gauge you
want this collar to end, where this will put you at 1.5
You can loosen the collar, set it where it needs to go,
then tighten the collar. This is what's going to stop the drill bit as you put it in. And that depends on where the hole is going
to start on the wood. When you have thicker
wood, it starts higher up. When you have thinner
wood, it's going to start here because you're
using a shorter screw. You put in your wood, make sure you know which side you're going to do
the pocket hole on. Usually do it on the
side that you don't want facing out front
most of the time. Sometimes there's some
exceptions there will be today. And then if this is too tight, you can't clamp it, you need to loosen it
up a little bit. And then just make sure
it's a good tight fit. So first set your pocket hole, Jeg to the thickness
of your material. Ours is 1.5 ". Then set your depth collar
for 1.5 inch material. We'll drill two pocket holes in each end of the three joist. We'll also be pocket holing the back and side
support bracing. So place two holes
at each end of the 223 inch supports
as well as the 50 inch. Now line up your pieces
and check for fit. The front and back
will be sandwiching the two side pieces and the joist will be
evenly spaced between. Measure the depth and width. If it's 33 x 60, you
are so good to go. If not, then your
cuts might have been just a tad off and
you're going to need to trim off
to get it to spec. We'll screw in our sides
to the front and back. First, glue the ends
before screwing. Use your helper or use clamps to keep the frame and square. While you drive
three inch screws from the front and
back into the sides, do one at top and one at bottom. After drilling, use a
counter sink bit so you can fill in the hole with wood filler if you'll be painting. We're not using pocket
holes here because they're going to interfere with
attaching the legs. Attach front and back to sides for both sides
of the platform. Then we'll attach the joist. Put 13.1 eighth
inch space between each screw in with 2.5 inch pocket hole screws
checking for square. Next we'll attach our legs. I suggest nestling the four
by four into the corners. It's important that these
are flushed to the top of your frame so that there's no differing heights in
each of the legs. If you can build face down on a workbench or
a flat floor here, we went ahead and put
it on the tabletop, just so we knew that
everything was nice and flat. Frequently check that the
legs are flush with the top. We're going to glue first on the surfaces that will be
in contact with the sides. Then we'll pre drill and drive three inch screws from the outside on the
sides into the leg. Try to place these
in a way that won't hit the screws you
placed previously. Since those were
at top and bottom. Aim for the center area here, put into, then
move to the front. Since this will be facing out, we'll be counter sinking these holes to fill
with wood filler later. After gluing, drill your hole. Then counter sink and drive 23 inch screws into the leg from the front
trim, evenly spaced. Do this to all four
legs of your pedestal. No need to counter sink, hole the back legs since
they won't be visible. Now let's add our
support braces. Start with the back
50 in two by four. Place it between the
back two legs wide, face down, so that it's flush on either side of
the four by four. Keep the pocket
holes to the top. Glue the ends, then screw with 2.5 inch pocket hole
screws into the leg. Do this on each side. You can do this without
a pocket hole jig, but you'll have to use
absurdly long screws to get through the
four by four material. Now we'll add our
side support braces. Take your 23 inch support brace, wide side down,
and glue the ends. Keep the pocket holes
face to the ground. Doing so keeps the screws
from hitting each other. Screw with 2.5 inch pocket hole, screws into the leg on both
sides of the support brace. Do the same for the other side, support brace, pocket
hole, side down. Add your last support, the middle vertical one, that's 12.75 " long. This will go to the
inside of the top frame and rest on top of the
bottom support brace. Measure 26 " over
from the end of the back bottom support
brace and make a mark. Measure 31 " over from the back left side of
your frame and mark it. This is right next
to your third joist. Glue. The top and
bottom pre drill and screw with two inch screws from the back trim
into the support, From the underside of the
bottom brace into the support, and from the joist
into the support. Now we can finally add the top. Take your top piece and place it flush to the top
of your pedestal. Check that everything fits, snugly, trim, if needed, put glue on the tops of
the legs and the tops of the joist and two by four
frame, set it in place. We're going to add just
one screw per leg with two inch screws from the top
of the table into the legs. Be sure to counter sink it
so it doesn't protrude. Do this on all four
legs from the top. Now we're going to cut
the molding to fit. This is always best
done as you go because your final measurements
are always going to differ just a tiny bit
from your original plan. To start either edge band or trim out the exposed front
edge of the plywood. We won't bother with the sides because
they won't be seen. So there's no point
in wasting material. If you're using edge
banding, start at one edge. Just a tad proud of the end. It can tend to shift
as you go and you don't want it to fall
short of the length. With your iron preheated, press the banding at the end to melt the glue and
adhere it to the edge. Hold your iron in
place along the wood for five or so
seconds, each section. And follow with a
very flat block to press the banding down. Once you've reached the end, cut it with scissors
or a box cutter. Trim your starter
side if needed. If you're using pine screen
molding, like we are, cut your piece the
length of the front, which should be 60 ". You can use your helper here, or if you have a clamp
with a wide enough reach, you can clamp it in place. Be sure to glue first.
Then take a Brad nailer with one to 1.5 inch nails
or a hammer and nails. And nail it in along the
length of the front, being sure to aim your nail straight into the plywood edge. Now we'll cut the trim
molding for the legs. This is of course optional. We're going to cut this
at 45 degree bevel ends for a clean, classy look. Now, using the bevel
on the miter saw is a little bit scary,
so I did this part. I don't think Colin
was ready for this. Please don't take this on unless you've done beveled cuts before. We're going to do a bevel
cut first on our first end. And then we come over here
and we're going to line it up to mark where this leg ends. And that's going to be the start of the other side
of our bevel cut. If you have a bevel
with your mitre saw, some of them are only mitre. This one happens to have
a mitre and a bevel. It also gets released this way. You turn this knob
until it loosens up. And you get to adjust this. You can go either
to the left or to the right to whatever
angle it is that you want. We want a 45 and we're
looking for 45 over here. Once we hit that, we go here
and we tighten it down. Start by setting
your miter saw to a 45 degree level and cut
one end of your trim. Bevel it toward the
back side of the trim. Now place the end of that bevel flush with the edge of the leg, with the pointed end extending past the
leg, the long edge. This is the short edge,
for obvious reasons, we're going to line
this short edge up with the absolute edge of this leg. Then what we do, make sure that's good and flush, is we're going to draw
a line where this leg ends on the back
side of this trim. And that's going to be the
start of the short edge. So just like here, the short edge needs
to be against here, pointing out to a long edge
to make them non parallel. This would be a parallel cut. You see how both of them are
facing the same direction? Yes. Parallel
around? Yeah. Yeah. Basic geometry.
Yeah. So we don't want to do this whenever
we're cutting our molding, We want them to be non parallel, which is like a
trapezoid, right? Yeah, and that would
be like this bevel, this cut non parallel
to the other bevel. So both pointed ends reach
out like a trapezoid. Okay, so this is our first
piece, took a couple of tries. What's good is that
you overcut first, and then you just bit by
bit make it until it fits. Obviously, if you undercut it, you can't make the
wood grow, but you can trim it down from there. So that's why you always overbuy your trim just so that you
can have some waste pieces. Especially if you're
going to be doing miners or bevels because
things are bound to be messed up at some point and you have it to work with no
sweat. Not a big deal. So here, I don't know if
you can see this or not, we have non parallel ends. So this is a trapezoid
like I was saying. And that's what a non
parallel bevel can get you. And so when we go to
cut this next piece, this one has already been done. It meets really
nicely right here. And it forms just a little
frame that is perfectly together that goes and
surrounds the leg. And we're going to do
that on each side, all four sides of the leg. If we were doing a mitre, that's where it
would be like this. Where it's still an angled edge, but it's not angled
into the wood, it's angled across the wood. And that would not
look right on this. You couldn't make it
work in a way that it would meet nicely
at the corners. Since we're trimming
out a perfect square, we can use this piece as our
template for the other ones. However, I found that
it was better just to measure as I went because things just got
off a little bit. We'll have four for each leg. Repeat this process
seven times for a total of eight
beveled trim pieces, glue the backs of each piece. Then Brad nail each one into place flush with the
bottom of the top frame. I also went ahead and threw in a couple of Brad
nails to the top, into the joist and the trim that just made
sure that it's as secure as possible at all places
and isn't going to have any gaps between the
top and the trim. It's not for support. We're totally fine with the screws and the weight
of the washer and dryer. Check out how strong this is. The very graceful, you
dance the chick, you do it. You know it call you do it. You take this row and row. Whoa. Okay. That was a
good amount of work, but you should now be staring at a complete functional pedestal
for your laundry room. Were don't go. I know
Colin is thrilled, and you probably are too.
7. Finishing: Now that you've completed the
assembly of your pedestal, it's time to make it truly shine and personalize
it with finishing, I went ahead and sent Collin
off to do this on his own. So let's check in with him and see how it's going
to begin with. He's going to fill all the
holes with wood filler. You need to fill in the
counter sink holes, as well as the beveled ends and the gaps between the
wood on the pedestal. Since Colin is going
to be painting, he can make this as
smooth as possible. Then he's going to let it dry
and then sand the pedestal. Do this in graduated grits. Start with 120 and
then move up to 220. Be very careful with
the top of the plywood as you can easily work your
way through the veneer. If you're not careful or if you're too aggressive
with your sanding, only use the 220 grit here. Once everything is as soft
to the touch as you desire, give every bit of it
a good wiped down. Any debris left on
the surface will end up in your paint
and mar the finish. Colin's going to be painting, but if you're staining, use a sponge brush or
shop towel to apply. Making sure to stir
your stain beforehand. Remove the excess
with the shop towel. Within a few minutes
of application, I suggest putting down a primer
first if you're painting, because this thirsty
plywood is going to suck up all of the
expensive paint. Colin is applying the primer first on every surface
that's going to get paint. After this is dry, stir
your paint well and apply even smooth strokes
with the paint brush. Multiple coats
might be necessary depending on the coverage
your paint offers. Once this is dry, Colin is going to protect
the paint with polyurethane for the wear
and tear of a laundry room. If you use oil
based polyurethane, beware that it can leave a
yellow tint on white paint. But it does give a more
robust and lasting finish. You clean that up
with mineral spirits. Colin is going to be
using a water based poly and applying it
with a sponge brush. Now, be sure to catch any drips with a dry brush as they will dry a milky white and be visible on your
completed project. Several coats are necessary unless you're using
triple thick. Now, let this dry and cure.
8. FinalThoughts: Right now. I forgot. We're
just robbing it down for I forgot what we're doing. We just need to
move the drive out. Finally. Got it. Then
what do you think? Think it was easier to build and to get it into the space. And that, do you think that you'll be doing
more projects from here? Is this felt empowering to Oh definitely this felt
really empowering. Good. Thank you so much. Plank you much. I'm excited for you to
not have to bend over and do your laundry.
Is this is an upgrade? No. I mean, look,
it's fantastic. I can just reach in exactly
normal level height, and it just makes it
so much easier. Tough. Oh man, way to go. Now, you and Colin know how
to build a laundry pedestal. I encourage you to
keep on building up your wood chop, acquire tools, dream up new ideas
and ways to grow and take on new challenges.
It's all part of the fun. Most importantly, post a picture of your finished
laundry pedestal here. I love to see what you've made and how you've made it your own. And lastly, if you
enjoyed this class, would you consider
leaving a review? Reviews. Let me know that you're with me on the classes I upload. And it also helps other
students, just like you, to find the class, plus Colin wants to hear from
you. Thank you for watching. It really means a
lot to me that we're building together
lesson by lesson. So now let's get on to building
some more fun projects.
 Brittany Joyner, SoCal WoodGal