Transcripts
1. Intro to Handmade Christmas Gifts: Oh hi, I didn't see you there. Merry Christmas from So Cao would Gal, sorry for the change of scenery, but my husband is currently using the woodshop for his own project and taking up all the space. I am not bidder one iota about this. Was that convincing? Okay, hello and welcome to beginner woodworking class number five. I am SoCal would gal, and today's class is all about building handmade Christmas gifts for your loved ones. There really is nothing quite like making a gift with your own hands and giving it to someone that you love. We'll be going over the following. Why make gifts? Types of materials and supplies needed for each of the gifts? Beginner give, coffee, mug tree, intermediate gift, beer, Caddy, and finally, another intermediate gift, a cutting board. This class is for anyone interested in making homemade wood projects for Christmas gifts. No prior experience is required, but some basic tools are necessary. Eye, ear and lung protection, sander or sandpaper, gloves, paintbrush, cloth or shop towel, sponge brush, miter, saw, jigsaw or hands-on drill drill bits, clamps and hammer and nails. Let's do this.
2. Why Handmade Gifts?: It seems like every year I talked myself into making Christmas gifts from my family and friends in the woodshop. It seems like right after Thanksgiving I start to hold up at the workbench and on Pinterest, just getting ideas for hand built gifts that will really bring joy to those that I love. It's not that buying gifts online or in stores as a lessor choice, but if you could make something unique for them, that will make them think of you every time they use it and have a ton of fun yourself in the shop. Why wouldn't you one year I made a jewelry box for my niece and filled it with costume jewelry. I customize the outside so that it would look like a princess chest. Oh my goodness. The look on her face was priceless as she paraded around the house and her readings and bracelets, It was so cute. Another year I made a vegetable then for my cousin. And honestly when I see it still in their kitchen all these years later, it makes me so happy to know that they have such a functional gift that has lasted all these years. Last year, I made a fireplace bellows for my husband and each time he pulls out this wave functional and crazy cool gift to stoke the fire, our hearts Peter pattern together. Now today I have specifically chosen three different gifts to make so that you can choose which one matches with both your current skill level as well as the tools you currently have available to you. None of them are incredibly arduous, but they are bound to give your loved ones and you great satisfaction. So what do you say? We dive into this class and make some cool things.
3. Project Tools and Supplies: For each of the three projects I'll be covering today, you'll need a specific set of tools and supplies. I'll go through each of them sequentially. Now there actually are some building plans in the project resources, but they're just crude drawings I make to guide me along as I build. For the coffee mug tree, the beginners project, you'll need the following. A one by six piece of wood, three different sizes of Dowell's 3-6, 3 eighth, and one-inch glue, sander, drill and drill bits the size of the dowels, uh, saw a counter sink, bet or forcing or bet, staying or paint and polyurethane. For the beer caddy, the intermediate project, you'll need the following. A one by six piece of wood, one-quarter inch thick plywood, a three-quarter inch thick dowel or a steel bar, half-inch thick by 1.5 inch wide wood for the side rails, nails and a hammer, sander, drill bit or forcing or bet the thickness of your dowel or steel bar handle. A miter or jigsaw, glue, stain or paint and polyurethane. And for the cutting board, the final intermediate project, you'll need the following 5-6 sticks of three-quarter inch thick hardwood in varying widths. I've chosen mahogany, poplar, walnut, and maple. You'll also need a saw, a jigsaw or scroll saw, a sander, glue clamps and butcher block oil.
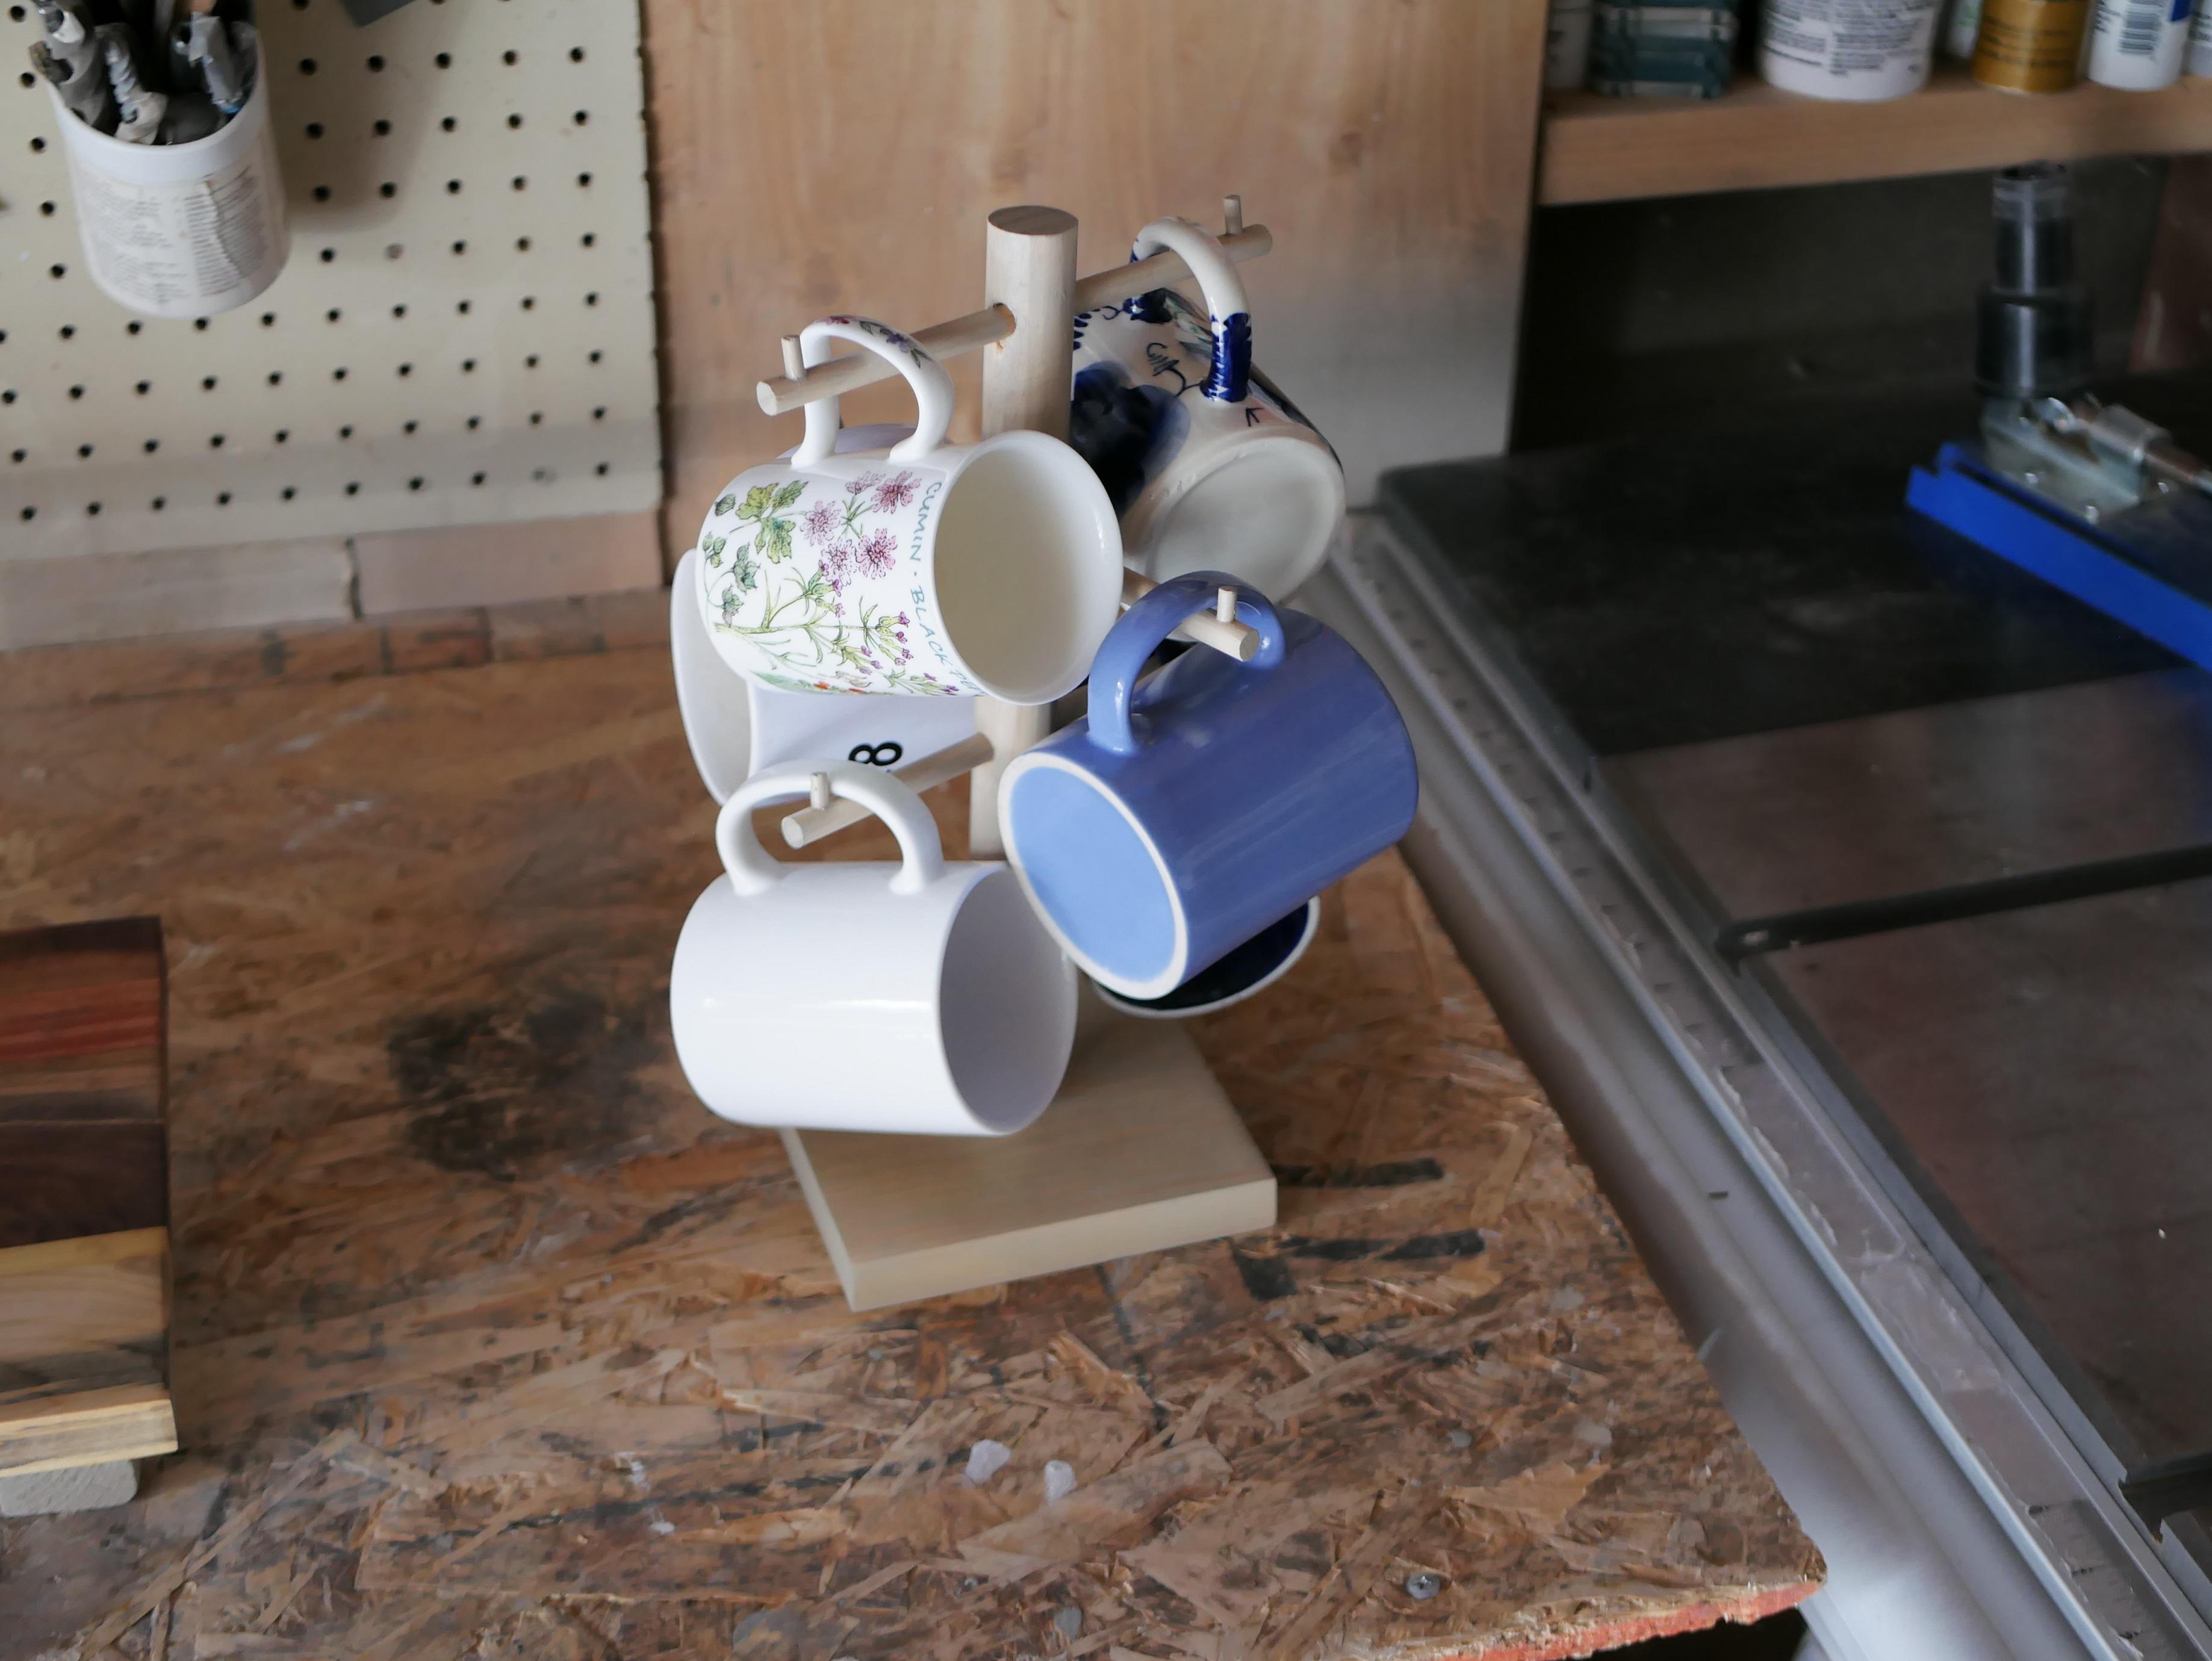
4. Mug Tree Measure and Cut: Alright, beginner gift the mug tree to refresh. Here are the materials that you're going to need for this project. I won by six piece of wood, three different sizes of Dowell's 3-6, 3 eighth, and one-inch glue, sander, drill and drill bits the size of the dowels, uh, saw a counter sync bit or forcing or bet staying or Pete and polyurethane. I'm using my basic four-inch tall coffee mugs for this project. If the person that you're gifting has really different sized mugs are really large ones. You'll want to use those sizes to make this project, to spec. It really is kinda best to fit and cut as you go. So first, cut out your one by six would base. This is going to be a perfect square. So you'll just need one cut at 5.5 inches, since that's the width of your board, a one by six is 5.5 inches wide. Make your measurement than either cut to the right of that line with your miter saw or Hansel or jigsaw as accurately as possible. Next, cut your one-inch thick Tao, which will be your center pole at 12 inches long. As before, measure and Mark and cut to the right of that line. Next, cut your 3 eighth inch towel into 37 inch long pieces. These will be the arms of the mug tree. We're going to go ahead and drill the holes for the arms into this Interpol. Because once it's assembled, it's going to be much harder to keep that central pole steady. The first hole will drill should be 5.5 inches from the bottom of the center pole. This is your first rung of mugs. Either clamp your delta the workbench, or hold it as steady as you can to your table. We want a straight hole all the way through that center doll. We'll be using a 38 inch drill bit, since that's the size of our dowel, drill through to the other side. Next, we'll drill another whole 5.5 inches above this hole on the same side of the center pole. This is our top rung. Next, drill another hole at this time, place it between the two holes you've already drilled. That would make it around 23 quarter inches above your first hole. Also, this hole will be drilled on the adjacent side of the center pole. Drill cleanly through to the other side. Your final bit of cutting can actually be done with wire cutters or strong scissors if you haven't had them. The 3 16th inch towel is thin enough that a miter saw is definitely overkill and you might have trouble with a large hands-on. If you happen to have a Japanese flush cut saw, this would actually work well to you're going to cut six half-inch long pieces from the tiny dowel. This will be the end stops to the mug arms. Lastly, drill 3 16th inch holes. The end of each seven inch piece of three-eighths inch dowel. Only drill a tiny way in, not all the way through.
5. Mug Tree Assembly: Before assembling the mug tree, give all of your pieces of wood a good sand. Waiting until your project is assembled makes access to sanding a whole lot more difficult. After you've sanded until smooth, the first bit of assembly will be the center pole. Now if you're concerned about Wab leanness than I do suggest counter sinking the pull into the wood base probably about a quarter of an inch. This will require a one-inch forcing or bit. You'll find the center of your base for r one by six, that'll be 2.75 inches over and drill a force NOR whole one-quarter inch deep into your base. You would then pre drill your doll in the center with the drill bit a little smaller than the size of the screw that you're going to be using and do the same in the center of your recessed hole in the base. Pre drilling helps mitigate the chance of splitting your dowel when you go into screw. Then glue the doll in the hole and counter sink a screw from the bottom of your wood base into the center of the dowel. You might want to clamp the base to the table as you do this to keep it from spinning. Check to make sure the center pole is securely attached to the base. If you're not reassessing your central pull into the wood, then the process is similar, but without the force in a bit. Find the center of your base, 2.75 inches over, make a mark and do the same for your centroidal. Drill, a pilot hole in those marks with a bit slightly smaller than your screw. You're really going to want to counter sink that screw. You can do this with a counter sync bit or a force NOR bit counter seeing just enough to cover the head of your screw. Next, put glue on the bottom of the dowel and start your screw from the bottom of your wood base. Go through the wood until it just protrudes from the top of the base and match it to the pre drilled hole in the center of your glue bottom del hold the dial securely in place as you tighten the screw in until the head disappears in the counter sunk hole. Next up are the arms. Grab those seven inch long pieces of 3 eighth inch doll, put some glue into the holes and place each dial into the center pole with even amounts on either side. Make sure the tiny 316th and tools are face up. Well, that didn't go how I thought it was going to go British or this work last time. But I think that these holes are just big enough that would the glue, it expands and it's not going through. So I'm going to regroup and I will get back. So here's what you do. You take that same 3 eighth inch drill bit, that is zinc sizes 0f dolls just go through these holes. And when you're building this or afterwards, like me, when you're assembling, just go through it and really clean out that area. Kind of bend it a little bit just so that it makes it a tiny bit whiter than this. You don't want it too much wider because these clearly are not gonna move, which is great. You don't want them, you don't want them to move. But now you'll see it goes in a lot better and with glue that will snug right up. So that's what you do. Let this dry so that the fit is secure. Once those arms are securely in place, take those tiny 3 16th inch doll pieces and place them into their holes with a little bit of glue. Let it dry.
6. Finishing Mug Tree: Your last step is to paint or stain your monk tree. You're so close. I'm gonna choose stain. Are you surprised? I'll put on one to two coats of a grey weathered stain with a cloth. And after that's dry, I'll protect it with two coats of polyurethane. I'll do that with a sponge brush. Once that's dry, uridine, congratulations, they're going to love this gift.
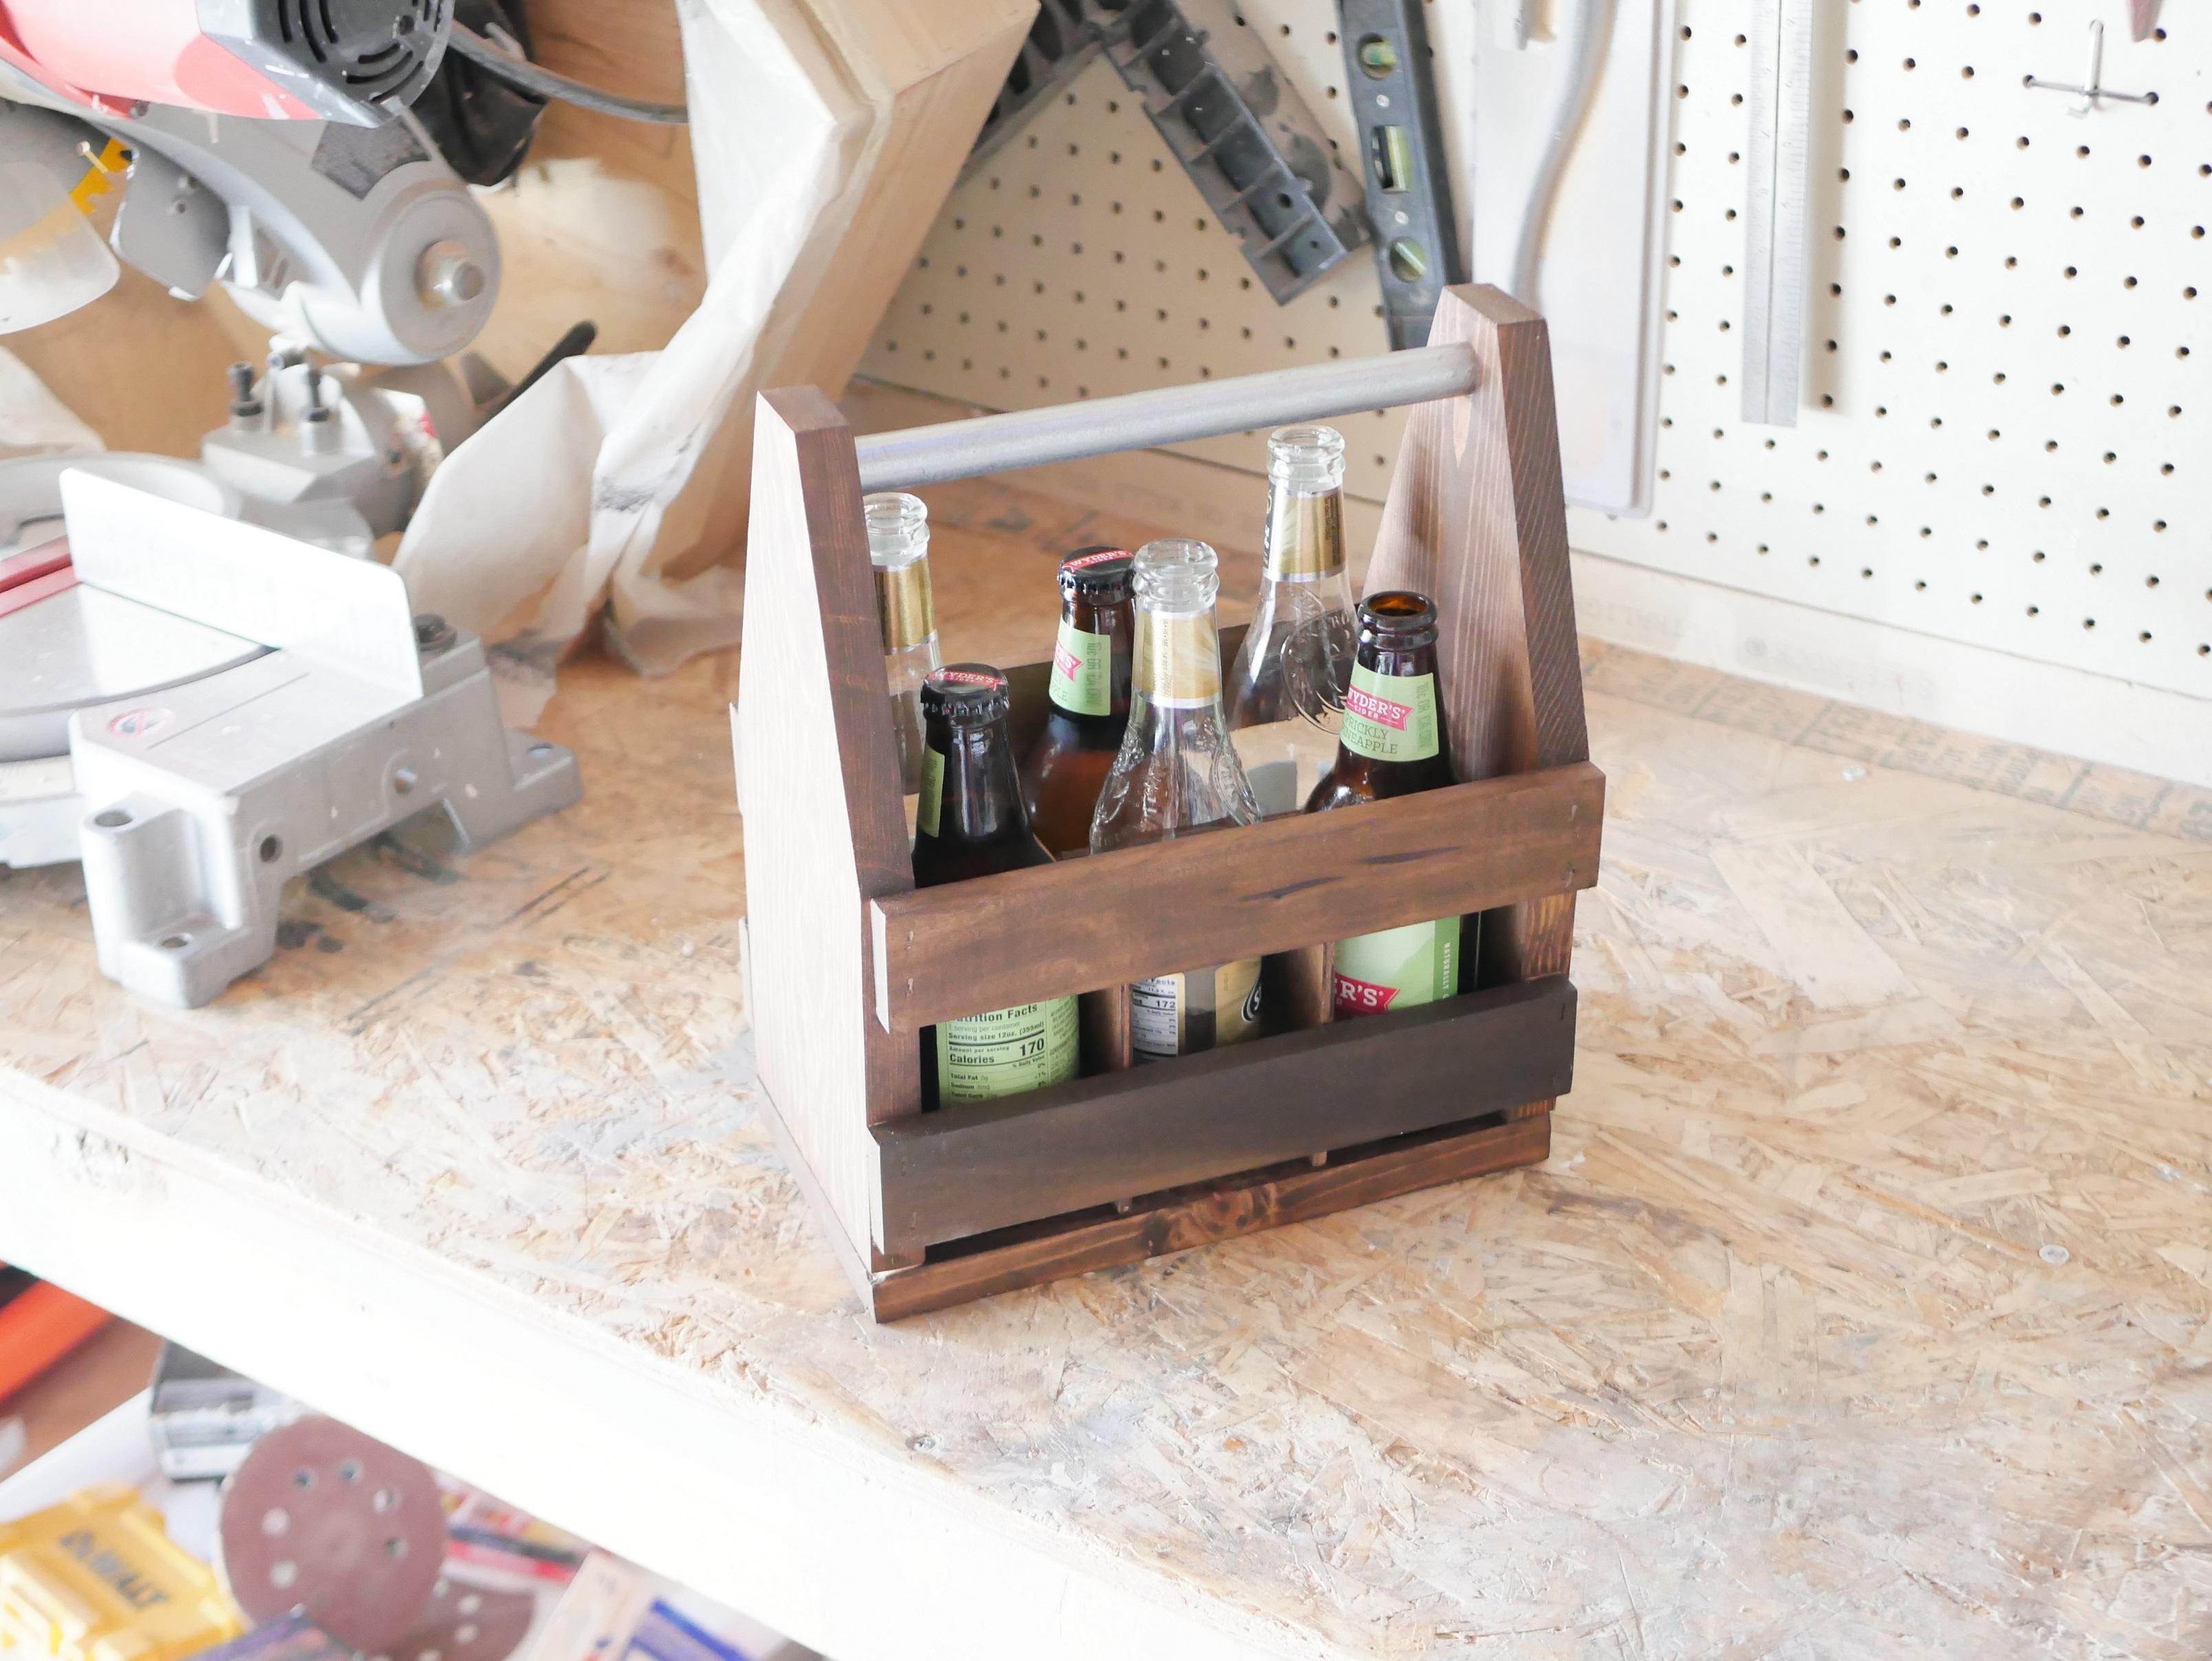
7. Beer Caddy Measure and Cut: Here's a recap of the tools and supplies you're going to need for the intermediate gift, a bureau caddy, a one by six piece of wood, one-quarter inch thick plywood, a three-quarter inch thick dowel or a steel bar, half-inch thick by 1.5 inch wide wood for the side rails, nails and a hammer, sander, drill bit or forcing or bet the thickness of your dowel or steel bar handle, a minor or jigsaw, glue, stain or paint and polyurethane. Alright, first you're gonna cut your sides and bottom. Take your one by six and cut your bottom piece at ten inches long. Measure, make a mark and cut to the right of that line. Next, make your sides from the one bisects. First cut at 11 inches long, and then make a mark 5.5 inches from the bottom. At the top, make a mark in the middle of the wood that's 2.75 inches over. Then mark three-quarters to either side of that mark. This will be your 1.5 inch top. Now this next part will depend on what kind of soil you have. I'll be using my trusting miter saw because as you know, I heart by miter Saul. But if all you have is a jigsaw or another type, there are options for you. At the edge of your 1.5 inch top line, take a straight edge, whether it be a piece of wood or your right angle, either will do draw a straight line from one edge of your 1.5 inch top to the top of your 5.5 inch mark, lower down on the wood. This is your angled side. You'll do the same on the opposite side of the 1.5 inch top. Do this for both side pieces of the caddy. If you have a steady hand, you can jigsaw or Hansel this line. Otherwise use your miter Saul my matched up with a 20 degree angle. Now, decide if you're going to make the handle go all the way through. I suggest this for a wooden handle. If it's going to be all the way through the wood, then cut your three-quarter inch doll ten inches long, then drill a hole through your sides with a three-quarter inch bit at an even distance from the top on both sides, div it half-inch to three-quarter inch from the top. For my metal handle. I don't want it to protrude through to the other side. I've not had good luck with adhesive holding the metal rod in place whenever I go all the way through the woods. So that's why I do it this way. And this method is also fine for a wooden dell. If it's a metal rod, then cut it at 9.25 inches. You're gonna need a hacksaw or an angle grinder for this. The next step will show you the reason for a shorter handle. Take a three-quarter inch forcing or bit or whatever the width through pipe is. Drill 3 eighth inch deep. This should be enough to hold the pipe in place with no adhesive. And this way the pipe is held in place on the top and doesn't fall through a hole in the sites. Do this for each side piece and now it's time to cut your side rails. Take your half-inch thick wood and cut four pieces ten inches long. These pieces should already be 1.5 inches wide, but if they're not and you have a table saw, you can just cut them down to size. These last cuts are slightly tricky, but I promise you with some patients, you're gonna get them. Take your quarter-inch thick plywood and cut one long piece, 858 inches long by four inches tall. You can do this with the jigsaw or a hands-on. Then cut to pieces of the quarter inch plywood at 5.5 inches long by four inches tall. Now comes the tricky parts. On the 85 eighth inch piece make a mark 27 eighth inch to either side of the piece. Make this mark two inches long. On the 5.5 inch pieces make a mark 2.75 inches from the side. This is the halfway mark. Make your mark two inches long. The line you've drawn two inches high and either too in 7 eighth inches or 23 quarter inches over r your slots. And what will enable these parts to act as removable dividers in your caddy. Now take your Jigsaw and make two cuts right next to each other centered on your vertical line. You're doing two cuts just so that you can have a bit thicker opening. In order to take the other piece of wood. You'll do this on the two lines you've drawn on your 85 eighth inch piece. And on the one line you've drawn on each of your 5.5 inches pieces now fit them together and make more cuts as needed for them to fit, snug and flush.
8. Beer Caddy Assembly: Now comes the fun part. You guys know that the building stage of wood projects is pretty much my love language. So without further ado, let's have a party. First. Give all of your pieces a light sanding as access will be very difficult later. You'll especially wanna give a good sand to the dividers. A quarter inch ply is notoriously splintering. You'll start by setting one side on top of the bottom piece, carefully cleaned but to your bench or hold super steady and pre drill holes all the way through the bottom and slightly into the side. Go ahead and use a counter sync bit or a force nor bet to hide the screw head. Do this in three evenly placed spots on the bottom. Now if you're using a metal rod, you'll place it in the partial hole on the side and bring the other Woodside into place, holding the metal rod in its position. Do the same jazz with the three screws on the bottom of the side. If you're doing the dial all the way through the sides thing, you can go ahead and assemble the other side of the Caddy as shown. And don't worry about the handle just yet. Put in your three screws. Next step, you'll be attaching the rails. Take your ten inch slats and place one just a little above your bottom piece. Make it even on each side and either nail it in place or screw it in. One will do. If you have a nail gun, this is crazy easy. The top railing can be placed just below where your angled cuts stops. Attach this in the same way, measure your placement and reciprocate those measurements to the other side of the caddy. Attach in the same way. Now if you're using the wood dowel, go head and put glue all around the hole that you've drilled in the tops of the caddy. Insert the doll and let the glue dry.
9. Finishing Beer Caddy: Oh my goodness, you are almost done. All that remains is giving your beer caddy a good coat of paint or state I'm going to wait for it. Stain mine using a cloth and wearing gloves, I'll dip into the stain and give each piece of the caddy, including the dividers, a good coat. And after that dries give it two to three coats of polyurethane. You'll really want to protect this project extra Well since there's going to be bottles with possible condensation that get placed inside. After the polyurethane dries, place the dividers into the center console of the caddy, ensuring that the slots take the different pieces of dividers. I don't like to secure these fully inside as I like to give my recipient the option of using the caddy without them. These are meant to be removable if wanted. Now you may consider adding some personalized touches. You can do a bottle opener on the side, stencil their name on the sides or the front, or you can even would burn their name. It's up to you. And that's it. Now wrap it up and watch the look on your loved ones face when you present it to them.
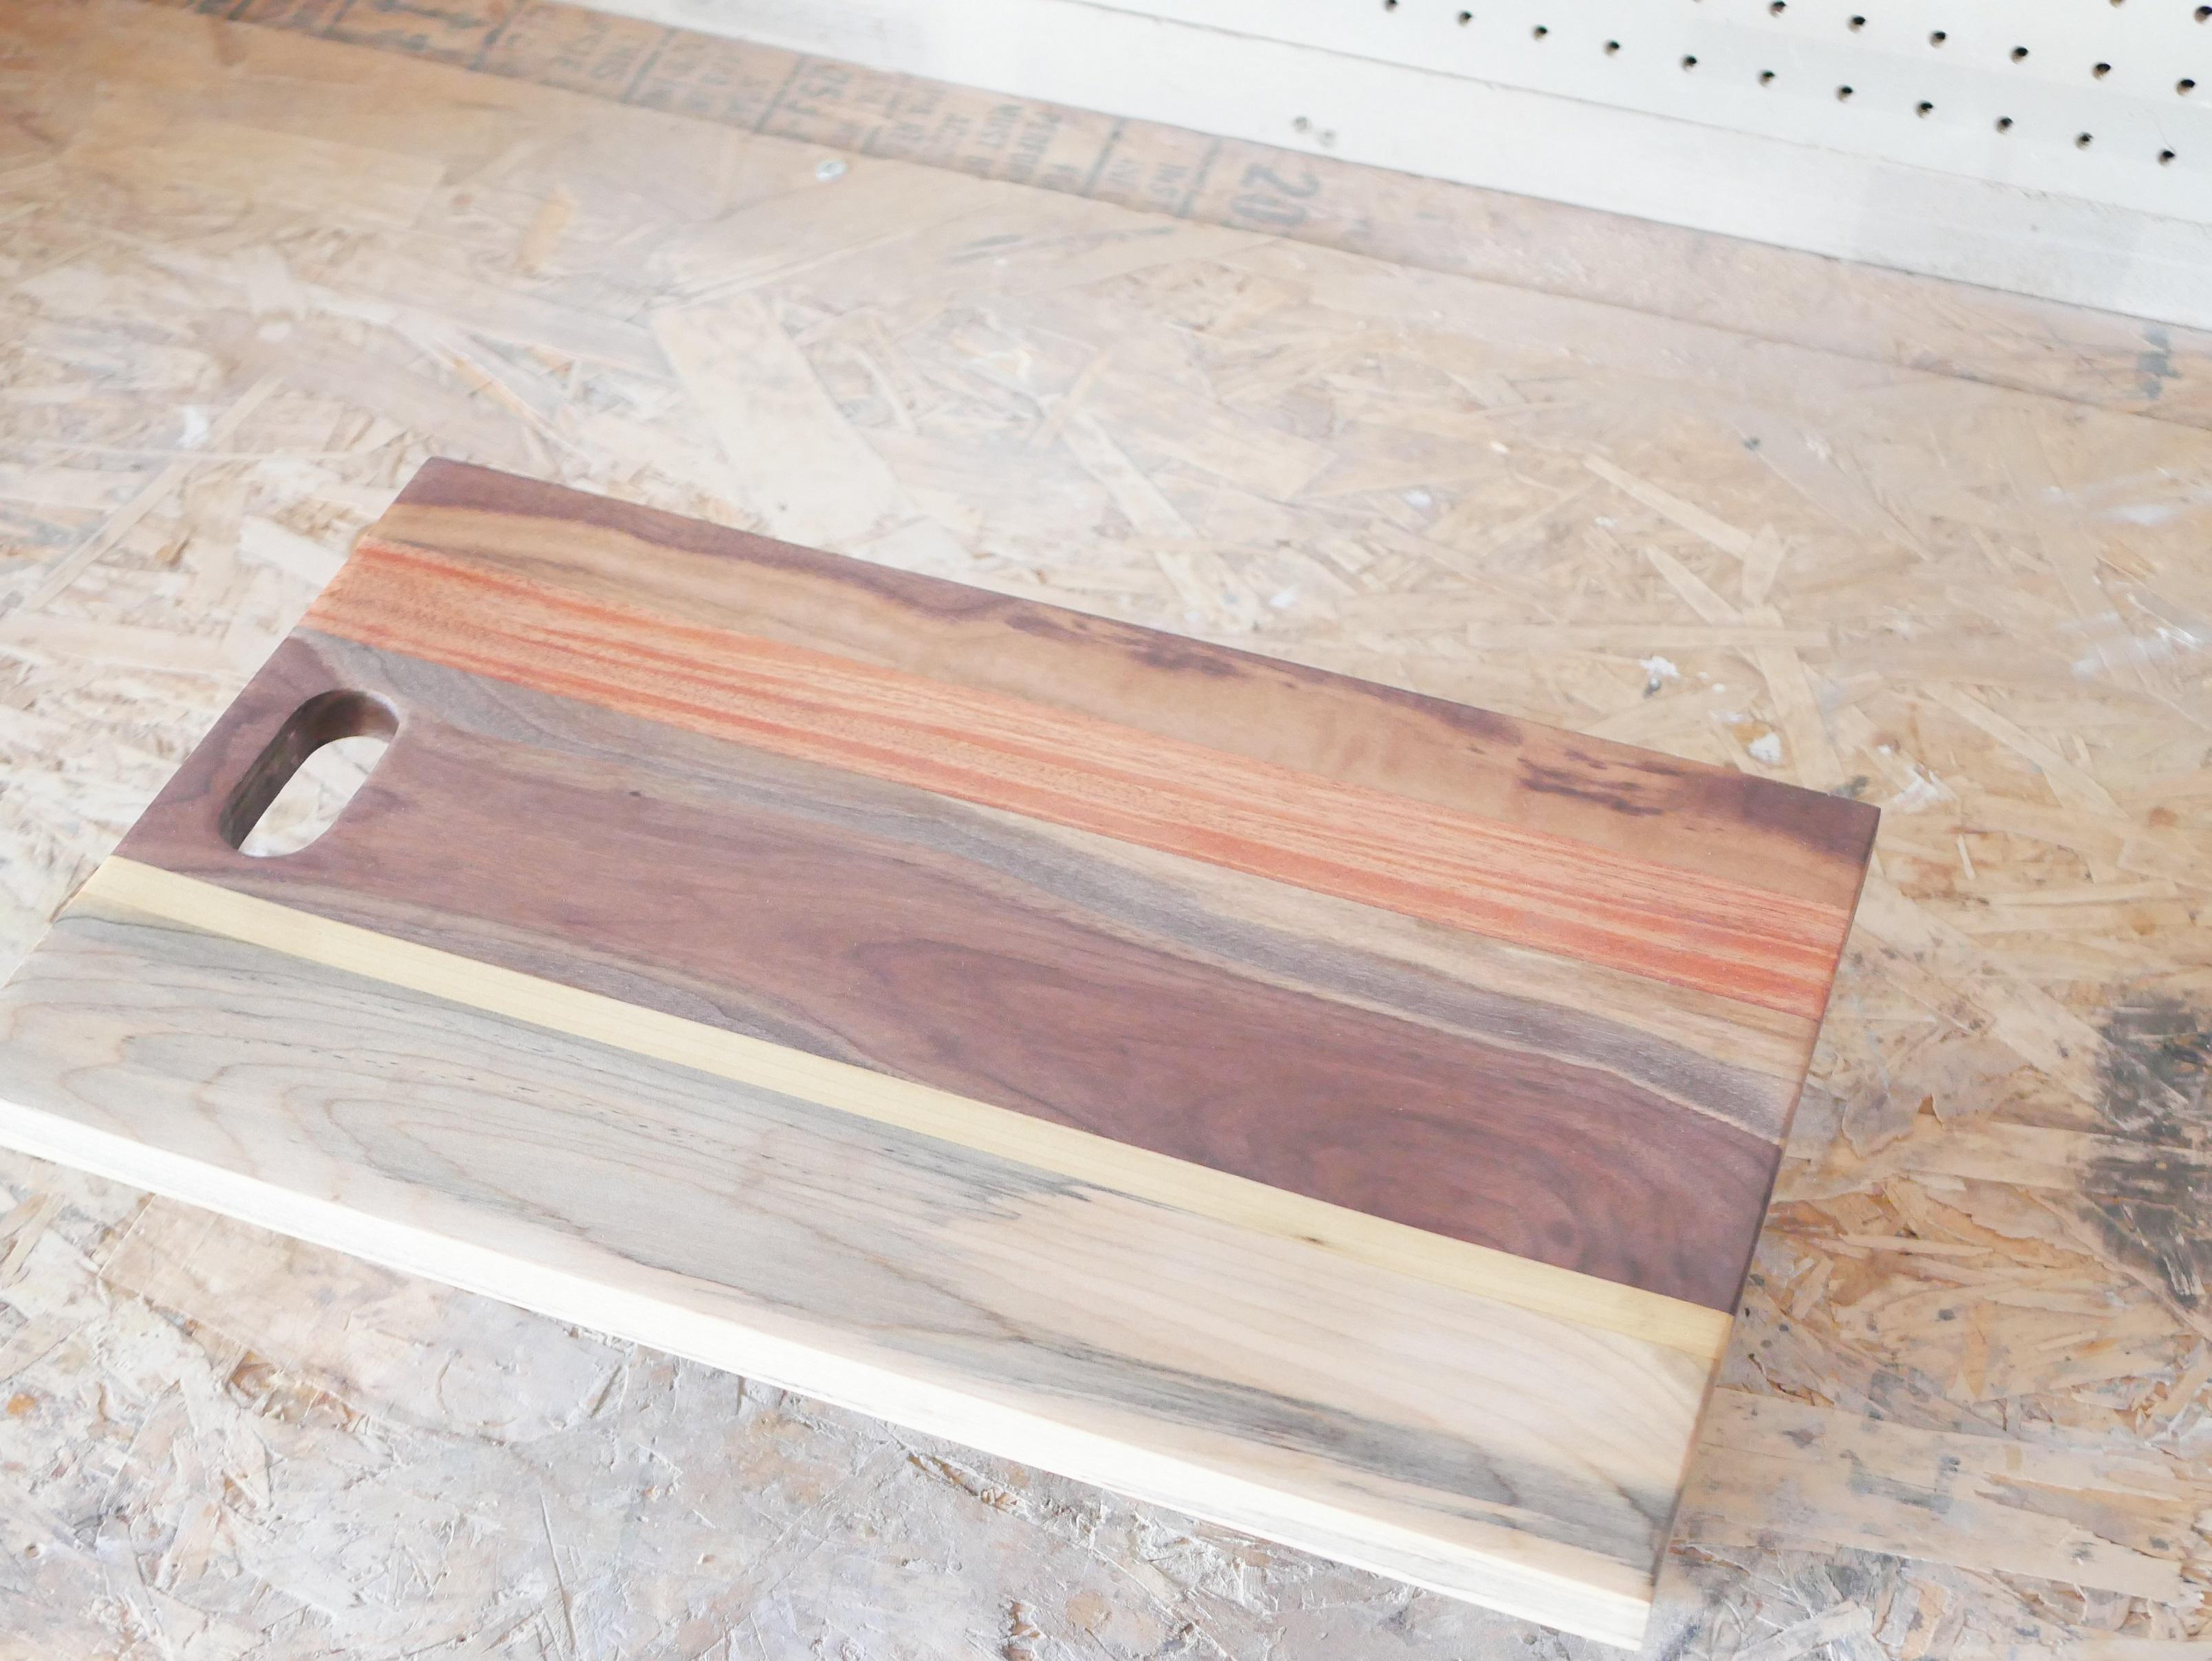
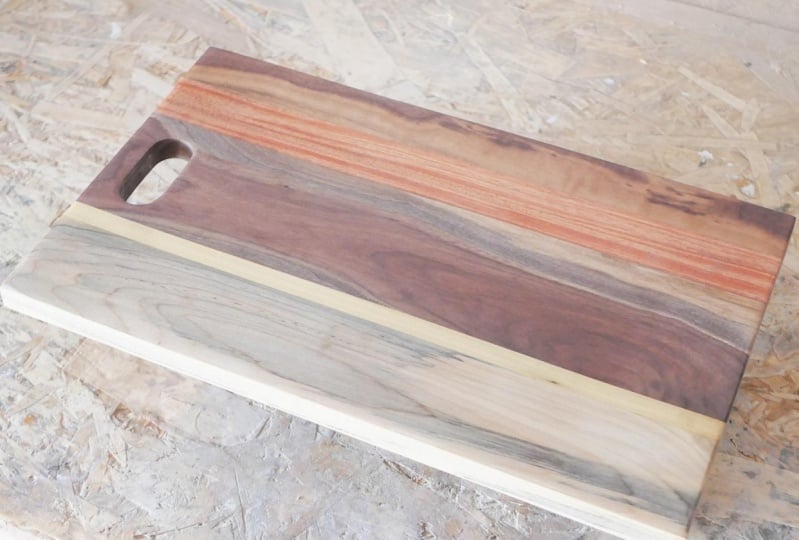
10. Cutting Board Measure and Cut: Our next gift is a intermediate project and it's a cutting board. Here's a recap of the tools and supplies that you're going to need to make this gift. 5-6 sticks, a three-quarter inch thick hardwood and varying widths. I've chosen mahogany, poplar, walnut, and naval. You'll also need a saw, a jigsaw or scroll saw, a standard glue clamps and which are black oil. You guys I had so much fun picking this one out at Home Depot. I never buy hardwoods because they are really expensive. But a cutting board definitely requires hardwood. I chose varying width, setting them side-by-side at the store just to see if they complimented one another and where it aesthetically pleasing. I went through every pile of wood, finding a piece that had the most character and was free of any flaws. If you're going to be paying that much for wood, you better make sure that there's one with no knots in it. I also check to see that the grain wasn't too visible in each piece. Ok, has a super deep grain and I really don't want any foodstuffs getting stuck in the grain and being caught there forever. So maybe just avoid OK. Plus I really don't like OK. Sue me. Are cutting board is going to be 9.5 inches wide by 16 inches long. Make sure your three-quarter inch thick pieces reflects that. I am labeling this and intermediate project, even though it's probably one of the easiest ones to make out of all of them in this class. But I'm doing so because in order to make this, you'll need a table saw to rip to thin pieces of wood for the board. Also using a jigsaw for the handle is a little bit tricky. Of course, you can make the board without those thin strips and eliminate the need for a table saw and you can do it without a handle. Up to you. My first step will be to cut two quarter-inch wide strips of maple for my board. Next, cut each piece of hardwood, including the thin strips 16 inches long. For now, this is the only cutting you'll do easy-peasy.
11. Cutting Board Assembly: Next, arrange all of the pieces in the pattern that you desire. I like to put the widest piece in the center so that cutting the handle later on is a little bit easier and more stable. Next, put glue on every edge of the wood and place them next to each other. Now, evenly place clamps to secure the pieces to each other. You might also consider placing paint cans on the top to ensure the boards don't cup overnight. Now leave them overnight to dry.
12. Cutting Board Handle: After your glue is dried, removed the clamps and check that the boards are sturdy and attached well. Next, take a measuring tape and make a mark in the center of your cutting board about three-quarter inches from the top. Then you'll place a mark 1.25 inches to either side of that center mark. Then make another mark one inch below those marks. Draw an ellipsis connecting those marks. This should be just enough space for some fingers to hold. Using a jigsaw, scroll saw, or wholesale cut a handle into the would. Start by using a large drill bit and drill three holes, one at each end of your ellipsis and one at the center. Then take your jigsaw or scroll saw and cut as close to the lines as you can. If you have a hole saw, you'll just make probably two to three holes in place there and then clean it up with the jigsaw.
13. Finishing Cutting Board: Living on the West Coast in winter, you guys, it's 330 and it's already almost dark outside. What does this antarctica come on? Now this is the last step of the last project of this Christmas gift class. Greatly, you want this cutting goign to be as smooth as my jazzy rendition of the Christmas song. And you get that by Sandy sand forever until your board is perfectly smooth, including the handle area. You'll have to do the handle with a handheld piece of sandpaper or you can use a dremel would the sanding drum attachment. I like to feel as I go with my bare hands so that I can cover any rough spots. Once it's buttery smooth, wipe all of it down to remove any saw dust. Then all you do is apply butcher block oil to all sides of the cutting board. I got this one off Amazon for a dollar and I believe one is sold at Home Depot as well for around ten bucks using butcher block oil mix, the cutting board food safe and protected, rather than a polyurethane coating that really shouldn't be in contact with food. The oil also really brings out the beautiful colors of each of the wood planks. So just follow the directions for your specific oil. In this one, you apply a coat with a soft cloth and then wipe off the excess a few minutes later. And that's it. That's your cutting board. It's sure to bring surprise and all from your recipient. Way to go.
14. Final Thoughts: Holy moly, did it. Congratulations. You should now be looking at one or even all three of some amazing Christmas gifts you can now give to your loved ones. You are so cool. They're going to love it. I encourage you to continue building up your shop. Put some tools on your Christmas wishlist. Gather wood from Craigslist, pin inspiration photos to your Pinterest page for future projects, and most of all before you give those gifts away, be sure to post a picture of your finished Christmas gifts here. I cannot wait to see your versions. Now let's go make some mary sawdust.
 Brittany Joyner, SoCal WoodGal