Building a Second Brain in Notion
 Eralp Sendan, Industrial Engineer / Program Manager
Watch this class and thousands more
Watch this class and thousands more
Lessons in This Class
-
-
1.
BASB in Notion Promo Video
1:55
-
2.
What is a Second Brain?
4:00
-
3.
The CODE
2:01
-
4.
CAPTURE
3:00
-
5.
ORGANIZE
3:18
-
6.
DISTILL
3:36
-
7.
EXPRESS
4:29
-
8.
Let's create our My Second Brain Page
5:29
-
9.
Getting Things Done Section Preparation
4:05
-
10.
Brain Dump
1:23
-
11.
Databases and Pages
1:42
-
12.
Creating Projects Database
2:07
-
13.
Creating Areas Database
1:30
-
14.
Creating Resources Database
1:27
-
15.
Creating Archive Page
1:32
-
16.
Creating Notes & Ideas Database
1:45
-
17.
Creating Tasks Database
1:55
-
18.
Buttons at the top of the page
1:57
-
19.
Getting Things Done buttons
5:55
-
20.
Adding views in GTD system
3:46
-
21.
Deep Work Page
3:30
-
22.
Button assignments under Brain Dump Create
1:24
-
23.
PARA and Notes & Ideas Call out
4:53
-
24.
Access your Second Brain from your Mobile
2:32
-
-
- --
- Beginner level
- Intermediate level
- Advanced level
- All levels
Community Generated
The level is determined by a majority opinion of students who have reviewed this class. The teacher's recommendation is shown until at least 5 student responses are collected.
278
Students
3
Projects
About This Class
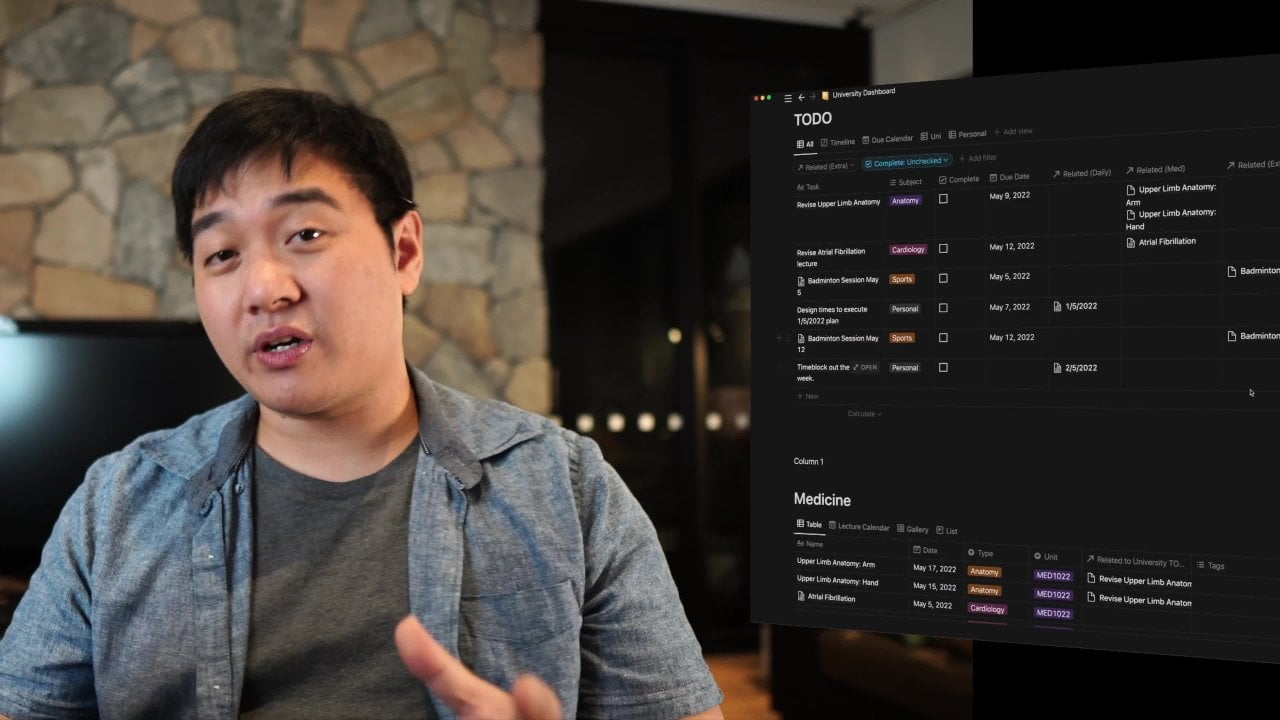
Do you want to learn how to build a second brain in Notion, the all-in-one workspace for your notes, tasks, projects, and more? Do you want to implement the Getting Things Done (GTD) methodology in Notion, the proven system for managing your attention and productivity? If so, this course is for you!
In this course, you will learn how to use Notion as a powerful tool to capture, organize, and retrieve your ideas, knowledge, and tasks. You will also learn how to apply the GTD principles and practices in Notion, such as creating inboxes, projects, next actions, contexts, and reviews. By the end of this course, you will have a fully functional second brain in Notion that will help you boost your creativity, efficiency, and learning.
This course is suitable for anyone who wants to use Notion as a personal knowledge management system and a productivity tool. Whether you are a student, professional, entrepreneur, or lifelong learner, this course will help you take your Notion skills and your personal growth to the next level.
Some of the topics covered in this course are:
-
What is a second brain and why you need one
-
How to set up Notion for your second brain
-
How to use the PARA method to structure your second brain
-
How to capture and clarify your inputs in Notion
-
How to organize and review your projects and tasks in Notion
-
How to engage with your second brain and make it work for you
This course is based on the work of Tiago Forte1; the creator of the Building a Second Brain method and David Allen; the author of the bestselling book Getting Things Done. You will also get access to a free Notion template that you can use to create your own second brain.
Don’t miss this opportunity to learn how to build a second brain in Notion and implement GTD in Notion. Enroll now and start creating your own digital assistant that will enhance your life and career.
TRANSLATE with
x English ArabicHebrewPolish BulgarianHindiPortuguese CatalanHmong DawRomanian Chinese SimplifiedHungarianRussian Chinese TraditionalIndonesianSlovak CzechItalianSlovenian DanishJapaneseSpanish DutchKlingonSwedish EnglishKoreanThai EstonianLatvianTurkish FinnishLithuanianUkrainian FrenchMalayUrdu GermanMalteseVietnamese GreekNorwegianWelsh Haitian CreolePersian
TRANSLATE with
COPY THE URL BELOW
Back EMBED THE SNIPPET BELOW IN YOUR SITE
Enable collaborative features and customize widget: Bing Webmaster Portal Back
TRANSLATE with
x English ArabicHebrewPolish BulgarianHindiPortuguese CatalanHmong DawRomanian Chinese SimplifiedHungarianRussian Chinese TraditionalIndonesianSlovak CzechItalianSlovenian DanishJapaneseSpanish DutchKlingonSwedish EnglishKoreanThai EstonianLatvianTurkish FinnishLithuanianUkrainian FrenchMalayUrdu GermanMalteseVietnamese GreekNorwegianWelsh Haitian CreolePersian
TRANSLATE with
COPY THE URL BELOW
Back EMBED THE SNIPPET BELOW IN YOUR SITE
Enable collaborative features and customize widget: Bing Webmaster Portal Back This page is in English Translate to Dutch
- Afrikaans
- Albanian
- Amharic
- Arabic
- Armenian
- Azerbaijani
- Bengali
- Bulgarian
- Catalan
- Croatian
- Czech
- Danish
- Dutch
- English
- Estonian
- Finnish
- French
- German
- Greek
- Gujarati
- Haitian Creole
- Hebrew
- Hindi
- Hungarian
- Icelandic
- Indonesian
- Italian
- Japanese
- Kannada
- Kazakh
- Khmer
- Korean
- Kurdish (Kurmanji)
- Lao
- Latvian
- Lithuanian
- Malagasy
- Malay
- Malayalam
- Maltese
- Maori
- Marathi
- Myanmar (Burmese)
- Nepali
- Norwegian
- Pashto
- Persian
- Polish
- Portuguese
- Punjabi
- Romanian
- Russian
- Samoan
- Simplified Chinese
- Slovak
- Slovenian
- Spanish
- Swedish
- Tamil
- Telugu
- Thai
- Traditional Chinese
- Turkish
- Ukrainian
- Urdu
- Vietnamese
- Welsh
Always translate English to Dutch
Never translate English
Never translate http://www.skillshare.com
TRANSLATE with
x English ArabicHebrewPolish BulgarianHindiPortuguese CatalanHmong DawRomanian Chinese SimplifiedHungarianRussian Chinese TraditionalIndonesianSlovak CzechItalianSlovenian DanishJapaneseSpanish DutchKlingonSwedish EnglishKoreanThai EstonianLatvianTurkish FinnishLithuanianUkrainian FrenchMalayUrdu GermanMalteseVietnamese GreekNorwegianWelsh Haitian CreolePersian
TRANSLATE with
COPY THE URL BELOW
Back EMBED THE SNIPPET BELOW IN YOUR SITE
Enable collaborative features and customize widget: Bing Webmaster Portal Back
TRANSLATE with
x English ArabicHebrewPolish BulgarianHindiPortuguese CatalanHmong DawRomanian Chinese SimplifiedHungarianRussian Chinese TraditionalIndonesianSlovak CzechItalianSlovenian DanishJapaneseSpanish DutchKlingonSwedish EnglishKoreanThai EstonianLatvianTurkish FinnishLithuanianUkrainian FrenchMalayUrdu GermanMalteseVietnamese GreekNorwegianWelsh Haitian CreolePersian
TRANSLATE with
COPY THE URL BELOW
Back EMBED THE SNIPPET BELOW IN YOUR SITE
Enable collaborative features and customize widget: Bing Webmaster Portal Back

Hands-on Class Project
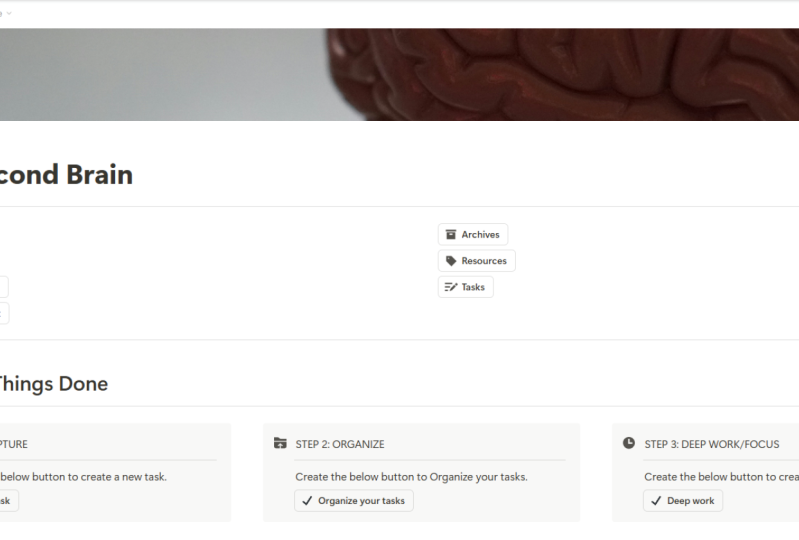
For your class project, you will create your own second brain system in Notion using the steps and tips that I taught you in this class. You will use Notion to capture, organize, and retrieve your ideas, knowledge, and tasks in a way that suits your personal style and goals.
To complete this project, you will need to:
- Sign up for a free Notion account if you don’t have one already.
- Create a new workspace in Notion and name it “Second Brain”.
- Set up your second brain structure using the PARA method: Projects, Areas, Resources, and Archives.
- Create a master database for your projects and tasks using the GTD principles: Inbox, Next Actions, Waiting For, Someday/Maybe, and Completed.
- Create a master database for your resources using the types and formats that you prefer: Notes, Articles, Books, Podcasts, Videos, etc.
- Link your databases using relations and rollups to create connections and insights across your second brain.
- Customize your second brain with views, filters, formulas, templates, icons, and covers to make it more functional and aesthetic.
- Engage with your second brain regularly by adding new inputs, organizing them into projects and resources, and reviewing them periodically.
Once you have completed these steps, you will have a fully functional second brain in Notion that you can use to enhance your creativity, productivity, and learning.
To share your project with the class, please upload the following to the project gallery:
- A screenshot of your second brain workspace in Notion
- A brief description of how you set up your second brain and what benefits you gained from it
- A link to your second brain workspace in Notion (optional)
The formula for the Processed property:
- if(or(empty(prop("Projects")), empty(prop("Areas"))), "No", "Yes")
I can’t wait to see your amazing second brains! Please feel free to ask any questions or leave any feedback in the discussion section. Happy learning!
TRANSLATE with
x English ArabicHebrewPolish BulgarianHindiPortuguese CatalanHmong DawRomanian Chinese SimplifiedHungarianRussian Chinese TraditionalIndonesianSlovak CzechItalianSlovenian DanishJapaneseSpanish DutchKlingonSwedish EnglishKoreanThai EstonianLatvianTurkish FinnishLithuanianUkrainian FrenchMalayUrdu GermanMalteseVietnamese GreekNorwegianWelsh Haitian CreolePersian
TRANSLATE with
COPY THE URL BELOW
Back EMBED THE SNIPPET BELOW IN YOUR SITE
Enable collaborative features and customize widget: Bing Webmaster Portal Back
TRANSLATE with
x English ArabicHebrewPolish BulgarianHindiPortuguese CatalanHmong DawRomanian Chinese SimplifiedHungarianRussian Chinese TraditionalIndonesianSlovak CzechItalianSlovenian DanishJapaneseSpanish DutchKlingonSwedish EnglishKoreanThai EstonianLatvianTurkish FinnishLithuanianUkrainian FrenchMalayUrdu GermanMalteseVietnamese GreekNorwegianWelsh Haitian CreolePersian
TRANSLATE with
COPY THE URL BELOW
Back EMBED THE SNIPPET BELOW IN YOUR SITE
Enable collaborative features and customize widget: Bing Webmaster Portal Back This page is in English Translate to Dutch
- Afrikaans
- Albanian
- Amharic
- Arabic
- Armenian
- Azerbaijani
- Bengali
- Bulgarian
- Catalan
- Croatian
- Czech
- Danish
- Dutch
- English
- Estonian
- Finnish
- French
- German
- Greek
- Gujarati
- Haitian Creole
- Hebrew
- Hindi
- Hungarian
- Icelandic
- Indonesian
- Italian
- Japanese
- Kannada
- Kazakh
- Khmer
- Korean
- Kurdish (Kurmanji)
- Lao
- Latvian
- Lithuanian
- Malagasy
- Malay
- Malayalam
- Maltese
- Maori
- Marathi
- Myanmar (Burmese)
- Nepali
- Norwegian
- Pashto
- Persian
- Polish
- Portuguese
- Punjabi
- Romanian
- Russian
- Samoan
- Simplified Chinese
- Slovak
- Slovenian
- Spanish
- Swedish
- Tamil
- Telugu
- Thai
- Traditional Chinese
- Turkish
- Ukrainian
- Urdu
- Vietnamese
- Welsh
Always translate English to Dutch
Never translate English
Never translate www.skillshare.com
TRANSLATE with
x English ArabicHebrewPolish BulgarianHindiPortuguese CatalanHmong DawRomanian Chinese SimplifiedHungarianRussian Chinese TraditionalIndonesianSlovak CzechItalianSlovenian DanishJapaneseSpanish DutchKlingonSwedish EnglishKoreanThai EstonianLatvianTurkish FinnishLithuanianUkrainian FrenchMalayUrdu GermanMalteseVietnamese GreekNorwegianWelsh Haitian CreolePersian
TRANSLATE with
COPY THE URL BELOW
Back EMBED THE SNIPPET BELOW IN YOUR SITE
Enable collaborative features and customize widget: Bing Webmaster Portal Back
TRANSLATE with
x English ArabicHebrewPolish BulgarianHindiPortuguese CatalanHmong DawRomanian Chinese SimplifiedHungarianRussian Chinese TraditionalIndonesianSlovak CzechItalianSlovenian DanishJapaneseSpanish DutchKlingonSwedish EnglishKoreanThai EstonianLatvianTurkish FinnishLithuanianUkrainian FrenchMalayUrdu GermanMalteseVietnamese GreekNorwegianWelsh Haitian CreolePersian
TRANSLATE with
COPY THE URL BELOW
Back EMBED THE SNIPPET BELOW IN YOUR SITE
Enable collaborative features and customize widget: Bing Webmaster Portal Back

Class Ratings
Why Join Skillshare?
Take award-winning Skillshare Original Classes
Each class has short lessons, hands-on projects
Your membership supports Skillshare teachers
Learn From Anywhere
Take classes on the go with the Skillshare app. Stream or download to watch on the plane, the subway, or wherever you learn best.


Related Classes