Transcripts
1. About this class: Hi guys, My name is Anna, I'm a watercolor artist, tutor blogger and also Schmincke
and da Vinci ambassador. And today I wanted to
present you my class dedicated to painting
the bright light, the light that is in your eyes. the light that
make you feel joy. We will together learn about the principles of creating
light in watercolor. I will share with you secrets
and things that you need to know about to paint these
kind of plots in watercolor. I will share my
tips and tell you all about water and color. I hope you will love this class and have fun while
painting. So let's begin.
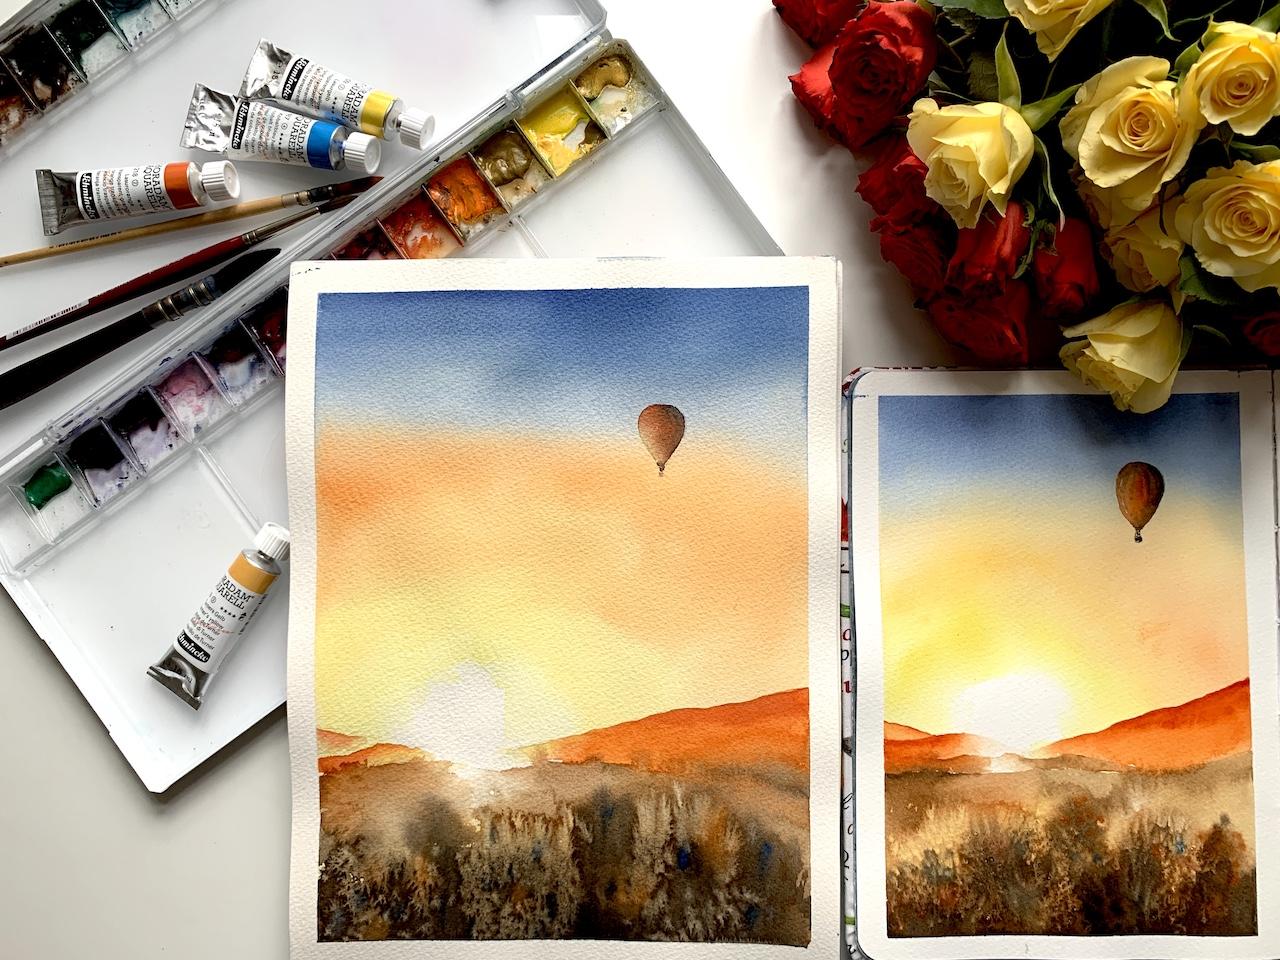
2. Materials for painting and examples of paintings with light: Hi guys. My name is Anna. I'm a watercolour artist and today we're going to paint this plot. I will explain everything. How to create the sense of light, the sense of bright light, how the watercolor washes, how to choose paints. So everything that you will need to paint this beautiful plot. First, I want to show you a few examples of paintings of light in watercolor. I love painting the light because we all love the light. So I will have painted this, but I have found in these plot and the hope you'll be inspired with my paintings and would love to paint light with me, was about the materials that we will need. Of course, we will need watercolor paints. Water the colors that were needed. Basically, it's kind of four, maybe five colors. You will need some yellow. I have transparent yellow by Schmincke,i. And these yellow should be I think, cold. So of course, we know that bright yellow Is thought to be warm. And here you can see that this color is colder than this one. What is called cold means that it is more bluish then these, these goes to orange hue and these cows to blue hue. So we will need basically yellow, some called the Yellow, and we will need some warmer yellow. I have turned us yellow. It's kind of early, warm, beautiful hue. Then we will need orange. I have transparent orange. I have all my paints that transparent than we will need some blue. I think I will use cobalt blue, but ultramarine is also suitable. So basically, you need four colors to yellow, orange, and some blue. And please be sure that your blue mixes with the orange in the kind of beautiful color because it can give Egypt. So next, we will need a masking tape. We will need water, ballot, all need brushes. And it's not important to what brushes do you use for this technique. It's important that you help one brush. For washes. The brush that you will do the washes, you will have, you must have some brush for details. And then you need to have some soft brush to mix the pigment. Because smooth transitions in light are critically important. And we will need some brush to mix the pigment and to receive for some transitions. As about the paper, it doesn't matter exactly what paper you would use. It should be just watercolor paper. And I have arches against him. But the paper for these blood is not so important. So that's all for much. Yeah. And we will need assault. It's just originally kitchen salt. I have brought these salts from my kitchen. And maybe Ks cancel. So there are basically not so much materials. So in these blogs and in next lesson, I will explain you how to create light, it's water. The three basic rules of creating glides in watercolor.
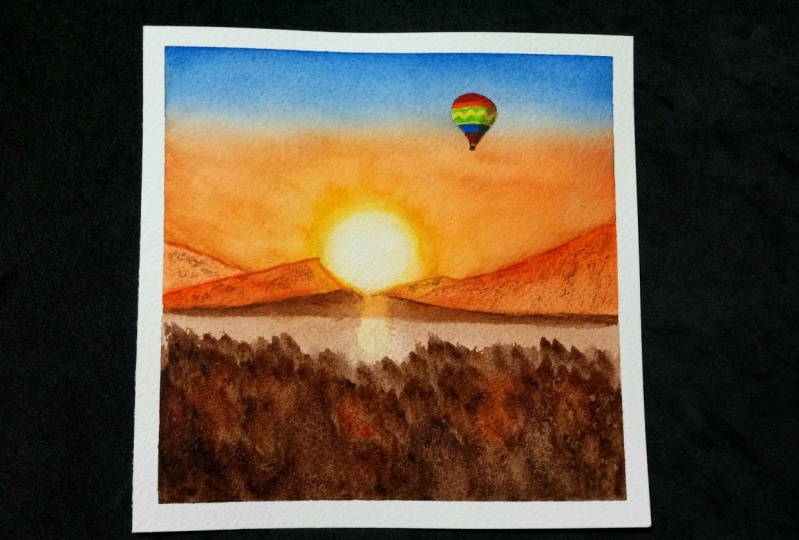
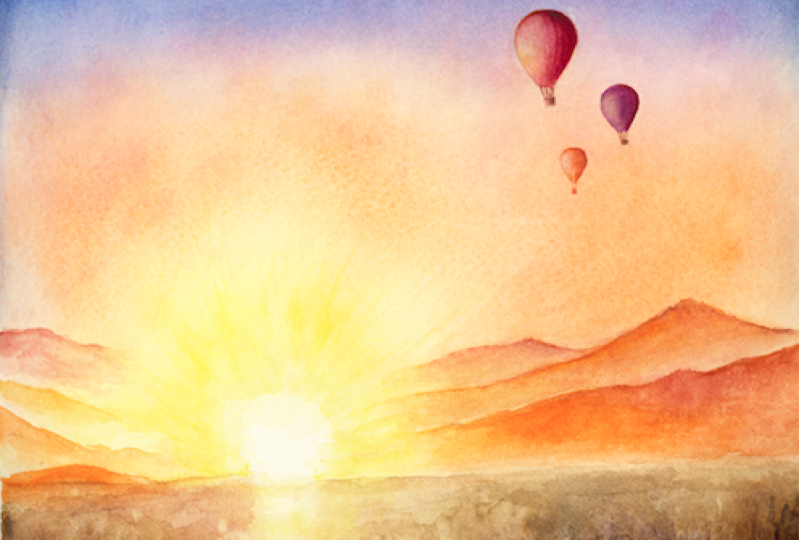
3. Theory of painting light in watercolour: Okay, so three rules of light. The first one is smooth transitions. What does it mean? It means that perfectly you shouldn't have no stripes. You should have a smooth gradient of, of your wash. So what does it mean? It means that we must do this only in wet technique because maybe, you know, maybe don't know. But when your paper is wet, you receive some kind of smooth edges. When your paper is dry, you received a hollow, hard edges. So for example, I'm bringing some yellow then immediately and being some orange than some orange again than red. And we will receive the smooth transition. And smooth transition. Really important to have the effect of light. So the washer should be done strictly on the moist paper. So your veins should be washed one into another. And it's important in sky and its importance while painting glide. Van. That second rule is that transitions. If we're talking about rainbow, there are some kinds of colors that go one to another. And they go from white than yellow, orange, red, purple, and blue. And this is important. I will also show you. So I'm again wetting my paper. It's just pure water. Okay. And then how to create the effect of the sun? We begin with yellow, with gold, yellow. And we remember that we have white. We should leave the area white. So we need to do like we are painting a circle because sun is ground. It's called yellow. Then we immediately wash our cold yellow with our warm yellow. Then it's time for orange. And remember about smooth transitions. So now my transitions are not so smooth and it seems strange. So I'm just mixing the pavement to receive smooth transitions. And then it's time for orange or with bread. And then you can move to verbal or too bright red. And then, so I'm just mixing some purple. And again and again, you see that transitions now are not. So it seems strange. So I'm mixing the pigment. I can do it while my paper is wet. And for example, some blue. If here is kind of see or something that should be reflection from. Our son. So it's like like reflection of the sun should be separately under the sun. Okay. Okay. So the m again telling you that you must strictly choose the colors from white to yellow to warm yellow to orange and Tourette. And then only blue is the second rule. And that rule is contrast because there is no light without shadows. So if here in this picture, we can see that it doesn't look so so shiny. Our sun of course shines, but not as as cool as it, as it can. So we are working with dome and it's important to have dense paint. And then Scala, which will be contrasting with our light and create the feeling of light. So what do I mean? I mean that I'm now applying really dance paint. And in the contrast with our dense paint, our sun begins to shine. So basically, these three rules. If you follow them, you will get a result. And now, Okay, So here is the landscape I have painted and the landscape that we're going to paint today. And if you Vera smooth transitions from white to yellow to orange to blue. These are the color scheme from, again, from white and cetera. And then we have a kind of dark spot here that grades contrast. And the contrast with these, our sun shines. So let's begin the watercolor.
4. Preparing the paper and pencil sketch: Okay, So let's start the watercolor watt. And we are studying the watercolor part with applying the masking or the tape. Why do we apply the tape on the paper? Because when the paper is taped on four sides, it waves not so much. And it's essential for watercolor paper to wave. Now, my paper is stitched and I'm taking a pencil for for creating the pencil sketch and it will be super easy. I'm just having the sled of the mountain here. And here. My light will be, here, is a little here because it's a compositional rule of thirds. And it says that people's attention draw when the objects, the main object of interests are arranged on the, on the dots that are gray are created by lines, by lines that divide your sheet into three parts. So it's like here. So it's most efficient to have your objects on these bonds here, here, here, and here. And here would be the light. And here we would draw something guide, don't know yet what did we maybe it will be a bird, maybe it will be an air balloon. I don't know. We'll decide in process. So now I'm just implying where I would be or would have my hills. Are there. Yeah. It's Hills. Yeah. So it's just and one important thing that we don't draw anything in this place where we will have the light because the white in watercolor is just white paper. So if there will be a pencil, it will be seen and E2 look not so good. And one might live hog. I'm applying just the sheets of my tape to the place where I would have my my light. So when I will be working with pains, I will seem these and I will know that there should be no paper, no paint, because there should be just ordinary white paper. It's important. And Nokia, our pencil sketch is done. And we begin the process.
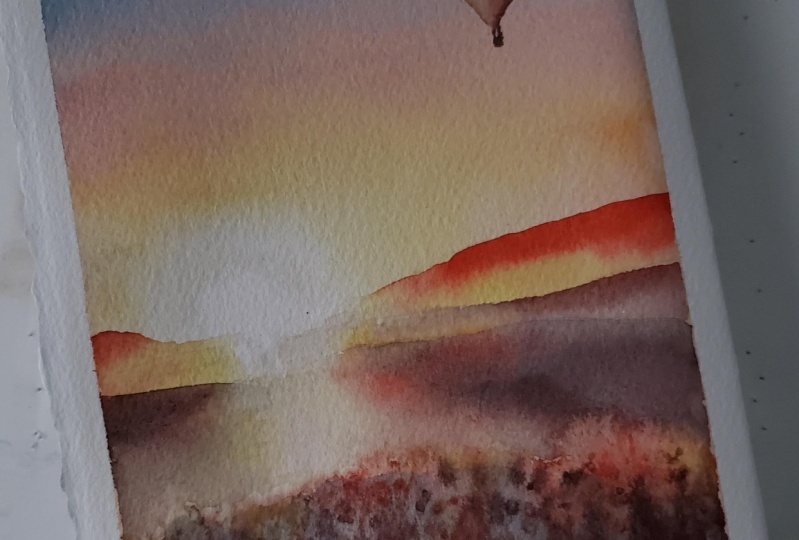
5. First wash: the sky and the light: The process begins with wetting the whole sheet. As I said previously, it's important to have smooth transitions. I'm applying water here. And I will show you on the light that I have these blaze not covered with water because there will be just white paper. So next, I'm applying water on all my sheet. There shouldn't be plenty of water. Don't be afraid of water because watercolor is a water veins. So what health brush that holds more water. And I'm applying the water on all my sheet. Okay. And we're beginning to paint. We are doing now the first light. And I'm taking my call to yellow. And applying my yellow. I'm washing the edges for the transition to be smooth. Then I'm mixing warm yellow in my previous previous paint on about. And you see that now I have done here, and I'm just washing my pigment off with my brush. It's just a clean brush and I am washing it. Then it's time for orange. And again, I'm applying it and I look for my wash to be with smooth transitions. Because I have wetted my paper previously. I have time TO I have time to have these smooth transitions. So I'm just mixing my pigment with kind of these movements. By the way, it's a cosmetic brush. It's brush for blushes. And I use it in my painting technique, then I'm having more orange and mixing it and applying it. So the principle is that we are receiving really nice smooth transition. And now I mix. I take cobalt blue. In BIO form. I'm mixing blend tool. We'd need to have a really thick thick paint. So I'm mixing it and I'm applying it on the top. And then when it goes to my orange I as water in my paint, I add water. Be careful because when you mix orange and blue, you can receive either green or gray. So I'm carefully going to this area and begin to create a transition. Don't forget to clean, clean the brush that you are mixing with the pigment. And I need my colleague here on the top to be more smooth. So I am applying this because we need these transition. So what do I have now? I am looking at my watch because now I have an ability to fix something that I don't like. It will be our sons. So I think that I should wash something men from this place, that it should be more white. I'm just taking clean brush and doing like this. Then I want it to be more yellow. My paper dries Not so fast because it's gotten and I'm applying more Yao. And the form of my yellow is like like a circle. So it can be just ordinary ordinarily vertical lines because it will look strange. And again, my smooth transitions from smoking. I want to add more blue here. So more dark blue. So I am taking industrial blue. It's kind of really dark, dark blue color. And I'm applying it. Yeah. This is yeah, this looks good. And again, you remember small transitions. So I'm mixing my pigment and my vapor begins to dry. So I should stop now because I should stop. Yeah. Okay. So I'm turning off my paper because I want my banes to go down. Okay. And then we can just do some light areas here. In the bottom. I'm taking my yellow, mix it with orange. So it will be just an apple layer. And again, while I'm going through this area, I been here nothing. I just leave here white area. Okay, that's our first layer. I will show you that with the first layer, we are doing a kind of very smooth washes. We're doing transitions. And then with the next layer, we are going to paint these elements, these mountains with really not solved hard edges. And because of these, we need to dry the paper completely. And to begin our second layer.
6. Creating the hills and the bushes: I have dried my paper with my hairdryer. And you can see that the tone, because I am working on clop on cotton paper, the tone is really not so intense as it was. So one of the roles of watercolor is that when we are applying paint on wet area, the band looks not so concentrated and not so towns if a blank paint on dry surface. So now we're beginning to make the details. And by the way, I can also get off my tape. Okay? So the objects, our mountains, they are also, they are shined by the sun. So here they will be more dark than here. And as you, as you see here, there are practically no paint and hear the band is kind of really thick. So I'm taking my brush. I'm drinking my orange orange paint. It's transparent orange, but you can use any any orange paint you want. And the the paint might be thick. So okay. And I begin to wash my so when I am going to this area, the area of the Sun, I'm again doing like I'm taking yellow. I'm taking piano and mixing it in my orange, and then applying it to be just white paper. And we're doing exactly the thing with this part. So that transition between between orange and yellow and white. And we can receive our light. Okay, I can make more molecule here. And I'm just washing it with clean water. And then we need to mix the color. For our main part here. I'm mixing cobalt blue in my orange, and I receive kind of really warm brown color. Okay. And I begin to wash. It should be really dark here in these places. Oh, I have a drop of water and that's no good. So I will take it off by with a towel and done. While getting to our light sport. Our wash begins lighter. And again, while having this spot, it should be white. And then we will do kind of kind of funny thing. We will do the ray of light. I'm taking clean paper towel and it should be done in really one movement. So I just want it to be not so sharp edges and smoothing the edge with the clean brush. And then we need these to be more dog. So I'm mixing again cobalt with orange, receiving my brown color. And look what I'm doing next. It should be really dark here. I will add also some brown, dark brown. It's Serbia. Okay. I'm applying really dark, dark color here. I would also have the dock goes a long way here. Then I'm taking salt and gently abide. These are my wet paint to receive the feeling of bushes or so. I can see that I have kind of not good transition between these and that a wash. So I'm just I'm just washing it with water and I want it to be Madame. So I am applying one more layer of paint and just Washington it. Okay. What are we going to do next? I can see that. I can see here a pencil. I don't want the pencil to be here. So I am doing kind of a yellow here. And again, it's important to do more week to move it to the water, clean water. And then I will be working with these, but you can see that the salt begins to react. So now I have an ability to add some Moodle places here. I'm creating just some random spots to create the ceiling of interest. I may be like doing some some vertical lines. And then it's really important that we will mix just the color from our sky is blue and put it in some places. But here. Because if we have discovered in our wash will look more interesting. And then I think few orange spots. You also well, because we're having blue and orange and we want to add blue and orange here in the bottom to create the feeling of some, some reflections may be added. Now, I'm looking what I have. And now I, I can add more things here. And I think I should add some brown here. Because these, so these Bart Luke really Tao. So I'm mixing again my orange with my cobalt to receive some brown color. And I'm applying some way and just create kind of interests. And again, when approaching to light, we should wash out all our brains to the water so that we will smooth transitions and so on. And the spot Also. Yeah. Okay, so you can see that when we added these, but our son really begin to shine. And okay, what are we going to paint here? I'm just adding more and more places here. Here. You can also use the spray, but be careful. And you can just and it's grades the efforts of some interesting interest. Okay, so let's go to final part. Let's bend something in here.
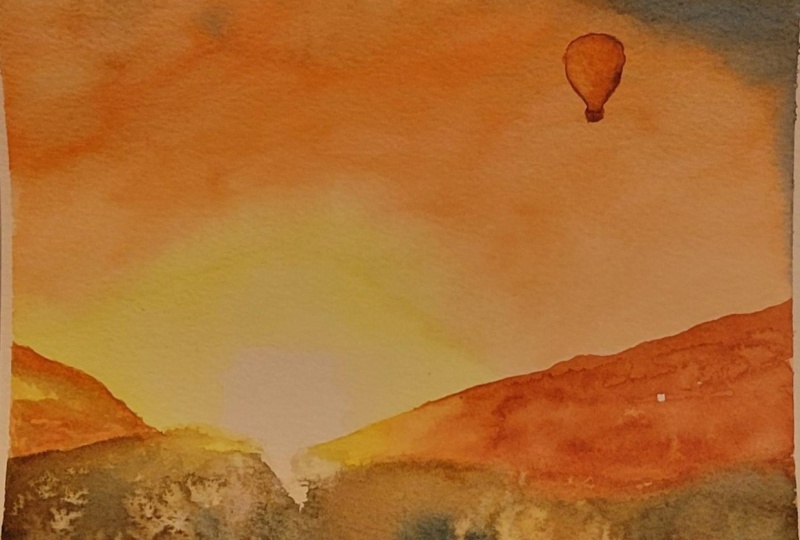
7. Painting the air balloon: Why do we need some objects here? Because without it varies too much sky here and we need something bring with it and something with a really sharp edges. Because each will look at the picture, will look more interesting. So I won't draw, I think our bowl. So now I'm searching for reference because in my, in my previous reference, I have no balloons. So I am doing it right now. I'm searching on my phone. Okay. And I'm just looking at the form and the shadow from for our balloon. And it's partly because the light is here. So the balloon should be lighted from here and it should be darker on this, but when it's the opposite side of the Sun. So I'm just searching any okay. So yeah. I can see here, boom. It's large it from the side. I need. So I'm thinking I'm just looking for the form of my terrible and Beijing it with my pencil. Watercolor. Because I previously thought that it's not okay to paint on watercolor, on watercolor wash with a band saw bought. Let's go. It's possible. So I'm just doing and then about the color. I think that it will look good if it will be blue or orange, but we have blue here. So orange would be better. And makes band. Then I take some darker paint here. And then it should be lighted from here. I think just clean water. I'm mixing my bank with water to get the results of my Arabella light from the right angle. And again, I can see that here. I can see the baneful. Personally, I don't like when the benzyl is seen upon the watercolors. So I'm just mixing some yellow. And I can see that the edge here is not. So even. Okay. So now we can see that the salt reacted in here and created a kind of very special and very good-looking affects. So now we should wait, just chew. It also dries, and then we will get our final barely painting. Okay, now my image is dry and I'm searching for final details. What should I do? I think that I need kind of structure here in my elbow. Okay. And I think that's all. It's time for taking off the masking tape. And this is my most favorite stage. Now how painting seems to be done. And I love what we have. I loved this feeling of some, these feelings of bright sun, bright sunny day, these sky. So I hope that you have enjoyed the class with me. I hope that you will have fun. You will love the watercolor. That's way that I am and I wish you good luck. And I hope you will love this.
 Anna Zadorozhnaya, Watercolour artist