Transcripts
1. 01 Class Introduction: I have always been fascinated by block printed critics, but it always seems to get my own designs on accessories for the best book look. I'm Cloudia. Join me in this class where I use block printing techniques to print a tote bag with simple materials such as cardboard and acrylic paint that can be created by anyone. Leave it, start by making a joke using cardboard and then prepare our paints to meet them ideal for printing. We will create multiple blocks to follow multilayer approach to achieve tricolor print. I will also share my tips and best practices to help you get most out of your time and effort. I'm excited to print. Let's get started.
2. 02 materials required: For the purpose of convenience, I have split the materials into two categories. That is cutting and printing . Let's see the materials required for cutting. Materials required for cutting. Cutting mat. A ruler, cardboard or chip board, pencil, and a paper cutter Materials required for printing. Some paints (Acrylic), containers for mixing the paints, waste fabric, sponge for applying the paints. On top of the block, a board for mounting the fabric. If you don't have a board, then you can use directly your table and some spare fabric clips for mounting. And our tool bag, and some glue for making the blocks.
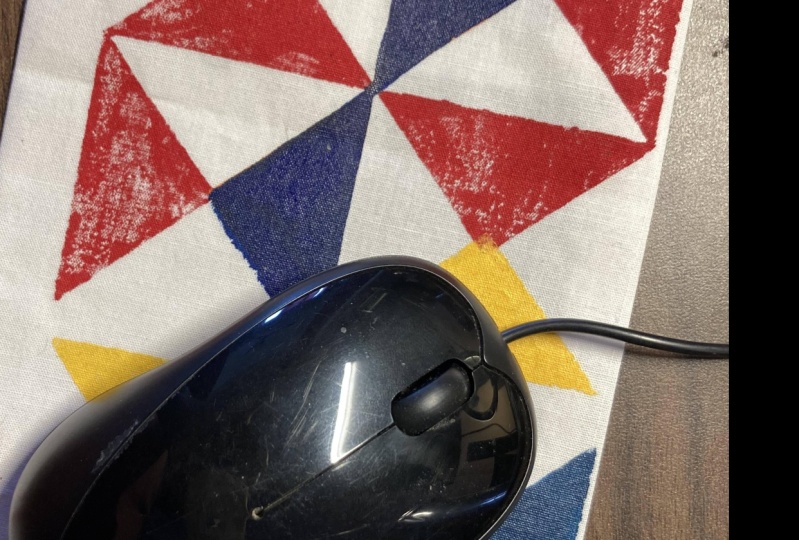
3. 03 knowing your design: In this lesson, we will see what kind of design we are going to use it for printing on tote bag. So this is the design we are going to use. This is a four-inch by four-inch square. We have used triangles to form this pattern. We have repeated that triangles in different angles and arrangements and the composition. And here you can see there are three different colors, hence it is a tricolor design. The limitation with block printing technique for using this design is, it is very difficult to achieve all the three different colors in one go. Hence, we are going to make three different blocks. And this file you can see in our exercise files, you can go ahead and print it and follow along with me. And if you don't have access for printing, you can draw it and then follow along.
4. 04 preparing the block: So in this lesson we are going to see how we are going to make the blocks. Here. If you can see, I have taken printouts of our design in four numbers. So three, we will use it for our block background. And one, we are going to use it for cutting the triangles. So the first step is we are going to cut out the design and mounted on top of a cardboard. So I'm going to use glue for pasting designs on the cardboard and then we will dry it for a while and then start cutting it. I'm going to cut all the designs individually. And finally, this, we are going to use it for cutting the individual triangles. Now let's apply glue on to this and then paste it on top of all cardboard. I am applying glue evenly on our design template printouts. Once your apply glue like this, you can take a wastepaper or something like this and then spread it all over the template evenly. And let's paste it. And then while pasting it and also just make sure that it is pasted. Evenly. In the similar way I'm going to paste all my templates on top of this cardboard. Now we have pasted all are design templates on top of our cardboard. Now let's cut it individually. First, we will cut all the three backgrounds required for the blocks, and then we will move on to this individual triangle blocks before you got this make sure the glue is dried properly, otherwise it will be difficult to cut it.
5. 05 cutting the block: Now let's get started with the cutting process. First, I'm going to cut all the three different background layers for our blocks. So I will start cutting. I will cut one by one. different layer, while cutting this chipboard or cardboard, make sure you hold the ruler very firmly. We can't cut our cardboard or a chip board in one cut. We will cut multiple times to separate this. In this way, we can achieve a very clean cut. When you are making the cut Make sure you hold the ruler very firmly and slowly slide cutter on the groove that you have created initially. And then, yeah, this is perfect. In this way. This is one, we have one background layer ready for a block. In this way, we are going to cut all the other two. Now we have finished cutting all our background, or the three background layers for our blocks. Now me, Let's start with the small triangles for forming this design. So I'll keep this aside. And with this cardboard template, we are going to cut out all these triangles. And then later we will mount on top of the individual layers according to their colors. While you cut this? Make sure you only keep the colored triangles as it is and this white layer we will not be requiring. So you can cut accordingly. And I'm going to make this cut over here, In this way. I'm going to cut out all the triangle color blocks here. Yeah, in this way, let's cut all the colored triangles out. Now the next step is to glue all the small triangle parts on top of the squares that we have cut.
6. 06 glueing the block: Now let's get started with the brewing process. Now if you see we have three different background layer. So I'm going to take the first one in here. And we are going to model each layer by matching the carlos of the triangles. So in this first layer, I'm going to match these two rates on top of this later. So I'm going to keep this wide like this. So we are going to glue these grand goods on top of this layer like this. Okay? So I'm going to apply glue. I'm going to play this glue like this. And then I'll use this white color triangle that we are not going to use it. So for spreading the group humanly. Here now we have the clue nets mounted. I'm going to match the triangle exactly on the bad grown Leo. Like this. Once I have much time learned to give a gender dress on top of it. So our first layer is completed. Now let's go to the second one. Let it dry for the array. So in this layer, we are going to glue the blue triangles together like this and this. So it start blaming the blue. I'm going to match it and paste it. And simulate D, The next to mine, I'm going to apply the glue. Fun too much it. Please do it. Gently. Keyword case. Yeah, Now our layer 2 is also ready. Let's keep it aside and then go to the third layer. And this layer, we are going to match all these orange triangles. I'm going to paste all these triangles on top, on top of this layer. Yeah, right now if you see we have completed the blocks for all the different colors. Now let's drive this for a while. And then we will start with the next step.
7. 07 tip marking blocks: Once it dried, we have all the three differently layers here. So this is the template, this is a design template we are going to follow for achieving this similar design template. We have to exactly match the layers while printing it. So what we are going to do is ,we are going to arrange the layers in the similar pattern and then we will flip it back and mark them what is the orientation that we are going to follow along. So this is the red. So I'm going to keep it like this. And then makes to one is the blue ones. So I'm going to keep this layer as my layer two And the final most is the orange one. So I'm just going to make it like this. We have arranged all the layers. in this Pattern. Now we will flip it. Now we will flip all the layers like this. Then we have do mark the orientation, the layers so that we will not get confused while printing it on our tote bag. So this is the layer one. I'm going to keep my layer to here and then we will put the layer three. So this is the layer arrangement now we will see whether the print, will be fine. So this is the red one and it's matching. So on top of that, blue one is also matching. And on top of that, this orange is also matching. Now this is the layer arrangement we have. Now I'm going to use my pencil and indicate, small indication, and we're going to make an arrow on top of it. This will be my direction while printing it. So I will also write top. So this way, we can mark our orientation in all the blocks or layers so that we will not get confused. And also here There is one more tip over here. If you see here, we have the triangles only, in the middle and the side, top and the bottom. I'm also going to give an indication like X cross mark over here and like this and also like this. And in the bottom. In this way, we can see where the pressure points exist in our layer. So while printed like this, when we apply pressure, we can apply only where the template where the design is there, that particular layer. And also this is the top direction. And also this, there is one triangle underneath you and one more over here. So in this way, we can identify the pressure points on our blocks. So here there is two triangles in the center. So I'm going to indicate this top and then here and here. So in this way, we can make our layers ready. So I'm going to mark layer one and layer two and layer three. So you know, in any order, that's up to you and also you can use any Colors as you require So in this way we have finished arranging like marking the orientation of the layers. Now we have completed the blocks with that three different colors here. Now the next step is to mount the tote bag on top of our board, and then we will start printing.
8. 08 mounting the tote bag: In this lesson, we will see how to mount the dog back on double for food. So before you found the tool bag on top of the board, who makes sure that you heat press it against me. And then I'm going to repeat the designs for dimes has discussed earlier. So I'm going to use eight inch by eight inch square area. So in the center of the tool bag, I have already marked squared of eight inch by eight inch for kids. So let's get started with the mounting process. No, for that, I'm going to please my board like this. And then I'm going to use a spare fabric. It can be any fabric. So this spare fabric ready to add our additional support by V block printed. So on top of this, I'm going to hide my tote bag. So I want to print on the friend clear of the good app. So I'm going to open this bag here and then, and then put this board insight. So we just get acquired an eight inch by eight inch square. So I'm going to place it in the center of the bag. Like this. Yeah. So if you'll see here, this so nicely, stretch the fabric spread evenly. And then we are going to just fold it. And then we'll use the Eclipse for mounting this. Okay, so now I have inserted though the board inside the bag. I'm going to just stretch it and flip it over and use the clip and mounted like this. And similarly, the other end as sweat, just folded little bit and then mode. And in this way we can nicely stretch the fabric. I'm going to repeat the same. This site estimate. Yeah. This Gardner has swelling. I'm going to stretch at 960. And then this clip and then mode. Make this here. So now you can see we have mountain back nicely the stretched condition. So this way we can easily get started with dot next to it. At this McLean lupins.
9. 09 tip making a sponge brush: So we have already discussed earlier that we require as punch for applying the paint on top of our blogs. So I'm going to show you a trick how to make Sponge brush like this. So for that you require a Benson. The first step is we are going to pick this block and then fold it like this. And then we are going to insert this and select this and hold it together and the edges. And if you have a rubber band, you can put a rubber band. I'm going to just use thread like this and then tie them like this. And in this way, you can use it for applying though paint on dopa heart blocks. In this way, I have created three different manipulations for our three different colors.
10. 10 block printing layer one: Now we will see what does that consistency of paint we require for this technique. For that I helped him some paid. So I'll go with a red shade first and then some water and a container for mixing and then this brush. So I'm going do bore, little bit paint on this. And then now I will mix a bit of water here. So the constant sensing we are looking heuristic ink consistency. So I'm mixing it very nicely. So this is the consistency we require. So we have three different colors in this design, so we will go one by one color. This kind of pain tends to dry quickly. So we have mixed a red shade first. So we will go with the red 1 first. We'll start destination on rough paper or something. So this is the blog for the red color have drusen slowly this color on top. So now we have to match the top, maybe make good. So I'm going to match the dog. And then on the pressure points I'll give some little pressure. Now I will slowly move it. So you can do this process, make 12 times and listen to NuGet dot ready Clean book. And then we can start with the tote bag. So now the processes that I'm going to match this line, so we're here at the edge of the squared, and then I will print this once. And then I'm going to repeat the similar process and into next to it three times. So I'll go buy 1234 in this way, we can ECV printed. So I'm going to apply the paint layer and make sure that I'm going to apply an even pink layer. If you're making this on the fabric, you can test it out on the fabric itself. Now. Dried layer of paint. I'm going to hold the top. I'm going to match the edge and this edge and then place it. And then press it gently and then slowly remove it. Well, have coordinates, shade of red. The same way I'm going to repeat it. While you play the paint, make sure you don't apply axes. And also it makes sure that you don't end up play less. So once you apply, make sure you are going to match the top and the bottom as well like this. One too much. Just give y1 pressure. And then slowly flip. Nice. So matching, just follow the baton and to have a fetuses little bit offset, then there is no problem. You have to do it weighs lonely and you should have a lot of patients if you're doing it in the first frame. Moving my chip, think this. Yep. So now we have finished with the first layer that is red shape. Now we can go ahead and make though paint consistency for the second one. So I'm going to go with the lower No.
11. 11 block printing layer two: We will keep the red paint a site and then start with a low one. So I'm going to hold the paint. I'm going to pour a little bit water onto lives. Very nice. Steve can make sit. So now we'll start with a low one. And we're going to apply the first layer of the bank. Yeah. So this the consistency of the paint is too thick. So I'm going to apply more paint and a bit perform the next segment. Now this is really good consistency here, and if you can see the ink feet, I'm going to match that dopant dope you up. My sleep pressure on the dress, on the pressure points. And only then this same way, we are going to repeat it again. So since we have marked the pressure points, it's very easy for us to exactly located and then press it. So this is one pressure point and then this is the other one. So I'm exactly giving even pressure on top of it. And then slowly, then last and a beat. With this. Next we move to the next shape. Since we haven't spread to fabric nicely for getting already good, solid here.
12. 12 block printing layer three: So now we wouldn't go to the next layer. That is suddenly one. For that I'm going to make stuff first and then you will start to adopt best thing to do, I guess. Well fig. So Ned's paid, stack and lambda match that door opened up even Nia blood pressure. And then slowly, Yep. And the final most at a beat, that this blue layer. And that's the last repeat Ofwat factor minus 8 dying for applying the paint. It's fine because you're going to get a good result. You apply the paint nicely on the block. Once you match though, designs slide, then you can place the block very slowly. And then once you place, then with your hands, even application of the pressure on the marked nines. Yeah. So now we have completed our back-in by repeating this design.
13. 13 finishing up: Now we have completed our block printing process. Now, let's see how it turned out. So I'm going to unmount it slowly and beyond the moon, all the clips. And I'm going to remove the board and then go fabric. And you remove the fabric slightly, gives some pressure and the nimble. So now it's completed. Well, you can see how the bag, this turned out. For setting the Spain took him mightily, a heat press it from the back side of the leaf. Now see if you see this is third tote bag with the array is simply a German trick Patton. And it's very colorful. S1.
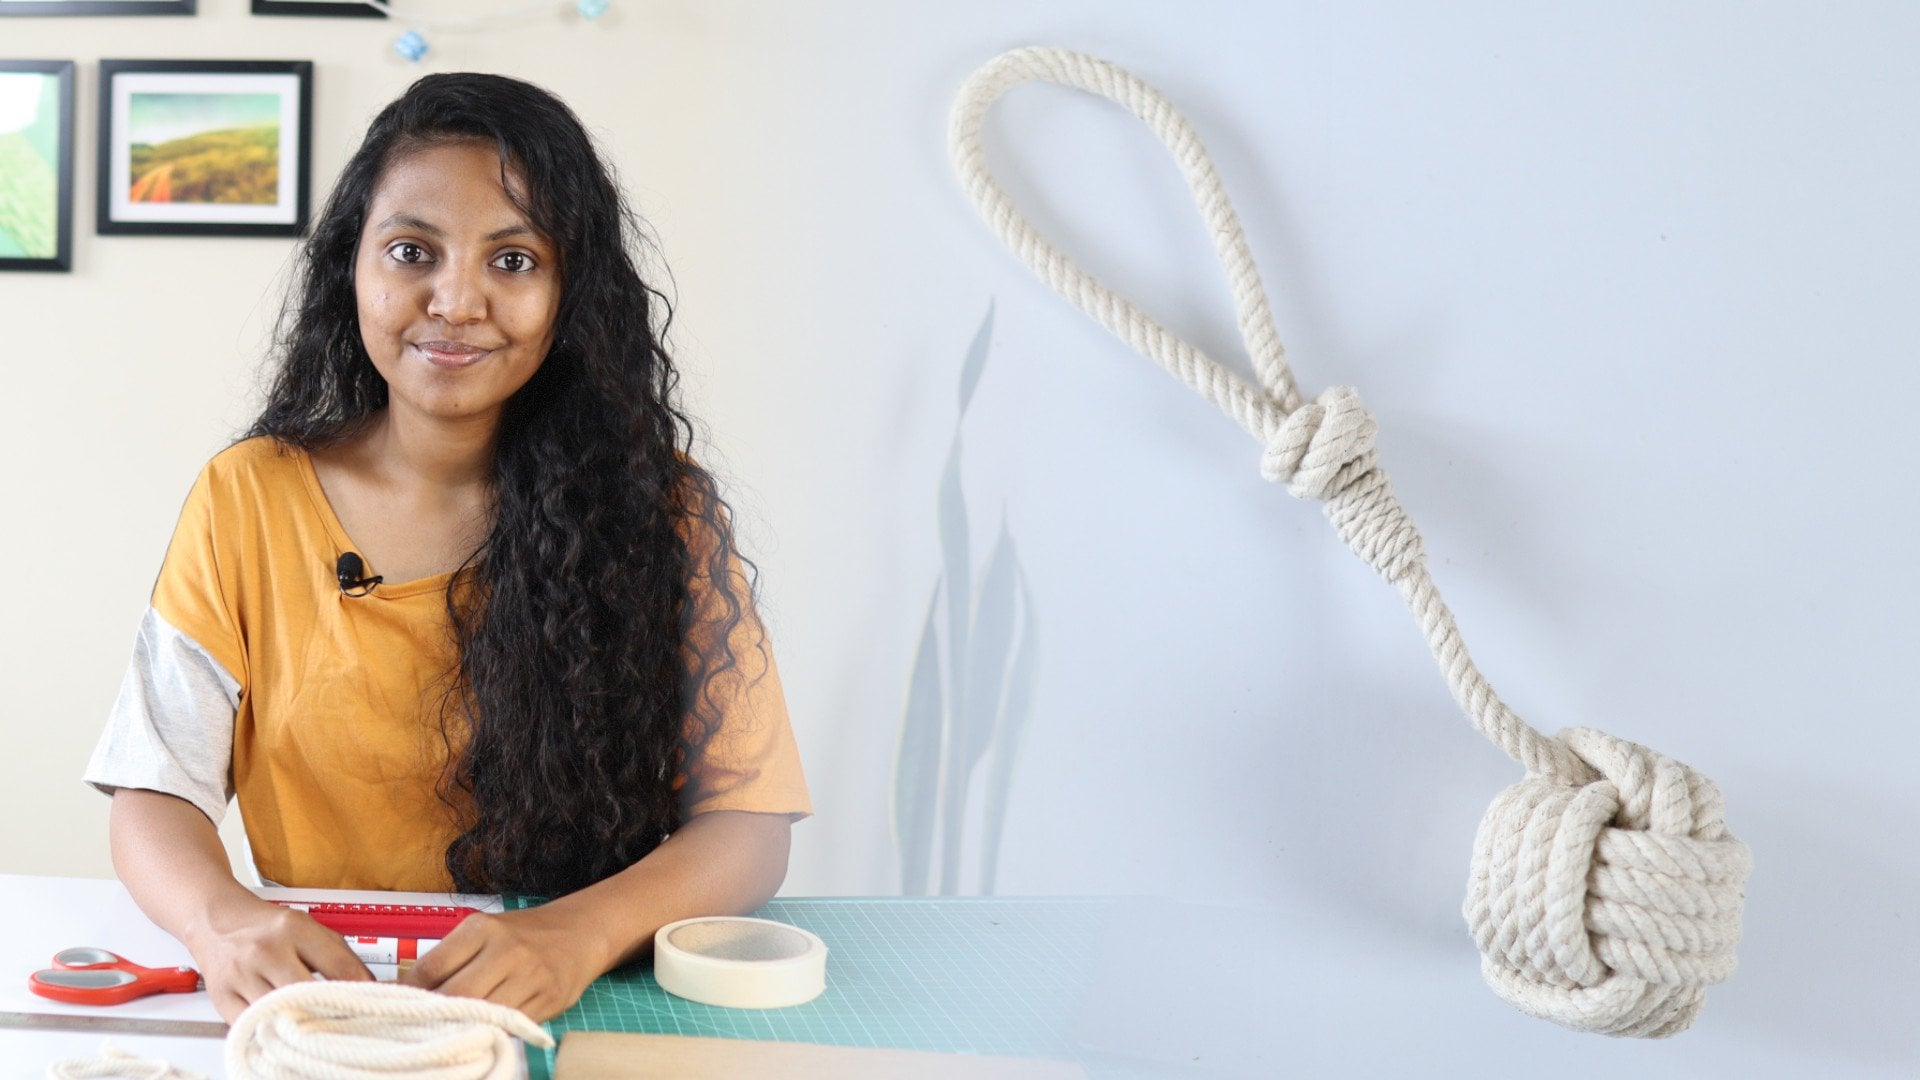
14. 14 conclusion: Now we have come to the end of this class. Here I would like to share some of my thoughts on block printing technique using cardboard. So here, if you see here that I have created different designs as well using the same technique. One of one such example is this Christmas tree. If you see it is a very simpler pattern using this cardboard, It's a mounted cardboard, the similar way that we created earlier. And this is the result I have got. So with this technique, you can create print on paper as well. And this can be converted meter into a product, it can be your book cover or it can be even used for wrapping paper. And here if you see, it is also a very simpler pattern. And this is a small, cute pattern on my ear your phone pouch and while printing on paper. There is one more good thing to be tried with it is that. I've experimented with watercolor paints. So if you see this cute little houses being printed and this is converted as a bookmark. And the same print, I have converted that into sketch book cover of my. In this way, you can create any custom designs of your own using this techniques. It's not really that you have to create your own cardboard blocks, even you can try with any household. Simple objects like this rope. I have tried a block with this rope and I have simply taken like a doughnut shape cardboard. And I have winded this rope all around, and this is the result I have got using this kind of block. And also one other example is that I have tried with match sticks. So if you see this block, this simpler geometric version of a Christmas tree with simple lines, these lines are achieved using these match sticks. I have pasted the match sticks on top of this cardboard. And this is a print I have created, so in this way, you can create any kind of designs on your own using household objects as well, I would love to see what you've created using these techniques. Finally, share your images and thank you for joining in this class, will meet you soon in the next class. Bye.
 Cloudia David, Co-Founder | Entrepreneur | Designer