Transcripts
1. Introduction: Small ambient
lights at home look beautiful and enhances
the mood completely. The use of simply mediates. I lose everyone to make such
handmade products that I add a personal touch to objects that are a part
of everyday life. I don't do it. I'm Claudia. Join me in this class. I will show you how to make paper desk lamp using simply
paper folding techniques. I have used simply techniques
to graph this desk lamp. So you won't need any prior knowledge or
expedience in people grafting. If you like creating
things by USMF, then GI know and next meet one.
2. Materials Required: The materials required
for this project. A4 size paper, 150 GSM, two numbers, scoring tool. Three MM macro made, got 60 centimeter length. Mm macro or cotton cord. Do MM cotton or Jude god
of 50 centimeters length. Paper cutter, cutting mat, who don't know it off
approximately 12 inches lint, LED bulb, socket and
bled connected glue, scissors and single hole punch.
3. Understanding and Cutting the Template: In this video, let's
see how we can use the template that I
have shared with you. If you'll notice the template that I had three
things to be noted. First is the red line, that is the border line, that is the Catlin. And the second one is
the green dashed lines, which is this coordinate. If you notice on the two sides, there would be a low
coloured solid blocks. That is for the flap. This will be used for attaching two sheets of paper for
this particular design, people required to A4 sheets. I have printed then
on my A4 sheets. So now let's see how we can cut them and start with
the scoring process. I'm going to cut
on the red lines. I'm using rulers and paper
gotta, for cutting them. I have placed the ruler just
on top of the red line. I'm gently using my paper
cutter and cutting them. Final Cut. This similar manner, I have got the other sheet SQL. In the next video, let us see how we
can score them.
4. Scoring the Template: In this video, let's
see how we can score for that and using a
ruler and scoring tool. So before we jump into
the final template, women cried with a similar paper that we are going to use for the financial lamp shade that
I have taken a small paper. For scoring. We have to
place the ruler exactly on the line and gently give pressure and slide
the scoring tool. Notice here, we have to place the ruler on top of the line. Gently. Slide the scoring
tool on the line. Now we have made this code. Now, in this way we have
tested the score line, how it is working on
this paper like this. We have tested these
coding on this paper. So now after main test
with this coding, we can move to the
final template. You'll notice define a template before deadly excluding on it. Let's observe the
scored lines here. If you notice there are vertical dashed lines,
diagonal dashed lines. These are the vertical
dashed lines. And these are the
diagonal dashed lines, which is going from left to
right and right to left. And also you can
notice here that our lines in between
the triangle, the center of triangle, which is not connected, and the Arad, it
discontinuing the other side. That is, it starts from
the top and ends here. And then it can again starts from this point and
ends at the bottom. Once we notice these lines, it will be very easy forests to get started with
scoring process. What I'm going to do right
now is I'm going to go pay the vertical
connected lines first. Then I will go with the diagonal lengths from
one direction to the other. And the next set
of diagonal lines from this direction
to this side. So in this way, we will not get confused
while you score. And finally, we'll be doing
the incomplete lines notice, which is not connected from top to this point and this
point to the bottom. Let's get started.
When you score, make sure that you will give consistent pressure on
all the scored lines. First, starting with the
vertical connected lines. In this way, we can speed
up the scoring process and also we will not
leave any lines score. Now, let's start with
the diagonal lines. Now. Start with this diagonal line starting from the
other direction. Now if you'll notice, we have completed all
the scored lines, except these lines on the
top and on the bottom, which is the midline of the triangles on the
top and the bottom. Now let's do that. How we can do that in a very easy
and efficient method is we have to place a ruler since this
is a straight line, but it is not connected. So we will align the ruler
on top and the bottom. And then we will use
this coding tool. Slide it over this
line and n cubed. And we would start
here at the bottom. Let's repeat that. Will align the ruler first, and then we will score
on only those lines. Now if you notice
we have completed the scoring process
on one template, the similar method we will be doing on the other
sheet as well.
5. Attaching the Sheets Together: In the previous video, we saw how we can score the
template in this video, let's see how we can attach
two sheets together. For that. I have taken these
two sheets snake this, and I'm going to use simple white glue for
attaching them together. Now, we are going
to fold this flap. This since we have already
scored on delaying, it is very easy. We just have to give a
little pressure using thymus and then press
it towards take this. Once this is done, we are going to
apply glue over here and then simply
attach it like this, matching the top and the bottom. And to get them. Let's
apply some glue. Manual apply glue mixture. You will spread it evenly for that as
simple technique is, you can use the nozzle of t, a blue bottle and
just spread it along. Now I have applied the clue, am going to simply match
the ends like this. We attaching the
templates like now is because after we fold it will be difficult for us to attach these two edges together. So this is attached. So we have glued them together. Now, let it dry further away. Let's allow it to
dry completely. Because then only we will get a better results while before, while it gets day. And let us see and understand
what are the full lines. If you notice here, there are triangles on
top with a midline. The same languages
carried out here as well. The bottom and the next is a diamond shape
with a center line. Now we folded, we are
going to use to foods. The first one is the
mountain for it. And the second one, the c value food for understanding what is
mountain and valley food. If you fold the paper like this, and if the folders
like this towards you, then it is called
Mountain fault. Doesn't a sheep. If you fold a paper in the reverse direction
that is like this, v-shaped, this is
called value four. We are going to use these two folding
techniques to define which line should be in mountain foot and which line
should be in the value for. That way, we can define a shape and completely
lamp shade.
6. Folding the Lampshade: In this video, let's see how we can start with
the folding process. Before we directly jump into the folding of final template. Let's see a quick example that how we are going
to fall. For that. I have taken a sheet
of paper that, and also there are some
scored lines on top of it. So the first step of folding, what we are going to do
is we are just going to fold on all the scored
lines that we have created. What I'm going to
do is I have 1234. There are four lines over here, so I'm just going to fold on all the scored lines
that I have created. This is the first step where I have folded on all
the scored lines. The second step of folding
will be defining defaults, whether it's a mountain
or a value food. Here in this case, I'm going to make this
as no value for sine, going to define it like this. If you notice, I'm going to define this as
well as a valid food. This is the two-step we're
going to use when we folder. First, we are going to fold
on all these code lights. And the second process we
will be defining the folds, whether it's a mountain
or a value food. In this way, we can get
a very neat folded. Let's get started. First,
I'm going to start with the diagonal lines or lower from this end to the other side, I'm just going to
fold these nines. Since we have already scored. It's very easy for
me to fold it. I'm just going to fold
on all the lines. Slightly. New folder on the scene. It will be little difficult. You can gently press over
there. It will be fine. Now. You're just folding on
all the diagnosis ninths. Now we add finished
towards one row of lights. Let's start with this side. Just for the paper and
give a gentle press on this edge. Folded nicely. This just folding on all the diagonal line
from this direction. It's very simple to fold because and this is
good line already. Now the diagnosis at who work. Now let's go with
the vertical lines. Just folding in one direction. Later on we are going
to define whether this fold should be in this direction or it
should be inverted. Now if you'll notice you
have finished that as well. Now let's define these
top ones like this. Now, we have simply folder on all the scored lines that is well-connected all
over the template. The next step is we are going to define the foods. For that. I'm going to start our
start with the top. If you notice in this template, the top and the bottom
are very similar. So whatever language
we are going to carry out on the top will
be for the bottom aspect. Defining it from the top
triangle with a center line. With this center
line, this endpoint, I'm going to pull them
towards like this. Make the folder. Notice how simple it is, just holding on
the top end point. And then I'm just
folding it like this. This similar way we will
do it on the bottom. This is the reason why we folded all the diagonal lines and
vertical lines before itself, because these are
the lines which is connecting these points. It is also helping us do fold in this week and very easy method. Now we have defined it. Now let's start define more. That is, this center line of the diamond shape should also go and say that
this value for it. So I'm going to define
that as well. Like this. If you notice here in
this diamond shape, we don't have any
lines in-between. It will be a little
tricky to fold here to retain this
end without any Ben. For that, we have to do it very carefully when it
comes to this point. Let's hold here. To
define the fault nicely. I'm going to keep
folding that way. I'm just taking the points in Word Perfect. Now if you see it can hold
all these points together, forming the shape that we want. The similar method we are
going to do it the bottom. Let's do it very gently. So what we are
doing exactly as we are holding the center
line of this triangle, the diamond shape, and
pulling it inward. This making a valid form. And also we are giving
some support here to make the fold
cleaner and crisper. If you notice, you can see
how I'm doing the support. I'm giving you a gentle pressure to meet default,
clean and crisp. So then it would be some lines where we have to give pressure. It will happen automatically because that's the trick
that we have used earlier, that we have scored it nicely. Yeah, perfect. You
can notice here, this is what will happen. So during that time
you just have to give a very mild pressure.
It will be all right. Now we have folded the
lamp successfully. In the next video,
let's see how we can glue them together
and complete.
7. Glueing the Top and Side: In this video, let's
see how we can attach the two open edges. Let's apply some glue
on one side of the flap and then spread it evenly. Perfect. Now let's join these together. Matching the top, this top. Slowly, Lewin till the
bottom of the edge. Let's give some gentle
pressure and fluid together. Now, let's allow them
to drive further away. Once it is dry, then we
can go and load the top. For the top, we
are going to apply glue on the sides
of these triangles. This on either one side. And then we will hold all these, bring it to the center. Make this, in this way, we can join them. For that, we have to
start a plain blue on one side of the triangles. Here. I'm going to apply glue. When you apply glue here, you just have to apply
the glue on the edges. That is the border
of the triangle. First, we can apply glue on all the triangles and then
bring them together at once. Once you finish applying glue, you can slowly
hold all the ends. That is all the end midpoints and then push them together. See, yeah, perfect. Now we have to hold
it for a while till it dries a little bit and
then we can do more hands. And then this can sit and stay for another five to ten minutes. Then we can continue
with the next process.
8. Closing the Bottom : In this video, let's see how we can close the
bottom of the lamp. Glossing the bottom of the lamp. We're not going to use glue. We're going to use this
code you'd got for that, we have to make these triangles. Why we're doing this instead
of pasting with glue because we will have control
over the bottom lock. That is, if you are placing
on any light source, we can tighten it as we want. In that way we can control
the locking mechanism. Let's make calls. Here. We will be making
holds on the transits. Each hole will be there in the center of these strangling. One here, one over here, and one over here. In the similar way,
we will be making holds on all the triangles. Let's start not marking any, anything, any point
or something. I'm just making hole. You're approximately
in the center. Once we make the hoods, we can insert the Jude caught
then tie them together. Yeah. Perfect. So now we can insert the jewel
code like this. For that. I'm just going to insert it. When you have these
kind of problem. We can just apply glue, some glue on the
tip of the Ute got. Then we can just lock
the end like this. Then it will be ready. You see photos to insert
Andy points up with these. See how effective this. It will add a temporary
needed for us. Because we have a blade blue, which will make the
code ends default. This way we can just pass the code on all
the holes like this. From here. Let's insert it again. From the site. From inside to out. I'll find a nice
weekend Exit here. Now, you'll notice
if I will tighten this book entitled The Lamb, not adhere, we can lock the
shape over here like this. If I wanted a little
bigger than I can make, like an egg can loosen it
a little bit unlocked. You're in this way. We can mount it on top
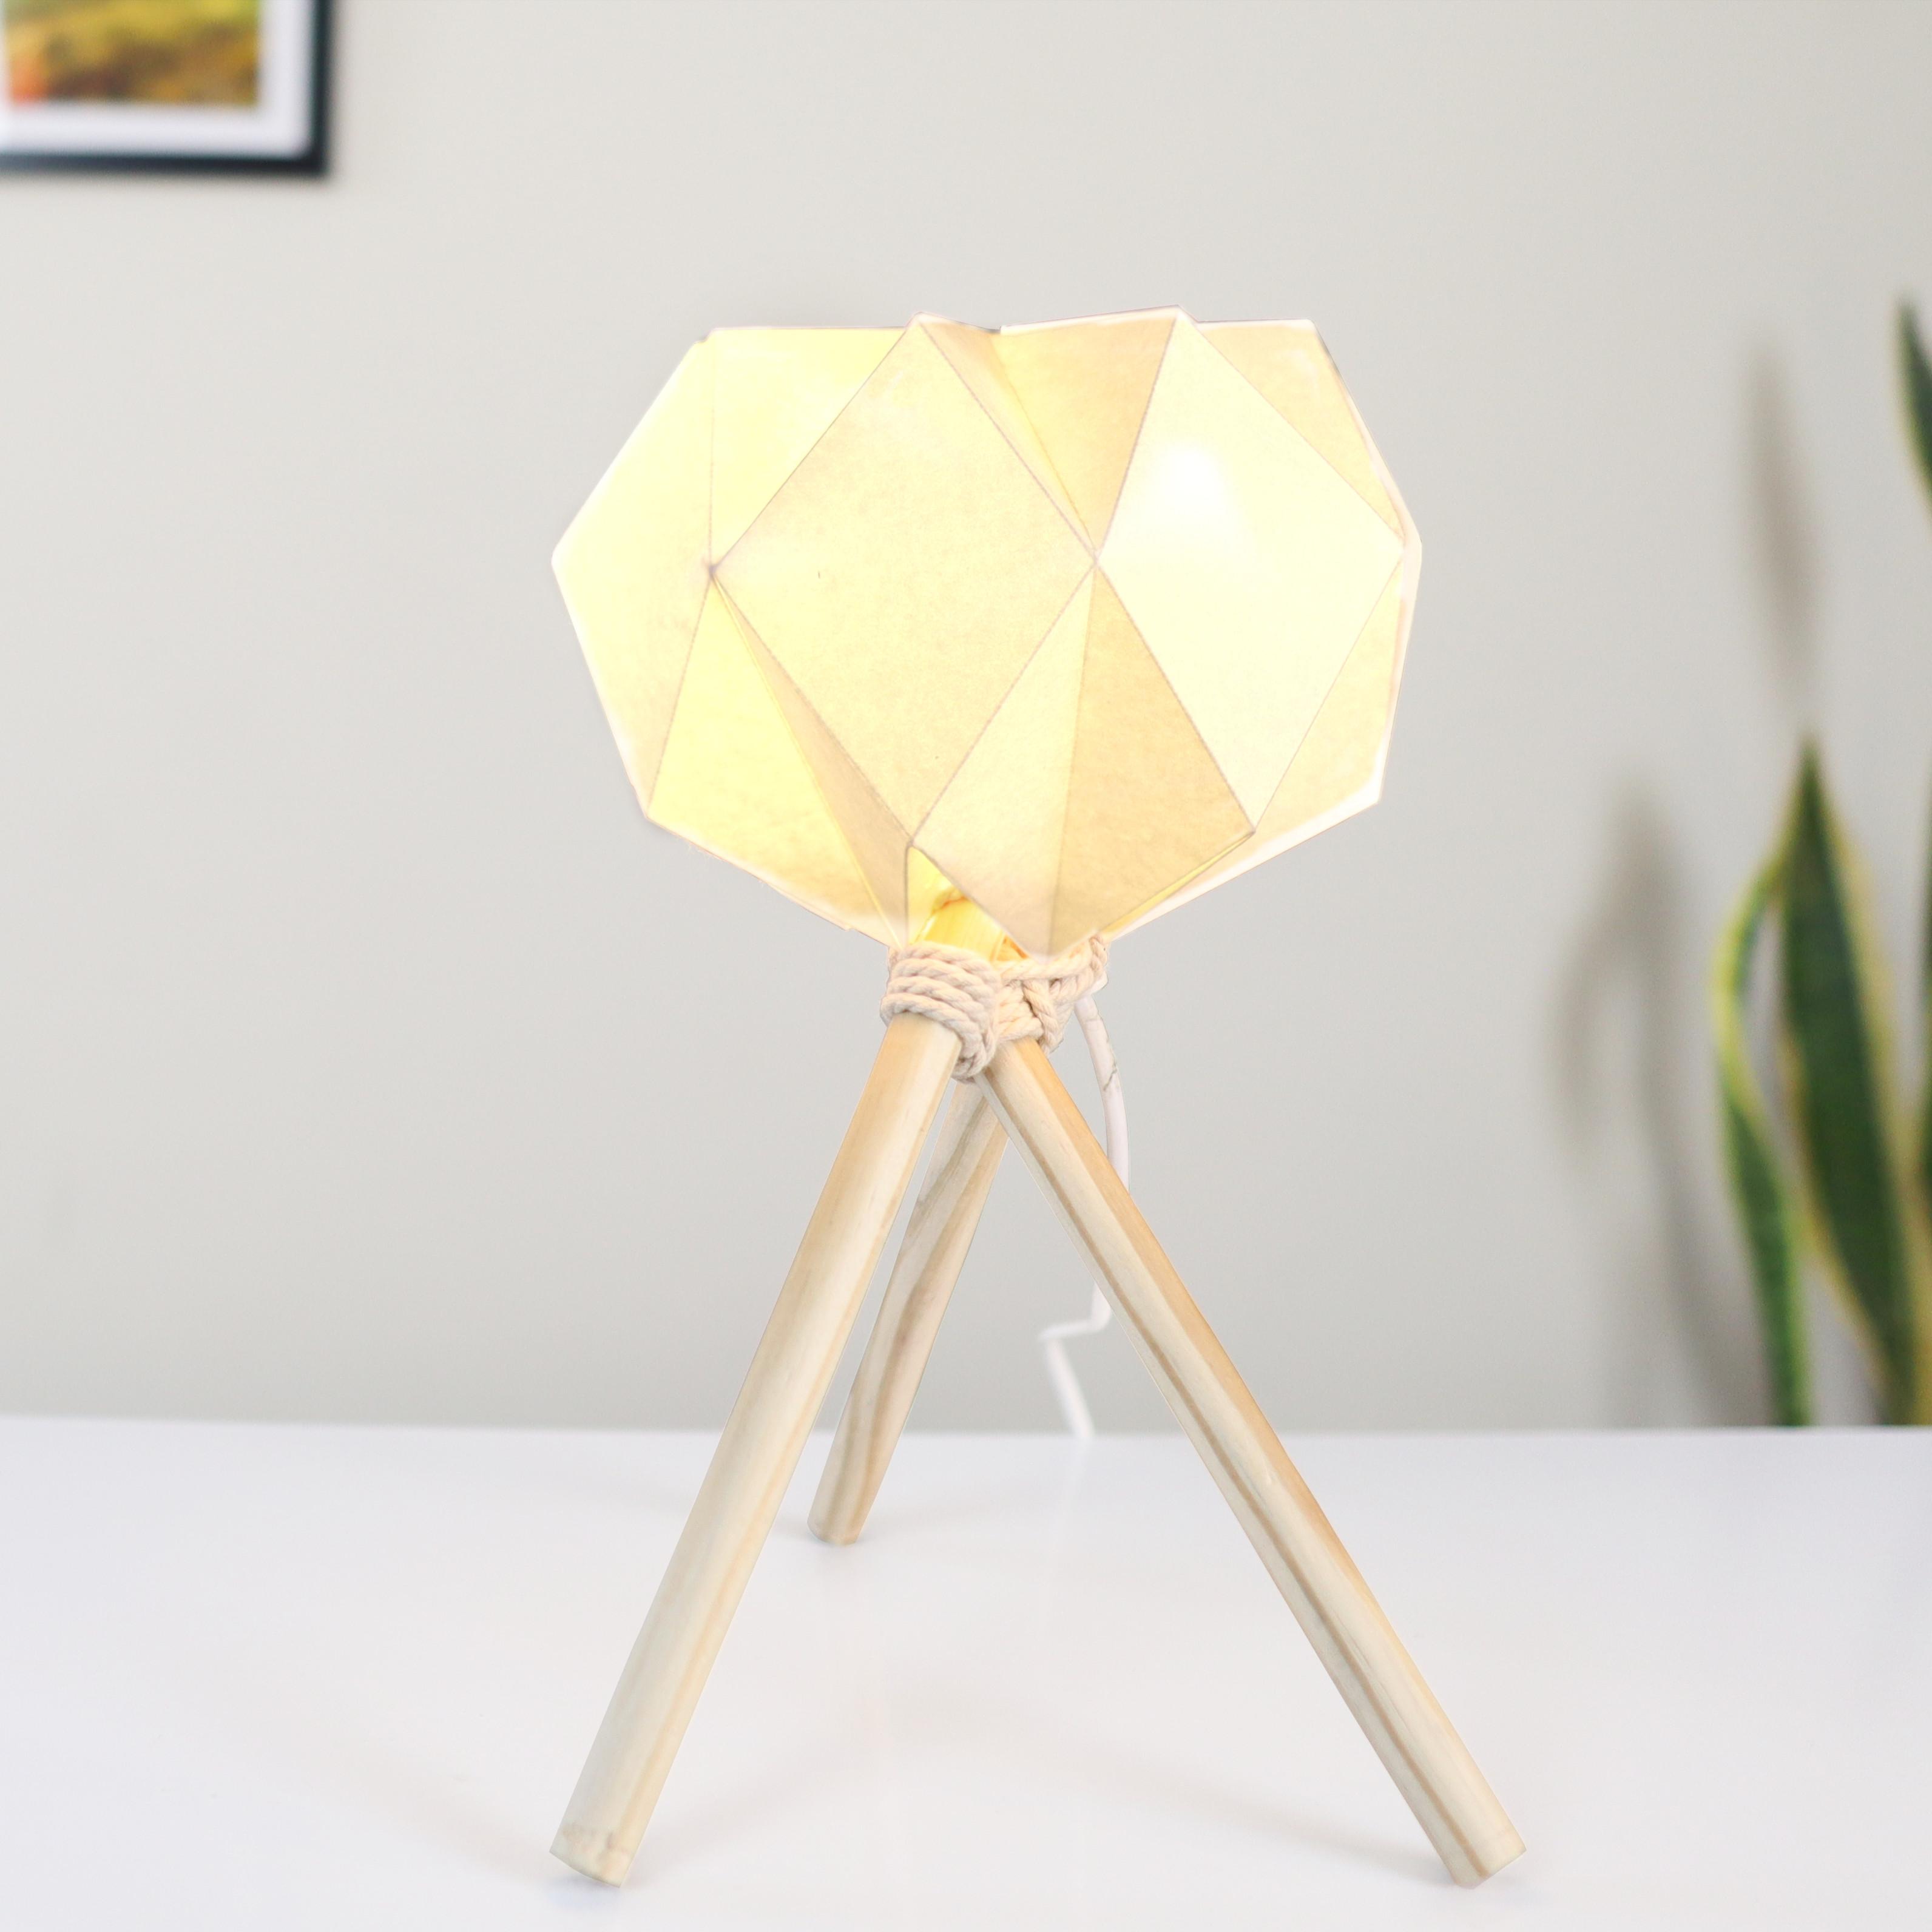
of the light source. Next video, let's see how we can make the tripod for this.
9. Making a Tripod for the Lamp: In this video, let's see how we can make the tripod
for the lambda. For that I hadn't taken
within three numbers and 12 inch length and
macro McCord 3M on thick. First-time going to take one. And then not at over here. Like a simple knot. Make this, if you're using
macro McCord like this, then make a simple node at
both the ends like this. And the second one, I'm going to place it over
it like this, over the code. And the third one I'm
going to place it under. Now, we're going to
do windy cold on these three would then
tell it's alternatively, like I'm going to take this code under this word or
this second one. And under the first one. Like that. Let's go again. Over the first one, under the second one, and over the third one. Again. We have to repeat
this for four days. Under the last third one, over the second
one. The first one. You can just put them together. Now let's repeat over
the first one under the second and over the
code under the third. Well, the second and
under the First. In this way, we have to
repeat it four to five times. It can be a little looser, then later on we can tighten it. Now if you'll notice there
are four windings here, 12341234 on all the three. Now we can stop, bring all the loops
together like this. And we can pull it from here from this end so
that it will get tightened. Just hold olive
tree like this and pull the court from this end. Now, the next step is we're
going to take the cord like this and put it in
the in-between leg. We're going to make
a loop in between. I'm going to repeat one
more time like this. The next step is, we're going to do the
same for the second gap. This after the second chord. I'm going to repeat
it one more time. Now we can hold the process, make this, you can
tighten it a little bit. This is the time that we can spread the legs of the tripod. So what I'm going to do
is I'm going to hold the center like this and then
pull it towards like this. And then cross it like this. See from the top, center will be pointing here. The first one will be
leaning on the last one. In this way. We can lock it. Now we can see how the
tray for this form. Now I'm going to
use this exists god and make loop over it. This way. I'm going to turn it on passing all the three Fudan done, we can make one
simple naught here. Just to lock the position. Like this. I'm making
a very simple naught. Now if you see is locked. I just did a little bit. Now this set right time that
we can attach a WebSocket. I have a socket. I have attached
three watt LED bulb, and I have a black connected. So this can be of your choice. So now I'm going to attach
this holder simply like this. And going to make a very
simple tying naught here by using this excess rope
and winding it two times. Holder. If you notice here, I'm going to pass
the code here like this and make a simple node. Now I'm tightening it. Exists codes. We can just connect
it like this and make a knot or tapping any loop, stepping in any loop
that will work because we just have to
hide the exist God. Now we have attached the
light source on top of the tripod that we have
created using wooden dot. The next step is we're
going to assemble the lamp. On top of this. I'm going to just
tighten it little bit. Insert the lamp like this, then make a simple not tiny knot so that we can cut the extra. I'm going to cut
this exists, this. Perfect. Now you saw how we have
mounted on top of this tripod.
10. Conclusion: Thank you for joining
me in this glass and I hope you have
learned something new. Please share what
you have created in the project section and let me know what your thought on
the class leader views. Goodbye and GIS.
 Cloudia David, Co-Founder | Entrepreneur | Designer