Transcripts
1. Introduction: Have you ever thought
of a tool that will allow you to
visualize anything you can imagine so that
you can create any illustration you want in 3D to effectively
communicate your science. Yes. There is one software, it is called Blender. Blender is a 3D animation
software developed by thousands of people over
the span of 27 plus years, and currently being
updated every single day. Unlike other 3D programs, blender has no subscription fee or any other payments involved, which means you can use Blender for even commercial purposes. Blender founder tone, blues, and dial one said
it would remain free for ever. Learning. Blender is a lifetime
investment for any science researcher
or science communicator. This animation you are about to see was produced using Blender. Here you can clearly see the production
quality is top nodes. This means you can do modeling,
texturing, VFX, rigging, sculpting, sculpting, simulations, and video
editing using Blender. As a researcher or a
science communicator. You may not want to learn
all these features, but learning the basics
of blender itself will allow you to make 3D illustrations
for your manuscript, thesis, research proposal,
blog post, presentations, etc. For the past six years, I have been using blender to make illustrations
for the manuscript. Toc graphics generally
cover arts and animations for communicating
scientific research. One of the remarkable
feature which makes blender easy to use is its
user interface. This is the screen that you
see when you start Blender. It is user-friendly
and well organized. What I love the most about blenders UI is it's
working space. You have ample space to work on your 3D models and animations. What makes blender even
more unique compared to other 3D programs
is its community. There are so many people who use Blender for
various purposes. Many are part of
its development. Being a free software. People love supporting
each other by sharing information on
how to use Blender. There are good
learning resources available online made
by the community. Not only that, there are forums where you
can post questions. If you have any problems. While using blender, you will get the solution
within few minutes. Recently, Blender
got a big update. It was updated with the real-time rendering
engine called EV, which makes the rendering
much faster than cycles. Ev will help you to render high resolution illustrations
in few seconds to minutes. Another way Blender will be useful for you is
to make animations. Using animations is a
great way to explain mechanisms and structural
formations, et cetera. You can use them in your
presentations and social media. Not only that, while you submit your research paper, journals, ask if you have any
multimedia files as supporting information
with your research paper. If needed, there you can submit animations for better
reach for your research. Many companies like
Microsoft, Google, indel, Ubisoft, Facebook, Nvidia
are supporting blender. This means you can expect more refined versions of
Blender in the future. The team led by Dr. Graham Johnson at the
University of California even developed an add-on
for Blender called EPM V, which specifically focuses on the visualization of proteins. Other structures related
to cell biology. We can surely expect
more updates on using Blender for
scientific visualizations. In future. In this workshop,
our focus will be on using Blender for making
3D illustrations. I will show you all
the principles, tools, and techniques you
need to create any 3D illustrations in
science communication, clarity is the key to success. If an image can speak
thousand words, you better to have
good images in your writing and presentations. Learning Blender is
the right step you can take to become a successful
science communicator.
2. Fundamentals of Blender: Hi, welcome to the
Fundamentals of Blender. This video will explain
everything that you should be knowing to start
using Blender. This is the screen that you will see when you open Blender. You can see that the version right now we are using is 2.93. You can download
the latest version from blenders website. The link is given
in the description. Alright? Okay, so we
have a cube here. They have a camera here. We have a lamp here. You can see a cube here. If you left-click on the cube, you can select object. And just like that, you can select anything
with a left-click. If you click outside, you can unselect the object. You can see that there is
an x-axis and a y-axis. Let's move this
cube before that, if you use mouse scroll
wheel in and out, you can zoom in and zoom out. Let me zoom in a little bit. I'm selecting this cube. You can see there
is a move to here. Grows arrow, icon. You can select that. Now you can see that
there are three axis. Green axis represents y-axis, blue represent z axis. You can see that here as well. This is called dismal. Right-click on y-axis and
hold and move the mouse. You can move objects like this. Similarly, I can move
in other axis as well. So the shortcut
for moving objects is D. If I press Z and move, I can move objects like this. If I want to move
object along y-axis, I have to type the axis
just followed by d phi d x. I can move objects along x axis. So next option is rotate. You can rotate objects
along different axes. You can see that our wheels, if you click on this
Greenville and rotate, you can see that the object is getting rotated along y-axis. If you click on this, you can rotate along x
axis, just like that. Okay? The next option
is scale view. Click on this scale. You can see that at different type
of axis is shown. If you click on this green
one and move like this, you can scale the object. And if you click
on this red axis, can scale along x axis. So for scaling, shortcut is, you can scale like this. For scaling along y-axis, I have two plus y and
move the white board. So we have seen how to rotate. If you want to rotate,
how to press R, and you can rotate like this. Control Z for going back. Like in other softwares. If I want to rotate
along x-axis, I have to press R x
and rotate like this. If you want to rotate the view, you can click the
central mouse button, hold the button
and move the most so that you can rotate
the view like this. Any object like this. Cube, spheres,
icosahedron, cylinder, etc, are called mesh. So let me explain
that in detail. So if you look here, you can see that there are
four different options. Plus one is wireframe
mode. Click on that. You can see that this is
a wireframe of the cube. If you click on the next option, can see the box. You can see that
there is an option here to add materials in 2D, we use colors for any
shapes and drawing. In 3D, we create materials
instead of colors. We give blue material, green material, read
material like that. If you click here,
you can see that it has a material by default, you can see here a material. You can change the
base color by clicking here and move this. Now you cannot see
the material it is because you have to activate
material preview here. If you just keep the
mouse on any menu, text box will appear. It will explain what
it is used before. Click on that. Now you can
see that it is a red balls. And the next option
is called splendor. So if you click on that, now you can see that
there is a light casting on the cube and there
is shallow here, right? This is how you will get
the final image out of blender that you can see
through this render preview. Alright, so let me
go back to solid. Review this one. Now let's
have a look how this cube is. Click on this tool. Right now, this is
in object mode. You can see here there
are different modes. If you want to make any
changes to this mesh, you had to go to Edit
Mode that you can go by clicking on
Edit Mode here. Or I can press Tab
to go to Edit Mode. You can see various options
to motivate this cube. We can see three arrows here. Right now. It is in
vertex select mode. Now you can see that this
particular cube is made up of eight different vertexes. You can see that in detail if you go to wireframe mode here, you can click individual
texts like this. You can also move the vertex. If you choose this
move tool like this. The next option is to select
them all. Click on that. Now you can select edges
of the box, right? And you can modify that as well. So you will get different
shapes like this. And the third one is
face select mode. Now you can select faces. If I move the face like this, you get different shapes. Let me go back and
rows. We can see all the buttons and mouse
clicks that I'm doing here. If you are getting confused. For example, if I
press space-bar, you can see spacebar here. Alright? So these are the
three Selection Mode, vertex selection
for vertexes and select four edges and
face select four phases. There are different options to change the shape of this mesh. You can see extrude,
option, extrude region. Now, if you move this plus icon, you can extrude out of
the cube like this. Alright? Right now it doesn't
face select mode. That is why I'm able
to exclude late this. Right? So while extruding, I
can scale the face S1. If I press S and scale. You can scale things like this. Alright? This is how you model things. The process of creating these
models is called modelling. Next, let's have a look
at the other option. There is an option
called inset faces. If you click on that,
if you click on this yellow dot and
move towards the face, you can see that an inset
faces for me, right? So if you extrude that, you can see that this
formula like this, I can make an insert
again and x2 again. You have to make sure that
you are in edit mode. So there are other
options as well. You can have a look at those, what they are doing. Some tools are four
different selections. So for this particular
example called B, well, you have to go to Edit Select mode to use that,
select candidates. And you can see that
it is getting better. Right? Let me show you. Select here and few more here. You can see that what
it is happening. Okay, let me go back. I'll delete this. I'll add a new cube
by pressing Shift a. You can see mesh here. Cube here. Let me go back to edit
mode. By pressing Tab. You can have a look
at other options which are used for
modeling light. Whenever you want to
add new measures, you can press Shift a. You can go to Mesh that
have different cylinder, cone, UV, sphere,
plane, et cetera. There are other options as well. And you can see that there are different tabs here
for modelling. You can click go
to modeling panel. By clicking here, you
can go to sculpting. Sculpting is where you
sculpt things out. Like this example. You model things
like clay, right? The mesh will behave like
the next two are nice. Uv Editing. It is for advanced sharing
options and texture pane. You can, you can
paint on measures. There is shading option. You can create any
materials you want. Animation, rendering,
compositing. There are several options, even video editing,
2D animation. All kinds of possibilities. Let's go back to Layout. Let me undo this Control Z. Okay? The next one is
modifiers. You can see. Modifier menu here. This called modifier properties. If I click that, there is a drop-down menu
called add modifier. You can see a variety
of modifiers. For example, first two and if I, Jews are a modifier and
change properties here, we can see that it
is forming an array. If I add that again, you can see that this
getting duplicated. So this is how you create
advanced structures like DNA, molecular assembly,
liquid bi-layer, cetera. If you click on this
and choose for example, CO2 subdivision
surface modifier, it basically small,
dense the mesh. You can increase the levels. Here. Now you can see that
the cube is forming a sphere. So there is a
wireframe modifier. It shows the wireframe
of the cube. If I increase the thickness, you can see that this
forming beaker and you can change properties here. So this is an important tab. This is how the magic happens. There are several
different options. Using this, you
can do animations, advanced animations,
all sorts of things. Learning and getting a grasp of all these modifiers
will take time. So we will be using modifiers
in all our projects. Okay, so let's
talk about camera. If you click on this camera, you can move the
camera like this. If you click 0, we can see
what camera is seeing. This is, this will be our
final output of the image. If you click on this
render preview, we can see that the
cube is there and light is getting reflected,
things like that. If you click on this
camera option here, and you can see a render engine. Mainly there are
two render engines. One is called EV, The second one is cypress, even gives fast
rendered images cycles we will take time cycles, will give you
photorealistic images. We will give more cartoonish
illustration kind of image. We will be using
this more often. And you can see there
is a bloom option. Does, it gives a glow. Let me show you if
I click on this late and go to Properties. You can see all the
properties of late. If you click here, let me change the color of
the Lamb to read, we can see the reflection
is getting changed to red. If I increase the power of
the lamp to 6 thousand, you can see that there
is a glow on the cube. If you click on rental
properties and uncheck blue, that glow will go. There are different
other options. If you click on camera and
go to camera properties, you can see properties
of camera and depth of field and other options. If you go to Viewport
Display and click on this drop-down arrow near composition guides.
You can click on this. And if you look through
the camera now, you can see that there are lines which represents
rule of third. So all these four points, our main area of focus
in any major new combos. An illustration, if
you press 0 again, you will go the camera view. If you want to add
materials to this cube, you can go to
material properties. Add new material. Here you can change all the
properties of the material. If I change the color
of the material, let me change the color of
the lamp back to white. There are several properties. If you change these properties, the behavior of this material
to isolate it will change. The look and feel of the
material will change. You can create any
realistic materials that you can imagine by changing all the properties and adding some other options
called the nose, etc. If you increase metallic, you can see that it
is becoming metallic. So it is not visible much here. So let's delete this cube
and add a ecosphere. You can change the properties
of ecosphere here. If you increase the subdivision, it will become smoke. Right? This is fine. Right now you can see
this grid length. Click on that and
right-click Shade Smooth, that lines will disappear. Let's go back to materials. Let me add a material here. And let's go to Render View. I will change the
base color to red. And if you change the
metallic properties, we can see that it appears
as a metallic ball. Change this back to yellow. You can see it is behaving
as a golden sphere. So you can duplicate any object by clicking on that
and press shift D. I'll duplicate this layer by pressing Shift D and move
towards this direction. Now you can see that the light is getting reflected
on top of the sphere. According to 3 lighting. You can keep a lamp here. With less power. You can keep a lamp the opposite
direction of the camera. With high-intensity. If I look through the camera, you have a nice
lighting on the sphere. I'll pick on this stuff. If you change other
properties like subsurface, you can see that it is
behaving like skin texture. Light is entering inside the material and
getting scattered, became like organic texture. Me go back and you can experiment with
all other properties. Play reduce roughness. More light will be reflected. If I increase roughness, it will appear as
a rough surface. And I can add light emission
to this by changing this emission to blue. For example, light
is getting amateur. If I increase the intensity to, for example, you can see that
more light is coming out. So that's how you add materials. If you want some advanced
artistic materials, you have to go here and
go to shader editor. And if you scroll
in, you can zoom in. You can see two nodes. So this is the final output. So this is the properties. All the properties are
connected to the final output. I can add more
properties here and connect to this as input. If I press Shift a, for example, add color mixed RGB node here, and connect that color
to this base color. And add one more node called
texture, shift a texture. Voronoi connect this, dispense
output FAQ on output here. And click on this color one, choose one color, and click on this color to choose
second color. You can see at texts there is forming on the surface
of the sphere. Right now. If you change the properties, you can change the texture. There are, if you press Shift a, you can see several
options. By connecting. Or those systematically, you can create any type of
material you want. Now, you can see a
outliner window here. You can see all the objects
within the scene here, you can select it by clicking
on the object you want. You can put a set of objects,
objects into collections. All these objects are
in one collection. If I add new collection
by clicking here, I have new collection here. For example, if I click on this ecosphere and
click on this icon, duty not be visible here. If I click on this camera icon, it will not be visible in
the final render image. Right now I activate
those two and back. Let me draw a couple of
things about lights. We have 3 lights here. If you click on one light
and go to light properties, you can see that
there are options to change this lamp to Adrian
and now it is an area lamb. If I increase the size, you can see properly. Now this is an area length, like a light panel. It is casting light
in this direction. Let me change this
also in a GLM. Now it is lighting
in this direction. I can rotate that by pressing R, rotate that along y-axis
here by pressing R, Why? Like that. And along z axis, like this. And move a little bit. Now it is casting light here. It may increase the
size of the light here. Okay, Now, if I look
through the camera, you can see that the
backlight is forming a white edge around the border. So I reduce the intensity
little bit back to them. I think that is too much. Let's choose 3 thousand. And you can save this file
by going to File Save As. And you can import any new
object by going into embodied. There are different
file format options to add images as planes, x, 3D, protein, data bank, etc. Blender was developed
by so many people. So some people will develop some add-ons and extra feature to blend them on their own. Few of them are integral
part of the blender, which you can activate by
going to the preferences menu. By clicking here, go to
Preferences and click on Add-ons. You can see several. The extra add-ons that you can activate by
clicking like this. Okay, let me go back
to three 3D view port. Now how to take final
output from blender? You can do by going to
render render image. So we have an image here. You can save that
by going to Image, Save As the stop. My first two. Okay? Now here is my
image on the desktop. Now you can see the image
has come out nicely, but it has a gray background
that you can remove. By going back to Blender
Render properties. At the bottom you have an
option called refilling. Click on this drop-down arrow
and check this transparent. Now, the background has worn. Whenever you want to make
a 3D image like this, for example, molecular assembly or some bioelectrical structure. You may not want to
have any background. You want to choose this image assets in
PowerPoint or Word document. So this will be a
useful feature. Now if you render, you can see that there
is no background. You can save this. Right now you are looking
through the camera. If I zoom in and out by
using the scroll wheel, you can see that the
camera is moving along. I can freeze that at that
position by going here and clicking on this view by
taking this camera to view. Alright. So another point
about camera is you can change the render
engine from the V2, cycles it so it will be
lit with slower cycles. Work on the principle like it is calculating each
rays of light is traveling through the
scene and how it is bouncing off of the surface of the object and how it
is getting reflected and all those calculations
are being carried out. So that's why you can see that all these light dots
are appearing slowly. But EVs calculated in real time. It is not a realistic
calculation, but it is a more kind of
catatonic style illustration. We will be using that
for us most of the time. One of the happy thing
about EVs, it is much, much, much faster than
say, Okay, that's all. If you click on an object, there is an arrow here. If you go to Item, you can see all the
properties here, but you can change the
location like this as well. If you click on one
x value and more, most right and left,
you can change the position like
this, just like that. And you can change the
scale also like this. And you can see
interpretation also here. So all the basic features
of Blender we have covered, I think that's enough
for you to get started. So now you know how to
add objects in the scene, how to put to model things. And now you know how to add materials and how to
change your views, how to change the render engine, how to change the
location, rotation scale, how to make adventure materials, how to take output,
final rendered output. Alright, so that's all. You can start your
first project. Thank you for
following along this much. I wish you all the best.
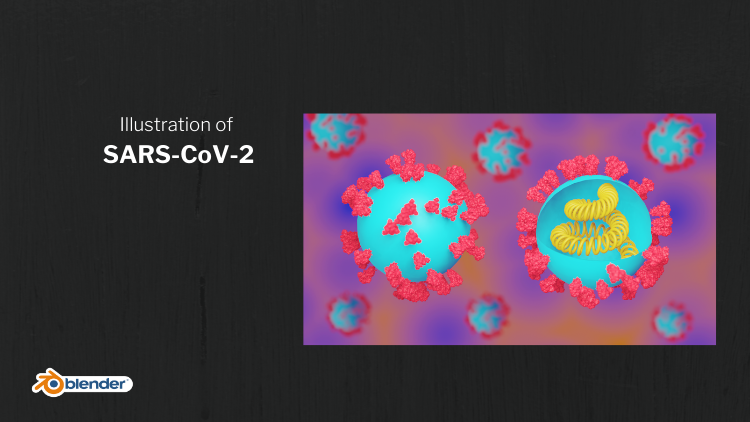
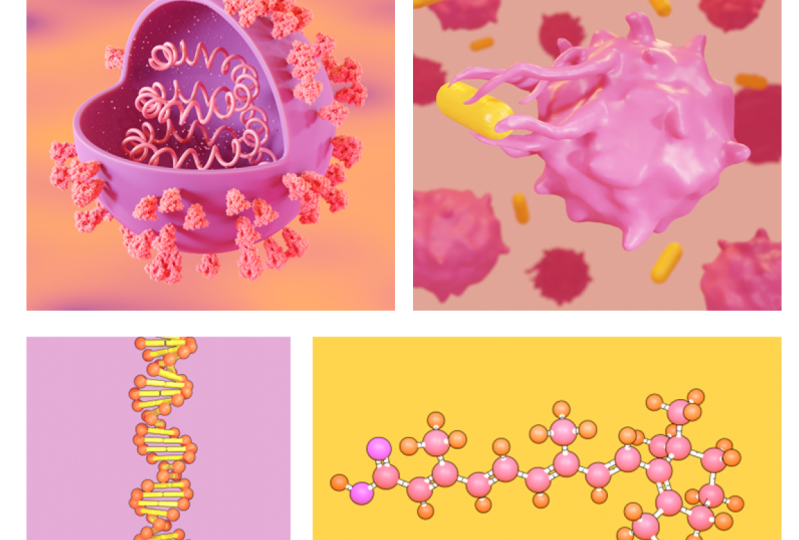
3. SARS CoV 2: Hi, Welcome to your
first project. In this tutorial,
you will be making 3D model of sars CoV-2, the corona virus particle. Before we start
modelling coronavirus, we know that virus has spike
proteins on the surface. How can we get the 3D model
of the spike protein? Let me introduce
Protein Data Bank, the open access
Protein Data Bank, BBB serves as the
single repository for 3D structural
data of proteins, DNA, RNA and their complexes
with small molecules. This is how PDB will be useful
for us in simple language. When a lab finds the
structure of a protein, they will be publishing
the structure on PDB, which you can
download as PDB file, which can be imported
to any 3D programs. In our case, we'll
be using Blender. We can open the PDB file in camera and modify
according to our needs. And then export file from camera and import
that into Blender. Alright, so this is the website which is called
Protein Data Bank. You can see the
utterances are CSB.org. For every protein, there will be a code which is called PDB ID. For example, you can see
that there is a molecule highlighted here as
molecule of the month. If you click on
that, you can see that there is an
entity called PDB ID. So this is the ID we will be using to import
proteins in camera. Here is an article
from PDB which discusses the spike protein and a receptor protein in which the spike protein
goes and binds to. So if you are dealing with some proteins that you are interested in or
you are working on, you will be getting the PDB id from the research
paper related to that. You can have a look at the supporting
information, et cetera. So it will be definitely
mentioned in that pepper. This article talks about sars CoV-2 spike protein in detail. You can see the PDB
entries are listed here. So we can click on that. So you can see structure of the sars CoV-2
spike glycoprotein. So all we want is
this code is six. So we have a
reference image here. We have a virus particle and a virus particle which shows the cross-section
where RNAs shrunk. Post-reform lips open Camera. Go to File, fetch by ID
and type that PDB ID here, six, VII, IX, X, and click on Fetch. We can see that for
tin is going on, that data is being
downloaded from the PDB website all at how beautiful is this?
This have a look. You have the 3D structure
of the protein here. So v1 surface structure of
this protein go to Tools, higher-order structure
multi-scale models. And here you can
change the resolution to four and click
on make models. So we have a surface
representation of the protein. So right now we can
export this structure. Go to File Export scene
and change the file type to colab dot d a plus
two ion bike protein. And I will say in the drape, say, right now, we
can go to Blender. So now what I'll do, I'll
import that structure inside Blender or delete
the default cube. Always remember to save the file when you're working in
Blender. Go to File. So as you can see, whatever keys that
I'm pressing here, if I am pressing V, You
can see that whatever I'm doing with the mouse
as well as keyboard, you can see here, if
you get confused, anywhere, which key I did press. Okay, I'll delete
the default cube. Now, we will embed that
protein structure. Go to File Import collateral. Go to where did you
save the protein? Spike, protein dot
da in bold color. So now the structure is so big. You have to zoom out a
little bit by scrolling. Most will back. You can see that the
structure is here. Alright. So beautiful. So what I'll do next, reduce the size of the
protein is now too big. I will click and drag, select the protein
and press S and move the mouse button like this so that it will
be scaled down. Now the size is small, which we can handle
relatively easily. I'll scale it down again
and move them all straight. Now we can see our camera
in late this year. So the protein is in the field. So I'll save control
S. Now you can see that the protein has imported
as separate domains. So what I will do, I will join them together, click and drag, select plus shift, and click on one protein
domain like this. Now you can see that it has a selection press
Control J or Control J, so that it will be joined. Now, if you click and move
this by using Move tool, here is the axis. You can move wherever you want. So V1, the axis to be at
the base of the protein. So we will be placing this
protein on top of a sphere. So we want the origin of the protein at the
base of the protein. So what we will do here is I can call the
cursor, click on that. So you can move
cursor like this. Click at the bottom of
the protein like this. Now, what you have to do, go back and click on select box. Right-click on protein,
go to set origin, origin to 3D cursor. Right now we will be
moving the origin to 3D cursor that we have placed at the
bottom of the protein. That now if you select on the protein and
click on Move tool, you can see the origin has more at the base of the protein. Okay, I'll move this side. Now we will add a sphere, a mesh UV sphere. Okay? Next we will add a
particle system. You can see here there
is a particle system. Go there and click
on this plus icon. And V1 hair particle
system or light. So the basic idea is when
you click on this hair, you can see hair lines going from the surface
of the sphere. So we will replace all those
hair lines with our protein. That is a main idea. So right now the
number of the hair, you can adjust here. I will change that to 50. And you can change the
length of the hair. I will change that to one. Now, if you go down and
go here at the render, you can click on this
drop-down arrow. There you can see
a render S change that from part two object. Now, there is an next option
called instance object. There is an eyedropper tool. Click on that eyedropper
tool and click on this object. Right. Now you can see that all those proteins are on
the surface of the sphere. So now it is more,
we can increase the size by increasing the
hair length like this. Okay? So what we have done, we
have replaced all those hair with an instance object here, which we chose with
the eyedropper tool. And all those higher pair
particles were replaced. Now, we want all
those particles to stand but perpendicular to
the surface of the sphere. For that, you have to check
this object rotation. Now what just happened if
you go to wireframe mode, you can see that all the
proteins has gone inside. We want all of them to
come outside, right? So whatever changes we make on this protein will be
replicated there as well, right? So what you can do, go to edit mode by pressing
tab and go to wireframe mode. Click here. Or if you press Z and you can
choose wireframe here, or you can click here. Now I want to go to top
view by pressing F7. Or you can go to View, view, Viewport. Okay. Now we know that
our origin is here. We can see a yellow dot. With respect to that origin. This particle is being
replicated on top of the sphere. By just rotating the whole
sphere around that origin. We can solve the issue. So drag select this
mesh like this. Now go to this Rotate tool and
rotate along X6 like this. In 90-degree. Right? Note the origin is here. If you press D, you can move the
protein like this. You can place like this, or you can move with this, move toward more like this. And if you zoom out, you can see the magic happen. If you press tab, you will be going
back to object mode. Go to Viewport Shading
mode by clicking here or Z and click on Solid.
Okay, That's all. We have a virus particle. If you click on this fear and right-click and click
on Shade Smooth, all these lines will disappear. Now we have a smooth
virus particle or light. And if you want to increase
the size of the particle, you can click on this virus and go here and change the number. Like this. I will choose Sandy. And you can change the size by adjusting the hair
length, etcetera. All right. So that's all. And what we will be doing next is we'll move this
protein to a side. We'll color this protein. Click on this protein,
go to Material tab. We have a material
already clicked. Change the base color
from white to maybe read. You can go to material preview or change material preview. This is the easiest way to do. Then you can, by holding z, you can change from Brenda
review material view, wireframe view or solid view. So this is the easiest workflow. So you can go to material preview
right now so that we can see the color
of the material. Okay, so I'll add a color
to the virus shell as well. Add a new material, change the base color too. Okay. So now you can move
this protein to side. Now what we'll do, we want to show the cross
section also, right? You see here, you can see
a cross-section for that. What we have to do click
on this virus particle. Go to side view by going
here, view, Viewport. Left. Now we are
viewing from the side. If you want to ban the view, you can go here. You can see an a hand click on that hold and move the mouse. Then you can move
the view like this. Alright? Or otherwise there
is a shortcut. You can press shift and
central most button. That is the shortcut. Okay, so now we want to cut
this much from the sphere. So now we'll cut the one
by fourth of the sphere. Before that, we will duplicate this virus particle to show the virus particle by clicking Shift D and move the
mouse to the side. So now you have one
more virus particle, which we don't make any changes. So we'll work on this, click on this, go to edit
mode by pressing tab. Whenever you want to make
a change dimensions, you have to go to edit
mode by pressing Tab. Or you can go here, object mode, or you can change
that to plus ab. You can go to wireframe mode by clicking here or pressing Z. Then choosing wireframe mode, I'll zoom a little bit so that you will
have a better view. Okay? So now click and drag
select, like this. Okay? So I'll repeat
again. You can see a horizontal center line
and a vertical center line. I will select the point just
above the horizontal lines, just to the right of the
vertical center line. So click and drag, select this. And now you have selected
all this red vertex points. Click X. Jews were pieces. So you will delete
all those points. So if you go back to object
mode by pressing tab, you can change the viewport. Viewport shading. Now you can see a cross-section
of the virus. Now, let's look through
the camera by pressing 0. I'll zoom in a little
bit by scroll wheel. Now, I want to freeze the view of the
camera in that angle. For that, I will go here in this small arrow. Click on that. You'll get the open
menu like this. Go to View, camera to
view under view look. Now, if even if you
zoom in and zoom out, the camera view will be
remain constant that okay, now I'll click on
this cross section of the virus and rotate along z. The exits are here. And choose this virus,
full virus particle and move along the y-axis. And move this just to the right. If you want, move very quickly, you can press Z and you
can move like this again, plus D and move this. Okay, I'll save the
file control tests. Now what we want is an
RNA strand that you have to activate
an add-on, right? If you go here in
this drop-down menu, you can see preferences. And if you type extra
in this search bar, you can see two add-ons. You have to activate both of
them by checking these two. Alright? So you can add several kinds of meshes
and objects in Blender. So let's go back to
our 3D view port by clicking on this gear icon. Now, if you press Shift
a and go to curves, you can see profits. There. You have to
choose torus or light. Now, you should not click
or change anything. What do you have to do
without doing anything? You can see a small menu here. Click on this drop up arrow. You can see a big menu here. What you have to do right now is if you change the settings, you can see the changes. Night. So if you increase
the number of turns, you can see that it is
forming a spiral structure. Don't click anywhere.
If you click, you won't be able to
make any changes. From that. If you increase the
height per cycle, you can see that it is
moving up and down. So you can increase the
height a little bit. And you can increase the steps. And you can increase
the soil in Greece. Number of cycles like this. Okay? You can see an
option of increase of radius if you change that, you can see that it is
changing like this. I'll reduce the
inner radius like this. Yeah, this is fine. Now you can click here and go back to object mode
by pressing Tab. Now you have RNA lake structure. If you see here, you
can make changes here. Object Data Properties
go to geometry. And there is an
option called depth. If you increase in depth, you can see that is forming
a tube-like structure. This is our RNA. Let's add a new
material to that, go to material properties, click New, and change that
to yellow with the material. You can see that. So you can move this to the
inside of the wireless. Scale it down by pressing
S and moving the mouse. Now, let's look through
the camera by pressing 0. More. The bottleneck. Don't scale up a little bit. Now on this is let's say the file Control S. Let's
go to Render View. By clicking, these are rendered. All right. If you render this image, this is what you will get. Okay? So let's give good background. What you can do is go to
this predictive type menu. Click on that, go
to shader editor. So right now it
is on the object. We want to change the world, the surroundings
around these objects so that we will have
a background color. Go to Object, check world. And plus Shift a. Go to color, mix RGB. Connect this color to color. And press Shift a again, go to texture, choose
water-in-oil texture. Connect this distance
to this FAQ input, FAC, choose two colors by
clicking on color one. And choose this can work
color by clicking on color. Okay, Now you have a
beautiful background. You can adjust the
texture by changing the scale and all this. And to increase the strength, you will become by,
I'll go with one. Now what I'll do, I'll
duplicate this virus in the background by
pressing Shift D. I'll move this to the back. Or you can change
the position by going to Item and
change location here. Right-click and drag
right, ten left. So that will be changing. This is a little bit easier. So I'll change like this. I didn't duplicate again. And more by pressing Shift D. Add one more there and
duplicate again on more. Duplicate again one year. And I think that is fine. I think I can add one more here. More. This to the back. No, it's this one. I will add one more
here by pressing Shift D. Yeah, this is fine. So in the next step is
adding depth of fields. The viruses in the background
will be out-of-focus. For that, what you can do, click on our camera
here on the border. So the camera is selected. You can see the camera receptor or you can click the
camera icon here. Go to depth of field here
in the camera properties. Check this depth of field and click on
this drop-down arrow. And you have to choose
a focus object. Click on this Eyedropper
tool and click this fear. Now the camera will
be focusing on this virus particles
since this virus, but the virus is also
in the same line. So this area will be in focus. So you can change the
f-stop value 2.2. You can see that all
the particles in the background is blurred. You can choose 0.34.054,
extreme focus. It's up to you. I will go with 0.25. Okay. I'll press Save. Now you can add more
lights in the scene. I have one lamb here. I'll change that from
sport to a lamp, and I'll increase the
size of the lamp. Now it is going in
this direction. You can change that
by rotating the lamp plus r, like this. Now our camera is here. You can move this
in this direction. Now, it is good to go, go back to camera
view by pressing. Now, this is ready to render. We can increase the brightness
of the light if you want. I'll go with 1300. Go back to camera view. I'll save that file. That's all. So now this is ready to render. You can go to Render and
press Render image, zoom out. You can go to Image. Save As. That's all. Now you have an illustration
of COVID virus particles. You can open this image and see how it looks. It looks nice. You can modify this image
if you want in power, open Photoshop or GIMP, you can increase the brightness and adjust the
contracts, et cetera. You can change in Windows by
going to Edit and create, to Edit, and go to adjustments. I'll increase the
light a little bit. In Greece, the color edit with that contrast
will be higher. That's all. This is the final illustration. This is all yours. So I hope you learned how to import protein
structures inside Blender, how to use particle system, how to generate helical shape, how to use Depth of Field, how to add materials, how to add color to the
background, alright? And how to save the file. You have any doubt you can ask. So share your work. That's all. See you
in the next tutorial.
4. Nanoparticle: All right, In this tutorial, we will be making 3D structure
of a gold nanoparticle. You can see here a microscopic
image of nanoparticles. If you look closer, you can see that this
nanoparticle is made up of uniform arrangement of gold nanoparticles
in there lattice. Let me show you a
research paper which discuss the shape and structure
of gold nanoparticle. You can clearly see different shapes of
gold nanoparticle here. We will be making
the exact structure that you are seeing here. Let me quickly show you what
is the idea that we will be using to create
this 3D structure? First of all, we'll be adding a sphere and a particle
system to that sphere. If we put the velocity of
the emitting particles to 0 and gravity in the scene 0, all the particles will remain
on the surface itself. Not only that, we want
all the particles to emit from the volume
of the sphere. There is a property called grid, which will make sure that
all the particles are uniformly arranged within
the sphere, like this. Now we will add
one more sphere in the scene with a golden color. And we will replace this article points in
this gold atom. So all these points
will be replaced with the gold atoms and you will
get enough gold nanoparticle. You will be using
the same technique for a lot of different
applications. So let's go to Blender and
make the 3D structure. This is very easy to do. So let's open Blender. I'm deleting this
default cube and adding UV sphere by pressing Shift a and
zooming in a little bit. Adding a particle
system by going here. And click this plus
icon and change the velocity of the
particles from one to 0. And we want all the particles to start emitting from frame 0 and end in the
frame zeros so that the oil particles will
be present at a moment. Now go to Scene properties
and uncheck gravity. So we don't have
gravity in the scene. Now you can see that all the
particles are emitting from the face of the parent sphere. So we want all the particles to emit from the volume
of the sphere. So go to particle properties. Hearing so Source drop-down. You can see that image from change that from
phases to volume. And if you go to wireframe mode, you can see that all
the particles are remaining inside the sphere. If you change the
distribution from two good, You can see that
all the particles are in ordered arrangement. If you look here,
you can see that the particles are arranged
like an hexagonal. Good fashion. So you can change that here
by taking hexagonal grid. Now the particles are
arranged more correctly. If you change the
resolution here, you can add more particles. So let me add a
gold atom by adding a fear UV sphere and
adding a material to that. And taking the base
color here to yellow. Let me go to Viewport
Shading you. And let me add a little bit metallic
properties by changing the metallic value 2.8. You can see that this
looks more metallic. Let me change it to 0.9 and reduce the roughness
a little bit, 2.2. Now it is more metallic. More roughness means less
light will be reflected. The metal has a
property where it reflects light comparatively
more than a rough surface. So I want this sphere
to be smooth shaded. So right-click on that. Shade, Smooth, Smooth. Let me move this
particularly to side. So right now we want all this particle points to replace
it with this gold atom. So click on this sphere, would do particle properties. And there will be a
render properties. And change a render as
from hallowed to object. And choose which object you want to want the particle points
to be replaced with. Here you can see
instance object. Click on this
Eyedropper tool and click on this sphere like that. So now you have an antibiotic. So you can remove this parent
fear in the viewport or final render by going to hear in the render
you can uncheck. In particle properties. In render you can
uncheck Show EBITDA. And also in Viewport Display. You can uncheck
Show emitter that. So now you have a nanoparticle. If you look through the
camera by pressing 0, can see the nanoparticle. So let me change the
orientation a little bit. This looks okay. I want
to add more particles. By increasing resolution. You can do that. Maybe can define, We'll be fine. Right now when I'm
zooming in and out by using the scroll button, you can see that the camera
view also is moving along. I want the camera view to
be free, frozen there. So for that, you
have to go to View and check this log
to camera two view. Now, if you zoom in and out, the camera view will
be remaining there. So now you can adjust the final angle of
rendering as you'd like. So if you go to rendered
view and this point, light a lamp and it may
increase the size a little bit. All right, looking good. I'm changing the angle
of the light and moving it to a little
bit closer here. And I'm increasing the power
of the lamp to 2 thousand. And I'm duplicating
that lamp by pressing Shift D and protecting
the lamb towards the particles direction and changing the intensity to 300. Now, if I look through
the camera, I haven't, but the lighting industry, now you can bundle the
final image by going to Properties and
go to fill him. Check transparent so
that you will not be having any
transparent background. Click Render. Now you can save this
image by going to Image, Save As this dog. Okay? So now in the desktop, you have an image
of an antibiotic.
5. Molecule: Hi, welcome back
to a new project. In this tutorial, we'll make a three-dimensional
structure of a molecule. How can we create a three-dimensional
illustration of any molecule? We will learn how you can create the three-dimensional
structure. How can you import
that structure into Blender and create
an illustration? You can see an example here. This is a cupboard published in chemistry, a
European Journal. So I use the same technique to create this three-dimensional structure of these molecules. Here you can see
these are forming an ion channel on the
surface of cancer cells, which is acting as an
entry passage for ions. So once you create
this structure, you can import into Blender
and you can modify. This will be useful
in so many places. You can see that these
are some other comrades. I have used the same
technique here, here, here, here, here. So this will allow you to import any chemical structure
into Blender. This is another example where interaction of
ligand molecules on the surface of a silicon
nanoparticle is depicted. You can see 3D structure
of a ligand molecule here. And it is forming bonds on the surface of
a silicon nanoparticles. How you can make
this nanoparticle that you can follow the, another project which
discusses in detail how you can create the 3D structure
of a nanoparticle. How can you create this
three-dimensional structure of a molecule that will
do right now or wait, for this, we will use a
software called Avogadro. I'll put the link to download the software in the description.
You can have a look. Alright, so let's go
to our guard row. So in Avogadro, here you
can see draw settings. There is an option
called elements. By noticing carbon here you can choose whichever
element you want. Right now, I'll go
with the carbon. So if you click here, you
will get their carbon with four hydrogens
attached to that. And click on that
carbon and drag out. Okay, so you'll get there. And another carbon, which is making a
bond to that carbon. So I can click on this
sphere and drag out. Alright, I'll repeat that again. So I have butane here by one to another atom,
for example, oxygen. It can choose oxygen
here and click on this carbon and drag out. I have an OH here. So you can see that the
structure is correct, but the confirmation and
orientations are wrong, which some bones or lengthier
and some are smaller. So we have to optimize the structure
according to the NLG. The bonding, bonding
energy repulsion, all those things
will be calculated and we will get
optimized structure. So for that you can see
a small icon with an E, which is called auto
optimization tool. Click on that and go down
here and click Start. Now you can see that the
structure is getting optimized. You can see energy
calculation is going on. All right. So if you rotate this, yeah. That's all. That's how you
create a structure. So one more method
that I will show you. If you know the name
of the molecule, you can just create
the 3D structure of the molecule
without any effort. I'll close this, whatever
we have built so far, discard to File Import, fetched by chemical
name or light. So I'll type one
random molecule. Maybe, buy it down more. So make sure you have
internet connection. And now you have the structure
of paracetamol here. And if you go to build, you can see other
options to build DNA, RNA updates, et cetera. You can explore that as well. And it is a nanotube
builder as well. You can build nanotubes
of graphemes, a carbon nanotube, et cetera. And there are other
options to explore. You can have a look.
So let's export this 3D structure
and go to File. Export, VRML, click Select, and type safe. And you have to click Render. The file will be
available in desktop. Let's go back to Blender. Go to File Import exe
3D, extensible 3D. You can see here in
bracket dot w Econ that in desktop we have paracetamol
dot WL, double-click. We have the 3D structure. All right, that's all. We can create. Any 3D
structure like this. You just have to
create the structure and optimize the structure by clicking that E
Aiken and like this. You can also save the
structures as PDB by going, go to Save As and
choose PDB also. But in PDB, one problem is you won't be getting
double bonds. You can try in
boating VDB as well. So we'll go with
the dot WAR file. For right now. We have our structure
double bond. Everything is available but
the colors are not there. We have to add
colors to all atoms. Now we can add color
to these objects. So let's click on a carbon atom, go to material
properties, add a color. Let's choose black. If you go to material
preview here, you can see the colors. So let's name this
material as car, but OK. And click on others
views and twos carbon. So this is an oxygen atom. So we can color it red. And one more oxygen atom. So this is a nitrogen atom. We can add a new material
and change it to blue. And let's call it. So you can color all these bonds and
hydrogens if you want. Right now, I'm happy with this. So if I look through the
camera by pressing 0, can see the molecule. I will lock the view of the
camera by going to View, Lock camera view, zooming
and go to rendered view. Add a light so that we
can see the structure. So I'll scale this
light here. Alm. I will move this up and increase the size a little bit more so that it covers
than the molecule. So in Greece the power
to send maybe 2017. Okay. We look through the camera so you can see clearly the
molecule is visible. So right now you can
see that there are grid lines visible
on these fears. So you can select
all these shapes together and right-click
and choose Shade Smooth. Now, all those grid lines are gone and the structure
is more smooth. If you want add, you can adjust the light team. I will duplicate one more
light here and move and rotate along x axis like this. So we have one more light
coming from the front. So one interesting thing you
can keep in mind is if you change the color of
this light like this, you can change the view
of the molecule like this if you want to add some
artistic effect, right? So I'll choose a
little bit yellow. So for this slide, I can choose a little bit blue. So you can see that there is a different shading
to the molecule. So let's render this image. Go to Render properties. Go to fill in and choose transparent so we will not have any background
to the image, will get a PNG image
without any background. Check this. So I'll keep this
lights back to white. I'll show you what
I'm going to do. Let's render this image. You can save this
image, the desktop. So one thing you can
do is if you change this or colors back to white. I'm choosing the carbon and
change the base color to white and changing the
blue color to white. Now, if you change the color
of this light to blue, now you can see that in
drastic effects are coming. See this is becoming blue. That's quite interesting. I can make this yellow. Whatever you'd like. I will keep it the
right way to front. Now you can, if you want to increase the shade of this blue, you can increase the
intensity of the light. So if I duplicate this
slide one more time, see I'm choosing yellow. Now we have an interesting
shading going on. You have a red color
coming from here. You have a blue color
coming from a bot. You have a yellow
color coming from the side and there is
some mixing happening. This is one way to generate interesting images by mixing
different colors of light. You can turn this
e-mail as well. So one more thing you can add is to create outlines
to all these shapes. So for that you can go
to Render properties, check this freestyle option, and change some
settings here as well. Go to View layer properties. And if you go down you can see all the fleece Tell
settings where you can adjust the boundary,
outlines, shading lines. So right now we want only
going to click Condor, uncheck border,
silhouette, and Greece. Now click Render. Now if you zoom in, you can see there is an
outline to the molecule. If you want, you can
increase the width of this line by going back
to render properties. And click on this
drop-down arrow. Nearer, please tell and change this line thickness
to render again. Alright, you have
a thick boundary. You can save this. Save as desktop. Now you have two images
of Paris tomorrow, another stove that you
can use for water. This is a nice image. Okay? Okay, That's all
in this tutorial. All right.
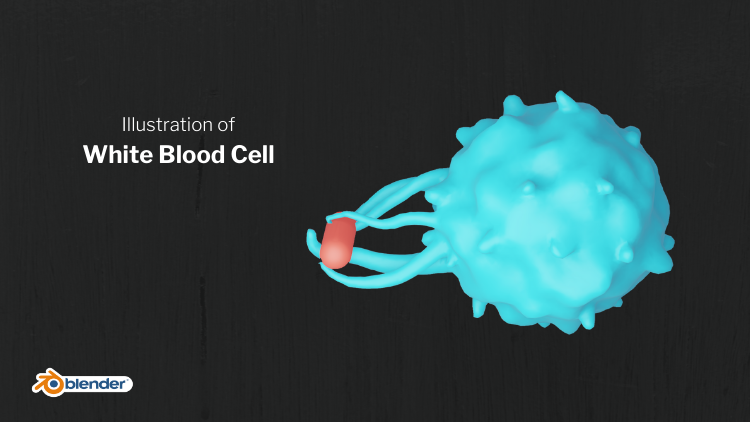
6. WBC: Hi. In this tutorial, we'll be making a
three-dimensional structure of a macrophage. Macrophages are a type of white blood cell which
angles a foreign body, for example, a bacteria. It will open up,
it's like structure, which is called pseudopods. So we will make the illustration which depicts this process. For this, we'll be
using sculpting. Sculpting is like
modelling with eclectic. Here you can see an
illustration which depicts what I just described. And we have a macrophage here. It has appendages
like structures. And there is a cancer cell in
which it trying to engulf. Once it goes inside
the macrophage, it will get hydrolyzed
and destroyed. So let's go to Blender. So I'm deleting
this default cube. And let's add a ecosphere, shift a mesh I ecosphere. And you can see that there
is a small tab here. It will add two sphere. Just click on this arrow. And you can increase
the subdivision here from two to four is fine. So once that is done, Let's go back to our
reference image. You can see that it was made
from a spherical structure. There are small
protruding structures on the surface of that sphere. And if you look closely, you can see that on the
surface itself there are deformations like we, like. It's not uniform sphere, it is like there is a
texture to the surface. So we will add that texture
by displacement modifier. Let's go back to Blender
and click on the Here. And here you can go to modify properties and add a
displacement modifier. And click on New, so that you can add that
texture that you will, you will be using to
deform the surface. Click on New. And at the bottom you
have texture properties. You have to choose
the texture there. So click here and you can go
to Type and click on clouds. So what just happened is
you can see a texture here with a lot of white
and gray colors. Those are certain values. Those values are guiding how
this mesh to be deformed. You can see that this mesh
is deforming like this. So you can see that
it is not smooth. So let's go to Modify tab and add a subdivision
surface modifier. So now it is smooth. If you right-click on Mesh
and click on Shade Smooth, it will become smooth
surfaced object. So you have a macrophage
structure here. So I want to reduce the
surface deformation little bit so you can go to
strength and make it 2.8. Reduce a little bit more, 0.45. Yeah, that is fine. Before
we start sculpting, we have to apply
these modifiers. You have to apply the
displacement modifier first, Play and subdivision
modifier second, if you click here in
this drop-down arrow, you have to click Apply. All right, so now we are
good to go to cultic. You can see several
tabs on the top. Click on sculpting. Before you start sculpting, one thing you should
keep in mind is you have to check
this dynode TOPO, which is called
dynamic topology, why it is needed. You can choose this
tool called snake hook. If you click and
drag on the surface, you can see that the surfacing
sees getting deform, but it is not smooth. So if you go to wireframe mode, you can see that
what is happening. So the vertexes are getting pulled out and the surface
is getting deformed. So if we want to, the surface, get
pulled out smoothly. You have to add
dynamic topology. So what it does when you
pull out the structure, they're more points and edges will be added so that
the surface will get smooth. Let me show you what I mean. Click here on the dynamic
topology and click Okay. Now let's go back to
Viewport Shading. And if you click here, you can see that
it is more smooth. I mean by that if you
go to wireframe mode, you can see that
what is happening. Wherever you are, sculpting, more vertex points
are getting added. So it is looking smooth. Alright? Okay, let's
go back to Control Z. So let's start adding those small appendages.
These things. You have to increase the
strength of the brush. You have several setup brush, you can experiment with them. Click on that one brush and have a look what all
those brushes are doing. Or these brushes have different,
different applications. So we will go with the
snake hook brush for now. So we have to increase
the strength to six. Now, if you pull
out the structure, you can see that it is
getting pulled out more efficiently because the
brushes more strong note C. Alright, so let's add
all those appendages. If you zoom in by scroll, you can see that the
area of conduct of that brush on that meshes small. So the size of the mesh getting
pulled out will be small. If I go out and the
area of conduct of that brush on the surface
of the mesh is higher. So you can see that it is
pulling out a lot of mesh. So we don't want that. So let's keep this
optimum height. And let's add these
structures here and there. So our idea is not
to replicate just exactly how it should
be in reality. This is a
representational image. Alright, so we are using for the purpose of communications. So we want to highlight the
main features of the seven. I think that is fine. So now we can add one bacteria. Here you can see a
cancer cell where the pseudopods are
modeled around that cell. Here we will add a bacteria. So let's go back to Layout. So let's move our cell
to outside shift. Let's add a UV sphere. So if you press seven will go to top view or
you can go to view, Viewport top, go to edit mode
by pressing tab and press. For getting wireframe view. Choose this wireframe or
you can choose it to here. Alright? So if you click here, you
can select these vertices. So now what do you have to do is click and drag and select the pieces just to the right
side of the y-axis. Alright? And move them towards
the x direction. So click on this Move
tool and click on this red axis and
just pull this out. Alright. That's all. If you press tab, you will go back to object mode. And now you have a
bacteria like structure, which is a cylindrical shape. If you right-click on this, shade smooth, you
have a bacteria. So let's scale it down. And it's more towards
the macrophage. Basically, pseudopods will be coming out and we'll be
wrapping around this bacteria. So let's put some angle
by rotating the bacteria. So let's go back to
sculpting mode and it's called doubt
those pseudopods. So what do you have to keep
in mind is you have to select the mesh that you are going
to scalp and go to sculpting. And you have to make sure this dynamic
topology is checked. Okay? And if you click here, you can see that these
arms are coming up. Alright? So our idea is to
pull out this arms like this. So it is wrapping
around the bacteria. So the main idea of
this project is to give you an idea of the
possibilities of sculpting. So it might take a time to get comfortable
with these brushes. Sculpting features of
Blender where updated recently in last
couple of months. So it is a great time to
start learning Blender. Okay. Yeah, I think this is fine. So you can pull up from here. All right. Yeah. I think I think this is fine. So what do we have to do
is go back to Layout. Now we have a structure. Click on the macrophage,
right-click, Shade Smooth. Do the same for our bacteria. So right-click shields. All right. If you want to look through
the camera plus 0 and zoom in a little bit. Log the camera in
the default view by going to View, camera to view. Now, even if you scroll in
and out and the camera view will be remaining constant,
like remained be, it will remain static so you can move around the
scene as you wish. So right now you want to add
materials to these objects. You can go to rendered view. Click on the macrophage,
add a material. So basically this is a cell. You can add a little bit of
red color here like this. And add subsurface. Subsurface is
characteristic where life gets a little bit inside to
the body and gets scattered. So for example, if your
skin is China with light, you can see that light
entering a little bit inside. So for example, if you pass
light through your hand, you can see light from
the other side, right? So basically light is
getting inside and getting scattered within that object. So when we add subsurface
here to, for example, 0.6, you can see that it
is becoming like skin sort of organic structure. So we're getting a
cellular a look here. You can add a bit of material
for the bacteria as well. Click here nu. Let's choose a green
color for example. Yeah, I think that's all. You have. A nice illustration. Yeah. Let's add a nice background. Bring this tab upside, and click on this
drop-down menu. Choose on shader editor, go to Object and zoom
in a little bit. Shift a texture. For a night shift, a color mix, RGB. Connect this distance to FAQ, connect this color to color. And click on this color
one. Choose blue. Click on this color to choose somewhere here in the red side. Now you have a
background, right? I'm pressing 0 to go
out of the camera view. They want to reduce the
size of the bacteria. Now you can see
that the origin of the bacteria is on
the other side. So because we started
from a sphere, you can bring it to the center of the bacteria by
right-clicking. Set origin, origin
to center of mass. And S for scale
and scale it down. Okay, Let's go back
to camera view. And to sell more different angle than the previous one. Yeah. I think this angle is
clearly the story. All right. So let's add a
light in the scene. We have already a lamp here. And I'm changing that
value to treat those send and change
from point to area. And increase the size
a little bit to five. Same here, phi. And move it here. Like this. Just on top of that. You can reduce the
power of the late. Maybe. Yeah, I think that is fine. That's all for now. I think we have a ready
and illustration. If you don't want any
subsurface scattering, you can change this subsurface
back to 0 like that. So now you have it and choosing it blue color, maybe a red color
for the bacteria. Now, you can choose
colors as you wish. Like that's all
you can blend up. And you have any image. Go to image, save as desktop. Macro phage. Know you have an image in the
desktop. Okay, that's all.
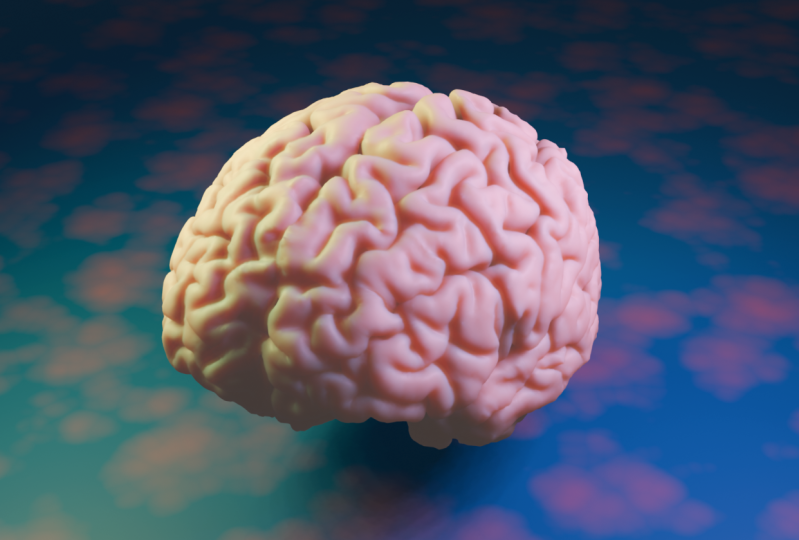
7. Brain: Hi, in this project, you will make it 3D
illustration of a human brain. You will use an actual 3D
structure of a human brain. They rented by 3D scans
of an individual's head. So first of all, we need at
3D structure of a brain. So you can go to a
website called Blender. So this is maintained by a singular from National
Institute of Mental Health. You can see a download section here in this drop-down menu, you can see brain for Blender. Click on that. Now, if you go down, you can see different kinds
of visualization of a brain. We have a full hemisphere here, we have cortical
mesh split here. And there are different kinds, but we will focus
on full hemisphere. If you look here, you can see different kinds of file formats. We will go with the first one. You can see OBJ format. If you click on that, you can see a file
is downloaded. Let's go to Downloads. So this is a compressed file. You have to extract this. To do that you can
install wind or most of the system has inbuilt
feature to extract files. So if you right-click here, I can see that extract here because I have
been installed. If you click here, you
can see the files. I have two files. One is for left hemisphere and the other one is
for right hemisphere. So let's open Blender. Ok, now we can import our brain
structure inside Blender. I'm going to delete the default
cube by left clicking on the cube and press
Delete, go to file. And you can see in both, and you can see various options. So depending upon the steady
that you are industrial in, if it is detailed study of the three-dimensional
morphology of the structure, whether it is brain or
other parts of the body. It is most likely
that there will be a 3D file which is attached along with the
manuscript in the journals. So you can download that or
you can directly contact the researchers asking for the file that you can
import into Blender. You can see various options. It can be extremely, it can be dot SDL for
now it is dot OBJ. You can see new friend,
you can click that. And you can go to downloads, open the folder, and
you can see both files. A legend knowledge, let's
import left hemisphere. Double-click. Now, Blender is in
boating the structure. Now the model is here. But we can see anything properly because the model
size is very big. If you zoom out by
scrolling the mouse wheel, you can go out, can go out and see
the index structure. It is really big compared
to the normal scale that we use for objects
inside Blender. Let's invert the
other hemisphere. Go to embed OBJ and RH
for right hemisphere. Double-click on that. And now the file is in voting. Okay, now we have
both hemisphere. It looks very fantastic
because it is a real 3D model of a brain. You can see the exterior of
the brain in very detail. But the interior of the
brain is not as much detail. We will focus on the exterior. So we need to scale it down. So what I'll do first,
I'll bring the camera out. Right now, our camera
is inside of the model. You can go to outliner
windows here, click on camera, and come here
and choose this Move Tool. Now you can see the
position of the camera. Let's bring it out
by clicking on this green axis, move it out. There is a lighter also
trapped inside the model. So I'll move that also out. Click on this light and
move out like this. What I'll do is click and drag, select both hemisphere
and plus S. And scale it down a
lot like this, right? Otherwise you can scale it down by using shortcuts.
I'll go back. Let me show you that. Press
S and followed by 0.05. Alright, so if you want
to scale into half, you can press S 0.5. If you want to double the size, you can press S two like that. All right, so let's zoom in. So you can see the brain
is oriented downwards. Let's rotate it. Click and drag, select. And press R for rotation
and x for x, x, x. And move the mouse. You can rotate like this. If you want to
rotate along y-axis, you can plus RY and move
them all so it will notate. Otherwise you can use this tool which is shown
here. It is called rotate. So I'll move it up
above the origin. You can see the origin now. Yeah, so now we are. Good to go. I'll move a little more up. Okay? So I'll add a plane,
press Shift a. You can see mesh
and click on plane. So I'll scale it up. And more than most like this,
maybe a little bit more. Plus S again, and
move like this. Okay. So zooming, choose an angle which you
would like to take the image. Yeah, I think this
angle looks good. So right now, I want to orient my camera
in that direction. For that you can use the
shortcut Control Alt 0. Now you can see an outline came around the brain
in that orientation. That is what camera sees. That is what will get as
the final output, right? So I'll zoom in a little
bit, scroll wheel, and I'll choose this orientation so I can see the brain properly. Go to views here and check this camera to view so that the camera will be locked
in that direction. Now, if you go to rendered view, you can't see anything
because there are no lights in the scene. There is one light,
but we need to increase the brightness
of that light. So whenever you want to find
an object in the scene, you can go here and locate that object so I can
see the light here. So basically this here, I'll move it towards the brain. Now you can see the latest coming and casting on the brain. And you can see the shape right? Now, if I go back
to camera view, I can see the shape. One more problem we need
to solve is you can see that the brain's
surface looks like sort of, sort of arrangement
of so many polygons. So we need to make
it look smooth. So select one mesh,
left-click, and right-click. Shade Smooth. Now you can see the
surface has become smooth. Do that for the other hemisphere also, right-click to smoke. Okay, Now if you look
through the camera, you can see an image of brain. So right now I want more background paste
so I can zoom out. What you can observe
is the camera is locked in that orientation. It is not moving because we have chosen the camera
to View Log option. That's fine. Alright. So if I zoom out further, yeah, I'll choose this angle. So let's add more
lights in the scene. So what I'll do, I'll
move this light towards the camera and let it be here. I would like to always
work with area lamps. We can change this point
line area for that. What we can do here in the light properties
and choose area here. So now it has become a lamp. You can see clearly if
you increase the size here by clicking on this number box and move
the mouse right and left, you can adjust the size. So I'll increase the dimension
in X and also in white. So it has become a bigger lamp. So now it is oriented
in this direction. So we want to rotate into
that other direction. So for that, you can see
that this is y-axis. So I'll plus RY to
rotate the light. Now it is facing
towards our brain. Let's go back to camera view. Now you can see that
the brain is well lit. So if I increase the
brightness of this lamp, you can add more late. I'll choose 1200. Okay. Let's give a material. If you click here and drag up, you can see another
working area. You can see a
drop-down menu here. Click on that and go
to shader editor. Now click on this brain. We have a material by default. It is white in color. You can see two nodes here. This is the final output. This is the node which involves all the settings
of this material. For example, if I click on this base color and
choose a different color, I can see that the
color is Teams. So what I'll do, I'll choose a material
which is similar to our actual material, which is kind of
scattered light. Let me show you that
it is very simple. You can see an option
called subsurface. If you increase that. What you are seeing
right now here, this half looks realistic
organic structure, which is similar to our skin. For example. You can see here
subsurface color. If you change that
color towards the red, you can see that clearly here. And move this door towards
somewhere here, for example. And click on other
half of the brain and choose that material
for that half also, by going here in the material
properties, click here. And you can click on
this drop-down arrow. You can see all the materials
within this project. Currently. You can see the review
of that material. You can see it looks like
the organic material. Click on that. Now
it is very clear. Alright. So now our
illustration is ready. You can take the output, but we will do more. Beautification. We can add a background. What I'll do, I'll click
on this plane, left-click. If you go out, you can see
that the plane is selected. So I'll add a material to that. Also. Click on this New. Now we have a new
material for the plane. So let's add a texture
for that plane. You can add new texture
node by pressing Shift a, you can see texture. So what I'll do, I'll choose Voronoi that
are various textures. You can have a look. I'll add that we have
a texture information, we need color information. So for that, but it's shifted. Again. You can see
color and go to mix RGB and connect this
distance output to FAQ input of this
mixed color node and connect this color to base color and click on
this color one, and choose one color, and click on this color and
choose a different color. Now, if you change this k
here in this texture node, I'll choose a 100. Right? Now you can see
there is a texture in the background, right? So I haven't changed
that other color. You can become creative
with these colors. So what we have done basically, we have at texture information, we have connected that
color information. And that texture will decide how to
distribute this color. And that information we have
connected to the color, that of the plane. Right? Now, it's ready to go, but you can become even more creative by adding
more textures. Press Shift a again. Go to texture, choose
add different texture. For example, Musgrave texture, connect this height
output, vector input. Now you can see
that the background has become different, Right? Basically we have given this texture data
to this extra data, and both of them are combined
to create a new texture. And you can adjust the
properties here as well. So what I'll do, I'll, I'll go with five. Now you can see clearly the background because the intensity of the
light is very low. What I'll do, I'll increase the intensity of
the light to 2500. I'll increase the size of the
light by pressing S. Now, we have more diffused
light in the scene. So increase the brightness
to 10 thousand. Now if you look through
the camera and the scene is very clear and
everything is visible. So right now we can add
a little bit of blur to the background so that the camera will focus
only on the brain. So for that, what we'll do, we'll click on the camera here or click on this outline so
that the camera is selected. Go to camera properties
here in this green icon. You can see depth of field here. First, check this box and activate depth of field and click on this
drop-down arrow. And you can see focus on object. So we have to define which object the camera
should focus on. We will choose brain. Click on this eyedropper tool, and click on this
half of the brain. Now, if you decrease the f-stop
value, for example, 0.05, you can see that the
background has got blood a lot so that only this
area is in-focus. I'll increase the value 2.6. Okay, you can see a
little bit of blur here. For now that is enough. So what I'll do, I'll move the camera a little
bit towards the brain. Now we are good to go. And according to your taste, you can even change the
intensity of the light. Again, I'll choose 13 thousand so that the scene
is more bright. And if you want to
even more creative, you can change the color of the Lamb by going to
click on this lamppost, go to Properties and
change the color here, click on this color
and change the color. And if you look to
the camera, now, you can see that at different a different
field altogether. Now it is very blue and cold. If you move towards
red, it is a very, a red and a very warm feel is the n. If you add more
lights in the scene, you can be more creative
with the lighting. So what I'll do, I'll
press shift D, right? And if you move the mouse, you can move the
duplicated light here. We have two lights in the scene. So I'll rotate this lamp
towards the brain, are right. Now, this lambda is
facing towards the brain. So change the color
of the second lamp, go to Color and choose blue,
something towards blue. Alright? And now if you
look through the camera, you can see a line
is passing through because the ALM is
cutting through here. So what I'll do, I'll move it to somewhere in other direction. Now you can see some
blue lighting here. So right now let's
take an output, go to Render and press
Render Image. That's all. If you want to change the
resolution and dimension, you can go to Output
Properties and change the resolution
presented here, right, 1900%. You can change the
dimension also. And if I press to render image, you can see a 3D illustration
of a brain. Right now. I can save this by
going to image. Save as desktop. Save As image. Now, if you go to desktop, now you can see a beautiful
illustration of a brain. And now this is all yours.
8. DNA: Hi, welcome back
to a new tutorial. We will be making a
3D structure of DNA. Alright. So here we have an image. This is the actual
presentation of a DNA. You have minor grooves
and major grooves. So we will be taking
care of that as well. Alright, so let's go to Blender. So I'm adding a cube. So let me reduce the
size of the cube x 2.32, the Y b1. So let me move the
box to the side. Here you can see the
location is getting changed. You can choose 1.04. Okay, that's enough. And this will represent the
steps of the DNA, which is basically
purines and pyrimidines. It will represent guanine, thymine, adenine,
cytosine, those. So we can add phosphate group. Sphere is fine shipped
a mesh UV sphere. We have to scale it down to
scale object very smoothly. You can press S on the keyboard and how
much you want to scale, whether it should be doubled. You can press S to, if you want to reduce
the size to hop, you can press S 0.5. So I want to reduce
the size to half. So I will press 0.5. Okay, So let me repeat
that again as 0.5. So it became half. So I am moving that
phosphate group to the other side of the box. So we will add a material to phosphate group by going
to material properties. Click on New, click
on the base color. Right now let's give
it the red color. If you go to Viewport Shading, you can see the material. And I will right-click on the sphere and
click Shade Smooth. Why? Let me go back. You can see this grid
lines is visible here. I don't want to see that so you can right-click
Shade Smooth. Now it is motor. So add a material for
this box as well. Go to material properties. Click new, choose
a different color. All right, so next
step is we want to join this measures together. Click on this green box, but as shift and
click on this sphere. So both of them are selected. Press Control J or Control
J is for joining meshes, so it will act as one object. So right now you can see
it has a common origin. If you move that it
is moving together. Alright? The next step I will be doing is to move the origin of this object to send up
here to center of the axis. Why I want to do that is
because I will be adding a mirror modifier so that this object will be getting
married to the opposite side. It will be getting red with respect to the origin
of that object. So I'll right-click on this set, origin, origin to 3D cursor. So the origin is right now here. Here you can see that
the box has sharp edges. I like smooth edges. So you can add, add a bevel modifier. So it basically smoothens
out the corners. If you increase the amount
of segments to five, can see that more segments
that are getting added. And I will change
the amount to 0.06. And if we go back
to the this view, you can see that it's
just getting smooth and I'll increase
the segments with ten so that you can see
that what is happening. Alright, so I like this. Let's add a mirror modifier. Go to Add Modifier, choose mirror, and
choose the axis white. Now it is getting mirrored
along the y axis. So next step is add a modifier. This RA modifier will repeat this object in a
particular direction. So we want the
direction to be z axis. So you can go to RA and change
the x0 to x1 and x to 0. All right? So if you change the count here, you can see that it is getting
repeated along the z axis. All right, so let's choose 25. Okay? So we want to rotate this array so that it didn't
form a helical structure. So for that, we want
to add an empty axis, which will help us rotate this array in
a helical fashion. For that we have to
press the Shift a, go to empty, choose plate axis. So what just happened here
is more axis is visible, right? You can see that. So using that, we
will be controlling the arrangement of these
base units or light. So this is the most
interesting part. I love this because you have a much more control
on your object. So what we have
to do is click on your array and check this
object opposite minimum. Tick that, and there is a
drop-down arrow. Click on that. And so click on this Eyedropper tool and choose on this empty when you
are exactly on top of Mt, you can see that there is a
empty which is written there. Alright? Alright. So you can see that
something weird, things are going on
because we have made so many changes to the
mesh in the beginning. So we want to apply all
those changes to that mesh. That is an important step. So for that we have
to add control a. You will get then a play menu
and choose all transform. So basically we have a plate all the transformation
that scaling, The, Changing the origin, etc, are applied to the mesh. So right now, everything
is good to go. So click on this empty. If you rotate this empty, if you go here and
rotate this z axis, click on this z axis
and move like this. You can see that it
is getting rotated. Let me go back. Or
otherwise you can press R to rotate objects. If you want to rotate
along a particular axis, you have to press
that axis as well. So here we will be
pressing R, right? So you can see
BlueLine has come. And if I move the mouse, you can see that it
is getting rotated. That's all in DNA. We have 10.5 base pairs in
a one-term 360 by 10.5, you will get 34.28 degree, which is the angle of rotation
between the base pairs. So you go to this rotation tab and change
this z value from 0 to 34. That's all right. Now you can see that there is huge gap between
individual base pairs. So I'll change that if
you go to Modify tab and change the z value from
one to choose 0.75. Okay, so let's add a
camera in the scene. So if you rotate like this, and if you want to position your camera
in that direction, what you can do
is press Control, Alt, Control plus Alt plus 0. Now my camera has come
in that direction. So I'll zoom in a little bit. I will freeze that camera in that location by going to View, on camera to view and zoom out. Alright, that's it. Now I have a 3D model of a beam. So if you go to rendered view, you can see that there is
no light in the scene. I will add a lamp. Light, a lamp. You can always remember
that shift a is the key for adding
any new object. So I have a lamb here. If I move it up and go to land properties and change
the power to tau center. We have a light, I'll
move in this direction. Or camera is here. So I'll keep this lamp here and rotate along
y-axis by pressing R Y. Okay? Let me show you that again. For theta along y-axis
are white or light. So if you look
through the camera, you can see that there is light. So I'll add one more
light in the scene. And I'll increase the size of
the light by pressing S and scale the light chains, the power of that light to six. Alright, we have one light
coming from this side, one light coming from this side. I will add one more light in
the direction of the camera. I'll rotate along the
y-axis by pressing Z. Like this. You can adjust the
lighting as you like. So I'll change it to 20 thousand or so right
now it is ready to go. I'll remove the background by
going to render properties and click on this drop-down menu and click on transparent. Now we don't have
any background. One of thing that
you will notice more frequently in 3D images. They use dark outlines
around the object. You can see that there
is a black outline around the object. Here. You can see that there is a black outline
around this object. And an organic shape
is the robotic arm. So I like that putting a dark bold outline
around an object. So to add that, what do you have to do is go to Render properties and
check this freestyle. Alright, if you click
on this drop-down, you can change the
thickness of the line as line thickness.
Right now it is one. I'll choose it to be 1.5. Okay? One thing in Blender is all the settings of this
freestyle is not here. You have to go to View layer properties
and go down there. You can see three-step
and go a little bit down. There are several options. I won't explain all the details, but right now what
you want is condo, uncheck this border and
silhouette and check this condo. So right now we
will get there dark border around the DNA S, okay, we are ready
to take the image. One thing that we have
to keep in mind is we still don't have minor grooves and major
grooves for the DNA. So if you move the
empty to the right side along y-axis by changing
the y value 2.5. Now what happened is we have a character representation
of the DOM. Render the final
image out by going to render and click
on Render Image. You can click F2. So right now you can see that
the rendering is happening. You can see the progress here. It is still at 98. So right now what is happening? Blender is calculating
the outline so it takes more time than
the usual renderer, which we don't use any outlines. Let's wait for a
couple of seconds. For light. We have our final image. You can see that we have an outline around the
object blackout plane. Let me save this
image. Go to Image. Save, As I'll save the desktop. Right now, I have an image in the desktop
which is usable. So this is not an actual ball-and-stick molecular
structure of the DNA. This is a representational DNA. So as a bonus section, I will show you
how can you create a molecule or presentation
of the DNA in blender? I'll delete this DNA. So for this, we have to use another software
called Avogadro. I'll put the link to the
software in the description. You can find them. So once you open the software, you can build a menu, go to Build, and go to Insert
and choose DNA slash RNA. Now, gastro is asking
what are the base? Since you want to add, I will add a C T G, C T, T G, C, D. Alright, I won't change
any other settings. So if you want
single-strand DNA, you can choose single. I will go with the
double press Insert. And now you have DNS structure. Alright? You can save this structure
by going to File Save As and save as DDB. You can see PDB, which is nothing but
Protein Data Bank file. Say. One interesting thing is you can import PDB
structures in Blender. Alright? So blender has an
add-on which enables us to emote PDB structure
directly into Blender. So this was an add-on which
was created a while ago and blender added to the
default software package. So you have to enable that by going here to edit the
type drop-down menu. And in the corner here, you can choose
these preferences. And there you can type PDB
in here in the search bar, B-D be there, you will see an add-on called import
export, atomic blender. Check that, and go back to 3D viewport by
clicking here and 3D viewport. Now you can import
our DNA structure. How cool is that? So go to File, Import. You have a new option called Protein Data Bank. Click here. In our desktop, we have a DNA
file called DnaA dot PDB. So let's wait. Or how cool is this? You have a DNS structure here. If you go to rendered view, you can see that you have a
beautiful structure of DNA. This is only a part
of a DMA if you build a little bit bigger DNA. So you can plug
whatever you have built so far by going
here and pressing close. And let's build a DNA again. By going to insert DNA, you have to insert
more seconds here so that you will have a big DNA. And just insert. Zoom out by scrolling down. See you have bigger DNA. You can import that as well. This is how it is done. So I don't want
any outlines here. It will take much more time to calculate outline for
all of these spheres. So for now, I will uncheck this freestyle and
render an image. So what can be the blender
is like quite satisfying, like every image
is a new problem. Like you will find
the methods if you know how it can be done somehow, you can find everything online
by typing right keywords. You how to mention
what are the features. For example, a particular
modifier that can be used you how to type that name. We have a final image. All right, so you can say
this as save, as desktop. Like this, you can build out of Nashville that in our garden
that we have seen already. Hearing build menu, insert, there is an option as well. You can change this DNA to RNA. How can you just
put this in bold? So right now you have an atomic structure of
DNA that you can use. It is all yours. Alright? So if you want to
change the lighting, like if you want to increase
the brightness, you can, most of the times you can change here itself in the windows. Go here and choose adjustment
and change the light. Now it is more than vector. And you can increase
the contrast here. And see if you are using Mac, there will be similar
option or you can use Photoshop or you can modify your image in
PowerPoint as well. Almost all Word document files has image editing options so
you can increase brightness. It's like that. Okay, That's all. This is how you make them.
 Rafeeque M., Science Illustrator