Transcripts
1. Intro: Hello everybody, Stella here. Welcome back to my class again. So today in this class, we're going to talk about
the anatomy of a bag today. We will also be discussing
its many, many, many, many industry lingo
so that you know exactly what people are talking about when you start
to design bags. So even small leather goods. You will also get a very quick overview
of basic construction. The type of materials
out of materials, as well as interfacing into lining materials that
we use such as fillers. And lastly, or actually
two more things. I will also show you the
accurate way of measuring a bag. Believe it or not, everybody measures it differently
and we don't want that. Now, lastly, we will
also be discussing the different types
of edge finishes. As you know, for bags, we work with genuine leather. Leather used to be
some animals skin. So in its raw form
is unfinished. So you cannot create a product with on
finished back unless, unless that's what
you're going for. Deconstructed fashion. Have we ever heard of it before? Anyways, jokes aside,
let's get this started.
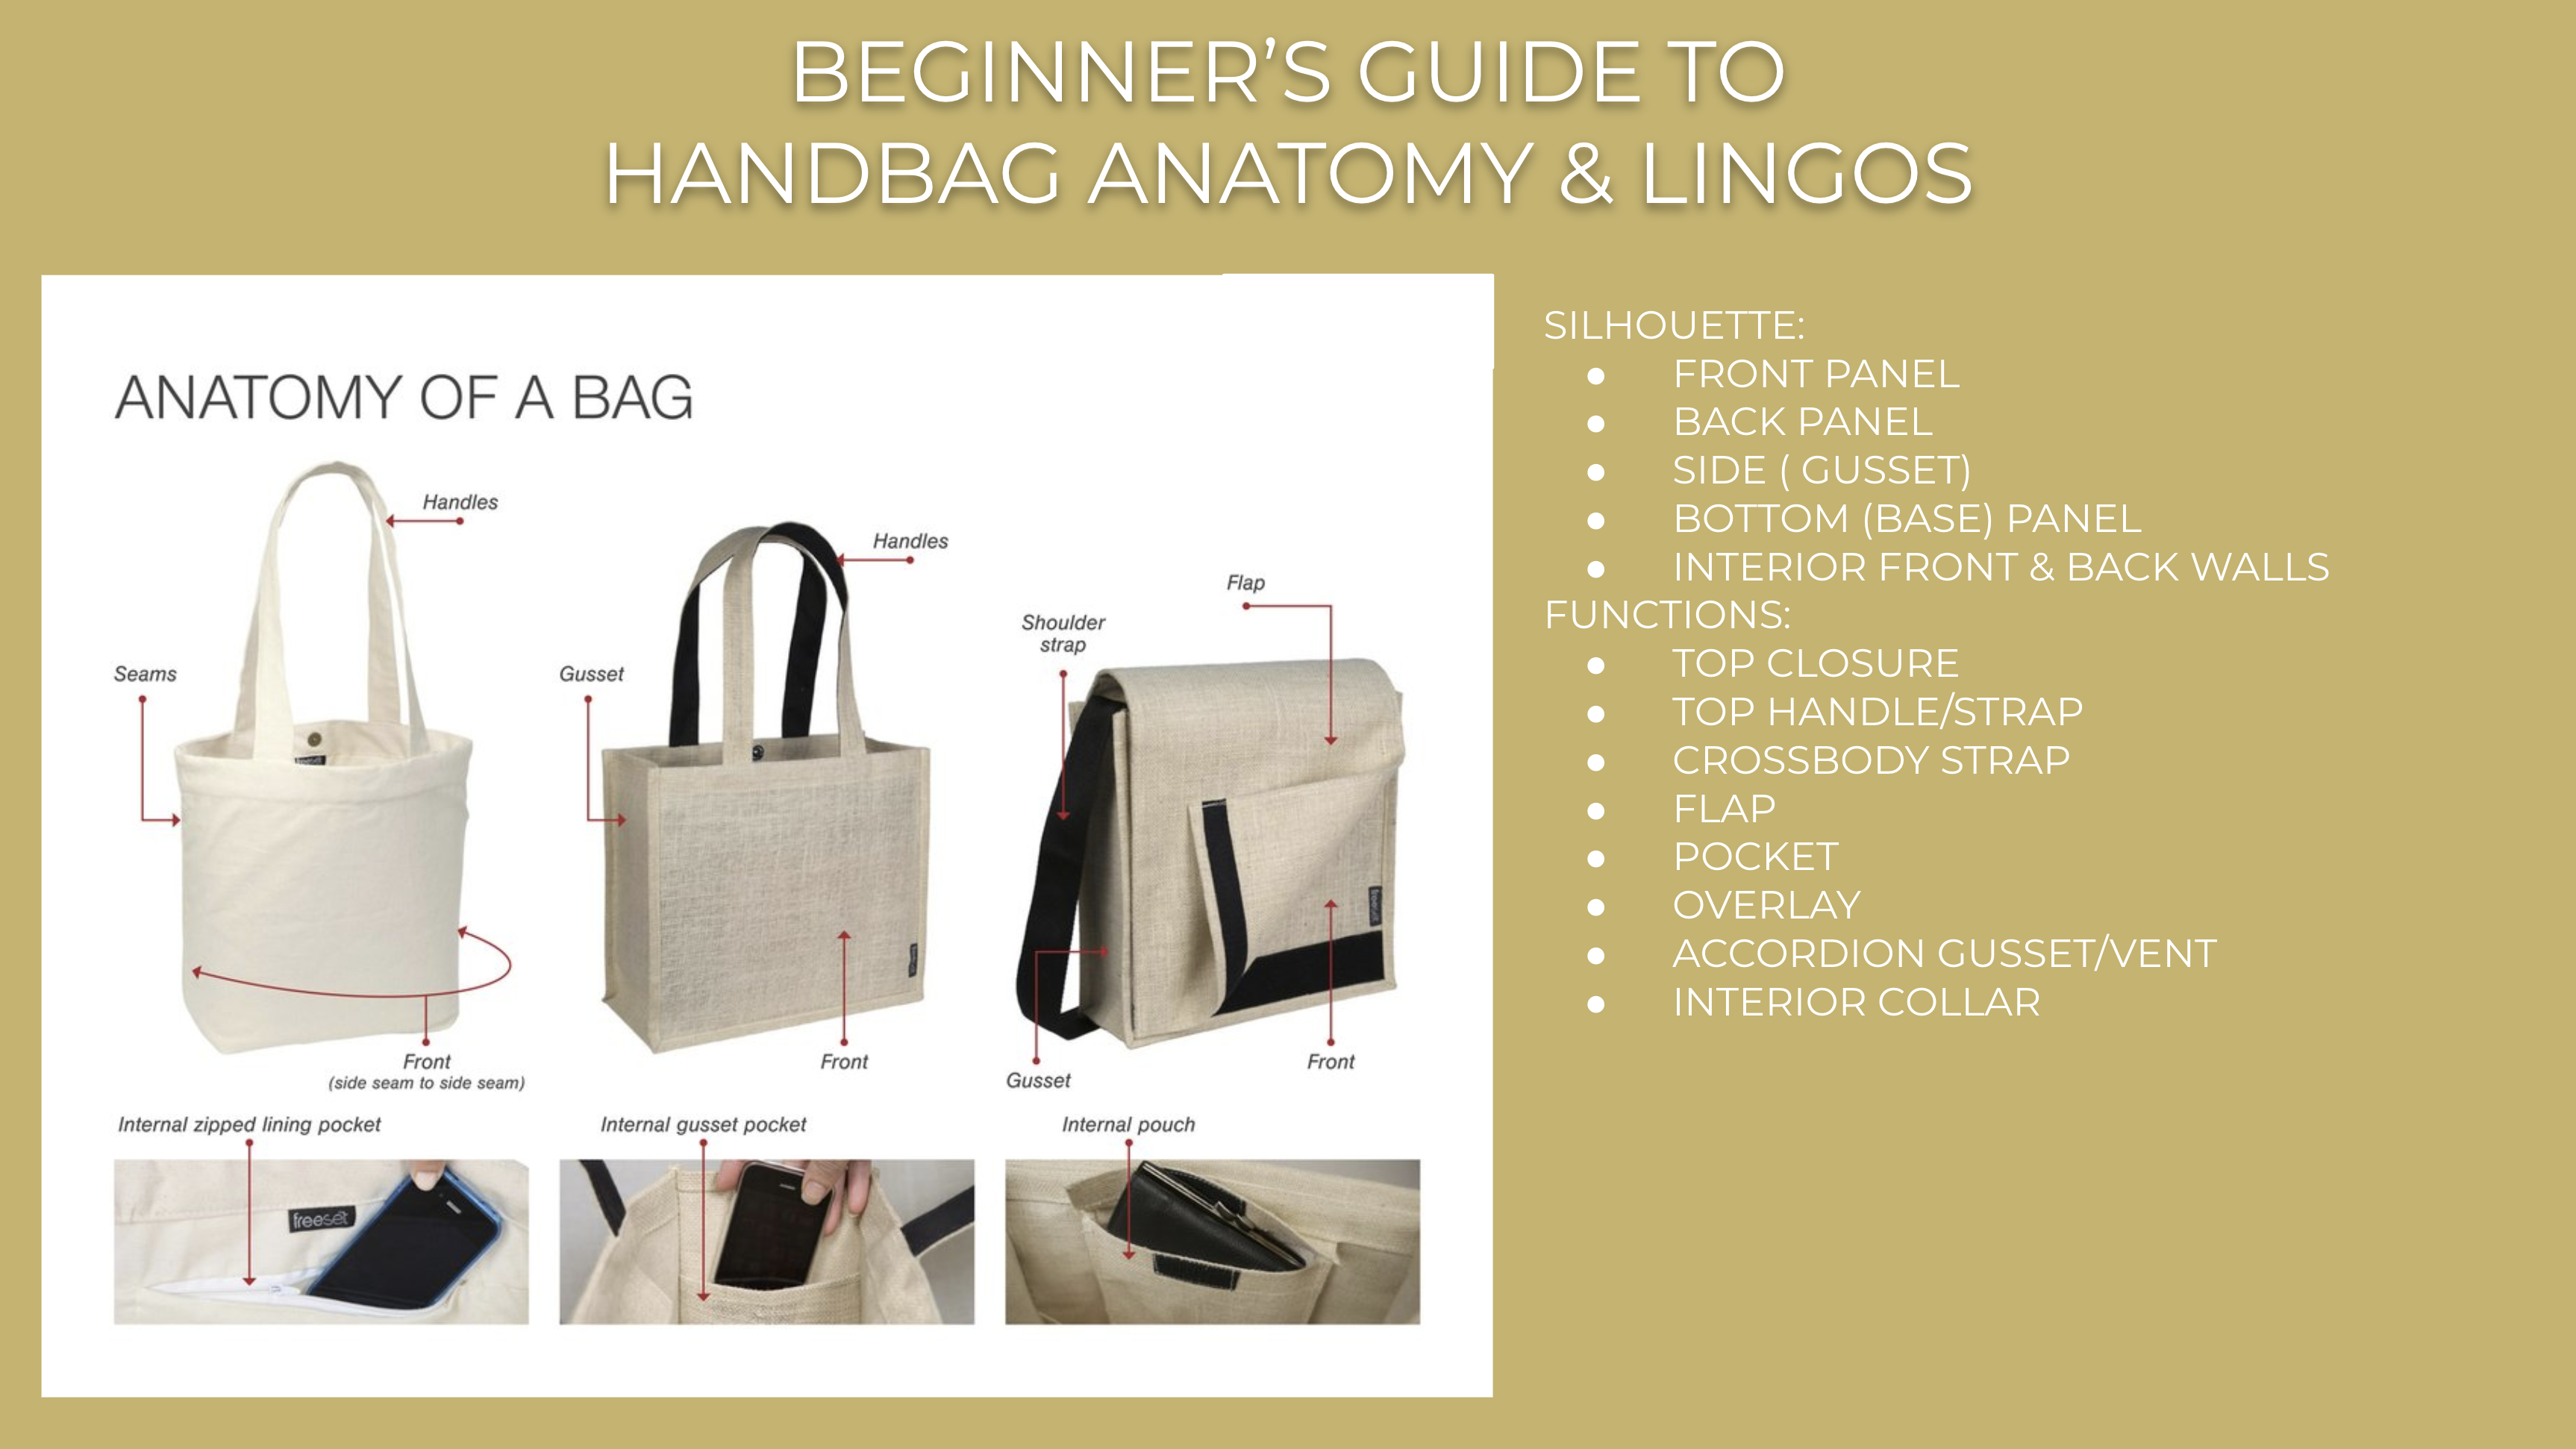
2. Handbag Silhouettes & Parts: Hi everybody. Welcome to hand back
anatomy one-on-one. So before I begin, I just
wanted you to know that today's presentation
is available as a class file that
you can download. So please do download it, study it in your own time. If you have any questions, just leave it in the
comments and I will respond to them as say calm. You need further
training in this or any of the classes that
I have uploaded so far, literally just leave
a comments as well. And I'm more than
happy to figure out a one-on-one class with you. Or we can figure out a way
to help you learn more. Alright, let's get
this class started. So in terms of handbag anatomy, I have selected three
very basic styles that you see everywhere. This is what we call a
sharper tone or sharper. This is a very
regular east-west TO, because east, west, north going from side
to side is wider. And then we also have a
cross body bag with flat. So let's just talk about
how do we call each part. So the silhouette,
the first thing that you have is this is
the front panel. The front panel, front
panel with a bad panel, which obviously is the backside, the bathroom wall of
a bag that you can't really see right now unless
I turned it back around. I'm sure you'll get it. Now, we call the side
of a bad GUS SET. So when you hear about people talking to you about all
the guts of the GSA, it is literally does the GSA this piece on the side that connects the front panel
and the back panel. This is also Gosset. This is also a Gaussian. This is not a Gosset. If you look at any
bags that you own, Does it matter if
his men's or women's children's not all
the bags come with GSA because every bag has a different types
of construction to show the different
type of function and use it that you can
use this bag for. Very simple sharper. You can choose to as a
Gosset, when you add a Gaza, obviously the bag is wider so you can put
more stuff in it. But for simple shoppers, sometimes the designer will
choose not to add a GSA. So in this case, the designer will literally
tell the factory, Let's solve the front petal
and the back panel together. When we so anything
with soil from the inside and then
we'll turn it outside. This way we create a scene or at war a lot of
times on tech packs, we will write it as the inseam
because that just means that the scene is being
sold from the inside. Alright, just to illustrate my point and please ignore it. I'm sorry it this
way, ignore my cat. So you see, this is a really
cute purple double flat. This is called flap
double flat, cross body. I designed for a brand
called femto cupcake. Not sure if you guys can see it. The point is, here
is the front flap. When I turn it. You see this this is the same. There is no Gosset,
no side panel. This this is the Fromm
connected to the back. This is the back panel. And we call this the inseam, like I said before,
because we saw it. We connect the two panels. Can't really see it
actually from the inside. You saw it from the inside. Then you turn it on the outset exactly just like the apparel. So in process, so
this is the insane. Coming back to this page, let's talk about the
remaining panels that made up a silhouette, the bottom, or sometimes
some people call it the base panel is literally
the bottom of the bag. Is this its own panel? Yes, he can be. It can also be part of the
Desert essentially just goes all the way to the
bottom and backup again, we call that the base or the bottom pedal,
doesn't matter. This one like that does not have a base panel because it's
literally the front panel, back panels sewn
together in the center, going all the way around. And this really comes
with experience, the way you can just either
bag and kind of know the construction at the
bottom or the back. So that is the bottom panel. Now, we also have to indicate it what I call the interior
front and back walls. As, you know, just look
at any bags you owe. If you open it up, you
will see the interior. The interior, you'll
have a front wall. This part is basically the
underside of your front block. And then you will
see the back wall, which is the underside of
your exterior back wall. And on each wall, depending on how
big your bag is, most likely, there are pockets. Some bags come
with many pockets. Sand bags come with just one and some
bags don't even have a pocket because also be because
it's just way too small. So the type of pockets you will get depends on the type of functions and design of a bag the designer is
trying to create. And these are just
three very basic boxes you see all the time. Internal basically
means indicates where the puck is internal. So we know this pocket is
on the inside of the bag. Interior. Zip how does open
What's the culture? It is zipped. So this
is a zip pocket. Lining pocket basically
denotes what material is this pocket made out lining the inside of the park
has made out of liming. Now, this is an
internal gossip pocket. That means that you
create a pocket literally on the interior side of the
Gossett right over here. When you do a pocket
that's not on the front or at the front or the back
wall of any type of bag. And then you put all the GSA. The width of the packet will be restricted by the
width of the GSA, but the depth, how deeply That's the pocket goal really depends on what type of function
you want to have. Let's say if I
want to put pen or brushes on then on the
interior gossip pocket, I may actually made the pocket
really tall, really deep. So then I know my loan
brushes for goal. But if you're only thinking
about just putting, let's say an iPhone. So maybe the cup pocket
doesn't need to be so D because once the iPhone drop
all the way to the bottom, it feels like it has to go all the way in trying
to fish it out. This typo Gosset pocket does not have any flat but it does not
have a zip closure. When it's a closure was nothing. We call it the excuse me, the open pocket because it's
literally white or pen. Now, this interior pouch, I don't know why some people
call the pocket the pouch, but I guess it works. It's the same thing. Patch pockets, same thing. This y has a little
flap opening, closure using Velcro strip. So again, you don't need
to just use snap buttons. You can use velcro, you can use zipper. You can use a lot of
different things, even locks if you choose to. But obviously when you go
into the hardware section, that's more money
you had to consider. Now, since we talked so
much about closures, openings, we need to
talk about top closure. So in a bag, unlike apparel or shoes where
you wear onto your body, a bag you wear over your body. So the bag has to
be able to close by itself because it's
not close by your body. So the opening or
closure on the top, how do we close it? You had to tell the customer you have to tell the factoring. Factoring is to know how to make it this particular closure, we usually call it the
max snap or snap closure. It basically means I am using a magnetic snap back or irregular snap button
to close it up. Same with this toe. You can see a snap
button right there. This one. We use this a flap closure. So the flap basically
closes out the bag. So is the Sandler on back. Obviously a flap design
for Sandler on is a lot more intricate,
feminine, beautiful. It has this beautiful
chevron shape, but it also uses a snap closure. So there's some
kind of snap button on the underside of the flap. So again, this is another part
of the anatomy of the bag. Closure of the valve is
extremely important hat to indicate to your
factory, to your consumer. And obviously you
can design into the flap and make it your own. So we talk about the
flat, the pocket, cross body strap,
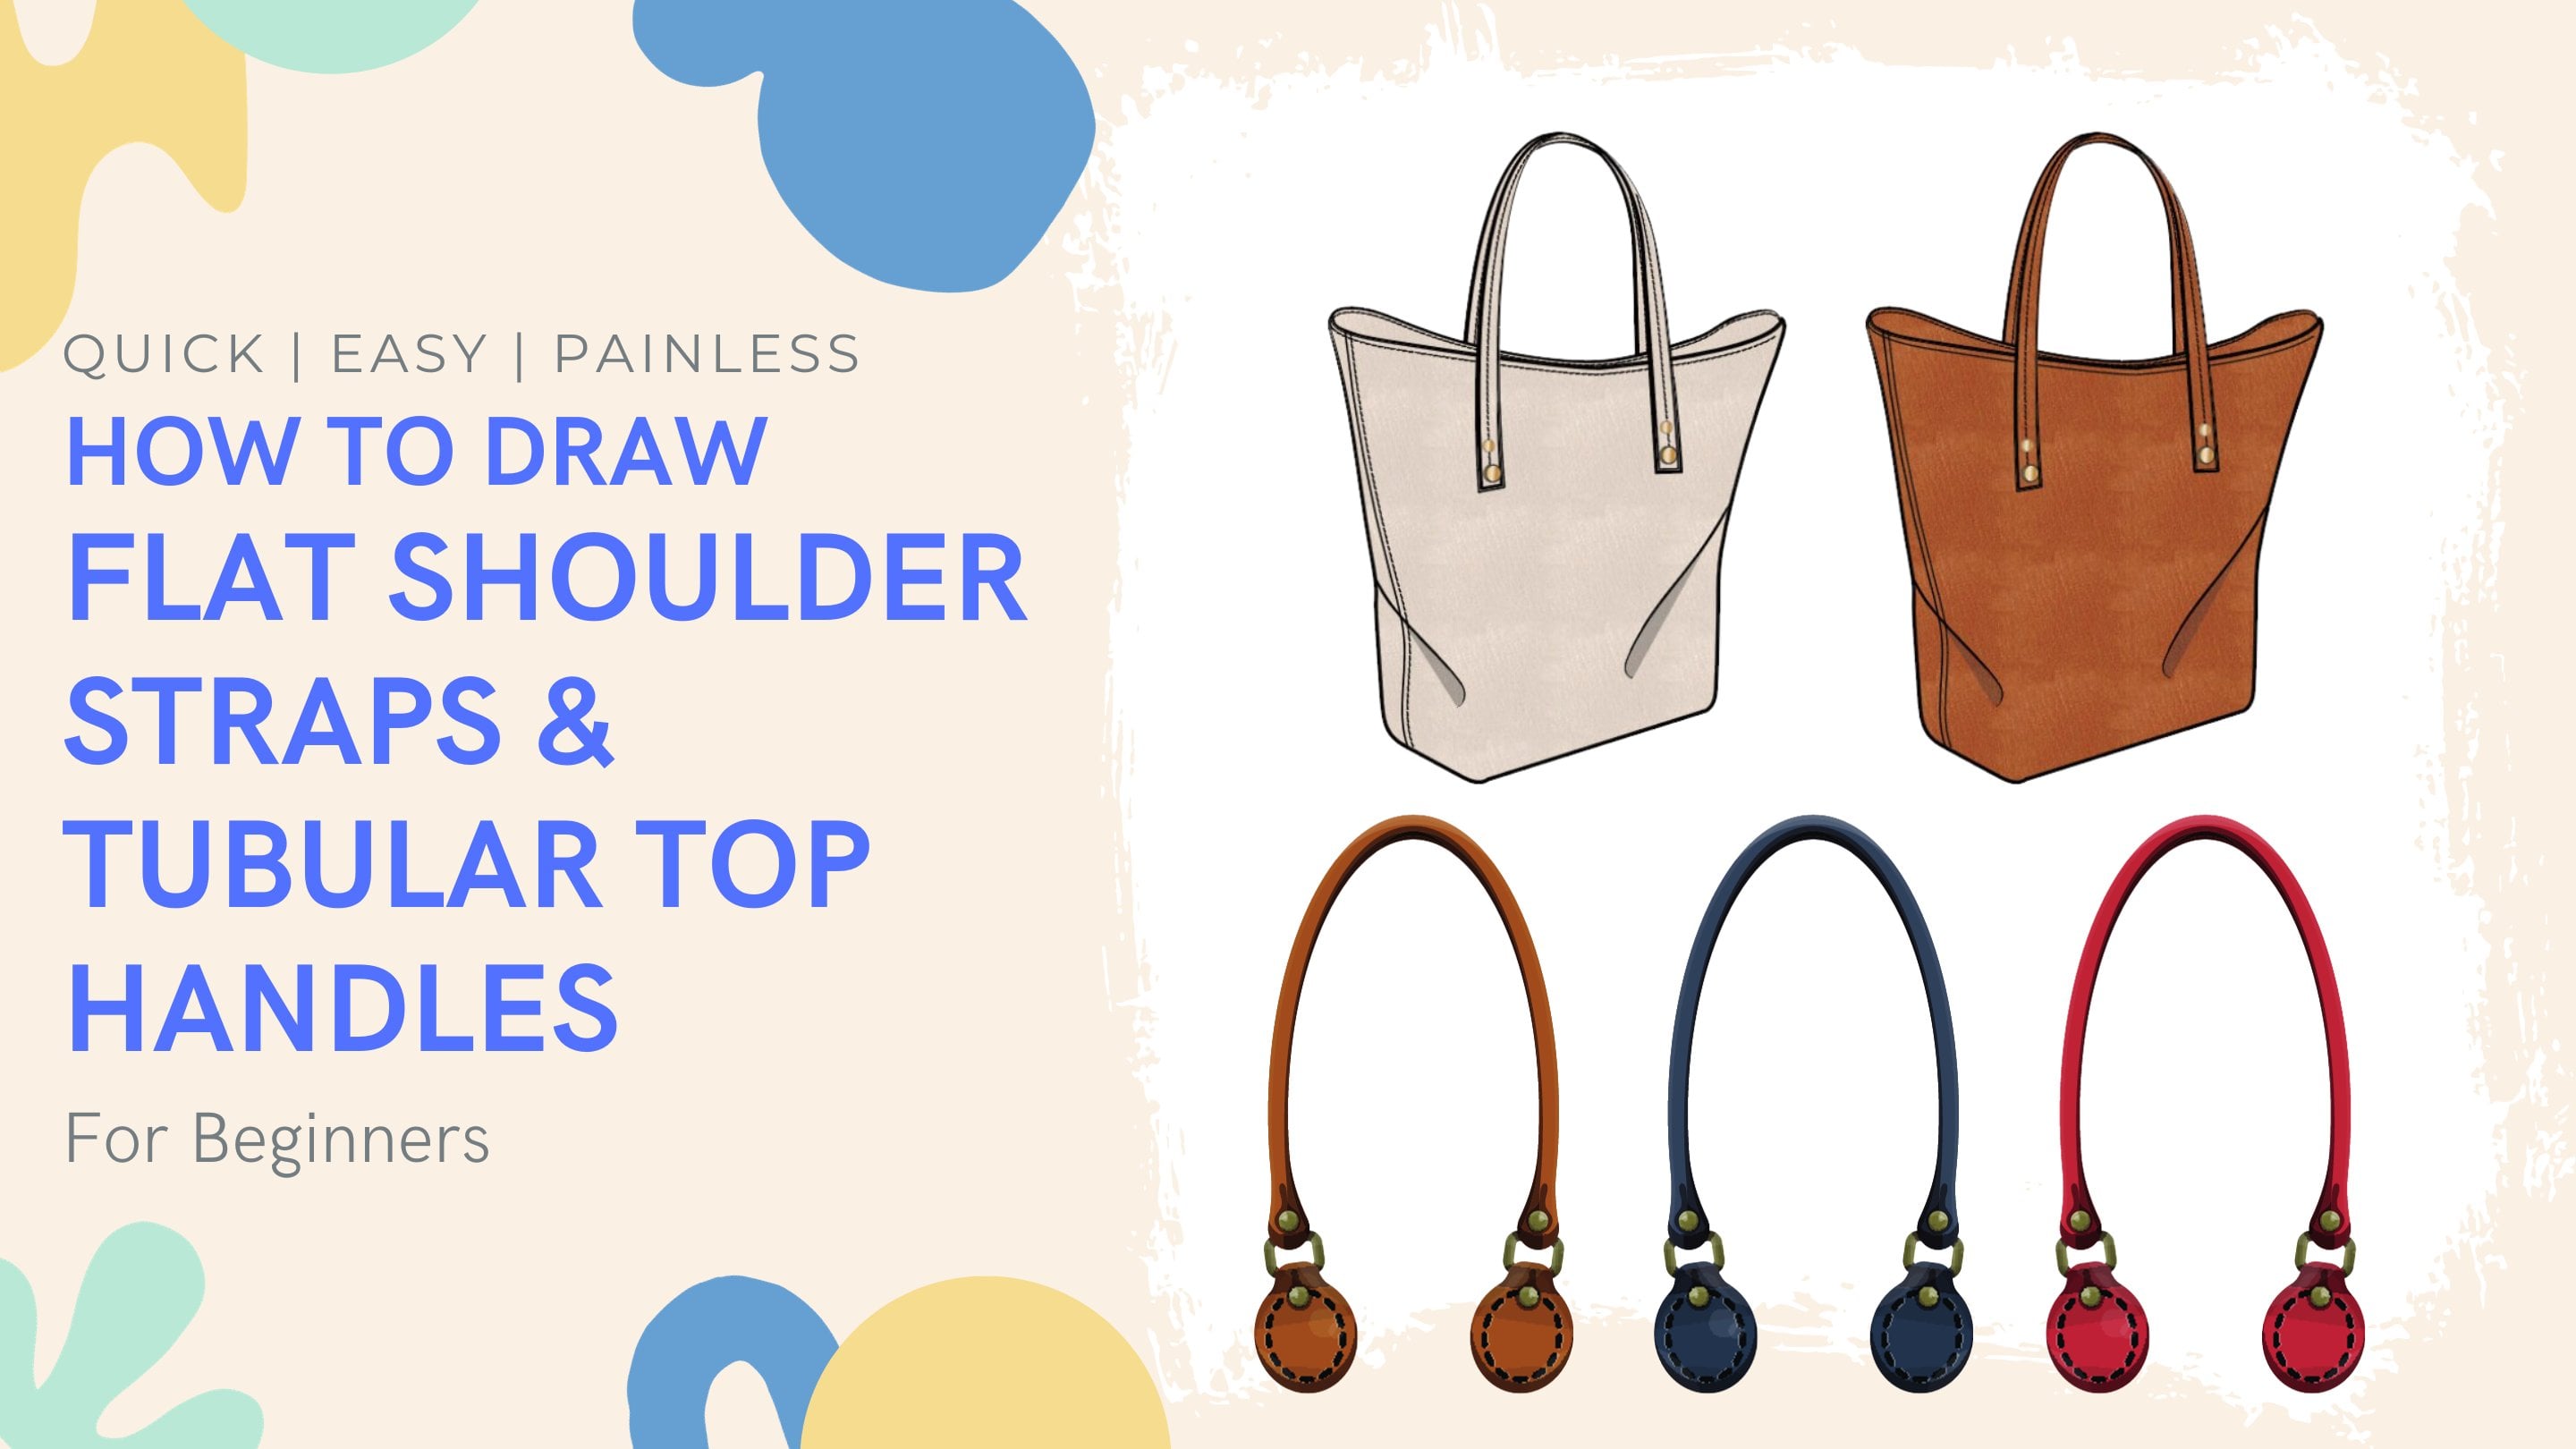
top handle strap. So tap handles. It can be a strap. It could be a tubular handle, which you will see
images in later slides. It's just this. When it's going on the shoulder, the strap sometimes can be called handled,
but personally, I like to call those
structured handle as handles and these type of flat,
very flat straps. I just call it straps, but it's the same thing. You get it. So these are flat. So this one has a shoulder strap and
you wear a cross body. So this is called a
cross body strap. Just look at your bags. You'll realize there are
many different types and desires of shoulder strap
or prosperity strap that you can really designing to overlay you will see images
in later presentation. Accordion Gazette. Okay, So all you had to know for now is just like the straps, just like to tap handles. Just like the flaps. You can really design into
what type of Gossett you want, depending on the function, depending on the look. Remember your other designers. So you decide accordion gossip basically means just
like an accordion. It can expand, it can retract. So in later slides, you will see an image of that. Lastly, we need to talk
about interior color. So it's actually this
piece right over here. So it is a color
just like apparel. We add to the opening, closure of the bag where you can see the
inside of the bag. The reason why we add this
piece for two reasons, actually reinforces
the openings, so it's not flabby
and very wonky. And then we also use it, especially in leather bag. Well, we want the consumer to
look at a bag and believes that illusion that the inside of the bag is also
made out of leather. If you look at your bag
and if it's a bigger bag, you will see that only the
top part is in leather. And that's a function
of the interior color. It creates the illusion of
top part is in leather, connect into lining
fabric materials. Once you look in bird's-eye
view of looking in, the thing is that leather
costs a lot of money. So most Designer Bags, like even prouder and Gucci, they do not create an interior. The bag in 100% leather, it just costs way too much money and there's really no point. So what they will do is that
they will cut interior color to create the illusion
that the inside is the leather when you just
look at it from the top. Now, most people don't really open up the bag and look in. And then this piece of interior column leather will
be connected to the rest, which is lining material, and that's where you
make your pocket from, the interior pocket
sprung as well. So I hope that makes sense. Now, let's move on to the
next part of the class.
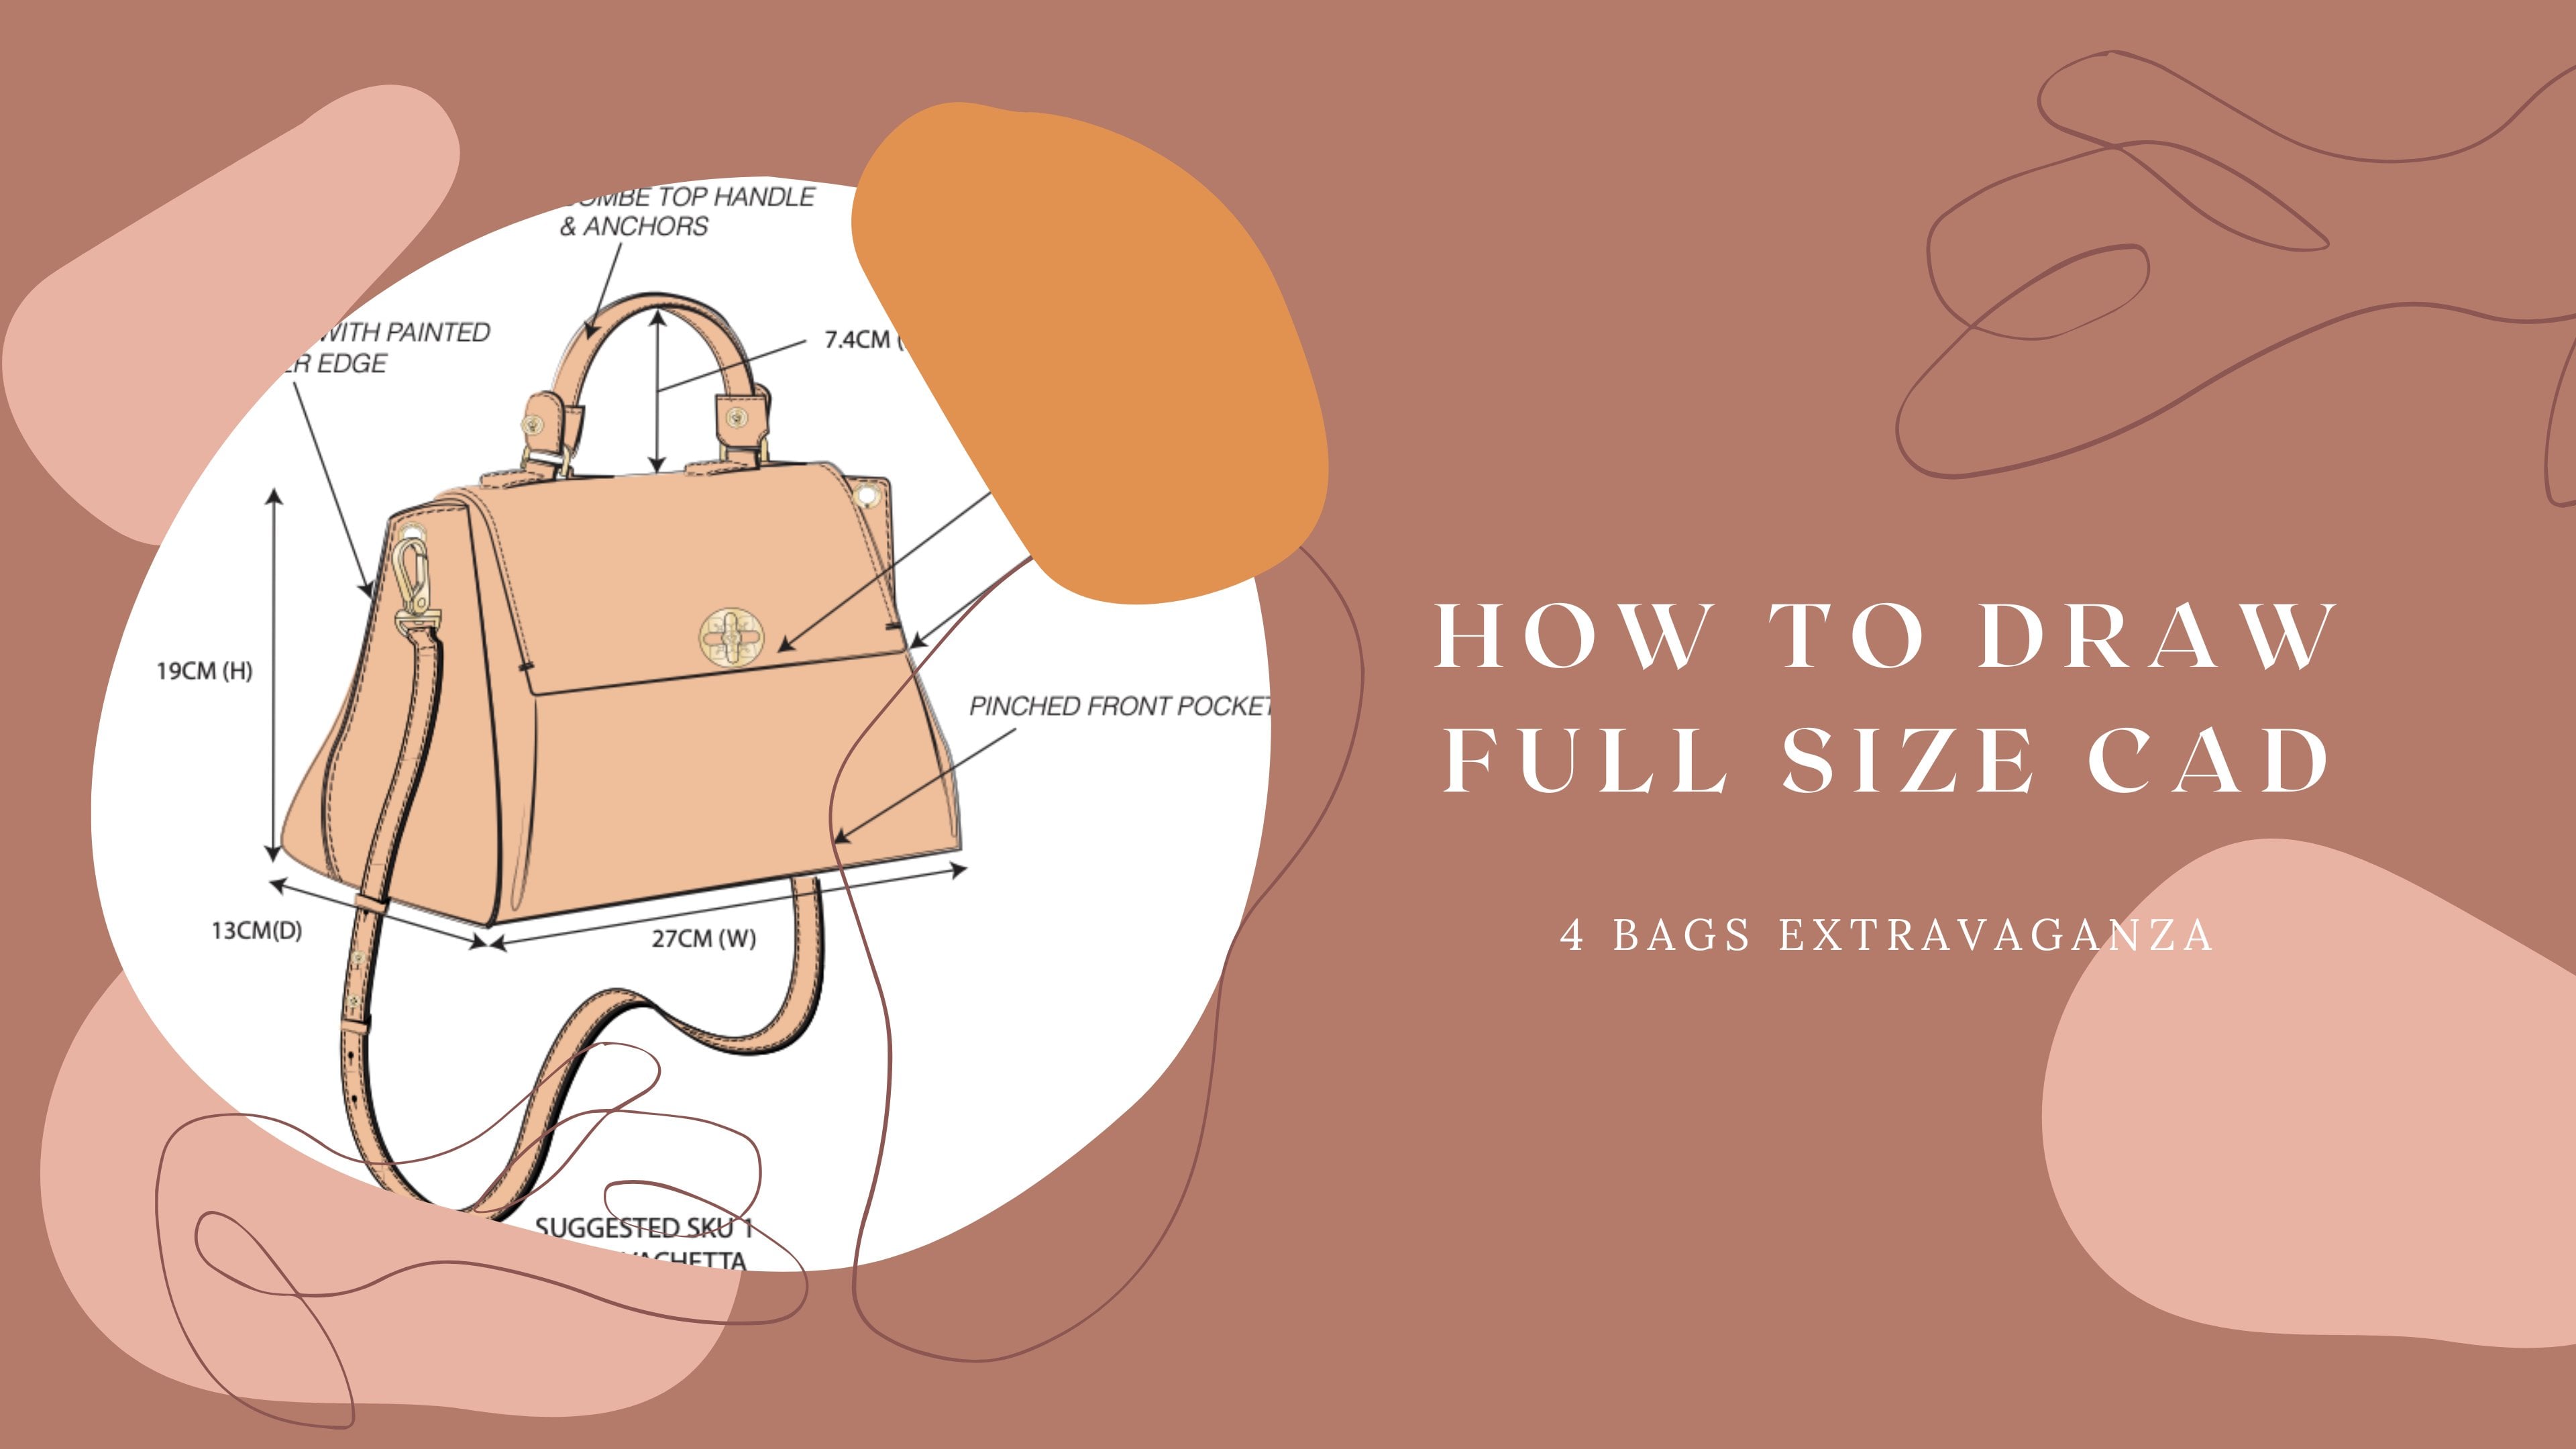
3. Real Life Demo : So to recap, this is a bag. Now you know, this is
called a front flap. Then this one uses a
Mac snap, snap buttons. And as you can see, this is the fall flat. This one has a Gosset. It also has a bottom panel
being connected to the GSA. It has a back panel, N2, a little caffeine. How Q is that? Anyways? So this is Bank Number
one, bag number two, you have one flat using a this is why
I call a pinch lock. You pinches in and
then it closes it. You have a double flat. If I can open, which uses
a Mac snap immediately, you notice will cost you. This is actually a real leather
bag design which I love. This is the closure. This is the front pocket. You can see the
interiors lining. And remember the illusion, the interior color I was
talking to you about. See that this is a call apart. It creates the illusion when
you just look at it from the top that always leather
until you look down. It's actually lining
on the inside. Again, this is a Fromm. There is no Gossett,
There's no GSA. You simply call
this the side view. So again, this is
the front panel, back panel sewn
together in the center. So you have an
emergency you don't see any top stitch because it's so from the inside out
just like apparel. And then this one, this is actually what
we call a a T bottom. So it's like a shape of a T. So you see the T going up connected to separate bottom
panel with metal fee. I will have a different
class to talk about hardware specifically and how
to design into it. I'll show you how to do that in Illustrator for size as well. So that's that. Alright, this particular bag has only one single top handle. This is what I call a
structured tubular handle. And the reason why is
tubular hand though is because we
actually, oh, sorry. Put C down the side. We actually put a plastic
tube on the inside. We sometimes put plastic rope, the cylindrical in shape to create this tubular
handle shape. Alright, so there's that. Now I want to show
you a third bag. So again, I designed this for
a vegan brand called Nico. Nico really, really
cute startup. Remember I was talking about
overlay in slide number one. This is called an overlay. Sometimes some
companies just call this the strap with buckle. That's totally fine. But now you know what
to overlay this. And this one has two
closure designs. Number one is a flat
with a Mac snap bottom. Oh, did you see this is
also the interior color. I add up all the way around the flap so you don't get to see the underside of it
is actually lying with ultra sway trust way. Sorry, it's actually cheaper than leather, like
I said before. When you flip it open
and look at a site, there is a second closure
which is a zip closure. And the reason why I
add a double closure is because this is
warm as a backpack. You see how deep this closure
goes if I only have a flap, everything will literally
just come off on the size. So I had to add a
zipper closure to it. So you have the front you also have a front pocket,
open pocket. There is no zip closure. It just an open pocket. And then I use a web stitching to connect a pocket to the front panel, the bag. You have the bottom panel
was for metal feet. And you have your back panel and a tiny little strap handle. Just to illustrate my point
and please ignore it. I'm sorry it this
way, ignore my cat. So you see, this is a really
cute purple double flat. This is called flat,
double flat cross body. I designed for a brand
called femto cupcake. Not sure if you guys can see it. The point is, here
is the front flap. When I turn it. You see this this is the Eocene. There is no gossip,
no side panel. This This is the Fromm. Connect it to the back. This is the back panel. And we call this the ys
seem like I said before, because we saw it. We connect the two panels. Can't really see it actually. From the inside. You saw it from the inside, then you turn it on the outside. Exactly just like the apparel. So in process, so
this is the insane. Alright. So I pretty much right
at my mom's closet and came up with this really beautiful Burberry
cross body bag. It's a cross body
bag because it has a cross body strap
that you can put up, cross your body like this. Hence cross body. And because you ever wonder why do we call it a cross body bag? Alright, so one thing I wanted to show
you about this bag, which is so pretty is
the drop zip closure. And the reason why we
call this a drop zip is because you see how
the opening is here. But your zipper is almost an
inch and a half way down, dropped from the top part of the closure all the way down. That's why it's called
dropped in zip. I really need to figure
out how to look at the confront and do
this at the same time. My apologies. So drops it. This is the zipper bridge. You see that the zipper
bridge connecting to the zipper tape
with some metal teeth. And usually for zippers, the exterior zipper
for main closure with stick to number five
zipper and you can use YKK, you can use any other
brands you want to use. For interior zipper. See that interior zipper
on the interior back wall, we usually use
number three zipper. And this one has
also metal teeth. For less than a mid tier
two lower end brands. A lot of times they
tried to save a buck, instead of using the
metal teeth zipper. We'll switch to nylon zipper. And there's absolutely
nothing wrong with that. It works just as well. Alright, so I also
wanted to show you this beautiful anchor
slash overlay design. So basically it is a anchor. The anchor is
something that allows a ring to be connected to that
incurs some kind of strap. So the anchor is basically
this is literally an anchor, is where the strap
is connected to. This particular Burberry design basically started
out as an anchor, but they decided to do a loop, a decorative buckle,
another loop. See how beautifully it finishes. So this is like an
anchor overlay design. Now, I also wanted to show you, starting at the bottom, you have this beautiful
trim, Alright, bottom trim. And then finish with a beautiful piping going
all the way around. So if you really look at it, the bottom construction
has no panel, is literally your
your front panel sewn to your back panel, adding a bottom trim in this
beautiful decorative shape. Okay. On top of both panels
to front and the back. And in the center. You so a beautiful piping. So as a designer, it's really up to you how you can utilize all these design
elements, the overlay, the piping, the trim, even the corner doors, and add them all together
and design it into your own. None of these techniques, design techniques or new, but it's the way
you utilize that. Incorporate it into
your own design that will give them new
life. Don't copy. I keep saying that
do not copy. Okay.
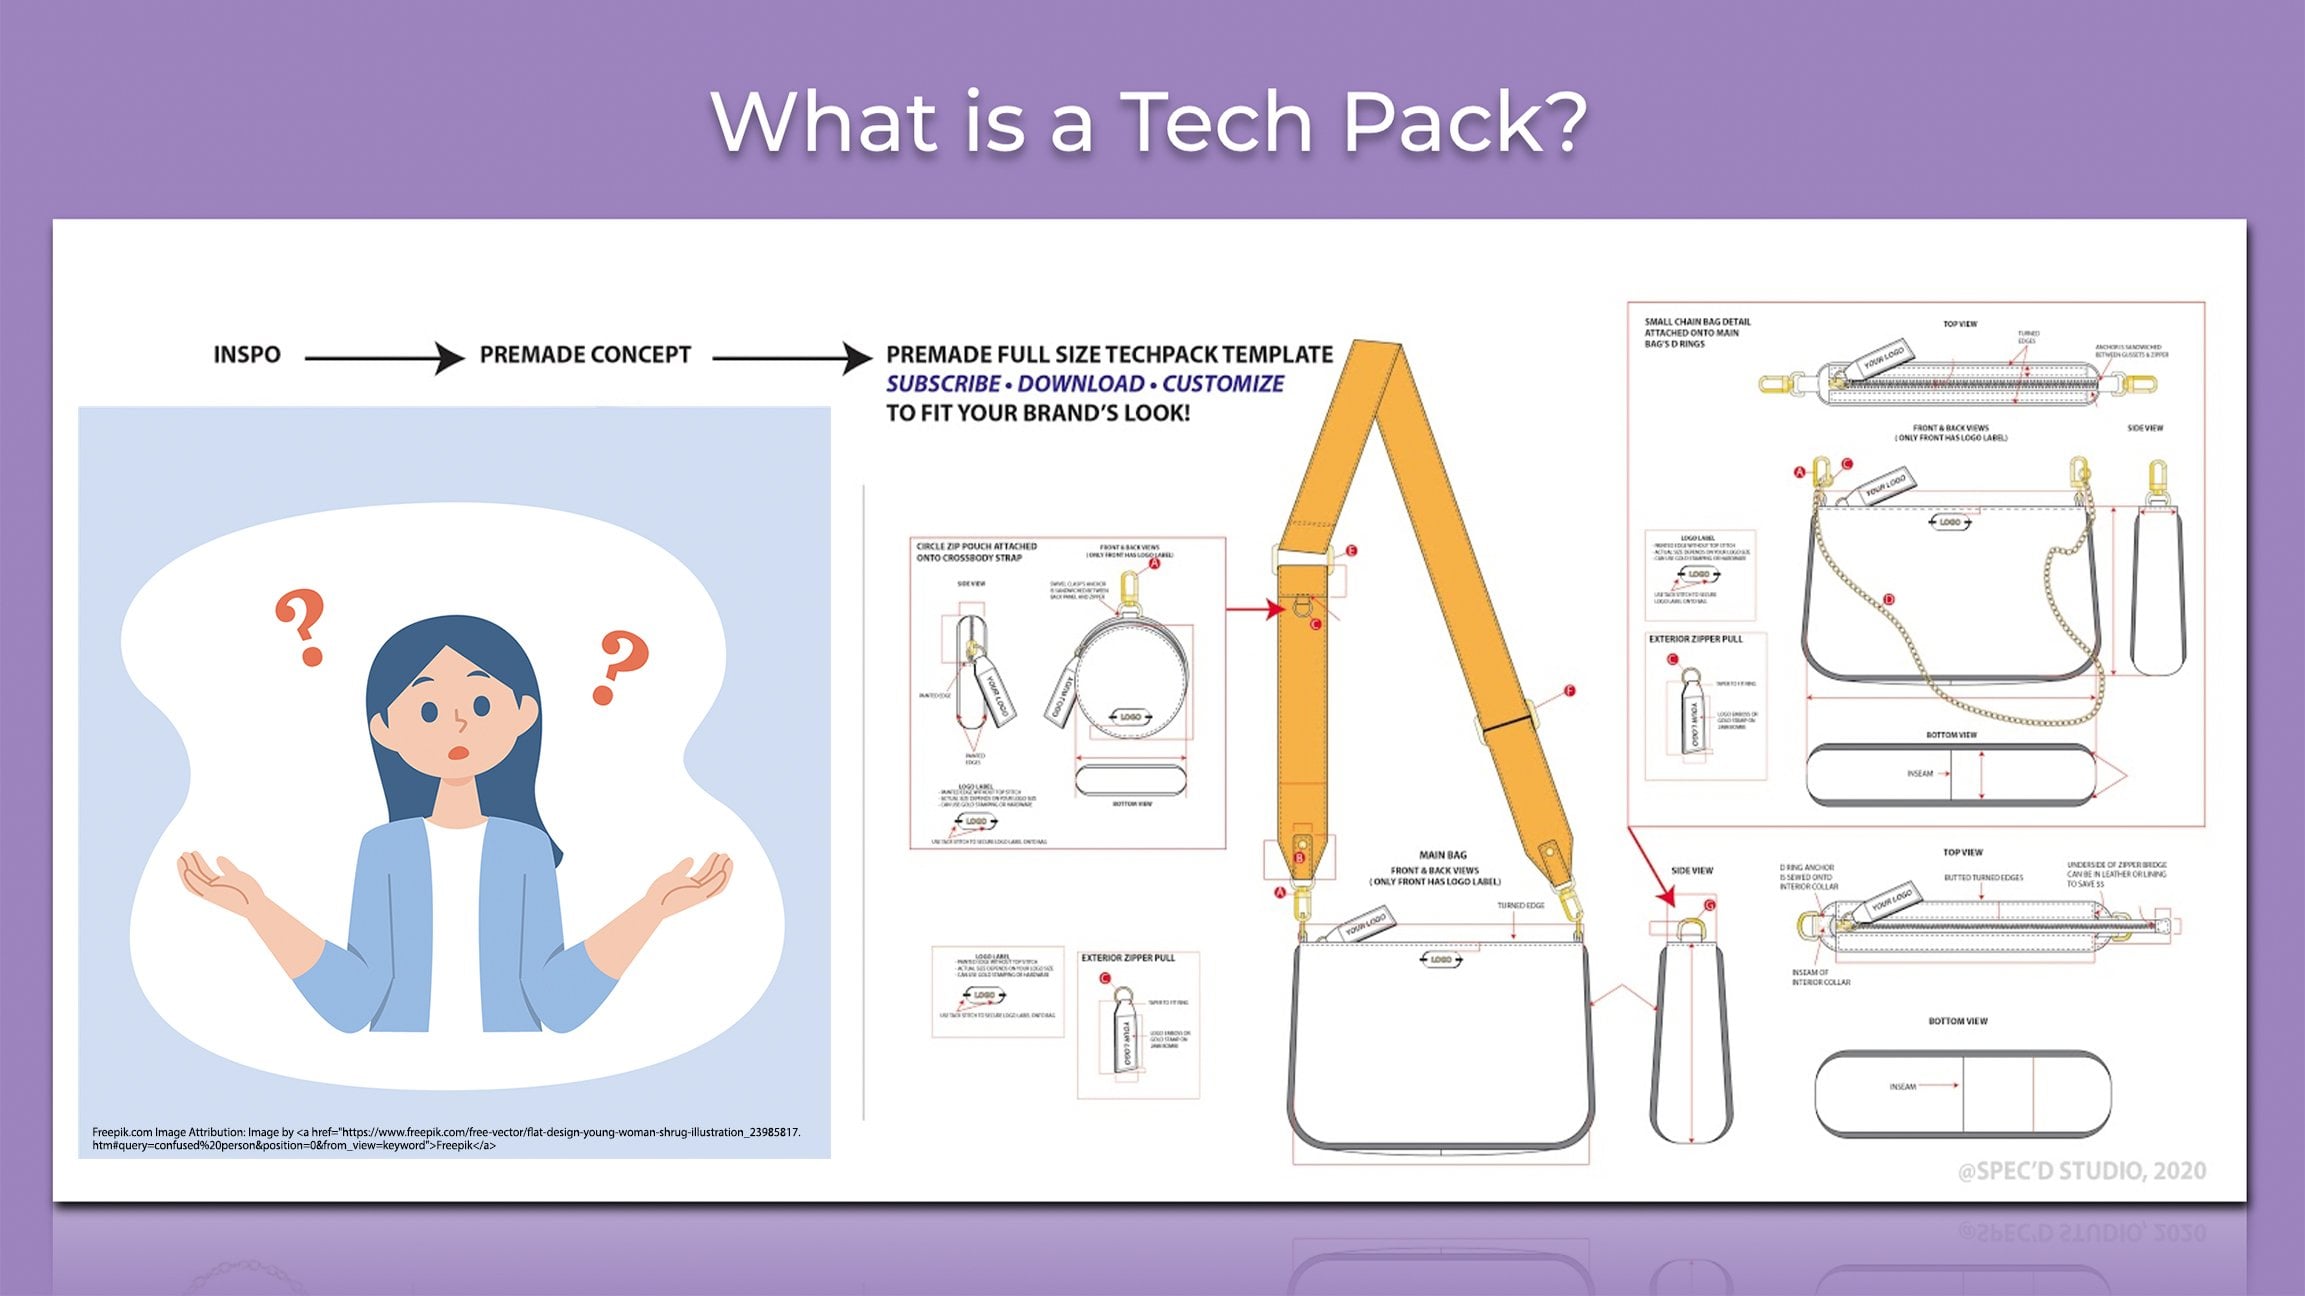
4. Anatomy & Construction Lingos: Alright, so on this page, I just wanted to go a
little bit further to share with you very minute details of certain constructions such as zipper, color or trip. So remember how we were
talking about interior color. You put it on the interior, but there's also
something called a zipper color where you create
a strip, a leather. Well, this one is
more like photo from the front panel playing giddy idea connecting to some
sort of a zipper opening. So this is the zipper color or trim some
companies call them. Does it portray
him? Some company called color doesn't matter,
it's the same thing. But you can see this color
is not connected directly to the zipper tape is actually connected to
another piece of leather. So this, this other
pieces of leathers on each side of the zipper tape is called a zipper bridge. So a zipper bridge
basically are pieces of leathers connecting
directly to the tape. The zipper tape itself
creating what we call a zipper window
or zipper closure. Same thing. Now, it will hold
the zipper together. And it will also
create the width of your zipper opening
of the bag or pocket, doesn't matter what it is. Now, second part to this is
what we call an anchor tag. So this little piece of leather basically anchors song
kind of hardware. It could be a ring like this. This is a rectangular ring, or it could be a dark lit. And again, some company
calls this anchor, so uncommonly causes tab I personally like
to call it anchor. It's the same thing. We see. Anchor a lot when there is a strap or when there's
a cross body strap, or when there's some sort of key you don't like
charms, no Bactrim. So key fobs, you
want to clip it on, you have to use an anchor. Obviously, anchor
is also something you can designing tools such as. So for this particular bag, I designed for fans of Cupcake, which was a fashion startup. I decided to cut, slit across the back
panel of the bag and literally insert the anchor
into it at a top stitch. And I'm done. And this
anchor holds onto a D-ring which connects to a
tubular top handle, a tubular top hand. Those created by wrapping as
sewing a piece of leather onto either a plastic
tube or a cotton rope. So plastic tube and cotton rope, they come in standard sizes. Pasta tube has a much
more a harder structure, Hatfield and rho. Rho is a little bit softer. You can bend the shape
a little bit easier. So again, whichever
one you use is up to the type of hand feel and
the look you're going after. Because plastic tube and cotton roll calming standard sizes. So you really had to
figure out what's the circumference of this
top handle you want? Is a skinny like 1
cm, two centimeter, or is a fat like three
centimeter or more, then you have to
communicate that on your 10-pack to
your pattern maker. So they can source the right width or diameter
of the tube for you to use. Remember how I was talking about accordion Gaza, this is it. So I got these two images from a website called
indestructible craft, just keyword search,
classic leather briefcase. They show you how to actually
cut the paper patterns, cut the leather, and make
this beautiful briefcase. I should do that myself. Anyways, the point is, we cut the Gosset in half. You see this is part one, part two sewn together
from the inside out. So there's an insane right here. And because now the GSA is
divided into two parts, it will collapse onto itself. It won't retract. It works span when you try, when you open up a bag. That's why this is
called accordion, because it's literally like an accordion design
retracts expense. You see a lot of really
creative designers incorporating this. I would say very classic
accordions design from doctrines, bad
Greek briefcases. The things that your
grandmother used to carry into monitoring martyred, modern day Walla design
and coin purse design. Obviously, when you incorporate accordion Ghazi on, onto wallet, it's a lot more harder to solve because remember
Wallace tiny, the gas is only a tiny
part of the wallet. So you're working with two pieces of tiny piece of leather on the
sewing machine. So if you see a wallet that
use this accordion design, you really need to
give a shout out to the pattern maker of
the sower who did it, tried to do it yourself
on a sewing machine. Alright, I digress. I'm sorry. Now I'm coming back. Sound designers also
take it up a notch. Let's not do accordion Gaza. It's a little bit
too complicated and hard to soap, but let's, let's do something even more interesting how the wrap glass, it is actually very easy, but aesthetically, it
looks really cool. This is the back panel. This is the front panel. All the designer did was
okay, let's extend it. Let's extend the back panel to the side so it
becomes the gossip. Let's also extend
it to the front. It becomes a flat. Same thing with the front panel. Extend it to the size of Gossett and extend it to the bottom
and the bottom panel. How cool is that? And you literally just use a rivet and secure
it onto the deficit. Now it's wrapping, Also
hugging each other. So this is, this is not
a hard construction, but it's a very cool aesthetic. So as a designer is
really up to you, my going for a really
difficult construction is a reason behind her? Or am I going for a
really cool look, but the construction
can be, can be easier. This is something that you as a designer music bell
is, thinks through it. This is also considered
accordion event. An event is basically a, it could be a piece
of leather or lining we added on
the other side, the interior of the bag. When the bag has a
very deep opening. As you know, when
you open a bag, like a cosmetic bag or even a backpack was
very deep openings, things start to spell it out. So we add this piece of n
as a preventative measure. If you add, if you cut this van into two
pieces at an inseam, then you have the accordion fan. Get it. Same idea for this class, a briefcase to an
interior event. Your items first building up. And then we have something
called a recessed Gosset. Recess basically
means that this bag, when you look at
it from the side, has an illusion of a
recessed compartment, which means that this part of
the Gaza part of the bands, literally it looks like
it's going inwards. While the front pocket
of the backpack I, of the bag is going outward. And we achieve that by literally create using an extra
piece of leather strip. This one, maybe 1
cm, two centimeter. I've seen it at three
centimeter long. And we made sure that the
front and the back panel, the total width of each matches to this extra strip of leather. So it looks like that GSA is going in when
reality is smaller, we're taking the front
and the back panel outward by one to
two centimeter and a sewing it to the strip on
whether you see a lot of vintage bag having this
type of recess GSA designs. So on this page, you see that there
is also something called the center zipped
compartment or divider. So on the interior of a bag, depending on the functionality
you want us back to, how we can really
designing to it. We can add interior pocket, which we've seen in
the previous slides. Or what we can do is actually creating a separate central
compartment like this one. So basically what it does is that we added two
pieces of leather, will literally sew
it to the scene, the center seam of the entire bag to create
a separate compartment. And we have a zip closure
that runs across. So there are many, many, many different ways of
constructing this bag. And if you look at
the side view of it, you can see that the
edges are painted. And this is clearly a number five metal zipper
with a zipper pull. The size you can see this is the front panel overlapping on top of the back panel
with the edge painted. I've been saying this
over and over again. As a designer, it is your job to not only
offer functionality, but to do it in such a way that aesthetically design wise, it looks fresh and interesting. Last but not least, let's talk about cross
bodies because there's also a lot of lingo associated
with its construction. So there are two different types of cross body straps here. This one, the white
one uses this is what we call a
pin snap. I'm sorry. Now pins snap, this is what
we call the colors star. I don't know why I say pin that. Call it. Color. Starts with seven
key ****, 1234567. So this is pretty standardized. You can also do five key holds. If you do five key hose, you might want to space
this apart more so that you can give a greater
adjustability to the where. And the second type of cross body strap basically
uses a adjustable buckle. Again, I think this is
also a seven key hot. So usually the way we
measure the drop is would pull the cross body
strap up and straight. And then we made sure
doesn't matter if we're using the colors
start or the buckle. It's measured when
the buckle or the color stop or in
the center hole. So the center hole for seven key host strap
will be this 11234. This is center front
measure from the top, 1234. This is still the center keyhole
measure from the bottom. That's how you measure keyhole. So POJO color stop or put your buck hole at
the center keyhole. Poll your strap up
straight and measure the drop like 52 centimeter
or 56 centimeter, which is a standard
drop size for cross body for standard sizes, if you're talking about, let's say petite, or if you're talking about plus size program, obviously a standard drop off, 52 to 56. Well, not work. This is what you need to
follow your brand's guideline, the sizing guides, and figure out what the
new drop sizes. Let's say it was 60 centimeter. If it's 80 centimetre, that you really need
to think through the placement of the key **** and how far apart
they are going to be two so that you're aware can
actually comfortably aware. Now, last but not least, try not to use slider
for leather strap. So a slider is what we see on webbing ally or
any type of sports bag. It literally,
you're able to pull your strap and just
slide it in and out. It's not a barcode. It doesn't have this ping in the center. The problem was slider
is that the edges, no matter how hard you try
eventually it will wear off the edges of any
leather material or even for leather material. And you start to
see every time you slide that metal across, you start to see the edge pink, like cracking up
and coming on down. And sometimes you even see
the threats coming off. For the most part, we keep slider for
nylon materials. Fabric materials are webbing, but obviously they're always brands who doesn't really care. They'll just go ahead
and use the slider. And there are very
well-made sliders with bevel edges does not gonna
slice off the edge pain.
5. Different Types Of Edge Finish: On this page, Let's talk
about edge finishes. This is actually one of the most important
parts of making a PAG, but usually people
don't even discuss it. As you know, we mostly working leather and even
imitate leather. And the edge of a leather which was really just a piece
of skin of the animal. They come unfinished. So is rod is very uneven and so you
actually had to send it. Then after you send
it, what do you do? We usually distend up practices. We turn the edge
inward so you don't even see the exposed
part of the leather. Even imitate in liver, the exposed part is just white. So it looks really ugly. And then the hand
feels horrible. So we turn it inward
like a piece of fabric. And then we just don't even like you see the inside of it. Let's say if you're
working for better brands, but even now lower brands
do this all the time. We paint the edge. So we've painted in
some sort of color that matches back to the
color of the leather, which is called
DTM die to match. Again, go to my bill
of materials class. You will see how we utilize
DTM and why we do that. We painted in colors
that matches back to the body or we painted in
some sort of contrast color. As you can see in this bag, the body itself as purple. But then I really want to
make a pop statements. So I told the factory, Can we just paint the edges
in block or a red or blue? Doesn't even matter what
color we're talking about, pretty much any color you
can find, you can buy it. Now, this particular bag has two different flaps
overlapping one another. And as you can see, this is called
butted turn edges. So what happened is the
top portion of the flap. I turn the edge, the
underside of the flap. I also turn the edge and
I bought them together, sew them together, butting
up against one another. So this is called
buttered turn edge. Then Ryan a nice, it does not apply where I just
paint the edges. So again, like I
talked about over and over again, as a designer, you can make this decision to really make the bag a statement. You can decide what type of design elements
you want to keep, you want to incorporate
and you want to highlight. Okay, so now this from pocket design also have multiple construction
and edge finishes. Number one, that Gossett, remember psi panel Gosset. The pocket is
painted edge on top, but the flap itself is
buttered turn edge. And then you can
see the back panel of the pocket is Peter edge. Then the GSA to the front panel, we do an easing construction. Now, when you create something
that's so elaborate, this will add to
your labor costs. Why? Just a very quick segue. Think about you as a solo or let's say you worked for
this company does factory, and then you've received a tech pack and
it's hepatitis it, this is how you're going
to make a front pocket. How many steps do you think
it will take you to sit in front of that sewing machine to sell this thing together. Where do you even
start sewing first? Or maybe you don't
even start sewing. You actually had to
paint the edges first. And whose edge do pay? You paint a petal first. You paint the GSA pen on top, possibly the prompt
panel on top only. Then what's the next step? So step one, you paint all
the edges that you see. Step to yourself. Oh, how will you still the
flat by yourself first, you turn all the
edges on the fly, but they use so the
flat by itself. Then what do you do
next are very simple. You can sort of flat to the back panel first
and once that's done, you can sell the front
panel to the GSA first. Once that's done, then
you sold the entirety of the Guzman depend
on how they are connected to the back
panel and a five. How many steps did I calculate? Ss, seven or eight steps, I think that will account
for your labor costs. How many steps, how long
the time it will take for one soar to put together
to construct your bag. That's how they
calculate labor costs. Obviously their overhead, which we don't need
to go into because no one will ever tell you
what their overhead cost is. Now coming back to this, you can also do
something like this. Let's say this is
the front panel. You overlap it on top
of the back pedal. You paint the edge of the front panel that's
on top, that's exposed. And then let's say this
is the back panel. You can add a piping. And then for the bottom
panel, I'm sorry, not back. This is the bottom panel. You can soak into the pipeline
so you create an NC chess, a very simple construction. How many different types of techniques did
you just employ? Edge finish, painted
edge finish, adding the piping during the incident construction
at the bottom. So do you understand why it's
so important as a designer, you have to understand
all these anatomy, construction details and lingo. Because if you're
not able to give very detailed instruction to the sower and I've had a baker. We'll just do the bag
however they want. And whatever is
comfortable to that and all these beautiful
design details will be completely lost. This one on the left, we have what we call the
roll edge or fold-over edge. So basically, if you look at it, you are literally folding the external exterior
material onto the inside, you're folding it or rolling it. I don't know why some
company calls a road over, what other company
calls a fold over, but it's the same technique. And this is another view
of it you can literally, literally see is folded in war. You can see a very faint
line right over here, about five millimeter
from the edge, which is the folded
over part is kinda showing through because it's
pushing the material out. Now, this central bag
is a background actual, again, I stole from my mom, absolutely loved this bag. This is where as a designer, where your value
really comes through. It's in little areas
like the edge finish. You really start to
see the designer really knows her stuff
well, his stuff. For instance, this beautiful trim all the way
across the flat, all the way across the
front panel, the bag. It's actually painted the, all the edges of painted. This is painted to
have really thick double stitch plus
perforation coming across. But then add the edge of this
pen to a edge, sorry, edge. You basically butted
against a piping, you add a piping to it. So again, individually, none
of these design elements, they're not reinventing
the wheels. But when you add them together
so cleverly, you know, it really transformed the bag
into something so much more elegant and worth
the buck binding. This is actually a very
simple way to finish the edge where you literally cut
a separate piece of a trim and you fold
it in half to cover up any exposed part
of the material. This one this is
leather binding, is finishing up the exposed
edge of the lining material. I believe this was your car, I want to say, I can't remember. And for this one is
binding on nylon. Again, nylon is fabric. If you don't finish the edge, the edge literally
looks like a raw, exposed fibers
just sticking out. Eventually the whole thing
will just fall apart. And you can also use leather
binding on leather as well. This is a beautiful ragged
bone back in fall letter, instead of painting the
leather turning the edge, they simply added a latrine all around it and you're done.
6. How To Measure A Bag: In the very beginning, I think the intro
part of this video, I talked about how everyone kinda measures it differently. And I hate to say it, the way the Americans
measure is actually quite different
from the way that Europeans measure and
the Asians measures. So I'm going to give you a very standardized way of
how to measure a handbag. First thing first, US standard, we measure it as such with
this is called width depth, which is literally how, why on the side as
bag is going to be, which is also this measurement. So this is depths and a height. I mean, come on, we have to
know what the height is. And if you want to
be very accurate, we call this the top width, going all the way
across at the top. Going all the way at the bottom is called
the bottom width. Obviously height
remains the height. This can be the bottom death. This can be the top death. Usually on a website that you see selling any types of bag, they will give you the bottom width times the
depth, times the height. In Europe, they
call this length. They do not call this the width, just so that, you know, sometimes I've seen it. They don't call the
psi with as depth. They call the psi with as well. So depending on which
company you work for, you need to figure out how
they actually measure it. Because next thing is, for the most part, we measure scene to scene. So for instance,
there's a scene here. This is same here. We measure this length
and obscene to the NFC. But some companies
don't do that. What they do is they measure. And to end, there's no
seam, there is no scene. They literally open up this
toe from here to here. And then they just
measure is 40.9 centimeter long in top width. This type of measurement
without the scene is literally call visual. Whereas visual
measurement right here, visual measurements. So you visually look at it, open up the bag, and that's how wide it is. The problem obviously with
visual measurement is that it's up to how
the pattern maker interpret visually
how why they need to stretch the bag so that
it hits 40.9 centimeter. Sometimes the shape of it will be wrong when
they tried to make it. Because it is not like they just cut the pattern from
here, this and that. They cut the pattern here. First. They need, then they
need to figure out how the total depth, 23 centimeter on
top stretch flat, connected to the front
panel, back panel. Then when you open that up, now open out about them when you put it back on the table and try to keep this side
and that side straight. Does that hit 49? You see how it's a
multi-step process. So for the most part, it is preferred we
measure seem to see, but sometimes life
phones is this toe. So for perfect example, there are no seam at
the end of the Gazette. So what I would like
to do usually is I would just tell them what
this length I'm sorry, what does width the
front panel width is. What's the total depths of
the top death of the Gossett? And it added together and
then the bag will be perfect. But again, most company which is doing a talk with visual
measurement like that. Now what is the spread? The spread is the distance
between two points. We usually use it to
measure the shoulder strap. So you see if you look at where did the red indicator line? I measure from the center
of the strap to the center. The outer strap, I mean, it's the same strap
at the other side, other end of the strap. And this is your spread. If you remember the very
first class where I show you guys how to
draw a very simple TO full-size up to scale. I talked about how
the wider the spread, the shorter your
shoulders drop can be. The longer the shoulder drop, the narrower the
spread would be. When the spread is. Why? Even if the drop of
the strap is only, let's say 20 centimeter, it can easily go over your
shoulder because there's enough space in-between for your call your arm
to go through. But let's say for
whatever reason this is a much smaller bag. So your spread is only, let's say, ten or 12 centimeter. In that case, you have
to lengthen to drop of your strap or your arm does not have enough room to
really go through it. So that's the
correlation between the spread and the
shoulder drop. Well, yeah, and this
is called a drop. And we measure this from
the top edge of the bag, pulled a measuring tape, and measure to the bottom, the underside part of the strap with a strap
is pull straight up. That's how we measure the drug. Sometimes will give
the total length. Oh, the shoulder strap to
the factory plus the spread. And then they'll
just fix it as such. And then you'll figure
out what the drop is. But we realized that if we
do our tech pack like that, there will be a
lot more mistakes because let's say
for whatever reason, the total length seems to
go over someone's shoulder. But in the process of making, a pattern maker might actually adjust the length
for whatever reason, maybe because the Buffalo's
too big or too small, and it happens all the time. So what we realize is actually better if
we just tell them, I don't care what adjustment
you need to make. I need to strive to be
24 centimeter after you make that adjustment and
they will do so accordingly. Center to center
for the highway. Oh, yes, this is very important. So a lot of times we add measurement based on
how the pattern maker actually creates all
those little dots and lines indicate the lines
on the actual paper pattern. For the placement
of any hardware. We usually measure from
the edge of where it needs to go to the center
of where it should be. Because this is actually imitating how the pattern
maker will use them, all, the art tool. They will actually create a.in the center of the
paper pattern and that dot represents this is
exactly where I need to fix the center of the hardware. So this is actually
for accuracy sake. Another problem we have
encountered before is a sound designer will measure the placement of the hardware from the edge or
wherever it needs to be to the edge of where
the hardware itself. But what if the edges bevels? There's a bit of a
corner, a shape. And what we realize is that
literally we're talking about one to two millimeter
of mistakes, inaccuracy because when it's
bevel is not a flat surface. So some designer will put a measuring tape over the bevel. Some will put it
under the bevel. Next thing you know,
it's inaccurate. Now, I just want to
also walk you through all the the many
different measurements that are also require. Please, again, paddle makers
are not mind readers. Please do not just assume
they'll figure it out. They will figure it out. But there will be mistakes. And also they may
change things because you didn't write things
out clearly for them. You always need
to give them how, why something is, how
far down does it go? Like this is a length, how far down it goes? You also have to talk about
obviously the edge finish, which we just spend like
almost 20 min talking about. Turn edge to edge or
is it painted edge? Where exactly does a strap ends from the top measure
down 9.5 centimeter. You need to give
that measurement. You also need to
clearly talk about, like for instance, this is
a three-quarter back view. There's the open park is so
light from the top to 7.5 cm. Then you add the pocket, the total length of how
wide the Gaza can be. And are the interior
colors turn edges are what you need to give these
measurements and indicators. Now, let's talk about
cross body drop standard. So for the most part is between 52 centimeter to 56 centimeter. That translates to
25 " to 26 " ish. And both straps
that you see here, this chain link and
this webbing straps. This one is non adjustable if it's not just
about our stick to 56. So there's more room. If there's a tall person
coming in to buy your bag, you have a greater chance of this bag as she's sitting
on the right place of that person's body forces becoming a nuisance because it's the cutting
into everything. If you have a adjustable strap like this webbing strap
with the adjustable buckle? Yeah. Then you could just tell them that standard drop is 52, but it can extend to, let say, 60 cm, 67 centimeter. So these are all the
things that you need to follow your company
skyline, the brand skyline. Or you can figure it out with the pattern maker and tell
them how you want this to be. Yes. So now you can see in
this particular tab here, you can see the top
width 30 centimeter, the bottom width
27.2 centimeter. The spread of the
shoulder strap and how why the shoulder strap is is three centimeter
the dropout of it. And then you can also see
there is a front pocket and I believe the phone
pocket measurement is on a separate page. If you want to do
super elaborate. Strap was little flower
applicants with gemstones, which I think was
all the rage like five or six years ago. You also had to tell tell the factory the placement
of each gemstone, the flower applicant, how far apart are they and
where do they start? You can see the first
flower applicants starts, I think with this one says 6 cm away from the
end of the strap. And then from here you go. You add another four centimeter. That's a second placement of your second flower
applicant was gemstone. Okay. So like I said,
how to measure it. This is how wide the
psi I want this to be. You need to tell the
pattern maker that you also had to tell
them if you have a decorative strap on top, this is two centimeter. Why? The spread is always measured
from the center of item one or object one to the
center of object two. So when there's a circle you measuring 3.5
centimeter diameter. Sometimes certain companies are extremely detailed oriented. I won't name names and then you literally had to tell the, even the spread the space
between the stitching is how far apart are they find a millimeter to
seven millimeter. So then when they're
sewing this, they will literally adjusted a little foot pedal to make sure that it is five millimeter apart between the
two stitch lines. And you also have to
tell it how far down do you want this circle, circular cutout to be, et cetera, et cetera. You have to give
the corner radius. This is something,
it's just one of the minute details
no ever think about. But then this is also
where, you know, whether your bag
is a good product will not start to show through. We found that when you can
give the radius of the corner, the pattern maker
will stick to it. The fracturing will just produce
it 5,000 pieces exactly. It will for the most
part almost the same. If you don't tell them, they may cut this however, why however narrow they want? Because you never really
care to tell tell them, Yeah, This is okay
or that's not okay. We actually do see
a higher percentage of defective bags coming back and then literally
in the store. And then when we pull it
up and look at the bottom, the corner radius per bag is slightly different
from the next one. And that can cause quality
issues because some, especially if you're selling
these customers, I'm sorry, sudden this back to
customers I like over 100 or even $200
customers want to make sure it's worth their money
and you don't have tiny little things
happening like this.
7. Interlining - Filler Materials: So lastly, I'd like to talk about inner lining
or what we call filling materials
that we use inside any bags to prop it up and create a structure in
the shape that you see. Because if you think about it, if the exterior material is mostly leather or
sometimes nylon, it really does not
give its shape. And the reason why a
bag can have a shape is because we added these inner
lining or filler materials, basically behind the exterior
material inside a lining. So you can't really see it. Structure bag,
usually we will add something called the EVA is essentially is a plastic sheet. I'm not really sure if he
can see how stiff it looks, but it's like semi enforce. It can be plastic coating or it could be more like a
crinkly paper coating. Whatever whichever type you get, it basically creates a much
more stiffer structure that most likely you
can stand on its own. We also use this
cotton sheets and then we usually use
this just to create that hemifield that's a bit more dense and
when you touch it, you don't feel lighter
material is so thin, the bag is so kinda like papery. You feel that out-of-bag
is solved as suppleness. We use cut and she. Sometimes we use
multiple cotton sheets to create the hand field. We also use something
called taffy. I know this is
really hard to see, but this is also kinda like, I like to call it
like a texture paper. So what one does is that
it's actually quite soft, but we usually use a
lot on the spine of a flat spine of a
wallet basically, anywhere where you have a piece of leather that's
going to fold in half. We realized that it adds, supports the leather as well as it creates a
beautiful arch shape. If you don't add it, basically the leather
on the spine itself, which has become
really, really wonky. And obviously we
also use cardboard. Yes, it is true. I know this urban
legend out they're all very cheap bags
when you open it up, it has cardboard and they usually start to
stink after well, which is actually an
unfortunately true because carpal gets
moldy very easily. So if you buy bags, I hate to say it in any one of those very cheaply
199 dollar store. Don't be surprised,
this is what you get. You can also tell whether
you have cardboard inside or simply by squeezing the bag, doesn't matter
where you squeezed the bags body or the flap
or whatever, you will hear. Almost like a paper crank. Like crinkly sound.
That's when you know, most likely to add
a car pointer. So now woven. You hear this a lot. If you have any very affordable or
giveaway grocery shopper toes, they usually made out
of noun woven fabric. So this are created in bulk. The very affordable. They kinda function In-between like cotton sheets and Teflon, where it gives you a better
hand feel is smooth. This out. The outer material. Yes, we do use it
interchangeably with cotton. She's a Teflon
like for instance, there was this one back. I was literally making
his sewing by myself in Italy where I couldn't get the flap right hand
field which is wrong. And the pattern master, the master master,
that's what I call him. He was really amazing. He pretty much show me
you have to stack up the Teflon and followed
by the cotton sheet. Then you end with a
noun woven to create a really good supple him
feel of the spine. And when you open up
the spine of a flap, it has a smooth arch and
the material will just follow through with the motion
and it doesn't wrinkle. It doesn't make funny
sound because it's supported by the now open the cotton sheet and the Teflon. So literally I have three layers of these
filler materials inside that one single
flap construction. Now, obviously when you
start to add lastly, my apology, the phone. So again, we use the foam a lot less than what
we want to create. A bag that has more of a thicker him feel like
visually a sticker. And when you feel it, it also feels very fault. We will use the phone. The phone comes in many
different thicknesses, so you kinda have to
experiment a work with the pattern maker to decide what type of foam is
best for your bag. Not too long ago there
was a bunch out. There was a trend
about bubble bags. And a lot of these bubble
bags ended up adding foam on the interior to
create that puffiness. Sometimes they use
cotton and like I said, sometimes they use form. And obviously when
you start to ask so many different types of film materials into
one single bag design. The cost of these filler
materials will be added to the first cost of your bag. In the next video,
the next class, I will explain what
a first cost is. Just know that all of these, you cannot even see it on
the outside of the bag. But each and every one of
them will cost you money. No MOQ or no minimum
order quantity basically means that you don't
have to order into them. Because usually the factory will literally have bought
some bolts and sheets of them just lying around in a pattern room
as they are making it.
 Stella Chang, Retired Handbag Design Director