Transcripts
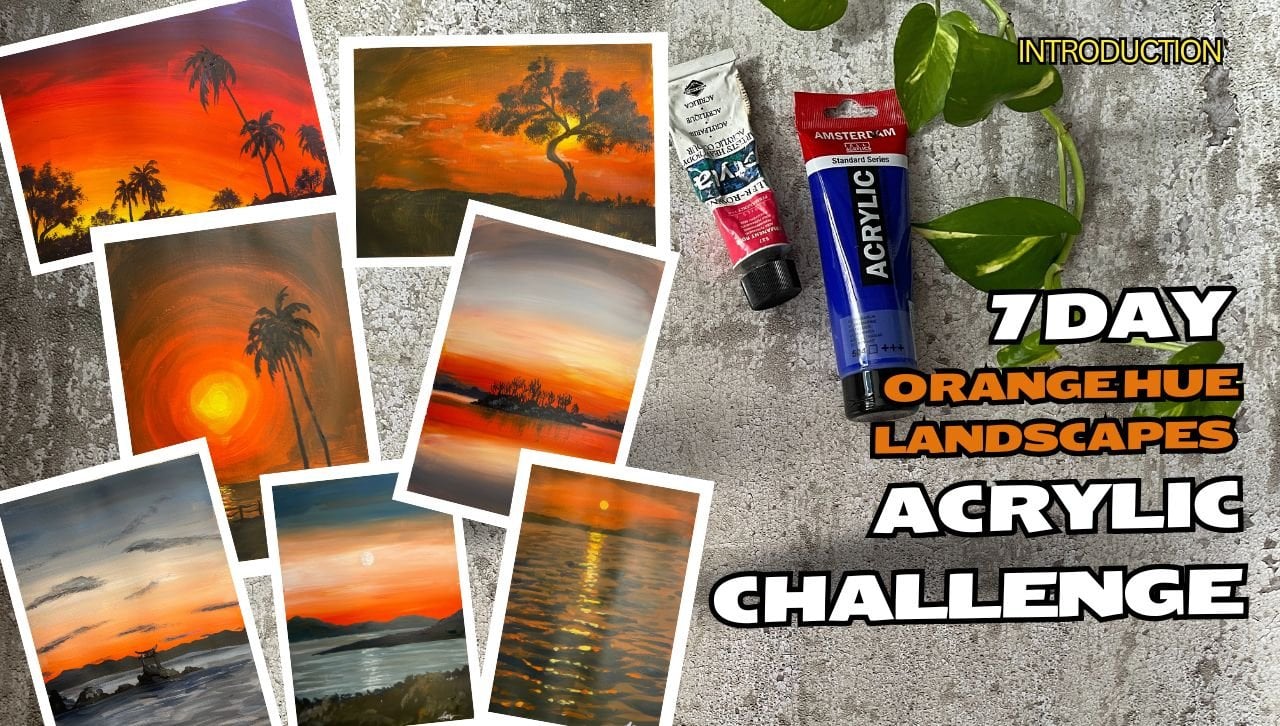
1. Introduction: Hi. Hi, I'm Teacher Iso. Welcome to this online
art Acrylic painting. And I'm so glad that
you took the first step to kick start your art
journey, Acylic painting. Now, Acylic is a very, very um, versatile medium. It's one of my favorite medium
to start when I'm learning or teaching art actually because it is really
such a forgiving medium. You can always paint over it
if you make any mistakes. So there's no need
to be scared when you're using acrylic
as a medium. And as a result, I use it and I teach it a lot
in my classrooms as well, in my physical face
to face class. And I am really
happy to share it here on skill share
with you guys. And I have crafted a series of beginner landscape
paintings for you guys so that you can take yourself through learning how to use
accurate from step one. And we're going to start with basic and simple landscapes. So for this project, we're going to do
this beautiful, beautiful Tight
mirror landscape. It's really lovely, right? Yeah, the colors are. So
beautiful. Don't worry. In the tutorial, I'm going to break it down to
really simple steps, and one of the key skills
that we're looking at is how to make
beautiful blands. Now, if you understand how to make smooth bland
in acylate paint, you can paint a, a lot of landscapes. Yes. A lot of the beginner questions that I get is how do I
make a beautiful bland? That's why I design all
these tutorials for you guys to practice and
practice your bland again because I want to
show you how powerful a single skill blending can improve your
artwork significantly. Are you ready to stop? Let's go.
2. Materials: L et's talk about materials. Now, if you look
at this, this is actually the setup
that I'm using. Now let's take a look at some of the materials
that we'll need. So over here, you'll see
that there's paints on top, there's paper, and then there's palette and
there's brushes. So these are essentially
most of the materials that I'll use that need some
kind of explanation. The other stuff that are
not shown in this picture is actually the cloth
and the water container. If you use the commercial ones, then usually they have three
columns or two columns. If you're just
using any you know, like, takeaway container,
you just get two. Yeah. That'll be good enough. Okay, let's go back to
what's on this picture. So at the back, you can
see that there's actually a paint on kind of paper pad. That's what I'm using
in my demonstration, but you don't have to use that. You can use any
paper that's thick enough to hold acylate paints. Now, some of you
may choose to use stretch canvas or canvas panels. That's entirely fine too. They tend to cost
a little bit more, but they are pleasure and really great to
paint on, right? So if you have access to that, then go ahead, use that. You don't have sketch books
with thick paper or even, you know, single sheets of
thick paper that's fine. Like if you really don't
have access to that, then use paint on
cupboard, that works too. It's thick enough, right? Okay. So cook that's paper. Now, in the picture, you can also see that I have a lot of different
kinds of paint. I have those in tubes,
those in bottles. Essentially, I would suggest
if you are a beginner, start with whatever
you can find. Start with whatever
you have access to, whatever you can find in your
country or where you live. Let's start there first, instead of trying to get the
exact same brand as me and delaying the painting process,
start with what you have. What I have here, you will see some are actually
big bottles. I have big bottles because I used to work with big classes. I have a lot of students, so I buy big bottles so
that it's cheaper. But you can see that the
ranges that I have here, they are actually
not artist quality. I actually use a lot of
student quality materials. In fact, in my demonstration, a lot of times I use
student quality materials in that mowing for you. So Uh, don't worry about
getting the best material. If you have material, then you're good to go. Start
with whatever you have. I would say that
some of those tube usually if they
label artist grade, then that might have a
significant difference. You also notice a
difference in the price. Of course, artist
quality materials will be a lot more expensive. So if you're starting,
you may not want to invest that much because it's a little
bit scary, right. It looks like such a small tube and it will finish really fast. So it's okay I just
e student grade. Personally, I started with
this brand, the rowdy, so I kind of stuck with
them along the way. And if you have access to that, you want to get that
go ahead. If not, y. Any brand is good. Okay. Then let's
look at the palette. You can see in the picture, I'm using a commercial pallet or I have a commercial pallet, but for the longest
time I didn't have one. So when I didn't have
one, what did I do? I just, you know, put it on acylate
board or at home, if you don't have access to that just use a plastic plate. Anything that, you
know, doesn't allow the water content in the
acylate pains to sip through. Like note you can't
use newspaper because the newspaper will absorb the pain and your pain
will dry really fast. So something that
doesn't any plates, paper plate pla paper plates, maybe, ya if it
has a wet surface, plastic plates, that would work. Okay. And lastly,
on that picture, what happened touched on
is actually the brushes. As long as it's a
synthetic brush, synthetic brush means if
you press your brush, it feels a little bit
tougher, then that's fine. Okay. Don't use brushes that
are really, really, really, really soft because
those brushes are typically for watercolor. Like they're so
soft that you can find kind of feel like
there for makeup, then yeah, that's not suitable
because it's way too soft. Accuate pain tends
to be a bit thicker, so we want brush that
can hold the paint well. Okay So brush shape, what kind of shape
we have flats, we have rounds, so you can have a mixture of both sizes as well. Like I said, when you start, just use what you have. M recommendation
if you are buying, then you can get a big medium
small, big medium small. Like a big medium small of the flat ones and
big medium small of the the sharp head one, which is we call the
round brushes, okay. So as you paint,
you realize, hey, I need a bigger one,
then you go out and buy. Okay? The bigger the
size of your brush, the more expensive it
is going to be. Yeah. Yeah, pretty much, that's it. And I hope you can get
all these materials together fairly quickly so that we can start on
our project. Let's go.
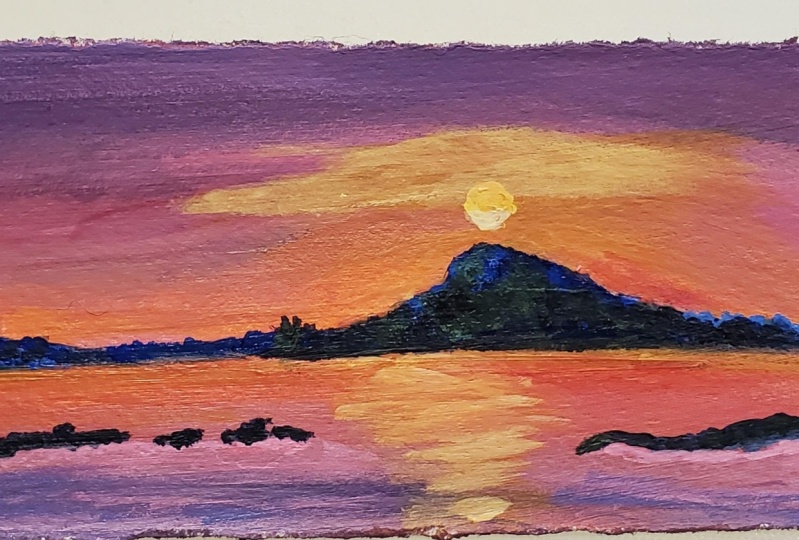
3. Twilight Mirror Part 1: Sky: Let's start. For this
piece of artwork, we're going to need
white, orange, some red. If you have pink, you can also use your pink. I don't have. For me, I need to mix my pink, so I'm using red. And then we need purple and
some dark wine is pcian blue, and then I have black as well. So let's focus on getting a nice bland and
learning how to blend with our acrylics
instead of getting the perfect color
before we can start. I'm going to go
ahead and just get a little bit of a watery paint. And figure out where I
want my horizon to be. Usually, we don't want the
horizon in the middle. Ottery paint because I don't
need it to be too obvious. So something like that. I'm going to create,
like a purpih, whitish, orange, sunset kind of field with some mountains and
rocks in the front. Go to start off
near the horizon. Okay. I want to go ahead, pick up some orange and. Right? Just to lighten
up the orange a little. So for blending to happen, the paint needs to be wet. You have to ensure that your paint mix is wet in order for it
to be able to blend. So notice when I put down
the orange straight away, I moved up and started blending. Some pinks up here can mix it, and then I can start blending
it up in big strokes. Okay. And I'm going to
go into the purple. F. The sheets in the middle. The longer you blend it, the smoother it will be. But it also means
you lose the color. I want the corners
to be really dark. I'm using the propo Ss
and I start to move in. Notice that I don't go back into the lower portion because
it's most likely dried. So as I'm blending, I make sure that I like the transition here,
then I move on. Pink here. I got
to bring it again. You see, now it goes
into the orange. I have to mix it again. You see? Because I went back. So now there's some
orange in the popo. I'm okay with that. Yeah. So you get what I mean, right? So if you want a very
smooth and clean bn, you need to be very disciplined. Finish up that portion. Don't go back in. And then what's going to happen is from the horizon line is going
to reflect back below. Same thing here. I'm
going to get something. So I'm not exactly trying
to make it perfect because, you know, I'm going to paint some mountains
over there anyway. And you can see the
purple showing, that doesn't matter because as we paint, we're going
to paint on top. A very sick bland below as well. If it's a choppy water,
we can add texture. I I'm doing a pieful one. Big strokes, left and right. Just keep going. All right. This is going to be your
first layer that's the base.
4. Twilight Mirror Part 2: Distant Mountains: Now that we've done this, next what we're going
to do is we're going to be painting the
mountains behind. So for mountains, right, the further they are, they
are going to be lighter. So I'm going to mix
either shade of the blue and I'm going to mix in some of the
colors that I've used here. This help to
harmonize the colors. A st horizontal line. Holding the brush table. Want to go fest one first.
Mountains at the back. You want to make sure.
They're not sharp and pointy. Let them have different
kind of cont. Maybe over here, let's
do on the mountain. Os. Now let's this Okay. Once you've got the mountains
that are further away. Let's get the mountain
that are closer. Means it will get
one shape darker. Test it with the
pain that you have. Times the mountains in
the front can be higher. For a stronger mix, you can use the dark blue and the reds. So I've got the base. Now, I'm just going to
do some dodging texture. This usually helps
suggest that there are some trees, straight landmarks. Use the side or use the top gently pat it to
create some texture. Once you're done with
this, I would also suggest adding some ones back inside that's way
too light as texture. Sometimes, maybe there's
little houses in there. Tops, but never pure white. I think pure white
is too strong, so just make sure
you really in a bit. Just to suggest
some texture in the
5. Twilight Mirror Part 3: Foreground Rocks: Now let's put another layer. This is really what's
very far away. I'm going to put some
land that's a bit closer, and we're suggesting
that the water is getting a bit shallower. I want to put in a
little bit of black. And I'm holding my brush horizontally so that I
can keep the distance. And this way, we get to create some teture as I'm
going along as well. Not just doing the top, but also some of the reflection. I started having a lot of similar strokes, so
I had to change. And I actually wanted to suggest a little bit of that mountain. Majestic. Here as well. Now I'm going to do the
rocks right in front, and these rocks are
definitely the darkest. So notice how I'm holding my paint brush because I don't
need them to be perfect. Some rocks that
are pain with us. Once we're done. Let's try it so that we can put in some light
to bring out the rocks. The blocks in front. You profly be a bit of
white lighter forms. The light will only hit, maybe it at the top surface of the blocks. See the texture. Use the slides and add
in some at the top. Then let's take a
look. There you go.
6. Debrief: Hi, hello. Congratulations for finishing your painting.
I hope you had fun. And do remember to
share your project inside the project section, upload your finished
painting so that I can support you with your artwork, give you feedback so
that you know what you can improve on
the next round. And don't just
submit your artwork. Also share with me what are your main takeaways,
what have you learned, what are the
challenges so that I can address them as I am making more content
for you guys to learn. I hope that So I hope that
at least at the very least, blending is a skill that you find yourself more
comfortable with after this tutorial and probably how to make rocks
more realistic. Okay. So I hope these two
things are something that you took away with you with this beautiful project
that we've tried. And please go ahead, try the other projects. And if you really
like the tutorial, I would really appreciate
if you could write a testimony or a
review of this class, especially which portion, which are the parts where
you benefit the most. That would really help other students greatly
in deciding to take a step and take a leap of faith to try this art project
for themselves as well. Thank you and I'll see you
for the other classes.
 Ee Sock Ang, Artist. Teacher. Traveller.