Transcripts
1. Intro to MediBang Paint Pro: Hello fellow art nerds. My name is Felicia, and this is part 2 of learning the basics of many bang paint Pro. So I'm going to go through a few more tools in the program that will help you feel more confident and hopefully get you excited about doing digital art on a computer or a tablet. Get your program open and ready so you can follow along with me as we make a fun drawing by the end. So let's get started.
2. Installing MediBang: Before jumping into the course, make sure you have many bang installed on your preferred device. To install many bang on your desktop or PC, you can head over to the official Comedy Bang paint website and click the download button here. Now if you have a Windows computer, you will want to download the first option here. It says windows within brackets, 64 bit. If you try downloading this and it doesn't work for you, maybe you're using a much older system. You can try downloading the 32-bit version. However, most computers will run on the first option here, and that is the one that is recommended. If you are working on a Mac computer and you will want to download this version here or your Apple device. Once you click on the right version for your system, it will begin downloading. So we'll click here, you'll see this window will pop up and it will begin downloading. And once it's finished, you can begin the quick installation process and it will appear on your desktop, free and ready to use.
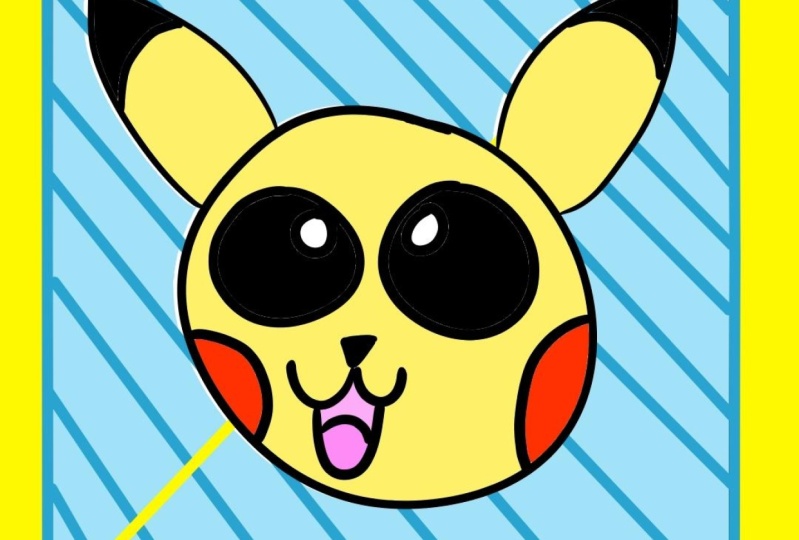
3. Basic Navigation & Setting Up Project: So when you open up many bang, make sure you are working on a blank page. So to do that, I'm going to click up on file at the top and click on New. And I'm going to keep my measurements at 1080 width and 1080 height. And I'll just hit Okay, so now we have our blank space to work with. So for anyone who loves Pokemon, today, we're going to draw the face of Pikachu. He's our familiar little friend from the Pokemon TV series, video games and card trading game. So you can follow along with me step-by-step as I show you how I draw him. So we'll make sure we have our brush tool selected. And I'm going to use the pen brush down here. And also make sure that you have a good size for your brush. So I think I'm going to put mine at around 15. So remember you can use the slider to adjust the size here, or also pick one of the presets down at the bottom right corner. And before we start making any lines, I'm going to show you a feature that can help you really make smooth lines if you're worried about your pen being a little too shaky. And that is our pen correction. So right up at the top here, it says correction with a drop-down, mine is set to 20. Right now, yours is probably at a 0. So if you set yours to 20, Let's try and make a smooth line. When you have it turned on to anything that's not 0, your pen will help you make smoother lines and correct you as you draw. So if I go to 0, this is me drawing without correction. See I'm a little wobbly there. But if I turn it on to 20 and draw the exact line, it's much straighter than the other one. And you can also see, if I turn it up to the max when I draw. We've seen how my pen is slowly catching up to where I am. It's kinda dragging along a bit. This is how we get our correction. When you click on the drop-down menu here, there are lots of numbers. So the bigger the number, the smoother your line will be, but also the longer it will be dragging behind you. So a good number to keep this at is 20. Just for a little support as we draw.
4. Pt. 1 - Lining: So let's start drawing peak at you. I'm going to move my pen and take it to the black color so I can line here. And the first step is to draw his head shape. So it's head is round, but I find it, it is not exactly a circle. It kind of goes a bit longer than that. I'm going to make that shape here like that. And see with our correction on it made a nice smooth line for me. So our second step is to draw his curved ears that come to a point like that. It kind of look like small surf boards. You want to look at it like that. Here we go. And on his ears we're going to draw small lines that go across like this. And this will be the black tips on his ears. And we'll color in those later. Now next we will draw his eyes. They are too small circles on the left and the right side. And in his eyes they also have smaller circles on the inside. This gives him a little highlight. Where's eyes are? I'm putting one on my left eye, moving it closer to the right side. And on my right eye moving the smaller circle to the left. So they kinda come inward towards the middle. So our next step underneath that, we were going to draw a little triangle for his nose with the point facing down. And then we'll draw a small wave for his mouth. Just like that. And I'm going to have peak, choose mouth open. So I will draw a long U shape that connects from the one side to the other, just along you. And we'll show his tongue in the middle. So we'll do another u, but facing the other way, kind of an upside down U, like that. Now for our last step on Pikachu, we are going to draw two curves on both sides of his face, almost a half circle to show those big cheeks that he has. And now we have our outline of peak at you.
5. Pt. 2 - Colouring Pikachu with Eyedropper Tool: So now we can go ahead and color him in. So when a member and we start coloring, we need another layer underneath our line layer. So here's our line. I'm going to double-click and name it. Our line layer hit okay. And to make another layer, we're going to hit this button down at the bottom, our first one on the bar, and click that. We're going to drag it underneath our line layer. And I will call this one color. Right? So make sure your lines are closed just like mine and there are no gaps because we are going to grab our paint bucket tool. I think they're kinda thin up here. So I'm just gonna make sure that they're closed. So we can use that paint bucket tool and fill them in. So on our color layer, make sure your color layer is selected. I'm going to grab my paint bucket. And let's get that nice yellow that pKa2 is n. We're going to click on each layer where he is yellow. Just like that. Now I left those tips on there. Those are supposed to be black. So let's grab our black and click and click rate. And same with his eyes to here. We're going to leave these small circles white and fill the rest in black. Just like that. Now he's starting to look like him. All right. And then I'm going to grab a red for his cheeks. So I think this is a good color for him. And we'll do a light tank for his tongue and the dark pink for the inside of his mouth. Now, you see I left out a cheek on Pikachu at you. And now I don't know what color I had before. I'm not sure what reddit was. And I want to know exactly what red I use for his cheek so I can match it on the other side. So if I missed a spot and I would like to go back and fill it in, there's a tool that will help me when I need to know what color of my drawing it is. So the tool up here we're going to use is on our toolbar here. And it is this eye dropper tool right above the hand you see here. Going to click on that. Now we have an eye dropper as our tool. So anywhere we click, if you look at the color at the top there, it will select it. So now I'm, I have yellow and black, and pink and red. So it will click anywhere I click will grab that color for me. So this comes in handy if you were to do a mistake like I did, and I'll need to grab that red there. So if I go back to my paint bucket with the red selected, I can go in and fill it with the exact same red that I used before. So if you ever need to grab the same color again or a part of your drawing, you don't have to guess what it was. This tool will do all the work for you very quickly.
6. Pt. 3 - Move Tool & Organizing Layers: So now that we have our peak at you, I would like to be able to move him around my page. So I will talk about the move tool, which is right by our toolbar here. It's this compass shape with arrows that are pointing up, down, left and right. This is our move tool. So let's click on that. Now the Move tool allows us to click on any layer that we have selected and move it around our page. So if I were to click and drag on this layer, this is our color layer. But I don't want both of our layers to be separated. I want both of these stay together as we have our whole drawing here. So since we have two layers that I don't want to separate, I'm going to create a folder within our layers so they can both stay together. So that is this button down here in the middle, right, where you see our layers, this folder. Let's click on that. So now we have a folder. I'm going to move it to the top of our stack. And if I click and drag on one of the layers and move it in over top, see how it highlights all in blue around a let go. And now our color layer is inside of this folder we just created. So I'll click and drag our line one as well and move it into the folder. And now I have both the line in the color in this folder. If you click on the folder icon here, you can close it up and click on it again to reopen it. So I'm going to double-click and call this S1 peak at you. This is our drawing and here. So folders are great if you need to organize your drawings to. So if you have too many layers in your list, you can also make a folder and then name it by double-clicking on it. And this will help you not get too confused on which layer is which. And it can be really fast to grab them if you need to. So now that I have both of my layers in this folder and I still have my move tool selected. If I click and drag, now, both layers will be selected. And now I can move it wherever I want. So if I wanted to move it down here or maybe up at the top, I can I'm just going to leave it right in the middle. But this is very handy for other drawings that you're making.
7. Pt. 4 - Creating Background using Line Tool: So now that we have our Pikachu face here, I would like to put mine in a shape or a frame in the background, but I would like to have my lines perfect without using a brush. And there is a shape tool that we can use just to do that. In back on our toolbar here we are going to click this icon here. It's called the shape brush tool. It's right underneath our eraser. So let's click on that. And this tool can make perfect lines, circles, and rectangles just by clicking and dragging. So if we take a look at the top, these are our different options that we can choose from. We'll talk about this first one here, the line. So we will click on this line tool here. Now, if I were to drag out a line tool here, now since we have a folder, we don't want to have our folder selected anymore. We now want to create a new layer. So I'm going to make a layer within my folder. And I'm just going to drag it to the bottom here. And I will put it into my folder. I want it to be the background. So I'm just rearranging my layers. Make sure you always have your line layer at the top, then your color, and then your background. So I will double-click on this and name it background just so you don't get confused. And now we're going to be working on our background layer. So make sure that when you use this shape brush tool, you always have a layer selected and not the folder. If you have the folder selected, it just won't work. And you might be a bit confused to why it's not working. Just make sure you have a layer selected. So now let's take a look at this line tool up here. So we'll have this selected. So now that we have our background layer, I can click and drag anywhere on my page to bring this along line anywhere. And so clicking and dragging to move this preview line. So if I were to let go at anytime, it will make a line exactly where the preview was before. See this line, this will show us where the lines gonna go. So if I wanted to make a small one, I can just let go here and it will make one for me. So if you want to make a straight line, but you just can't get it perfect. This will come in handy. And this also depends on the size of your brush. So my size is 15 here. If I make it very small and do it again, the line will come out a lot more thin than the one I had before. I will bring it to 12 for now.
8. Pt. 5 - Background using Ellipse Tool: So another one we can try out is the rectangle tool. So we'll skip these two other lying ones here. These ones are a bit more advanced, so I won't talk about them yet. But this rectangle tool will help you a lot. So we'll click on this one here. And it's very similar to the line tool. All you have to do is click anywhere on your page and drag out your rectangle. You can make it small or really wide and big anywhere you want. So if I let go here. Now my Pikachu is within a square and I didn't have to go in and draw those lines. It did it perfectly for me and very quickly. In this also applies to the circle tool up here as well. So we'll click on the circle, fun. And again, if I click and drag anywhere on my page, big circle will pop out. If I let go. Now pKa2 is in a circle. So actually I will keep the circle since I like how that looks for my peak at you. In remember, you can move your layer by hitting the Move tool. If you click on that, maybe you didn't like how your shape came out or where it was on the page. You can move it around so you can center it to where you would like or center the whole entire thing on your page as well. I'm going to move these to the center. So now I have my frame here. And I would like to make this color a blue color for peak at you. So I'm going to grab my background layer that has this circle on it, going to hit the paint bucket right on my circle. Now I have eight blue line going through it. And I also want to have the inside the circle colored. So I'm going to hit the background there. And now it's all filled again two. So now I really like my circle, but I'd like to add some stripes in it too. So instead of just taking my brush like this and making straight lines with my pen, I can make perfectly straight lines with the shape tool. So when we click on the Shape tool, we'll click on the line one right up here. And we can click and drag to make those nice straight lines. I'm just going from top to bottom, making my lines clicking and dragging. Now also remember, if you want a certain color from your drawing from before, so maybe you want it to have a red background. Remember you can use the eyedropper tool at the bottom. Click on the eyedropper, and if you click anywhere, it will pick up any color that you have on your page, even the white. And you click on the whitespace here, it will pick the white as well. So I still got my blue. So I'm just going to click up on the top there. So now we have our Pikachu in a little background or a frame to put him in. So now he's not just on a white page, we have something that looks really nice in the end. And this is with using our eyedropper tool, our Move tool in our shape tool. And we also learned about using layer folders in here, using our line color in background and putting them all into a folder. So this also organizes our work and makes our project much cleaner. So I hope the tools discussed today will help you a lot when creating digitally and also give you a better look into what Mehdi Bang has to offer. So thank you all for watching.
9. BONUS: In-Depth Look at the Shape Brush Tool: Hello fellow art nerds. My name is Felicia, and today we'll be taking a look at the shape brush tool within Medi being paint Pro on desktop, NPC. The long list of tools that come with any digital art program can be a little overwhelming when first getting started. But today I will give you an interrupt look at the shape brush tool on how to use it and when to use it while creating to find our shape brush tool once many bang paint Pro has been opened, we can take a look at the left side of our screen here. We have our toolbar which holds different button icons with pictures and each one being a different tool. So right below the eraser tool here we have a square image and this is our shape brush tool, leaking. Click up on this one here. This tool can help you draw perfectly straight lines and crisp clean shapes. So you can see on the top bar here, it has changed. And now we have six options that we can choose from for our shape brush tool. Let's start with the first option here it has a dash in the middle of this button. This is our line tool. So the Line tool is used to create straight lines. And to do that, we will bring our pen to the canvas or a big whitespace here. And we will click and drag out. And once we drag out, we see that it gives us a line that comes from the point wherever I'm dragging my pen. This line gives you an idea of where your final line will be when you let go. So if I have my pen over here and let go, I will now have a straight line and going from my first to my second. So the thickness of my line also depends on the size of my brush. So you can change the brush size here over in your brush control window. So here I have mine at 10, but you can make your smaller. So if I make mine around 2.4 and I once again click and drag out my line. I now have a much thinner line then Book 4. So now I can use a thick or thin line depending on the size of my brush. So I can move it back here to 10. So just using my keyboard to change the size. And I can also change the opacity of it as well. So this is the slider to change how see-through you would like the color to be over. I bring it to around 50. If I'm able to draw out some lines right over top, you will be able to see through it. Since now we have our see-through slider at 50 percent. Next option we will look at is the polyline tool. So this button here has an image of a lightening bolt shape. We will click up here. So the polyline tool will create multiple lines that are connected. So to use this tool, we're going to click on our canvas here. We'll just click once, not dragging. And then now we have our line that shows up, that helps us figure out where our final line will be. And if we click one more time on our page, we can now lock in that one line and continue with another one. So all of these lines will now be connected. So if I click again, that walks in the next slide, and I will continue to do this all the way down my page. So just clicking to lock in my lines. And whenever I'd like to close the line or just stop making lines, I can double-click on the last point that I make. And that will stop me from making anymore. So I'll just double-click here. And now I have clean, crisp lines in a zigzag form. So this tool can be used to create things zag patterns in different interesting shapes or patterns that you would not be able to use with just a line tool. Next option we'll look at down the line is the curve tool. So right beside the polyline tool, we'll give this a click. And the curve tool will create lines that are rounded rather than straight edges like the line or polyline tools. So this works the same as the polyline. If we click and start are aligned up here, we will now get that preview line that we can work with. And if we click once more, we can now curve our line, bend it to any direction that we'd like. So we can make a really wide curve or we can make one that's really narrow. And if we click one more time. We can end up dragging it around, even more, curving it and making some around edges. And you can do this all the way around your page. And when you are finished and happy with the line that you created, you can double-click to close up your line. This can be used if you would like smooth curved lines instead of drawing them out with a brush. This is just a faster method and maybe a technique that you would like to use in your art more. The next option that we'll take a look at is the rectangle tool. So that is right beside our curve tool here. We'll click up on this. And similar to the line tool, if we click and drag on our canvas, we now have a preview of what our square or rectangle will look like. So I can drag out a thin rectangle or a large square. And to finish or close your line will just let go. And now we have a square on our Canvas. And we can start making some thin rectangles inside, maybe some wider ones just by clicking and dragging it out. And once we let go, we now have some finished shapes. This makes that process a little easier and faster if you don't like creating those straight lines, we can now make closed rectangles and squares instead of sketching them out with a brush. Another option that works the same as the Rectangle tool is the ellipse tool. So that is this circular shape button right beside the rectangle tool. We'll click on this here. And this tool will create ovals and circles of all sizes. So if we have this tool selected and click and drag onto our canvas, we can make any size of circle or oval around our page. So we let go. We have now created a large circle onto our page, perfectly in a clean shape. And you can click and drag out as many as you would like. That you can make some smaller ones inside one another. You can make a lots of them. This comes in handy if you'd like to make a perfect circle or just a nice closed oval instead of trying to use the brush tool to make one. Now our last option down the line here is the polygon tool. So this tool will make different shaped polygons with as many edges and points as you would like. So this tool works similar to the polyline tool, but instead closes the shape rather than having an open line. So if you click once on your canvas, we now have our preview line, like always. And if we click again on our page and a different area, these two points will now create another set of lines showing you that you can make a triangle shape by adding another point. So three points on a polygon, we'll make a triangle. Let's say you add a, another point to this shape. You can add or points now, and that creates a rectangle or a square, maybe a rhombus, diamond sort of shape. If we click again, we can now create a five-sided shape. And you can move it inward, outward wherever you'd like. And if we click again, we can make a six-sided shape. So we can continue to do this and create as many edges as we would like and as many points. But when you are done with making a shape, you can go ahead and double-click to close it up. So now, with all of those points that you made, it creates a closed shape rather than an open line. So that's the difference between the polyline. So our second option up here, and the last option, which is the Pali gone to the polygon, will make shapes for you. And the polyline. We'll just make an open line instead. In with that concludes this in depth look at the shape brush tool within Medi bang paint probe. So this can come in handy for creating those straight, perfect lines or clean shapes like circles, rectangles, or any sided polygon. So thank you all for watching and we'll see you in the next one.
10. BONUS: In-Depth Look at the Fill Tool: Hey fellow art nerds, my name is Felicia, and today we'll be taking a look at the fill tool within Medi bang paid pro on desktop and PC. So today I'll give you an in-depth look on how to use the fill tool to create different types of shapes. And also when it can be used while creating to find our fill tool once many Bang has been opened up, we can take a look at the left side of our screen here we have a long strip of icons, each one being a different tool. So right underneath the Move tool here is a white filled square icon. Now this is our fill tool. Let's click on this. Fill tool can help you create shapes with filled color inside of it. So if we click on the tool, we have it now selected. And you can see the top bar here. It has changed with a whole bunch of different options. So each option will now personalize the fill tool. But we are going to take a look at the first option here, which is a drop-down menu. If I click on the drop-down, you will see we have three different shapes that we can make with our fill tool. We have a rectangle, ellipse, and polygon. So with the rectangle selected, let's grab a color on our palette here. I'm going to grab a nice blue color. And we can also change the opacity of our build tool. So this is our see-through slider. And we can change how see-through we want the color to be, but I'm going to keep mine at 100% today. So if we click and drag out on our Canvas, we will have some lines that will show us what kind of shape we are making. So I'm still holding on and dragging onto my Canvas. I haven't let go yet. I can move it around. I can make a thin rectangle, a really large square, any sort of rectangle shape that I like. I'm going to make a rectangle here. And once I let go, I now made a filled shape with the color that I have chosen. So we can grab another color here if you bike, and we can do the same thing. Click and drag out on your canvas, making another rectangle. And you can let go. And now you've made another shape. We can make as many rectangles as we want. Let's can help you make perfect edges to your shapes. So an example that you can use this for is by making a cityscape. So we can grab a whole bunch of different rectangles here, maybe some different colors of the blues. We could make a whole bunch of different buildings. And what this, we can create some small windows as well. And maybe we have some little windows on here. All done with the fill tool. It's now making some filled rectangle and squares for the buildings and also the windows. Now this is a method of using the fill tool and just a way of using the rectangle option. The second option on our drop-down list is the ellipse. Let's go ahead and click up onto our drop-down. Choose the Ellipse tool can help you create ovals and circles of all different sizes filled with color. So if we have this tool selected and we click and drag out onto our canvas, we can now make any sort of size for our oval or circle. So we can make a thin oval, a wide circle, any sort of shape. And this is a preview of what our shape will look like. So if I want to make a great big circle, I'll have it set up like this. I can let go. And now I have this great big blue circle on my page. So this comes in handy if you ever need to filled circle perfectly or some sort of oval shape rather than using a brush tool. Our last option in the drop-down here is the polygon. The polygon will help you create different filled shapes with as many edges or points as you would like. So this works a little different from the rectangle, an ellipse option. So if you click once on your page or canvas here, you will now have a line preview that shows where your next point will be or where it would look like. So I'm going to go ahead and click again on my page. And once I do that, you can see this line is now locked in. So I can't change this fine anymore. And now I can continue my shape. Now I can click as many times as I'd like. I can go ahead and click anywhere and have locking in those points. And once I am done with my shape, I can click anywhere on my page and double-click. So double-click, we'll close your polygon. And now it will fill in those lines that you created. So you can have as many points on your shape as you would like. So I can do another one in here. Is looking. I'm not dragging anywhere and double-clicking to close that shape. Another option to take a look at on the top bar here, it's cold round corners. So this will create a rounded edge to the shapes corner that you are making, but will not be as sharp of a point. So this option has a checkbox so you can turn it on or off. I'll keep it on for now. And it also has a drop-down with a percent on it. And this can change how intense you want those rounded corners to be, the minus 60 percent right now. And to really see this in action, I will select the rectangle option here, since rectangles have sharp points. So if you see I can click and drag out my rectangle. And in my preview, I now have round corners to my rectangle. So they don't have as sharp edges anymore. I can let go. And now I have a rounded out sort of square shape. I don't have those sharp points anymore. I can also change this to 20 percent. So if I change my color here and click and drag again, it won't have as much of a round corner, but it's also not as sharp as a regular rectangle. So you can change how intense you would like these round corners to be and you can turn it on and off at any time. This is a great addition to the tool as you have more freedom to customize the shape to your liking. Another checkbox beside this is called select from center. So if this option is checked on and we'll drag out a shape, you can see rather than it being dragged out from the corner, the point we make first will be in the middle of the shape. So if I grab another color, you can see right in the middle here, That's where my shape will be coming from. If I de-select it, I'll show you what it looks like before. It's not coming from the middle. It's coming from one of these corners. The last checkbox here to take a look at, it's called constrain proportions. For these two really big words mean that it will create equal lengths for all sides of your shape. So if I click on this and have it turned on, and make sure I have my rectangle options selected. And I'll click and drag out my page. I am now making a perfect square. Well, I'm not able to make a long rectangle. I'm only able to make a perfect square with this turned on with equal lengths in if I choose the ellipse option here, just to back in our drop-down. I'll change the color here. If I click and drag now, I am making a perfect circle. So I'm not able to make an oval, just a perfect circle for this option with equal lengths all the way around. So constrained proportions will help you make any sort of perfect shape, like a square or a circle. And what that concludes this in-depth look at the fill tool within many bang paid pro. So this can come in handy if you ever need to make filled shapes or would just like another option rather than using the brush tool to create your lines and edges. So thank you all for watching and we'll see you in the next one.
 Winged Canvas, Classes for Art Nerds