Transcripts
1. Intro to MediBang Paint Pro: Hello fellow art nerds. My name is Felicia, and this is Part 4 of our introduction to digital art, as well as learning the basics of many bang paint Pro. So I'm going to go through some more new tools and techniques to help us start blending our art, which is adding more color and value to it. So we'll be making our drawings look more 3D as if they're popping right off of the screen. Make sure to have your program open and ready so you can follow along with me. So let's jump right in.
2. Installing MediBang: Before jumping into the course, make sure you have many bang installed on your preferred device. To install many bang on your desktop or PC, you can head over to the official Comedy Bang paint website and click the download button here. Now if you have a Windows computer, you will want to download the first option here. It says windows within brackets, 64 bit. If you try downloading this and it doesn't work for you, maybe you're using a much older system. You can try downloading the 32-bit version. However, most computers will run on the first option here, and that is the one that is recommended. If you are working on a Mac computer and you will want to download this version here or your Apple device. Once you click on the right version for your system, it will begin downloading. So we'll click here, you'll see this window will pop up and it will begin downloading. And once it's finished, you can begin the quick installation process and it will appear on your desktop, free and ready to use.
3. Pt. 1 - Drawing Apple Shape: So here I have my canvas to work on here that I got and clicking up on file right at the top and new. So now I'm working in a new project. And I also made a gradient on my background, which blends two colors very seamlessly together. And this is using the gradient tool on our toolbar. Now I won't be covering the gradient tool today, but if you'd like to know more about it, we have a video that completely covers the tool and how to easily use it so you can watch that on your own time as well. But today we will be drawing an apple, but really focusing on how to blend our colors digitally, adding shadows and highlights together. So we'll be experimenting with different brushes, learning new layer settings to help us blend with a painterly approach. So I encourage you to follow along with me as we draw our Apple and also go through some new fun techniques together. So I will grab my brush for now as I start my outline. And I will be using the pen brush just to start out our outline. So I'm going to grab a nice red color here, a dark tone, and I will be making a new layer, should already have a layer in your project. But since I made a background here, I'm going to add a layer. I'm going to name this one background just so I don't get confused between the two. And I will start drawing my apple. So to draw an apple, I'm going to start by making a very round shape. Going around. Not exactly a circle. Apples aren't exactly perfect if you've held one in your hand before, they kind of have some little bumps at the top and the bottom. But that's what I'm going to do. Just a small bump making some nice little curves. You can start by drawing a nice big circle if you'd like. And remember if you ever make a mistake, you can always head to the top here to click on the Undo arrow or use your eraser tool. Now, before, in the other video, I said I was using shortcuts or keyboard shortcuts. This makes my process drawing really fast. And I can go through each tool in zip by it very quickly. But I will not be covering that today. If you would like to know more about keyboard shortcuts, you can watch our video that we have explaining them all in more detail. Right now. I'm just going to clean up my lines using the eraser. Thinking this round apple shape doesn't have to be totally perfect. I had one bump on the top here and one on the other side, and same at the bottom. This gives me space to do our stem as well. I'm going to start with my stem here. And it's just like a small rectangle. I'm going to start by making a line that goes upward here in, at the top. Curves in a little bit. Stems aren't exactly just a straight rectangle like this. That makes it a little bit unrealistic and also a little cartoony. So we don't wanna do that today. I'm just gonna do a little bump here. And this makes our stem look more real, perfect. So that is our stem and I have the base shape of our apple here. Perfect.
4. Pt. 2 - Organizing Layers & Colouring Apple: So now we will move on to the coloring stage. So after we create our line drawing, we will add a new layer. And I'm going to name this layer Apple color here. And I'll also name our line layer as well. And remember your color layer always goes beneath your line layer. So I'm going to click and drag and move it underneath. So to draw out or color out our apple, I'm going to grab the exact same red. So I'm not going to move anything else. And I'm going to start painting inside of my lines. I'm going to keep the same color just so we can focus on our blending today. We won't be looking at line work that much. I'm just going to go ahead and start coloring in our apple. This coloring in through the lines. You can make your brush small to go through the edges, or change the size here on your brush control window to make it a little bigger. This will color it a lot faster. But you need to be careful on if you're going outside of your lines. I like to make my brush smaller when I go around the edges. So right now my brush is add 17. That is the size of my brush as I go along my edges. This carefully going around. Perfect. So now with our stem that we're going to color, I'm going to make a new layer. So this one is going to be called stem color. Since we have two different things on our Apple, I want to make sure that they have two separate layers. This will make it a lot easier to work with when we start blending our colors. So I'm going to just move my stem layer below my Apple so I can color in perfectly without going on top of the apple itself. Well, stem color is brown. I'm going to slide my color on my color palette here to the oranges. And this makes the brown colors come up, is when you add darker values like lack to orange, it turns into a brownie color. Well, I will just grab a nice brown in color in my apples stem. Perfect. Now I'm going to go back to my line layer and get rid of the lines I have up on the top with my stem. I don't really need those anymore. And I will just go over the color that I had there in after I'm going to get rid of the line on my Apple as well. So I can do this just by hiding my layer right now. I don't have to completely erase it. I just go ahead and click on this small white dots outside the line layer. This allows me to hide it, not deleting it, just temporarily hiding it. So now I can go back to my apple, go to my brush, and start making those edges look a lot more crisp. So I'm going to zoom in again onto my Apple and get rid of those bumps I have there. Don't want to see those. Just fixing up the shape of our apple. I'm going to zoom out here.
5. Pt. 3 - Protect Alpha & Clipping Masks: So now that we have the base color, we can start applying darker and lighter colors to it. So creating shadows and highlights. However, if I start coloring onto my apple, just write onto the apple color and I start coloring right on top of it. I can't get it right to the edge. I sometimes draw over top. It can be very, very hard to get it really close. If I undo this and I tried to zoom in maybe and zoom in and try to do the same thing. I don't want to be able to color outside my lines, but it can be very tricky. You have to have a very steady hand. And that would take a long time to finish your drawing. So you don't want to take a long time when we do our art. So there are two ways that we can color our apple without going outside of the lines. So the first one I'm going to talk about is protect Alpha. And protects alpha can be found in your layer window here. It has a square right next to it to click on this box. So this is a layer function that only has a checkbox so you can click it on and off if you'd like, on any layer that you choose. So if I click it onto my Apple color and I start coloring in it, the color is only going into my Apple and nowhere else on my page. So this is locking all of the color into that area and anything that's in the layer itself. So the color will only show up onto my apple and nowhere else. This is great if you need to work in between the lines and don't want to have the fear of coloring outside of them. Well, another function that's very similar to this is called a clipping mask. So this clipping mask is actually right beside our protect alpha here. But the clipping mask is relied on the layer below it. So if I click on my bottom layer here, the option is actually grayed out. And this is because there is no layer underneath our background. This is the bottom layer. But if I click up back to our Apple color again, it says that I can use the clipping mask because there is a stem color layer underneath it. So clipping mass only work if there is a layer below it to work off of. So if I make a new layer up at the top here, up on top of my apple. And I click on the clipping mask. If I start coloring, it will be the same thing as our protect Alpha. The big difference between the protect Alpha and our clipping mask is with our clipping mask, we can move our drawing around. We can change it up by using our Eraser tool, maybe erasing some of our mistakes we have here. With Protect Alpha, we are not able to do that. Unlike protect Alpha, I can move the scribble around my Apple because it's an entirely new layer and it won't affect our original Apple below it. So clipping masks allow for you to have change. So if you want to erase or move it around in the future, you are allowed to do that, but protect Alpha is better to use for permanent changes or things you know, you won't want to change later.
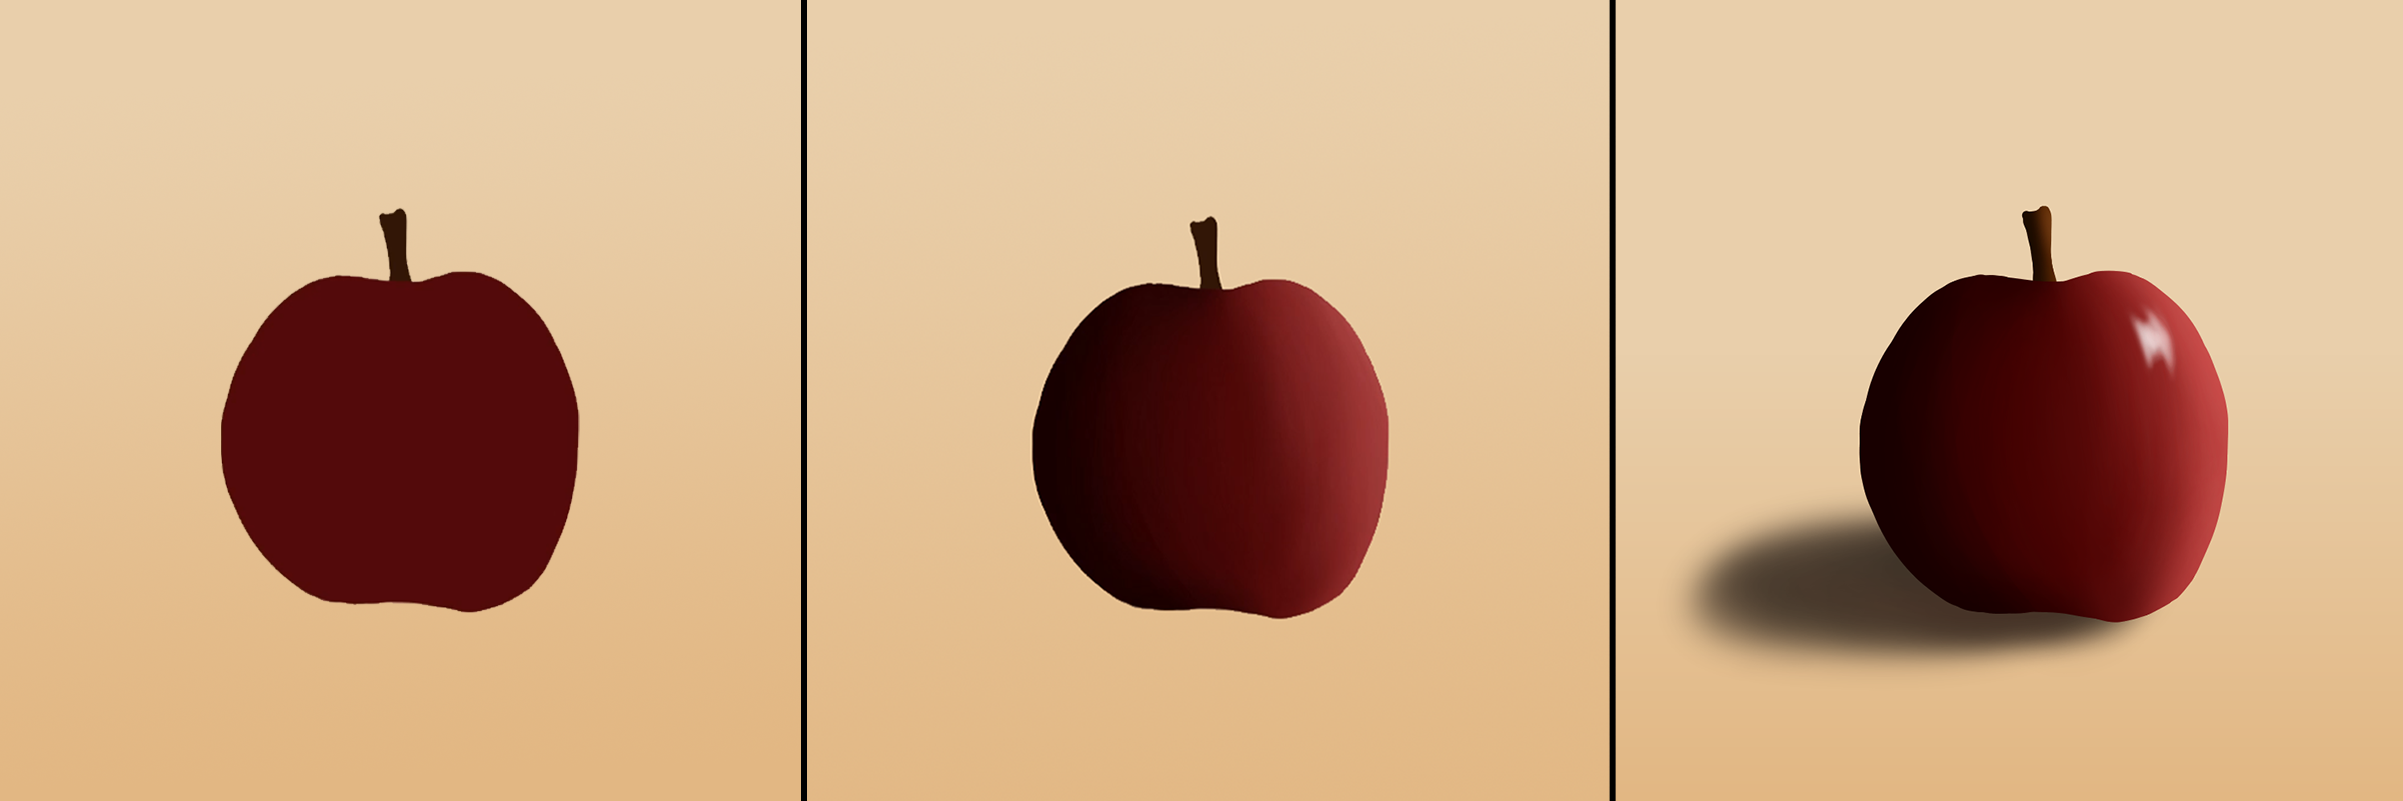
6. Pt. 4 - Soft Shading using Airbrush Tool: And we're going to start shading and blending our colors. So we are going to change our brush. If you go to your brush list down here, right now we are working with the pen brush, but we want to click on our air brush down here. If you click on this, this brush is very, very soft compared to our pen brush. It's very, very light, very soft, and allows us to go over top and build up our color. We want to work with a very soft brush. As we blend. We don't want our brush to be completely solid. We want to go very lightly and have the color come out little by little. So that means we can turn down or opacity. And we can control this to how we want our brush to be minus at 15 percent. And this is perfect for when we blend our colors. I would keep it at this number so you can build up your colors. And I also have my size at 1, 50, or 150. This is a larger size compared to my apple here, and I don't want to go very tiny or else my brushstrokes will come out very harsh. So I made a new layer above my Apple color. I'm going to go ahead and call this one blending here. And this is what we will work on our Apple width. This is a clipping mask that I have set here. Make sure yours is on a clipping mask as well, and not protect Alpha just in case if we want to make some changes. So I'm going to grab a darker red here. I'm not going to get solid black, just a darker red color. And I'm going to go ahead and make our shadow. Now I'm going to have my shadow on the left side of the apple. And I'm going to have the light coming on the right side. So the light is shining down and the shadow is going to be over here, since the light won't be hitting it. I'm going to lightly press down on my brush. Going around the shape of our Apple. Very, very lightly going around it. This makes a soft shadow on it. You can already see that there's a nice softness to it. Our airbrush allows us to have nice color come out there. You very lightly. You don't want to hit our brush very hard. This will have the color come out too fast and it won't look very nice. Going to have my darkest color to the side here. And I'm also going to bring it all the way to the middle of our bump here. There will be some shadow within here. And also on the top here, right in the middle. We don't want to go on this side since that's where our light will be. So blending is all about using your brush very, very lightly and keep adding color to it. If you go very dark and keep doing that, it just won't look as nice. Wanna make sure we're using our brush very, very lightly. And also your see-through slider will help you with that as well. So make sure your number is very low. When you do blending. It works much, much better. So now I will go ahead and grab a lighter red color. So more of a pinky tone in. I'm going to go ahead on the other side and do the same thing. Very lightly pressing down on our brush and moving with the shape of the apple. So I'm not coloring from side to side like this. I'm moving with the shape of the apple going around the curve. Always following that shape. Very, very lightly going along. And grabbing a lighter color as well up here. In going ahead right on top of that edge, I'm going to write very, very close to it. Not going in the middle here, just on this edge, just so we have the light right off of it.
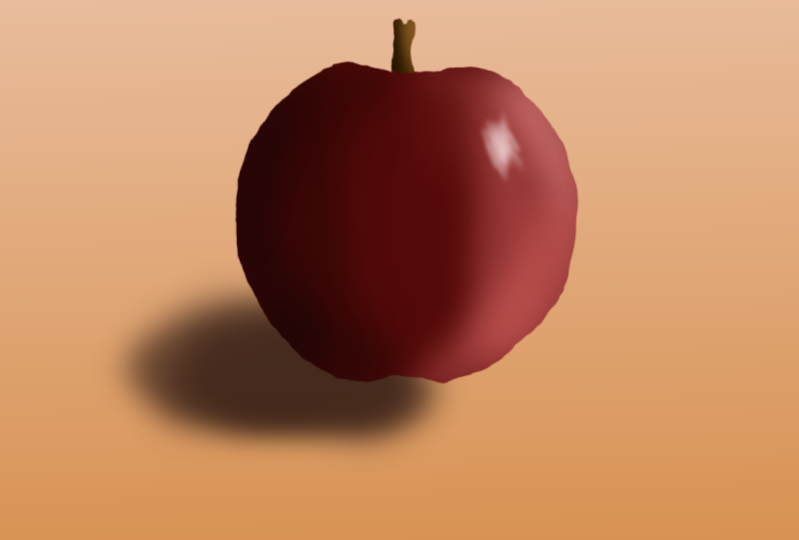
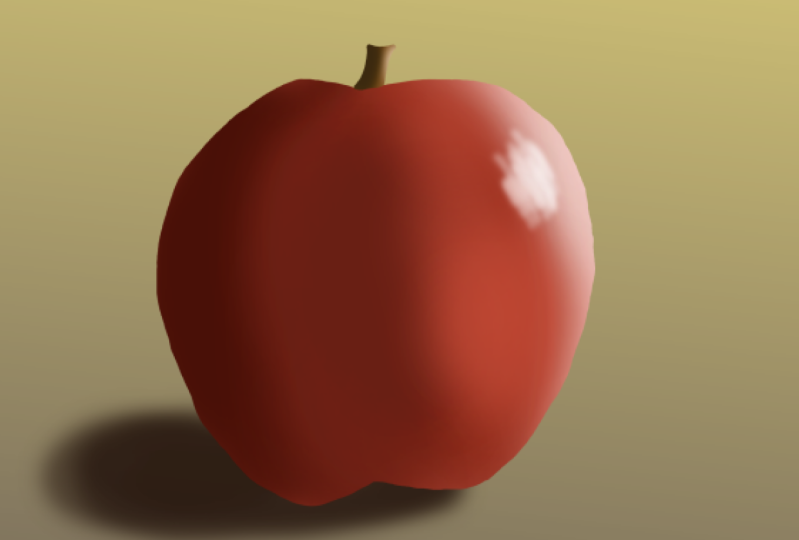
7. Pt. 5 - Smoothing Out Blends & Adding Highlights: I'm also going to grab the eyedropper tool here on our toolbar. Remember this picks any color that's on our Canvas. I'm going to grab the color right in the middle of our Apple. So this is like our original red that we had. Going to go back to our brush. And I'm going to color a little bit in the middle here, just so I'm blending our shadows and our highlights together. And using this eyedropper tool can help you a lot when blending. Since you have to move from color to color a lot. And we want to have our lights in one spot and our darks in another. So this is where my light is showing and that's why it is lighter. I'm going to go and grab our darker shadow color here. It will little bit of a darker color and have that shadow really, really come through. So it's very, very dark here. Now. In for a finishing touch, I'm going to add a bright highlight. So I'm going to grab a very, very white color right into the left corner here, a very bright color. I'm also going to turn down my brush size to about 25 is good. 24. And I'm going to make a bright highlight here. Well, making a line and slowly, slowly, making it a little larger. This makes a small little square or a rectangle. And this will be our highlight. The highlight doesn't have to be completely perfect. I'm just going to go ahead and make it just like this. This shows that our Apple is a very shiny just going over with the white again. And since I made that very bright, I'm going to go back into my larger airbrush. So back to about 150. Just lately making some changes. Alright, perfect. And now I'm going to do the same process with our apple stem here. So I'm going to make another layer. So I'm going to click on our stem colored layer, make a new one. And again, clicking on our clipping mask. So this group's our clipping mask to the stem. And I will call this one stem blending. Now with our stem, I'm going to go ahead and grab the eyedropper tool. Click on our brown color. Since our stem is smaller than our apple, I'm going to turn down our brush size a little bit. About 65. I'm going to grab a darker brown or our shadow. So for our shadow is on the left side of our apple here, it will also be on the left side of our stem, making very, very small strokes. And I'm also going to grab a light brown or nice warm orange. Our stem for the highlight. This part isn't as noticeable, but it leaves a nice look to your apple, makes it more believable. This lightly pressing down, making that nice blending transition.
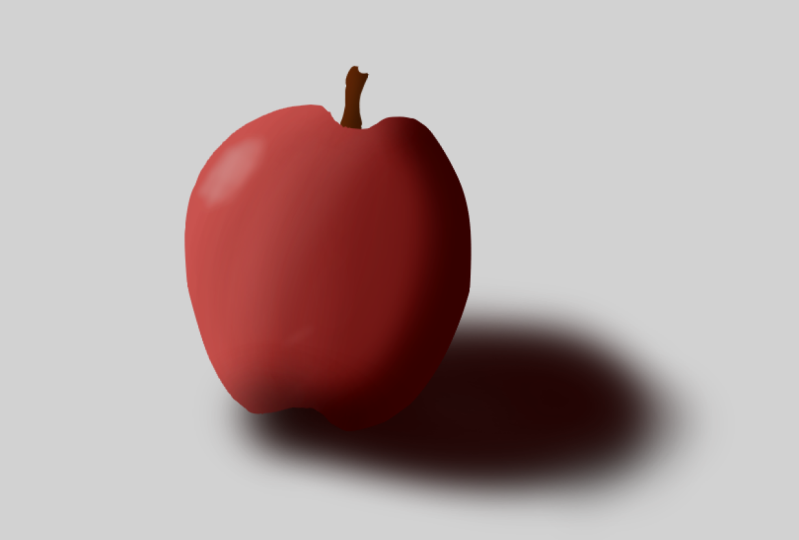
8. Pt. 6 - Making a Cast Shadow: And now for our final finishing touches, I'm going to add a shadow below our apple that shows that our apple is 3D. Right now, it looks a little flat. So we're going to add another layer. Now this is our last layer that we're going to be working with. So I'm going to click on our background. Just so when I click our new layer, it goes right above it. Now this layer is beneath everything else. And I'm going to call this a cast shadow. Cast shadows show up on objects with a light hitting on it. So there will be a shadow right over here, since our highlight is pointing this way. So our shadow of our Apple will be right here. I'm going to grab a dark color, almost black. I'm going to make my brush size a little bigger. I'm probably going to go back to the 150 size. And I'm also going to keep my see-through slider at 15 percent, not changing anything there. So I'm going to start right in the middle of the bottom of our apple here. Let me start drawing a small oval right beneath our apple. Will very, very lightly moving in circular motions back and forth. Very lightly. Building up our dark color here. We're going to add a darker right beneath our Apple, building up those colors just very lightly pressing down in, going around. I'm going to bring it right beneath that bump we have there on our Apple. Very lightly just going in. Now I'm also going to change the opacity on our layer here, which is our see-through slider. Right now it's at 100%. I'm going to go ahead and just knock that down a little bit. 85 me the alternate down to 75. So it's not as dark as I wanted it to be. And it also has the Apple form still there, just so we can see that small shadow, but also seeing that nice apple shape. So this is our finished apple. We did a lot of blending today with shadows and highlights, and we also added a cast shadow underneath it just as a finishing touch. This makes it appear more 3D and not as flat of a shape. So that concludes Part 4 of our introduction to digital art, as well as learning the basics of midi bang pink Pro. So the collection of tools and techniques that have been discussed through this series is a great start to your digital art journey. But feel free to experiment and also explore with new tools as your confidence grows as a digital artist. So thank you all for watching and we'll see later.
9. BONUS: In-Depth Look at Paint Bucket & Gradient Tool: Hey fellow art nerds, my name is Felicia, and today we'll be taking a look at the Paint Bucket Tool as well as the gradient tool. So today I'll go in depth on how the paint bucket tool works, when to use it, and also how to apply gradients. The first tool we'll take a look at is the Paint Bucket tool and define this. We can take a look at the left side of our screen here. Each of these icons are different tools on our toolbar. The paint bucket tool is right underneath the fill tool here with an image of aid bucket of paint being spilled over. You can click on this. The paint bucket tool will fill an area of your drawing that is closed. So based on the shapes around it, it will fill in the area with color. So imagine having a big paint can and pouring it all over the ground. Not much paint would cover a very large area. In this tool works similar in the way of wherever you click the paint bucket tool, it will fill color within that area or shape. So I will draw a little image here to demonstrate how we can fill in color in the drawing. I will draw a little familiar image here of a small crater with very large ears in a little cloak around him. This will be as little robe. Look here we have a cute little baby Yoda that you can see in the Star Wars Mandalorian series here. And I'm just drawing with my pen and brush. So I just have my color selected at black with the size of ten on my brush. Just using the pen here to make a little baby Yoda. And I'll switch this over here. I'm going to close it on this end. So with my drawing of Baby Yoda here, I can grab a green color to fill them all in. So I will grab a green color on my color picker here, more in the middle. And I'm going to select my paint bucket tool. So with my paint bucket tool here, I can quickly click onto any part of my drawing to fill in the shape. So this will quickly apply color to it and bring it to life. However, this only works when lines are completely closed and you don't have any gaps within your drawing. So here on yogas robe, this line is not completely connected. I have an open gap here at the bottom. So if I were to take my green color and try to fill in this area, it will fill in my entire page. And this is not what you'd like to have when you're trying to fill in your drawing. To fix this, I'm going to go back to my brush tool and just fill this part in connecting those lines, making sure that there are no gaps. And now if I try this again, going back to my paint bucket, liking and right in the middle there, I can now cover in that area. Well, I'll go back to my green here so I can fill in Yoda when using the paint bucket tool, you also need to remember a couple options here on the top bar. So the first is reference, and this is what your bucket we'll be looking at when you apply color. The drop-down here, we'll have Canvas and layer. If you choose Canvas, the bucket, we'll take a look at everything that is on your page. So everything you see on your page, every drawing, it will take a look at all of those shapes. But if you choose layer instead, it will only take a look at what is on the layer you have selected. So if I create a new layer, and this layer has nothing on it right now, and I click, it will cover my whole screen because there's nothing on this layer at the moment. So if I go onto the layer that has my drawing, it will look at what is on here, and it will also color in that section. So make sure if you are coloring onto a drawing, make sure you are habits set to the canvas so you can color in whatever is on your page. The second option to remember here is a slider called tolerance. And tolerance will help you fill in the entire area that you have clicked on and in the middle of. So having a tolerance of 0 could give you the possibility of not having the area completely filled in. They'll sometimes a thin border. Be left behind. I'll give you an example here. If I click on my Yoda, you can see that it has filled in. But if I zoom in here, you can see that there are some areas around those borders that are left white and they haven't been completely filled in with my bucket. So I'll have to move my slider. So it's a little bit bigger. So the bigger the number, the more space it will cover. If I have it around 100, and I can undo this. Let's try it again. I'll click. Now there aren't those white gaps anymore. It's now filled in my whole area and there isn't any space left behind. So this slider can be adjusted as you create different size drawings. But a great number to have this ad is 100, as your bucket will try its best to not miss any areas. But this tool is another option to use when coloring your pieces. But I will continue to color in my Yoda here and finish him up while I'm taking different colors. Grabbing eight pink for the insides of his ears. I'll grab a brown for his robe. And I'm just clicking into those shapes. Now let's talk about the gradient tool. So this tool can be found right underneath the paint bucket on the toolbar here. This is the gradient tool, so we can click up here. In the gradient tool allows you to create a smooth transition between two different colors. So to do this, we will pick our first color up at the top here. And let's pick a nice warm sort of orangey yellow. So this is our first color that we have picked, right in our color picker. Into grab your second color, we're going to take a look at these squares that are up here. This first one that I have selected is the color that I've chosen. And we have one that's underneath it, that is white. Right now, we are going to click on this square here underneath. And now we have that square selected, and we can pick a second color. But I'm going to grab a darker sort of orange to have this one blended in with the two colors. So now I have two colors selected on my gradient. And to create the gradient on my background, I'm going to click and drag anywhere on my page. So I have the gradient tool still here and selected. I will click on any spot here and drag. And drag. You will see this preview line and this will show which direction the colors are going to go. So when you're happy with the spot that you've made on your page, which direction you will go, you can let go. And now the two colors that I've selected are blended smoothly across the page. However, I would like to use this for my background. So I'm going to create a new layer here just by clicking on this button in. I'm going to drag it underneath my drawing. So this is going to be behind everything. So this will be my background. And I have my Yoda here. So with my background layer selected, I'm going to create that gradient once again by clicking and dragging. And if I let go, now the gradient is underneath my Yoda. So now I have a nice sandy background for him to be setting in. So these two colors that I have chosen have now blended very smoothly and seamlessly across my page that this can be used or any sort of background you have on your drawing. Maybe a sunset to blend some warm colors together or any sort of combination that you can come up with. In what that concludes this in-depth look at the Paint Bucket Tool as well as the gradient tool. So this can be used for creating backgrounds or another method of coloring your pieces. So thank you all for watching and we'll see you in the next one.
 Winged Canvas, Classes for Art Nerds