Transcripts
1. Intro to MediBang Paint Pro: Hello fellow art nerds. My name is Felicia, and this is part three of our introduction to digital art, as well as learning the basics of many bang paint Pro. So I'm going to go through some more new tools and techniques to help you create some really interesting drawings. And also take your digital art to the next level. Make sure to have your program open and ready so you can follow along with me, will be making a glowing joule by the end. So let's get started.
2. Installing MediBang: Before jumping into the course, make sure you have many bang installed on your preferred device. To install many bang on your desktop or PC, you can head over to the official Comedy Bang paint website and click the download button here. Now if you have a Windows computer, you will want to download the first option here. It says windows within brackets, 64 bit. If you try downloading this and it doesn't work for you, maybe you're using a much older system. You can try downloading the 32-bit version. However, most computers will run on the first option here, and that is the one that is recommended. If you are working on a Mac computer and you will want to download this version here or your Apple device. Once you click on the right version for your system, it will begin downloading. So we'll click here, you'll see this window will pop up and it will begin downloading. And once it's finished, you can begin the quick installation process and it will appear on your desktop, free and ready to use.
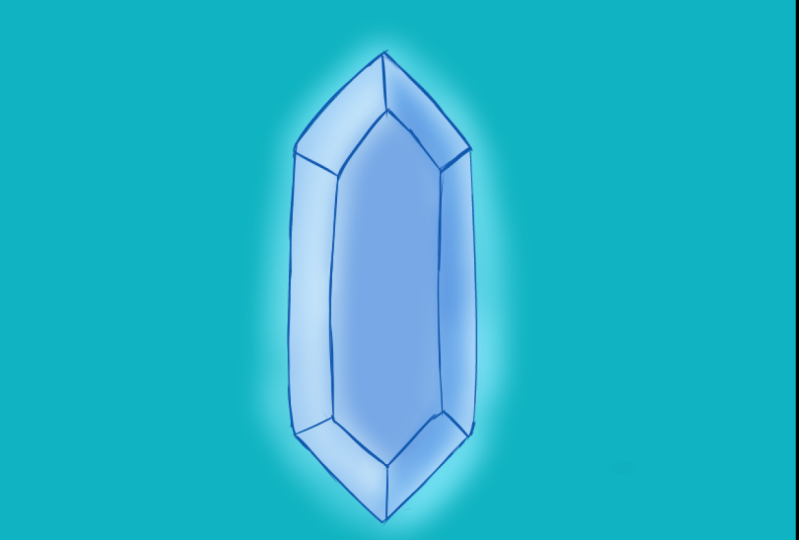
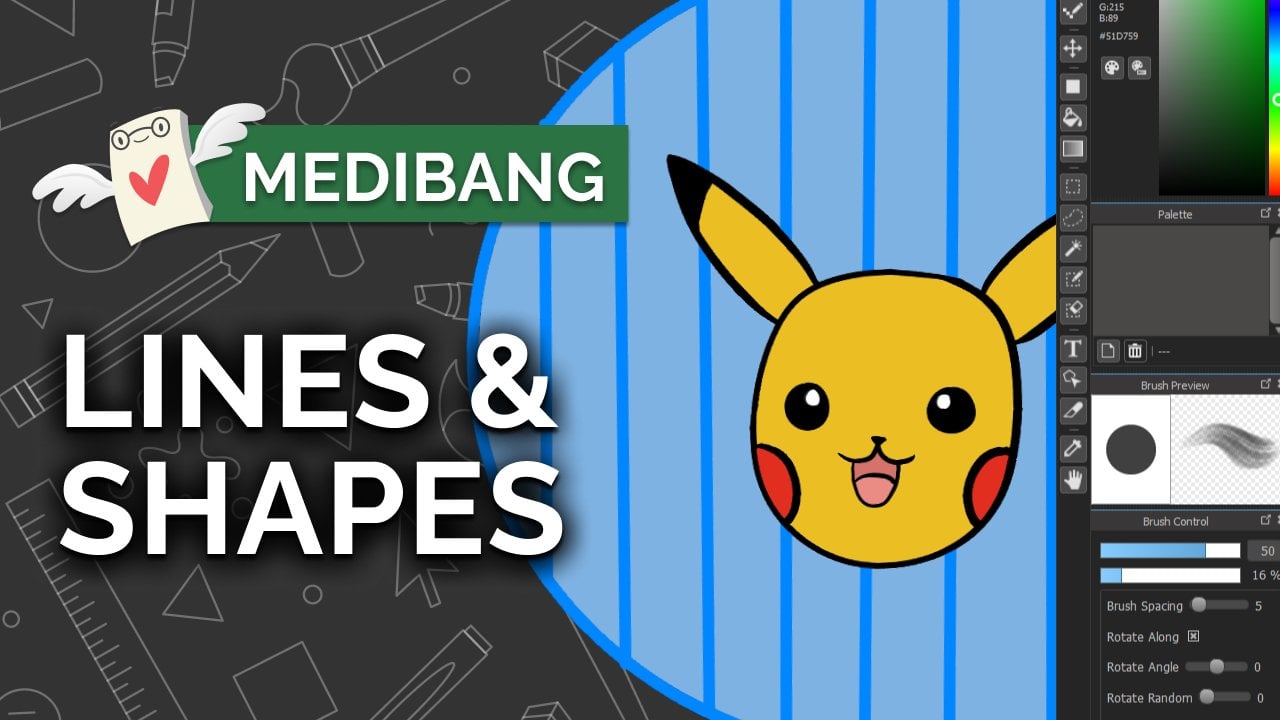
3. Pt. 1 - Opening Program & Drawing Jewel Shape: So here I have my blank canvas to work on that I got by clicking here up on File and New at the top. So now I'm here working on a page. I also made a simple background on one layer. So I just use the paint bucket tool here, picked my color and dropped it onto the canvas. I made sure that my paint bucket was referencing that Canvas as well. So it fills up my entire page. Now today we will be making a magical jewel or gem that glows. So I'll be showing you a way of creating a glowing effect. There are many ways to do this, but this is very basic, and you can use this on any magical object or light that you draw. So I encourage you to follow along with me as we draw and go through some fun new techniques. So first we are going to draw our joule. So I'll be making mine a teal gem today. But what I can show you can be done with any vibrant color that you'd like. So I'm going to make a second layer here. I did that by clicking on this icon here to say and create new layer. So I'm going to be using the pen brush with my correction up at the top here at 20. So to get your pen brush, you have to go at the top right on this toolbar on the left side. So here is my correction. Remember correction makes you have those smooth lines and also helps get rid of that shakiness a bit. So 20 is a good number to start for this because we are going to be making straight lines on our gem. So I'm going to grab a dark teal color here to start with. And I'm going to start drawing at the top of my gem here, making these points go from a triangle now to quickly undo, I'm using shortcuts right now, and that means I am using the buttons on my keyboard here, I'm on a computer. So when I click on certain buttons on my keyboard, it makes the different tools work faster. Instead of me moving all the way to the top here and clicking on do, I can easily hit some buttons on my keyboard that will help me go faster. If you want to learn more about keyboard shortcuts, we have a video that you can watch that goes through the basic ones that you need to use. So right now, I'm just drawing these straight lines or my gem. So here I have two coming into a point. And on each side I'm going to do a straight line coming down. Remember you can use the Undo up the top here if you don't like the line that you drew. And then now that I have my two here, I'm also going to draw the same point at the bottom. So two lines coming into a point in the middle. And I'm going to hit my eraser tool right below the brush in going to clean up the lines that I just went through. Just cleaning up any spaces that I have. And you can do the same as well. Now that we have our basic shape, we're going to draw some details in the middle that will make this object appear more 3D like and also adding a bit of a pop. So I will draw a short line coming from each point of the gem and it's going to move inward. So all my lines are pointing to the center. Just some small lines like this, all on your points of the gem. So here I have 1, 2, 3, 4, 5, 6, so six short lines. And now we will connect each line together. So this one will move to this line, right here. This one to this line, this one to here. Not going across anywhere, but just connecting right along the edge of my Gem, following the shape. And if you make any mistake, don't forget, you have an eraser and also the undo button. This cleaning up my lines here. Perfect. So now we have the base shape of our gem.
4. Pt. 2 - Organizing Layers & Colouring Jewel: So we can go ahead and start coloring it in now. So I will create a new layer. Remember, if you're going to add a new thing to your drawing, you should create a new layer. So when I hit this button here, I've made another layer and I'm going to drag it underneath my line layer. So remember line always goes up the top and color right underneath. So I'm gonna go ahead and name these just so I can have them organized. And I also don't want to make a mistake here. Line and color. So I'm going to choose a lighter teal up here to color in my gym. And I'm just going to color it in just with my brush tool. So I'm going to change the size over here on brush control. I'm going to drag this slider by making the brush size bigger so I can cover more of my Gem quickly. This coloring inside the lines. And you can also make it a little smaller to go around those edges, just so you don't make any mistakes. Perfect. Now, our joule is all colored in.
5. Pt. 3 Airbrush Tool: So now that we have our colored jewel, it's time to add some glow to it. So since we are going to be making a new addition to our drawing, we are, we'll make a new layer. So this button here at the bottom, like on that. And I'm going to go ahead and call this one below. Perfect. So now we're going to draw a glow effect around our joule, but not using the pen brush this time. So we're going to grab from our list of brushes here in the corner. You have a lot of brushes to choose from. Today we are going to be focusing on the airbrush. Oh, go ahead and click on that. Now, the difference between our pen brush in the airbrush, if you go ahead and color right on your canvas, you can see that the brush is very, very soft, much softer than our hard pen brush here, has a very nice glow to it already. I'm going to eye drop, pick this color right in the middle. So I'm clicking on this Eyedropper tool on my toolbar here, and clicking in the middle, just so I can get my color back. I'll head over to my brush again. And I have my airbrush tool. So I'm going to make this eight good size. I'm keeping mine at about one hundred one hundred and two right there is fine. And right underneath. Remember this is the opacity slider, which also means that it makes your color see-through. So helps see-through. Your color is going to be I'm going to keep mine very, very light because I want to be able to build up the color instead of having it very solid. So I want to be able to keep going and adding more color as I go. I will keep mine around 15 and I will start coloring right around the edges of my joule. So very lightly pressing down with my brush. I'm coloring the edges of my jewel very, very lightly, just going around it. Not too far out from the jewel either. Very lightly pressing down, creating a halo all the way around. So very lightly, soft look around the stool. You can already see now that we are making a glow effect with this.
6. Pt. 4 - Creating a Glow Effect: So this is already giving a great glow effect, but we want to make it more believable. So we're going to talk about layer blending modes. So layer blending modes are used to change how the colors blend together. So they give different effects to your drawing. So some could lighten up your colors and some can make them more vibrant or even help you make shadows and make your colors darker. So we are going to look at the layer blending modes here. They are found in your layer window, right underneath our opacity dial. If we click on this drop-down here, we can see a lot of different options. These are our layer blending modes. There are many to choose from, but we'll be focusing on screen and multiply here. So with our glow layer selected, if we choose screen here, you can see your colors become more vibrant and bright, helping us make our jewel really low on our background. So screen adds brightness to your layer. So now the other layer blending mode we are going to talk about is the Multiply layer right up here. So the multiply layer is the opposite of screen. It will take the information from the layer underneath and make it darker. So I will demonstrate this by making a shadow layer. So clicking down here, creating a new layer. And we'll call this one shadow. Like okay, still with my color of my gem here, I'm going to lower the size of it. Just saw I'm able to draw exactly where I want to go. I'm going to start coloring on my gem. But before that, I'm going to change the layer blending mode to multiply. Right now it's on normal, which all of your layers that you create new should be on normal. I'm going to hit multiply, so that's right underneath. Click on there. Nothing happened because we don't have anything on our layer just yet. So when we start drawing, I'm going to draw on this side of my gem here you can follow along with me. You can see how the color gets darker, even though I selected the exact same color as the gem here, it's the same color. I didn't go any darker. But with our layer blending mode, it changes the color for you, making the color darker than what it's supposed to be. And that is what the multiply layer blending mode does. It makes the color darker. So here we have our shadow on the side of our joule. So now our jewel has a great shadow and glow to it. These layer blending modes and the airbrush technique can be used around any object that is magical or has a glow coming from it. So if we're drawing a lantern or some sort of light, this would be great to use as well.
7. Pt. 5 - Adding Highlights using Layer Blending Modes: I'm going to go back to our glow layer here. And I'm just going to do a single highlight on the opposite side where we have our shadow. So I'm going to grab up here on my color palette. I'm going to grab a very, very light color, almost white, just a very, very light teal color. I'm going to increase my brush size just about 30 here. And I'm going to keep my opacity about, let's say 18 here. And I'm going to lightly press, very, very lightly, following the shape of my jewel, creating this line right here. This adds a pop to your gem and an extra highlight. Very lightly just making a line all around the shape of my gym. Now perfect, So this is our glowing jewel that we have. So we made a line drawing first, then we created our color layer Coloring in our gem in creating a glow behind it. So this is using our screen layer blending mode. And we also had a shadow on the one side of it using our Multiply layer.
8. BONUS: In-Depth Look at Move Tool: Hey fellow art merits, my name is Felicia, and today we'll be taking a look at the move tool within Medi bank pain pro on desktop in PC. So today I'll be giving you an in-depth look on how to use the Move tool with layers and folders and also when to use them while creating. So here I have many being opened up on my desktop with a new canvas to work on. And I'm going to grab my brush tool, which is in the left side of my screen here, right on the toolbar. Click my brush tool, and now I have it selected so I can draw with it. It is going to be on the 104 brush size, and I'm also just using the pen. So this is the default brush that you will have when you open up many bang. So I'm going to draw a simple drawing today. I have a reference of a poke a ball in the corner here. And that's what I'll be trying to demonstrate the Move tool with you. I will draw a circle and I will draw the band that goes across the bocce ball. And I can erase some of these parts that I went over a little bit just with my eraser tool. And I'll also do a circle in the middle here. So here I have my potable line drawing, but I'd like to add some color to it. So I'm going to grab a, another layer on here. So going to my Layer window, and I'll be creating a new layer. And this is by clicking the button right at the bottom. The first one on this bar, create a new layer. So now I will name this one over here line. And then that will be my line drawing. And I will name this one color. Just so I don't get confused between the two. And now I will color my Poker Ball. I'm going to grab on my color window a nice red color width. So the top part will be red. I'm going to change my brush size a little bit bigger. So I'm able to alert a lot faster. So mine is at 40 right now. And I will go ahead and color this all in. It's like a coloring book right inside the lines there. And I can lower down my brush size. Yet those little corners minus at about 1212 for this, a smaller size, to get those edges, I will go and grab a gray color. So that's by going to the left side of my color panel here, where I have white, all the way to black. So if I want gray, I'll go right in the middle between those. It a nice gray color and I'll color in my band here. The rest of my ball will be white. So I don't need to worry about coloring in that. Since my background is a white color as well. Let's coloring in side these lines here. Perfect. So with my drying, I would like to be able to move it around my page. So to do this, we will take a look at the move tool, and it can be found on the left side of our screen here with all these different tools on our toolbar. It is the fifth tool here that's two arrows going across each other, going up, down, left and right, almost like a compass shape. This is our move tool. Let's click on this here. Now I have my Move Tool selected. So the move tool allows us to click on any layer that we have and move it around our page. With my line layer selected, I'll click my line layer. I'm able to move this part around, but you can see I'm not moving both my line and my color together. I'm only moving one layer, just like with my color. If I have that selected, I'm only moving my color around now. What I want to be able to move both of them together, so I'm able to have my whole drawing selected. But since we have two layers that I don't want to separate, I'm going to create a folder to put them in. So a layer folder will hold as many layers at once where you can select the folder with everything you have inside of it. So to create a layer folder, we are going to go to our layer window again here. And at the bottom we have all these different buttons. So this is where we can create a new layer. But if we head over right to the middle, we have an image of a folder icon. We're going to click on this. And this is to create a new layer. And you can see in your layer window, you now have a new folder. So I will click and drag to move it up to the top. And if you click any one of your layers, you can drag it into the folder. You can see a blue outline will go all the way around your folder. That means you're able to drop the layer in. And I'll do the same with my line layer. Click and drag and drop it in. And now I have both of my layers in one folder. I can open it, I can close it, and I can also name it. So I will name it Poker Ball. Since this is my whole drawing. And I can keep it selected. And with my move tool, if I try to move it now, I will now be able to move all of my layers at once. So it has both my line and my color locked into this folder. So if I click on the folder now, I can move both layers together. If I click on my line or just my color, I can still move just them separately. But now I'm able to grab the whole folder and move it all at once. Maybe I wanted the drawing to be in the corner. I can move it over here. You can move it into any spot you want on your page. You can see if you move it all the way across, you can hide it off of your canvas. But I don't think you want that to happen. You, we want to be able to see your drawing. I'll leave mine right in the middle here. Another way to use layer folders is if you have too many layers in your list. So right now I only have two. So that's not that many. But if you create a lot of them as you go, a folder can be created to organize them. So to create a cleaner luck with your layers. You can have some in one folder, close it up, and now you have your layers more organized and easier to look at. This will also help you to not get confused which layer is which, and it can also be faster to grab them when you need to handle. That concludes this in-depth look at the move tool as well as layer folders within Medi bang paint Pro. So this can come in handy if you ever need to move a part of your drawing on your page or need to organize your layers into folders. Thank you all for watching and we'll see you in the next one.
9. BONUS: In-Depth Look at Transform Tool: Hey fellow art nerds, my name is Felicia, and today we'll be taking a look at the transform and the mesh transform tools within many bang paid pro on desktop and PC. So today I'll go in depth on accessing the transform tools and how they can be used to really change the look of your art. So here we have many bang opened up and I'm going to draw a small character that I can use the transform tools on. Though this character will soon turn into a familiar face from the X-Men series as I am going to create the wolverine. And then I can go in with his mask. Has to spiky points going on either side that connect in the middle here. I'm going to create this loop that goes all the way to this section and same on the other side. Going outside of his face as well. This will be where his mouth is. I'll do a little frowny face there. And I'll also add his eyes. He's going to be an angry Wolverine. And then I can go in and color this part black. Both sides will be colored. Black. Is kind of going in still with my brush here around those eyes. And coloring this in black. And now I can go in and color the rest. So I'm going to make a new layer on my Layer window. This one will be called color. In my other layer will be called a line. I'm going to put the color layer underneath my line layer so I can start coloring. And inside, I'm going to grab a nice yellow color. And it's bright yellow for the inside of his mask here. I'm just going in and adding this yellow. It's going right into these lines here. And then I can also grab a skin color. I'm going to the oranges on my color palette and going to the lighter values to grab a skin color or the Wolverine here, a nice tan orange. So with this Wolverine drawing that I have, I'm just going to put these two layers together by merging them. So on the keyboard you can hit Control E to merge. Or this icon down here will also merge them together. So if I click here, I now have my Wolverine drawing on one layer. Now with this, I would like to change its size, maybe rotate it around a bit. And that is by using the transform tool. The transform tool cannot be found on your toolbar on the side of your screen. So we're going to look at the top here where we have lots of different menus. So the menu we're looking for is called select. There'll be click on Select. We have a bunch of options here, but we are going to look for the transform option. So once we click on this, you will now see your drawing has a guiding box around it. So there are some little white squares on each corner and also on the sides. So if we were to click and drag on any one of the corners here and drag it in or out. We can change the size of our drawing. So maybe you made your drawing a little too small. You can change the scale and make it very large onto your page. If you click anywhere outside of the box here. So anywhere around your page and click and drag. You can now rotate your drawing. So maybe you want to have it on an angle here, upside down. You can rotate it however you would like if we click inside of our drawing. So inside of the box here, anywhere inside, I can now move my drawing around. So this is similar to using the Move tool, but you can also use it within this transform tool. Though clicking inside of the box will move your drawing around your page. Another option you can choose is to flip your drawing. So this will mirror it to the opposite side. And this button can be found at the bottom here, just called flip. And if we were to click on this button, it will now move it to the opposite side. You can see it kind of flipping back and forth here as I just click on it. So the transform tool will allow you to change your drawing in any way that you'd like. And if you're happy with your final result. You can head over to the bottom where it says, oh, okay. So once you click Okay, you will now have your changed drawing here with the changes that you've made in the transform tool. Another tool we'll take a look at is the mesh transform tool. So this tool is different from the regular transform tool as you are able to change and warp your drawing in smaller sections rather than as a whole. So this can be found back in the Select menu over here, up at the top. We'll give it a click and it's right underneath our transform option. It is mesh transform. So let's click here. And you can see your drawing is now in many sections rather than one whole square. So we have right now for squares by four squares. So this means there are 16 right now covering your drawing. So this grid will divide your drawing into different sections where each of these points can be dragged on to move that area. So by clicking and dragging on any one of these points here, you can see that a part of the drawing will be moved and pulled around, giving a warp effect to it. So I can pull on any one of these points here and really change the look of my drawing. Wolverines looking very sad right now as he's getting stretched everywhere. To add more sections to your drawing, you can increase the column and row number down at the bottom here. So there's some drop-downs and you can select a number here. So if I select 12, you can see in each of the columns it added more lines. So now I have 12 points going up and down. And if I pick row, I'll change that to 12 as well. Now it is separated into much smaller sections. So now I can make very fine details to my piece rather than very large parts of it. A couple more options here are vertical link in horizontal link. So this means if you have one selected, this will select an entire line of points on your drawing. So if I click on vertical link and I click on any one of these points here. You can see that it now collects all of the points in the line. And we'll move it in that direction. If I uncheck this and click Horizontal link and click on any one of these points. It will now move the entire line back and forth horizontally. So the mesh transform tool can be used for quickly changing your illustration instead of erasing and starting over. So this allows you to warp your drawing and move your lines to a position that you'd like them to be in. So once you're happy with how you're drawing looks in the mesh transform tool. You can click OK to save your changes in with that concludes this in-depth look at the transform tools within many bang paint Pro. So these can be used to change your drawing size, rotation, and overall shape. So thank you all for watching and we'll see you in the next one.
 Winged Canvas, Classes for Art Nerds