Transcripts
1. Intro to MediBang Paint Pro: Hello fellow art in there. It's my name is Felicia. Today we're going to go through and learn the basics of many bang paint row. Now this is a great program to start your digital art journey and, and making drawings through either a computer or a tablet. So make sure you have the program open and ready before you start. And so you can follow along with me and make a fun drawing by the end. So let's jump right in.
2. Installing MediBang : Before jumping into the course, make sure you have many bang installed on your preferred device. To install many bang on your desktop or PC, you can head over to the official Comedy Bang paint website and click the download button here. Now if you have a Windows computer, you will want to download the first option here. It says windows within brackets, 64 bit. If you try downloading this and it doesn't work for you, maybe you're using a much older system. You can try downloading the 32-bit version. However, most computers will run on the first option here, and that is the one that is recommended. If you are working on a Mac computer and you will want to download this version here or your Apple device. Once you click on the right version for your system, it will begin downloading. So we'll click here, you'll see this window will pop up and it will begin downloading. And once it's finished, you can begin the quick installation process and it will appear on your desktop, free and ready to use.
3. Basic Navigation of MediBang: So when you first open up many bang to advertisement windows will pop up. So we're just going to go ahead and exit out of both of them. So here is the main screen of medi bang. If we want to start drawing, will need a blank space for it. The first thing you do is click up on file up here at the top and click on New. So this is where we are going to pick the size of what we want our drawing space to be. So I'm going to make my width and my height 1080 pixels. So this creates a square to work with, since both sides will be the same, you don't have to worry about any of these other options here. Just click, Okay. Now the white area in the middle is called the canvas. And it's where you can start drawing. It acts like your piece of paper and your space to create. So to move around the space or your canvas, we're going to use the scroll bar down at the bottom to click and slide across are the left and the right. Or we can click on the other one and move up and down. Another way of doing this is to go to the window up here to the top right called Navigator. This is a small version of your work. And by holding click and dragging, this will drag the page around so you can move it wherever you want. If you want a closer look at your drawing and need to zoom in, you can click on the buttons in the navigator window here there is a button with a magnifying glass and a plus sign and another magnifying glass and a minus sign. The plus size one, zoom into your drawing and the minus sign will zoom out. Don't want to zoom out too much, or it'll be really, really hard to see what you're drawing. So we're going to keep it at a good size. And the beginning where you can see the entire page.
4. Overview of Program Settings & Brush Tools: So to the left side of the screen you have this strip of icons with little pictures. And these are our tools. The first tool we're going to look at is the brush tool at the top, this little button here with the paintbrush image. So let's click on that. This tool is super important because this is what we will use to draw on our space. So when we hover over top of our screen, you can see a little circle attached to the cursor. So this shows what size of the brush you are using. So if we press down on our page here, we can start drawing. Wherever you press down, your brush will follow. You can try making some lines or little shapes here. So the next thing we're going to look at is on the left side, you see this beautiful rainbow of colors. And this is where you pick the color you want your brush to P. You can click anywhere on the strip here or on this larger panel to the side. If you hold down, you can drag the colors around to see which one you'd like to choose. So, with my chosen color, if I go to the large panel over here, this has the different shades of the color I selected, with lighter purples on the top, all the way to white and darker purples on the bottom, all the way to black. So you can go ahead and choose the color that you want to draw with. And now your brush will be that exact color. So underneath the color palette shows what your brush looks like when you draw it. And also what the size of your brush is. Below that window are two sliders that mean two different things. So the first slider bar will control how small or how big your brush is. You can tap anywhere on this bar to get the size or just drag it along. You can see the size of it changing in the little image preview above or in the middle of your canvas. Let's really big or really small. So if you make your brush really big, and we'll try and draw here, your brush will come out really thick. And if we make it really small, your line will be very thin. There are also bras sizes down at the bottom right corner here. And this, you can quickly change the brush size as well instead of using the slider. Now the second sidebar has 8% decided. So this slider will change how see-through the color is on your brush. So if the slider is all the way at 100, the color on your brush will be completely solid and cover everything. If you turn it down any less than that, I'll just change my color and my brush size here. And we start drawing over top. You can still see the line that I made right underneath it. This is sometimes used to blend colors together. But when you're drawing, it's best to keep it at 100%, just so you get that nice, vibrant color that will cover everything on your drawing. So after I draw lots of lines on my page, I might want to get rid of them. Don't want them anymore. So if you draw something and decide you don't want it anymore or need to remove a part of it. There is an eraser tool that acts just like an eraser on the top of your pencil. So to find it, we go to our toolbar here, and it's right underneath our brush icon. This little guy that looks like an eraser. So we're going to click on him. And if you start drawing with this tool selected, it will start erasing your lines. You can use this to fix up your drawing if you make a small mistake or if you just want to make small changes, you can still use this slider to change the size of it. So you can quickly erase things. So it's great to quickly erase and start again. And all artists make mistakes. Nobody is perfect, so there's no need to worry. Fixing up your drawing can be done very quick and easy. There's also another way of changing your art if you make a mistake. And this is by using the undo and redo buttons. So I'll draw a little guy here. Maybe I didn't like the way I did his smile. So there are two buttons up at the top, right here. An arrow pointing to the left and an arrow pointing to the right. So the left one is culture undo. And if you click on that, it will remove exactly what you just did and reverse back to the last spot it was in. It's like you're going back in time. So I start drawing and think, hmm, I don't like what I just did. Instead of going to the eraser tool and erasing it, you can go up at the top and hit Undo. But say you hit the Undo button too many times, like, oops, I didn't want to get rid of those eyes just yet. Don't worry. You can get them back by hitting the Redo button. By pressing redo, the arrow pointing to the right, you will reverse the Undo you just made. So going back in time again and not hitting the undo button too many times.
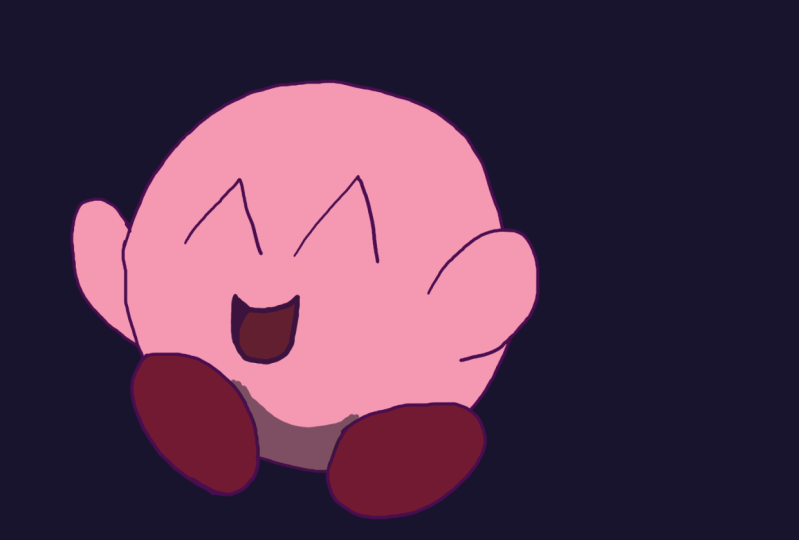
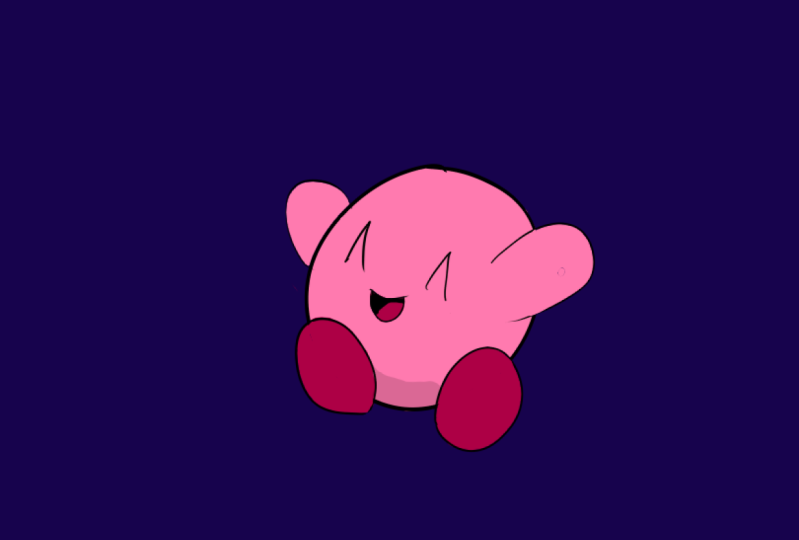
5. Step-by-Step Pt. 1 - Lining: So with what we just learned when using our brush and eraser, I'm going to draw a little alien hero named Kirby, who you may have seen as a video game character in Nintendo games. So you can follow me step-by-step as I draw him. So first thing I'm going to do is pick a dark pink color to start outlining. So curvy body is what we're going to start with. And it is just a big round circle. So I'm just going to draw a circle here. And you can do it as many times as you'd like. If you need to fix up any edges, you can go ahead and use the eraser tool up here, or click arrow for undoing what you just did. So when you have your body. Next, we're gonna do his little arms, which are also very round. I'm gonna do one at the back here. Here's one and another one right here. Now see how my body line is going right through my hand. I don't want that to happen. So we can take our eraser tool and we're just going to erase the part of the body that goes through that arm. Much better. Let's go back to our brush. Now with copays body, we're gonna do his feet now, which will be at the bottom there also round ovals. So we'll do one right here, little bigger than the hands that we just did. Here we go and see it. Same thing. The body line is going through the feet. So we're gonna take our eraser tool and erase that line. And on the right foot as well, just erase it. Now the most important part is this face. That's what we're gonna do. We're gonna make him really happy. So I'm going to have caries eyes closed. And for this we're going to do little v shapes. So kinda like a triangle but not completely closed. Just like that. And once you have that, we're gonna do is mouth. And a rate below the eyes gonna do one line like that and a curved line to close it. So there has open mouth. He is super happy. And I'm just going to make some little changes here. If you need to zoom into your Canvas, remember to hit the magnifying glass to zoom in at the top. Now you can get a better look at him. If you made a little mistake, go ahead and hit your eraser tool or your brush to fix up your lines. Zoom out. Here we have our finished little curvy.
6. Step-by-Step Pt. 2 - Organizing Layers: We're going to talk about another very important thing to remember when drawing digitally, and that is our layers. So our Layer window is over here on the right side of your screen. And layers are like clear pieces of paper that are stacked up right on top of each other. Artists usually use several layers where each one is a certain stage of the drawing. I have one layer here with a cute drawing of curvy. So this layer only has Kirby on it. This first button down here is where you can create another layer. So let's click on that. So now I have layer one at the bottom. In layer 2, up at the top, you can see in this small preview here that there is nothing on this layer. It's completely empty with layer one having curvy on it. So if I click on this layer and start drawing, I am covering up curvy completely where you can't see him anymore and you can only see the color on this layer, right in this preview, there's only color. And here's curvy, He's still here. We just can't see him. So now we have our patch of color over top of him because the layer is over top of his. So we want to see Kirby again. We can click on him on this first layer and click and drag right to the top and let go. Once he's at the top, you will see this blue line appear. And now he is on top of our pink patch of color. You can make as many layers as you want by clicking this Add Layer button. But if you make, start making too many, it can be very confusing to know what you drew on each one. So for now, we'll just have one layer for our outline. I will call this one outline. Will have another layer for our color. And I will make another layer and put it underneath to use as a background. And I'll call this one background. So our background layer should always be at the bottom of our stack because it's always going to be behind the rest of our drawings. So by clicking on the small circle beside any one of these layers, this will turn it on and off, temporarily hiding it. So I'm not deleting it. I'm just hiding it for now. The slider bar up here is very similar to the slider bar for your brush. It will make the layer see-through or completely opaque, which means that you can see the full extent of it in the full color. So if I want to remove a layer, you can delete it completely. There's a trash can at the bottom here, little icon. And if you click on that with the layer you have selected, it will delete it, and it will get rid of it completely.
7. Step-by-Step Pt. 3 - Colouring with Paint Bucket: So with our Kirby here, we need to add some color to it and bring them to life. So this can be done with a larger brush where we could just go ahead. I'll pick a nice pink color for him. And make sure to be on your color layer. And we can start coloring in the lines, just like a coloring book. And if you're coloring something quite large, this can take a long time to go in and color, and it might not be the best choice to color it in like this. So instead, Let's undo that. Click on the button up here, on do. So now we don't have it anymore. And we're going to go to a new tool on our tool bar that looks like a paint bucket right over here. So this paint bucket tool can be used to apply color onto an area really quickly. So imagine we have this really big paint can and you pour it all over on the ground. That's a lot of paint and would cover the whole area that it's spilled on. So the Paint Bucket Tool works in the same way. So wherever you click on this paint bucket tool, it will fill up the area. So now Kirby is all filled up and I didn't have to go in and color it completely. But this only works when lines don't have gaps and are completely closed as a shape. So for an example, I will draw up here a circle that's completely closed. And I will do a circle that has a little gap in the middle. See how there's a space here. Now if I try to use the paint bucket and fill this one, it fills it up completely. No problem. But if I try to fill the circle with a gap, won't work exactly the way I wanted it to. The line needs to meet without gaps for this paint bucket tool to work. So if I try it again after closing the gap, now it will work. So Kirby here doesn't have any gaps, so he should be good to go. So with our pink color here, I will take the paint bucket tool and have color attitude very quickly. I'll take a darker color for his little feet and his mouth fever. So I'm going to click on the background layer now and choose a color. Going to pick a dark purple equal lu. And with my paint bucket, if I click anywhere on this page 48 in the open area and tap, it will cover the entire page. So now we have our cute little drawing of kirby with the background. And I can zoom in. And if I wanted to, I could add a little bit of details to him. Just using my brush. I can go in and draw a little shadow with this little tongue here. And maybe add a little shadow underneath his feet. And there he is. So that concludes our medi being paid basics tutorial. So there are a lot more features to talk about in this program, but B6 will help you jump in and start drawing right away. So thank you all for watching and we'll see you later.
8. BONUS: MediBang ToolBox - Brushes: Hey fellow, our ignorance and welcome to the many bang toolbox. So the long list of tools that come with any digital art program can be a little overwhelming when first getting started. But throughout this series of lessons, I will clear up any confusion you may have about the toolbar. So today I'll go in depth on the brush tool within many bang paint Pro on desktop and PC. Before we begin taking a look at the tools we need to make sure we have all of our important windows open. So if you look at your program and can't seem to find the color palette, or maybe your brush list is missing. Don't worry, there is a very easy way to find these and get them to appear on your screen. This will travel to the top bar on our screen here, to a tab called window built. You click on the Window tab. You will see that there are lots of options for our different windows that we see on the screen. So if there is a window that you are missing, you can click on any one of these checkboxes here to display it on your screen. So make sure that the ones that I have checked on are also the ones you have open onto your screen as well. So now that you have all of your windows ready to use, we can get started to find our brush tool once many Bang has been opened up, we traveled to the left side of our screen here, where we see a long strip of buttons with little pictures on them. And these are our tools here. We're going to click up, up on the first tool here, there's a little image of a paintbrush, and this is our brush tool. So the brush tool is what we will use to make drawings on our page, just like a pencil or a pen. Let's click up on it here. And when I hover over top of your page, not pressing down just yet, you can see a small circle is attached to the cursor. And this circle shows the size of the brush you are using. So how big your lines are going to be? Let's press down on our page here. Start drawing. Wherever you press down, your brush will follow. You can try by making some lines. Here are a couple of shapes. On the left side is where you see this beautiful rainbow of colors, where you can change the color of your brush. You can click and drag this bar over here, or just right in the middle. On this large panel. The larger panel shows the different shades of each color with lighter colors on the top to pure white, darker colors on the bottom to pure black. So if you tap anywhere, you can pick the color that you would like. When you use it. Your brush will be that exact color. Underneath the color palette. This is our brush preview. In this window here shows what your brush looks like when you use it in its size, right The sided. Next we're going to take a look at brush size and opacity. So below the color window in your brush preview our two sliders here. This top one will change the size of your brush. So how big or small you would like your brush to be. So you can tap anywhere on this slider or click and drag to change it. You can see it changing on your Canvas there and also in your brush preview. And make it a little bit larger. Right now it's at 150. And I start drawing on my page. Now my brush is really thick and covering a lot of my page now. Now the next Spider right underneath is our opacity slider. So this slider will change how see-through our color is. So if the slider is all the way at 100% like it is right now, the color on your brush will be solid and cover everything. If you turn it down any less than that, I'll bring it down to 35. And I start to draw right over top. You can still see the line right underneath. And this is because my brushes now see-through. So I can start to see the colors right underneath. If I start drawing right over top of it. Now I have lots of lines that I can see right over top. So the opacity slider is great for when you need to blend your colors, but when you're drawing, it is best to keep this at a 100 percent so the colors come out really nicely and only change it if you are ever blending colors or experimenting. Now, we are going to dive into Rush types below the brush size. In opacity, sliders are a long list of different brushes. These brushes can be used or drawing and coloring here, there are a long list of brushes. Right now, I am using the hand brush. When I use the pen brush here, I'm just going to turn down the size in. If I start drawing, it comes out very solid. We have nice crisp lines. But if I change my brush to the airbrush here, just by scrolling down on your brush types. If I give that a click and I start coloring. You can see the difference between these two brushes are airbrush here is much softer. It doesn't have a crisp line like our pen brush. For the airbrush is great for blending, but not for drawing any sharp lines. So you can click on any of these brushes and try them out on your page to see how each of them work. But the pen brush is a great place to start to Stewart drawing and sketching, or maybe even lining your work. So make sure you are super comfortable with the pen brush before changing to any other options. Next, I will show you a small feature that can help you make really smooth lines. If you're worried about your pen being a little too shaky. And this is called Penn correction. So you can find this right at the top of your screen here once you have your brush selected, and that is called correction with a drop down menu here. So if you click on the drop-down, there are lots of numbers and this is showing how correct your pen will be. So I have mine at 20 right now. But if we change it to 0 and I start drawing, the hand is following exactly to where I'm drawing and isn't correcting my lines at all. However, if I change it to 40 and I start drawing, my pen is kind of lagging behind. You can see it's slowing down in quickly trying to catch up to where I am. This will slow down my pen, but also is letting me correct my lines, making them very smooth. And I don't have to worry about shakiness or having my pen a little too wobbly. So the bigger number you have for your correction, the smoother your line will be, but also the longer it will be dragging behind you. So what good number to keep this ad is 20, just for a little support as we draw. So I'm using my pen and my correction at 20. Just going to draw a small little image here. This will be a little power of mushroom here. So let's talk about the Eraser tool now. So I just drew a small mushroom power-up from me, Mario game series. And I'd like to remove the middle circle here. So if you draw something and decide you don't want to have it there anymore, or you'd like to remove apart, then you can use the eraser tool. So the eraser can be found right underneath your paintbrush here on your toolbar, and give it a click. And now your brush as an eraser. So if you click and start drawing, you can start erasing the lines you just made. Very similar to an eraser on the back of your pencil. Just removing any of the lines that you make. And you can also change the size of your eraser here. Like if you were to do with your brush and have a larger eraser here. So this is great if you wanted to make some small changes to your drawing so you can quickly erase it and start again. There's no need to worry if you make a little mistake, it can be fixed very quick and easy. Another way of using the eraser is with transparent color. This means that the color you pick on your brush is completely see-through. And we'll also remove parts of your drawing. You don't want to use this. Make sure you have your brush selected. I'm going to go the top here, click on my brush. And you see this small square in your color window. It has a few checkered pieces here. If I get this a click, this is my transparent color. So there is no color on this brush and we'll remove anything on your drawing. So if I start drawing over top of my mushroom here with this selected, it is now acting the same way as my eraser does, removing parts of my drawing. But the big difference between the two is now with the transparent color. You can change the brush that you want to use it with. Who in your brushless, you can use any one of these pens here, any one of these brushes. And you can use it as an eraser. So I can pick up this airbrush and start using this to erase. Maybe I want a softer look to my eraser. And I can use this, change the size in a race little parts of my drawing this way. So this lets you have any brush tight from your list to have as your eraser. And what that concludes this deeper look into the Brush tool in many bang paint Pro, the brush is a super important tool when creating art digitally. As it's your way of putting your ideas onto the page. So feel free to experiment and have fun with all different types of brushes in applying lots of color to your Canvas. So thank you all for watching and we'll see you in the next one.
 Winged Canvas, Classes for Art Nerds