Transcripts
1. Introduction: Do like pencil drawings. Have you always wanted to create them but didn't know
where to start, then this is the class for you. Hi, my name is Trisha and I do all things art from drawing, sketching to even painting. Here are some of my
favorite pencil drawings I've created for this class and getting on my art supplies and sticking
to just one pencil. The project of this class would be to draw
and shade a human. I don't be intimidated
by the project. Trust me, once you
complete this class, you'll be amazed at
what you just created. I still remember
when I first joined shaded and I it was
in November 2019. I was astonished. I just marvel at the
fact that our drew in. I want you people
to feel the same. I have made this class
keeping in mind what I needed to know when I first
started my pencil drawings. We will begin the
class by shading in various values we can
get from one pencil. Then I will show
you how to shade a sphere cube and encoding, I'm sharing with
you in this class the easiest foolproof
method to draw an eye. If you follow along
with me step-by-step, you won't be overwhelmed
by the project. You don't need any fancy
stuff for this class. All you need is a
pencil and a paper. Pencil I'm using here is
an HB regular pencil. I will also be using
a kneadable eraser. You can use any result
of your choice. Last but not least, the most important
thing that you will need to complete this class is the willingness to learn and
having fun in the process. Since you just need a
pencil and a paper, you can complete this
class anytime, anywhere. You can pose your questions
in the discussions tab. I'll make sure to
answer all of those. By the end of this class, you will be able to share
it with any pencil. Grab your pencil and paper
and let's get shading.
2. Values and Gradient: In this lesson, we will
shade with this one pencil, which is a very regular pencil. In this first block, we will shade the darkest
weekend with this pencil. So we push the pencil
literally hard. As much pressure as you can
apply in this first box. You don't have to be
very clean about it at this point where we just
have to fill in the box. You can go over
it a few times so that you drew it, it gets dark. You want it to be the
darkest, dispenses concrete. Now in the next box we'd apply a little bit less pressure
than the first one and create a color which is a bit lighter than the first one. We can go over the
block a few times so that we can achieve
the desired Carlo. You can follow the
way I'm doing it. Now in the next one, we can go even a little bit more lighter than
the previous one. Goal here is to create the colors one lighter
than the other. The next walks and
go a little bit more lighter than
the previous one. We want more pressure. We can hold events
in the very front, but as we want less
pressure on the pencil, I'm moving my hand
backwards on the pencil so that I can exert less
pressure on the pencil. When we are shading, we begin light so that we can always bend up the dark sheet, but it's very difficult to
come back to a lighter shade. As you can see in
the last two blocks, I will hold the pencil on
the very back and apply the least amount of
pressure I can do achieve very light gradient. You can probably even
see the last box I filled in because
it's that light. So what we want to
create is a smooth blend kind of gradient
in the box below. So I'm just going to turn my paper so that it's more
comfortable that weighs. So now we'll again begin with the darkest color and achieve the dock and
stones on lines. You need to go over the color a few times to get
a very dark tone. As I'm moving down the gradient, I'm reducing the pressure
of lying on the pencil. As I'm moving towards
lighter part of the radiant, I'm applying less
and less pressure. You need to go over the whole
gradient a few times and apply appropriate pressure to achieve very
smooth-looking gradient. Now, this is the final
gradient we have shaded. And it looks pretty good to me. All the big names out there. What do you need to do is to practice this
gradient a few times, develop a Muslim memory for shading and soon
you'll be a pro at it. See you in the next lesson.
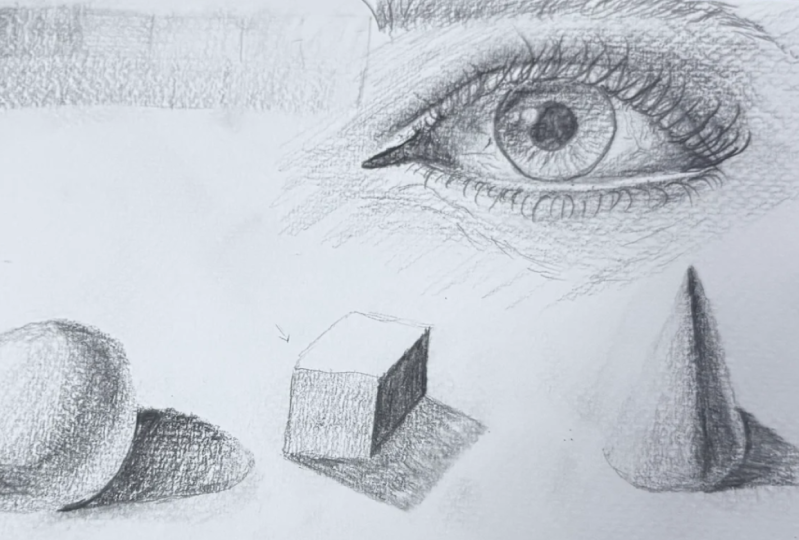
3. Sketching 3D Shapes: In this class, we learn
how to shade a sphere, Q and a cone. As you can see, I've drawn the two-dimensional shapes
of the tree right here. And now we'll children to
make them look more 3D us. We'll begin with
the Q right here. And now we make
the light source, the place where the light
is hitting the cube. The top part of the cube
will receive a lot of light. Hence, it would usually
light in color. In the top part
is the highlight. I would like to leave
it plain white. The front part of the
cube will receive a little less light
than the top part. So we will put a mid tone. Now this third part of the cube will receive
no light at all, so it will be the
darkest and we will put the highest value in this part
two, Let's begin shading. If you're not familiar with
these terms of highlights, midtones, and shadows, you can just follow
what I'm doing. Just try to copy it as it is. And I mean, aim here is to mean the object look
three-dimensional. So as you can see, I'm
drawing the shadow that the cube will
cost on the surface. It will be parallel
to the light source. The cast shadow would be a bit darker than the midtone value, but lighter than the
darkest core shadow value. Now let's move to the sphere. A sphere right now
is looking like a circle because it's a circle. You can draw a circle
freehand or use any circular object I
used. Paint bottle. First, we'll begin by defining where the light is coming from. Somewhere here would
be our highlight, and somewhere here would
be our main shadow. Since it has spherical object, the shadowed also bend
with those objects. I'm very lightly marking out
where the highlight would be because that would be the lightest part
of the drawing. The other board would
be again, midtones. I'm just beginning very, very light and eventually
I'll darken things up. You need to go over the
whole sphere of few times so that all the
shadows up blended in. Halloween draw a car
shadow of the sphere. Since it's a so-called, the shadow would be an, or. This shadow will be very, very dark near the object. And it would gradually lighten up as we move
towards the other end. You can always go in with
an eraser incorrect. Now let's move on to the cone. And to draw a cone, what
do you need to draw is a triangle with the
hemispherical bottom. I would like you people to
shade in the cornea itself. And here's how the
code should look. In the end, it would be a little fun practice for
you guys to do it yourself. You can pause right here and see how I have shaded the cone. And go ahead and try it. Hope you enjoyed shading these
three-dimensional objects. See you in the next lesson.
4. Drawing the Eye: In lesson three,
how to draw an eye. So first we'll draw big enough
for the iris of the eye. Then we'll draw a smaller
circle within the big sack, which wouldn't be
the pupil of CI. Next I'm drawing two circles, which would be the
highlights in the eye. Next I'm going to draw a reference line below
the pupil of the eye. Now I'm going to
mark two points, which could be the beginning
and the end of the eye. We'll begin by drawing
a coastline from the first to the iris of the eye. Then we'll go off
the line from there over the iris because
that would be at eyelid. Do the second endpoint. Next we'll draw the
lower border of the eye. Now I'll draw a tear duct
below the reference line. And it will golf to join. It will go around the
iris to the end point. Now I'm going to just erase the reference line because
I don't need it anymore. We are also going to erase
the top part of the arteries. If you want to draw a
different kind of I, you can always look up
at Jefferson's photos. Now we're going to draw the
upper eyelid for the eye. And it will basically follow the contour shape of the eye, but just a little bit
above the eye here, and I'm just adding a little
decrease below the eye. The next lesson we'll
talk about how to shade design to make it
look realistic.
5. Shading the Iris: In this lesson, we'll
shade the iris and the pupil of the eye cell begin by darkening
the pupil of the eye. The pupil of the eye there
will be fairly very dark, but the most amount
of pressure in the Benson and shaded in. Now I'm making these
lines which are like little muscles in our iris. I'm going to shade the top
part of the eye pretty dark because it will receive
shadow from the eyelid. Make sure to leave
the highlights that we drew completely white. Next, I'm going to draw a lash line on the
lower part of the eye. The lower lifetime we follow
the shape of the eye, but it would be a little thinner towards the front
end of the eye. Similarly, I'm also going
to draw an upper lash line, but you'd be very, very thin. You can totally skipped upper
lash line if you want to. I thought she was the I was looking a bit all
so I just corrected it and erase the part of
the eye and redrew it. I'm just darkening the
shape of the artists, also darkening the
shadows on the iris. Shading around the
outer edge of the iris and just darkening the lines, the muscles Edwin true to
make it look more prominent. That's about it. We have
successfully shaded the iris of the eye and it's starting to look a little bit
realistic, isn't it?
6. Shading Around the Eye: In this lesson, we
shade around the eye. So first we'll begin by
shading above the eyelid. So I'm very lightly
shading the area above the island and the area
below the lower lash line. Next I'm going to
shade the tear duct. So I made these shapes inside the tear duct and I would
shade the tear duct and leave those spaces white so they will look like a little
wetness in the tear duct. Now we are treating the
white part of the eye. So oftentimes the
mistake a lot of people make is leaving the white
of the eye a white, though it's Hawaii, but
it's not white actually. What I'm doing here is I'm shooting the outer
edge of the eye. As you can see, that the eye
starts to look a bit GVHD. I think it's very
important when you are doing print initiating
is to begin light, because you can always build up. Here, I'm cheating a
little dark values on the outer edge of the eye and the inner corner of the eye. If you see closely on
the outer edge of the, I am shooting in circular
motions I'm going but the shape of the eyes so
that it looks circular. One the outer corner of the lower lash line a bit dark and the inner
corner a bit light. I'm just defining the
eyelid a bit more. Cheating in dark value
is above the eyelid. Light pressure. I'm
just shading around the eye so that the
eye just pops out. Not literally though.
7. Eyebrows: In this lesson, we'll learn
how to draw an eyebrow. I'll begin by defining
the shape of the eyebrow. Slightly reserve the
shape that I just drew so that it won't
be true the drawing. And now dooming
the eyebrow hair, we need a very sharp
pencil so that we can get very clean, crisp strokes. At the starting of the IRA, the hair would be straight up and then it would
turn a little bit. As you can see, as you move towards the
arch of the eyebrow, it will begin to move down. You can turn the paper
as you find comfortable. We need to go about
the eyebrow a few times to make it look full. You can even change the arch
of the eyebrow if you want, if you want it to be a really high arch die brow
or maybe a bushy eyebrows, maybe a thin I wrote that
up to your own imagination. I'm just going to lightly
shade below the eyebrow. Here. I'm just darkening
the dog pods and Z bit more which would be the
dark part of the iris, the lower lash line and the
inner corners of the high, the inner and the outer
corners of the eye. You can also use your finger to blend here because I got like really strong strokes and
I wanted a blended look. I just use my fingers a bit
to blend the strokes in. Now we'd shade then eyelid. The eye lid would be
pretty light in color. As we move towards the front
friend part of the eye, it will become
even more lighter, so I'm leaving it almost white. Right now. I don't have
any deference picture of any in front of me
which I am following. I'm just making a regular
looking I out of my head. I'm just adding and
subtracting whatever I think is essential
at this point. It's very difficult
to define and describe each and
every step I'm doing. I'm trying not to
fast-forward the video so that you guys can
watch me shade.
8. Eyelashes: In this lesson, we learned
how to know eyelashes. As you can see, I'm already done the eyelashes on the eye. And I later realized
that I need to individually tell you
how to draw eyelashes. It may come naturally to me. I didn't may not come
naturally to a lot of people. And the clip of me drawing
eyelashes is attached after this clip and before you draw the eyelash
incidentally on the, I would recommend that
you just practice a few strokes on a rough paper before
drawing it on the eyes. So basically it's
just a tick mark. But a little GVHD tick mark
to the lashes will go to the right at the
outer corner and to the left in the inner corner and straight in the
middle of the eye. And venom practices
motion a few times, you'll just get
used to it and make sure your pencil sharpened before joining the
eyelashes because we want it pretty
crisp and clean. Also, as a general rule, the lashes are pretty long
at the outer corner of the eye and pretty small at
the inner corner of the eye. Now we are making
the lower lashes. As you can see, the
lower lashes are very small and very spaced out. They're not as thick and
dense as the upper lashes. The eyelashes in the inner
corner would be also, would also be a little shorter
than the outer corner. You can make as many eyelashes as you want and as
little as you want, It's totally up to you. I definitely love and
enjoy making eyelashes. In not making a lot of them. I'm initiating a little
bit more around the eye, inside the eye, just darkening the shadows
a little bit more. Just darkening the muscles in
the eye a little bit more. Now we're going to make
these tiny details. And that would be a
little crevices and drinkers sort of on the bottom part of the
eye as I have made it. I've also made a few lines
on the upper eyelid. What I'm going to
add in this drawing, like little knobs, like
little red nerves. You can see in
some people's eyes from the corners of the eye, you can totally skip
it if you want to. It's not the necessary thing, but I like drawing them too, just to make it
look a little bit more. Go ahead and I'm,
you're shooting a little bit more around the eye. This is the end product. I really hope you
enjoyed making this.
9. Conclusion: Congratulations on
completing this class. I hope you had as much fun as I had by creating the class. In this class you learn how to shade different
values ingredients. Then you learn how to draw
and shade a human eye. I hope after this
class you'll gain confidence in your
shading skills and don't forget to live in your comments and suggestions
about this class. Do post your artwork in the project gallery
on Skillshare. And if you're on Instagram, make sure to tag me. As Pablo Picasso famously said, that new drawing, nothing is better than the
first attempt. And be happy and pat
yourself on the bag because you guys have
made the first attempt.
 Trisha Jain, Art Educator & Art Lover