Transcripts
1. Introduction: Plus always make people better, happier, and more helpful. There sunshine, food and
medicine for the soul. This class, we paint beautiful
flowers in watercolor. Hi, my name is Trisha and I'm a watercolor artist
based in India. Do I have tried a few
different mediums? I always inclined
towards watercolors. The reason I chose
watercolors for this particular class is because watercolors are so buildable and you can create some beautiful
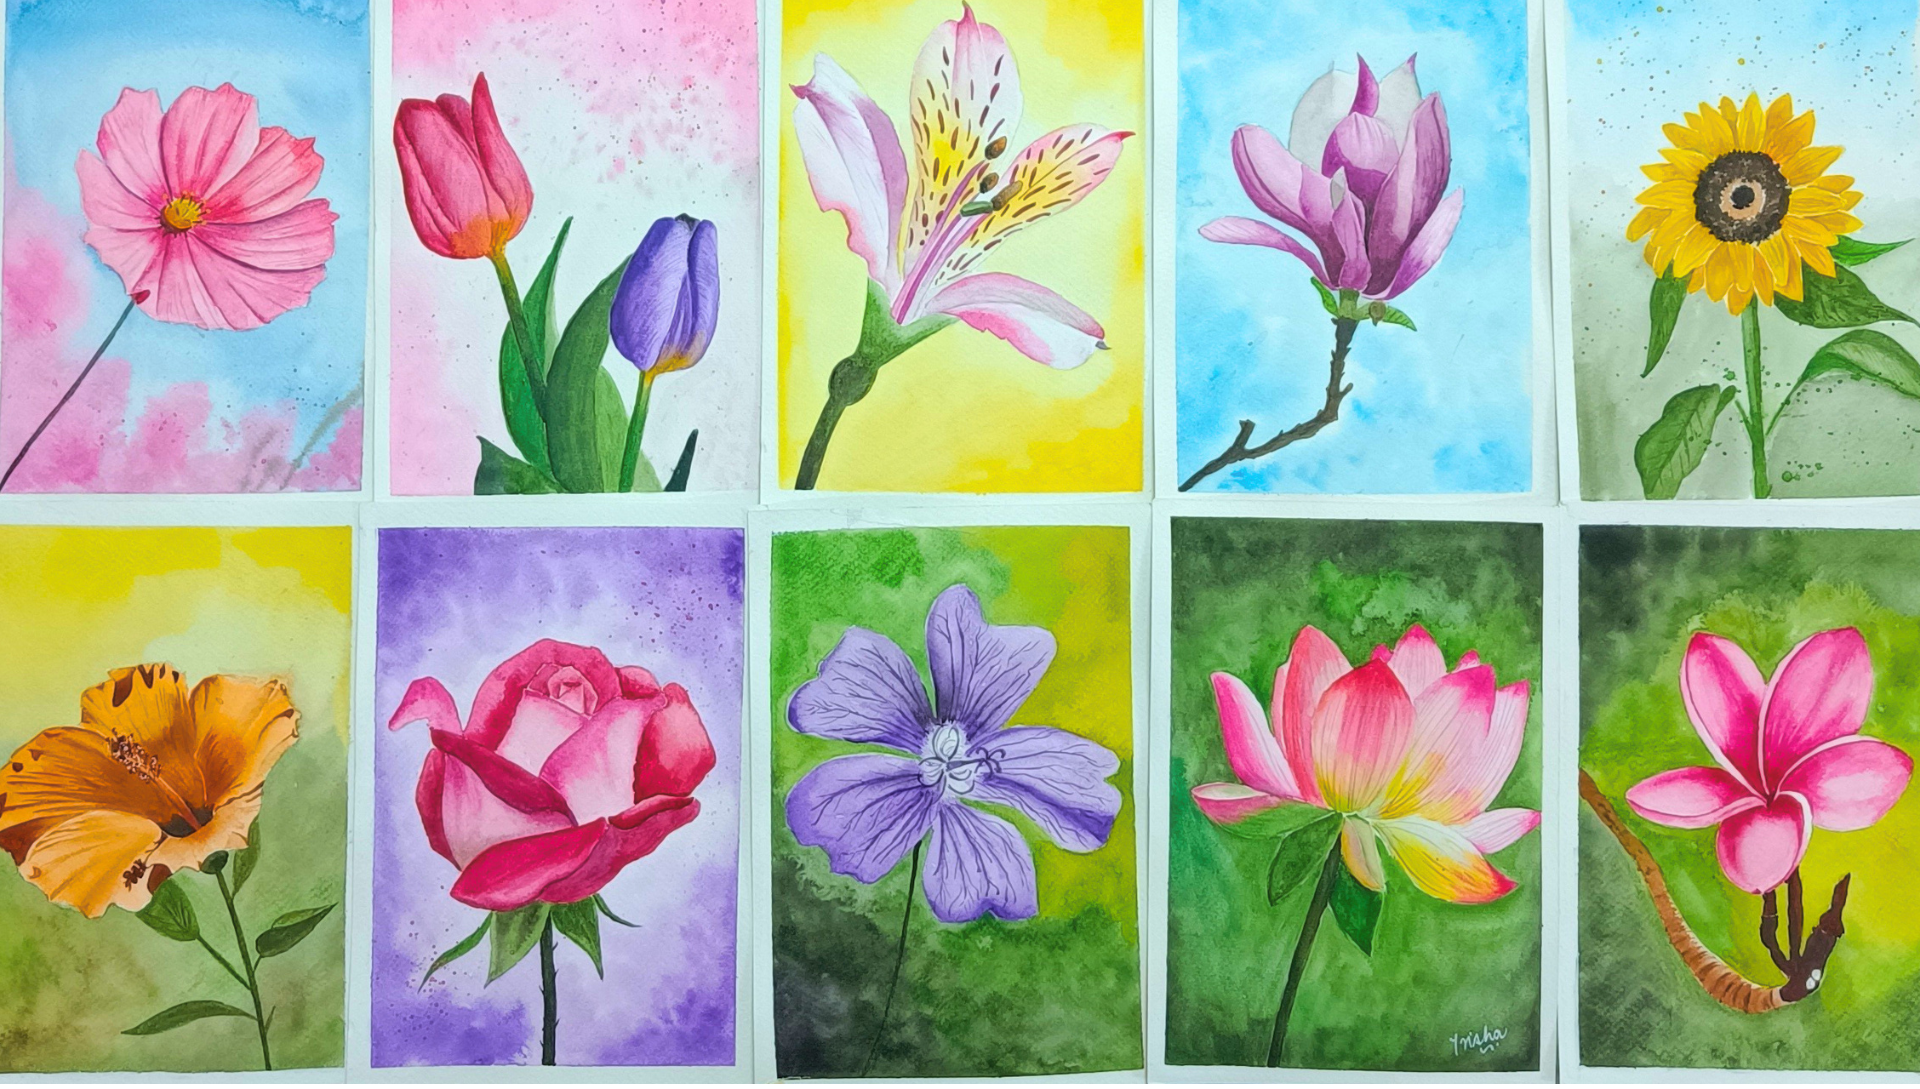
paintings with them. At the end of this class, you will not only define
your watercolor skills, but also have ten
beautiful plopping things created by you. All the lessons in this
class are presented in real time so that you
can paint along with me. So if Lars and paintings that you're paying see
you inside the class. So let's begin the journey. Creating the floor escapes.
2. Before You Begin: I will talk about the
class structure and a few things which you
should keep in mind before starting
painting that would elevate your painting
and your painting experienced this
particular class is short and present
it in real time. That means you can
paint with me that no crucial part of the painting is removed
for sped up at all. So this is a class
for people who would love to follow through
tutorial and paint with me. The reason I decided to do classes like these
with because watching somebody paint in
real time gives a very real sense of perspective to somebody
who's watching. Make sure that you not
only watch the clauses, but also paint them
amazing plots with me. If you feel like
you're lagging behind, thanks to the platform, videos can be self-paced. That is, you can pause and
play as in when you need. I personally took about
one or two reach painting. So it was about ten
minutes of drawing and about 40 or 50
minutes to think. I had a lot of fun
creating this class. I hope you have similar fun too when you're painting
these flowers. I will release one video
everyday for the next ten days. And if you are somebody
who's watching this later, you might find all the lessons
in the class of loads. Next, I would like to share a few words of advice
before you start painting. Now move on. Have your reference
photo nearby. I have provided all
the reference photos, all the paintings that have done in the resources section. Make sure you
download all of those whenever you're painting
or drawing the floor, make sure to have that
reference photo nearby, either on your phone, laptop or iPad or whatever. Number two, keep
your palette ready. By that, I mean, if you are using two pins, make sure to squeeze
out the pains that you would need for
the particular painting in advance so that you're not doing all that hassle
why you are painting. Similarly, make sure to
keep freshwater nearby, clean your water if you need to. Before starting to paint, make sure you clean your brushes so that there is no residue will pay less than them from the previous use and
they are clean and dry. The next could be sort
of a mindset advice. Where want to advise
you to clear your mind, put on some good music
for something you like listening to and start
with a positive attitude. Because our main aim
is not only to create beautiful paintings and learn the skill of
watercolor painting, but also enjoy the process and not get irritated or
frustrated during it. So make sure you take your time, pause from time to
time and don't hurry. While I was painting, I was listening to some
music awesome podcast, which really helped me enjoy
the process even more. Also, these classes have
a bit of drawing in them. So if you are somebody who's
not very comfortable with drawing or that perplexes
you in any way. I have a trick for you. You can go ahead and
watch this class is mine called How to transcend reference photos for
painting or sketching. It will make the process
even more easier for you. If your main aim is
to learn painting and you don't really care
about the drawing process. It's absolutely fine
to trace references. There is no harm in that. You're not any less of an artist just because
you trace your reference. If that's your thing, go ahead and trace
your references. And you can talk
with the video to the painting part
and start painting. I really hope that these
ideas were helpful to you and it makes the experience of this class for you amazing. So what are we waiting for? Let's start painting.
3. Art Supplies: Welcome. In this lesson we'll talk about the art supplies you would
need for this class. So you don't need all these
colors and all these brushes. I'll tell you exactly the
colors you need and exactly the brushes you need.
For this class. I really tried my
best not to use a lot of color that
a lot of brushes, so that everybody can
join for this class, even if they have
very minimal supply. So let's start with
the paint first. So in this particular class, I have used about 11
different colors. Some of these are
watercolor tube paints, and some of these
are watercolor pan. I will tell you
what color they use exactly in the next lesson. Number two, brushes. For this class, I've used
about four brushes in total. Three of them are more brushes
and one is a round brush. The advantage of
mob brush here is that mop brushes very
picking the center and very, very fine at it. Step two is able to hold a lot
of water at the same time, you can create bay detail
fine lines with it. To do. For this class, I used
three mop brushes, number 2481, other round
brush, number eight. If you don't have a mop brush, you can use round brush, a bigger round
brush in its place. And for the fine details, you can use a fine
liner brush or a number 0 or a number
one, round brush. Number three. Paper. Watercolor paper is very, very important in
watercolor painting because a good watercolor paper is made out of a large
percentage of cotton. If you have, you can use a
100% cotton watercolor paper. But since I have a lot of these twenty-five percent
watercolor paper, I would use that. You would also need
two jars of water. One would be to clean your brushes after
you have seen this. One would be for
the clean water. When we use the
wet-in-wet technique, make sure to have some sort of tissue paper or
handover also nearby. You would also need paper
tape for this class, we will use the paper
tape to tape down paper on a flat surface so that the paper doesn't
buckle up or crumble when we are applying a lot
of water on the paper. Next, you would also
need a pencil and eraser as it will draw all
the drawings from scratch. I use an HB pencil here, which is a very light pencil, so that when you paint over it, it does not show two
from the painting. In the next lesson, I will share with you the
color palette for this class.
4. Color Palette: Welcome to the next
lesson of this class. And in this lesson we'll talk about the color
pallet of this class. When I started
creating this class, I made sure not to
use a lot of colors. For this class. I used
about 11 colors in total. Let's start first
with a yellow color, which is in the form of a pan. And it is called Hansa
Yellow by white knight. It is a very lovely
bright yellow color. Next, we'll go with the orange
leaf again by wipe night. It is again a very, very pigmented orange color. The next color is called permanent rose by
Winsor and Newton. And it is a beautiful
pink color. The next one is
called crimson red, and it's by BR know. It's somewhere
in-between red and pink. The next one is
called Vermilion, again by beyond all, and I would say it is
more on the reddish side. Next up is violet by
Winsor and Newton again. And does it superbly
pigmented color. The next color is cobalt
blue hue by Camden. And they use this particular one in the background
of a few paintings. The next color is
crashing blue by camel. Next we have sap green by piano. This one is burnt
umber by camel. And the last one is lamp
black by Vinson and neuter. You don't necessarily have to
buy the exact same colors, which is the same results
by any watercolors, which are good enough and which have the same kind of colors. You can also mix a few
colors to get the color. For example, if you want sap, green, you can make blue
and yellow together. Similarly to create
some orange color, you can add some yellow to red. Try not to mix more than three colors
to get another color, because watercolor tends to get muddy if more than three
are mixed together. So now with the color palette sorted, let's begin painting.
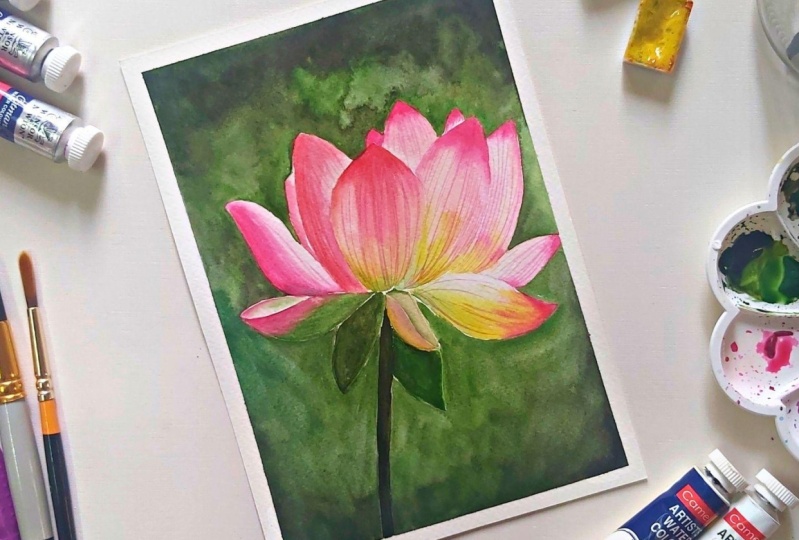
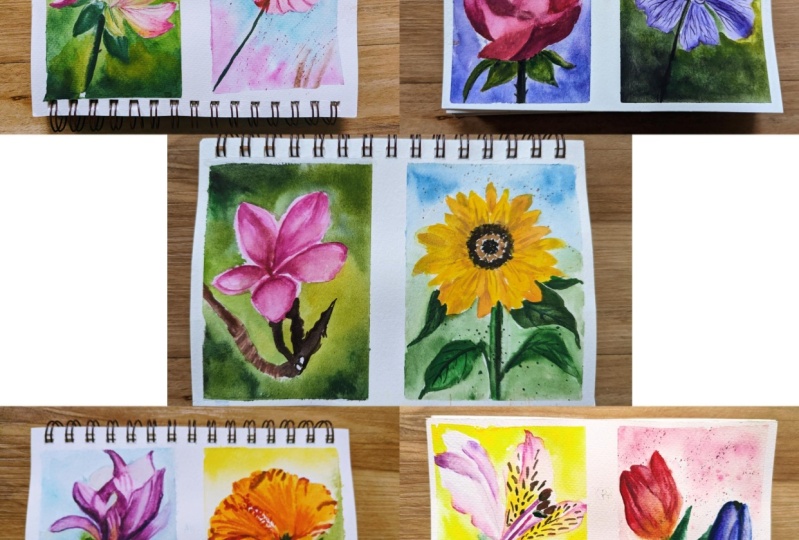
5. Lotus: Welcome to another
lesson of this class. And in this lesson we
will paint the loop. So I'll start by
drawing the lotus. As you can see, I'm
drawing freehand here and not using
a lot of guys. Start by drawing the stem. You can download
the reference image given in the resources section. So I'm using an HB pencil so that the pencil marks
are not very dark. If you're somebody who's not
very confident in drawing, you can check out a class of mine which was
about transferring references onto paper canvas
in watercolor painting, especially in this class, the main idea is to learn
painting rather than join. So even if you don't feel
like drawing that much, you can go ahead and just trace the directions on your
watercolor paper. So this gets took me about
five to ten minutes. Whenever you're erasing
on your watercolor paper, try to be very gentle and
not rip the paper off. Good trick here is to keep
looking at your reference so that you don't lose the
idea of what you are drawing. I get a bit finicky sometimes
and I tend to eat a lot. But you can just pause
the video here and draw the whole thing and then come back when we start painting. I do please a lot of emphasis on drawing
part of the painting because it's like the base
or the foundation of PPP. So I take my time to make it as close to the real
one as possible. Try not to press the
pencil way too hard as it will create crevices on
the watercolor paper. I do tend to eat
a lot sometimes, but I feel that it's
very important because I need to be very satisfied with
the drawing I'm creating. So that, because once
you start painting, there's no going
back the joints. So I take my good time. I raised a lot as you can see, but I made sure that I'm very
satisfied with the join. Here I'm drawing all the petals
of DOTs that became see. I think we're pretty
much done with your drawing and it
looks really good to me. Before starting painting. Keep up on paper
with a paper tape so that the paper doesn't buckle
up and we add water to it. It also gives a very beautiful white border
to the painting. Make sure to take out
any air bubbles that are trapped in-between the
paper tape and the surface. So I have big nails and I
use my needs to do that. But you can use any sharp
objects to do that. Make sure you tape is a line and it looks
straight when you're placing it and make sure to pick out any air gaps that
are between them. Let's begin painting. To put the background
of the painting, I'll be using the wet
on wet technique, wherein I will place
a lot of water on the background of the
painting, leaving the flower. So I'm dry and then I'll add
color to the background. You can also use masking
fluid for this technique. You can put the masking fluid on the floor and not on the background and
then just paint as no, and then you can just drop off the masking fluid and your
flower will be intact. So here while applying
the water to the surface, I'll make sure to not let the
water go inside the flower. Because if it goes
inside the flower or the paint will bleed into it. I'm being very,
very careful here, and I'm using a mop brush for the same purpose because it holds a lot of water
at the same time. It has a very fine tip, which allows me to be very, very careful and precise with
the shape of the flower. For the background, I
chose to make that green with a bit of flack
for dark green color. Now I'm just going
to bring the color down and be very careful here to not go inside
the shape of the flower. Now I'm going to
clean my brush and take a bit of sap green
without any black, and then go around the Florida. The wet-in-wet
technique is very, very useful here because I don't have to blend in all the colors. Because the whole people is that the colors get blended
automatically. And it also gives a very soft looking
finish to the painting. I'm taking a bit more
of that green and then going around the
flower very, very close. To give it a baby defined. It might look difficult,
but trust me, I think doing the
background is one of the very fun parts of all
these paintings that I did. If you want, you can also choose any other background
color that you want. Now I'm going to wash my
brush and soften the edge. Now I'm adding a
bit darker color on the right side of the law. Maybe even give such a nice
effect to the bathroom. Makes them adding a bit more black to paint so that it
gives them more dramatic look. So here I'm defining
the edges of the petals so that it pops out. When the painting is complete. I'm going to add the water on the lower part
of the painting, again, making sure that I
don't put water on the floor. Now I'm again going to
mix up a green flag and the lower parts
of the painting. Now I'm feeling my brush
and taking on Sap green. Almost done and I
did a lot of sap green to the background. So now I'm just adding a
bit more darker black to the lower part of the painting and then
just blending it out. I'm trying to make
the background as smooth as possible so that the attention draws to the floor and not the
background as much. We're done. Now we
let the painting dry before beginning
to paint the flower. Now I'm going to take
a smaller brush, which is a number four. And then I load in the
formula and joules Vincent and Newton pink color
on my brush for the petals. Please make sure that your
painting is dry at this point. Otherwise, the colors
can bleed into itself. Since starting with this really
small petal at the back. So in all these
paintings that we will do in the course of this class, make sure that when you
are painting patterns to paint some petals
at the same time, because when that is bad, we don't want the color
to bleed into it. That is not the style
you're going for. So make sure not
to paint a petal. The next thing I'm going
to take a clean brush, smaller, more brush number two, and just pull the feet. I'm going to do the same thing to the other bedroom where I've put a bit of color on
the top of the petal, then use a clean brush
to pull down the colors. Now we'll add a bit
more pink color. The bottom. Now I'm going to add a bit of yellow
at the bottom of the petal, mix it with the pink. In this video, I will
also add a little bit of green and then yellow. Next, we'll do another
bathroom and start with the thing and bring the
follow-up all the way down. Losing a clean, fresh since this is a bigger petals. So I'm using a bigger brush
to bring in the gut it out. Hello, add green
to the bottom of this vector and a
bit of yellow too. I'm trying to make here, but I do want them to pay
very visible right now. I'm just going to
blend this true thing. Now, we can make the pink
with the little bit of yellow and paint another
bedroom with it. The better you'll notice that they are so
pigmented epitope. And they translate the center. Again, adding a bit of yellow and green at the
bottom, the bedroom. Once we're adding some
strokes, some fine lines, some beans would be say, the bedrooms, that
the pink color. You do see the painting
coming together, don't you? Now we move on to the next
page and add more paint to it.
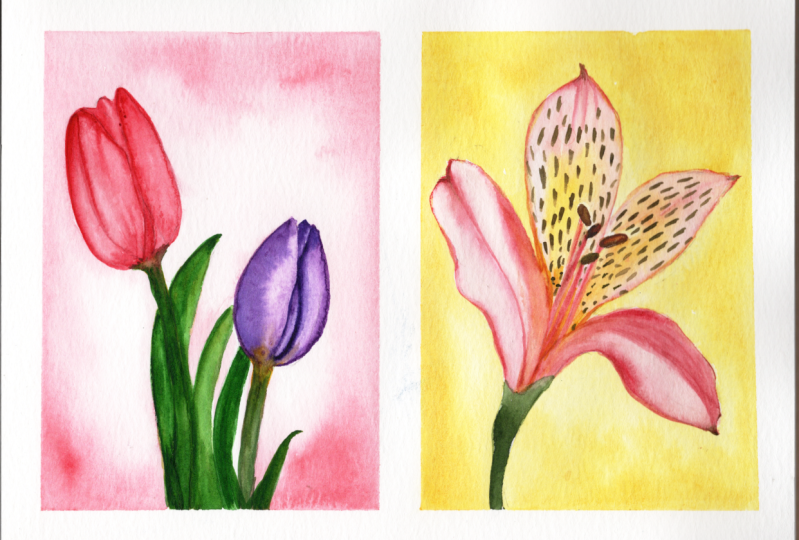
6. Tulip: Welcome to another lesson
in the flows capes. And in this lesson, we'll paint for other
a bunch of tulips. So again, we start by drawing the two left corner A5
size watercolor paper. I mostly started drawing
flowers with their stems somehow because it gives me an idea of how big lie would be. Next, we'll start
drawing the tulip. Does not have a lot better, but it's for Sutherland, beautiful at the same time. So don't get a lot of
patterns inside flower, but we can only see
about two petals. I really advise you to take your time during
the drawing part of the painting as it will
really make a big difference. Now I'm drawing the big
leaves off the floor. Heel. You can be a bit
creative and maybe leave out some leaves or draw some
leaves out of your own head. And even while erasing
made sure not to put a lot of pressure because you don't want to harm the
people who need it. Next, I'm going to draw the second unit and then do a little bit
of a rough sketch. And then I finalize because
it gives me an idea of how big the flowers and then how it can fit or
not fit in my page. I'm just refining the shape, but as the day and I
feel that it is done. Now I'm going to
step up the paper and then add water
on the background. The background, we'll use
the wet in wet technique where we soak the
whole paragraph with waters and then add color to it to give it a very
natural soft look. I'm trying to be as
precise as possible to not do not add any
water to the flower. Now I'm going to take
some permanent rose and some of that color on paper,
especially on itself. But I'm really going very intense with the background
in this painting. I'm going to keep it
very light because the color of the few lists in this one is very frightened
and wanted to call. And I don't want
the background to take a lot of
potential in this one. So I'm going to
keep the backbone very soft and very, very light. As you can see, I'm
adding a bit of pink urine there just to give it a very nice soft thing for the bottom part of the
paper. So that it looks. He says that this is
like the background. If your people tends to get dry by your painting, get embed, don't hesitate to add a bit
more water to make paint. You can use any other color
of your choice you'll want. Here and I'm closing my brush, this flatter on some paint onto the paper to give
it a nice effect. Even if the pain
gets into the fly, you can clean it
with a clean brush. Nixon going into
the crimson color and painting the Piketty. So as you can see,
I just painted the output area, false the bed. And using other thin brush
to bring the color in so that it gives a very
soft look to the bathroom. I'm going to do the same with the other packing of the tulips, wherein the outer edges are quite dark and new
pod is pretty light. Made sure to keep at
least two brushes, which wherein one
brush you can have the color and the other branch
you can keep for planting. While the paper is still wet, I'm going to add these. I'm going to add a few lines. So the dark in the
crimson color, I did a bit to find
it to it and it gave very tiny bit of violet to
the crimson color to give it a tinge of darkness that I'm using to darken the edges of the petals and
the bit lumpy back. Darken any color. You can add a
complimentary color to it. It will turn down, you think I'm darkening shade here while if you live with still a bit wet, I'm trying to define the
bedroom bit more distinctive. Next, I'm adding a bit
of yellow at the bottom. I'm trying my best
to blend it in. Next, I'll also add a bit
of crimson and yellow EBC. Next I'm going in
with the green color, the sap green, then painting
the stem of the doulas. Now I'm going to
show you why this color and painting
the other two lab. I'll do the same technique
where to put the paint on the edges of the petal and the paintbrush to
bring the painting. I'm going to use the black color for
the petal at the back. Next, I'm going to add
a vein that you did violet to the center
of cuny and try to define it so that it
looks like that It's the part that is
inside and there are two petals on the outside of it. In watercolors, always
made sure to call light in the beginning because
you can always add up Laos encode darker later. Once you've bought in
the dark colors first, it's very difficult
to call back. Now I'm going to add a bit
of yellow at the bottom of security lift and bring it all the way
down to the stem. Hello again at the green
color to the stem. Makes it a lot, a bit of black, green to paint the leaves. Make sense. What I'm trying
to do is to leave the stem of the few
left darker so that they will make a clear
distinction between the stem of the
Kubernetes. Api bad. So what I'm trying to
make things a bit more, walk as well so I can stop
as you lift them a bit more. Next, I'm using the crimson
colored lines on the key. And the value that he sees. And lending that. Also defined the following way. There was this leaf behind
this sap green to see this. Then going to do the same thing
with the adhesive and the y. I'll take a
very diluted color and had these liens on the plot. Next time, make those
little veins again and just dab it with my
finger to soften them, but still have waned. Make sure your color
is really diluted. So it's not very
harsh and prominent. Now I'm using the crimson color and doing some splatter
effect on the painting. You can either use
your hand to do it all you got to do it. You can use any colors
of your choice. I'm using the
crimson and violet. Also, as you can see, I got a few letters
on the slides, which I don't really like. So wildly away. I'm going to use
clean brush to clean. And you're done with the
painting in the morning. Five left is to be in the depot. This is the end product. I really hope you enjoyed
painting this amine. See you in the next lesson.
7. Sunflower: Welcome to another lesson
or the plural scapes. And in this lesson,
we'll paint a sunflower. So start by drawing a circle which is the center
of the sunflower. Then small petals around it. Do I was a bit hesitant
to draw this plot for this class because
it has a lot of petals. But I think because
they are small, it's not as much of a
hassle as you think it is. The drawing pad didn't talk
much time in this one. Nixon grow these
stem of the flower. As you can see, the
leaves are a bit big and they are coming out
of the page, but it's okay. That's not much of a problem. So I'm going to draw the remaining of the
petals of the flower. After joining the whole shot, I found that I thought that
the center of the flower was a bit smaller as it goes
in the reference photos, but I just erased it and
redo it to be a bit bigger. And now I feel it looks
much more realistic. Next I'm going to draw the leaves mature coming
out of the flower and leaves which are on
the stem of the flower. I used to be adjusting the
shape of the petals a bit. So I would advise
you not to spend a lot of time in the drawing. The drawing part is
really important. But try not to spend more than 1520 minutes
on the drawing. The drawing part here took me around ten minutes for a
bit less than ten minutes, but you can indulge
a little bit more. So we are done with a drawing and now I'm going to tape up the paper and start painting. Again as Todd, by
reading the whole paper to add a beautiful bag
done with the painting. Because the petals are so
small and so many and who not going to be very precise
with the water application. As I'll do a play very
light background. One really interfere with
the shape of the flower. And I'll start by
adding a bit of cobalt blue as the sky
on the top of the paper. And I'm not going to ignore
to the flower because I know the water can bleed into the flower,
which I don't want. Now I'm adding a
bit more water to the bottom path
and then I'll add a bit of sap green
mixed with a little bit of black on the
bottom of the flower. I don't want it to be very, very dark because then I won't be able to paint on top of it. And as expected, it did
read a bit into the flower, but I just remove
that and my finger. Non being very precise
here with the leaf, because the leaves will anyway, be darker so that can
override the color anyways. Always remember one thing
then watercolors tend to dry lighter than
they seem to be. The color here seems to
be a bit light to me. I'm going to add a bit more
darkness to the color. Now I'm going to take
the black color and type some dots on the
center of the sunflower. Next I'm going to
dilute a bit of brown. And again makes me a few dots around the
center of the sunflower. Next I'm going to mix the black and brown together to have a dark brownish color
and make them more doors on the outside
of the cell. After that is done, I'll start by taking the yellow, which is by White Nights, and I will start
painting the petals. I'm again using
the same technique wherein I have two brushes, wherein one has the color
and one is a clean brush, which is used to
blend out the colors. So as I told you,
made sure to paint adjacent leaves so that the colors don't bleed
into each other. So here I added a bit
of very small bit of orange to the leaves to
give it bit more depth. I just mixed a bit of brown which will million red to paint the leaves which are in the back to give them a
bit of a shadow effect. What I did here with that, I started painting
the petals with a little bit of brown
and crimson mate, and then ended it
with the yellow. So it gives you a very nice
gradient to the petal. And then make sure
that I add a bit of brown to the petals
which are in the bag. So they have a bit of
a dark shadow to them, which makes them look that
okay, they are in the back. The base of the petals. I'm adding a bit
dark brownish color. Now we move to believe, and I'll mix a bit
of black with SAP creaking and start painting the leaves which are
closest to the flower. Make sure that your petals
are dry when you're painting believe which I
can move to the petal. Because flowers on my
main aim in this class, I'm not putting a lot of
attention to the leaves. Now I'm going to paint the stem. I always start very
light with colors so that it gives us perspective
how they will look. And then I go a bit darker. He'd really like this
leaf from the right, which is a bit dawn, reminding Moon Dog
Green to the stem. The best thing about
watercolors is that you can build up as many
layers as you want. I'm also painting this one leaf, which I think I forgot
around the fly. Adding some veins of the leaves. Now I'm going to take the
yellow and the orange and add some details
to be Florida as well. I'm going to take the
black color and then paint these little dots
around a little bit more to give a more
darker look to it. Adding more green to the leave until I'm
satisfied with it. Next I'm going to
splatter bit of orange and a bit of
yellow onto the page. I'm going to plot
a bit of green. One, the lower part
of the painting. And I'm just going to clean
a bit of splatter marks on the painting
with a clean brush. Then we're all done.
Now we peel off the tape and painting is ready. I really hope you enjoyed
painting this bin me. See you in the next lesson.
8. Cosmos: Welcome to another
lesson of this class, and in this session
we paint the cost. Let's start the drawing box. So even in this one, we'll start with the
stem of the flower. And I'm going to say this again that if you're not
comfortable with the Dwayne, do check out the
source of mine coal, how to translate
reference images. It will be really
helpful to you. Go ahead and trace it. Going come back to
the painting session. Now I'm going to draw
the center of the flower and then start drawing
the petals around them. So the patterns of this slide is a bit different from the
others that we have painted do for the outer
part of the petals are very random and have a very different shape than
the others we expected. So I'm trying my best here to replicate the shape
of the pecking. Also, I saw this
cove in the Padlet. I had to draw it. I cannot
miss that. Didn't go. Well, do I do it is if you die insulin satisfied with
the drawing diseases. So it is not about replicating the reference photo exactly
onto your painting, but it is about your
own satisfaction venue. Feel that now it's fine. You're actually fine. This gets surprisingly took
me around seven minutes. I'm readjusting defender of
the solder a little bit more. We're done with the drawing. Nixon, will you take
off the paper and start painting as we did in all the lessons before I
start with the background. And I will apply
a lot of water on the background to create
a very soft background. Because back in wet technique, I started by adding a beautiful by blue on
the top of the paper. And I'm bringing that same
gotten all the way down. I'm trying to be a bit precise when it comes to the bedroom. Next, I'm also going to use the formula and draws
in the background. They will act as the flies, which are bad and lead the
pack in a very fluid out. I'm adding more blue on
the bottom of the flower. A little bit more
pink at the bottom. Now I'm, Will you take
a bit of brown and I'm going to make the stems
at the bottom of the paper. I'm just setting up the
blue a little bit more. But if we all pay defined, There's no need for that. Next, I'm going to go
in with the yellow and being the center
of the flower. Next, I'm going to add a
little bit of orange to it. Now we start
painting the petals. Pseudo paint the petals. I'll take the
permanent rose color and start with
base of the petal. Has similarly added the
color at the end of the faculty and take a clean
brush to bring the colors. And I'm also making new light joke with my brush to create more
depth in the bedroom. I'm adding a bit
more saturated color to the base of the petal. Next, we'll start
with the other person and we repeat the
same procedure again. Said put some paint at the base of the petal and at the end of the petals and use a clean brush to bring
the colors together. Look at your reference
photo and see where the petal colors darker
and add more color there. And try to keep
the other parts of the petty pretty translucent. You and I mix a bit of
violet in the permanent rose colors to create a shadow
color for the shadow, create on each other. Now, I'm going to
apply that color and use another brush
to soften that shadow. What this does is
that it suddenly gets the petals sense of depth that they are casting a
shadow on each other. That means they are
kind of overlapping. Yoda, making sure that I keep looking at my
reference to see where the shadow got exactly and try to please them
similarly on my floor. Next them will you dilute
the permanent towards the bed and being this
whole petal with it. I'm adding a bit more
continuity color at the base of the petal. Then using a clean damp
brush to spread the color. By spreading the color, I'm also making sure to make these little wind or the
strokes and the better. We are going to do the same thing with the other patterns. Now I'm going to paint the stem of the flower
completely black. Next I'm going to take
the shadow color again, and I'm going to add the shadows wherever I
see this necessarily. So now I will take
a bit of carmine and draws me and I will use the number to
mop brush to create these fine veins in the
petals of the flower. Sam also mixing the
male who was with the crimson to give a bit
more depth to the flower. I'm using a bit of crimson here, but I'm making sure
that it's not very bright or that will take
away from painting. The towards the petals
on the leftmost side. Odd bit more done, Susan, anyone's Anita? Eight. Next I'm going to take
the black color and draw these columns
inside the flower, or the pollen sticks
inside the flower. Next I'm going to use
the bite it and crimson mixed to create the shadow of the center of the
flower on the petals. I think the beautiful
thing that shadows do is that it suddenly
after adding the shadow, you can see that the sender is a big deal and it is casting
a shadow on the petals. I'm adding a bit more orange to the center of the flower
to give it more depth. Now I'm going to use
the yellow color to create moral Poland on
the visit six, that makes them well, you did
department enjoys and I'm going to do a Saturday effect
on the painting, but just on the lower
part of the painting. You can skip that
if you wanted to. Now I'm just going to peel off the tape and the
painting is ready. And don't forget to post your paintings in the
projects gallery section. Because it will
not only increase your confidence in
your painting ability, but it will also
give other people some confidence to
force the painting. So see you in the next lesson.
9. Lily: Welcome to another lesson
to Florida, keeps class. And in this lesson
we'll paint a Lilly. She first few soundbites join. One of watercolor paper. Has usual, I'll start with
the stem of the flower and try to eyeball the size of the flower that I
will eventually draw. Now we move on to the petals. And the good thing
about this painting is that this law has
just about four petals. What do we need to
keep in mind is to get the shapes
of the petals dry. And my right, I don't mean
it has to be perfectly the way it is in the
reference photo by right, I mean, what feels right to you? Before starting painting? Make sure you are
very satisfied with the drawing because there's no going back once
you start painting. You're almost done
with the bedrooms. As you can see. It took me about five minutes
to draw this. Next, I'm going
to draw the stem. Now, we are done
with the drawing. And let's get started painting. We'll tape the paper and
made sure that there are no spaces between the
paper and the surface. So use a sharp
object, all you need. And next we'll start painting. For this one, I'm going to do a yellow background
where I would start by applying water on the whole paper as we did
in most of the glasses. I'm using a number
eight more pressure. And I'm trying to be
very precise so as to not water let inside the
shape of the plot, otherwise, a colorful place
inside the slide, which we don't for me very generous with the amount
of water you pad, but make sure that they are no more two parties
on the paper. Next, I'm going to
start by adding the hunger yellow
color on the people. And the color would be very
softer towards the floor and PyTorch are toward the border and the
edges of the paper. As the cauda will go towards the side and make sure
to soften the color. Then add some yellow on
the top of the paper, clean the brush to
bring the cut it down. I'm going to do
the similar thing on the left side of the paper. Then just touching
up the yellow bit. Clean the color around
the edges sloppily, and added a bit more of
colors wherever it's needed. Now again, done with
the background. And we let it the background dry before starting
painting the law. You can even use a hairdryer too fast in the drying process. But since it's really
hot and humid, it did take a long time to dry. Now we started by
painting the floor. I've taken Pokemon intro
was in my paintbrush. And I started with the tip
of this really big petals. And I'm going to use
a clean brush to bring the cut it down.
We always shoot. If you couldn't notice, I added a very small amount of
sap green and this petal. Most of the flowers, this is the pattern that we add
color to the edges, better than being the
color all the way down. Thanks. I'm willing to add a bit of yellow to the
center of the path. And I see it. It was a bit stronger, so I just lifted little bit
of color with my brush. Next I'm going to add the pink at the
bottom of the petals. Next I'm going to
load up the pink and paint the edges
of the petal visit. Since it is a very
soft, loose lie, I'm making sure to
blend if all the edges. Now I'm going to
take the formula and start the next leaf. Again, adding color to
the edges of the leaf. Then using the paint brush
to bring all the collagen. Now as printed in the first bit, add a bit of yellow to
the second path lengths. Next I added a bit of yellow to the first
person to darken it. I'm going to take the
thing with some of the edges of the petal. Next I'm going to add a
little bit of violet to the pink to make a bit
darker tone of the pink. And I'm going to use
that on the third petal. Again with the pink. We're going to start
doing the next pressure. And this has this
beautiful fold within it. And with the dark green, we're going to make this
little blip in the person. And then the same violet, we're going to add these details and
strokes of dark color. While the paper is wet, I'm going to add a
few more strokes so that it truly
blends beautifully. Next, I'm going to take
the sap green and start painting the stem of the flower. I'm going to mix, mixed up a
little bit of black with it, darker in a few parts of the stem to give it a
more realistic look. Next, we'll paint these stems of people in pink mixed with
a little bit of blue. Some dark colors. Make sure to paint them individually so as to have a clear
distinction between them. Next we're going to
paint Poland with brown. And the second one
with the black. And then, and then the top
part would be a bit of green. We'll add a bit of black
and brown on the base. Then a bit lighter
brown on the top. Nixon just touching up the pink a little
bit in the patents. Now I'm going to mix
Prussian blue with the carmine and make these
beautiful spots on the petals. You can be quite random
with these spots. Make sure that they are not
too much already too late to make sure the paint here
is very, very concentrated. As you want, really dark, beautiful spots on the petals. Dot painting these only
when the petals are dry, otherwise they won't
have a very clear shape. They will spread through
if the paper is wet. Next I'm just touching up the top parts of all the leaves, of all the petals
a little bit more. Next I'm going to
add a bit of carmine and pink to the leftmost petal. It will really help define
the cut off, the petrol. And we are done.
Now. Just remove the tapes and
you're ready to go. You have another beautiful
flower in this class. I hope you really enjoyed it and see you in
the next class.
10. Cranesbill: Welcome to the next
lesson of this class. And in this lesson
we'll paint a crank. So let's start by drawing
the stem of the transmitted. The placement of
these stem gives a very general idea of how big the flower would be anywhere It could be
placed on the page. So I'm trying my best to place the flowers can be
centered on the page. Now I'm going to start drawing
the petals of the flower. And this law also does
not have a lot of petals. So that's a good thing. One thing that I realized
was that the shape of these petals with a bit different compared
to the other one. But it was fun
drawing this slide. I'm trying my best here to get the shape of the petals right. Make sure to keep looking at your reference photo when
you are drawing the flower. Becky, fly, and we have drawn the basic
structure of faith. Next I'm going to draw the full lens or the
little protruding during part that isn't
the center of the flower. I'm just refining the shape of the solid and it's a bit more. I'm also adding the vein
to be flying, deploying. Make sure you are satisfied
with the drawing. But before you start painting. Now we're done with the
drawing and I'm going to tape up the paper
and start painting. Make sure that
there are no spaces between the paper
tape and the self is because the paint
can go inside that and not create a
crisp edges we want. So use your knees or
a sharp object to take out any a gap between the cell surface
and the paper tape. Now we are all done
and ready to paint. Now we'll start with the
wet-in-wet technique. And I'm going to apply a lot
of water on the background. Color painting. I'm using
a number is more pressure. He not only was a lot of water, but it's finer tip
has with the details. So I'm going to add
a bit of black on the bottom left
part of the paper. Next I'm going to
make sap green with a black and continue
painting with it. We wanted to create a
JD from black to green, black and then to green. Now I'm going to take the sap green and start painting
the background with it. It's very important to know that watercolor paints generally dry, lighter than they seem to be. So make sure you put
a good amount of pigment where you want the
paint to be really saturated. Next, I'm going to
go in with the sap green and define the
shape of the flower. As I move upward, I realize
that the water dried off. So I added a bit more
water and then it continued adding
paint to my paper. Now as I'm moving to
the top right corner, I'm adding a bit of yellow to this ad and then
using the yellow. So there are three colors
in the background, which is black,
green, and yellow. Next we'll start
painting the flower. And I'm going to use the violet color to
paint the petals. Starting from a very
diluted color and go on to add more darker shade
of violet on the floor. Also making sure to make these veins of the fly
because they are very, very prominent in this one as compared to the other flowers
that he has painted before. I'm going to do the same
thing with the next slide, where I'm adding color to
the whole petal and then using a more saturated color to paint the veins
of the flower. Now we're on to
the third pattern and with each other who
fall in the bedroom, wherein I will add
more saturated colors. While the pattern is still wet, make sure to add your
stroke so that they can blend beautifully
with the whole vessel. I'm going to do the same
thing with the fourth petal, wherein I'll add a
lot of colored and in the clean brush to fill out the color and kind of
even out the color. We are on to the last
leaf off this fly. And we're going to
repeat the process here. I'm using the old
violet color here. Next, I'm going to
make a bit of luck with divide it to create
the shadows in the blog. To achieve a softer look, make sure you blend all your
stove with a clean brush. It gives a very soft
look to the flower, which is what we are trying
to achieve in these laws. I'm also going to add more color wherever I feel is
more necessary. That is to the end
of the bedroom. Make sure when you're painting, kind of move around the
painting and not just fixate on one petal or on
one part of the painting, otherwise DO tend to overwhelm that part of the painting,
which we don't want. A good advice would
be to move around the whole painting so that
nothing is underworld or over. Now I'm going to
use the black color to paint the stem of the flower. I'm really sorry that I lost
a bit of video here wherein I was drawing these veins and the center part of the flower. So I've mixed a bit
of violet and live together and have diluted
that colors a little bit. And now I'm using a number to mop brush to paint the
veins in the vessel. So these veins can
read and then we don't need to be extremely
precise with that. But compared to the other
flowers that he painted, the veins in this one are more prominent than
the other ones. And the veins make the Florida up in such a beautiful way. To paint the center
of the Florida, use latch and a bit of violet. As far as the veins
are considered. We want the color to be dark
and not very, very light. We want the veins to be
pretty prominent in this one. Make sure that all
of your paint with good amount of color
because we don't want the veins to be light
or not as prominent. Also use a very
light pressured hand to paint these paintings. I'm adding a bit more detail
to the center of the flower. Add more devious wherever
you feed it as necessary. And we are done
with the painting. This was a pretty easy and
fun painting that we did. When I was spilling
off the tape, I ripped off a part of the
paper which is not good. But it's okay, we
can manage that. So be very gentle when
you're appealing a tape off. We don't want to report
the paper as I just did. You're done with another
beautiful painting. I really hope you
enjoyed painting this with me sealing the next lesson.
11. Hibiscus: Welcome to another lesson, or don't skip slash. And in this one we'll paint the hibiscus to lead to begin with the drawing
of the flower. So as usual, we'll
start painting the stem of the
flower and this list. But you call this the little bulb-like structure on which, from which the plot and go. They don't know
what it's called. I'm also drawing the leaves
of the flower within it . And tomorrow we'll have a
real fascination for leaves, which are called
the way this one is nicely inside the flower . So I started by drawing a rough sketch of the
center of the flower. And then I'm going to draw
the petals around it. When I think about it. All
the flowers that we've painted in now has had very, very different shape
and structure with which makes the painting
process. Julie phon. Next, I'm just drawing these little leaves
and maybe Phil, he bought the beaches
inside the flower. Next, I'm moving on to the
Poland in the Florida. This particular drawing I
think took me a bit more time and a bit more effort
because it is very, very different than the
other drawings that we did. A lot of erasing in
this fund mind, you So we got one was done with
the drawing of the side. I'm just going to
draw the pollen and the foreign stem and
obviously the shadows, which are very, very important. Now I'm going to save
out with a paper as usual and begin painting. I'm going to apply water on the whole surface of the
paper leaving the floor. We're going to paint a beautiful background
for this painting. I'm using the sap, green and black mix for the
lower part of the painting. And I'm not being very precise with the
leaves as you can see, because the leader, anybody's going to be darker . Initially I thought Apple part of the
painting should be blue, but because you have
already done that and it wouldn't compliment, these are as much in
this one central thing, a yellow color for the top
part of this painting. And I have a base
saturated pigment and yellow paint with me, which I'm going to use the
upper part of the painting. I'm just adding some
paint on the corners of the paper and bringing
the paint in. I'm adding a bit more sap green on the lower part
of the painting. And especially
close to the flower because it will make
the plot Bach more. So when you're done
with the background, make sure that your
background dry completely before we start
painting the flower, because you don't want the paint to bleed into each other at any point to make sure your
painting is completely, completely dry before you
start painting bizarre. And now we're painting is dry and we start painting
the flowers. So I'm taking this
course, slate color and I'm going to paint this lower
smallest petal with it. And I'm taking a bay diluted version of the yellow
because we want to fill that because eventually I'm using a clean brush to spread out the color and
just soften the look of. Next week, we'll
do the same thing with these other petals . And I'm going to take the
orange and paint this petal . Next I'm going to add a bit
of black at the center of the flower from which the
pooling is coming out. Then I'm going to
take a saturated yellow and paint this
particular battle with it. I'm adding a bit more
black and orange or in the center of the flower and you live paint brush
to even that out. So for the softer gradient, I put the black forest and
then I started leading orange. And then using a clean brush, I just spread the color out. Next, we're going to
do the same thing with this other person,
wherein we are good. We're going to add a bit more saturated
orange in the center of the petal and use a clean
brush to soften it. Next, I'm going to mix some black with the green to paint the bottom bottle fi Florida and understand
more of the flower . I'm also going to paint the leaves
with the same color. Now to the best part, which is the shadows. To create the shadows, I just mix the orange
with a little bit of violet and we are going
to paint in the shadows. So there's not much
blending required for the shadows because they
are strong, sharp shadows. We don't want to soften
them because we want the shape of the shadows
to come forward. So this is the shadow of the colon on the
petals of the flower. Also there are some
folds in the petals, which are also
forming some shadows. So we've been doing as well. Also, there is
another shadow which the petals are forming
on each other. So this is one example of that . The reason I chose this particular
reference of the hibiscus flower was because it has some strong
shadows in it. I didn't like to
paint strong shadows. And strong shadows provide a very easy realistic
look to the Florida. Because it's really easy to get the strong shadows right, because they are
just shapes that you need to draw it compare to soft shadows which
are very difficult to achieve exactly as you
want them to feel. This is the reason why I chose this particular reference
photo for the hibiscus. I'm adding just a little bit of diluted shadow on the edge of this petal because to provide a bit of
curvature to this packet . Next we're going to use the very saturated paint, which is orange and violet mix and paint on the top petal. And it had a lot of fun
painting the shadows . Because the moment I
painted the shadows, the largest came together
in a very beautiful I'm going to add the same color at descended on the
floor and then use a clean brush to
vet it out because the shadow yard is
not the sharp shadow . It is a soft one. I'm also using a very
dining washing of the same color to make
little veins in the patent. Next I may see my
shadow color to this leftmost badges and creating the soft
and strong shadows . Whenever you use soft shadow, make sure you use a clean
brush to soften it out. And wherever you need a hard
shadow, the strong shadow, make sure that the edges
of the shadows are very, very crisp and solid. Yeah, going to do the same thing with this particular fashion. And I'm using more of orange, the lesson violet in this one. Next I'm going in with the
orange for the colon stem. And because we want the
fallen stem to stand out, I'm going to add a bit darker, but it on the other edges
of the pole and stem to that the pooling
stem cells stands out . I'm just darkening the shadows a little bit more. Next, we're going to
use the same color to be in some Poland,
only Poland steak. And there are some lines or you, some so good on the
ball and stick. Next I'm using a
bit of sap green to create these little buds
that was below the slides, which I kind of forgot. I'm also going to paint
a few other leaves. I'm just adding a bit
more shadow color wherever I feel is
more necessary. We're done with
the painting now, time to be loved,
the date and design. Thankfully, I didn't
rip off the paper. And good on the painting. I really hope you
enjoyed this one and see you in the next lesson.
12. Magnolia: They can do Flores case. And in this one, we'll paint a beautiful Florida
called Magnolia. Let's start by
drawing the slide. And as he was moving to
start by drawing the stem of the flower for the
branch is bizarre. This plot had a very
different brand compared to the other flowers
that we have painted. Soften Duany stem
and a few leaves. I started drawing the flower. We started with when you said
two piece of the flower. And it took me two to three days to get the shape with
this one. Right. Now we're moving to the
other petals of the flower. Make sure to keep looking
at your reference. Why is drawing? You can also shoot
the page the page in any direction to
get a better grip. Had the drawing healed. I'm just refining the shape
of the petals a little bit. And now I'm done
with the drawing and let's start painting. We have saved up the paper, and now I'm going to apply water onto the watercolor paper. I'm going with the
cobalt blue hue. Now you did a yard is to create a very soft looking
sky for the slide. You can add a bit
more saturated color at the edges of the paper. You can use a clean brush to clean the edges
around the flower. Next I'm going to make some pulmonary showList than the violet and start
painting the flowers. I started with a small petals
at the back of this law. So I applied a bit of paint
at the edges of the petals and now I'm using a clean
brush to bring the coloring. We're going to paint the edge of this particular pattern with
a dark, saturated color. And then use the same
brush to soften the edges. And adding a bit of black to the color mix that we
have created an ad, that particular mix to
the base of the petal. We're going to use pink
and the wireless mics, the other person to make sure your color is more
towards the violet side. Now I'm going to
use a clean brush. It's often on the color and spread it evenly
across the petals. I'm using a clean
brush here to pick up some color which is
highlighted part. In the. Next, we'll use some black and brown to
paint the stem of the flower. Now, let's move on
to the other better. Now for this particular
veterans here, which is at the back, I'm going to use a very
diluted black paint which will look very grayish. Make sure I did not paint. I just embed lists at the same time because the
collagen bleed into each other. Now I'm going to use the same that you could block
color for this, another leaf which is
at the Black Hand, is very, very great. Now I'm again using
a bit of diluted black for this folded
petals of the flower. Now I'm going to use sap
green to paint the leaf. And a bit of black and brown to paint this particular bond. I'm going to dilute the pink and the violet mixture
of bed and paint, the centers of the
flowers in it. I'm just defining the highlights in this particular passage. This particular flower
also has strong shadows to be flooded with a viscous. I'm just adding a bit
more flashing green bar to the base of the flower. Now we're going to pay in
the last petal in the flour. And to be able to distinguish
it from the others, I'm going to add a bit
of flak at the base of this petal and blend
it with the violet color. I'm using a bit more
saturated colors to paint this
particular pattern. We can also add a bit
darker color that basis. I'm adding the more
saturated color at the center of the flower. Now with the theme that
I'm going to make, very light rains in the flour. I'm using a number to mop, brush to add some
details to the flowers. And don't forget to add
your strong shadows. I feel strong
shadows up the game. Amazingly. Almost done with the painting and look
how beautiful the silo. I'm also going to add a bit of black in the center
of the flower. Now it's time to build
the data and just look how beautiful increase
the edges are the same. And you end up with
another beautiful painting in his class. See
you in the next one.
13. Rose: Welcome to the second last
painting of the thoughts. And this one is it all. Let's start by drawing it. So as usual, we'll begin
with the stem of the flower. Rose may seem a bit complicated
to a lot of people, but trust me, it's
pretty simple. Just try to get the proportion
All the best choice. If you don't like to draw
or you don't want to draw, you can check out my other
class of mine, Paul, how to transfer reference photos for painting and sketching. And you can go ahead and
raise your reference photo on your watercolor paper and come back to the
painting session. Now we're moving into the
inner part of the room. I'm trying my best here to get the shape of the petals dry, but you don't need
to be that precise. His tried to get the
proportion of people who drive the size of each petal
compared to the other. If that proportion is correct, your flower will
look good anyhow. And after a lot of raising us quite successfully
drawn the rows. And I'm going to draw
some leaves it on it. We're done with the drawing
and let's start painting. Before painting gave up the
papers so that your paper doesn't boxes and you can
create a beautiful background. Now we're going to apply water on the background
of the flower, leaving the flower and start painting for this
particular one I chose provided by your
own because I think that could be
perfectly complements. Now I'm going to take
divide it and start applying at the bottom
part of the paper. So you can use a clean brush to clear out the edges
of the paint. I'm also going to apply the same paint on the top
part of the paper and then use a clean brush to kind of bring the coloring
and kind of softness. I'm using two brushes here, which is number eight mop brush, and number two mop brush. We're going to do the same thing to the left part of the beach. And we have successfully
painted a beautiful background. So now let's start
painting the rows. Now the pain the rows, I'm
going to take crimson, red and start painting
the petals with it. I'm going to apply a very
saturated color at the base of the petal and then use a clean brush to spread because. What I'm mixing a bit of
sap green to the crimson red to create a muted
colors for the shadows. I'm going to use that at
the base of the vessels. I'm diluting a bit of
permanent Charlotte and I start painting the inner
part of the door for that. Next, I'm going to make the
crimson red with a bit of permanent rose and paint
this fall in the bedroom. I'm applying the shadow
color at the far end of the petals and the
more saturated colors had the beginning. We're going to do the
same thing with the small of the back. Now I want you to make
the permanent rose to the Crimson Campaign,
this bed love you back. Many precisely painting
the inner part false so that it stands out
from the leaf behind it. Next, I'm going to apply
some paint on this code. And then I'm going
to use a bit of permanent job for this
particular Becky. I'm going to apply the curve
is below the Gulf part of the pattern because that is
adding shadow on the bed, Mr. Again, to mute it down, shadow washing off the color. I'm going to add a bit
of sap green to it. Wherever you find hard
edges which you don't want to make sure to clean that
up to those clean brush. Next, I'm going to make the
crimson red with a bit of violet and being this
long battle with it. This particular one is the
dark is better because the whole Florida is casting
a shadow up on this one. Next, with a clean brush, I'm going to apply
some water on, on this particular pattern. And next I'm going to put
a bit of permanent rose, diluted version of permanent
job on this petal. I'm going to apply the
paint on the edges of the pattern and clean
that out with a clean. I'm going to do the
same thing with this other bedroom to end
up in the color a bit wherever the edges
and make sure you add a bit more color so that the edges are
very, very definite. And you can see the distinction
between the bedroom. Now with the crimson,
we'll paint this one. Had the bat. And I'm using a base asked
you to just be. Now let's move to the
center part of the room. So he hadn't mostly using
a very diluted color. But just to define the
edges of the petal, I'm using a darker shade. Next with the crimson red
anyway, and it mixes. I'm going to paint this
particular pattern. Now, let's move on to the leaves and the stem of the flower, for which we'll use a mixture
of sap, green and black. Don't forget to make them
fall on the new stem. Next, I'm going to use sap
green to paint the needs. The color can be darker and
lighter towards the end. For the leaves which
are at the back, all of which have any shadow. You can mix it with the sap green to paint
the shadow colors. Similarly, p in the
remaining two leaves. Now let's move on to the
last petal that we had left, and we're going to use the red and the pink mix for
this particular one. While painting the last part of my camera got a shaky hand, an ad to edit out
that particular part. But I think after
painting so me, flowers, you are skilled
enough to paint that on. And now with the
green mid block, we are going to pay me
last leaf off the floor with the crimson
red and defining the inner part of the
rose a little bit. You can use a very
diluted form off the permanent tools to create
some veins in the bedroom. Now I'm going to do a bit of standard effect
with the crimson. If you want to clean the sliders on the road
with a clean brush, then we are done
with the painting. Had already hope you enjoyed
painting this with me. You in the next one.
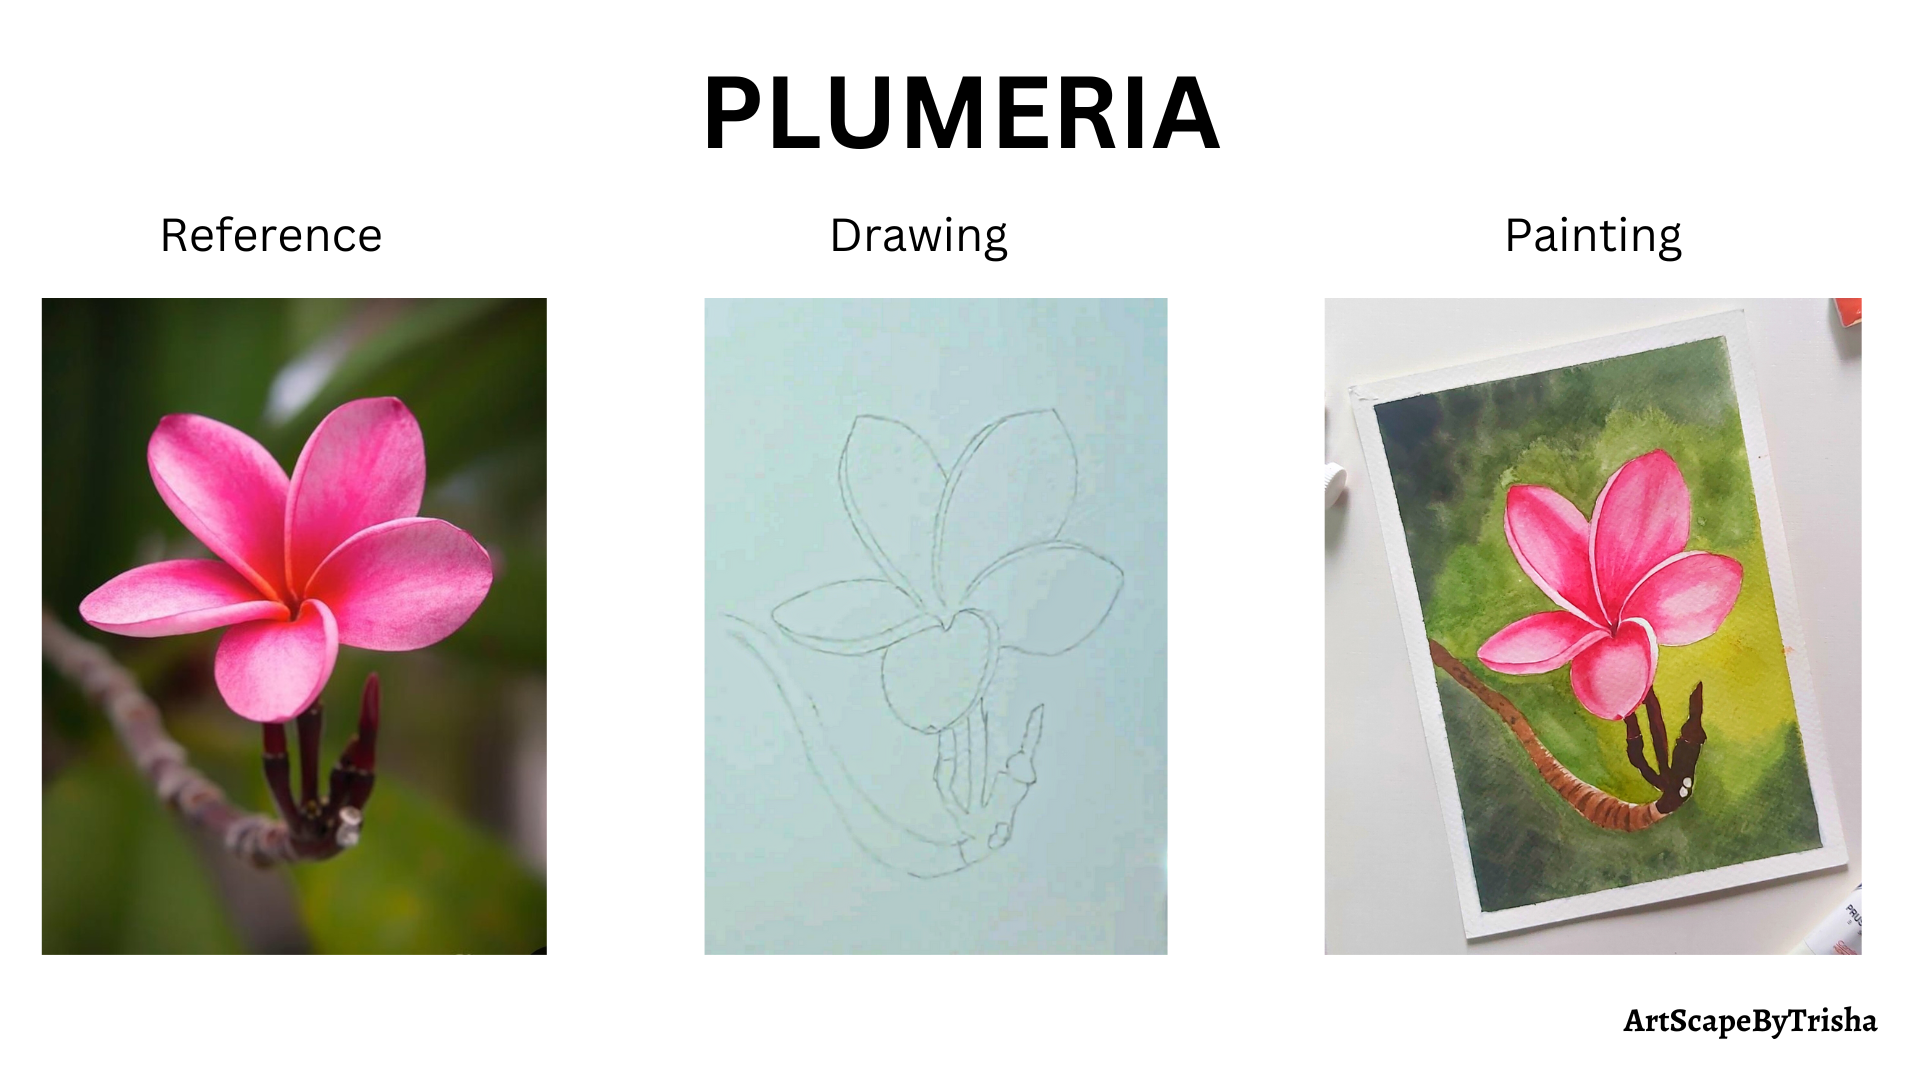
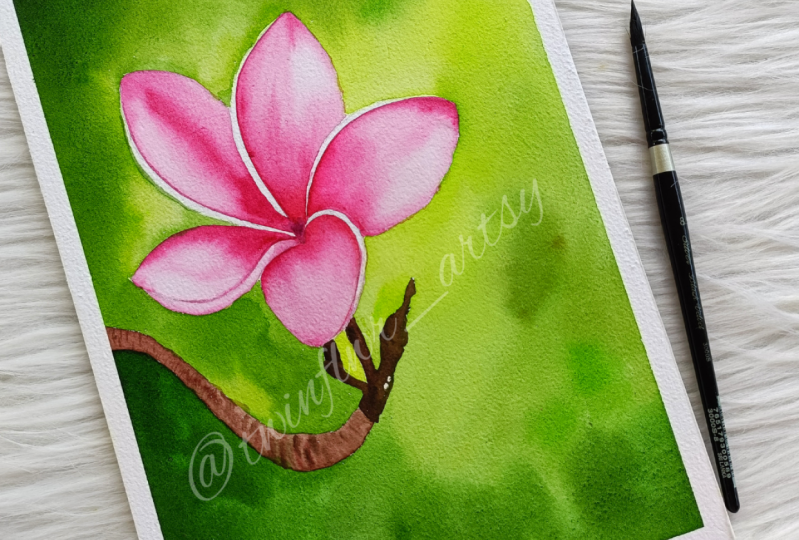
14. Plumeria: Welcome to the last lesson
of the stalls case. And in this one, we
think of whom area. And I really want
to congratulate you if you made it this far. So let's begin enjoying the
last slide of this class. And as usual, we'll begin by drawing the
stem of the flower. This particular stem with very, very different from the other
stems that we have painted. It's a branch which is
coming out of poetry. I suppose. I should join this then let's
begin drawing the plot. Let's begin joined the
first battle of the flower. I took my time to get
it up the petal right. Here comes the second bit. Now let's speak enjoying the
third button of the flower. Now let's begin drawing. The next one is also five petaflops, leg cramps. And notice that all the petals have a little hole in them. Hello, all straight forward
the shape of these bedroom. And they took my time
with the details of the flowers. And you should do. And now we're done
with the drawings and let's move to the painting. We'll begin the
painting by applying a lot of water on the
surface of the paper. This technique is called
the wet-on-wet technique. And keeping your in mind not to let water inside the flower. And with that done, let's
begin painting the background. I'm helping me with
the black color on the top right
corner of the paper. I'm mixing a bit of
sap green with it. Continue painting
around the flower. I'm using a number
it more pressure. Now been moved to the
bottom part of this live. I'm going to mix a bit
of yellow with the sap green and begin painting the
right part of the flower. Now I'm, Will you take some yellow and add it
to my painting? Define this in the
mop brush helped me create really precise
line. But on the floor. Next I'm going to
take some yellow and start painting the bottom
of the jar with it. I'm adding a bit of green and black to cover the bottom
part of the paper. I'm using a bit of yellow
in here, this button. Now it's time to let
the painting dry before we begin
painting the flower. Now let's begin
painting the flower. And I'm going to use the
permanent rose color here to paint some beginning with
the base of the petal. Then I'm using a clean
brush to move the paint. I'm also adding a bit of saturated color at the
edges of the bedroom. Next yml file, and
painted in the same way. Don't forget to paint the
little fall in the bedroom. Now we're moving onto
your code better. But I'm going to add a lot
of stroke with the pain at the center of the
peppy at the edges. And then use a clean brush
to bring all the colors in-between and maybe pick out some color which
is a bit dark. Next, I'm going to make some vomiting draws
with the crimson red. And I'm going to
apply that color at the base of the petal. Next I'm moving towards
the fourth question. And I'm using crimson and
pink here to paint this one. Now we're on to the last
petal of the flower. I'm going to use the crimson and the pink color to
paint this one too. As you can see,
I've added a lot of saturated colors in the
center of the petal. And now I'm using a clean, wet brush to soften the color. Now let's add more color
to some of the petals. Good, I'm defining the
edges of the bedroom. I'm adding some color to the
oldest part of the petals. I'm using a bay that you did
color here to pin the pools. Next, I'm going to move
towards the stem and I'm going to use brown to paint
the stem of the flower. I'm mixing some black
with the brown fur, darker brown. Here
for the edges. I'm going to mix
crimson with the brown and paint this edge here. And that's all I'm
going to paint the branch of the flower. Next I'm using a very diluted
brown paint the whole stem. Next I'm adding a bit
more saturated color to the lower edge of the stem. Next I'm going to make
some curved lines or pattern on the branch
of the flower. You can use a darker color to
define some of these stems. I'm Diego Bay diluted black to paint the little
circles in the stem. Now I'm going to add a few
details to the flowers. And the pink color. I'm going to darken the crimson with the violet and add it
to the center of the flower. Next, I'm going to
dilute some crimson to add some details
to the flowers. Especially this
one at the bottom. And we are all done
with the painting. This is the last slot off
the walls gates class. And I really hope you enjoy
painting this with me. And I'm looking
forward to creating more classes like
these in the future.
15. End Note: I'm so happy in Sweden that you made it to the
end of this class. Don't forget to post your paintings in
the project gallery. And if you're on Instagram, don't forget to tag
me in your paintings. I really enjoy seeing
your paintings. I would be glad if
you could take out a minute and leave a
review for this class. I put a lot of hard work in
time in making this class. And I would love to
know your comments and suggestions about it. And I'm planning a lot of other watercolor
classes in the future. So stay tuned for that. See you soon. Bye-bye.
 Trisha Jain, Art Educator & Art Lover