Transcripts
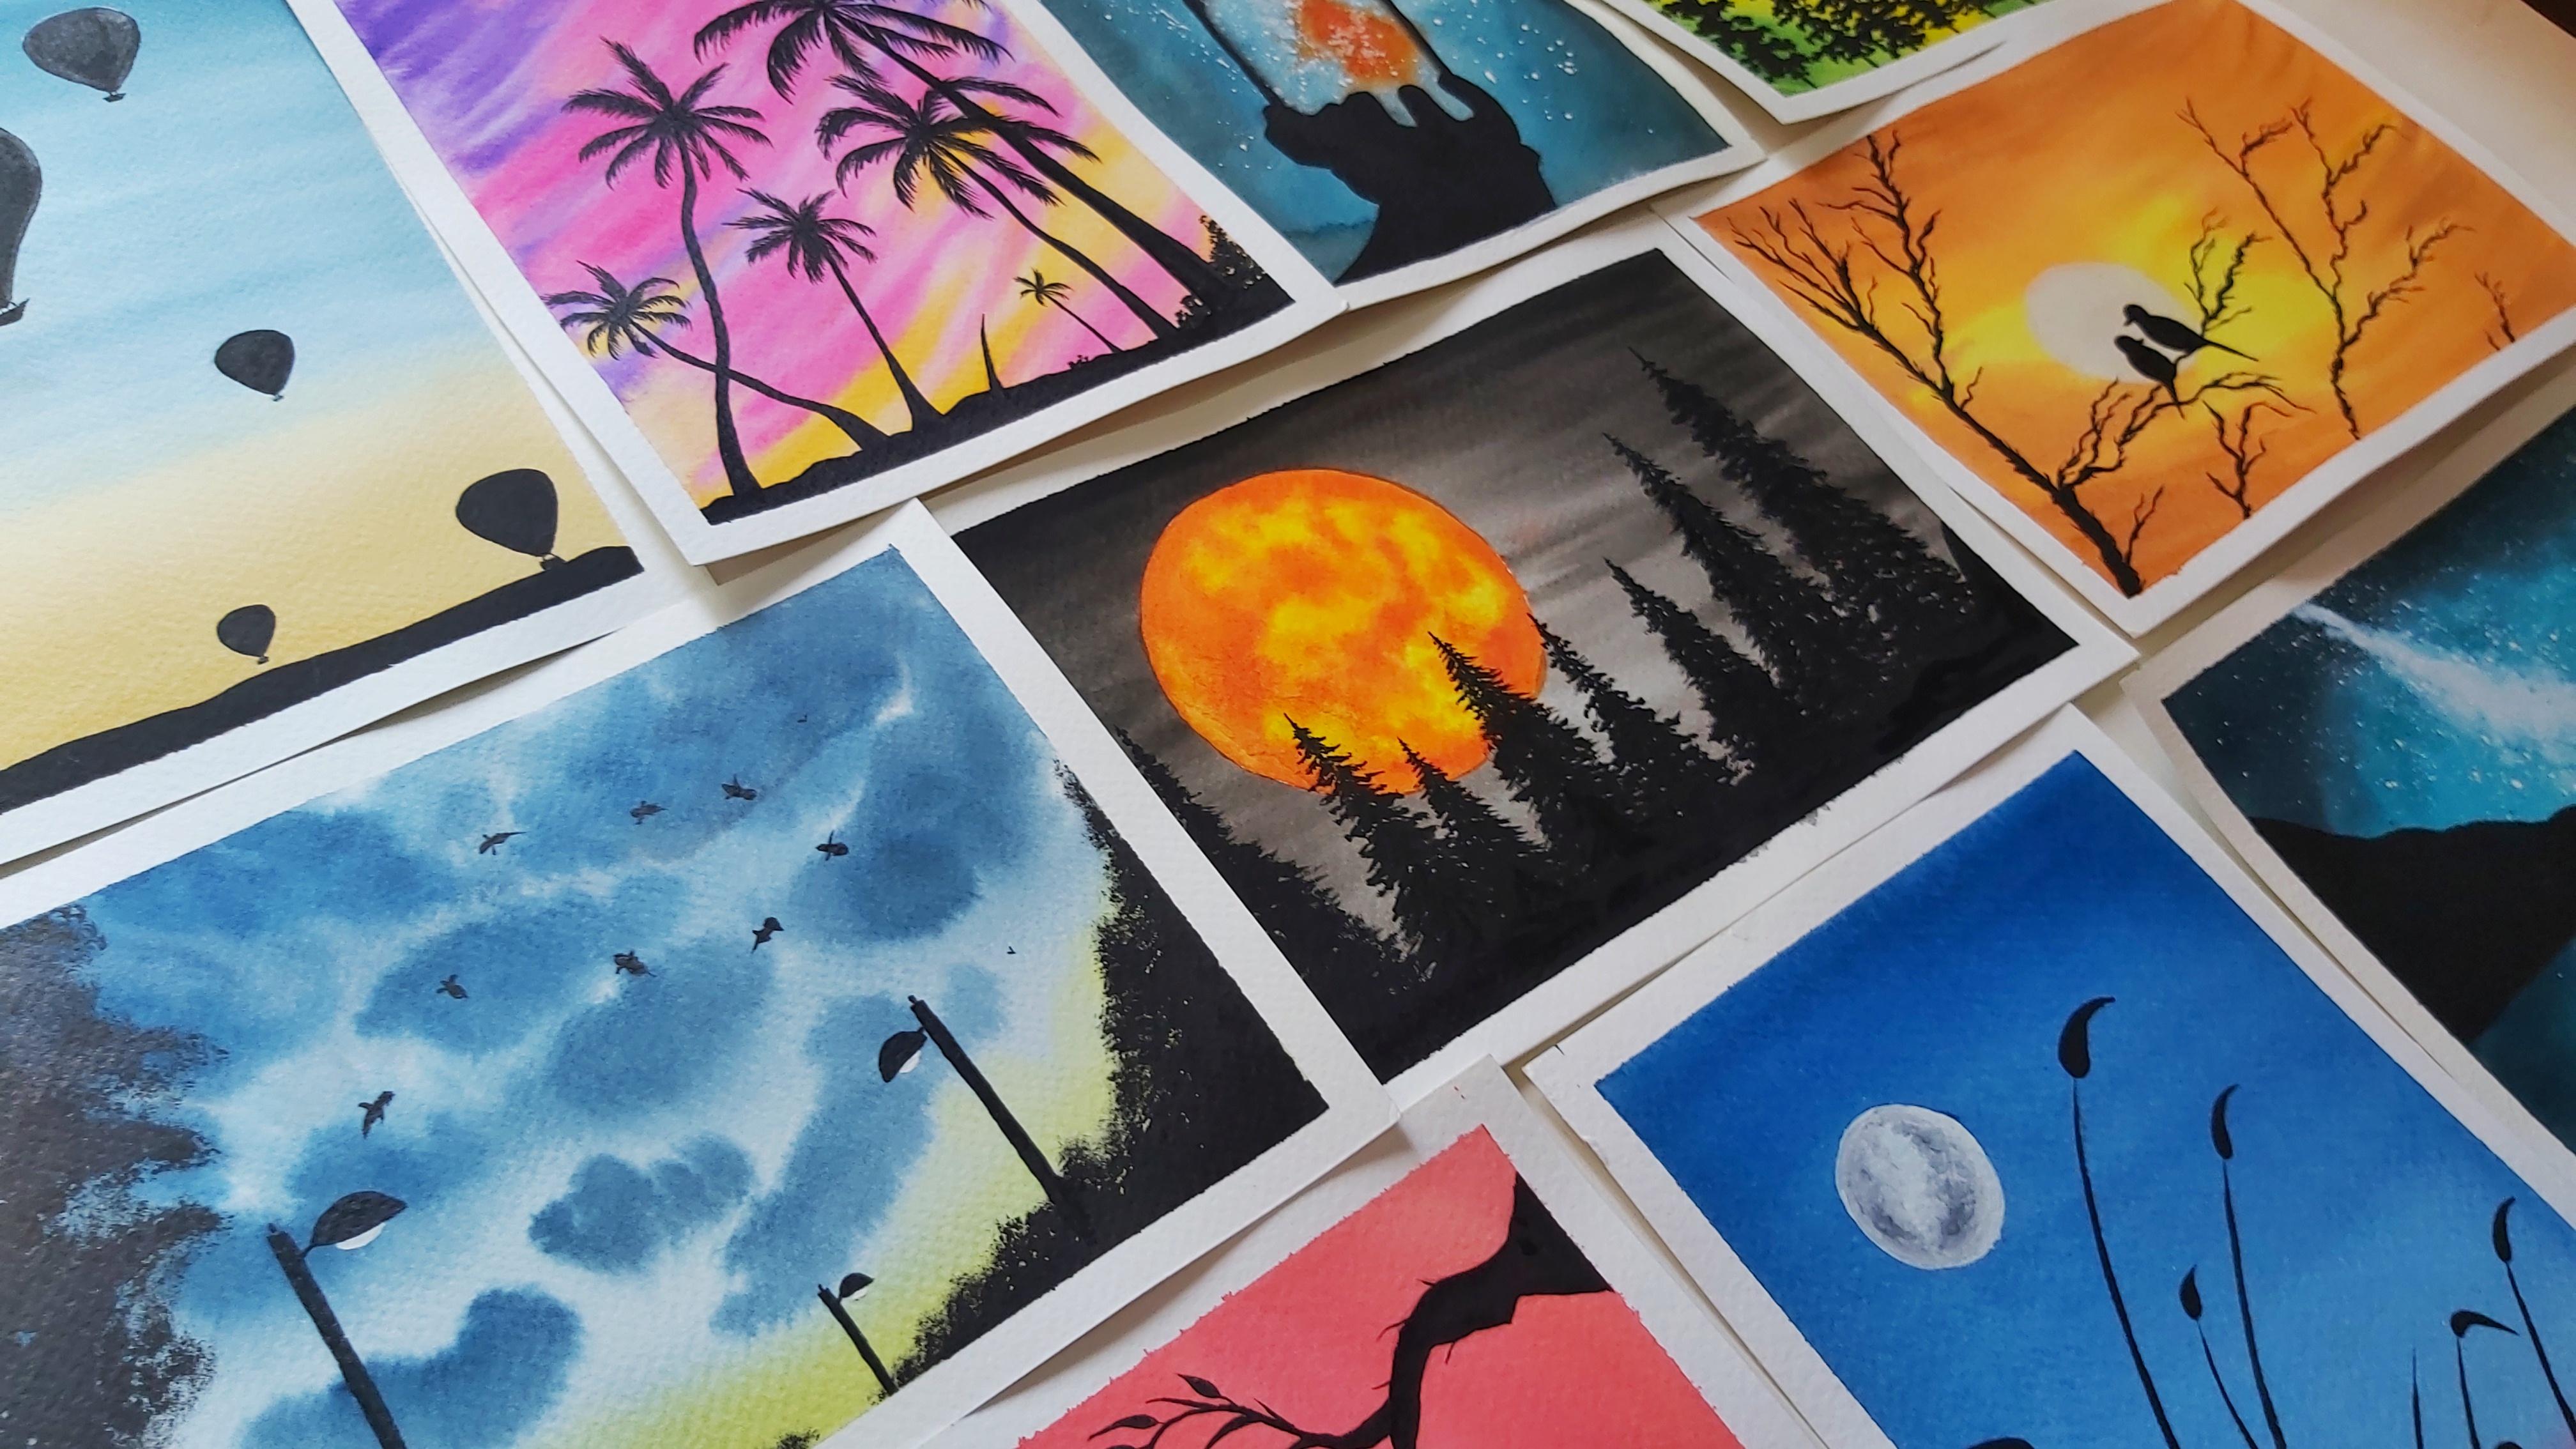
1. Introduction: Silhouettes. What exactly this silhouette and why do I think that it is the most fun and relaxing painting subject, especially
with watercolors. Hi, my name is Trisha and I'm
an artist based in India. So it really doesn't
matter if you are a newbie at watercolors
or you are a pro, I know that you would love the idea of painting
silhouettes. Silhouettes are basically
very dark shapes against a very light background. And do you know the best thing about painting silhouettes? There is no light, no shadow, just
solid black color. You don't need to worry about the values that don't,
anything like that. You just need to take in some
black color and just paint. I'm believed that to learn
to paint any subject, you just need to
paint ten of them. Painting ten pieces
of any subject gives you a very detailed
idea of how to paint. At the same time, we don't get bored or
orphaned by the paintings. In this class, you will paint ten gorgeous
silhouettes with me. And I'm going to take
you step-by-step through all the processes for
creating the painting. So this particular class is very beginner friendly
because we even begin to paint some of the easiest painting and then move on to the
difficult ones. There is very minimal
drawing in the class. Don't have to worry if you're bothered by
the drawing part. Inside each lesson, I
will show you exactly how to mix the colors and
how to paint the background. Then we'll move on to painting
the black silhouette. You will also learn how to fix some common mistakes
while you are painting. After painting about
ten silhouette, you will be able to see the exponential improvement
in your painting scales. Trust me, painting
this silhouette is not only a fun exercise, but it's really a
good muscle memory in you about how to
handle your brushes. So if you haven't picked up your watercolors in a long time. But even if you're paying daily, it's very hard to not want
to paint some silhouettes. This class is the
perfect stepping stone to you to advance. So even begin your
watercolor journey. And if you love looking
at silhouettes, trust, pain, you will have even
better time painting them. So if I have convinced you to paint them
silhouettes with me, Let's get inside the cloud.
2. Art Supplies: Welcome. In this lesson we'll talk about the art supplies you would
need for this class. For this class, I
really tried my best not to use a lot of colors are a lot of brushes so that everybody can join
for this class, even if they have
very minimal supply. So let's start with
the paint first. So this is the
class that does not follow a very particular
color palette. I feel that almost
all the colors in all the painting
can be replaced with some other colors and
it could look till as pretty as it goes
through the painting, I'm going to take a
deep about how I mix my colors and how to
achieve a particular color. But by no means you're obligated to follow my color palette, the only color which is very
constant in this class, in the black color. You can also use a very
darker Payne's gray or a darker blue to
paint the silhouette. But I like my silhouettes
to be solid black. If your intuition says that I don't want
to add purple here, I'm going to add some red here. Then just go ahead and do that. Trust your intuition
and your instinct. They are never wrong. Over the time you will
develop a lot of confidence in your own creative
instincts and infusion. So this is the color palette that I've used in this class, which is pretty much the same
as the Florida skits class. And I would love to see
how you're going to infuse your own creativity with the painting that
you will paint in this class and with the
color palette sorted, we are all set to pay. Now, let's go with
the brushes I've used in the class to merely
for this class, I've used about four brushes to the first one is the
number 12 plaid brush. I use this particular brush in almost all the paintings
to lay some water on the paper to begin the wet-in-wet technique for the background
of these paintings, this brush does
make the process of laying water on the
surface very easier. But I really don't
think that it is very, very necessary because I
just recently bought it. And even before that
I used to paint. You can just use
any big round brush or any big rush that you
have glaze of water. Next, I also used to more
brushes for this class, number four and number eight. And I mainly use these brushes to paint the background
of the painting. I also used number
four round brush and a number zero round
brush to add the silhouette. The number zero round
brush is pretty important because it helps you add verifier details to
your silhouette, which makes it seem
more beautiful. Number three, paper. Watercolor paper is very, very important in
watercolor painting because good watercolor
paper is made out of a large percentage of cotton. You would also need
to George the water, make sure to have some sort of tissue paper or
handover also nearby. You would also need paper
tape for this class, we will use the paper
tape to tape down paper on a flat surface so that the paper doesn't
buckle up or crumble when we are applying a lot
of water on the paper. Next, in this
particular class for about two or three paintings
are also used masking fluid. Masking fluid is
basically a plastic base fluid that when you apply on
the surface of your paper, it just covers that particular
part with a plastic coat. So you can paint
the background or the area around it
without worrying about the area masked
with the masking fluid. Whenever your mouth. So whenever you are using masking fluid, you have to understand that you will always get a hard edge. In all the ten paintings
that I've painted, they're probably two
or three of them in which I've used
masking fluid. If you don't have masking
fluid, very naught. What you can also do is either you can be
very careful while painting around the object even without using
the masking fluid. We have done that in
the soil scape slots and we can do it again. But if you really do want to have that effect of the
masking fluid without it, you can use the
paper tape you have and cut that down into a shape. One more important to
others that I've used in this class is whitewash. I have used this
particular whitewash to add some highlights, some stars in the paintings. And again, I don't
really paint that it is a massively important product that you can not do without. If you want, you can use
white watercolor place. But because it's watercolor, it won't be as
vibrant as gouache. If you have, you can
use white gel pen or just the white marker
of any sort to add stars and other things that we will add in the painting to go ahead and gather all your supplies before
you start painting.
3. Hot Air Balloons: Welcome to the first
painting of this class. And in this one we'll paint a hot air balloon against
a beautiful soft sky. Let's begin by mixing
the colors first. So to make the pastry shade
of any colors in watercolor, we add white to that color. So I'm going to
take Prussian blue. Now I want a very
soft based on Skype. So I'm going to make a very
tiny amount of orange in it. Since the orange is the
complementary color to blue, it will mute down
the color a bit. It will reduce the vibrancy
of the color a bit. Next, I'm going to add a bit of light to the color as well. Because here we want a
pastry shade of blue. Color that we will use
would be yellow ocher. And I'm taking that
down in my pan. And let's start painting. We'll paint the whole background in a wet on wet technique, wherein will apply
water on the surface of the paper and then use
wet paint on top of it. With a flat brush. I'm going to apply clean water on the surface of the paper. And I'll make sure
that every part of the paper is covered with it. If you want, you can give it a few seconds so that
the water can soak up inside the paper and then the colors will move
beautifully on the paper. I'm beginning with the
yellow ocher and we apply that to the lower
part of the paper. Because the paper, because
this surface is already wet, the paint will automatically spread and you won't
have to work as hard. Hi, I'm only applying
the yellow ocher in the lower part of the paper. Next, after cleaning my brush, I'm going to take the
blue color that we just created and start applying
that blue on top of the paper. You can apply a bit darker
color at the top part of the paper here. And I'm just touching of the
yellow ocher a bit more. And you can blend that
in with the blue. Now we are done with the background and we
let the painting dry. Make sure that your
painting is completely dry before you start painting
on the black silhouette. Here I'm taking a
small round brush and taking some jewelry
concentrated black color in it. Start painting the silhouette by painting a black surface. This is like a piece of land
which is really far away. Make sure that your
black color is really dark and
concentrated here. Before painting
the water balloon, you can go in with
a pencil and draw the water balloon before
actually painting them. This will give you
a very clear idea of where the balloons
are and their shapes. So you don't have any house and while you are painting it. I've painted a few small
water balloons at the bottom, and I'm drawing a big one at
the top part of the paper. And I'm really sorry for the lighting because
he would need you to playing a game
and it's a bit cloudy. So I've drawn about
six hot air balloons. I try not to erase too much because people
can be a bit fragile. When you are happy with your afforded balloons
that you have drawn. Just go ahead with
the black paint and let's paint in
the harder balloons. Somebody as a child
who love coloring. And I feel this particular
silhouette classes just like coloring. So here I've painted
policies balloons. And you can go in and
refine the shape of the balloon even by painting. So Yoda, I'm using
the number 00 brush, round brush to draw
the finer details. All the hot air balloon, which are the little baskets
in which people stand. Hello, It is a funny thing. And now let's peel off the tape. I hope you enjoyed
painting this one. And the next one
we paint a metal.
4. Meadow: Welcome to the second
painting lesson of the class. And in this one, we'll paint
the silhouette of a middle. I'll start by drawing a circle on the top left
corner of my paper, which would be the mode. So here I'm using my
acrylic paint bottle to draw the circle. And I'm going to cover that
with the masking fluid. Masking fluid will
really help us to paint a very beautiful background without bothering
about the mode. So now, with that done, let's start mixing our colors. The first color would be
the crimson red color, which I really like. And I'm going to mix some paint. The same color would
be Prussian blue. And I'm going to again make a good mix that with water and keep it ready
for the painting. Now, make sure that your
masking fluid dries completely before
you start painting. So here I'm using
my flat brush to apply water on the
surface of the paper. And I'm going to cover the
whole paper with water. With that done, we'll
start painting. And I'm going to start with the Prussian blue color on
the top part of the paper. Make sure to add color
only on the top part of the paper and then use your brush to bring
the color down. This will help you gradually decrease the intensity
of the color. Next, I'm going
to go in with the crimson red from the bottom of the paper and very softly
mix it with the blue. You can go with the colors a few times the mix beautifully. I'm also adding a bit
more saturated solution, blue at the top of the paper. And I'm doing the same
with the crimson, red, wherein I'm adding a bit more saturated
color at the bottom. Now before peeling the
masking fluid off, make sure that your
painting is dry. And trust me, don't use
an eraser here because I tried using any reason
and it was a bit of math. And I'm excited to tell
you that the way I have used the masking fluid before, I kind of messed up here. And a bit of paper also got pillow like peeling
off the masking tape. To be very careful while you're peeling off
the masking tape. But I think making mistakes is part of the process
and fixing mistakes. And you will see me
fixing my mistake because fixing your mistakes
is also part of the process. So as you can see,
I'm using a bit of whitewash to cover
the whole mole. So if you successfully
build up your masking fluid without ripping the paper or you don't have
to do this one. And while doing this, I
realized that I can mix a bit of luck with
the white wash and create some patterns on
the moon. And so I did that. And that took a bit of time and you can completely
avoid that. Next, let's move on
to the actual middle. Here I'm using number
four round brush to paint the minerals, going to take my black color and start painting some grass. You can even use a
smaller brush to add finer detail
to your painting. This is a miniature
painting I did a long back, which I'm kind of pre
creating in this class. Next we'll paint the
flowers or leaves, whatever they are on the metal. And the beauty about this
one is that you can paint as many classes as you want
to let that you want to. It's totally up to you. And we are done
with the painting. This is one of my
favorite paintings in the whole class because it was so easy and so fun
at the same time. Now let's peel off the tape and reveal our final painting. So this is the final
thing that we did and a little miniature
version of that as well. I really hope you enjoy
painting this with me. See you in the next one.
5. Pine Trees: Welcome to another
lesson of this class. And in this one we'll
paint some pine trees. So let's start with
the background first. Use the baton wet technique
to paint the background. So let's mix our colors. What I'm taking a
bit of sap green and mixing some yellow with it. Next I'm going to take
some yellow separately. I'm also going to
take some green and mix a bit of a
dark blue with it, which would create a
darker shade of green. Now using a flat brush, I'm going to apply
water on the paper. If you have excess
water on the paper, you can clean that up
with the tissue paper. This time this one is inspired
from the northern lights. And we'll start with the green and paint a few
strokes like this. Next, I'm going to add
the darker green in the center of these patterns
that we just painted. One thing to keep in mind is that when you're
using the wet in wet technique and then applying wet paint on top of it. Usually the pain dilute a bit more because of the
water on the surface. So make sure you paid is pretty saturated when you
apply it on the paper. Make sure to apply
towards three coats of the paint on the paper for a very bright saturated colors. Next I'm going to take
the yellow and apply it on the white parts of TB. Make sure to keep cleaning
your brush whenever you touch the green color because we don't want the yellow to
make the debris. While the paper is still wet. I'm going to define the shape of all these alleged bit more. And that happens quite often. That might be Gets whenever you being ghetto would
just make a bit more up and start painting. So I'm adding a bit
more saturated green, dark part of the pattern. I'm adding a bit more saturated
yellow to the painting. We're done with the
background now we leave it to dry before starting
painting the pine trees. The pine trees or one of my favorite trees to
paint because they're so easy and they look
amazing to hear. I'm using the white gouache to add some stars
in the painting. And I've taken the
whitewashing one brush and I'm using the other brush
to just tap the knees. We'll create some beautiful
stars on the background. Now, while that is drying, I'm going to start
painting the pine trees. Before starting
painting the trees, I'm just going to paint
the trunk of the trees. The binaries are
basically dead trees. That is what I call them. Who to paint the pine trees, you just need to type well or just dead or a zigzag motion. So at the top start with
really small leaves. And as you move down the tree, makes sure that this
spread out a bit more. This is a very fun
technique to draw the pine trees and they turn out to be very beautiful display. To make the process easier, you can hold your brush
at a 90 degree angle. This will make this
typing process easier. And we are done
with the painting. This is a very quick, easy painting and it
looks so beautiful. Now we're going to peel off the tape and read
the final painting. I really hope you enjoyed
painting this one. See you in the next painting.
6. Cloudy Sky & Street Lights: Welcome to another painting
lesson of this class. And in this one we paint a cloudy sky and a
few street light. So let's start by
mixing our colors. So I'll start by digging
some Prussian blue and mix some woman in red with it
to move down the blue. Next, I'm going to
use a flat brush to apply water on the whole paper. Make sure that the
water is evenly spread on your paper
so that there are no patterns and our paint can spread evenly on
the whole paper. Now let's begin painting. Now I'm going to take the blue indigo violet mixture and start painting some flowers. So I'm not going very specific with the way I
want the clouds to be. I've just mixed a bit of black. And I'm going to paint some
more clouds with that. So as I'm going down, I took some water and cover the whole page with the paint that made
some cloud disappears. I'm going to take a darker blue and paint the
clouds once again. I'm taking a bit of yellow to paint the base of the paper. The yellow, we'll add a
beautiful contrast to the blue. If you want. You can also
add few more darker clouds. Now we let the painting dry and healed and using
some of my very old brushes, which which I don't use
on a regular basis. And the presence of
these brushes have worn out all the time and they are not in
the perfect shape. And that is the kind of brush
I need to paint the bushes. Here. I'm using an old
flat brush of mine, which has weathered out. And I'm going to take some black and start painting the
bushes. With that. I'm keeping my brush
at a 90 degree angle and using cycling motions
to create the bush. Now you can move pretty
random with the Bush. There's no particular shape. So I'm going to take
some more black and paint the other
side with the bushes. And this one is going to be at the top left corner
of the painting. I'm just using random motion
here to paint the tree. Using another brush of
mine which is worn out. And I'm going to take
a bit dried version of black paint to paint some
details along the bushes. So now I'm happy with
the Bush's new tree, and I'm now going to paint
some birds in the sky. And as I used to paint
when I was living, I started painting
some little beads as birds in these guided. And I quickly realized
that I need to paint proper birds since
I'm a grown up now. I just added a little
bodies on those V's that I painted to make
it look like your birth. And I'm really sorry because
they're really small. I'm sure you're not
able to see properly. You can paint birth any
which way you like. Now when the bird done, Let's move on to
the street light. So I'm going to
start by painting a few calls to the street
lights and make sure that both, which are smaller, are the
poles which are far away. So they are thinner and taller. That means they
are closer to us. So the goal is well, would be ticker insight to make sure to keep that perspective in mind while you are painting. And I managed to pay for poles. So that means every
four street life. Because the shape of this
tree ties a bit difficult to draw without
moving the papers. So on. I've decided to take off the tape and I can rotate it or move it
as in when I wanted. That will make the processes painting the street
lights much easier. So I've taken off the base and let's start painting
the street lights. The street lights are basically golf bell-like structures
which we are going to paint. Make sure that the head
of the street lights, which are farther away, are smaller than the
ones which are closer. I'm using white gouache to paint some bulbs or some light
within the street lights. So here we are done
with this painting. And I really hope you
enjoyed painting this. You in the next one.
7. Cat on a Branch: Welcome to another
painting lesson. And in this one, we'll paint a cat sitting on a branch and looking
into this guy. So let's start by mixing the
background colors first. Here I'm going to take a
bit of globally in red, which is a bright red and mix that with a bit of crimson red. Next thing, using
a flat brush to lay water on the
surface of the paper. You and I'm loading up my
brush with some paint. And as you can see
in circular motion then going around the page, leaving, leaving a circular
part in the center. I'm using more of crimson red to make these strokes
in the background. Here I'm using a dry, clean brush to soften
the edges of the center. The reason we are not
using masking fluid, and this one is because you want a very soft looking circuit. You can clean out
the extra color at the edges of the paper. And now we're done
with the background. Now we will wait for the
background to dry before starting painting the
silhouette on this painting. I'm going in with a
pencil and I'm drawing the branch and the
cat first with a pencil sketch or is
not very clear to you, you can use the photo, reference photo that I've
provided and draw accordingly. Now let's started
drawing the cat. And somehow I was not very satisfied with the
body of the cat, so I kept changing it a bit. Don't forget to draw
the tail of the cat. Now in a basic structure done, Let's move on to the painting. The painting, I'm going
to use a black color and I'm willing to use a base
saturated black color here. That means I won't add a lot of what should the pain
because that will dilute the paint and hence pain will turn more transparent. We want a very solid
looking silhouette in all these paintings. You and I'm using the
number four round brush to paint the branch and the gap. I've also made a small
little branch at the bottom left part
of the painting. Now I'm going to paint the
tail and the ears of the gap. Now it's time for the leaves and the pain the
least comfortably. I peeled off the tape so that I can move around the paper and
paint comfortably with it. So as you can see, I'm
rotating the paper as admin required to
draw these leaves. If you want, you can
skip the leaf spot. But I really enjoyed
painting the leaves and the leaves elevate
the whole painting. I'm going very random
pillars with the leaves. You can paint as
many leaves as you want or as less as you want. I've also painted a
few fallen leaves which are distributed ring off. As you can see, I'm
taking my sweet time here to paint the leaves to
make sure that you'd also take your
free time to paint the leaves and enjoy
the printing process. And now I'm going to
add the final details, which would be little
mustache on the cat. We are done with the painting. I really hope you
enjoyed painting. This would mean See
you in the next one.
8. Mountains Against a Starry Sky: So welcome to another
lesson of this class. And in this one we'll paint the mountain against
the starry sky. So let's begin by mixing
our colors together. So here I'm going to make some cobalt blue with some sap green to
create the light color. The next color I will mix Prussian blue and
black together. So now let's begin painting. I'm going to draw
a horizon line, which would be about one-third
the weight of the paper. So just start painting
the background. I'm going to apply water on the upper two-thirds
of the paper. I'm beginning with
a dark blue color at the edges of the painting. Because we are using the
wet in wet technique. The color automatically moved along the people and I
don't have to do much. I'm going to take the new
mix and start painting. Now with a clean brush. I'm going to pick up
some color of the paper. Next, I'm going to use
some whitewash color. To paint the galaxy of stars. You can even use
white watercolor. Now for cleaning my brush, I'm going to soften out
this door is a bit more. Now I'm going to wet
the lower part of the painting and paint a reflection of this
time, this spot. Similarly, the edges
would be dark. The sand deposit would be light. I'm also going to paint
the reflection of the galaxy of stars
that we just painted. And in a similar pattern, I'm going to pick
up some color with a clean brush and add
some whitewash. Do it. Now, we're going to
leave the painting to dry and then begin
painting the mountains. Now I'm going with a black color and I'm starting
to paint demanded. So after painting one
mountain and I realized that I had to add some
stars in this guy. So I've taken some white washing the brush and I'm going to tap it with the brush to
create them stars in the sky. I'm covering the lower part of the painting because I don't
want the stars to be there. Since the white wash went over the black silhouette as well, I had to paint over it again. Now, let's keep painting the
silhouette of the mountain. Made sure to keep a good
consistency of the black paint. We don't want it very
runny, are very dry. You can go over the
silhouette a few times to make sure that the black
color is pretty solid. Here we are done with
this easy painting and let's peel off the tape to
reveal our final painting. I really hope you
enjoyed painting this one with me. See
you in the next one.
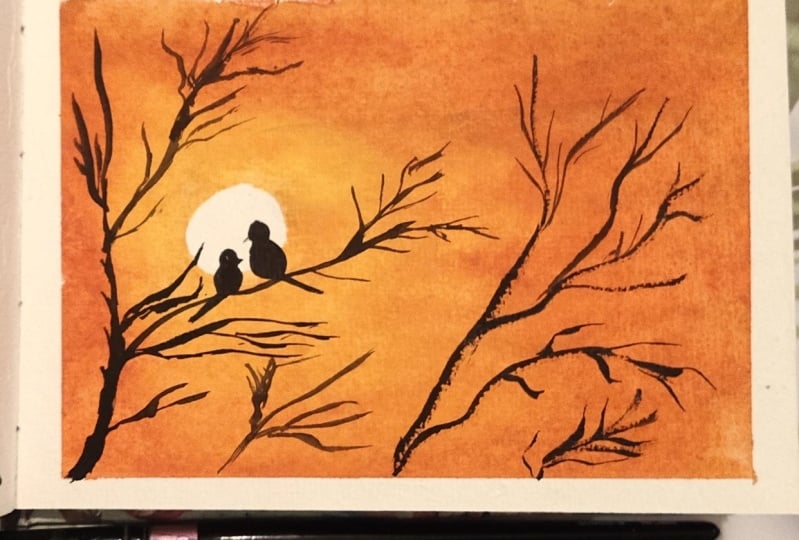
9. Love Birds: Welcome to another
painting lesson. And in this one, we'll
paint a pair of gloves. To begin painting,
we'll first start by drawing a circle
using the ruler. So one rule of composition
is the rule of thirds. The rule of thirds, say
that is the main object is placed on the intersection lines drawn horizontally
and vertically. That divides the whole page into three parts and objects placed
on those in this section, lines will create a
good composition. So I started by drawing a circle at the intersection point here, which would be the sun. Now I'm going to lightly erase the line because we don't want
the line to show through. We are not using any masking
fluid here because we want a very soft transition
between the sun and the sky. So now let's begin by
mixing our colors. The first color I'm going to use here would be Hansa yellow. It is a very vibrant yellow. The next one would
be orange lake. Again, a very vibrant
orange color. The third color I'm going to
use would be burnt umber. Now, let's start
painting by adding water on the surface
using a flat brush. And I'm going to go around the
sun with the water and try not to enter inside the
sun with the water. I'm beginning with a
yellow color and I'm going to paint around
the sun as you can see. Then when a clean brush, I'm going to soften the
edges of these dots. With that done, I'm going to
start painting more of the yellow around the sun and few more strokes
around this guy. Next I'm going to go in with the orange and make them more
horizontal stroke length d. Next I'm going to use
the brown and make some more horizontal
strokes along with Guy. And a bit of color
seed inside my son. So I'm again going in with a clean brush to lift up
some color of the sun. Makes sure to keep cleaning your brush while you
are picking up color. Why is my paper is still wet? I'm going to add a few moisture, brown and orange on
my brain thinks. With that done, we are
going to let the painting dry before starting to
paint the silhouette. Some color has saved inside your son and you want
it to be more white. You can go in with the
white watercolor or white gouache to paint
inside the sun is blocked. So now as a painting is join, Let's begin painting
the silhouette. So in this one, all
the branches in the tree are pretty
dried out to. There are no leaves or anything like that
on any of these. To paint a branch with them
going in with the black color and painting some squiggly lines branching out
just like this. There is no reference photo
I'm referring to here. So you can go pretty
random, but these branches. So now let's begin painting the main sheet on which
I love, but the fitting. Now let's begin
painting the last spot. I purposefully
painted the love bird directly in front of the sun because I've wanted
that high contrast between the Sun and
the black silhouette. You can go in with
a smaller brush to add some more finer
details on the branches. Now let's paint in
the second lab, but you can relax and have
fun while painting these branches because they
do take a bit of time. So now we're done
with the painting. And let's peel off the tape. I really hope you enjoy
painting these lovers with me. You in the next one.
10. Palm Tree Sunset: Welcome to another
lesson of this class. And in this one we paint some bomb trees against
a beautiful sunset. Already taking out
three columns here, which are yellow,
violet, and pink. The best thing about this
painting is that you can use almost any three colors of
your choice to paint the sky. So I'm using my flat
brush to apply water the surface so that we can paint the sky using the
wet in wet technique. Make sure that I feel water is evenly spread
throughout the paper. So now I'm going to take some violet and begin
painting the sky. I'm going in with
undiagnosed strokes here, mostly around the
edges of this guy. Next I'm going to go
in with some paint and paint in more
diagonal stroke. In the lower part
of the painting, I'm going to go in
with the yellow. Now with a basic
structure, this guy said, I'm going to add more color to add more
vibrancy to the painting. You can add more
saturated color once you know where you are going
to place those colors. Now, let's go in with more
saturated pink over the wall to make sure that your paper is still wet
while you are painting these shops so that they can
blend in beautiful name. Now, let's wait for
it to dry before we start painting the palm tree. So let's go in with the black
color and I'm going to use a number four round brush
to paint the silhouette. First, I'm going to go in with
the black color and paint a piece of pottery land right at the bottom
of the painting. I'm going to start painting
the trunk of the tree. I've used the black color
to paint some bushes. Now with the trunks painted. Let's move on to the
leaves of the tree. The first thing I'm going
to draw a general shape of the tree and then go in with a smaller brush to create
the detailed leaf. Just make sure that the direction in
which your leaves are falling and you're good
with the palm trees. My advice would be to put on some good music or listen to some podcasts while doing this, because it is a fun activity, but it does take a bit of time. Now the biggest palm tree done, Let's move to the other tree. Also a little
disclaimer that I'm not adding any audio for the next at least 10 min because there is absolutely
nothing left to me to say. It's just me painting
the palm tree. So you can go ahead
and listen to some music of yours
while painting thing. So the palm trees did take
a long time to paint, but I think it was worth it. It looks beautiful and it was a lot of fun painting
the palm tree. Let's peel off the tape and
reveal our final painting. Sometimes I feel that the most satisfying part
in a watercolor painting is just the way the clean, crisp edges come out. It's just so
satisfying to watch. This is that when painting, and I really hope you
enjoyed painting this one. Let me see you in the next one.
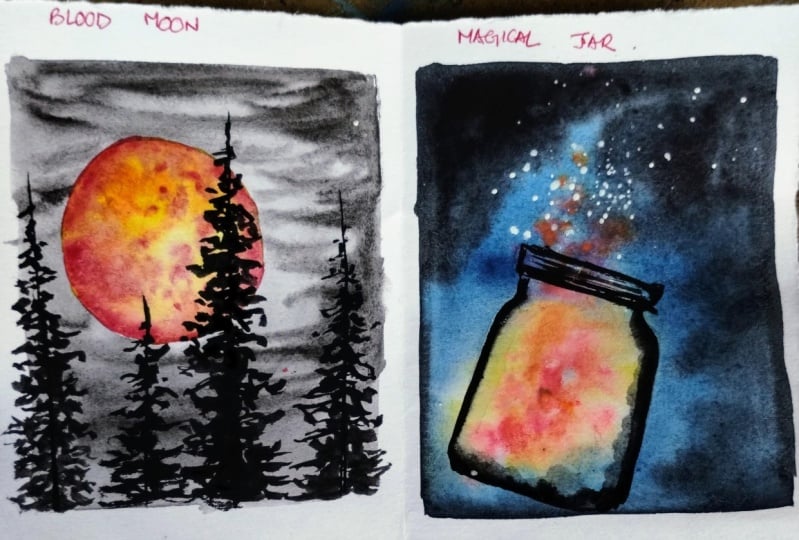
11. Blood Moon: Welcome to the second
last lesson of this plot. And this one will
paint a blood moon, again, very dark. The moon. I have drawn a very big seconds at the left part of the paper. I'm painting layer of the masking fluid
adult multi moon so I can paint the background
without worrying about. Make sure to let
your masking fluid dry before starting
painting the background. So now I'm masking
fluid has dried and now I'm going to move on to
painting the background. Now with the background, I'm taking a Buddhist solution blue and mixing
some black with it. I'm also going to make a bit of red with it to move
down the column. Now, let's begin by
applying some water on the surface to paint
the background. I knew that the water
Shaw is a big colored, but it really doesn't matter because the background
is very dark. Often evenly applying some
water on the surface, I'm going to begin painting. Now. I'm going to take
any color we have just prepared and start
painting from the top. I'm using horizontal strokes here to paint the whole paper. Now I'm going to go in with some black and start painting
at the top of the paper. I'm also going to bring
the blacks down with little strokes along
the edges of the paper. You can add a bit
more saturated and black to give a more
contrasting look. Now we'll wait for the painting
to dry before taking off. The masking fluid. Will be masking fluid. And after that, I start
painting the moon. I'm applying some water on
the surface of the moon. And next I'm going to take some orange and yellow
can start painting. Next I'm going to take
in some orange and start painting the edges of the moon and some spaces in between. The reason this painting
works so well is because the background is very dark
and the monitors is very, very bright, that brings all
the tokens down to the moon. I'm adding a bit darker
red on some parts. So why did they do
for the moon to dry? I'm going to start painting
the pine tree silhouette. So I'm going to
use a round brush and some black paint
and start painting. When that done, I'm going to
move to the pine trees now. So as we did in
an earlier class, I'm going to paint the
trunks of the trees first and then paint
the leaves on it. You only need to submit
a small painting. I did a long back and I'm
recreating that in this one. I'm not painting the
other two chunks as of yet because the
moon is still wet. I'm going to start by
adding the leaves and the pine trees in
a zigzag motion. I like the pine trees
you painted earlier. I'm going to add leaves to
the very bottom of the tree. We're going to do
the similar thing for the other two trees as well. And now it has been
one has dried. I'm going to be the
other pole tree trunks and then start painting
the leaves in it. Make sure to overlap
some trees on the moon, which will add a
beautiful contrasts between the moon and the trees. I'm using the number
zero round brush here to add finer detail
on the cheese. Here we are the last three
that needs to be paid. And now let be noted date and
reveals the final painting. So this is the final look of the blood moon painting
that we just did. Here is also a miniature
version of that. I really hope you enjoyed
painting this to me. See you in the next one.
12. Magical Jar: Welcome to the last
lesson of this class. And in this one we
paid a magical jar. So let's start by mixing
our colors first. And I'm going to make
a good mixture of motion blue with water in
my palette and keep it. Next, using it to H pencil, I'm going to draw a jar. Next, we're going to
use my flat brush to apply some water all over
the paper to begin painting. Using wet-in-wet
technique here to paint the background as we did
in most of the lessons. Often applying a cold
water on the surface. I'm going to start painting. I'm going to begin
with a blue color and start painting randomly
around the jar. Hou, and I'm making sure
not to put a lot of color very close to the jar because I know the color will
absorb and seep in. Next I'm going to
take some black and paint the edges
of the paper with it. You can see the blue virus itself moving towards
the center of the paper. I'm also going to add a
few more strokes of color. I'm using a clean brush to bring all the color
inside the jar. Next, I'm going to
clean my brush and pick up some color from
the center of the jar. At the same time, I'm also going to
add a little bit of orange in
descender of the jaw. Again, after cleaning my brush, I'm going to pick up some color. Unm again adding a few dots of the orange color
outside the jar. So I'm going to take
some whitewash and pain, some doors inside
and outside the jar. I'm using the same brush to do some standard effect using
a light wash on the paper. The paper is still wet to
whitewash is bound to create a little bit here and I'm adding a bit more saturated color
at the edges of the paper. Please give that if your
paper has already dried out because that will leave some marks on the paper
which we don't want. Please leave out this bot
if your page has dried out and it is bound to leave some marks on the paper
which we don't want. So now after painting is dry, I'm going to draw the
silhouette of the hand. You can also use the graphite
paper transfer method here. That is, you can draw
the silhouette on a different paper and place
a graphite paper on top of this watercolor
paper and place that final drawing on top of that and just sketch it
out once again, the graphite paper
will help you transfer this sketch onto your watercolor paper
without any hassle. Next, I'm going to
take some black and start painting
the hand silhouette. This is the only
painting inequalities which had some sort of
human element in it. The bad thing about
painting silhouette is that you don't have to worry about shading or John
put into it anything. You just want solid
black color. That is it. So again, after painting
half of the silhouette, I realized that I need to add some stars, which I just forgot. So I'm going to add in the
stars now with a whitewash. You can also cover the area nearby
watercolor paper with some sort of newspaper
or some oil paper, because this platter literally
splatters everywhere. So we have splatter some
stars onto the paper. And now let's go back to
completing a silhouette. The painting manually come together once we have
painted the job. You can also see
now divide wash, which landed on the orange
part of the painting. Now we've successfully painted
this cellularity hand, and now let's move
on to the job. The only difference
between the silhouette of the jar here or any other
paintings that we did. Is that the entire border
of this silhouette is a bit blurry or is a bit soft
compared to the other ones. So the trick to doing
that is that I'm going to apply paint on the
outside the jar. And then I'm going
to use the semi dry clean brush to bring
the color a little better than recreate the look that we're going for. Now we're going to move
to the legacy jar. As you move towards
the inside of the jaw, I'm again going to use a little bit bed brush
to bring the gallery. You can also use a clean brush to soften the edges of the net. We are done with the last
painting of this class. And let's speed
up the tapes now. So this is the last
painting of this class and I really hope you enjoyed
painting this with me.
13. End Note: I'm so happy in Sweden that you made it to the
end of this class. Don't forget to post your paintings in
the project gallery. And if you're on Instagram, don't forget to tag
me in your paintings. I really enjoy seeing
your paintings. I would be glad if
you could take out a minute and leave a
review for this class. I put a lot of hard work in
time in making this class. I would love to
know your comments and suggestions about it. And I'm planning a lot of other watercolor
classes in the future. So stay tuned for that. See you soon. Bye-bye.
 Trisha Jain, Art Educator & Art Lover