Transcripts
1. Promotion 3(HoopEarrings): Hello, and welcome to part three of my beaded jewelry
making series. In this class, we'll create a stylish pair of beaded hoop
earrings that are elegant, lightweight, and easy to
wear with almost any outfit. As we work through
the project together, you also learn how to attach
the earring hook securely, giving your finished
piece a clean, professional look, and
ensuring it's ready to wear. This project is simple
enough for beginners while also introducing techniques that every jewelry maker should know. If you're following this series, don't miss the previous
and upcoming classes. Each lesson focuses on a unique design and teachers new skills that
will help you build your confidence and grow into a more creative and
experienced jewelry designer. Now, let's gather our materials and start creating
something beautiful.
2. 3.Beginning the Beading: Hello. Today we
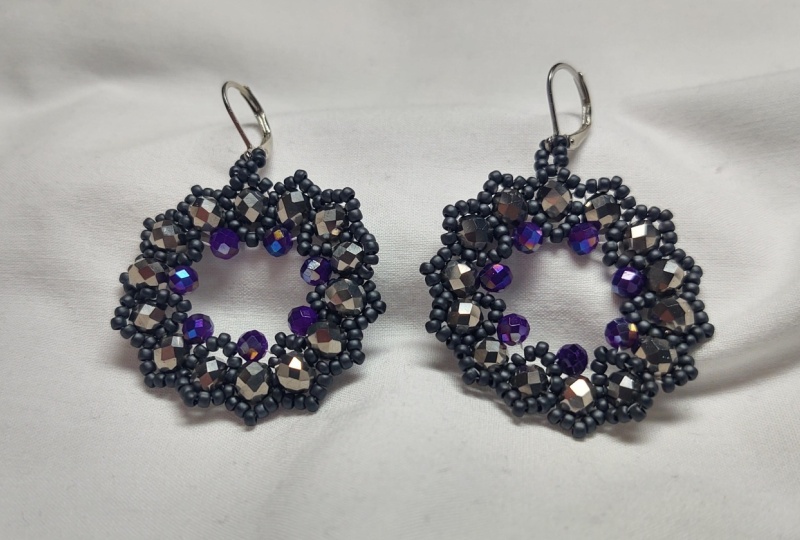
are here in order to teach you this
beatable earring. The diameter of this
one is 5 centimeters, and this lower one
is four centimeter. You see the difference
is the crysondl beads. And in the upper one,
we have 16 of them, but in the lower one, we
have only 14 of them. So if you want your
earrings to be smaller, almost 4 centimeters, you use 14 crystals, and if you want it to be bigger, you use 16 crystals
in this case. And the size of the
crystals are size six. Then we also need
these gold crystals. These are size four, and obviously we need some
seed beads in size 11. Invisible monofilament thread. And we need earing
hook for them. So if you like to create
these beautiful earrings, just prepare your materials,
and let's start it. If you see that, your
invisible thread is just bothering you during your work
and it gets knotted a lot. You can actually put your
thread in boiling water for almost ten to 15
minutes after cutting the amount and measurements
that you wanted. And then you can work with
it easier in this way. It would be easier
for you to work with, and it would not
get knotted a lot. So for starters, we should
place 14 of our crystals and 14 of our seed beats one
after another in a thread. And then I hold the end
of the thread in my hand. Crystals and seed beads are
transferred to the end. And then, again,
I pass my needle through all of these
beads from the end. Pay attention that your needle should go through
all of these bits, especially the seed beds
because sometimes the needle actually gets past and gets
to the side of the seed beds, and you think it
went through it, but it hasn't, so it would make some problems
for you later. So pay a lot of attention
and check if your needle just goes through each
one of them finely. I stretch my thread, so at the end of my work, only 5 centimeters of my
thread would be left. I pull the thread and I create two very strong
knots over there. And in this level, above all of these seed beds, I add another row of seed beds. The thread should be
before the seed bed. Now, for mine, it is. Then I get another
seed bed and I leave one seed bed below it and I come out of the next
crystal after that. So I just pass the needle
through this crystal. This seed bead has actually been placed above the previous one. Then I'll just do it again. I get a seed bed
inside of my needle. Then I leave one
seed bed and I pass the needle through my next
crystal and come out of it. So I'll do this thing over
and over again until all of my se beds have one
extra seabed above them. So it's like my sea
beds are in two rows. Okay, I finished this step, and now for the
next step, you see, my thread is right over
here after the crystal. Now I should pass my needle
through this lower seed bead. Then I get four seed
bids on my needle, and then I pass my
needle through the next seedbed and
the next crystal. And also another
sebd after that. So basically, the needle should pass through all
these three bits, one speed, one crystal, and another seed bed. So with this action, the bottom of my
crystal would be filled with these
beautiful seed beds. Then I repeat the same thing. For the next part, I get four
seed beads in my needle. See, my dear friends, just be careful and pay
attention to this part. Sometimes this upper
seed bed comes down. So do not mistake it and don't think that this is
the lower seed bed. Pay attention to its
original placement. Basically, this is
the upper seed bed that has turned and came down. So after taking four seed beads, I just pass my needle through
one seed bed on the bottom, then the next crystal and the
next seed bed after that. And there you go. The bottom is filled
with the seed beds. I'm just going to do
it one more time. Four seed beads, passing
through one seed bed, the crystal and the next
seed bed after that. A lot of my crystals are
filled with seed beads. But as you can see, they've been done every
other one of them. See, one of them
hasn't and one of them doesn't I just did the same
pattern until the end. Okay, I've already
completed this step. And if you see some seabeds are just turning
out and coming out, don't be afraid
because at the end, by the end of our beating,
they would be fixed. Be careful over here,
my dear friends. First, in between the crystals, we had two seat beds, right? Before we add the
extra four to them. We had two seed beds between
each of our crystals, the upper one and lower one. And we added all these
extra four seed beds at this step from the
bottom seed beads. I mean, for now, we don't have anything to do
with the upper seed beads. Now, in the next
step, as you can see, just below each of my crystals, we have four seed beads. I pass my needle
through two of them. I take one seed bid
inside of my needle, and then I come out
of the next seed bed. And by doing this,
as you can see, it got a pointy tip, a pointee end to it. Now I get a size for crystal. Then I move on to
the seed bids that I've got under the next crystal, then I get into the second
seed bed of Then again, I take one seed bed inside of my needle and then I come
out of the next seed bed. Now, every other one, I just go one crystal, one seed bead, one crystal, and one seed bed. So when we take the crystal, we go to the four seed beads which are under
the next crystal. And then we pass the needle through the second
seed beat here. And then again, I take one other set bead and we come
out of the next set bead. So I just continue
this until the end and until I get my full
ring full of this.
3. 3.Completing the Beading: Okay, now I've completed
this step, as well. Actually, in this step, I have to pull my
thread so hard and so strictly so that
all of my crystals, especially my gold crystals, just get closer to each other and be right
next to each other. And as you can see, my earring has been shaped and formed. Okay, now our work is done with the inner ring and with
the inside of our earring, and now we want to work on the outside or outer
part of our earring. So right now, my thread is
over here, as you can see. So I come up from
the side seat beads. And now I should just
pass my needle through one lower seat bead and
also a crystal after that. Now over here, I go through
the upper set beat this time. And from now on our work with the upper seed beads
are just starting. I'll take just four set beads, and then I pass my needle through the
next upper set bead. And then I do it again, I'll take four set beds
inside of my needle, then I pass my needle through
the next upper setbad. I'm just going to do it
one more time for you, four seabeds inside
of my needle. And then I pass my needle through the
next upper seed bed. And here we go, as you can see, I'm adding four seed beds to the top side of all
of my crystals. And you can see if we've added four seed beds above all
of our crystals, right? And we should add one more seed bed in the
middle of these four. So I give it that pointy shape. I pass my needle through
these two seed beads. Then I take another seedbed
inside of my needle, and then I also pass
my needle through the next two seed beds and
also the middle seed bed. I'm going to do it again. I pass my needle through
these two seed beads. I take one set bid
inside of my needle, and then I pass
my needle through the next two set beds and also the middle
seed bed as well. So I'm just repeating
the same drill. I pass my needle through
the first two seed beds. I take a seed bed
into my needle, and then I pass
my needle through the next two seed beds and also the middle
seed bed as well. And now, as you can see, I'm also creating
that pointy shape in the top of my crystals with
my seed beads as well. So I just continue
this until the end. Now the last part is about
adding the earring hook. Now, I should attach
my earing hook on top of one of my crystals
and in the middle of it. Actually, this extra seed
bed that is coming out and it's the pointy
shape of my crystals, that will be the
middle of my crystal. Now my thread is here, so I have to pass my
needle through three of my seed beds so I can get to
the middle of the crystal. I'll take three seed beads, one earring cook, and again, another three seed beads. You see, right now, my throat has came out from
the front of this sebd but I pass my needle through the back of the
set bed one more time. Just like that, the earing cook has been attached
to our earring. Then I pass my needle
through all of these six seed beds and also my earing hook ring
one more time. I would be stronger and firmer. And now you can see I'm moving
a few set beds forward. And now on top of this
invisible thread, I just create my knot
and I'll finish my work. Now, how can I make a knot? I just pass my needle through
below my thread like this. And when I pull this
you can see a ring, and then I pass my needle
through this threaded ring. Then I hold my knot with my finger or my nail and
then I pull the thread, and our knot is made. Now, I'm just going to
repeat it one more time. I pass my needle below my thread like this
and I bring it out. Then it makes a ring and I pass my needle through
this threaded ring. Then I hold the knot and I
pull the thread strongly. Now, I just cut my thread until two or
3 millimeters of it, it's left, and then I heat it
and I attach it to my knot. And I'll do the same
thing for the part of my thread that was for the
beginning of the work. If you enjoyed creating
these projects, don't forget to leave
a rating or a review. And this is our beautiful
completed earring. I hope you can make it
easily and enjoy making it. And if you have any
questions, please do ask. The next work, which I'm going to teach you
is this beautiful, attractive piece of art. Well, you should be definitely
with us so you can learn the techniques and its hints
completely and thoroughly.
 Mariya Karim, null