Transcripts
1. Promotion: In this class, you
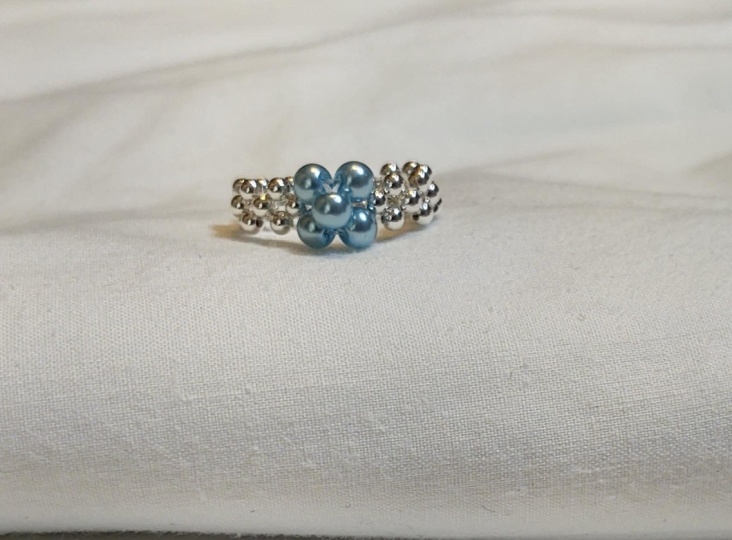
learn how to create an elegant pearl ring with a timeless and
sophisticated look. Welcome to this class, part of my complete
jewelry making series. This series is designed to help you build your
skills step by step. One beautiful project at a time. In every class, you
learn a new technique. Discover creative
design ideas and creative jewelry pieces
that you can wear, gift, or even sell. Each lesson is connected
to the next one. So I encourage you to explore both the previous and upcoming
classes in this series. Even if you're a
beginner, don't worry, I'll guide you through every step in a simple
and easy to follow away. My goal is not just to
teach you one project, but to help you build a
complete jewelry making skill set and the confidence to
create your own unique designs. By following the entire series, you'll gradually develop
a professional techniques and build an impressive
collection of handmade jewelry. So after finishing this class, continue your journey with the next lesson and keep
creating beautiful pieces. Thank you for joining me, and let's get started.
2. How to stitch the pearl ring?: Hello, everyone. In the
beginning of our course, I just want to teach you
a beautiful pearl ring. In the advanced
jewelry making course, you'll also learn about all
different pearl necklaces, pearl bracelets,
and you can make this beautiful ring next to
them and make a pretty set. This work, we need curls
in size two or three. Spacer bead with the same size. So it can either be a
hematite gold stone or it can be steel. As I told you in the material
parts in the threads, for the works that you want them to be more rigid and firm, we use invisible monofinament
thread or fire line thread. And now, because we're making a ring and we want it to
be more rigid and firm, use either one of these threads. If you're a beginner,
invisible monofinament thread is much cheaper than
the fire line thread. And you can use this thread. And obviously, the strength
of fire line thread is more than the strength of the
invisible monofinain thread. But now I'm using an
invisible thread, so you can see how
to work with it. If you're using invisible
monofinain thread, the size of 0.3
millimeters is good. But if you're using a fire line, you can use a six
pound fire line, which has a thickness
of 0.15 millimeters. Just be careful that
your fire line thread should be in the crystal color, so it's almost invisible, and it would show
in your work less. Okay, now I divide almost 30 centimeters
of my invisible thread. If you see that, your
invisible thread is just bothering you during your work
and it gets knotted a lot. You can actually put your
thread in boiling water for almost ten to 15
minutes after cutting the amount and measurements
that you wanted. And then you can
work with it easier. In this way, it would be
easier for you to work with, and it would not
get knotted a lot. And I put three
pearls inside of it. So I take both
ends of my thread, and I put them in the middle. Now, I take one pearl and
I use it as a shirt pearl. You see, both ends of the
thread is in my hands now. And how could I use a pearl as a shirt pearl is like this. First, I pass it through
one of the threads, and then I pass the other thread through this just like that. And then I take both ends of
my thread, and I pull it. And my work would
look like this. Now I put one pearl
through this thread. And another one in this one. And then again, I use one
pearl as a shared pearl. See, first, I put it
through one thread, then I pass the other
thread through this pearl. And as you can see, both ends of the thread are in my hands, and just like that,
I pull my threads. All right, then again,
one pearl on the left, one pearl on the right. And then I use one pearl
as a shared pearl. I'm just going to do it
one more time for you. One pearl on the left, one pearl on the right. And then I use a pearl
as a shared pearl. Okay, now right here, I'm moving toward
the golden bead. That here I'm using
gold hematittone. So after I've bid it four times, then I'm going to use
my gold beads. Okay. But I just do it like the previous steps
one on the right, one on the left, and my third bead would be
used as a shared bead. Now, this time, as you can see, one gold on the left, one gold on the
right on this side. But this time, I'm going to use a pearl as a shared pearl. So now I work with our gold
hematit stone is done, and now I'm just going to
continue the work again with my white pearls until it gets as the size of the
round of my finger. And then I'm going to
show you how you can attach the two ends of
your ring together.
3. 2How to connect the two ends of the ring together?: Okay, my dear friends, if I do this beading
one more time for you, it would be exactly as the size of the
round of my finger. After we've added the right
pearl and the left pearl, we do not have to use another
pearl as a shared pearl. I'm going to use the pearl, which is at the beginning of my work as a shared
pearl here this time. If you want to beat this
work with seed beads, then you should use invisible monofinaen thread with the size of 0.15 millimeters, or if you want to use
a fire line thread, you should use a four
pound fire line thread. Because the whole of the
seed bead is smaller, we should use a thinner thread. Alright, now my work is done. But now, how can we
tie a knot over here? Let's see, first, I pass my thread through some
of these side bits. I pass each one of my threads through three of
the side bits here. Now, the next thread. Now, over here, I tie a knot for each thread on the thread
which is next to it. Now, how do I tie a knot? I pass the thread
which is in my hand through underneath this
thread which is in my work. Then I pass the thread through this loop that has been
created over here. And then I pull the thread so the knot would be tightened, and I'll do it one more time. Now, I just cut my thread until two or 3 millimeters
of it is left. Now, I actually heat up this two or 3 millimeters
of my thread, and then I attach it
to the end of my work. Just pay attention,
my dear friends. I only heat it up
and I do not get it straightly on the flame. When I want to do this, I should also just make a distance between this extra thread over here from the
threads in my work. So when I heat it, the threads in my work
wouldn't get heat as well. Then I do the exact same
thing for this side as well. And this thread,
which is next to it, again, I tie a knot. I tie two tight knots. If you enjoyed creating
these projects, don't forget to leave
a rating or a review. Now, I just cut my thread until two or 3 millimeters
of it is left. Now, I actually heat up this two or 3 millimeters
of my thread, and then I attach it
to the end of my work. You can also do
it with a spacer, a bead, which has
steel and gold. Or instead of pearls, you can use cultured pearls
in the same size, too. So you make it and enjoy it in a set of pearls
that you've made. If you're using invisible
monofilament thread, it has a melting
and sticky feature. But if you're using
fire line thread, it cannot melt and you
shouldn't heat it. So how we should make the end of our work safe so it
wouldn't get open again. So after we knot it two times, we should pass the thread
through several more beads. And then cut the thread off. We can also add a
drop of jewelry glue on the knot that we've
made like E 8,000, so the end of our
work would be totally safe and the knot would
not get open at all. The next work which I'm going to teach you
is this beautiful, attractive piece of art. Well, you should be definitely
with us so you can learn the techniques and its hints
completely and thoroughly.
 Mariya Karim, null