Transcripts
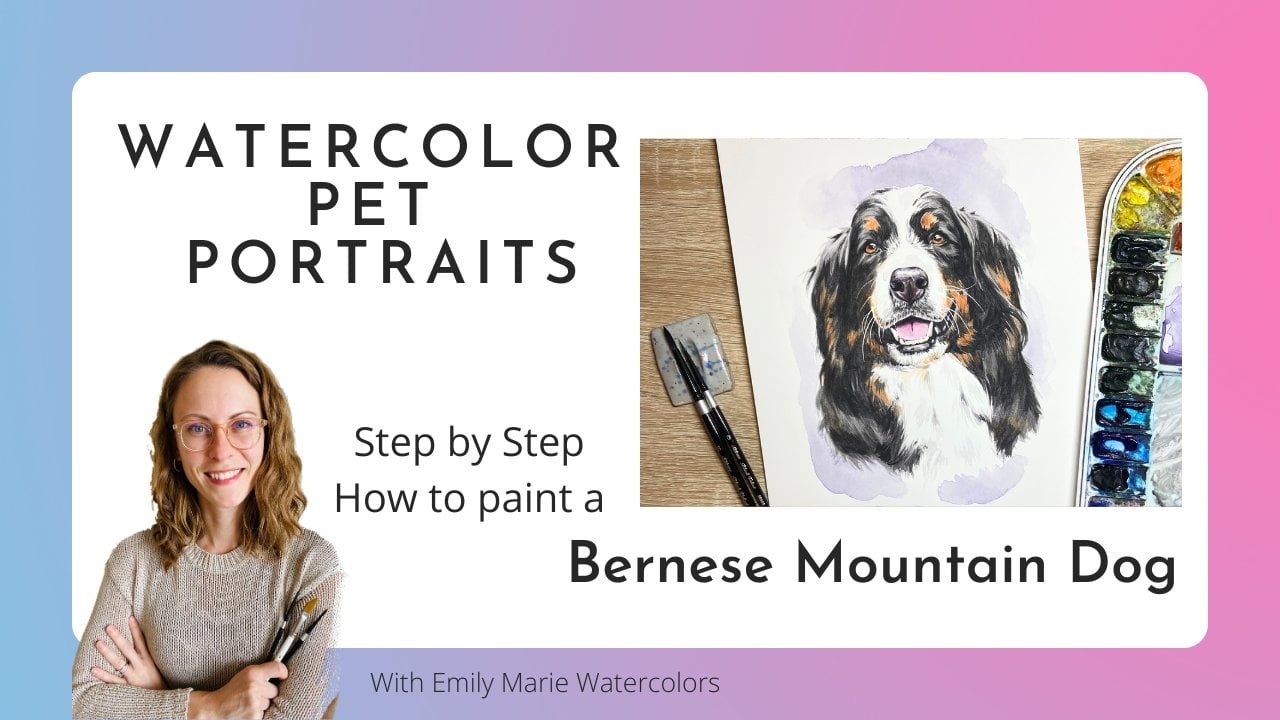
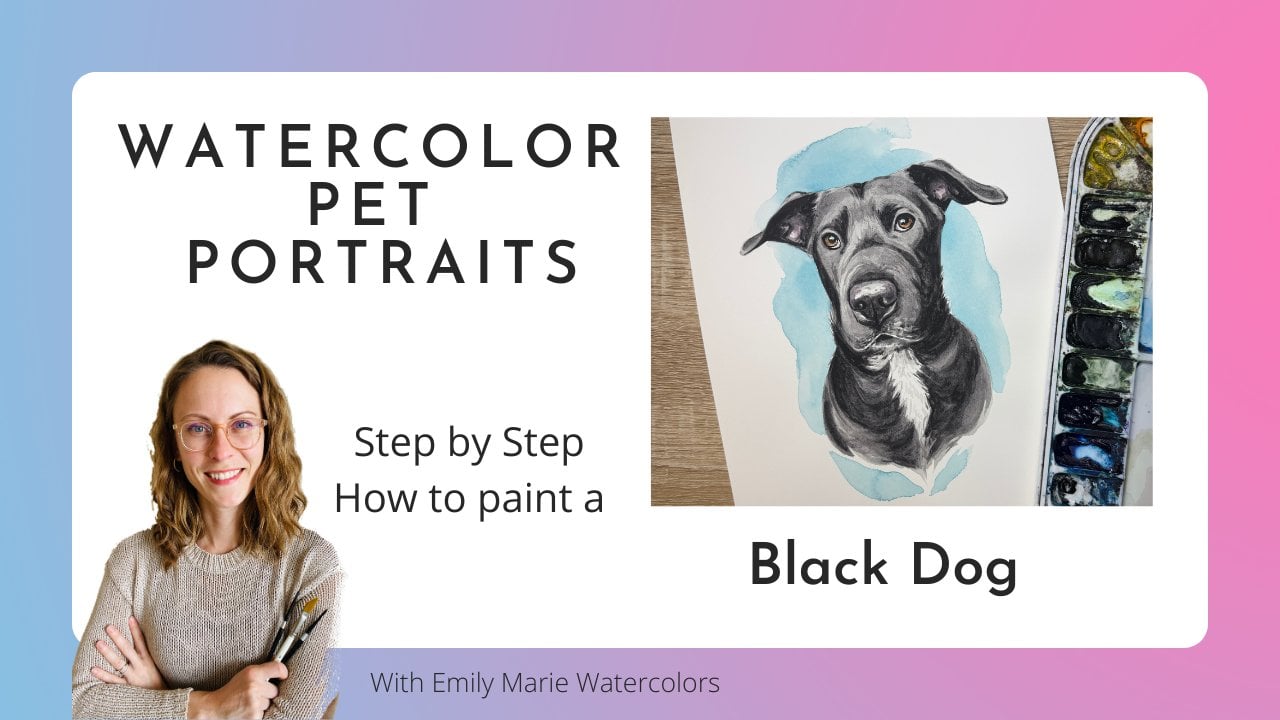
1. Intro: Backyard Birds in Watercolors: Hello, and welcome
to my home studio. I'm Emily, and in today's
Skillshare class, our goal is to relax and have fun while painting
with watercolors. This Skillshare tutorial
is designed for all skill levels and comes with three
different bird projects, a Baltimore Oriole,
an Indigo Bunting, and a Cedar Waxwing. These three designs
focus on mastering an initial wet-on-wet
layer and then adding shadows with a
second wet-on-dry layer. Glass includes printable
templates for printing the outlines directly onto
your watercolor cards, using your home printer and traceable templates if you'd rather trace the outline
onto your paper. I've also included a video
tutorial to teach you how to print onto your watercolor
paper using your home printer. In this step by step
video tutorial, you'll learn how to create
these paintings using basic watercolor techniques like wet-on-wet and wet-on-dry. You'll practice your fine brush
control and techniques to paint birds without having to
paint individual feathers. So get your paints, paper, and brushes ready, and let's get started painting some backyard birds
using watercolors.
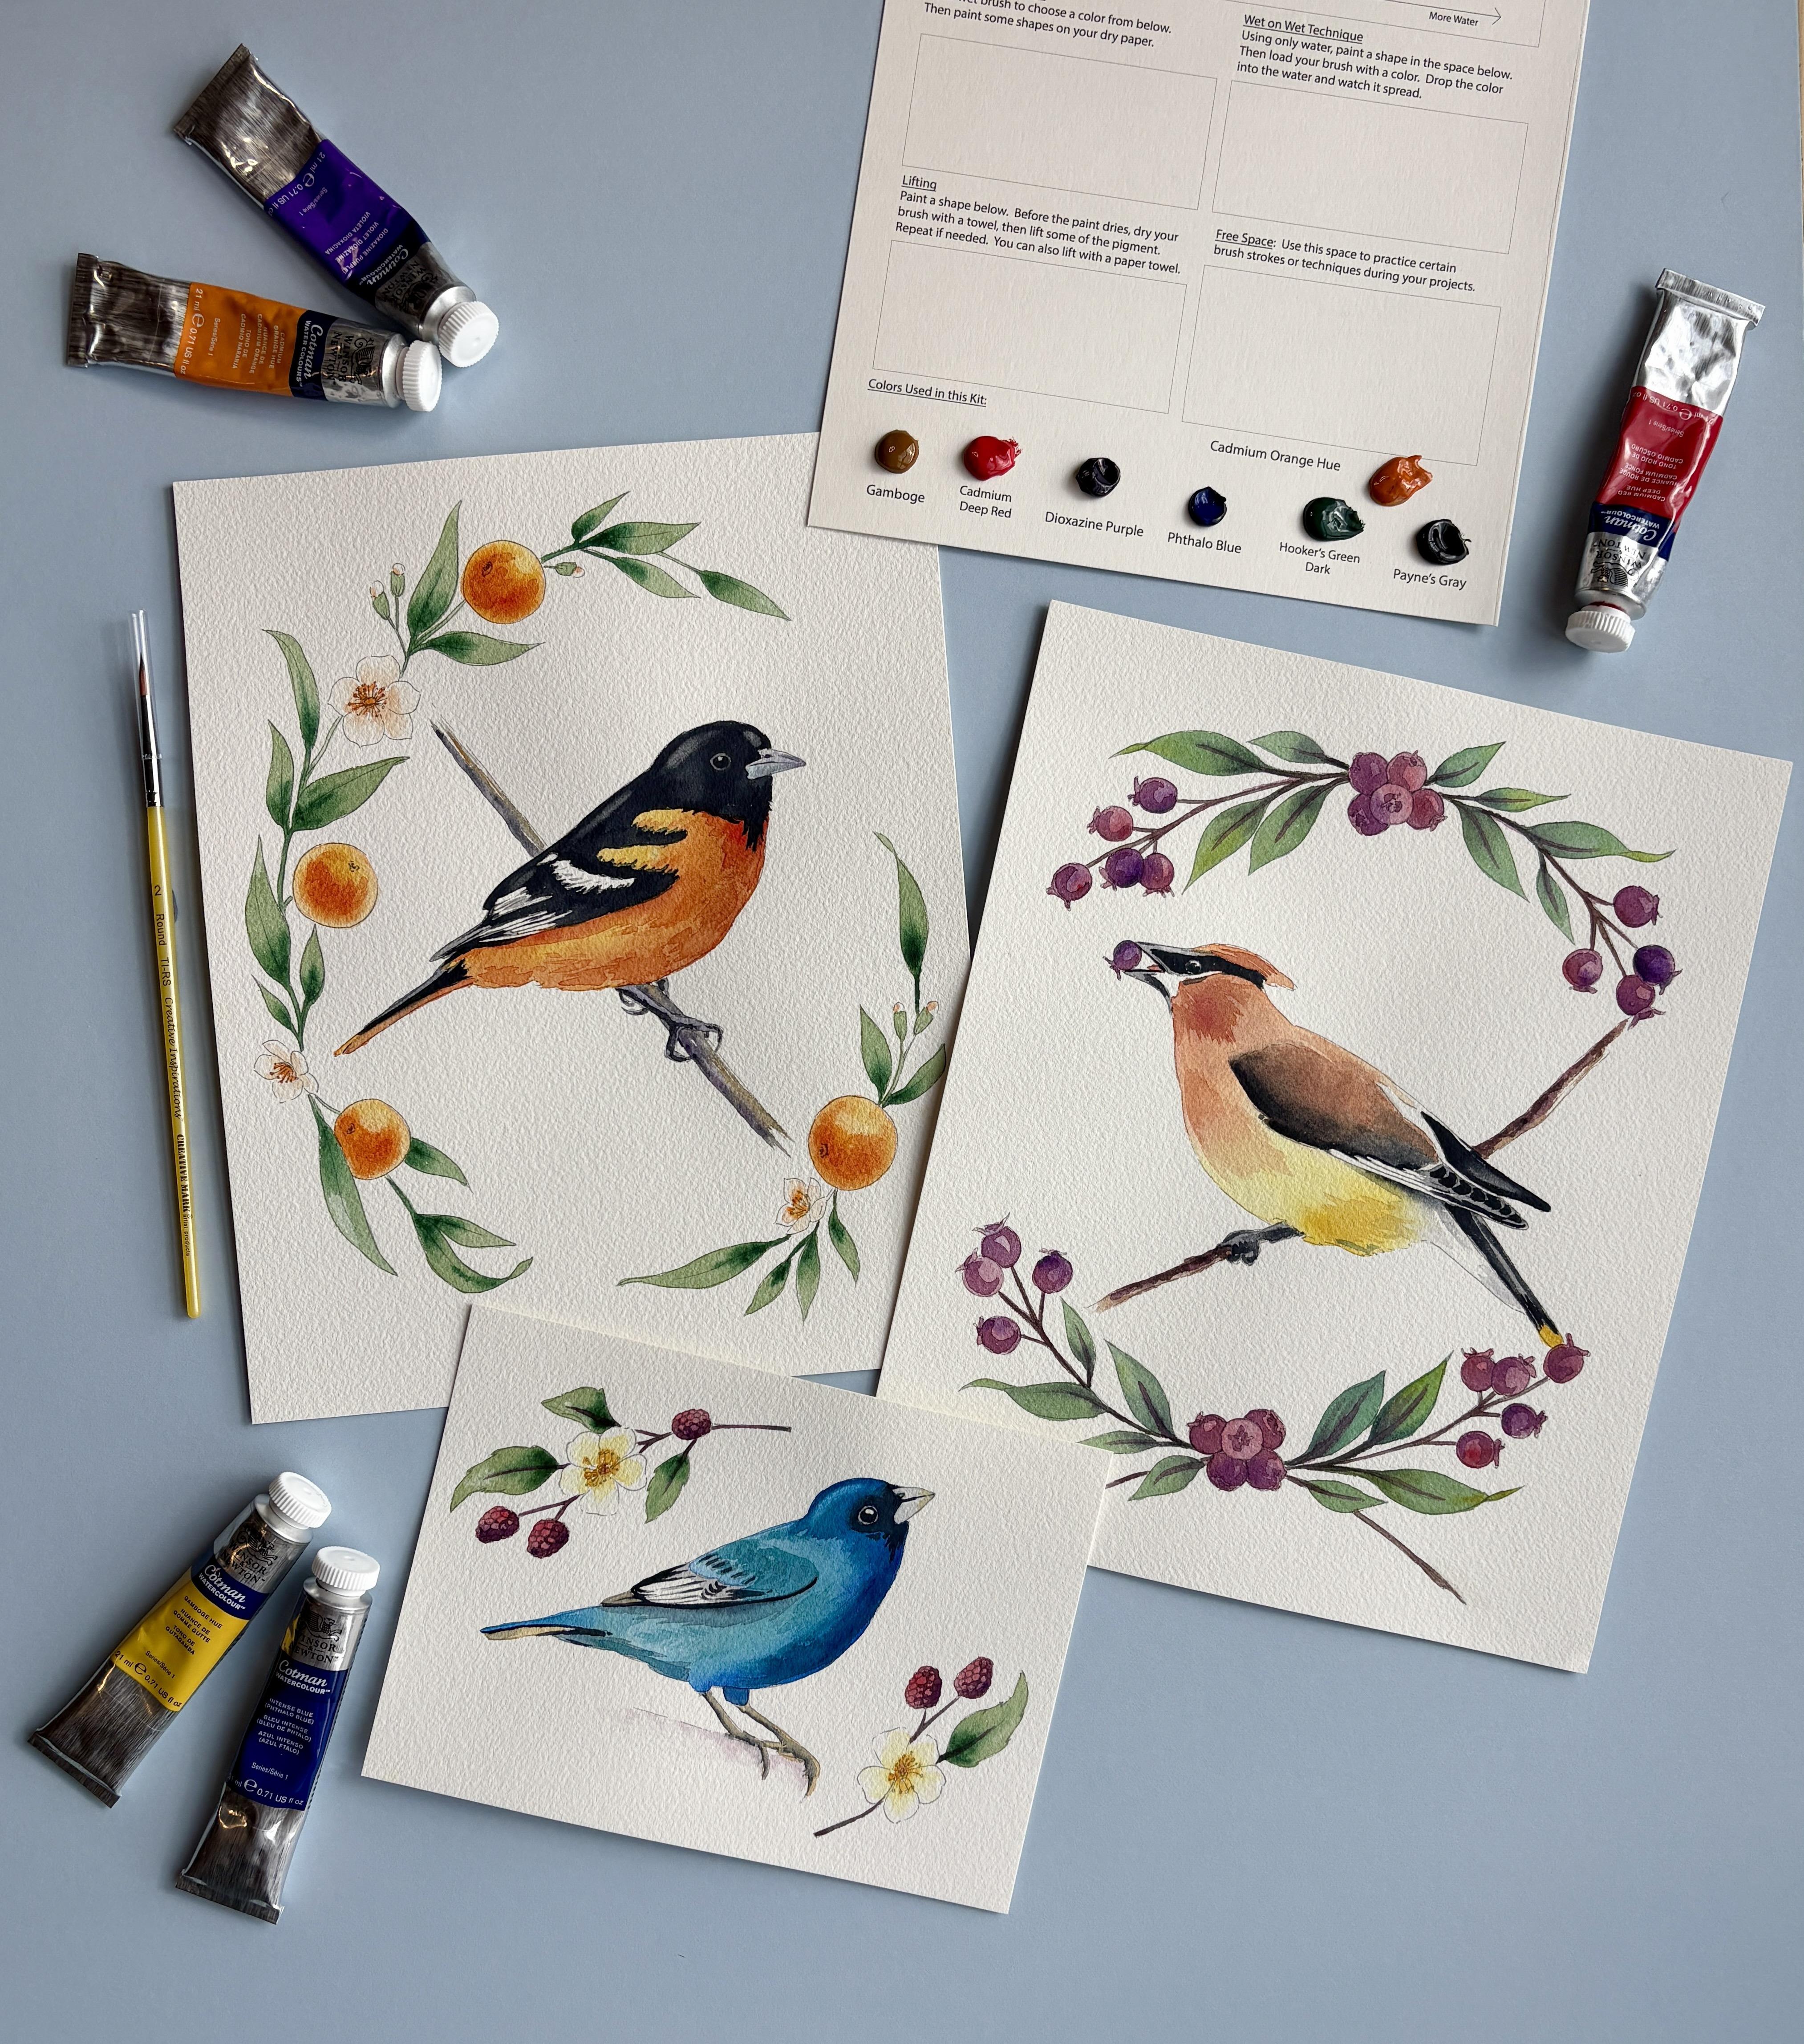
2. Supplies: Alright, so let's start
out by talking about the supplies that you'll
need for this tutorial. First off, you will notice that for all Three of the tutorials, I will be using paint that's on the bottom of a single paper, these paint dots
that look like this. It's because these
tutorials were originally created
for watercolor kits that I sell on my website. If you're looking to have
the template already printed out and a brush and your colors, you can go on my website. You can order the kit
for the tutorials. Otherwise, you can use the supplies that
you have at home. So we'll start
with paper choice. So for paper, I am using arches, cold pressed, 140 pound paper. This comes in blocks of paper. You can use blocks or you
can use you can use pads. I am using the pad of
paper so that I can cut them into eight by ten pieces. These eight by ten pieces, then I can either pass
through my home printer and print on more or
less waterproof ink, or I can hold it up
to my window and use my window as a light box to trace the template
onto my paper. Now, you notice that
in my tutorials, I am not taping my paper
onto a flat surface. That's because we're not wetting the entire sheet of paper. Your paper might bend and warp just slightly if
you don't tape it down. If you do want to tape it down, though, you're more than
welcome to tape down. I usually use these
plastic corrugated boards. I buy these from Michael's. They're large poster
boards that I cut into sizes, different sizes. The tape that I like to use for watercolors is either
a green frog tape. It's like a painter's tape, but it's called frog tape. Or I've also found
a different type. It's an Australian
brand called kiwi Hub, and this tape is made
specifically for watercolors. You will also need
a cup of water. A paper towel or a rag, and then you'll need
some paint brushes. So for the tutorial, I'm using the round size two brush that was included
in everyone's kits. However, at my home studio, I like to use silver limited
black velvet brushes. These are round brushes, size four or size six. I usually use the size four for project details
like these bird tutorials. You can also find a slightly smaller
brush for some details, either size zero or size one if you need a smaller
brush for the eyes. And then before we
talk about our paints, I do want to mention that
in parts of the tutorial, there is an optional place
to use a white gel pen. I'm using Nibal
Cigna white gel pen, and this is just in case you
don't if you're not able to keep the white of the paper for the highlights of the
eyes open and clean, I like using these
white gel pens to add a highlight after
my paper has dried. Alright, so let's then go on
and talk about paint choice. Like I said, on my home studio, I like to paint from a
palette that looks like this. But in all the tutorials, you'll notice that
I will be painting from paint dots on
my practice sheet. Alright, so for my
watercolor paints, I am using Windsor
Newton Cotman brand. So Cotman is their student grade brand
for watercolor paints. You'll notice in the tutorial, I'm using a yellow called
gamboge, cadmium deep red, dioxyine purple, palo blue, hookers green dark, pains gray, and cadmium orange hue. Uh, now, of course, you are more than welcome to use whatever colors
you have at home. It doesn't have to be
Windsor and Newton. I also really enjoy
using Daniel Smith. And so whatever
colors are similar to the colors in these
tutorials, feel free to use.
3. How to Print and Use your Templates: In this video, we'll look
at how to print templates, trace using those templates, and trace using your phone. I'm going to talk
quickly about printers. Not all printers are
designed equally when it comes to printing on
your watercolor paper. The first printer I
want to talk about is the Epson Workforce WF 78 40. I just purchased this printer,
and I am in love with it. It's an ink jet printer. It uses pigment ink, which is known to be waterproof. So when you're looking
at your printer, pigment ink is
better than die ink. The ink that this
printer uses is called Durabrte ultra ink. That means that when
it's printed and you use your watercolors
on top of it, that ink will not bleed. It does have a rear feed, which is definitely useful. You will need to use rear feed when you are printing
on watercolor paper. However, you do need
to load it one by one, which can be tedious, and
it is a very large machine. Next, we're going
to compare that with a brother laser printer. With laser printers,
a lot of people will tend to use a
laser printer instead of an ink jet for
printing templates on watercolor paper because
the ink used is a toner. Toner is waterproof, whereas pigment and dyes can
be not so waterproof. You do have a rear feed option, which you will need for card
stock watercolor paper. However, some laser printers
don't print color very well, so you have to be careful when choosing your
laser printer. There's also some concern
that the heat used to print using lasers will ruin the sizing of
your watercolor paper. Others have used them and
think that they're wonderful. I personally don't have any experience with
laser printers, but this is just what I've been reading as I've done research. Lastly, we'll talk
about the cannon, TS 95 21 C. This is the printer that I'm using in this video tutorial. It's the first printer that
I started printing on. I have been printing
both prints, cards, merchandise, as
well as some templates. This is also an ink jet printer, which can cause some
concern because the die used in this
printer is a die ink. Dye inks tend to be not
waterproof and will bleed slightly versus the pigment
ink used in my Epsin printer. After I noticed how
much bleeding of ink this was causing on
my watercolor paper, that's when I decided to
purchase the Epsin workforce. The cannon printer does
have a rear feed option, which is necessary when printing on cardstock or
watercolor paper. However, you do still need
to load it one by one, or otherwise it will jam
and cause a complete mess. As you get ready to print
on your watercolor paper, using your home printer, just be aware of
these differences knowing that the template that you print might be waterproof or it might
not be waterproof. I might bleed slightly. If this is a concern for you and it ends up
being troublesome, remember that there
are templates for tracing in this
tutorial as well, and it might benefit
you to trace the template instead of print it directly on your
watercolor paper. Let's take a look at how to
print using Mcanon Ts 95 21 C. If your project is meant to be printed on an
eight by ten inch of paper, you will need to cut it first. I do recommend using a cold press paper of
at least 140 pounds. Once your paper is cut, you'll once again scroll down to the printable template
section of your PDF. Continue scrolling
until you find the eight by ten inch design
that you'd like to print. For example, this Pony, go find the printer icon
and click once again, you'll want to
check to make sure that you have your
printer selected. We do not want to
print all of the PDF. We just want the current paper. Make sure that the current view is the design you want to print. Right now, we need to
choose a different size. Currently, it's on a seven
by ten inch size of paper. So we're going to
click on page setup. Then paper size. And you'll notice that there
is no eight by ten option, so we are going to have
to manage custom sizes. Once again, we need to
create our own custom size, clicking Plus Bot button, and we'll rename
it eight by 10 ". Change the width to
eight the height to ten. And once again, we
don't want any margins. We're going to change
every margin to zero. Then click Okay. Check the paper size once again to make sure
it's the correct size. Eight by ten, then click Okay. Now, it might be
the setting on fit. We do not want it to be on fit. Remember, we want
it to be printed on the button to the right
that says actual size. So I'm going to click
on actual size. You should see, once again, the red box around the
area that will be printed. Check again that you have an eight by ten inch
piece of paper. Make sure that it's on the correct portrait
versus landscape. If it's landscape, it will
not fit within the red box. And then click Print. Once again, you'll load your pre cut paper in the
rear tray of your printer. Make sure that the rough
side is facing up. These designs are meant
to be printed on, so you'll notice the
lines are a little bit lighter. You're
all set to paint. If you don't feel
comfortable printing out the template directly
on your watercolor paper, there are also darker templates
that you can download to use to trace the template
onto your watercolor paper. As soon as you open up the PDF, you'll need to scroll down past the printable templates to the traceable template section. You can use the following
templates to print each design onto regular
8.5 by 11 inch paper, and then trace it onto
your watercolor paper. You'll note that these
traceable templates have darker outlines. Scroll down to the template
that you'd like to print. If you're printing
a watercolor card, you'll notice that it
has a box around it. Click on the print icon. We will not print all. We'll click on the
current selection only. You'll check the paper size. Right now, it's
on eight by 10 ", so I need to go down
to my page setup. Find paper size and click
on US Letter. Click Okay. And now, it doesn't matter if
we have fit or actual size. Either one will not change
the size of your printout. It will be the same size. Once again, make sure that
you're printing to an 8.5 by 11 inch piece of
paper, and then click Print. Since you're using
regular plain paper, you can either load it in the rear tray or you can
load it in the lower tray. You'll notice that your template
comes out nice and dark. To use your tracing
template, first, place your watercolor paper
on top of your dark template. You'll need to line
it up correctly. Then use some masking
tape or painter's tape to secure your
watercolor paper on top of your template. Use either a light box or a bright window to trace the template onto
your watercolor paper. Last option is to use your phone to trace the templates onto
your watercolor paper. I like to use an app on my
phone called DaVinci Eye. It's a one time
purchase where you can upload any picture or image
that you'd like to trace. Using the classic mode, you can move and resize your image to help you draw it onto your
watercolor paper. To use this technique, you will need a
phone holder so you can look through your phone as you're tracing your outline. Please do remember that these templates are
for personal use only. It is illegal to paint them
and then sell them for money. Enjoy painting them for
yourselves or to give them as a gift. Thank you. If you are interested in these designs printed on
your watercolor paper, but don't have a
printer at home, you can always purchase one of my watercolor kits
on my website. Paper, paints, and a brush are included in
the purchase of your kit.
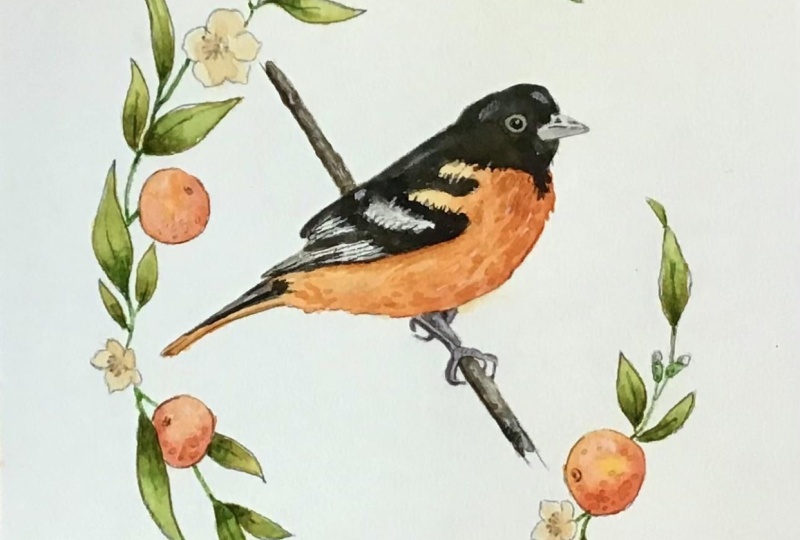
4. Baltimore Oriole Part 1: Alright, so our first
step in painting our Baltimore Oriole is we're going to want to paint
the colorful body first. We need to let this section of that bright orange dry before we can paint
the black on top. So we're going to use a
technique called wet-on-wet. You practice this on
your practice sheet. And what we'll do is we'll
drop in some paint using water the section that we want to add that
orange color too. Now, we're only going
to add water to this section where we
want that orange to travel because the black is just so deep and
dark of a black, I don't want to lighten
up that black by adding a layer of orange
underneath my black. So I'm going to try to keep my water only to where
that orange is going. I'm going to constantly
be grabbing more liquid. I want to make sure
that this section really is nice and wet. So I'm kind of grabbing
a puddle of water, and then I'm going to
push that puddle to the edge of my bird's body. Now, when I come
down to the tail, I'm only going to paint the section of the tail
that has orange on it, so it's this lower
section of the tail. And then before I grab my
pigment and drop in my paint, I want to go back to
that first section, kind of re wet that
first section. I'm gonna tilt my head to
the side and take a peek at that section that I wetted
to make sure that I see a really nice and
bright reflection. If I can see this nice
shine on the wet space, it means that it's wet enough. If any section of
this wetted area is starting to become a
little bit more matt, that means that your section is drying and you'll
need to rewet it. So I'm going to start with
this cadmium orange hue, since the majority of the body, it has this base of orange, and then I'm going
to drop in lows and some reds from that orange. So I'm going to
start by dropping in my orange closest
to the belly here. I want the most amount of
orange here on the belly. And then as I drop it in, you'll notice very
quickly if you have enough water on
your bird's body. You should be able to really easily mix this color
in with the water. If you're not able to, add some water right now. You want to make sure you have enough time to mix all
three of your colors. So I'm going to
take this orange, and then I'm going to bring this orange all the way up
to the edge of the body. If I leave any of that
clean water at the edge, you're going to end up
noticing that there's going to be a clean
line of water. And I want the pigment all
the way up to the edge. I'm going to bring this orange all the way down to the tail. Once again. If I accidentally go over any of the wing here, I can take my paper towel, press down really hard. And then I do need to add water to that section
because by pressing down, I do dry out that section. I can already tell that my
tail here is getting dry, so I'm going to re
add some water. Now, the section here, kind of above the wings, I'm going to use whatever
orange is on my brush because this section is a lot lighter
than the body of my Oriole. So I don't need to
add more orange here. I'm just going to kind of use whatever's left on my brush, and I'm gonna drag
it into that area. Now, before this dries, I do want to drop
in some highlights, and I do want to drop
in some darker shades. So I'm gonna clean my brush. I'm going to start with my
highlights with my yellow. So grab a little bit of yellow. I want more of this yellow on these two little sections
on the shoulder here. It is a little bit brighter of yellow orange than the darker
orange from the whole body. I may also grab a little
bit of that yellow, bring it kind of on this
underside of the wing. The darkest of these
oranges is going to be concentrated along the
breast of our Oriole. Now, I'm doing this
quickly because I don't want this layer to dry. And so now I'm gonna
switch to my cadmium red. And I want to mix in some
of that red with my orange. So I'll grab that org that red, and I'll kind of
start to mix it. Seems like I had some
purple on top of that red. I'm going to start
to mix it along the belly here of my Oriole. And if it gets a little
bit too dark of a color, we can always add in a little bit more orange
there, as well. And I'll just grab some of that red orange and I'll pull some of
that red orange down. I do want to leave some of that brighter orange
to shine through, so I don't want it to
be completely mixed. Grab a little bit more
of that orange hue. And then if there are
any sections where it blended a little bit
too much for my liking, I can go back and I
can use a dry brush to soak up and stip up any of these sections that got a little bit too dark from my red. Now, this first layer is
gonna be simply trying to get my a few of
these shades here. So I don't need to add all of the orangy shades and the
darkest shades that I see, but I just kind of
want a template for myself as to where some of
these colors are going. After we let it dry, then we can go in and we can add some extra an extra
layer of colors. Alright, so I'm pretty happy
with how that's looking, so I'm gonna let
that section dry. And as I let that section dry, I'm gonna move on
and start working on my greenery and my
oranges around my Oriole.
5. Baltimore Oriole Part 2: Alright, so I'm gonna continue with this theme of what on W, and I'm gonna be painting my oranges all around
my Baltimore Oriole. So for those of you who do
know a little bit about birds, you'll know that particularly the Baltimore Oriole is really attracted
to fresh oranges. So you might see a
lot of people leaving orange halves on their porches to attract these
Baltimore Orioles. And because of their really
beautiful orange coloring, I thought it would be
fun to add some oranges. So we're going to be doing the same exact technique that we did on the chest
at the Baltimore Oriole, so you'll be able to
continue to practice this and we'll wet our
area first of our orange. And now that our
whole orange is wet, now we can drop in our colors. So I'm going to keep this
whole concept of keeping a high light in a
certain spot of my orange and then keeping
low lights as well. So here I'm laying down
my first coat of color, and this is going to
be my medium tone. So I can lift some color from
this to make highlights. I can also drop in some
darker color to add shadows. Now, before I do
this, I want to make sure that I have a light
source figured out. So I'm going to pretend
that my light source is coming from this upper
right hand side. So all my oranges are going
to have highlights on this upper right side and low lights and shadows
on the lower left. So when I add a little bit of a highlight or
with some yellow, I might add a little bit of
highlight on this right side. And then I might add
a little bit more of this orange to this
lower left side. Now, you may notice that because of this round shape
of my orange, I'm still gonna leave
a little sliver at the very lower
edge of my orange, and that's going to stay
this lighter orange color. I'm not gonna wet my brush. I'm gonna go directly
from a wet brush to grabbing some red
just from the tip. Now, I'm not mixing that red
with water because I want that red to stay put in
the center of the orange. I don't want this red
to blend too much. If I add too much water, to my brush, when
I grab the red, then that water is gonna push
all the other pigment away. So I keep very little
water on my brush, just whatever's on it, and then I can add my
red and my oranges, my more concentrated
colors along this center C. Before we move on
to our next orange, we can wash our brush, dry it. And then we can
use a dry brush to lift any areas that
got a little too dark. So I can go back to where this
highlight might be and use a dry brush to lift some of that paint from that
section of my orange. Now, you could go in and you could press down with
your paper towel, but because these are so small, it's a little harder to
control your paper towel. It's a lot easier to control your lifting
using a dry brush. And we'll continue doing that
same step three more times. That's That's well, we let our oranges dry. Now let's move on to
some of our leaves. So for this step, instead of using wet-on-wet, we're going to mix a color and then use that
as our base color, and then we can drop
in our darker tone. So my base color is
going to be a green. So I'll need some
water on my plate. I have a fairly large
section of water just because I have quite a few leaves that
I'm going to paint. And I'll start by grabbing
some of my green dark. And I'll mix that on my plate. I'm gonna need a
few brushfls Mm. Alright, now, from
here, I actually am going to add a little
bit of orange into my green color just
because I want to connect the orange
from my Baltimore Oriole, and I want to connect the
orange from my oranges. And so by adding a little
orange into my green, it's going to kind of muddy
up that green a little bit, so it'll make it a
little bit more of a warm green instead
of a cool green. So when we test out this green, it has a few, like, brown tones to it because
of adding that orange. So we're going to use this kind of orangy green as
our first layer, and then we'll drop in
that hooker's green, that green dark directly
from our paper. So it's nice and
concentrated and dark, and we'll drop it in
to our wet leaves. And we'll drop that in to where our leaves are attaching
to our branch. Now, remember that some of your oranges are still
going to be wet, so you're not going
to want to start with these leaves that are
touching your oranges. So maybe I'll turn my
paper and I'll start with some of these smaller
leaves here in the corner. So once again, I'm
going to start with a base layer of this green. I always like to start my leaves and touch my leaves first
at the center of my leaf where it's the biggest because that's where
all of that liquid from my paintbrush is going
to let go onto the paper. And so I always want to start in a section that is nice and big. I don't want to start touching my paper at the very
tip of my leaf. Alright, now that I have
this base layer of color, and I made sure that I
had enough liquid on my brush to really get
a really nice edge. Now, without washing my
brush, I didn't wash it. I'm just gonna grab some of that green directly from my paper. And I'll dot, dot, dot, and drop it in at the
base here of my leaf. Because your leaf is wet enough, you're gonna notice that
it'll naturally blend. If your base color leaf or if your leaf starts
to dry too quickly, when you drop in
that dark green, you'll notice that the dark
green and the light green, you're going to have
a hard edge there. You can soften that edge by
drying your brush and then just kind of going
back and forth with a dry brush across
that hard edge. No, for next time when
you paint another leaf, just make sure that
that leaf is really nice and wet before you
drop in that dark color. So, particularly when you're painting these larger leaves, you'll want to make
sure that you go back to the stem or
wherever you started. Make sure it's nice and wet before you grab that dark green. And I'll dot, dot, dot, and dot that dark
green at the base.
6. Baltimore Oriole Part 3: So once again, I drop in quite a bit of liquid
in the center of my leaf. And then I use that liquid, and I have a very light
touch on my brush, and I'm using that liquid to pull that liquid to the edge. If I have too much
liquid on my brush, I can tap my paper towel, and that'll give
me a little bit of a fineer of a point on my brush to paint some
of these smaller areas. Without washing my brush, I'll grab some of
that dark green. And I'll dot, dot, dot on the dark green
at the base of my leaf. Once again, if you don't have enough of a difference
between that light and dark, you can wash your brush, dry it, and use a dry brush
to lift a little of that lighter green from
the very end of your leaf. We are going to paint all
of our leaves this way, and we're also going to paint the little bases
of these buds here. Now, I know that it
can be tricky to get the right amount of liquid to do these really
fine little lines here. So start with these little buds. And then when you
pull the line here, down the stem, you're using
a very, very light touch. And I'm pulling that stem using whatever liquid
is left in my brush. I don't want to grab more
liquid just to paint a stem. Now, once you get a
little faster at this, you are more than welcome
to do two leaves at once, where you paint two
of your leaves with this lighter green,
the first step, the water down,
and then you take your dark green and you dot your dark green at
the ends of your leaves. So once you've practiced this
a few times and you feel confident in doing more
than one leaf at a time, just make sure that however many leaves you're
doing at once, that that base color, that watered down
green stays wet before you drop in
your darker green. That's That's That's That's That's that's do That's That's That's That's Alright, so we're
going to take a pause from painting our flowers, and we're going to
paint the first layer of the black of our feathers. The reason being is that
we are going to need this first layer to dry before
we can do a second layer. And so we'll need
our plate to start. If your green kind of has
gone all over the place, you can wipe off your green. We won't need that
green anymore. And you'll grab some more water on a new section of your plate. It'll be about the same amount, a similar amount as you had for the green because we are
going to need to cover a large amount of our feathers and head of our Baltimore oil. And now, this first layer
of our black feathers, we're actually going to start
with a water down gray. So we're going to mix, grab some pains gray, grab some pains gray from
your plate, from your paper. We're looking to have a medium
tone for our Panes gray, so we don't want
it to be really, really light and transparent, but we also don't want it to
be our blackest of black. So Panes gray is an
interesting color, where when you lighten
it with water, it's this really nice cool gray. And then if you use it
directly from our paper, you have almost a black it
can get really, really dark. We want to make sure that we're using a water
down color on our first layer
because if we make any mistakes and we go over any sections that are
supposed to be white, we can press down with
our paper towel right away and lift up any
mistakes we make. If we go in with a really, really opaque color
directly from our paper, then it's going to be
a lot more challenging to lift up because it
isn't mixed with water. So this is going to
help us kind of gain the confidence to go
a little bit darker.
7. Baltimore Oriole Part 4: So I'll start with
the head area because that's going to be the
easiest section to paint. And so I'm going to start
painting an even layer. We're not worried about any sort of any sort of feather details. At this point, we just
want one even layer. I'm not going to do
the beak quite yet. I know the beak is also gray, but I do want to mix in a
little more color in this gray. So I'm gonna try my best just to go around
the beak for now. If you noticed, just
like when we were painting the breast of our bird, I'm really grabbing
quite a lot of liquid. And when I grab enough liquid, I can kind of have
it puddle and pull, and then I push the pool around. When I do that, I'm
left with a really, really nice, even color. If I don't have enough
liquid on my paper, that's when you're going to start to see your brush strokes. Now, when I come down to where our color is meeting our gray, I can start to add a few little brush strokes going on top of this
color underneath. It might be a little bit hard to see some of this
color going on top. So I just want to
make sure that I don't have any white
shining through. So I might be able to add a few little pull a few
little details. So I'm pulling a little bit
of that gray into the orange. The same around the neck here, I can pull a little bit of
the gray into the orange. And then I'll continue
around the backside. Now, you notice
that I started in one section and then I'm
moving gradually downwards. I'm not jumping from the head to the back of the
feathers to the shoulder. The reason I'm
staying and pulling this puddle with me
is that this is what creates a really nice even wash is when I start in one section, and then I gradually pull
it all the way down. Now, I make sure
that every detail is is finished before I move on. So I make sure that all of
my gray comes all the way to the edges because once this
section starts to dry, we lose the ability to
work on that section. Here on this little
section on the shoulder where we've got some of
this dark bleeding in. We're going to paint a solid
line along the base of it. And now using whatever
liquid is left on my brush, if I don't have
that good of a tip, because I have too much liquid, I can take some of that off. I'm going to pull some of
that gray into that orange. I'm going to pull these
little feathers upward. I'm not going to
pull it all too far. I'm just going to pull a few in this kind of
upward direction. Just so I leave a little
bit of a jagged edge there, and that's going to help
it look like feathers. I'm going to do the same
thing on this lower side, being careful that this section here is going to be white. So once again, I'll
kind of paint that almost line of gray
along the base. And then while it's still wet, I'm going to pull
some of that gray up using If I have too
much liquid on my brush, I can dab my paintbrush. But I'm using whatever
liquid is already on the paper instead of grabbing
more paint on my brush. Alright. Now, this section here of the wing is
going to be a little bit more challenging because there's more sections of the paper
that we need to leave white. This strip of wing that
is kind of the left wing, where we can just see
this little sliver of the left wing
in the background. That's going to be all black. There is a little almost P shape of white that we'll
try to paint around. And then this whole
section here, like I had said, that's
gonna stay white. So what we'll do here is we'll add just like we did in
these upper sections, we'll add our kind
of a line of gray. And then from that line of
gray, we'll do the same thing. We'll pull our gray up. Now, this is a technique
called negative painting where instead of painting the orange going above the gray, and instead of painting the
white going above the gray, we have to pull our
colors underneath. And so it paints the
negative space underneath these white feathers and underneath the gray or
the orange feathers. Mm Alright, now as we move
downward on our bird, the largest section of black that you're gonna
have is there's going to be this kind of stripe of black in between these two sections
of little wing feathers. And so I am going to pull
my gray along that line. And now I will be doing that similar
pulling little strands. But now I have these little
guidelines for me to follow. And so I'm going to pull
this gray from the top down I'm using a really
light light light touch. And I'm pulling my brush
as I'm painting down, I'm pulling my brush up. And what that's doing is that's gonna create
a really nice, tiny line, and it'll have
a really fine point. But I'm also not gonna worry if I make any
sort of mistakes. If I accidentally cover
up some of those whites, I'm gonna try my best. But if I accidentally
cover any up, I am going to remember that
I do have a white j pen, and I have white
colored pencils, just in case I need to add some white highlights because
I actually covered them. With watercolors, we don't use white on top of our colors. Uh, because our white and watercolors isn't opaque enough. And so we need to try to keep the white
of the paper clean, or we need to use a
different product, like an acrylic or like a gel pen or colored pencil
on top of our watercolors. So as you can see, we've
left a little bit of these sections of feathers
here without paint. If it's gotten a little
bit too white for you, I might do, especially on
this top section of white. I just added two little lines of gray towards the
base of this white. And I'm going to look at
this white section as well because these are also
little sections of feathers. So I have whatever's gray, whatever gray is
already on my brush, and I might add a few lines, single lines that are mimicking the shape of the
curves of this here. Just to kind of show that
there's something going on. I'm not trying to paint
individual feathers here. I'm just trying to
give the essence that, Hey, there is something there. So on the tail feathers, we're gonna use the
same technique where we'll drop in our gray. And then as I come up
towards the body here, I'm going to pull that
gray up into the orange and leave some of these
lines going into my orange. And That's good for
my tail feathers. Now, I'm not going to blend
out any of these hard lines. So I know for some of you
who have painted before, you might get the urge to dry your brush and then
blend these hard edges. Try to refrain from doing that. Unlike where we have all these soft edges where
we did our wet-on-wet. When we paint wet-on-dry paper, our goal is to keep some of these hard edges
because that's where you get these details of our feathers
looking like feathers.
8. Baltimore Oriole Part 5: Alright, so I'm gonna
take this same gray, and I'm gonna paint a
layer of gray on the feet. On the feet here, there's a little foot
kind of peeking out here. On the feet and on the beak, on my reference photo
that I'm painting from, there's a little bit
of a purple accent, a little a little tiny purple to the feet and to the beak. And so I'm going to use just
a little bit of purple. I'm going to add just a
little purple now that the gray is already on my paper. I just want a little purple
just to add a little bit of that of that color to my gray. I'm gonna do the same
thing for the beak. But I think with the beak, I actually need this gray
a little bit lighter. So I'll take some of that gray, and I'll grab some water, and I'll pull some of that gray to kind of to the side there. And this is going to give me
a lot less pigment so that I can have a much lighter beak. That's even kind of too dark. So I add some pigment. I'm just going to
paint now using water. Because I really do
want this beak much lighter than the
rest of my bird. And now, from here, there is quite a little bit of purple. So I'm going to grab the tip of my brush with a little purple. And then I notice more purple along the tip of the nose here. I'm going to add that purple, but now I'm gonna wash
my brush and dry it off, dab it to dry it a little bit, and then I'll pick up some of that purple if it got to
be a little too purply. Alright, and then with
this lighter color, now, this gray is already dry. So I am touching it,
making sure it's dry. I'm going to use that
same water down gray, and I'm going to paint
this all of these circles here because I'm gonna add
a darker color on top. But I want this nice light gray. Now I'm adding just enough of that light gray that I can still see the lines underneath. If it gone too dark, I will lift up some of that gray because I want
to stain the paper, so it's not bright white, but I still need to be able to see these two
circles underneath. Right now with this gray, this paints gray that we
still have on our plate, I'm going to remix
it because some of my colors I notice
started to settle. This was the gray that I used for the back of my
Baltimore Oriole. And so I'm going to actually use this to paint my branch
in the background, and I'm going to add a
little bit more color to it. So I'm going to
see what this gray looks like with just a
little hint of orange. It's going to kind
of make more of a brown, a brownish orange. So I'm adding one or two
brushfls to this black. And I can always drop
in a little bit more. Now, from here, remember that our light source
is up to the right. And so my bottom side of my
branch is where I'm going to paint my first line of color. And it's going to be a
continual line of color. I don't need to bring
it all the way up. And now on this right side, I'm going to try to leave some of the paper
to shine through. And so I'm going to add
some lines that are continuing to they're in the same direction
as this branch. But I'm just gonna leave some of the white of the paper
to shine through, and that's going to leave me a really nice gradual
dark to light. Now, before this section dries, I can take a little
bit of purple, and maybe I can drop
in a little bit of purple on this bottom
side to darken it up. I can add a little bit of
that pains gray directly from the plate if I want to add a little bit
of darker on the bottom. And then adversely, I can
always add a little bit more of that lighter brown by
adding a little bit of orange along the top. So you can just kind of play
around with your colors. We still don't want to we still want to try to keep some of those whites open to the papers. I'm only dropping in a
little color here and there. If you don't like how
that color looks, you don't have to
paint it those colors. You can just paint
it one solid color. Mm. That's That's that's That's That's that's Black, we're going to add a few extra layers
to our orange. So we'll need to clean off a
section of our plate because we do want that
orange to be really nice and bright and vibrant. If your water is
really dark and dirty, you can get a new cup of water. However, it is a
little deceiving. A lot of times your waters
still clean enough to use. So we'll grab a new section
of water on our plate. We're wanting just over a
quarter's worth of water. And now to that water, we're going to start with some orange. Now, your orange hopefully
is nice and clean. However, if it's not clean, you might want to just
add some water on top. Take away some brush
fuls of water and clean your brush if that orange was dirtied up by
your green at all. And so I'm going to
take some clean orange, add it to my water. That was about three
brushfuls of orange. Clean my brush, and I'm going to do the same thing to the red. So I'm gonna find a section of my red that I can
kind of clean off. I don't want any purple
on top of that red, so I'm gonna clean my brush, re wet that section, make sure that I take all that purple off,
clean the brush. I really want to have
that nice clean red. And then I'll take
that clean red and I'll add it to my orange. I'm trying to make,
like, a dark orange. We'll check the opacity of this dark orange using a
new section on our paper. So this is looking great. I don't want my orange to be as dark as directly from my paper. That's gonna be a
little bit too opaque. When personally, when
I'm doing feathers or any sort of fur technique
on top of a layer of color, I do like to keep my second and third layers
nice and transparent. I can always drop in more
color while it's wet, but having too opaque
of a second layer might make that layer look like it's floating on top instead
of connected to. So it might make it look a
little bit too different. And we want all of these
layers to connect nicely. And so having transparent
layers really helps with that.
9. Baltimore Oriole Part 6: So when I take a look
at my reference photo, I do notice that the underside
of the belly here is where the darkest of
these patches are, as well as on the breast here. So I'm going to
start by adding a few of these wet-on-dry. We're painting on dry paper. And I'll start by adding
kind of a blob of color. It's kind of like
an oval of color. And from that oval of color is where I can if
there's too much, I can dab off some
of that liquid. But from that blob of color, just like I did
with the gray here, I can pull some strands coming down the same way that I
kind of pushed some up here. I do want these ones
on the belly here to be using the same
curve of the belly. I'm not going to have
any strands push upward. I want these to all
come the same way because our feathers are
laying flat underneath. I'm going to kind of stick towards this
underside of the belly, and I'm gonna try my best. Because I have this
transparent color, I don't really need to blend
this to my background. So you notice I'm
not drying my brush. I'm not blending
these out at all. I'm leaving these hard edges, and I know that can be
challenging and it can be tricky. But leaving these
hard edges is going to create that feathered look. If we dry our brush and we blend all these nice edges out, that's where it's going
to look too blended, and we won't be able to see
any of those nice details. Now that I have kind of
a line along the belly, I'm going to take a jump
here because there's a little bit of fluff kind
of on this underside. And there is a little bit of
a shadow here underneath. So I'm still doing brushstrokes that are following the
curve of the body. I also notice that there are some darker shadows
under the wing. And so, same thing. I'm gonna
follow kind of the shadow. Underneath this
wing, I'm going to add some of this darker orange. And then in this section
in between here, I can always do a few kind
of single lines just to kind of denote that there are
feather like There's, like, a feather area here. So I'm adding these single
lines to this area, but I'm also leaving
some sections here that don't have any details. Now, while this section
under the wing is still wet, I might go in and add a
little bit of red just immediately under
this section in the wing just because it
is a little bit darker. Looks like I got a
little too dark, so I'll grab a little bit, lift a little of that away. To Alright, and now there is this section kind of by the triangle that's coming
down from the chest. And this little section is also a bit darker on
our Baltimore Oriole. So I'm gonna add a little bit of darker color to this triangle. I'm gonna keep it kind of in
this same triangular shape, mimicking this triangle here. I might add a few little hairs to kind of mimic feathers
along this base. And then this edge, I think is the one edge that I might blend out a little bit. Now, this section here, I can also drop in
a little bit more of my red or a little bit more
of my orange just to kind of get this chest area a little bit deeper
of a red, orange. And then the last little area that I know there's a
little bit of shadow is on this bottom side
of the tail feathers. So I'm just gonna paint a single line of that orange on the bottom side
of this tail feather here. Alright, so if any of these edges are bothering you now that they're
starting to dry, instead of blending it out with your paper towel or
with your brush, you can always try to
blend a little bit. I don't want to completely
take away all of them, but maybe I'll just blend out
one or two here and there, if it got to be too intense. So just by blending out with a dry brush or my paper towel, I now have some edges
that are still hard, and then one edge
that's blended. I do kind of like how that
looks a little bit better, and maybe I can see about
blending out this edge. Some of your edges,
if they're too dry, they might not blend
out as easily. But like I said, few of
these little details, particularly where you see
more of the feathers pop out. So on this underside here, I love all of these
really hard edges. And so this is where
the restraint. You have to really
restrain yourself from blending,
blending, blending. Now that we have this
orange still on our plate, I don't want to get rid
of this orange quite yet. I can go back to my oranges, and I can add almost some, like, little dimples onto my oranges. So I'm just adding a
few little spot dimples in where the darkest of the shadows is I'm using kind of the
edge of my brush, not the full edge of my brush, but I'm using kind of a
little bit of the edge, not the point of my brush to
add some of these little, like, stipples to the orange. Alright, Al, while
we have some of this orange from our shadows, we're also going
to use that orange for our orange blossoms. So I'm going to paint the center of my
orange blossom here. I'll dry my I'll
wash my brush off. And then using that wet brush, I'm actually going
to pull I'll kind of wet some of these,
um the petals. And I'll just allow
some of that orange to get pulled into the flour. Now, I'm not completely covering with water,
the whole petal there. So it'll just kind
of slowly seep. I'll show you what that
looks like on this one. So I've got my orange
in the center. Just kind of dotting my
orange in the center here. I'll wash my brush. I'll kind of as I wash my brush, I'll just tap it
along the side here. And then I'm going to point my wet brush towards the
center of my petals, and I'll just come on
in and I'll gently touch that orange
with my wet brush. And what that'll do is
it'll just slightly pull some of that
orange into the petals. Now, the key here is we want
this to be slightly orange. If you're noticing your orange, your flowers are
turning to orange. You can take a
little paper towel, clean section of
your paper towel around the edge of your flowers, and you can just kind of
lift some of that up. But we do want some of
that orange to just nicely blend across the flower there. We'll just add a little hint of orange to these little blossoms. I'm just painting
a little hint of orange. It's barely anything. It's just one line
of orange across one edge of this blossom. And Oh. Already, these first
few are already dry. And so I can go back
with my orange. Maybe I'll grab a little
bit more orange directly from my plate or from my paper. So it's nice and concentrated, and then I can add a little bit darker of an orange
in the center there. I'm just kind of dotting
this darker orange. And
10. Baltimore Oriole Part 7: So the last step of painting my Baltimore Oriole is going
to be my black details. I always like to leave my black details until
the very end, just because I want to
kind of build up colour, using color instead
of using black. So I'm going to just wet my pains gray
directly on my paper. And I'm going to
grab that pains gray directly from my paper and keep my water handy and
my paper towel handy in case I need to lift
some of that color up. But the head and the back
here are really dark. So this is going to
be a little intense. I know it looks very, very dark. I want to remind everybody
that we can always add more water onto our
project as we're working. But then also once
this black dries, we can use a wet
brush to lift up some of this black to
create highlights. So instead of trying to leave highlights on this head here, I'm going to actually just paint one whole layer of black, and then I'm going to
come back after it's dry, and I'm going to lift
up some highlights. I might try to lift some
highlights well well, it's wet, but if it's not working for me, I know that I can always lift
highlights after it dries. So I'm going to start by
making sure that that layer of black is nice and dark
along the head here. I'm going to keep my brush
nice and wet so that I can really grab and paint this black up to the edge of the beak
wherever it needs to go. Now, from this here, there's a little almost
like nostril in the beak, so I'm going to add
that little detail. And then I'm going to
use my brush to just pull the slightest
little black line here. I'm pulling it from the
center of my beak out. If this is too hard for
you to paint that fine, fine, fine line like that, I would suggest maybe
not doing it with paint, and if you have a
black pen at home, maybe you try doing that
detail with a black pen. Now, as I come down
to my chest here, remember that I already made these little lines that are going to be covering
the orange here. I already made those
guidelines using my gray. And so I'm going to use those guidelines to
paint the black on top. The Baltimore Oriole body is
quite, quite, quite dark. I mean, it's the
males, at least. The body is really
nice and dark. So now I'm going to come
to the shoulder here. This little back section of
the wing is nice and dark. The top section is where we
also have some highlights. So I can try to lift some highlights once I'm done with this whole
black section. So once again, I'm going to try my best to come
in with my black. And slightly go over
those that gray. Now, here, if I leave some of those gray lines that
I painted first, if I leave some of those open, and leave those gray
and I don't cover those with black, that's okay. All that's gonna do
is it's gonna leave a little bit of dimensionality. So I might not pull my black
to cover all of those lines. No. If that happens, grab your paper towel, press down as hard as you can. I'm gonna have to
lift that up later, but I'm gonna I'm gonna
finish with my black, and then I'll show
you how I can kind of lift that spot later on. I'm gonna continue
around with my black. As we get to the end
of our wing here, I actually don't need to keep the end of this
wing all that dark. I'm going to add
some dark lines, but most of the end of this tail feather or
sorry, not tail feather. The end of the wing feather
is actually a lighter gray. So I'm adding a line
of black along. It's almost like this underside
here, under the wing. As kind of a shadow. And then I'm leaving the top of that really nice and gray. I'll do that same thing
here with the tail feather. So I have this nice, dark black along the bottom
of the tail feather. But then along the top of
the tail feather here, it is still this nice gray. So I'm gonna keep that gray on the top of the tail feather. And this black got a little bit. My reference photo, the black
isn't quite as thick there. But my brush wasn't able to control it quite
that well. That's okay. Right. Now I do notice some darker black lines
in between these whites, but, you know, that's I think I'm too hesitant to add
some of those black lines. So I'm not gonna add
those black lines there. This is where when we're painting watercolors
from a picture, we do have to, you know, take a step back and
realize that it's a picture and that we can
add details where we want, but we can also edit out some details and not add
all the details we see. So in the eye here, I'm painting the center
pupil of the eye black, and now I'm going
to add a little bit of that black to the feet. So there's not a ton
of black on the feet, but I'm going to add a
little line of black along the lower side
of the leg there. I'm gonna dry my brush. Just kind of blend out
this black a little bit. Bird feet are really
hard to paint. So I'm just adding
a few spots of black here and there
because it's dark, but they're kind of,
you know, dinosauri. And so I'm adding a
little bit of shadow, but I'm also not needing these feet to be
perfect by any means. There's a little
bit of a shadow at the bottom of the beak, so I'm using kind of this water down Gray, add a little shadow. I noticed I didn't really
add a shadow on that beak. Alright, and now is where we can we've painted this
whole layer of black. It's starting to dry. It's fairly dry. In fact, I'd say it's mostly dry. And so I'm going to
show you how to lift up some of that black
now that it's dry. So as it stands right now, this black is looking
kind of flat, mainly because it's one
solid color of black. Now, in my reference photo, it does look fairly flat, as well, because it is so black. But I can always lift where
I would see some highlight. And so I'll dry my brush. I'll dab it on my paper towel, just so it's not soaking wet. And just along this
back edge of the head, I'm going to wet this again. And do a combination
of wetting it and lifting up a little bit of that black just along that
back edge of the head. Now, this is what
it's looking like, but if this is not something that you like on your painting, you don't have to add
this little highlight. I can do the same thing
on the back wing. So I've got this
little highlight on the back of the head. I'm gonna jump to the
back of the wing. I'm still leaving just
like I did with oranges, I'm leaving that edge. But I'm just gonna pull
a little highlight in the back of that wing. I wet it. I might need to do this a
few times to be able to actually see some of
that black lifting up. But as you can see, it does
give you a little bit more of a three dimensionality
here for your birds. And then the same thing. I'm going to do the
same thing jumping along this bottom section, too. Now, when I come to
the front of the face, I might add just a
little highlight, lift up a little highlight of that black kind of
on the front of this head because I'm remembering that
my light source is coming from this top area. And just by lifting a
few of these highlights, it's kind of giving our birds
a little bit more shape. Now, the eye here is still a little that little kind of ring around the eye is
still a little bit too bright. So I had to wait until
it's totally dry, and I'm going to go back and mix a little bit of a gray
here with some water. And then I'm going to leave
that highlight of the eye, but I'm just going to darken
that ring a little bit. I don't want to completely
lose the ring in that eye, but I do want to make that
ring just a little bit darker. We'll go back to that little
section of gray that I accidentally touch that
section of orange there. Now, when I'm at my home studio, I often work with a squirt
bottle to clean off my plate, and it has clean water in it because my waters
a little dirty. Whenever you're trying
to clean a section, you'll want to use clean water. So I'm gonna grab
some clean water. And I might take a new
paper towel for this just because I want to make sure that I'm not using a stained
section of paper towel. So with my clean water, I waited until this stain
was completely dry, and I'll go back with my water, and I'll just rub
back and forth, kind of in a circular motion a little bit until
that gray lifts off. And I have my paper towel handy just in case I need
to lift again.
11. Indigo Bunting Part 1: Alright, so the
very first step for painting our indigo bunting
is we want to paint the blue section of our bird using a
wet-on-wet technique. Now, if you remember back
to your practice sheet, wet-on-wet means that we wet the area first
using clean water, and then we can drop in the colors that we
would like to use. So I'm gonna wet my paintbrush. I'm going to just activate the colors that I
know I want to use. So I'm just going to grab
some drops of water, and I'll add a drop or two
of water onto my thalo blue. A drop of water onto my green, and then also a drop
of water on my purple. All that's going to do is it'll just soften up
those colors as we paint the body using
just clean water. So I'll wash my brush. Remember that wherever
your water is going, your color will also go. So when we look at
our indigo bunting, we're going to want to paint
clean water along the head. We don't want to paint
the beak quite yet. We'll paint around the eye. There is a little
section of the eye that is almost like
almost like the eyelid. It's that second circle
around the edge. We're gonna try our best to keep our blue out of
that second circle. Then we'll keep grabbing
more more water. Along the wing, we're
going to push our water up until you see these kind of
the first scalloped edge. So along the edge here,
along our scallop. Now, this line that's kind of cutting the
wing from the body, we can go over that line. Because I'm printing
using waterproof ink, you don't have to worry
about the lines on your paper dissolving at all. Now, we'll come
down to the belly. We'll make sure to
add quite a bit of water onto the belly. Under the wing. As you're
painting with water, if you accidentally go over
the line at all, don't worry. That's why you have
your paper towel handy. Take your paper towel, press down as hard as you can, and then you can re add your water and paint
that straight line. When it comes down to the feet, we are going to paint kind of these little shorts that are going to go
Bunting is wearing. Then we'll come
along the back side, remembering that we're not painting that
section of the wing. Now for the tail feathers, we're only going to paint the small strip on the
top of the tail feathers. The bottom strip is
going to be a brown, an orangy brown, so we don't
want to add blue to that. We're only going to want to add wherever our blue color is. Now that we've painted
water over everything, the most important step is to go back to where you started and really make sure that
that whole section that you started with
is really nice and wet. We want an even wetness in the whole body of
our indigo bunting. I can always tilt my
head to the side. And when I tilt my
head to the side and I look onto my paper, I'm gonna notice that the same shine is all
over my indigo bunting. If I start to see an
area that's really matted, a matt color, not shiny glossy, like
here in the tail, that means it's starting
to dry already, so I need to rewet it. Alright, now that
my whole section that I want to paint
is nice and wet, now I can add my color. So I'm going to
start with my blue, my halo blue here, and I want to start
painting where the blue is the most intense. So the most intense blue is gonna be along
the belly here. You notice that the minute
that I put my brush down, that blue color is most intense right
where I set my brush. I'll bring that blue all
the way to the edge. If I just leave it to kind
of seep out on its own, it actually won't go all
the way to the edge. I do have to help it go
all the way to the edge. And then using that blue, I'm going to bring that
blue into the body because the inside of the body
doesn't actually need to be quite as bright of a blue. So I'm just using whatever
blues left on my brush. I can always add more
water to the center of the belly because
I don't really need it all that dark. I'll bring it down
towards the tail. Bring it down at the
very tip of the tail. Underneath this section here, I'm making sure to bring that color all the
way to the edge. And now I'm going to grab just a little bit more
blue for the head. Now, the head is also
really nice and dark. So I'm going to put some
extra blue on the head. Gonna go around the eye. Make sure that it goes all the way to
the edge of the head. Now, this step all
we need to drop these colors in while
the body is still wet, so you might notice that
I'm going a little quickly, and that's because I
want to make sure that I get all my colors
down before it dries. I'm gonna add some more
blue on top of this wing. I'm gonna try my
best to kind of keep the wing a little bit
lighter so I can always add a little bit water
on top of the wing here. Alright, and now that I
have blue everywhere, I can go back and I can
add a little bit of green. So I'm going to grab
some green here. Now, I want my
green to be mainly mixed to a teal along
the center of the body. So I'm taking just the tip of my brush and grabbing
a bit of that green. And then I'm going to
blend the green in with the blue to make this really
nice light teal color. I'm not blending the blue
along the edge here. I'm just blending it
along the center. And now, before it dries, now I'm gonna want
to look and see if I can bring in any purple
where it's the darkest. So I'll grab just a little
purple on the tip of my brush, and I might want to
add just a little bit of purple along the belly. And when that purple
blends with the blue, it's gonna give it this
really nice, rich blue color. I don't need to
overly blend here. Just adding a little
bit of purple, maybe a little bit
around the eye here. And now I can take a
dry brush and I can lift in any sections where that color got a
little too dark. Now, I do know that my
watercolors are gonna dry just slightly lighter than what they look
like when they're dark. So I don't have to
worry too much about taking away color from
the darkest of the areas. I just want to maybe lift up some color from the belly here, kind of this underside, and I noticed that the tail
is a little bit darker. I'll add a little bit of
that dark blue to the tail. And then I want to let it
sit and dry completely. Alright, so we're going to start by painting our raspberries. Now, we'll use a
similar technique where we'll wet the area first
and then drop in our color. But instead of wetting
the area with water, we're going to actually paint a first layer of red and
then drop in some purples. So I'll grab some
water on my plate, and then I'll come
over to my colors, and I'll grab some red from my paper and add it to my water. Alright. Now, this red is really
nice and bright of a red, and I don't want quite
this bright of a red, so I'm going to grab
just a little bit of that purple and add some
purple to that red. It's just going to calm the red down and make that just
a slightly deeper red. So when I check it on a
section of my practice sheet, it's looking really nice. Now that I have this base layer, I'm gonna paint the
base layer first, and then I can drop
in both red and purple wherever I would
like on those berries. So I'm going to turn
my paper so I don't accidentally set my hand
on my indigo bunting. And I'll start by
adding a drop of color to the center
of my raspberries, and I'll push that
water to the edge. Wow, this is still wet. Now I can drop in some red, or I can drop in a
little bit of purple. And so these two colors, the red and the purple are
gonna mix on my sheet. So the purple obviously is gonna be where you
have some shadows. So I might keep the
purple just on one edge of my raspberry and remember
that I can dry my brush, and I can lift up using a dry brush if that purple got a little
too dark anywhere. So we'll do this a second time. I'll grab my water down red, dot it in the
center of my berry, and then push to the edge. I want to make sure that the
paint goes all the way to the edge of my berries or otherwise I'll have a hard edge. So I want to take the time in the beginning to
really make sure that the color is going all
the way to the edge. Alright, now I can
drop in my colors. I can either drop in more red if I wanted a little
bit more vibrant, or I can take just
a little tiny bit of purple on the
end of my brush. That wasn't enough. A
little bit of purple. And then along one
edge of my berry, I can drop in a
little bit of purple. Remember that if your purple goes where you don't
want it to go, you can dry your brush
and use a dry brush to kind of help soak up where you don't want
that purple to go. Alright, we'll do the
rest of the berries the same way. Mm.
12. Indigo Bunting Part 2: Alright, so now we need to let the raspberries dry that first
layer of the raspberries. Remember, once
they start drying, even if you can
see little slivers of where you didn't push the paint all the way to the edge, wait for the whole thing to dry before you add
another layer. So while we wait, let's start
on painting the leaves. You'll need a new
section of your plate. If the red kind
of went all over, you can clean your plate off. We'll grab more water
in a new section. You'll need about
the same amount of water as you did
for your berries. So to that water, I'm going
to add some green first. So I'll roll my brush around in the green, add it to my water. I'm gonna need to do
that two or three times. And now, this green is a
little too bright for me. I do want to kind of make this green a little bit
more like a sap green, which has a little bit
more brown hues to it. So to my green, I'm actually going to add some of my orange. So I'll roll my brush around. I'll grab one brush full of orange and add it to my green. And already, you see that
I've got a little bit warmer of a green with
that orange there. So testing it on my paper, It's going to look
so here's our green directly from the dot. It looks a little bit
more like a sap green, which sap green does have more of our brown
yellow color to it. So we're going to start by painting a leaf
using this green, and then we'll use the
same wet-on-wet technique to drop in some of that hooker's green dark
directly from the paper. So it's going to
be nice and dark. And we'll drop that in where the leaf attaches to the stem. So here's my first
layer of green. I need to make sure that I
go all the way to the tip. And all the way to the edges. And now, while it's still wet, I don't need to wash my brush. I'm just going to grab some of that deep green
directly from my paper, and then I'll dot,
dot, dot where the green attaches to the stem. I can either.it or I can use some brush strokes
to push I like to push the pigment into the
stem and then maybe pull a little bit towards the center where you can see
the center stem come off. Now, you can always blend your two colors by
cleaning your brush, drying it, and then using a dry brush to just blend where these two
colors are mixing. You can also take a dry brush
and lighten up the end of your leaf if you want a little bit more of a difference
between light and dark. Alright, we'll move
on and we'll do the other leaves that same way, remembering that we can
twist and turn our paper so our wet paint
doesn't get in the way. So we'll paint this
first layer of our leaf using that
watered down green. And then while it's wet, we don't wash our brush, we just take some of
that hooker's green deep directly from our plate or from our paper, excuse me. And then we'll dot wherever that leaf connects to the stem. Then I always like to
wash my brush, dry it, and then I'll use that
dry brush like a sponge to lift up where I want a
little bit of a highlight. And then we'll do the
other leaves the same way. Alright, I can also
use this water down green to add a little
bit of color to my stem. If you can't get a
fine enough point for these little tiny
sections of the stem, I do suggest tapping
your paper towel. That's going to release
a little bit of the liquid that's
on your brush so that you can get into some
of these littler sections. Alright, so while we wait
for our colors to dry, I'm noticing that the body of my indigo bunting
still is a little wet. I know it looks I may
look like it's dry, but there's quite a big
bump on the body here, meaning that the paper
is still trying to dry. So while I let that
continue to dry, I'm going to work on
my little blossoms. So for my blossoms, I'll wet some gamboge. That's your yellow color. And I'm gonna paint
the yellow color. I'm gonna.it along the
center of my flower. I'll do that actually to
both of them right away. Then from the center, I'm going to wash my brush, and then I'll use a wet brush. I'll keep this amount
of wetness in my brush. I'll point it to the
center of my flour, and I'll paint some white on the petals until I
get just up close, and I'll grab just a little
bit of that yellow to drag into and blend
into these petals. So I'm going to rotate my paper. I'm kind of painting with the flat the long edge of my brush. So I'm just kind of going up and down and back and
forth like this. Now, the reason I'm doing
that is because then I don't have the water going
all the way to the edge. I don't need it to
go all the way to the edge because these
are white flowers. When I wet it, the yellow is really seeking soaking
way too far out. So I'm gonna use a dry brush, and I'm just gonna soak up
a little bit of those of that yellow on the
edge of the petals. I want a little bit
of yellow coming out, but I don't want
it to be too much. Now, before this
dries, I'm gonna do the same thing on
the bottom flour. Now, before these
two flowers dry, I can always drop in more
color in the very center. I can drop in more yellow. I can also drop in some orange, if I want to make that center look a little
bit darker of a yellow. And since I did lift
up some of the water, that orange and
yellow that I just placed down might
spread a little bit, but for the most part, it's
gonna stay where I put it. But I know that I can always
wash and dry my brush and lift if it spreads
a little bit more. If you want it a little
bit darker in the center, you can always add a little bit of red to the very center of your blossom just to keep it a little
darker in the center.
13. Indigo Bunting Part 3: Okay, so I'm noticing that
the body is mainly dry, but I do want to give it just a little bit
more time to dry. So I'll be looking at the wings, the feet, the beak, and the eye. And we want to start
with our gray. So I know we've got a lot of black and dark blues on our
wing and around our face. But before I get too
dark with watercolors, we always like to
start lighter with lighter layers and then build up the intensity of the
color through layers. So I am actually going to take away my green here so that I
have more room on my plate. I'll keep the red if I can, because I will do an extra
layer on the raspberries, and I'll grab some water in
that new section of my plate. To the water, I'll
add pains gray. I'll roll my brush around a little bit, add
it to the water. I'm looking to have a medium
to medium light opacity. So what that will look like
is I want it just darker, a bit darker than
staining the paper, why in this section here, this is about the opacity
that I'm wanting. If I take my pains gray
directly from my paper, it's going to be way too
dark for that first layer. And then if I have
too much water and too little of pains gray, I might need to use multiple layers to get
the opacity that I want. So I'm kind of going for
this medium to medium light. Now that I have that, now
I'm going to take a peek at where on my indigo bunting, I will need this gray. I'll start looking at the wing here because this is going to
be the most tricky section. I do need the point of my brush to be a little bit
tighter of a point, so I'll dab my brush on my paper towel so that I get
this really nice fine point. I'll start with at the very tip of my indigo bunting
at the very end here. This section of wing
that's actually laying underneath the
other wings on top, that's going to be gray. So I'll paint this whole
section here gray. Notice that I've
got these kind of white wings almost
sitting on top. Most of this I do want
to try to keep white. So I'll make a skip up to the top here where
the scallop was. And I'm going to paint a line of this gray
along the scallop. Now, this feather on the
top here can be gray. Then I'll turn to the scallop. From this line of gray
along the scallop here, I can pull some gray down where these lines that were indicated that are
indicating feathers are. I'll bring the gray around to where the wing
meets the body. And I'll do the same
thing. I'll just bring some of that gray down these lines that are already
printed on your paper. These feathers here
in the middle, I'll try my best to
keep them white. But if I accidentally
paint on top of it, you'll want to take
your paper towel and blot it up as
fast as you can. Now I can take a
peek at the beak, and the beak here is
also going to be a gray, so I'll paint this whole
section of the beak gray. Now, as you're painting on the body of your
indigo bunting, if at any point, when you touch the blue here, if you see that this gray is starting to push
the blue away, stop, dry that gray and then let your paper
dry a little bit more. That means that your
blue is not dry enough. Alright, so I have this first
layer of gray on my beak. Now I want to lift
a little highlight. So I'll clean my brush, dry it. And I'm going to actually
lift a highlight right where that center line is
on the beak there. So I'll use my dry brush. If I lifted too much, I can add a little bit more of that gray on
the top and bottom. It's going to be
a really, really subtle highlight in the
center of the beak here. Alright, if you notice that
your paper is dry enough, we are going to start
painting the eye. So using that same gray, there is a little bit of a highlight in the
Indigo bunting's eye. So that highlight is kind
of a moon shaped highlight. I will not paint. I can paint the section that's around the eye so that
second ring I can paint. But I'll try my best to
keep that highlight open. Alright, next, I'll
use this light gray, and I'll add a little bit
of shadow to the tail. So I'll grab a little
bit of that light gray. I'll add a dot to the tail. I'm gonna dry my brush, and then I'll use a dry brush to just blend this edge here. So the edge where that gray
meets the white paper, I'll just kind of soak
that up a little bit. I might dot a little
bit more at the base. By using a dry brush to
blend your color to white, we can then keep this section of the paper nice and light. Alright, now, using
the same gray, we'll take a peek at some shadows on the body
of our Indigo Bunting. Now, where we see some shadows naturally occurring on
birds is under the wing. So this line here that
denotes where the wing is, I'll paint a very
watery line here, starting from where
that wing starts, and I'll paint it all along
the blue underneath the wing, all the way basically
to the tip. Now that I have this line of
shadow, from that shadow, I can pull a few strands that is running at the same
direction as the body. I can pull a few strands out. This is just going to help blend that shadow into the body. I can make the shadow a
little bit darker by adding some pains gray directly
from my paper to my brush. And then while that
section is still wet, I'll add a little line of that darker pains gray
right up next to the wing. If it gets too dark, remember, you can dry your brush and lift wherever
it gets too dark. But as you can see, you're already starting to notice that that wing is looking
a little bit more three dimensional
coming off the page. Alright, we'll take a Pekis
to where else we can add some shadow using
this lighter gray. I'll add a little bit of shadow along the
top of the wing. You will notice that
there's some of these little lines here
on the top of the wing. I'm going to add some more
shadows on top of those lines, and I'll actually
add a few more. Kind of all the way to
the end of the wing. And then on the section
above the wing here, I'll add just more
some dots almost. So these are just a
little bit of some of the natural markings on your indigo bunting
along the wing. You've got these little lines here are going to represent the start of
your wing feathers. And then these dots
along the top here is going to also help to represent
some of these feathers. Lastly, we'll add a
little bit of shadow along the bottom of
our indigo bunting. So right here where this
leg is coming in front, I'll add a little shadow
to just behind that, and then I'll pull
that shadow along the bottom of my bird. When I look at this leg, this leg is actually behind. This is the leg
that's closest to us. So the leg that's behind, I'll add shadow to
that whole leg behind. Alright, now that we've added some shadows around our
indigo bunting's body, now we'll add the
second layer of color. And adding a second layer
of color around the eye, around the chest
is going to give us a little bit of details
that look like feathers. So I'll take away that gray that we were
using for our shadow, and I'll add new
water to my plate. Now to that water, I want to mix a teal. So I'll start with my blue. I'll add one brushfl of blue. This blue is pretty
concentrated, so you don't actually
need all too much of that blue to color your water. And then to that blue, I'll add a little bit of green. Now, you may think that
your second layer of color needs to be darker
than that first layer. But in reality,
with watercolors, our second layer is still
going to be watered down. The main difference
from our first layer to our second layer is that this second layer
will be wet-on-dry. So now I'm painting
on top of dry paper. And when I paint on
top of dry paper, just like when I
painted the shadows, you'll see hard edges. And those hard edges
is what's going to give us the
impression of feathers. The color itself doesn't
have to be much darker. So when I test out this
color on my practice sheet, it's about the same opacity as my Indigo Bunting
as the first layer. That's about what we want. We don't want it
darker than that, or we'll have too much of
a contrast between layers. In fact, if I start painting and I'm noticing
that it's too dark, I might add a little
bit of water.
14. Indigo Bunting Part 4: Alright, so we'll start by
adding a second layer around the head because the head is
actually quite a bit darker. So I'll add around the eye, I'll paint around the eye first. I'm keeping it
really nice and wet. And then from there, I'll paint all the way
up to the beak. Now that I'm on this
back side of the head, I can pull some
of my color down. And now I'm gonna pull this color but then lift it up as soon as I get
to this neck area. And when I pull up
my brush like this, following along the back first, I'm left with a little bit of brush strokes that can
kind of look like feathers. I'm not adding any more liquid. I'm just using whatever
liquids on the paper. I'll leave a little bit of this intersection here that it won't come down quite as far, and then I'll move on
to the front side, and I will pull some of that
down over this chest area. So this section is coming down a little bit
further than by the eye. I think I need to actually add. I'm gonna add a little
bit more green. I think I want this a
little bit more teal. Then blue. Yeah, that's looking
a lot better. Alright, and now I'll pull
this shadow along the belly. You'll notice that I am lifting my brush
up as I'm pulling, and that's going
to create a few of these little markings that are going to look like feathers. I'll add a little bit
darker to this face here. And then I'll use this teal
along the wing here to add. That's looking a
little too dark. So if I add a little
bit and it's too dark, I can tap my paper towel and then use my dry brush
to lift a little here. I'm going to add a little bit of that teal on top of these
shadows that I painted earlier. In fact, I think I want this whole wing here to
be a little bit darker. So I'll connect some
of those shadows here. Now, some of these edges
are looking a little dark, and so with my brush,
I'll clean my brush. I'll dab it on my paper
towel because I don't want a wet brush when
I'm blending out edges. And I might just
blend out an edge or two along the neck here. Along the backside, I might
keep this a hard edge. But some of these edges
I just might blend out a little bit so that they
don't look quite as dark. You can kind of play
around on yours with which edges you keep and
which you blend out. Now for adding a little bit
of detail along the body, this color that I was using on the head and chest is
actually quite dark. So I'll add some water
just along the edge here, and I'll grab just a
little bit of that teal. I'm just making a
lighter shadow color so that it's not so
dark on the inside. And from here, I'll add just a little section
on the chest. I added a little
bit of this teal, the water down teal. And then from that teal, I'm pulling some strokes down, and I'm pulling some strokes up. I might do that in one or
two other sections here, especially along the tail. So with that lighter teal, just along this tail area here. I'll make that tail
a little bit darker. And then I might add just a few little hash
marks in this open section. So I've got hardly any
paint on my brush. And I'm creating some
hash marks this way, and then some hash marks
the opposite direction. It's going to kind of give it a little feathery of a look. I'm gonna grab a scrap sheet of paper so that I can show
you what that looks like, what those hash marks look like. I'm going to grab a scrap sheet of paper so I can show you what those hash marks look like in case it's a little
too hard for you to see. So using that water down color, I'm going to tilt my paper. I'll start by adding a few
diagonal has strokes downward, and then they'll kind
of connect at a point, and then I'll add a few hash
marks on the other side. They don't have to connect, and some of these hashes
can go over each other, but notice how it kind
of looks like a feather. Now, you might not do one that's this large with a body
that's that small, maybe your hash
marks might look. Oops, I did it the
opposite direction. Maybe your hash marks might look you might have three or
four hash marks instead. We do want it now. I had done that in
the wrong direction because if you do it
in this direction, the opposite way, your feather is gonna look like it's facing, pointing up instead
of pointing down. So our diagonal have
to be the point of our feather has to be
towards the tail there. So you can practice this
as much as you need to just with three or four
hash marks on one side, three or four on the other,
and just make sure that you're using your
really water down teal. We don't want to add two dark hash marks on
top of our first layer. Because if we do if
they're too dark on top, it's just gonna stand
out way too much. This is actually all
I'm going to add. I'm going to add
just a little bit of those hash marks along
the bottom here. I've got my wing that's
a little darker, my head that's darker, and the body here that's darker. And that's all I'm
going to add because I don't want to
overcomplicate this. Alright, while we let
that second layer on the body of our bird dry, let's move back to
our raspberries, and we can add a second
layer to our raspberries. Now, I still have this red from the first layer.
I can re wet it. Or if you don't have this
red anymore, you can mix, take some more water
on your plate, add some more red. And then remember that we did add some purple to that red. Now, I actually want to add a little bit more purple than I did the first time because
this second layer, I want it to be more of a
shadow on one edge of my berry instead of over the
whole entire berry. So this is gonna look more
like a reddish purple. When I add it to a new section
on my plate on my paper, it looks more like this,
so it's not as red. And now, just like with the
body of our Indigo Bunting, where the second layer is wet-on-dry and you
have hard edges, we want the second layer
of our raspberries to also be wet-on-dry
with hard edges. So I'm only going to
be painting a few of these edges of the berry
along the darkest edge. Now remember, I added that
purple only along one edge, thinking that maybe there's a light source coming
from this side, and so it's highlighting
this side of my raspberry and the
shadows on the other side. So I'll load my brush up with as much liquid
as I can have on it. And I'll start by just adding a few almost, like, circle dots. I might circle around some of these just on one
side of my berry. So I'm keeping it
really minimal. So I'm just adding that second
layer on the right side, painting kind of a
line of this color. And then from that line that
I paint on the right side, I might take that paint
and try to kind of go around some of these
individual berries just until I get to
about the halfway point. I don't want to do
anything on this side. Now, with the same color, since some of these stems
that are connecting the berries to the plant are a little bit
more brown in color, you can always add
a second layer of this purple to your stems, and all that's going to
do is it'll just kind of change that color of the green into more
of a brownish color. I can also add that brown
purple and run like a little stem down the center or a center
vein down these leaves. Once again, if you don't
like how that looks, you don't have to add that stem. When I use the same color that I used in a different
section of my painting. And I use that same
color as a second layer, it helps to unify the
colors in my painting. So because I used
this purple already, this reddish purple
in my berries, when I add it to my leaves, it helps to connect my
leaves to my berries.
15. Indigo Bunting Part 5: We are now ready for
our black details. So instead of mixing
a black on my plate, I'll actually add
a drop of water to my Payne's gray,
maybe a drop or two. And I'll be picking
up this Payne's gray directly from my paper and
using it like a black. I am keeping my paper towel
handy just in case I need to soak up any of that
black using a dry brush. And I'll start with
my darkest areas. So the darkest areas on my Indigo bunting is definitely going to be
the pupil of the eye. So I'll try to once again, I'll try to keep that highlight
from getting paint on it. I like to turn my
paper upside down, and then it might help a little bit to get that color
in where it needs to be. Once again, I am dotting my
brush on my paper towel, so I've got a little
bit fineer of a point. If you do have a
smaller brush at home, you definitely can use the smaller brush
with the eye there. I'll grab a little
bit more pigment, and then I'm going to
start painting I'll grab more of that
watered down pigment. And I'll start
painting this section of around the beak and
eye that are black. So I'll start here on
right next to the beak. And I'll bring my black up to where that second
ring of the eye is, and I'll paint that
black around the eye. I'll paint it around
the bottom of the beak. And then from this section
at the bottom of the beak, I'll dry my brush, and I'll use whatever's
liquid is there, and I'll pull some strokes. Now I'll pull the
longest one kind of in between the neck here
immediately below the beak. And then I'll pull
a few strokes, kind of keeping it in
this triangular shape. I might add a single
stroke here under the eye. There's just a
single stroke here. And then while this is wet, I'll go back to where the
center of the beak is. And I'll pull a really fine line from the center of
the beak coming out. Now, if this is too
hard for you to do, it's just a
paintbrush, you might be able to do this
with a micron pen. So micron pens are black
pens that are waterproof. They are not
included in the kit, but I love having
these black pens. It's just a really fine tip pen that you can use to add details. You could also use if you
don't have one of those, you can use a fine
tipped sharpie. You can also use a fine
tipped colored pencil. I might add a little
bit of this black along the tip top
of the beak here, and then a little black
and this little nostril. That's all that I'm
going to add black to to the head and the beak. Now I can take a
peek at my wing. So on my wing, I'll grab
a little bit more black. The darkest section of black is just at the base
of this wing here. So I'll start by painting
this second layer of wing. It's not the wing
at the very base. It's kind of this
one in between. And from this line, I'll drag that black up I might try my
best to kind of go down some of these lines that
were printed on your paper. If that's hard for you
to do, don't worry. We'll just try our best to
bring a very light touch. And then I'll also take some
of that black and pull down. Along the bottom here, I am gonna have a little bit more of a shadow with my black. All along the bottom
of this wing. From the top of the wing
here where it's kind of in almost What would
be their armpit? All the way down the wing. I'm using a very light
touch on my brush. And then I'll come
back in and I'll add just a few little black
details in the center. There are some little ma, like backward Cs that
I can outline with the black if I can do
that with my black, I might also add a little
bit extra black here. And then along the
back of the wing, where we had these little lines, I might add just a
few extra black lines just along the
outward most edge. When I move on to the tail, I'll add a black line. I don't have enough water there. I'll add a black line
in between where this black and then where the lighter color
of the tail is. Very, very fine, fine line. I'm barely touching my paper. And then from here,
I can just add a little bit of
details to my legs. So I'm going to choose one
of the edges of my legs, so I might choose
this bottom edge, and I'll add a line down
the bottom of the leg. I'll add a little line of black at the bottom edge of all of the feet
and all of the toes. Feet are a little difficult
to paint with birds. Once I've added
this bottom layer, I'm gonna wet my brush, and then I'll use a damp brush to blend out some
of those edges, so I'll come to the
feet particularly. And I'll just blend
some of those edges, so I'm coming up
with that wet brush. And I'm just using
that wet brush to kind of turn that black into a little
bit of a gray on top. Now, where the Indigo
Bunting is sitting, you can really use
any color there. I think. I think I want to add just
a little bit of this purple color almost, but I really want it to be
very, very light in color. So I'll add quite a
lot of liquid here. I'm gonna use the
edge of my brush. So instead of, I might
practice this once on a little practice
sheet or I can flip my practice sheet over
practice on that. I'll use the flat
edge of my brush, and I'll kind of hold it
as close to my paper as I can so this whole edge
is hitting my paper. And then I'll just drag
it across my paper. You notice because the
texture of the paper, it's going to leave you a
little bit of a texture there. I don't want a
whole lot of color. I don't want this color
all the way to the base. So I'll just add a little
bit of color here. I'll dry this off. I'll just kind of
lift it a little bit. That's really all I want. I don't want a ton of color only because I
don't want to take away from all the pretty
things that we just painted. Can even lift up a
little bit of that with my paper towel if I don't
want it quite that dark. Alright, and then the last little thing that
I wanted to add to our indigo bunting is on the bottom of the
tail and the feet. So the bottom of
the tail and feet do have a little hint of orange. So I'll take some water and
a new section on my plate. If you need to clean off a
new section, clean it off. I just need a really little bit of water. I don't need a lot. Then I'll come and
I'll take some orange. And add it to my water. I don't need that much
orange in my water. What we're doing now
is called glazing. So I already painted
all the shadows, all the colors, everything
onto my painting. And glazing is a
very, very light, transparent layer that we add on top of sections
that we already painted. And that's going to just change the color of that section. But it still allows
all the shadows and everything that
was underneath it to still shine through. So I'll add just a little bit of that orange along the
bottom of the tail. The bottom of this wing
that's underneath. I also is just a little
hint of orange as well, and the feet have a
little hint of orange. So I'll paint this light
orange over the feet. Because it's watered
down enough, you can see all of the shadows that we
painted underneath. Everything is just kind of sticking through and
showing through. And then I'll take just a
little tiny bit of that yellow, and I'll add it just to
the end of my beak here. I'll dry my brush. I just want the end to be just a little hint
of that orange, maybe also in where
that little nostril is. It also has a little
bit of orange.
16. Indigo Bunting Part 6: Alright. Now, the very
last little details are you can always lift a little bit of a
shadow from the head. Now, we added quite a bit of
shadow around the head area, and it got a little dark here. So now that it's dry,
it's completely dry. I can clean my brush, and I can use a damp brush. To lift a little highlight
on the end of the head. So I'm going to leave the
edge completely dark, but I'll come just
in from the edge, and I'm going along the
same shape of my head. I'm re wetting it, and I'm using my paper towel to lift some of that color away. You may need to do
this a few times, so re wet the area
a few times and then dry your brush
and use a dry brush. But going over that
area just a few times, you can already see
that it's lifted. Some of that blue away, and that creates a little
bit of a highlight. Can also use a damp brush to help with any of your hard
edges that got too hard. So this edge here by the face, if that got a little bit too hard and I want to
blend that edge, I'll use a damp brush and just lightly go over that edge to
just soften it a little bit. Now, all of these little
corrections I can only do when my painting
is totally dry. If the head here is still wet, it actually will ruin your
painting because remember, it'll push the pigment
out of the way. All right. And that's
our Indigo Bunting. Lastly, I do want to
mention that if you weren't able to keep that
highlight of the eye clean, you can always use
a white gel pen or white gouache paint or white colored pencil to add
that highlight in the eye um, if you accidentally
painted over it. You can also use
these gel pens on top to add little
feather details. These are just kind
of nice gel pens to use to add extra details. I like to use a UIBal
Cigna in my studio. This isn't included in the kit, but it's just something
extra in case you do like kind of a more illustrative approach to your paintings. And that's it. Congratulations.
17. Cedar Waxwing Part 1: Alright, so the first step for
my Cedar Waxwing painting, we're going to start
with a wet-on-wet layer. So remember, from
your practice sheet, wet-on-wet is when
you wet the paper, the section that you
want to work on first, and then you drop the color in. So for this first layer
of my Cedar Waxwing, I'm going to wet the whole area wherever I want the
oranges or yellows to go. However, I'm also going to wet the area where the
white of the tail is and underneath the wing here where it's
also darker brown. The reason being is that
I don't want my color to stop where the paper is dry, and that's going to
create a hard edge. So I want to keep
that water going and just keep my color
out of that section. It'll make a little
bit more sense once we start to water the area. So you can start by
wetting your brush, and we're going to
wet only the areas, like I said, where we
want those colors. You'll notice that I am
keeping my paper pretty wet. I'm going to paint up to
the edge of the lines. I'm constantly
grabbing more water because this is a
cold press paper, this paper will stay wetter
for a little bit longer. It's also a professional
quality watercolor paper. So it is going to hold
that water and retain it, keep it wet for a lot longer than a student
grade paper would. I'm not going to be
all too meticulous in these little fluffy areas because I can always extend my paint a little bit further. I'm only going to extend my
water to this bottom area. I've got this whole
bottom here up to where the mask on my Cedar Waxwing is. And then the area that I'm going to paint this first
layer of color, I'm going to keep this
little section open. I noticed that that is white
in my reference photo, but I'm going to do
this layer of the wing. I can go on top of these
lines in the center here. But this little section of the top of the wing here,
I'm going to keep open. Now, when I tilt my paper
and under the light, I notice that the areas where it's wet is going to stay shiny. I'm going to re wet,
add more water. I just really want
to make sure that my color is going
to be able to run. And if it's dry at all, the colors going to stop there. So I really need to make
sure it's nice and wet. I'm also going to wet this
section of the head up here. Now, as we're doing
this first layer of color, if at any point, you notice that your paper is starting to dry too quickly, you'll want to re wet
that area because we do want this first layer
to stay really nice and wet. So I'm going to start
with my lightest color. So I'm going to grab this
gamboge, this yellow. That's going to be my
lightest color here. And it's most concentrated under on this underside
of the belly here. So that's where I'm going
to start with this color. Now I know to the right
of this is mostly white. So I'm not going to
move my color that way. I'm going to now extend this
color, this yellow upwards. And I'm just using whatever
color is left on my brush. In fact, I'm going to
wash off the rest of that color because
up towards the face, it's actually gonna
turn into orange. So I've got my most
concentrated color here at the bottom. It kind of stops
and becomes white. Now, I can dry my brush off and use a dry brush to just kind of blend
those colors out. And now before this dries, I'm going to add some orange. Now, you can either use
this cadmium orange or you can use the cadmium
deep bread and then mix that cadmium deep bread with your yellow
color underneath. So here I'm going to add a
little bit of that cadmium. If it's too red, you're not liking how red
that's looking, you can add a little bit
of that orange instead. Now, you might notice that I'm continuously adding a
little bit of water back to my section so that
it stays nice and wet. Okay, now, before I
finish with this, I noticed that this orange is a little bit too bright
in my cedar Waxwing, it's a little bit more
of a brownish color. So here, where these
colors are blending, I'm going to use a dry brush to just kind of blend
these colors out. So once again, right here where my colors are a little
bit too orangy, I'm going to
actually take just a little hint of that purple. I'm going to add just a
little bit of purple, maybe a little bit of red. And all this is doing is
it's using a little bit of color theory to just kind of tone down that
orange a little bit, make it a little bit
more of a rusty color. So just a little bit
more red on my brush. Now, this whole section
is still nice and wet. Maybe a little tiny
bit of purple. Like I said, if your section starts to dry a little
bit too quickly, you'll want to re
add some water. Alright. Now, I know I didn't do a huge section
of this wing here. I'm gonna come back
with some browns, but I'm gonna let
that all dry first. Alright, so to start
with my berries, I am going to mix some
colour on my plate. So I'm adding some water
onto my mixing plate. And I'm going to start by mixing kind of a
medium tone color. That's going to
be my base color, and then I'm going to drop in some darker tones
from that base color. Now, my June berries, my service berries are kind of a mix between
this red and purple. So I started with a
base of this red, and now I'm adding just
a little bit of purple, just to tone down that
red a little bit. And now I have this base color. If I practice use a
practice section, if I use a practice
section here, I notice that my color is not too dark, it's
not too light. It's kind of a medium tone. So I'm going to
start by painting that medium tone
color on a berry. And now, just like we did with our bird with the
Cedar Waxwing body, I'm painting one layer of color, and now that it's wet, now I can drop in more
color if I want to. So I can use this as the
opportunity to drop in a little purple on one edge or a little red on a
different edge. This is kind of your opportunity
to paint these service berries all slightly
different using these different combinations
of red and purple. And this is just going
to be the first layer of color so if I have two berries that
are touching each other, I can still paint them together, and then I'll take my second layer and use the second layer of color
to separate them out. But this first layer, we can do two of them
at once if we want. Like I said, I can drop in
some purples somewhere. Or I can grab a little bit
of red and drop in red. Like I said, these
service berries are just a combination of this
red and purple both together. If, as you start painting, you get one section that's
a little bit too dark, or if you get color somewhere that you don't
want that color to be, you can dry your brush and use that brush to just kind
of soak up that color. Your other option is you
can take your paper towel, a clean section on
your paper towel and press down on that
section as hard as you can. And it's gonna mainly
lift up that color. Now, a little additional tip as you're painting some of
these smaller berries. I do like to grab as much
liquid in my brush as I can, and I kind of add a puddle of
that liquid in the center, and then I push that
puddle to the edges. That's going to give
me a really nice edge. Instead of starting at the edge, I'm going to start
in the center and then push to the edge. I find that gives
me just a little bit more control with my brush. I can also turn my
paper if I need to. And then that way,
I can use my hand, keep my hand in
this really nice, comfortable position as I'm
painting these berries. So I'm not trying to turn my wrist in an awkward position where I don't want it to go.
18. Cedar Waxwing Part 2: I wa, now that we
have the berries done on the bottom frond, now I'm gonna do the berries
on the top. Same thing. I'm going to use that
base layer and then drop in either red or purple. Since this is my
first layer of color, I am going to try to keep it kind of in these
medium shades. So I'm going to remind
myself that I don't want to go as dark as I possibly can. I still want to make
sure that I can add a second layer on top of this first layer
that I'm painting. Okay, so now that we're
done with our berries, we're actually going to move
on to our leaves because I'm noticing that the body of my Cedar Waxwing is
still a little bit wet. It still needs to
dry a little bit. And the first layer of my
berries is still a little wet. So let's start working
on some of the leaves. Alright, so to paint our leaves, we are going to mix our
base colour on our plate, so grab some water on
your mixing plate. We're looking to have about
a quarter's worth of water. You can always mix
more if you run out. And then we'll grab some
of our hookers green dark. You might need a few brushfuls
to add to the water. When we test our color, we are looking for kind
of a medium opacity. So that was looking
just a little light, so I'm going to
grab a little bit more green from my plate. There, that's looking
a little bit better. So I think I'm all
ready to go now. So we're going to do a similar
technique for our leaves, as we did with our berries, we'll paint each leave
individually with green, and then we can drop in
some darker color at the tips or at the base
using our Pains gray. Now, we can also
drop in a highlight, so we can also drop
in some yellow, if that's something
that you choose. So we'll start with
our green color. I'm going to start
maybe with one of a leaf towards the edge. So I'm going to
paint the whole leaf first using that
watered down green. And remember that we want
to keep this color wet. We want to keep the
leaves wet before we drop in our our pines gray, so I'm going to do
one leaf at a time. And I'm going to I'm not
going to wash my brush. I'm just going to dip the tip of my brush into
that pains gray. And then you can either
drop the pains gray at the tip of your leaf or
at the base of the leaf. So I'm gonna see
what it would look like at the base of the leaf. So I'm brushing, lightly brushing that pains gray
along the base of the leaf, maybe also a little
bit of the stem. And then I can bring that
pains gray either up the center vein or I can bring that pain's gray up
on one of the edges. Now, you can also, if you want, you can play around with
adding some yellow at the tip. Remember, you have
to do this while your color is still while
your leaf is still wet. I'm going to wash my brush and grab a little
bit of that yellow, and then I can add just
a little hint of yellow at the end of my leaf. Now, after seeing it
on the paper here, I'm not too sure if I like that. I think I might just
stick with just the green instead of the yellow, but it's something that
you can play around with. You can also mix a
different base color of green if this green is a
little bit too bright for you. So we can always
add a little bit of red to our green just to dull down the
brightness a little bit. It'll make it a
little bit more of a brown color to your green. If you want your green
just a little bit darker, you can always add a
little pains gray to that base coat of green. Alright. So I have
that leaf painted, and now I'll grab just
a little bit of pains gray and I'll add a little bit of shadow
to the base there. You can play around with adding a little shadow to the tip, too. It's completely up to you.
This is kind of where you can play around with
some of your colors. Like I said, if you
had wanted to add just a little hint of
that red to your green, do you see how adding
a little bit of red just kind of dulls
down that color. It makes it almost more
of a brownish green. And so you can either
dull down your green, you can also add a
little bit of yellow to your green if you want
to brighten up your green. And we'll continue painting every leaf using
this wet-on-wet, where we apply the
base color first, and then we drop in our
shadows or highlights. Remember that if at
any point you have your gray or your shadow color that is spreading too much, you can dry your brush
and use your brush just like a sponge to soak up where you don't
want that color to go. And then you can always
replace that color with your green there. Mm hmm
19. Cedar Waxwing Part 3: Okay, so as we leave our
leaves to dry before we paint the stems and before
we add our second layer, let's take a peek back
at our Cedar Waxwing. We're going to paint
the second layer of color in the body of
our Cedar Waxwing, and then we'll move on to the gray tones in the wings
and in the little mask. So for my second layer,
I'm going to use my plate. I am going to paint wet-on-dry. So remember our first layer, we wetted the whole body, and then we added our color. And so now we have these really nice blended edges of color. Our second layer is going to be wet-on-dry where we
have a wet brush. We paint on dry paper so that we can get some
of these harder edges. Um, this layer is where
we're going to add a few brush strokes to
mimic some of the feathers. So let's get our color ready. You might need to clean off
a section of your plate. We're gonna be mixing an orange color that we
can use for the body, and then we'll go back
in and we'll add a little extra yellow
if we need to. So I'll add some
water to my plate. And now I'm going to
come over and I'm going to grab my
cadmium orange hue. We do want an orange color, but we do also want a little
bit of a rusty orange color. So this is a little too
bright of an orange. I added about three brushfls
of orange to my water. I'm going to add a little
bit of red to my color. So I'm trying to make kind
of this darker orange. So let's check out that color. I think I'm going to add
just a little bit more red to make a little
darker orange of a color. I think
that's good for now. I can always add
an extra layer of color on top if I need
to make it darker. So it is still transparent. We don't have as
dark of a color. If I take the color straight
from that paint dot, it's gonna be a lot darker. And so that's why we're
adding our water. Alright, so we're going to
start with a little bit of some feather
strokes at the neck. So I'm going to
fill my brush up. And remember, wherever
I touch my brush first, that's where the most liquid from my brush
is going to sit. So I'm going to touch my brush in this center of the neck here, and I'm going to add kind
of this blab of paint. Now, from this blab of paint, I can pull a few brush strokes. So I have a very light touch. I'm gonna pull some
brush strokes down. And it's going to kind of
mimic the curve of the body, and I'll kind of pull a little bit over to the edge as well. And now that I have some of
these brush pulled down, now I can also push a
few brush strokes up. I'm gonna grab a little
bit more pigment, go to connect some of
that darker patch. So we've got a little darker
of a patch here in the head. And a slightly smaller
patch here, as well. Now, from this patch, I know that this
little patch here, particularly kind of
the patch closest to the center of the neck here is going to be a
little bit darker in color. So I might add just a little bit of red while it's still wet. And I'm going to
try to just keep that red kind of in the
patch here in the center. That looks great. Now I'm going to do something similar along the top
here of the head. Just go to add a few
extra brush strokes. I'm so going to leave the
color that's underneath here. So the lighter tone towards the tip here and the lighter
tone towards the top. I'm just going to add a few
strokes here in the center. And I'm going to look
at the belly here. I'm going to do the
same thing that I did before where
I'm going to add a few brush strokes following mimicking the
curve of the body here. And now, down where I'm grabbing where I'm
getting into this yellow, I do want to make this a
little bit lighter in color, so I'm just going to add water. And adding just some
water to the edge to this lowest edge is gonna make sure that it blends
out pretty nicely. I'm just going to add
a few brush strokes coming down. I'll come back up. Add a few brush
strokes coming up. I think that looks pretty good. I'm pretty happy with
how that looks here. Now, if you're at home and you're noticing
that you don't have that nice graduation of color that's a little
darker to a little lighter, maybe you have some hard edges. You can dry your brush, lift up where it's too dark, or you can take
your paper towel, and you can blot where
it's a little too dark, particularly around the edges. And what that's going to do is it's going to pick up
some of the pigment along the edges so that the edges are a little
lighter in color. Alright, now, the
last thing that we can do is we're gonna be adding a whole no section of
color to our wing here. We are going to add a little
bit of black on top of this. So for our section of wing, we're just going to
paint a full layer of color of this orange on top. Where the wing is connecting
to the back here, you noticed I had most of my color concentrated along
the base of the wing. And then as my brush
was losing the color, I just dragged my brush upward so that I have
less color on my brush, and I have this nice graduation of color from dark to light. I'm going to do the same thing. I'm going to try to keep
these little lines here. I'm going to try to
keep those white. And now, as I come
to the tip here, I'm going to I'm going to um dab my brush on my paper towel to get all
the rest of that liquid off. And now maybe I'll
wash my brush. It seems like that's
not working too well. I'll use then that slightly
damp brush to kind of get my color gradiating from that darker color
to this lighter color. We are, like I said, going
to put some gray on top. So if you don't get this
really nice graduation of color, that's okay. As I'm looking at
my reference photo, it seems like
there's a little bit more orange at the top of this. So I'm going to add a
little bit more orange. We can add a few more
brush strokes to mimic some feathers on the yellow
section of the body. I'm done with my orange, so I can get a new
section of water. I don't need a lot of water. I just need a little bit to mimic the feathers
on this underbelly. And I'm gonna grab some
of my yellow color. If this yellow is a
little too bright, I can come over and
grab a little bit of that orange just a
hint of that orange, just to dull down that orange dull down that yellow
just a little bit. And now I'm going to do the
same thing that I did up top, where I'm going to put my brush where I want the
majority of the liquid. So I'm going to put my brush kind of in this
darkest section of yellow. And then the same
thing, I'm gonna pull some brush strokes following the strands of the
body and pull some down, and then I'm going
to pull some up. I can always take
the liquid out of my brush to kind of help. I do want to leave some of
these edges to be hard edges, so I can see some little hints of what you might
see as feathers. Just like up here now
that it's drying, these paint these brush strokes here are the ones that are
going to mimic your feathers. So we do want to have some
of these hard edges here. And then I noticed that there is a little section of yellow on the tail that I had forgotten to paint along with the body, and it is a pretty bright
yellow on the tail there. So we'll paint this
little tip here, yellow. Alright, the last little thing
that I'm going to paint, I noticed I forgot to
paint to the tongue there. So I'm just gonna grab
a little bit of my red. I'll add just a little
bit of that red, maybe a little bit of the orange to kind of dull down
that red color. H.
20. Cedar Waxwing Part 4: As we let our second
layer of wet-on-dry dry. Let's work on some
of these branches, since the branches aren't
touching the main body. I'm going to use some of that
orange that I had mixed, and I'll add to that orange. I'll grab a little
bit more orange. And I'll grab a
little bit of yellow. And now yellow and purple
mix to make a brown. So I'm going to
grab some purple, mix that with my orange
and yellow here. And that's gonna give
me this brown color. Now, I do want a medium tone to my brown because then
I'm gonna drop in a little bit more purple where I want a darker section
of my sticks. So this is kind of a
medium tone of this brown. I can always add
a little bit more red if I want my
brown a little bit. Brighter of a brown. You can just kind of play around with the tone of
brown that you have. If you want it a little darker, you can always add a
little paints gray. And now I'm going to start by painting a section of my branch. I can leave some of the
paper shining through. So you notice that I left a little bit of this
paper shining through. That would be for the
highlight of the branch. And then I'm going to grab a
little bit of this purple. And while it is still wet, I'm going to drop in a
little bit of purple just along certain
sections of this branch. I can dry my brush, lift up where I want to lift up. But we were wanting to just
add a little bit of texture. And so by dropping in
some of that purple at different sections
of my branch here, it's going to help almost look like little
knots in the branch. I forgot to leave a little
bit of paper shine through. Before it dries,
I'm gonna drop in a little bit of that purple. I noticed that this
section is drying, so I'm going to add a
little bit more brown. And now I can blend it with either a wet brush
or a dry brush. If you blend with
your dry brush, you're going to take
you're gonna soak up some of those colors. If you blend with a wet brush, you're going to mix
them a little bit more. So here I'm lifting a little
bit of that branch up. Now, this brown is a
little bit too orangy for me for doing the
tiny sticks here, so I'm gonna add a
little bit more purple. I do want the brown to be a
little bit darker of a brown. And maybe I'll add a
little bit of gray too. Make it a little bit darker. Now, my brush is a size, too, so it's not quite super small enough for these
little tiny twigs. And so, a good hack is to
take your paint brush. I load it up with pigment. And I'm gonna before I paint, I'm gonna tap it
on my paper towel, just to release a little bit of that liquid so that I have
a bit of a finer point. And now I can grab I can now
that I have a finer point, now I can paint these
little branches connecting the berries with my leaves. All right. And while I have this brown, I can always do a
second layer on top of the stick if I want
to add even more texture. I'm sticking to one
side of this branch, and I'm just adding
here and there, a little bit of texture. So I'm just dragging
my brush and I'm kind of lifting it up and
down and pressing it down. And this is wet-on-dry. So I'm leaving all this
nice texture behind. Alright. Now that we've given a little time for
our bird to dry, now we can go in and start with some of our darker colors. So once again, I'm gonna need
a new section on my plate. If your plate has
too much on it, you can just take
your paper towel, dry off a little section. If you still have
some of that brown, I would leave some of
that brown on your plate because you might be able
to drop it in on the wing. So you'll need same thing about a quarter's
worth of water. And this time, we are
going to mix some of our paints gray with that water. So our first layer of color. Here I've got my
browns mixing here. Alright, so our first layer
of color on the face and on the wings is going to
be our medium gray. We can always do
another layer of black or the darkest of
Paine's gray on top. But remember, with watercolors, we do our lightest colors, and then we build gradually
darker and darker. So we'll start with
this light gray. We'll start with the beak. So I'm going to paint the whole section
of this beak here. I am going to bring
it up to the eye. But I do want to be
careful that there's a few little circles
here in the eye. Those I'm going to try to
keep white, if possible. And then there is a little
band of white along the bottom here of this mask that I'm also going to try to keep white. I'll follow this little
mask on the face. And I'm going to just pull up. I got a little too
dark here on the top. So I'm gonna lift it up. Now on the bottom section
of the beak here, this lower section of the
beak, we're going to paint. There's going to be
this little triangle of color here that we're going to keep away
from our color. We're gonna keep this white. Now, you've already noticed that as this gray starts to dry, it is drying a little bit lighter than what it
looks like when it's wet. We'll also do a single
layer of gray on the feet. Now, you'll know that
your gray is too dark if you can no longer see the lines
that are underneath. So which is why we made sure to mix our gray
with water first. And you notice how I can see these printed lines underneath. That means that my gray
here is not too dark.
21. Cedar Waxwing Part 5: Alright, now, as we
look at the wings, this is where it gets
a little bit more complicated for our wings. And so, before we start, I do want to show
you which sections we're going to try
to keep white. So we have a few of these lines along the bottom of the wing. We're going to try
to keep those white. We're also going to keep
this little triangle here, and then it extends
down the wing, we're going to keep
that white if we can. But these little feathers here along the
center of the wing, we can paint with gray. As I am coming closer to these sections
that I want to keep open, I'm going to use
my brush and just gently pull as I
lift my brush up. And so I'm going to
cover a little bit of that wing with this gray. But because I'm
lifting my brush up, this whole section is
going to stay white. Then there is a section of the wing here
that we will paint using a gray I kind of
went over the line there. That's okay. As you notice, I'm trying to keep there's this
little sliver of paper here that I'm going
to try to keep white. And now we'll take a peek
at the tail feathers. This whole section of tail feathers is gonna
have one coat of gray. As we come down to the
tip of the tail feathers, we don't want the gray to
cover up the yellow at all. And now we also want
just a little bit of we want some of this
gray on the wing itself. The darkest gray is going to be towards
the base of this wing. So we're going to add the majority of the color
to the base of this wing. Up until we hit these
white feathers. Now we're going to
wash our brush, tap it on your paper towel. The point of my brush is
pointing towards the gray, and now I'm going
to blend this out. So the tip of my brush is
hitting up against the gray. Gonna grab a little
bit more water. And because I'm wetting that
line there of the water, it's going to blend it out. Now, I do want this
gray to continue. Down the wing here. I grab a little water,
do the same thing. I grab have this gray
kind of come up. I'll wash my brush. And now from here we're gonna try our best to use a damp brush and just
blend out the wing there. We can always if it's
starting to dry, we're gonna re wet
that whole area. Just kind of blend it out. Blending with watercolors like this can be very challenging. So be a little kind to yourself. Now that it's all wet, I'm gonna take
some of that pains gray directly from the sheet, and I'm gonna drop in
that darkest pains gray along the bottom
of the wing here. Now we can always add another layer of color
afterwards if we'd like. But for now, I really like this gradiation
that I have right here, so I'm going to
let it dry because if I continue to work at it, and if I reintroduce
water to this section, it might start to create a bloom where the water's gonna push that pigment
out of the way. Now, with the rest of this gray that I have
here on the plate, I'm going to add a
little bit more water so that it's a little
bit more transparent. And with this transparent gray, that it's a little
bit lighter in color. I'm going to add
just a little bit of shadows to the
underside of this wing. So here, right
where this wing is, there would be a
little bit of shadow because that wing
is sitting on top. So I'm going to add a
little bit of shadow here. And then with my
brush is still wet, I'm going to dry my brush off. And then I'm just going
to pull a little bit of that shadow down a little
section of the tail here. I might wash my brush. I'm gonna make this. Add a little water there to make it a little bit
lighter in color. So since it was a little
too dark right there, I added a little water so
that it was a little lighter. I'm also going to
add a little bit of shadow to the end there. I noticed that's too dark, so I'm gonna wash my brush. And then I'm tapping
it on my paper towel because I'm working on a
really little section here, so I don't need that much water. Okay. All right. Then lastly,
I'm just going to add a little shadow here
to the underbelly. Now, this section
here is still wet, so I'm going to grab
just a little bit of that darker pigment. Add a little line of
that darker gray. Underneath, I can always
dry my brush and soak some of that up if yours
dries too quickly, and you can't paint this
line of darker gray. You can do that when that
lighter section is already dry. We're just kind of
adding a little darker of a shadow right
there under the wing. You notice how
that little shadow really makes the wing pop out. The last little area that I do want to add a
little shadow, too, before I make my second layer of my little mask here
is I'm going to add a little shadow under that white section
of the mask right underneath I, kind
of a line under. Okay, now I'm ready for my darkest darks in the mask
and the tip of the wings. So the darkest darks, we're gonna use this gray
directly from my paper. I'm gonna keep my paper towel handy just in case
it gets too dark. The darkest section on the beak, I'm gonna do one solid line in the bottom side of the beak. And then also kind of on the
center of the mouth here. That's where that darkest
line is going to be in the center on both the top of the beak and the lower beak. And now this triangle
area on the inside of the face right along the
eye is going to be dark gray. It looks like black. So I'm going to use that gray
directly from the paper. And I'll follow the
guidelines on my paper. I'm going to go around the eye And then I'm going to go along the base of this mask
here on the face. Now, I also have a little bit
darker along the neck here. So with whatever's left
over on my paint brush, I'm gonna just add a little
bit of a dark section here. All right. And now the
last little section that I can paint is
the center of the eye. Now, remember that we have those three little
white dots that we tried to keep away
from our gray. So I'm going to add a darker
black on the inside here, and I'm just gonna try my best to not cover those
three dots with paint. If you accidentally cover
those three dots with paint, it's not the end of the world. I actually feel
like this dot here, I can cover with a
little bit of paint. I feel like that's too much of a highlight in that eye there. So I did cover a little more of that highlight to the left, so I kind of am keeping just one of those little
highlights there. If you accidentally cover
the whole eye there, there's always options
to add a little bit of pen or colored pencil, white pen or white colored
pencil when you're done. In my home studio, I like to use these UIBal Cigno pens
for highlights of the eyes if I have a hard
time keeping that white of the eye, the
white of the paper.
22. Cedar Waxwing Part 6: Alright, let's move on then to the darkest blacks in the wings. So the darkest black
in the wing here, I'm going to start
with my darkest black at this corner here. And then I'm going to
grab a little bit of water in the middle section. Pull a little of
that water down. So pretty much
this whole section here is gonna be nice and dark, especially at the
tip and at the base. And now, before I'm done, I want to give a
little shape to that. So I'm gonna dry my brush off. And here, just in the center, I'm just going to lift
up a little bit of that black from the
center of that wing here. So I want the tip
here to be dark, and I want this tip to be dark. But lifting a little bit of a highlight from
the center there is just going to help with
the three dimensionality. Alright. Now when I
look at my wing here, if you needed to
add a little bit of extra black to any
sections of your wing, if it got a little
muddled in color, you can always add a
little bit of extra black. Wet my brush, grab a
little bit more color. And then here these
little almost C shaped, backward C shapes I can add some black to these
backward C shapes. Now, if you can
leave a little bit of dar that lighter
gray shining through, so I am painting kind of a C shape with my
brush and leaving a little bit of that gray in between is gonna make it look a little bit
more like feathers. So all I'm doing here
on the edges is I'm using kind of a wet brush to keep these edges
really nice and clean. You may notice because
the paper is textured. If you don't have enough
water on your brush, you don't get very good edges because the texture of
the paper shines through. Now, with the same dark gray, I'm going to pull
just a few strands from the tip here up. This is a little bit
more challenging. If you don't, if you're not able to get very
small lines, that's okay. And then the tail feather we'll add a darker line of tail
feather along the base here. And then along the top. So we're gonna leave
just a little hint of that lighter
gray in the center. I don't like how that
ended up looking, so I'm going to
take a wet brush. And I'm just going to blend the edges now that
it's a little dry. The nice thing about this gray is that you can
take a wet brush. If you have an edge that's a
little too hard of an edge, you can always wet
it and then blend that edge using a wet
brush once it's dry. Alright, and now we'll take a little bit more
of that pains gray. We'll look at the feet. The
feet are kind of challenging. So I'm just kind of
adding a little bit of shadow to the center
of the foot here, and then a little
shadow along the top of the foot and along
one side of the leg. And then I'm gonna
use a wet brush, a damp brush, just kind of
blend out some of those edges. This foot bird feet are
kind of gnarly looking, and so we're not painting the actual toes
or the actual feet there. We're just kind of painting
where we see shadows. Now, the last thing that
I'm going to do is I might add just a little bit
more brown to my wing. And I have this
brown from my tree. Now, if you are liking
how your wing is looking, you definitely do not need to add this extra layer of brown. But I'm using the edge
that long edge of my brush to add just a
little bit of brown, almost like a puddle of
brown to that wing there. And now I'm gonna
use my paper towel. Don't you just kind
of pull some up on the edge use I'm gonna dab just a little
bit on the edge there. So that this upper edge
stays a little clean. If your brown isn't red enough, you can always add a little
bit of your red color. And now, if any of
your sections, say, for example, if this here where
your wing meets the body, if that's looking a little
bit too hard of an edge, you can take your wet brush, dab it on your paper towel. And then just go on with
some circular motions there. And all you're doing
is you're softening the edge just a little bit by re wetting that color there. And so when you
take a peek at it, what happens is that that edge
isn't as hard of an edge. It kind of just softens
things up just a little bit, almost makes it look like it's coming out of the
connecting to the body, just a little bit nicer.
23. Cedar Waxwing Part 7: Once again to all
of these berries, I am leaving some of that
under layer to shine through. So some of these,
I'm only adding that little C shape two, and others, I'm leaving
a little highlight. And then for this
berry in the center, maybe I just add a few darker dots of color
in that very center. Move on. Some of these berries that are
in the background, I can paint the whole thing and just leave a
little highlight. And for others, I might
just do a little C shape. And now I'll turn
this upside down. I'll do the same exact thing
to the berries up top. Now, if you had
wanted to connect the berries with the
leaves a little bit more, you can always use
this same color that you mix for the berries, and you can always add
a little vein down the center or down the
sides using this purple. So all that's going to do is
it's just going to tie in that purple color to
your leaves as well. This is obviously just an optional step. You can even add some of
that color to your stems. I'm keeping my brush
very light here. So I'm barely pushing
my brush on the paper. And you are done painting your Cedar Waxwing
and service berries.
24. Follow me on Socials!: For watching. If you
enjoyed this ertorial, please follow me
on social media. Check out my website, and make sure to subscribe
to my YouTube channel.
 Emily Marie Watercolors, Watercolor Artist and Dog Lover