Transcripts
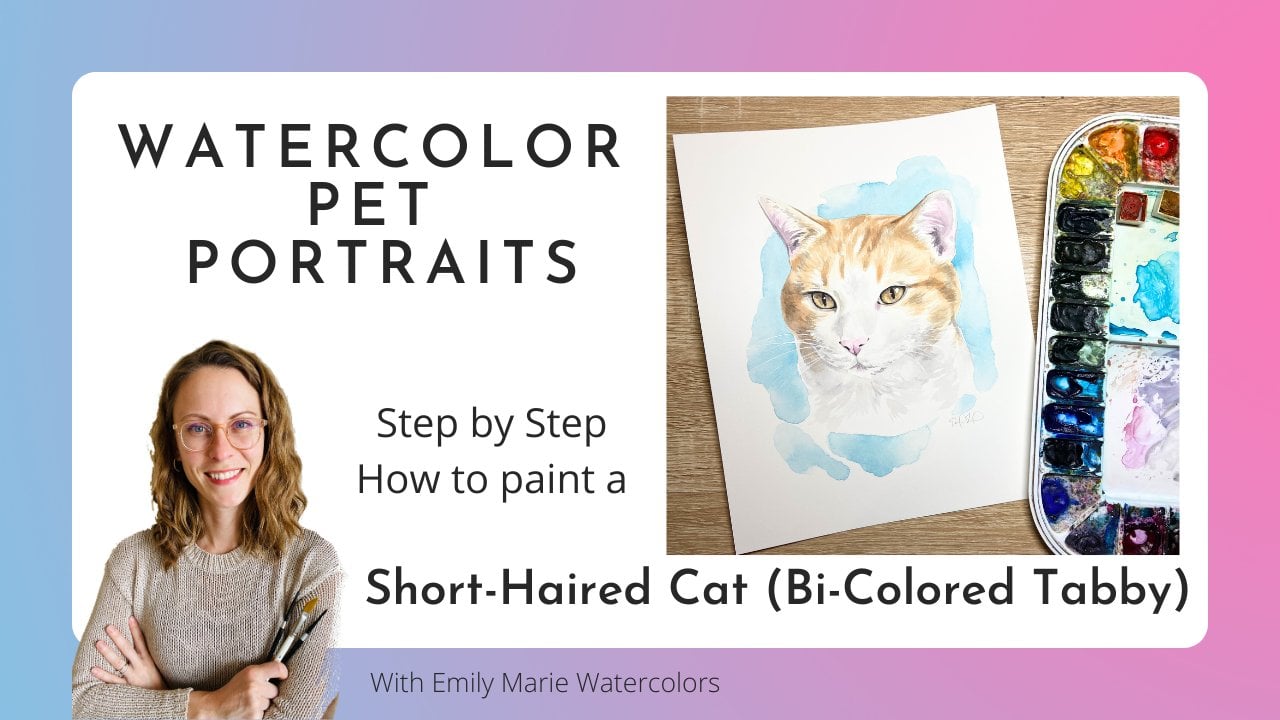
1. Intro Pet Portrait Tutorials: Hello, and welcome.
My name is Emily, and I am the artist behind
Emily Marie Watercolors. Welcome to my home studio
here in Madison, Wisconsin. In this tutorial, you'll
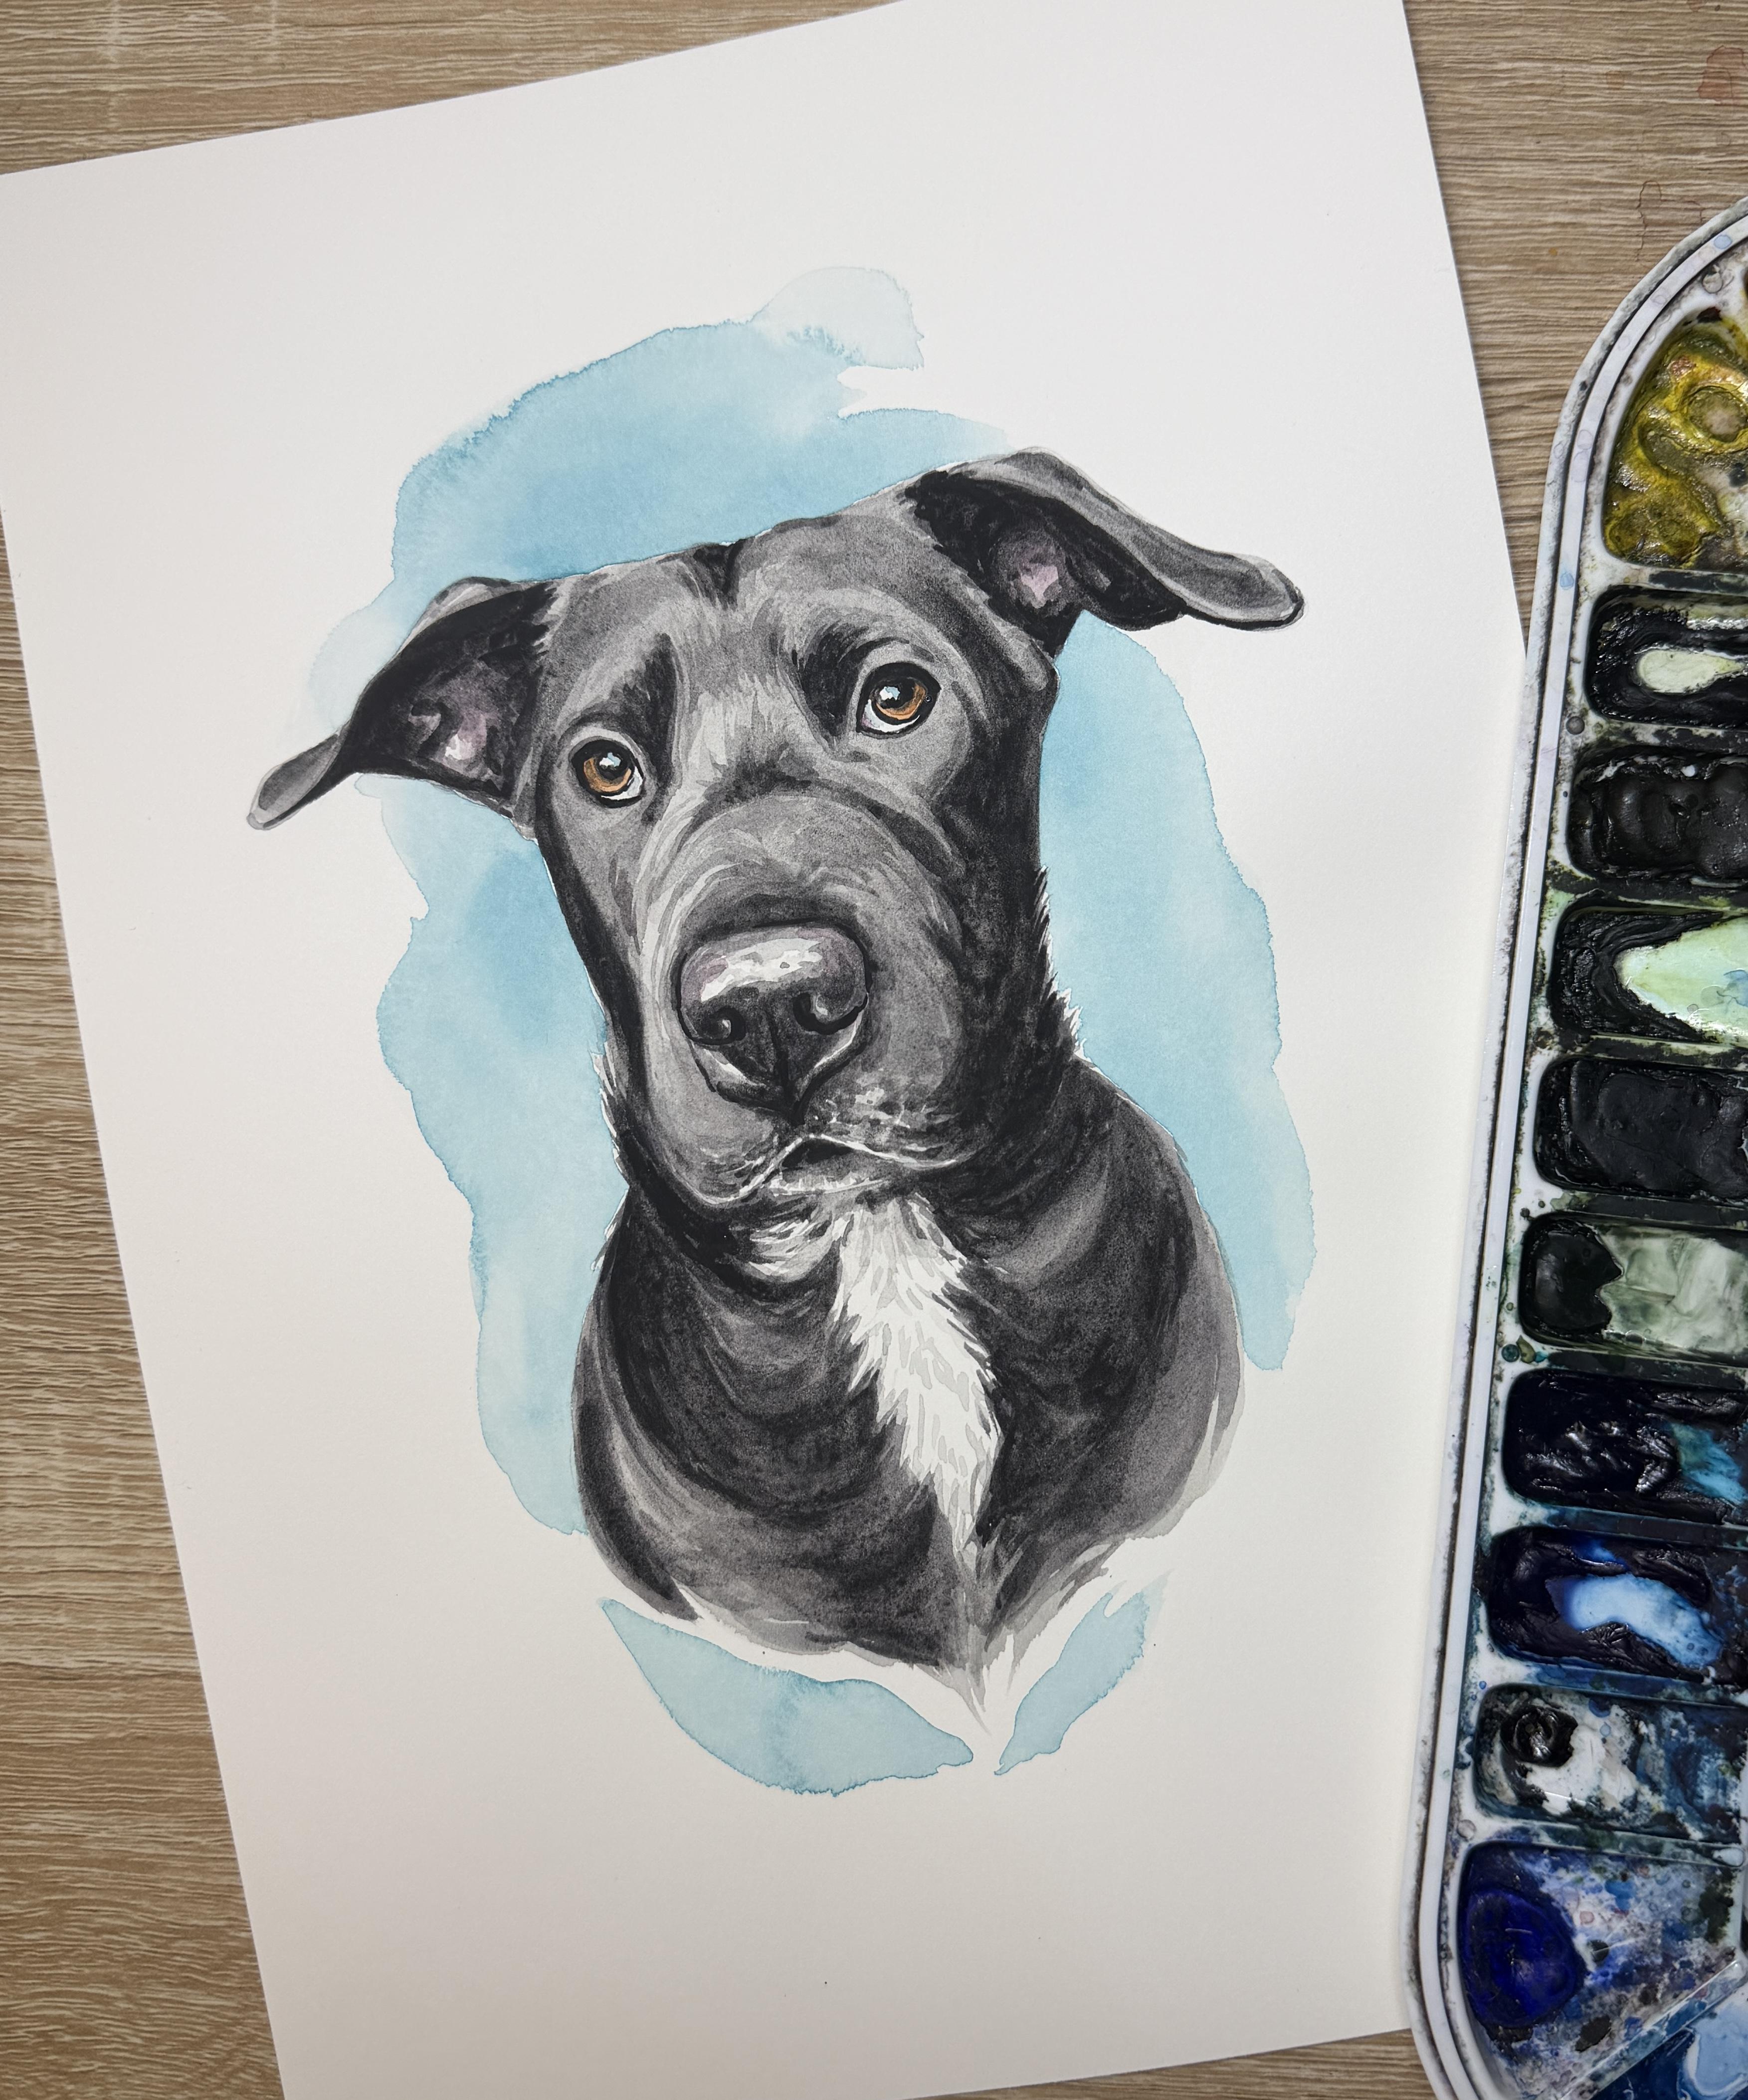
learn how to paint Billy all black dog
using watercolors. As a watercolor artist, I have found a passion for
painting pet portraits. If you already know the
basics of watercolor, painting pet portraits can
be a great way to turn your hobby into a part time
or even full time career. My style is characterized by adding details to
the mouth, nose, and eyes, but not
getting caught up in painting every
single hair or curl. You can use the tracing
template included in this tutorial to trace Billy, the mixed breed dog, or you can use your own reference
photo of your own black dog. There's also a color
reference photo of Billy for you to use, as well as a supplies guide with the supplies and colors that
I'm using in this tutorial. I'll guide you through
painting Billy, the A Black Dog layer by layer. We'll focus in particularly
on keeping the black fur from looking flat by adding multiple layers of
gray under the black. I'll show you a combination
of real time video with time lapses so you can see the whole process
from start to finish. We'll also talk about
the secret to success of painting black dogs and why
that step is so important. As an added bonus, I've even included a quick
guide with step by step pictures so that
you have an easy way to see how all these
layers come together. So grab your supplies, and let's get ready to paint. Don't forget to upload any
questions that you have, and I'll try my best to answer them along the way.
Let's get started.
2. Supplies: Alright, so we are ready to get started in preparation
to start painting. I did tape my paper onto my plastic board using some
kiwi hub watercolor tape. You'll notice that this paper is slightly larger
than an eight by ten. The client had gotten her
prior dog painted by me, and that was back
when I didn't cut to US standard sizes for frames. And so I had painted it on around roughly nine
by 12 sheet of paper. So you'll notice it's slightly bigger than an eight by ten, but feel free to paint yours
at home on an eight by ten. I did trace it out
already onto the paper, and then I did add some masking fluid on the
highlights of the eyes, as well as the white
underneath the eye. And I used my Windsor
Newton masking fluid with a little calligraphy pen for the small fine
details under the eye. Alright, for the
brushes that I'm going to be using
for this tutorial, I have two different sizes. I might use a detailed brush here and there,
especially in the eye. Most of the time, though, I use this number four. It's a round size four. It's a silver limited
black velvet brush. And then I might use
something slightly larger for the largest areas. This is the number six round. But that's pretty much it. You might choose to
use, like I said, a smaller brush or a larger
brush that is your choice, but those are the two
brushes that I'm using. I have two cups of
water just in case. I have a paper towel. I have my reference photos. You can't see it, but it's
on my laptop sitting next to me so that it's a
nice large area. And then I wanted to show you the second reference photo that is also included
in this tutorial. I'm only using the neck
area for that tutorial. The majority of the time I'll be using this
reference photo, the one of Billy in
a little tuxedo. Alright. And then, for
watercolor paints, I am using Daniel Smith Colors. You can see a list of all of
the colors that I'm using in this tutorial on
the supplies guide.
3. First layer of Eyes and Nose: Alright, so when your
masking fluid is dry, we can get started. So I'm going to start off
with my round size four. I'll set my other supplies aside so that I don't
get them all dirty. And I'm going to start by
painting the iris of the eye. So Billy's eyes are these
really nice caramel color. So you'll notice I'm using
a pan on my palette. This is actually an
art philosophy color, but the closest color to
this one that you can buy at home is a
quinocratone, burnt orange. Then you don't have to buy the whole art philosophy palette. So it's really nice
caramel color. I'm going to start by
painting the iris. Now the nice thing
about painting the iris is you can paint on top of the pupil and not worry about needing
to keep that pupil open and save that for color because we're
going black on top. Now, you did use the
masking fluid for the white under the eye. I'm not really extending the
color all the way up where the black eyelid is if you're not using
masking fluid under the eye, just
be cautious there. Then we're gonna
leave that to dry. Now, the next thing
that I always do for my pet portrait paintings
is if there's any pinks, particularly in the
ears or the tongue, there's a really tiny
bit of pink in the ears, but since it's so small, I'm gonna wait and do that until I'm done with the
rest of the painting. Just add a little hint. So instead, I'm going
to start on the nose. Now, for the first
layer of the nose, I'm using and actually, for the majority of the
rest of the painting, you're gonna get
sick of this color. But I am using a
lunar, no, sorry. This is shadow violet
from Daniel Smith. It's a gray that's granulated, and so you'll notice some
of the pigments, um, starting to separate if you leave it on your
palette for too long, and it also can
start to separate if you add water on your paper. So our first layer here, we are going to paint the
entire nose and the nostril, but we do want to keep try our best to keep
some of those highlights. I can add water on
top if it's too dark. At the tip top of the nose here, there's gonna be quite a
few highlights on the top. So I'm just going to come
to the nostrils here, and then I'll work on adding
some highlights on the top. I like to do that by kind of speckling around the
tip of the nose. I'll dry my brush, and then I'll just kind of lift where some of those edges. I'll leave some of
the hard edges, but some of the edges that
I might want to soften up. And then I'm also
noticing there's a big bright highlight here that I just painted
over. I think that's. So this is why we work pretty light at first,
'cause, of course, we want to get our
colors all figured out, get our highlights. So I had kind of painted over this little highlight
here underneath. So I'm gonna try my best to keep that little
highlight. Same here. There's this little highlight kind of on the side of the nose. It's always going to come. These noses, I
shouldn't say always, but a lot of times
they're going to come to this little point here. And then this whole section on the inside is going
to be darker. It is hard to not have
these hard edges. I find sometimes one
working quickly helps, and then two using a dry
brush before it dries. Kind of working on some of
those edges to kind of soften them up or just leaving it until it dries and seeing if you
really do need to soften it. Most of the time you don't. Like, I like how
hard that edges. Now that it's on the paper, you might be able to see it
at home a little bit better, but you can see the blues and these kind of violets
that are separating. So you can see these warm blues and violets separating out. So every time that you
work with this color, you are going to
want to remix it.
4. First Layer of Fur: Part 1: Alright, so now that we have
the iris and the nose done, now we're going to
start working on the first layer of the fur. Now, this is where
I'm going to actually switch to my larger
brush because I do want my first layer to be
this same shadow violet, so I'm gonna need
to pull quite a lot more color
just so I'm ready. This first layer does have
to go kind of quick because we're we're wanting to
just get the color down. So we're not worried
about any sort of fur shapes or fur strokes. The only area that we're
really going to add some fur strokes to is where it's butting
up against the white. So the white of the chest, I need to be cautious of. There's a little bit of
white under the chin. I need to be cautious
of keeping open. And then there's two little
highlights in the middle of the ear that I don't necessarily need to keep white because I know it's not white, but I will want to lift
up this extra pigment. So I like to work left to right because I am right handed. And so we'll start. Remember that you
do want to start in one section and then
pull your pigment over. I have quite a lot of liquid. And remember, all I'm doing
is I'm just filling in this area because it's
an all black dog. Now, here's where
I'm gonna pull up just a little bit of that color. I can either use my paper
towel or I can use my brush. And this is why we're also moving from one side
to the other because we do need to work quickly before any of these
edges start to dry, especially when you're
working on hot press paper. You do need to be more
cautious here of these edges. And so sometimes,
if I know that it's a really big section and I
won't get there in time, I will pause where
there's a natural edge. So there's a natural
edge here by the nose, and I'm noticing that the section up on top
is starting to dry. So I'm gonna pause at
that nose to give me some chance to finish
the rest of the section. Now, if you are working
on cold press paper or yuck on cold press paper
instead of hot press paper, you might have more
time than I do. You tend to have
slightly less time when you're working
with hot press paper. So I'm gonna finish this
section out right now. I forgot to lift up a little
highlight in the ear here. I'll go back and make
sure. There we go. Now, I know I said
that we aren't going to be adding any
sort of fur details. Obviously, when
you're coming up to these sections where
you've got a little bit of tufts coming out into
the white of the paper, you are going to want to
add those little tufts. And then we do want to be cautious as we come around the
neck line because, of course, here's
where the white is starting to pop through. So I am going to start to add just a few little
pieces here and there. So there's just a few that
are following the edge here. The rest on the side is
going to get filled in. When I work on the edge here, this right edge is going
to be a little bit softer, so I'm pulling
down on this edge. But then on the
edge in the center because we've got
these white tufts, I'm going to be pulling
some strands inward. And here's where I'm doing
this little negative painting. So negative painting is
painting the space in between. Now, because this naturally comes down to a really nice
point here in the neck, I want to keep that
shape on this edge. So I'm going to kind of
curve the hairs a little bit and then pull
down to a point. I can always take and have a few little swoops kind
of come out of this shape, but the main shape here
that I want to keep and preserve is going to be this kind of shape
to the point here. It's going to help to
balance our painting, and it's going to give us a stopping point so that we don't continue the
body all the way down. Alright, now I'm at kind of a
good stopping point because I've got this border here and I've got
this right side done. So I need to mix a
little bit more paint. I'm gonna try my best to
have the same opacity. Now, I've been
doing this a while, so I can kind of eyeball it, but I always keep
some test strips of paper on the side that I can always
test out the opacity. Make sure that it's not too much darker or too much lighter.
5. First layer of Fur: Part 2: Alright, now let's take
a peek at the nose here. Um, it is going to
be the same where it's gonna be all
one solid color. Now, I am gonna kind of
butt up here to that edge. I'm not gonna worry too much about blending out that edge. Depending on the
age of your dog, you might have a little
bit more white here along in the mouth
on the cheeks area. I am noticing a
little bit of white around the cheeks from the
second photo of Billy sitting. And so I think I'll just add a tiny little bit of
white in this lower area. Now, to do that, actually maybe we'll switch
to my smaller brush. To do that, I want to have
a little bit of line of, like, white dots that are
kind of shining through. And then I also want
a little bit of a white line at the edge
of this mouth here. So it can come down, and this lower lip is what's
going to be the darkest. So once I add this lower lip, you should be able
to see a little bit better this kind
of edge of white. There's a little bit
of edge of white here. It distinguishes the upper
lip from the lower lip. The lower lip is
always going to be darker because it's tucked
down into the mouth there. And then immediately
underneath this, you've got this lower lip here, you can kind of outline it a little bit just to kind of get it to come out from the neck. And then in between, we're
going to do the same thing. We're just going
to kind of dot Oh, almost like hash
lines in between. You do want to let some of that white of the paper
to shine through. So again, I have to keep
mixing up my color. And then I'll pull through,
and I'll do this side. I think I waited too long. This edge started to get
a little hard of an edge. You might notice that
I do work fairly wet when I'm doing my paintings. I just find that it's helpful to stay working fairly wet so that you have
a little bit more time. If I were working on
cold pressed paper, I might actually not
work quite as wet. I feel like I tend to work a lot wetter on hot press paper. So once again, I
started filled it in. Once you get to this
lower lip here, I started almost dotting in between and leaving
the littlest, tiniest of a hint of paper there just to denote the difference between the lower lip
and the upper lip.
6. Outlining the Eyes and Nostrils: Alright, at this stage, I want to let this first
layer to dry fairly well. And so I'm going to take
a peek at the eyes. There's sometimes
in some tutorials that you might do
the second layer where you see shadows and
start to add some fur details. I always like going
into the eyes before I add any
of those shadows on the face because sometimes it's easier
to outline the eyes. And so that you have enough
space there for that outline. Otherwise, if I go in and add
the eyebrow shadow first, I might come too close to
this eye and not give myself enough room for
adding those details. So I'm going to go in. I kind of started doing
this as of recently, and I'm going to go in
and add a few layers, well, not a few layers,
but kind of more of a medium layer to my eyes. I'm still using this
size four brush here. However, if you would like to use a smaller brush,
you definitely can. I always starting outlining the top and the
bottom of the eye. Keeping it around
the iris there, especially with dogs like Billy. This upper black section of the eye is going to be
thicker than the lower. There usually is a black
ring around the iris. It's fairly thin. And then there's also so it's a little thicker
in the corner. It's thinner on the inside. And then there's
also, of course, this black around the lower lid. This is where with
Billy, you can see a little bit
of that inner eye. So Billy is a mixed breed, but this inner eye
being like this kind of it reminds me more
of like a boxer breed. This is why it's helpful to have that masking
fluid there. Then this is where we can expand this upper eyelid to help
with the shape of the eye. So it looks like there's the top is a little bit
more of like a table shape, and then it comes down. And then I also can add
the black pupil here. Now, I'm still using this
might look like black, but this is still
this shadow violet, a more opaque than
that first layer. Alright, now, here's
where if I need to make any corrections
on the thickness. So I already am noticing
on the center here, this black is a
little bit too thick. So I'm gonna come in
with a wet brush, lift a little bit of
that thickness out. I'm thinking that'll
probably help with the shape of the eye, too. No, these are all really
minor details that if you're not able to add
to yours, that's okay. Do your best. But this is also a great way
to kind of see how I make little tiny corrections
on the shape of the eye or on the size. And I'm very impatient, and so I didn't wait
for it to dry enough. It started to spread. So we'll move on
to the left eye. I'll give it a little
chance to dry. We're doing the same thing here. More of a medium to
medium dark opacity using this shadow violet and looking at trying to get
the shape of the eye. Alright, but you
see what I mean? Especially at the top of the eye that depending on the thickness of that upper eyelid there, if you started with the shadows, you might push your shadow
down a little bit too far and kind of
cut into that eye. And then we don't have
enough highlight in between. So this is why I like
to do the eyes first. So I don't think I have
this big enough even. The next thing to think
about is try your best to keep these edges to be
really nice and hard edges. You can always soften
them up afterwards, but I really do think that
it helps with the clarity of the eyes if you can keep those edges sharp up
till the very end, and then you can add
some extra color in. Um, just like how we
did with the eyes, I actually like to go ahead and paint the darkest
section of the nose first. So these nostrils it's
a similar concept, a similar reasoning behind
why I'm doing this and why I did the eyes darkest first is I want to
be able to see where these darkest sections
are so that when I add the in between layer of color, I know exactly where my
darkest sections should be. Sometimes doing the medium
tones right now at this stage, sometimes can be challenging. Mainly because then a lot of those pencil lines
that you did in the very beginning are now
suddenly harder to see. Alright, so I did
the nostrils here. I connected it a little bit. I know it's not as dark
as it needs to be, but I know I will go
over that part later. I just wanted to let the nostral area dry a little bit before I add
that other layer.
7. Second layer of Fur: Adding some details: I am still sticking with
my round size four. I do want to get a little bit
more detail on this layer. And so I'm keeping
this round size four. I'm not going smaller
than this because I don't want my hairs
to be really tiny. I don't personally like when watercolor pet
portrait paintings are just a whole bunch of hash marks like this,
the entire painting. I think I would go crazy
if I had to do that. So instead, what I like
to do is I like to make, um blobs of color and then pull some strands of fur
from those blobs of color. So what does that look like? What does that mean?
We'll go over it. I like to start with
the ears first. So this second layer of color is almost the same as
the first opacity. The reason why it's not all that much darker is because
we're adding it on top. So it's automatically going
to be a little bit darker. I might correct it once
I start painting here, but the one thing you
want to be cautious about with this second layer is going too dark too quickly. When we go too dark, too fast, what ends up happening is we end up having our paintings look a
little bit too cartoonish. And so making sure that we keep the second layer still
slightly semi transparent, and then I want my black layer on top of the second layer. Now, in areas that are
super dark like the ear, it's not quite as big of a deal. But in areas like the face. So do you see how we do have a really nice contrast if
this layer was this dark? I mean, I know this is
kind of an exaggeration, but if it were that dark, then suddenly you have the
same contrast as the eyes, and it becomes too contrast, too much contrast right away. We do really want to have that
in between layer of color, the in between
value, I should say. Alright, now, um, I
think I'll let that dry. Let me do this right ear first. I certain edges like
that are too hard, I would definitely suggest to wait until the section is dry and then soften it
up a little bit. Sometimes it's hard
to have those edges, soften them up while
it's still wet. Alright, now, when we take
a peek at the face, now, I know there's sections like
above the eyebrows that are darker than
sections in between, but we want to remember that that's going to
be the last layer. So I kind of need
to train my brain to think about where am
I seeing any shadow. So I'm going to start
on this left side. I am seeing a shadow
that's kind of running up. Around the side of the face. It's got that too close
to the eye there. Now, this is also
why we're using this lighter transparency for the second layer so that we can lift up if we
make any mistakes anywhere. I'm noticing that there's
this shadow here. It's kind of helping with
the shape of the face. It's coming kind of
all the way around. You've got a little highlight that's being left by the ear, but it kind of comes all
the way around the head. Here's where if you
wanted to pull any of those little hairs
out that you see. Now, as I'm painting, sometimes I'll keep
section by section. Sometimes I'll just
kind of run where I see the whole shadow because I
didn't want a hard edge here. I'm basically running along
this side of the head now until I am at a spot
where I can stop. Now, it seems like this
whole side is just gonna be a little bit darker. And then I think this
is where I can stop. I'm not going to do the body yet because I'm resting
my hand there. We'll remix up our pigment, and I'm going to go
back to this left side. So usually, generally,
you're going to have a darker shadow
around the outside of the face along the
outside edge of the face, and that's going to help
give it a little bit of dimension in that
circular shape. So you see I painted
this right hand side, now I'm coming back to
this left hand side. And of course, this is kind
of a good stopping point. So now you also will notice
that under the eyes of dogs, you do have this almost
triangular shape here that comes underneath. Now, when I get too much liquid on my brush, I tap it off. So it's this dark triangle. And then there's a little bit of dark on the edge of the eye. Immediately above the
darkest section of my eye, I've got a little
bit of a highlight. So where this eyebrow is, this is why we did the
other eye first is because the eyeliner first. It's because now I
can paint and leave this little tiny section as
a little bit of a highlight, and then I come in, and
I'm going to come up and touch the center
of that eye there. Now, this edge here seems
to be quite pronounced. And then I do have a little
bit of, like, a curve. Billy's got a little
bit of a curve here. It almost gives him that
kind of sad dog look. If at any point I need to
blend any of these edges out, sometimes I will dry
my brush and then use that dry brush just to soak up a little bit
of that dry edge. However, I still want to
keep this highlight here. There are ways of going back and softening up those
highlights afterwards. I think I'm going to go and I'm going to do this eye first. I don't want to do this
little section here because I want to make sure that this has a chance
to dry a little. So I'm going to do
this right eye, this darkest section right now.
8. Second layer of Fur: Adding details, Part 2: I am wanting to add kind of this bridge of the nose as
kind of the second layer. So this natural where
I had stopped before, it almost seems like I've got a little bit
of a shadow here, and then it's a
little bit of almost like a fountain
where I've got it coming to the edge to
the sides and then to the center and now back
over to this right side. Once again, if I've got
too much on my brush, I'll take some of that off. So it looks like it's
pretty much in line with the maybe just slightly above the pupils here
is where these start. So now that it's
dry, I can touch. So now here's where I'm
adding some single lines, but I am making
these lines connect. So what do I mean by that? I don't have these as
little hash marks, so I'm not doing this along. I'm connecting them all. But the reason why
I'm still doing the hash mark stroke is so that I have these hairs
on the top and the bottom. Now, here is where if you've got these sections that are a
little bit too light in color, you can always go back and add a few separate
little strands here, particularly along the edges. If you want to try to blend
the hard edge with the soft, I'm coming in, I'm adding
some separate lines. I'm not going over any of those sections
that I just painted. But I can add a few separate
hairs in that space in between or close to the edges so that it just kind of
helps to blend blend it out. Same with here. I can add just do you
see how I'm adding just a few little extra
hairs in the in between? Now, what that does is
it keeps us from going insane by trying to do
little tiny hairs all over. So I've got these
clumps of color. And then I can go back
afterwards, and in my next layer, I can always add some extra, you know, individual
hair details. But for these first few layers, I don't want I don't want
it to be too separate. Now, this is just stylistically. I mean, if you are the type of person
that you wanted to add, all those individual
hairs, go for it. It's just I don't All right. So now let's take a
peek at the nose here. So in a lot of our
dark colored dogs. The nose is actually, at least the top of
the nose is lighter. And so we want to go up to
the edge of this nose here, and then we're going to add
the shadow above the nose. Now, for Billy here, it's a little uneven of
a shadow on the top. I'm gonna see how it looks. I might actually kind of correct that shadow just to help balance it a little
bit more. We'll see. I'm starting now that
I've got this shape here, now I'm going to start leaving a little bit of
space in between. And I noticed this
little corridor here that's a
little bit lighter. I'm going to try to
leave that corridor, but I'm still painting in the shape of coming up
and out of this fountain. So it's a similar shape
up here. It's mimicked. All right. Now, around this side, I am going to leave a little bit of a highlight
here on the left. It does seem like
my light source is more on the left hand side, because, of course, this
side is much darker. So I'm going to try to leave a little bit
of light source here. This lower jaw seems
like it's pretty dark. And then it's going
to be a little bit darker towards the
bottom of that jowl. And here's where I'm
going to start to continue where I had these
little dots here in between. So I'm coming on the same
shape coming around. And then as I come inward, I'm going to start to
almost dot inward and up, come down, dot inward and up. And then I'll do the same on the inside and start to
dot a little bit out. So I'm leaving this
little chunk inside to be shining letting what's
underneath shine through. Now, this side is darker
than the other side. Now, remember that this
lower lip is the darkest, so I do want to have a really
nice solid, hard edge here. So it's very triangular. I know you might see some fur. I like to keep it very linear because I want to make sure that you can tell that that's where the lip is. Then on these all
these little, like, in between, remember that? That's kind of where the hairs
started coming together. So now we go back to just kind of dotting as we try to connect
them a little bit. If you lose the lip at all, dry your brush, and
you can always lift.
9. Darker layer on the Neck and Third layer of Gray on the Face: Alright, so let's start
with the neck line. So my neck line, especially under the face here is going to be the darkest. So right here under the mouth
is going to be the darkest. And then I can start to lighten it up as
we get down below. Now, I'm using the second
picture here to help out. So if you notice that I'm kind of strain from what you see on that first
reference photo, that's why. Alright, so we've
got this nice and dark in this little
jowl here underneath. And now I'm gonna actually leave a little
bit of highlight there. Bring this dark shadow. Now, I'm trying to keep these kind of
similar shapes here. So you'll see very
similar movements. Now, to do this, I'm using
the edge of my brush. I'm using I'm not
using the tip of my brush until I get into these little
sections in between, then I'm using the
tip of my brush. Now, before that dries,
I'm gonna come in. I'm gonna grab more of
that shadow violet. And I'll add a little bit more here where I see
it's the darkest. Alright, and then
while I'm at it, since this is so much darker than the rest of the painting, which is on purpose, I definitely wanted
to make sure that I kept the facial features
a little bit lighter. And so I can, though pull some of this
darkest shadow violet still to this right hand side of the face where you
see the biggest shadows. Now, I might not bring this
next layer of shadow violet. I might not bring it all
the way to the edge. I might try to
keep still some of that edge, that first layer. So do you see if
I would have gone completely over that
first shape that I made? And if I would have gone
all the way to that edge, then I would have
had I wouldn't have been able to blend all these
layers together so easily. So I'll show you one
more time on this side. So I'm starting kind of at the darkest
areas in the center, and then I'm working my way out. And as I work my way out, I'm not gonna come
all the way to the edge to the edge of that
layer that's underneath. Once again, I'm still
not overly blending. These layers, I'm trying to
keep these layers nice and, like, lots of contrast, and I can always
blend them out later. Now, Billy's got
this very signature kind of almost bump on his head. And then the other ear. I just noticed I
didn't really had a little lighter
layer there. Whoops.
10. Second layer of Gray on the Nose: Alright, so now
I'm gonna look at the nose area where
I should have this darker or my
darkest of colors. So once again, I'm looking at
the nose area I definitely need more in the
nose and the mouth. So the mouth is kind
of that darkest. Same with the nostrils. But remember that I did not add that kind of in
between color yet. I'm gonna just kind of
outline the nose slightly. I mean, I shouldn't
even say outline, but sort of outlining. And then I can use a
little bit of a wet brush. Alright, so I'm going
to add a little bit of water to what I've been using. And now I do want to add
another layer to this nose. So I'm still working on kind of the outer edge of the nose, but I'm
trying to keep. There's this little
almost, like, moon shape highlight here that I want to try
to keep clean. Everything underneath
it, though, is going to get a
layer of color. There's if you can leave a little tiny highlight in
the nostrils, leave that. If you can't, no worries. Soften up these edges of
this highlight a little bit. And then this is, like I said, that in between layer where it's darker
on the inside here. Now, if it's starting
at this stage, especially with the nose, if
it's starting to look like, pretty dark everywhere, know that we are going to
come in with the black. Now, we do want to make
sure that the little shadow above the nose needs to be
darker than the nose itself, or otherwise, that
nose gets pushed back into the face instead of getting
popped out of the face. So make that a
little bit darker. And then I'm gonna
make looks like this isn't the bridge
here isn't dark enough. So I'm going to
add another layer to this fountain in the nose. Oh
11. Color Corrections: Alright, at this stage
of the painting, now that we've got our
three layers already, I'm going to take a peek
back at the white and at the irises of the eye
and to see if we want to add any color in before
I add my black details. So this is kind of like the
color correcting stage. So my whites, I do need to water down some of
that shadow violet. It needs to be really
quite transparent. And then I'm just going to add a few little dash marks following the curves
of the hair here. Now, I'm not adding a lot. I do notice definitely a
lot in Billy's chest there. But if I add too many, it's going to then look
gray and not white. So I want to just be
cautious with that of not adding too many of these
little hash marks there. So I want the white
to shine through. And then I'm going to take
a peek at the irises. Now, I solve some color there. I am going to add a
second layer to my iris. But really what I want
to do is I want to add a little bit
darker on the edge, the outside edge, and
around where the pupil is. So I'm tracing that
edge of the pupil. So what that does is it
just kind of softens it up. And then I'm adding darker
color along the outside edge. Not really adding it
in the center edge. Now, if I wanted to add
any color to the ears, this is the sage
I would do it in, so I would add just
a little bit of water to This is
quinacraton magenta. And now I'll add
it really watery. This is also where you can take advantage of it
being all watery. You can blend some of those edges if you
need to blend some of those edges on the
inside of the ear. Even if it's not as
pink in the picture, I still kind of like adding a little bit of pink to the ears just to add a little
bit more color, especially for our
all black dogs. You can also do this if you
see any color in the nose, for example, you can add a little bit of extra
color to the nose. So it's just little
areas here and there, if you wanted to
add little hints of color if you see
it here and there, or if you see any hints of
color of any brown anywhere, depending on the lighting
of your picture. So like in a different picture, I saw some brown over here
on the right hand side.
12. Lunar Black Layer: Ah, so now I'm going to
start my next layer, which is going to be
starting with black. So up until now, I've only
used my shadow violet, and now I'm going to start using a black for all these details. So I'm going to start
by using the black I'm using that I have in my
palette that I like to use for pet portraits is
called lunar black. It is a granulating
color by Daniel Smith. The reason I like using lunar black and
specifically granulating colors with my pet portraits is because it does help to leave
a little bit of a texture. So as you can see with your black color,
once you do paint it, it starts to kind
of almost leave this molting type texture where it's a little bit darker in certain spots and
lighter in others. I like that effect
in my pet portraits. I also think that the
granulation from lunar black helps to let the
underlayers shine through. However, if you don't
like granulating colors, you want to use a
different color, you are more than welcome. That's definitely
your choice to use something that
isn't granulating, more like a lamp black or some other pure black
that you have at home. So before I do any
of the black fur, I'm going to start by adding all the black details
around the eyes. So once again, I'm still
using this size four. But if you would like to
use a smaller detail brush, you definitely can use
a smaller detail brush. I'm going to start
the same way that I started with the eyes at first, outlining them, making sure that I've got the right shape. When I do paint the
pupil with the black, I do want to leave a
little bit of a rim around the pupil using
that shadow violet, leaving that shadow violet, mainly because I don't
want there to be a really, really hard edge along
with the with the black, and keeping that soft edge
of the shadow violet is gonna help keep that edge
a little bit softer. Now I'll go on. I'll move on to the nose. I'm going to start
with the nostrils. So I'm starting with this black directly from the pan
just with the wet brush. I want to make sure that I
get my darkest values first. I like doing it this way
because I don't want to start with the darkest
values on the face, and then all of a sudden have the eyebrows be darker
than the eyes itself, and then my focal
point will switch from the eyes and nose and mouth to then the
fur around the face. So right now, I'm kind of outlining but leaving
some space in between, so it's not one continual line. I'm going to let
that dry before I fill in the darkest
parts in the center. Now I'll add some
dark to the mouth. Remembering that
the darkest area of the mouth is going
to be this lower lip. Alright, and now, as
I let this all dry, I am going to work on the
darkest part of the body, which is gonna be the ears. And then at the very end, then I'll add some black to
the face and to the body. Rinse my brush and then use
a damp brush or just pick up a little bit of pigment and then carry that pigment
into the lighter area. But since I have that
dark pigment all around, then it's a lot easier to use a wet brush to just
kind of blend inwards. Now, the biggest thing to
think about when you're adding these black details is you don't want to add black
over the whole painting, but you also need to make
sure that you're not adding black just to one section. So if I'm adding black to the ears to the
inside of the ears, I do want to go back and add maybe a line here or
there around the edge or around the tip here so that it helps to connect the black with
the rest of the ear. I don't want the center of the ear to look like
it's off on its own. Come back and add a little bit of this black that
I have mixed with water into the sections
where it's the darkest. Alright, I think the
nose is going to be dry enough now to
add another layer. Now, instead of taking the
black directly from my pan, I have mixed it with water. However, it is still
fairly dark in opacity. I am noticing that the bottom of the nose here is quite dark. But mixing it with
this water is going to allow it's going
to do two things. One, it's going to help give it a little bit of transparency so that if I have to lift it up, it will lift up a
little bit easier. So if I place it
in the wrong spot, having water is going to help me be able to lift it easier. And then adding the water
is also going to allow some of the colors
underneath to shine through. Now that I have the water down, I can pull some black directly from my palette and then drop it in where
it's the darkest. Now, with this black layer, you do want to be a
little cautious of over mixing. So what do I mean? When you are placing your
color onto that bottom layer, you want to avoid
scrubbing too hard. If you start scrubbing too hard, you are gonna lift
up the underlayer. Now, this is another reason
why it might be a nice idea to leave that gray layer to dry fully before you start your black layer so
that it gives it a little bit more time to dry on the paper so that you
don't lift it off. Most of the time, though, I just paint all in one session. So Alright, now that
the nose is done, when I look at the darkest
areas in the body, I still want to leave
the face for the end. I'm going to start
on the neck area. And when I'm doing the neck
area and around the edge, I do want to focus on where is the darkest sections first. So I'm going to add once again, I'm using the water down black here because I do
want it to be dark, but I do want it to be
still somewhat transparent. I don't want it to be
completely matt dark. Like I said, when it's wet, you can still drop
in a darker black if you need it darker, but black is one of those that I think it's very easy
to go too dark too quickly. So when we are painting
our darkest sections, we still want to remember
that some of these areas, we can let that
gray shine through. We do not have to cover up all of this area with the black. Now, this black is a little
bit harder to blend in. So while it's still wet, I'm going to take a damp brush, and now I'm going to
go back and blend out some of these edges. Black is almost more
challenging to paint in large swatches versus
in small swatches. It's a lot easier to paint
these small areas with black versus these larger areas. Now, move on to this right side.
13. Lunar Black Layer: Part 2: Now I'm ready to bring this
black up into the head. So now I'm going to start
on this right side, still with this
watered down black. Use a damp brush to
blend these edges. Be cautious, though. Here's where, if you use that damp brush or you go
over it too much, you might lift up that paint. Especially, this is
for this reason, this is why I do say that black all black dogs are the most
challenging to paint. H. Now, know that still at this stage, it's going to look
a little bit weird. Remember that we still have
all of these hard edges. There is a trick that I'm
going to be showing you in a little bit once
we're done with all these darkest sections. So hold on and have faith. So once again, we finish
this right hand side. Now we're looking at
the left hand side. We want to get the darkest
values on this left hand side. I did this right
side of the nose. I do this left side, so I dotted a little bit of that black in the
center, pulled it out. I'm keeping a darker line
along the base of this cheek. But I'm still trying to preserve a little bit of that
kind of white highlight. Doesn't have to be pure white, and it doesn't have
to be a solid line. Alright, and now we'll
move on to the face, where it's the darkest. Now, we are not going in and
adding black to everything. Like I said, we're just looking
at the darkest for now. So the first area that I see it really nice and dark is
this little triangle here. Paint the darkest section first. Wash my brush. Use a damp brush to pull some of that over. Not going all the
way to the edge, leaving some of
that shadow violet. So it's just like what
we did with the eyes. Now, I'll use some of
this black in the center, the eyes, just like we
did with this last layer. We're gonna leave an
edge around it to show these other layers
that we did underneath. So I'm not bringing that black
all the way to the edge. I'm leaving a little bit of that shadow violet
to shine through. So I'm starting painting that black only in the
very, very center. And then it seems like I
need a little bit of black in this center of the
nose just a little bit. I think I also might
need a little bit of black above the nose here.
14. The Secret to Success: A Glaze of Black to Help Blend: Right now that we've done our darkest sections
in the face, now you have two options. One, you can leave it
like this and have a more higher contrast
from light to dark, or you can glaze over some of the facial areas using a water down black to help blend
out some of those edges. So I'm going to start
by doing that on the right side of the face so that you can see
what it looks like. And also, so then I can decide, do I want to do that
over the whole face? Because I know my light source is coming from this left side. So when we do this step, I would definitely suggest that you paint over areas
that are already dry. So you want to make
sure that you're not going over these
darkest sections. These darkest sections,
if you go over these, you might run the risk of
pulling more paint up. So you just have to be cautious. Once again, if you wanted to, you can always let this
layer dry completely and then do the black glaze if you're concerned about
lifting up some color. And then the consistency, the transparency of this
black glaze is going to depend on how dark you
want your final piece. So I'm going to start with
about this transparency first. If I'm noticing that
I'm losing a lot of my nice shadows in there and
some of my nice texture, I might lighten it up, but I just have to kind
of go with the flow. And then, of course, you don't want to glaze over the eyes or you probably
don't want to glaze over the nose or any
of the white sections. Alright, so I know this is
kind of scary. We'll try it. Oh, and the last thing,
just make sure to remember that when
you are glazing, that you are doing
this fairly quickly. But know that when you do glaze, any of these sections that kind of that where you have too hard of edges and you want to
blend it out a little bit. So here you can always take a little extra time and just slightly
blend them out. Now, you can already
see a difference between this side and that side. I'm going to do a little bit
of glaze on the nose here. But I am kind of wanting to keep this without the glaze to kind of keep it a
little bit lighter. I also do like
this section here, so I might do a little bit
of glaze, but not a lot. I do want to keep a little
bit of that detail. Now, this glaze will also
dry a little bit lighter, but already you can see how it's kind of subdued some
of those hard edges. Now, if you wanted to, you
can always glaze a little bit over where the chin
area is coming in. What that's going
to do is it's going to push this neck back a
little bit and the chin up. And then I do want
to glaze the ears. Oh. Now, at any point, if you don't like any
sections of the glaze, you can always use your
paper towel lifted up. But this is one way in
which we can kind of help to soften some of
those edges a little bit. While it's still wet, this is also a good stage of if there are any
sections that you needed to drop in a
little bit more pigment, just to help with the shape, you definitely can
do that, especially around the outside edges. So just by adding a little bit more pigment up
here at the top, kind of helps to bring that shape into the
head a little bit more. Of course, you have to do
this while it's still wet. So now I'm just adding adding back a little
bit of texture. And, of course, probably
the hardest part of paintings like this
is where do you stop? And so I think this is
probably a good spot to stop. So we're going to do
our colorful splash and then we'll come
back and we'll add some details to the ice.
15. Colorful Splash: Alright, so my client did not specify if there was a color that she preferred
for the background. She allowed me to
choose the color. And so a lot of times
with all black pets, I do choose a color that's
a little lighter in tone. I'm not going to choose a
purple because I do feel like this shadow violet does pull
a lot of purple already. And so I want a color that's
going to kind of contrast a little bit with the
purple background. So I'm gonna choose to do
a teal for my background. I do have a turquoise
here already. This is Theo turquoise. Turquois also um, goes really well with
orange in the eyes. And so I think that
also will look nice. If you wanted to kind of dull this turquoise
down a little bit, you can always add a little indigo to it to
kind of dull it down. But I kind of like how
it's nice and bright. Alright, so we're
gonna wet a section here and then drop in our color, and we'll move around as we go. Now, shape wise, I am going to leave maybe some of the little tips of
the ears hanging out. So we'll start by the ears. Now, you do want to make sure, since you are just glazing, that whatever section
you're working on is more or less dry. I'm only going to wet
probably just around here. I don't want to once again, I don't want to have
that ear included. And I'm not going to wet in between all
these little hairs. I'm going to leave
that open and then pull some of that color inward. Once I drop the color down. Now, this section is
always challenging. I'm going to actually leave it and maybe add the color later. So now that it's wet, now
I can drop in some color. Now, we'll continue
all the way around.
16. Final Details: Alright, so I've taken the
masking fluid off of the eyes, and now we're ready to kind of clean them up a little bit. This is also why I only do
masking fluid around the eyes, instead of in parts of the
nose or any white of the fur, I do feel like it's hard to control how wide the
masking fluid gets. And so, I do prefer just keeping that
white space with my brush. So I'm going to start
with this left eye, so I'm using some black paint. I'm just gonna clean up
kind of the shape here. And then I'm also
going to clean up a little bit the shape
of the white highlight. Alright. Then once you have your shapes kind of cleaned up, now we can go in and we can add a little bit more of
some shadows here. So the white of the eyes is just a little bit
too white for me. So I'll use my brush that's kind of dirtied
up with this black, and I'll grab just
a little bit of that turquoise that I
used for the background, and I'll add just a little bit of that turquoise mixed with that black just to the corner
of this white of the eye. You can always add a
little bit more of that blue or pull it off
if it got too much. I'm gonna do the same
thing for this left eye, just in the largest
corner of the eye there. I also do see a little bit of pink in the very
corner of the eye, and so I'll grab a little
bit of that magenta and just drop in a little bit of magenta in that
very center there. If it gets to be too much, you can pull it off. And then the last
thing that I can do is I'm going to add a little bit of shadow
to the highlight. So I'm grabbing just
the turquoise here. And now I'm going to that
white highlight in the eye, I'm just going to do,
like, a little coma on this right side. Of the highlight. I'm still
leaving some of that white, but adding just a little bit of that blue to reflect
is gonna help a lot. The last thing that you might
want to consider is adding just a little bit of
shadow to the iris here. So you can add just a
little line of this shadow here in the center of that iris, especially at the corner here, if it got a little bit
too bright in color, um, just add, like, a little a little shadow there. I'm noticing that black that's sticking into the
iris is bothering me. You can also do this with a black micron pen
if that would be helpful. But just adding a few of
those little details really helps to kind of brighten those eyes and
bring them to life. A few little extra things. You can always go back and add another layer of this black
glaze, if you choose, especially if you need
to get certain sections darker or if you need to
get all around the head, the outside of the head
a little bit darker. You can always go in
and use a little bit of pH Martin bleedproof white in any of the sections that
got a little bit too muddied, or if you have any white, around the nose area or
around the eyebrows. If the dog is older, you can sometimes use
white gouache for that or for adding highlights
that you accidentally lost. And another option, too, is you can always go around and add black micron pen either to the outline of your pet or outlining the features that
you want to really stick out. So the eyes, the
nose, and the mouth. Those are some options as well.
 Emily Marie Watercolors, Watercolor Artist and Dog Lover