Transcripts
1. Intro: Waterlily Greeting Card: Hello and welcome to my
home studio. I'm Emily. And in today's Skillshare class, our goal is to relax and have fun while painting
with watercolors. The best part about this class, you can print the design directly onto your
watercolor paper, just like a coloring book. I created these simple designs to be printed on
your home printer, meaning they're
more transparent. In this class, I will guide you through printing
your designs at home, or if you prefer, printing the tracing
template to hand trace my design onto
your watercolor paper. Then I'll lead you through painting the project
using watercolors. Since this is meant to
be a relaxing class, the tutorial isn't very long, just long enough to show
you the techniques I use. So grab your painting supplies
and your favorite drink, and let's relax and paint.
2. How to Print Templates: In this video, we'll look
at how to print templates. Trace using those templates
and trace using your phone. Don't forget that all of the templates that you'll
need for this class are under the projects and resources
tab of this Skillshare video. The resources are on
the right-hand side. First, how to print
your template. If you're painting a
watercolor greeting card, I recommend using Canson
watercolor cards. This pack comes with 30
cards that are five by 7 " and 140 pound paper. You'll notice that
each piece has a crease running down the
center to make it easy to fold. And they come with envelopes. After downloading the
printable card template, you'll want to set your printer settings
to seven by 10 ". Borderless. It does need to be borderless In order
to print correctly. I like to pre-print using
only black and white. I found that it works
the best to load your paper through the
rear tray of your printer. Loading it in the bottom
tray will sometimes bend your paper and cause it
to jam in your printer. My designs are specially
made to be printed, so you'll notice that
the lines are more transparent and not as dark.
You're all set to paint. Now, if your project is meant to be printed on an
eight by ten inch of paper, you will need to cut it first. I do recommend using a cold pressed paper with
of at least 140 pounds. Once again, you'll open up
the template and print it, making sure that you're
printing settings match the size of your print, you'll need to find
eight by 10 ". Once again, it needs
to be borderless. You can choose to print
only using black and white. And then click Print. Once again, you'll load
your pre-cut paper, the rear tray of your printer. Make sure that the rough
side is facing up. These designs are meant
to be printed on, so you'll notice the lines
are a little bit lighter. You're all set to paint. If you don't feel
comfortable printing out the template directly on
your watercolor paper. There are also darker templates
that you can download to use to trace the template
onto your watercolor paper. Makes sure to download
the correct template. The template for tracing
is quite a bit darker than the template for printing
directly on watercolor paper. When you print, you don't need to worry about
changing the size of your paper since
you'll be printing on a regular plain
sheet of paper. Traceable templates for any of the greeting cards are going
to be only five by 7 ". When you choose to
print that card. You'll also print it on a regular eight-and-a-half
by 11 size sheet of paper. Since you're using
regular plain paper, you can either load
it in the rear tray or you can load it
in the lower tray. You'll notice that your template
comes out nice and dark. To use your tracing template. First, place your
watercolor paper on top of your dark template. You'll need to line
it up correctly. Then use some masking tape or painter's tape to secure your watercolor paper on
top of your template. Use either a light box or a bright window to trace the template onto
your watercolor paper. The last option is
to use your phone to trace the templates onto
your watercolor paper. I like to use an app on my
phone called Da Vinci I. It's a onetime
purchase where you can upload any picture or image
that you'd like to trace. Using the classic mode, you can move and resize your image to help you draw it onto your
watercolor paper. To use this technique, you will need a phone holder. So you can look through your phone as you're
tracing your outline. Please do remember that these templates are
for personal use only. It is illegal to paint them
and then sell them for money. Enjoy painting them
for yourselves, or to give them as a gift. Thank you. If you are interested in these designs printed on
your watercolor paper, but don't have a
printer at home. You can always purchase one of my watercolor kits
on my website. Paper, paints and a brush are included in the
purchase of your kit.
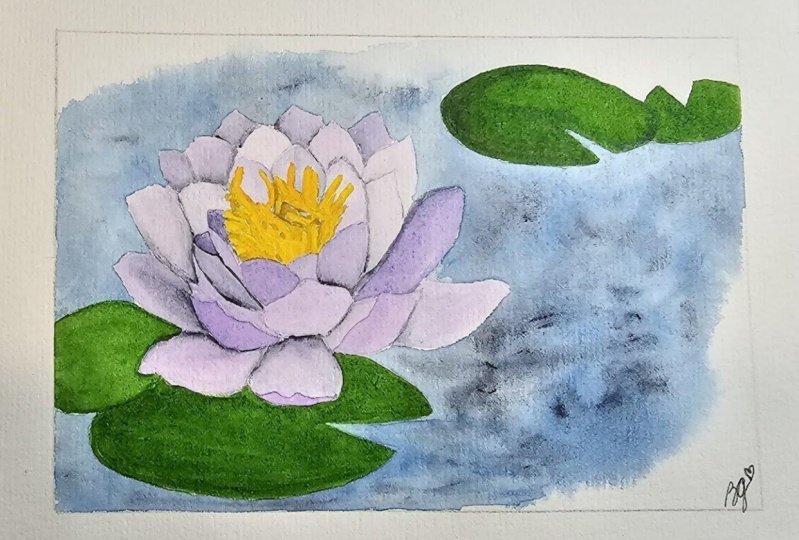
3. Painting your Waterlily Greeting Card: The first project and our Florio's kit is
painting a water lily. The first thing that
we're going to paint for our water lily is white petals. Let's get started. We'll use our plastic plate. I'm using the top of
a yogurt container. You also need some clean water. First what your brush. Add some water to your plate. Then grab just a small amount of purple and add
it to your water. I actually didn't grab enough, so I'm gonna go back and
grab a little bit more. Now we're ready to start
painting our petals. Clean your brush. We're going to be painting our petals one petal at a time. We'll be using a wet on wet technique where
we wet the paper first and then add our
pigment using a wet brush. We're going to paint just
water into one petal. I still want to be careful
during this step to make sure that my water
doesn't go over the lines. Remember that wherever
your water is, the pigment will also follow. Now that I have
this section wet, I'm going to take some indigo and add some indigo towards the
center of my petal. This is going to create
a bit of a shadow. I'm going to control
the density of my shadow by cleaning my brush, dabbing it on my paper towel, and then moving that pigment
wherever I want it to go. On certain petals, I might choose to add a
little bit of purple. And the purple I'm just
going to put towards the center of my petal. We're going to continue this for every single petal mixture. The next pedal that you paint is not immediately next
to a wet puddle. Remember that if we touch water with a section that's drying, we are going to
have that pigment come into that new section. So I'm going to skip
the ones around it and paint a different
section with water. If there's too much
pigment there. Remember, you can dry your brush and lift some
of that dark pigment away. The center of the flower. I'm going to start by painting
with this gamboge color. This is a nice yellow. First I have to wet my
brush, wet the color. And with my paintbrush, I'm going to paint all of the little centers
of this flower. To paint the lily pads, I'll use a sap green
as my base layer, and then I'll use
an indigo to drop in while the lily
pad is still wet. Your brush. Wet the sap green. And uses sap green to
paint your Lilypad. You might need to
grab more water to activate more of your paint. I'm using quite a bit of water because I do want to
keep this Lilypad wet so that I can drop the indigo in while
it's still wet. I'll clean my brush. Now I'm going to
grab some indigo. I'll use the integral around the outer edge of my lily pad
just to give it some depth. Grab a little bit more. There. If I want to, I
can always soften the edges between the two
colors by cleaning my brush, tapping my brush
on my paper towel to remove the excess water. And then using my brush
to soften those edges. Now that the center
of my flower is dry, I'm going to mix a darker yellow to paint
in the very center. Grab your lead and add
some water to your lid. The colors that I'm
going to use to mix a darker yellow for the
center of my flower. Are the gamboge yellow mixed with just a
little bit of purple. Adding just a little
bit of purple is going to deepen
your yellow color. Remember that if you
have too much liquid on your brush for the fine details, you can dab it on
your paper towel so that you don't have
quite as much liquid. I'm trying my best to go
around what I already painted, but if I go on top,
that's okay too. If the center isn't dark
enough for your liking, you can always grab just
a little bit more of that purple and add it to your
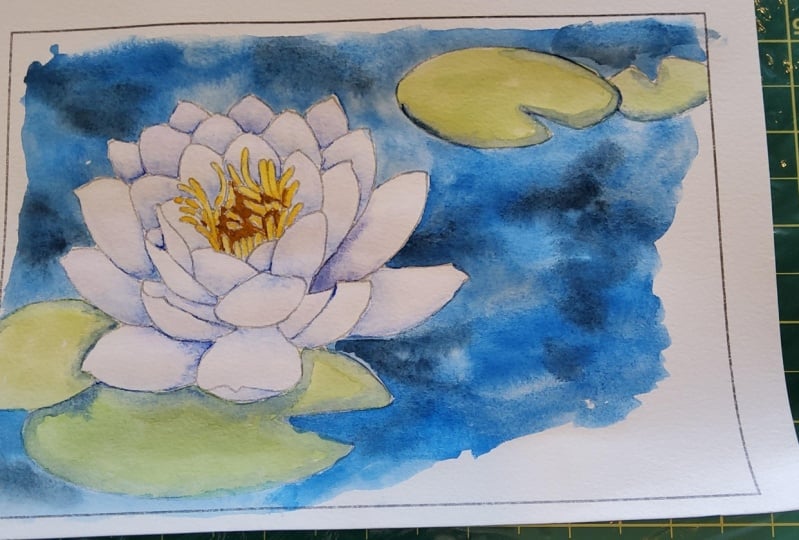
center while it's still wet. Once we've given enough time
for our lily pads to dry, we're ready for the background
color of the water. We're going to use a
wet on wet technique. We'll be using Prussian
blue and indigo. First. Let's start by wetting the
area we want to paint. Since the water is a
large area of our paper, we're going to chunk
this into sections. So I'm going to start with
this lower section first. I don't want to wet
the whole paper. Otherwise it'll dry. Before I have time to add color. Now right here, I had my water
go over onto the Lilypad. I'm going to use my
paper towel to block that up because I don't want any water on top of my lily pad because that's
where the pigment will go. Now I'm ready to
drop in my color. I'm going to start
with Prussian blue. Drop some water over this dot to be able to get a
nice dark color. And now I'll drop in that color. In the wet area. I'm going to use some of the indigo to add in some
darker value to my water. I'm not going to
add the indigo to every over all the blue. Just going to add a
few spots of indigo. It's going to give some
depth to my water. Now I'm ready to move on. As I'm working with wet on wet, I like to turn my paper so that my hand isn't resting on the
area that I just worked. While you let your flower
dry on the back of the card, there are few little hearts
that you can paint as well. And signed your name where it says hand painted with love. By. Thanks for watching. If you enjoyed this tutorial, please follow me
on social media, check out my website, and make sure to subscribe
to my YouTube channel.
 Emily Marie Watercolors, Watercolor Artist and Dog Lover