Transcripts
1. Black Bear in Fall Aspen Trees Step-by-Step Painting Tutorial - Intro: Hi, I'm wildlife
artist James Corwin. We will be painting
a young black bear crawling up fall aspen trees. I will take you step by
step through this painting, demonstrating here on
the canvas and then giving you time to complete
each step before moving on. In the video, you will see a prompt show up that
says pause a video. That'll give you some
time to do that step. Rwatch any section that you need to if
there's something you missed and when you're ready
to move on, press play. If you're struggling with
anything or have any questions, please reach out to me, ask me in the comments
or send me an email. I'm super happy to help. This class is great
for all skill levels, even if you've never
painted before. The color we'll
be using today on our paper plate palette
is ivory black, cadmium yellow, titanium, white, cadmium red, raw umber, and some ultramarine blue. Also have three brushes. It's a large flat brush, medium flat brush, and
a small pointy brush. Some water for rinsing those brushes and
cleaning them off. A paper towel for drying. Also, if you make any mistakes, we're using acrylic paint, which is super forgiving. So just dampen that paper towel and wipe that mistake away, or you can let it dry after a few minutes and
then paint over it. Our canvas is 11 by 14 in size. All right. Let's die.
2. Black Bear in Fall Aspen Trees Step-by-Step Painting Tutorial - Laying in the Grid Lines: In our first step here, we will use our small
pointy brush and our black. I like to get my
brush wet in some of the water to make it
flow more easily. We are going to start with a grid system and drawing
out this grid helps us place our bear accurately and proportionately on our canvas before we start
filling in with color. The first line I'm
going to do is divide our canvas in half vertically. When you put in these lines, put them in very light and faint so that they don't show through in
the final painting. We'll also do a line going
across horizontally, cutting our canvas
in half again. Now, focusing on
this bottom half, we're just going to
cut that in half using your best judgment on where
that halfway point is. Then finally, up
in this section, we're going to divide
that into thirds. Again, using your best judgment, measure this distance
so that they are equally apart and then
draw a line going across. For this section here, we're going to divide
this in half vertically. And this half and half. Great. Go ahead and start
putting in your grid now. Rewatch this section
if you need to, and then I'll meet you
in the next section.
3. Black Bear in Fall Aspen Trees Step-by-Step Painting Tutorial - Begin Drawing your Bear within a Gri: We will continue using
our small pointy brush in our black and begin
drawing in far bare. We're going to come
to this circle here. This line will actually
become the edge of the tree. Focusing on three
squares in and two down, go ahead and paint a
circle within that square. Now our destination
here is for the foot. So coming off of this circle, I'm going to put in
a bit of a neck. Then this arcing curve that is the back of the
bear, it bows out, but it's going to curve down and about halfway between here and here is where it will
rest on this line. Like that. Then if we were to come from this point to this point and find
that halfway point, make a mark, this is for
the extended foot that goes down and then curve into
the tree line here. Do those steps now and
then I'll meet you in the next step and we'll draw
out some more of our bear.
4. Black Bear in Fall Aspen Trees Step-by-Step Painting Tutorial - Finish Drawing your Baby Bear: Let's add in some
more of our bear. We're going to put in the elbow. Our destination is
this line here. We're going to come
from this point, this intersection and start the arm at about 5:00. Well, six, five, four, three, about 4:00 down. His elbow is going
to sit right there. Then we're going to come
up towards this line. Right before we get
to the top though, it's going to curve
off for the paw. This is about 2:00. The top of the paw just
hits right on this line and then back in creating a
bit of the elbow there, but we want need to
fill in too much. The rest of the body
goes into the tree. Of course, there's the ears which fill in this
triangle here. Triangle that makes in
the box, I should say, right in there, and
then another ear going right to the edge
of that line there. Finally, in her face. Let's find the center
of that circle. If this is 6:00 and
five and seven, do a triangle that goes to
seven and goes to five. And within that do a
box for that nose. If we were to draw
just a very faint line going across here, dividing our circle in half
off of our point here, you can do a little loop
here and a little loop here for where the eyes will be Perfect. That's all we need to do for
drawing out our black bear. In this next step,
we'll begin to add in our first layers of color and build up the layers and we'll also be able to draw
in some trees too. I'll see you in the next step. Let's mark out a few of our
trees. We have this tree. I'm just going to
darken it so how do we know that that's
going to be a tree. The other side of this tree is very close to the
edge of the canvas, but just about an
inch or so off. Again, I'm making this
line pretty thick so that I know this is a tree
line and not a grid line. You can even mark X
in it if you want, this is a tree and these
are not trees yet. We'll do that now. Let's make this either
side of the tree. Thick line and
another thick line. Going right down to the back and continuing down to the bottom of our canvas and the
other side too. X in there, so I
know that's a tree. We're going to take this line
and turn this into a tree. This one's a little skinnier. You can take any
artistic liberties that you want in your painting. Meaning if you want thinner trees or thicker
trees than I'm doing, feel free to create the forest in whatever
way that pleases you. Okay Finally, there's a tree over here that's going to go off the
edge of the canvas, this has an X, X. I know that's a tree. I don't get confused by
these negative spaces. And that's a tree. Pause the video now
and complete the step. When you're ready to move on, press play, and I'll
meet you the next.
5. Black Bear in Fall Aspen Trees Step-by-Step Painting Tutorial - Filling in your Bear with the First : For this step, take out
your medium size brush and take your black and mix just
a little bit of red into it. We're looking for deep
burgundy red wine color. And this is going
to be painted as your first layer into the
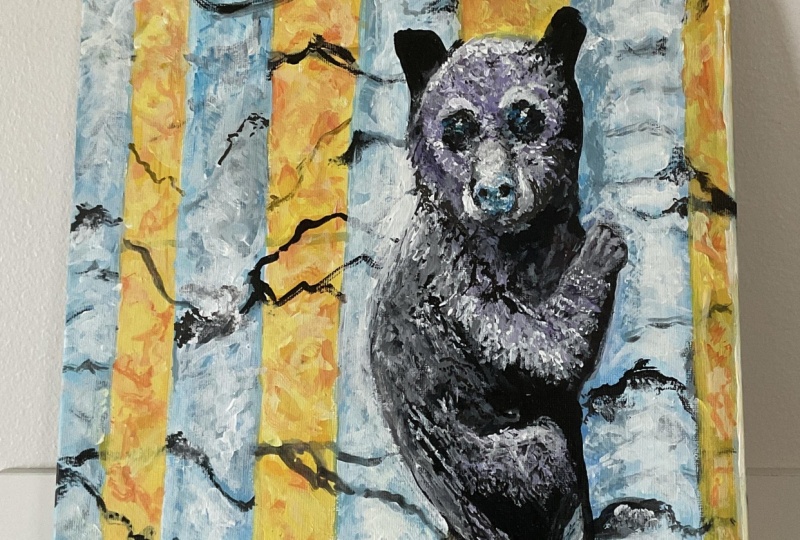
body of your black bear. Even though it's a black bear, we're not really painting too many black colors
into this fur. Instead, it's going to have more purple and
blue tones in it, which go very well with the gold and fall colors
will be also painting. Now you can see because this
paint goes on transparently, I can see my brush strokes. Now I'm using this
to my advantage to bring out the fur
texture and the bear. I'm mindful of the direction
of in Brush strokes. There's also a hip in here. We'll bring it out more later. But I can carve that out now in Brush strokes and the foot there just so I know where
to come back to later. The direction of
your brush strokes, bringing out the
form of the bear, starting to give it some
three dimensional form. If you were to just go
horizontally or vertically, it would really
flatten the image. Taking note of the
direction I'm taking these brush strokes
so you can copy it and do the same
in your painting. Now, as I do the face, I'm going to leave
the eye sockets and this triangle area
unpainted for right now. We'll come back to that if
next later step could be nice. That way we don't lose it in the other purply color
we're putting in right now. I'm just going to
square that off those corners and take the point out of the
top of that triangle. My black bear is painted with
its first layer of paint. Do that step now and then we'll start to add some more colors. We'll probably work into golden
colors and let that dry.
6. Black Bear in Fall Aspen Trees Step-by-Step Painting Tutorial - Painting the Background Yellow: Go ahead and clean off
your medium brush, give it a good dry. We're going to take our
yellow and just pure yellow, and we're going to
paint yellow in those negative spaces between our trees and make sure you know which ones are the trees so that you don't accidentally
paint yellow into it. And we're starting with
this yellow because it is quite a transparent color and we want the brightest
yellow to show through. Normally I teach painting
and we work dark to light. But in this case, we're
going to be working light to dark for the fall foliage. Don't worry too much about seen grid lines showing through. We'll be able to remove those in future steps as we
put in more layers of paint. Go ahead and start quitting in the yellow if you
haven't done so already. I'll meach the next step. K.
7. Black Bear in Fall Aspen Trees Step-by-Step Painting Tutorial - Painting the Trees: Clean off and dry
that medium brush. We're going to make a
light gray by taking our white and mixing
with some black. This is going to be our
first layer base coat of paint here for our trees. You can start to also paint out those black drawing lines. Go ahead and fill in all that
white space with the grey. Beyond the next tree. This is such a calming step. Go ahead and finish
painting in your trees, and then I'll reach
in the next step. And
8. Black Bear in Fall Aspen Trees Step-by-Step Painting Tutorial - Adding Shadows to the Trees: Clean off that medium brush
and keep it a good dry. We are going to make
a gray that's ever so slightly darker than the gray that we have on our trees
by taking out white, mixing it with black. Until you get a gray, that's just a step
darker, just like that. This gray is going to go
down this side of the tree. This is going to
add a roundness to our trees so they're
not so flat. So on this side too. And a bit of this shadowing
underneath the arm. Even darken it up ever
so slightly red in here because this is a real shadowed
area underneath or there. I just added a little
bit more black to that gray just to darken that down. Same here along the face. Now, this will continue
on these trees. Creating a darker strip
of gray on either side. And for this tree, we just have this one side. Okay. Do that step now and I'll meet you in the next step. Okay.
9. Black Bear in Fall Aspen Trees Step-by-Step Painting Tutorial - Painting the Nose and Eyes: For this tip, we're going to use our small pointy brush
and take our brown and mix just a little
bit of white into it to make medium shaded brown. That's going to be going right here into that white space. Finishing off the
nose and muzzle area and also right up here
into the eye socket area. Beautiful. Then rinse off that
brush. Give it a good dry. We're going to do the nose, which is just a gray by taking white and
mixing black into it. But this gray is darker than the gray we did for the trees. It's more of a medium gray. And just fill in that box
like that. Do that step.
10. Black Bear in Fall Aspen Trees Step-by-Step Painting Tutorial - Adding a Layer of Dark Fur: Take out that
medium brush again. We're going to add a new layer of paint now into our bare, taking our black and mixing it with a little bit
of that red again to get that really deep dark
red black color. I might actually add
a little bit more black to that
because we're doing the shadowed areas now bare to give it some
three dimensional form. We're going to be
working dark to light. I want my darkest bits
of fur to go on first. That's going to start right here in the neck underneath the head. All the way down to the arm. Then we have some right
here underneath the arm on the belly above this hit that we drew in with our brush strokes. Darken that a little bit. Bring out some of these
knuckles and shading on the arm a little bit of dark fur here in the leg, but more around
where the foot is and down this foot two
and watch carefully where I am placing this darker
color so that you can do the same in your painting. Leaving these areas lighter, but darker as we get
closer to the tree. Now up in the head,
we have the ears and the side of the face here trusses up
against the tree. A now for the eye sockets, darken those there. We'll bring out some
of this tan brown around the eyes again. We'll just give
those some darkness. We're going to let that
dry now and we're going to move into doing
some of the trees before we move back
into our black bear.
11. Black Bear in Fall Aspen Trees Step-by-Step Painting Tutorial - Painting in a New Layer of Lighter F: For this step, take
out your small brush. We're going to revisit
that dark burgundy color, taking her black and mixing
just a hint of red into it. This time we're going to
lighten it up by taking white now into that color. It's a bit too much white. You only need a little bit, darken that down some more
black bringing red again. But I'm also going to take
some brown into this, mixing that brown in there. And getting the red back in. What I'm trying to do is recreate this burgundy purply
color similar to here, but with a more opaque color rather than the
transparent color. If you were to bring
just the white into it, you'll see that it's a
pretty gray purple color, but bringing that
brown and red into it will certainly give it
some more vibrancy. You can always test this
color here on your canvas, and this is closer to
what I'm looking for. I'm going to begin to
paint this in now bringing out these furry
feathery brush strokes as I work this color in, letting it just fade lightly
into my shadowed areas. I'm also very mindful
of the direction of my brush strokes so
that I can bring out the natural form and
shape of my blacker. And, Again, watch how I'm placing
these brush strokes so that you can do that same
direction in your painting. I bring out these knuckles for when we put the claws in and the claw
marks in the tree. Now in the face here, these brush strokes go
around the face like the dials in a clock or hands in a clock,
I guess they are. Shape out these eye
sockets here so that. They're a little more
friendly and cute. Nice. I like that.
You can see I'm starting to get that nice
furry texture in there. View this step now and then I'll meet you
in the next step.
12. Black Bear in Fall Aspen Trees Step-by-Step Painting Tutorial - Adding White Highlights to the Trees: Let's do some more work on our aspen trees with
our medium size brush. We're going to use pure white starting here in
the center of our tree, we're going to paint
that color down. But as we paint it, we're going to use that residual
paint to push it out to the sides of our tree so that we get a
very light gradient. But you can still see that
gray showing through. And this will create that
beautiful roundness of our trees before we put in all the characteristic
notches of our aspen trees. So you can see and
probably even hear it how I'm just
scrubbing this color into those darker grays to create that blended
transition of color. I like this going
back and forth here. That also brings
out some roundness. Let's do that. Be careful
not to paint over your air. If you make a mistake, I'll show you I'll fix it
because I'll do that too. But I'm just going back and
forth and arc curves here. Beautiful. Do the same for these trees too. Doing that same technique, rocking those brush
strokes back and forth, bringing out that natural
curve of the tree. It's a little hard to get those brushstrokes in there
in these tighter spaces. I'm just going more straight up and down
in that area there. But these ones will be
easier to do it all. Get some more weight. Then finally, take some more
of that pure white and just do another solid strip of white down the center of the
trunk just to give it one last bit of polish and I'll really set some curvature to these trees. Beautiful. All right, pause the video now, complete that step when you're ready to move
on, press play.
13. Black Bear in Fall Aspen Trees Step-by-Step Painting Tutorial - Adding Fall Leaves to the Background: Let's do some more work
in the background in those yellow areas that we
haven't painted in a while. Take out that medium brush, give it a good clean and dry. We're going to take our yellow and make a very light orange. Just a hint of red
is all you need. And begin to paint in just
random blotches here. These are going to serve
as fall aspen leaves, adding some variation to
that background there. Start to break out
that yellow all bit. I'm just randomly
placing these in. U. Great. Do that step now. Two.
14. Black Bear in Fall Aspen Trees Step-by-Step Painting Tutorial - Adding Details to the Nose and Eyes: Go ahead and pull up
your small cony brush and take just a little bit of your pre brown and draw these very faint lines down on either side
of our nose here. Then right under the nose, it's going to be just shadowed like that. But then take white and bring
more white into that brown. We're going to make a light tan that's lighter than
that color there, but we're going to add
just some tinted yellow to it to warm it up a little bit. That color is going to
go right across the top here and into this cheek area. Then there's a little
bit right up here in the eyebrows and under the eyes. It's very faint and light. That's all we need to do there. Do that step and then
we'll do the next step, which is adding a little bit
more details to the face.
15. Black Bear in Fall Aspen Trees Step-by-Step Painting Tutorial - Bringing the Nose and Eyes to Life: I rinsed off my small brush. I'm going to keep using it. I'm going to take my
black and mix it with that blue to make
a dark blue black. That's going to go right
here in the nose for two little nostrils
and then some shading right under the
nose and down for a mouth. Then we're going to add
just a hint of white to that to lighten it up so that we get a light blue gray that's lighter than
the one we have here in the nose so that we can do
a highlight across the top. I think I want to darken
this just a little bit. I'm going to go back to adding black and blue to that gray, just so I can darken underneath
the nose ever slightly, you're welcome to
view this with me. Just make it a
little more natural. Great. Now with this dark gray, can also just bring out
a little glints here for the eyes doing an eyelid, hint of light up in the upper eye and then taking just a dot of pure white right up into the top. Give it that. Their some light. Maybe a little glint of light right here
on the nose, too. Beautiful. Do those steps now and then I'll make
it to the next step.
16. Black Bear in Fall Aspen Trees Step-by-Step Painting Tutorial - Painting Knots and Branches on the T: We're going to make
our aspen trees look more like aspen trees now by taking our small pointy
brush and our black. We're going to bring
out these notches here. And again, use your
artistic liberties in placing these notches. You can do exactly as I
do it or you can make up your own and wherever you
think they look best. The only thing I would say in
this step is less is more. Don't really overdo it with these notches
because it's easy to do. But just keep it simple. You can see them dragging some very faint lines
across here too. You can notice
there's a slight arc to these lines and notches. That's because I want to
keep that curve form of the tree trunk. Okay. Let's add some branches
to these aspen trees. Coming off some of these
notches, using our black, we can paint in a
few branches here. I can also use
these grid lines in the back some branches. And a few little branches
here in the background. Again, less is more, so don't want to
overdo it and get too many branches and make
the painting too busy. Do that step and then I'll
meet you in the next step.
17. Black Bear in Fall Aspen Trees Step-by-Step Painting Tutorial - Adding Fall Gold Leaves: For this last step, I'm going to do the
highlighted fall gold leaves. And I'm going to use
my small brush again. Gave it a good rinse and clean. I'm going to take my yellow
and mix it with some white to make a very light,
more lemony yellow. I can now just dab
this in here all into that yellow to bring out
some highlighted leaves. This is also a chance
to cover over any of those blasting grid lines that we don't want to
see in our painting. I'm still leaving this yellow
and orange showing through. I'm not completely covering over everything with my light yellow. I just love that. Go
ahead now and finish that step and then we'll close
out this class together. And
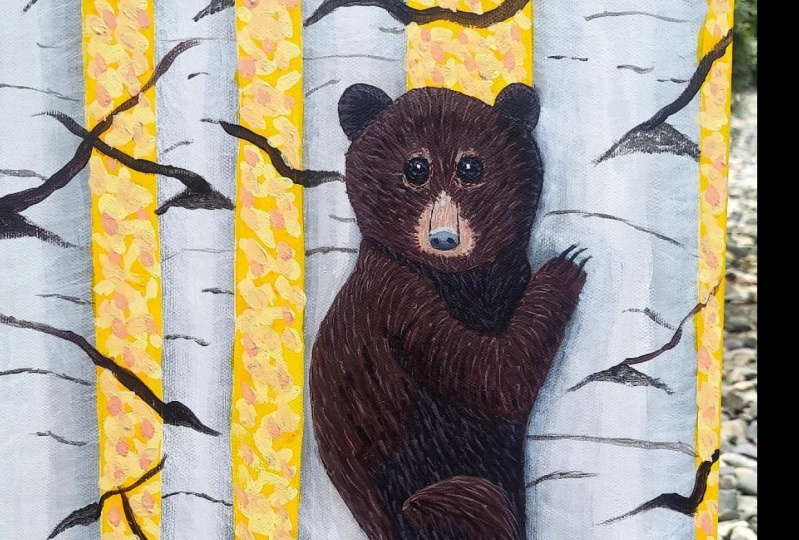
18. Black Bear in Fall Aspen Trees Step-by-Step Painting Tutorial - Closing: What a fun painting. I hope you enjoyed
learning how to paint this little black bear
and fall aspen trees. I certainly enjoyed taking you step by step
through this process, and I hope you'll join
me in a future video. Please follow along, subscribe, and send me pictures
of your painting. I would love to see.
Thank you so much.
 James Corwin, Professional Artist