Transcripts
1. Introduction: Do you want to turn your skills
into a source of income? If yes, then this
course is for you. Because in this course,
you will learn how to create animations and
product renderings, that will not only
allow you to create a portfolio that will
attract your clients to you, but also will allow you to satisfy your clients and
grow in the free field. And you don't need a higher
education in Free D or supernatural abilities to learn this because in this course, you will touch on all
stages of creating content in free D
from basic knowledge, modeling and creating
textures to animation, lightning, and even
color correction? And we will also share the
secrets of professionals. That will allow you to
learn how to be one. So don't miss the
opportunity to learn valuable skills with
which you can create a unique portfolio that
will attract clients to you and will help you gain
respect from the client. Let's not waste a minute
and let's get started.
2. Basic Knowledge: This lesson will be useful not only for absolute beginners. We have learned how
to open a blender, but also for pros, because we will also learn
a secret technique that will make your work much easier and save
you a lot of time. This lesson, we will learn all the basic
knowledge that will be necessary not only to
create today's masterpiece, but also which will serve as a basis for you to
create a free model, which will give you
unlimited possibilities and create in masterpieces. So let's get started. The first thing we
need to do is open a blenzer and create
a new project. And congratulations, you
have learned Blenzer. Just, we have a lot of
new things to lower. But let's start with the theory. The three D word consists of
three directions of length, width, and height
or x y, and z axis. In bundle, we can
notice them as red, green, and blue lines. You can also find
out which axis you are on why looking here. In blender, as in other
programs, you can scale, rotate or move an object
along the x cric or axis. To scale an object,
you must first select it by clicking on it, and then press S. In order
to rotate, press R k, in order to move g key, and also if you then
press the x equ. That keys, you can do these three actions
along a specific axis. Blender also has modes
that you can choose here. As you can see, there
are a lot of them, but today we will analyze only two of them, the edit mode, and the object mode, in which we are by default, and which allows us to select different objects and make changes that I
mentioned earlier. Edit mode is intended for more detailed changes
to the object. To go to the edit mode, we need to press top and in it, we have the opportunity to
choose between changes voices, edges, or faces, which
we can select using one, two, or three keys. And we can also rotate them, move them, and scale them. But in edit mode, there is another new
action available, and this is extrusion. To extrude, you need to select the vertex corner or
face and press the key. So let's move on to how to rotate the camera
and create objects. To see our object from
different angles, you need to hold down
the middle mouse button and move the mouse or
rotate the mouse wheel, to zoom out, or move
closer to the object. But how to create an object. Everything is simple here. To do this, we press
Shift plus A, and here, we can select a different
set of things that we can create from standard
ships to Suzan. You can play with it and find
out where everything is. Now the trick I promised
at the beginning. Now a question for the experts. Did you know that in edit mode, you can simultaneously
select vertices, edges, and faces without switching
between them every time and without using the
annoying menu or keys. Well, this is possible. To do this, let's go to the edit mode and
withholding shift, select, for example, vertices
and corners in this menu. Now we can select both. You can even not waste time and select everything at once to save a lot of time and save your fingers from
hard work labor. In this lesson, we learned all the basic knowledge that is useful for creating
a free model, and also learned a secret
that will make your work much easier and save you a lot of time when
changing an object. And in the next lesson, we will apply the
knowledge again and create all necessary
object for animation. And in the next lesson,
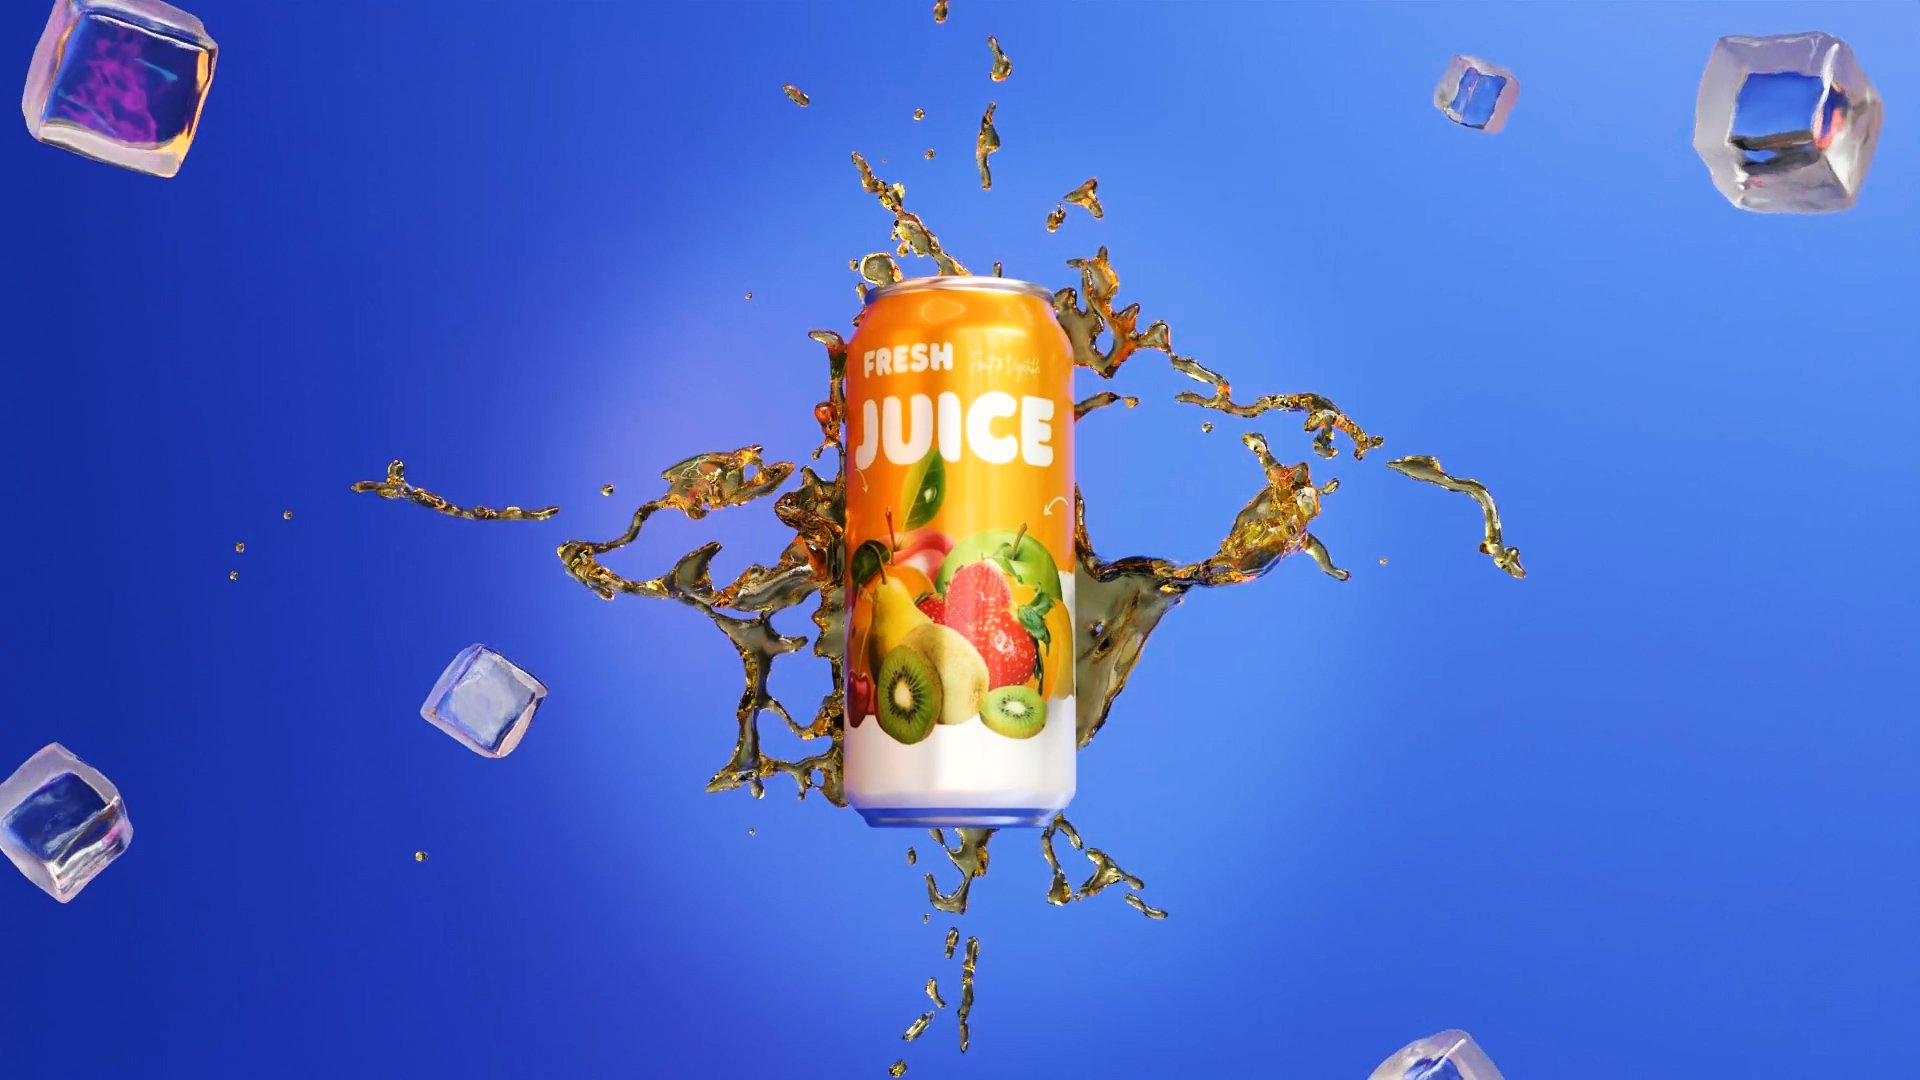
3. How to create a Product in Blender: In the previous
lesson, we've learned the basic knowledge with which
we can create free models. And in this part, we will create a pre model
of a product as will become the center of attention and
the main object of our scene. So let's decide it. Okay, ladies and
gentlemen. Let's begin. The first thing we need to do is obviously open the blender. And I hope you have
already installed blender. If you don't, just
go to Google type the load blender and deload the latest
version from the site. So with blender open. Let's create a new project. And in the left corner, you can see all the
buttons that they press. So even if I say
something wrong, you can see what I'm doing
right now and repeat after me. Select all these things
and delete them. Then press three on the
und, go to the front view, press Shift plus A and select the reference that I have
attached to this course below. And let's move the reference on the x axis so that it doesn't interfere
with us when modally. And now I will show
you a unique way of creating objects from
reference using coves. So press Shift plus A
and create a basi cove. Let's rotate on the x
axis by 90 degrees. Go to the edit mode
by pressing up, and similar to the
penol in Photoshop, we will replicate
the shape of the can by selecting this points, moving them, and scaling them, and also rotating them. When you're done with
that ankle, press e two, duplicate the core
then we need to repeat this process until we duplicate the
shape of the can. To be honest, this
tool takes a bit of practice and may take you
some time to get used to it. Okay, we have already covered half of it, and we don't need to do the
same on the other side. And now I will show you why. Okay, now that every Right click click convert
two and select mesh. So now it is no longer a curve. Then go into the edit mode, select pin by pressing A, select the spin tool on the
left side of the screen, and make sure that the
ax is selected here, and the color of
this line is blue. Then grab this las icon
and move your mouse, and you can see that the can is magically
appears on our eyes. Now, in the lower corner, there's a setting menu for the tool in which we
can change the angle, which will be 360 and
the number of steps. I'll set it to 17 steps, but if you have a slow computer,
you can leave it less, but don't set it to a very
small amount because our can will be too low poly
for a realistic render. Okay, let's tweak
our can a little. At the bottom of the can, let's select all these
vertices by holding alt and turn on
proportional editing here. Press G, and by rotating
the mouse wheel, you can adjust the
proportional editing radius and just move along the z axis. Thanks to it by
changing the, vertices, we can influence and change those that are
around to hide this whole press F. Let's
go to the top part. Here we need to select
all these potics Press, then to scale, then press again and move it
down on the axis, and we can also
scale it a little. Let's add more polygons to it and add a subdivision
modifier here. Okay. Trade it smooth. I decided to get rid of all these
vertices because I fought that we wouldn't
need that many vertices. But later on, I
was wrong because we will need them for a
little bonus that will add more realism to
our C. But if you have a low PC or laptop or
weak PC or laptop, you can also do this by
selecting all of them, holding and after you're done, press X and self dissolve edges. Let's add one more reference. Press num seven on the
numpad to call the w. Then press s plus
a image reference, and then select the
second reference. Let's also scale it to
match with our product. Next, select our product. Go to the edit mode, hide the division for more convenience and
select these vertices. The shift plus d
to duplicate them. And then select P selection to make them a separate object. Go back to the object mode and to select the reference and vertices we duplicated and
it to focus on those two. Let's go into edit mode. Alex rode these vertices
and then scale them. And to make our job easier, let's add look at here to add
a center edge to the side. And then we need to select all
vertices on the left side. Okay. And then delete them. I know the sounds weird because now we're
missing how can. But when we add the
mirror modifier, everything will be in a place. Just make sure you only select
the axis in that modifier. Now when we do something
in the right side, it will repeat it
on the left side. Let's move the vertices
according to the reference. Inside the vertices and
extrude them along the axis. And let's scale them too. Oh, yeah, we also need
to check the clipping in the mirror modifier and
now move the tices to the center from this
side and from the side. All right. Now we just need to move the vortices
according to the reference. Okay, and when
everything is ready, extrude and scale it again. As you can see, the
process is not very complicated and quite simple. Again, move the vertices
according to the reference, and here extrude this edge
and select these two edges, and then also extrude them
and move along the x axis. To fill this hole, select
the edges around and press and the same here. Let's also add a loop cut here and just move it according
to the reference. Let's extrude and
scale it again. We need to connect these
edges by selecting them on this side and on this pressing F and
on this side too. Let's save our file by
pressing control plus S. And then we put our
subdivision modifier back, we'll see this terrible result. Okay. To fix this, simply take the mineral modifier and
place it over a subdivision, and everything should
work fine again. Let's make it more realistic by adding loop cuts
around the edges. Pick and hide the
subdivision modifier for convenience and add the lopcuts in those places where
we need sharp edges. All right, looking great. But there's one more thing we need to create to plet our can. We need to create the opener. So go to the edit mode, Select that phase
Duplicated press P, selection and make it
a separate object. Now let's move it or even
hide it for convenience. And here we again simply
move the edges and extrude them according to the
reference as we did before. The But here we need to extrude it
up along the Z axis. And to add thickness, select then by pressing A and then extrude eth
along the Z axis. And also, we need to add lopcts around the edges
for more realist. Okay, ladies and gentlemen, we've almost created the can. The last thing we need to do
is get our thing into place. To land this part
exactly on our plane. We need to open this
menu and click on this square picture and move
this part on the z axis, and this hole control. Click on that plane. Let's apply Mmdifi
store objects. Now, let's select all
objects and combine them into a full by pressing
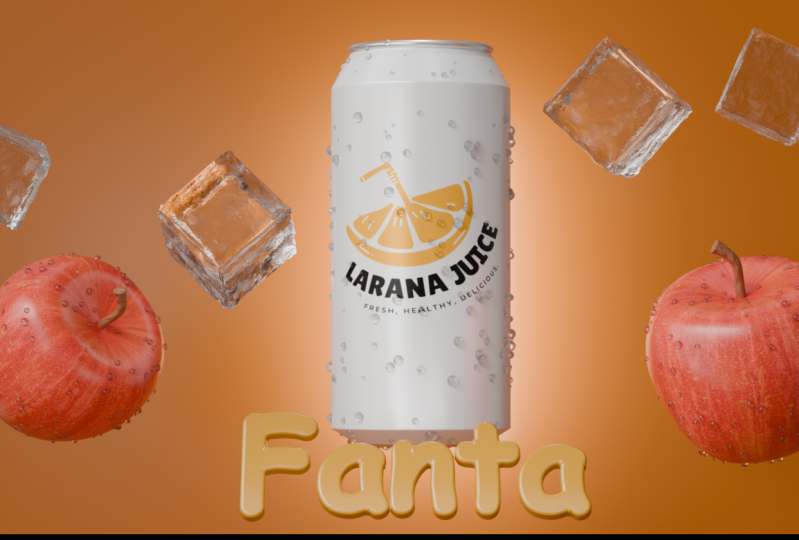
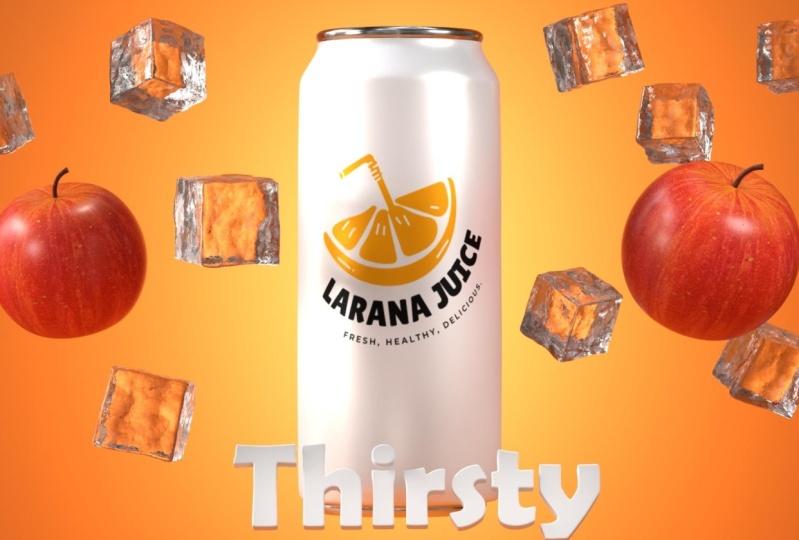
control plus j. Here we go. O can is created.
4. Creating additional objects: The previous lesson, we learned a unique way of creating from reference and created a
free model of the product. And now we will continue
modeling and create new objects necessary for animation using new
interesting methods. Okay, so let's hide all the
objects and create a cube. Then we'll go into
the edit mode and add a loopcs by pressing
control plus error. And here, let's change the
number to 17 in this menu. In this side also
make 17 loop cuts. And on this side too. All right. And now we need to go
to the sculpture mode. And with help of all
of these brushes, we will create a
realistic ice cube. I usually use these brushes. You can also change
the strength, radius of the brush. Let's also add a
division of fire to it. And use our imagination and
the tools that we have. To give the shape of ice. We can also use proportional
editing to form a Q. And this is what
I got in the end. Now let's go back
to the object mode and return all the objects. And scale our cube
to a realistic size. Also, let's rename our objects. Just the object, and here
we can give it a name. And also, let's unhide our references and
create a collection for it by pressing M new
collection and naming it. And now we can hide it. Okay, let's create an apple, press Shift plus A and
create a with sphere. Go to the edit mode, slit vertice at the
top and at the bottom. Now we need to enable proportional editing scalt axis while changing the radius
of proportional editing. Okay. I also press S plus shift plus z to scale
on every axis except Z axis. Let's also add a subdivision
for more realism. And also using
proportional editing, we can add more details
for even more realism. Okay. When we're done, let's create the last object
to complete our apple. Press s plus A and
create a cylinder. Scale it and place it
on top of the apple. Then co to the edit
mode and add a bunch of loop cuts Select
the top partices and with proportional editing
enabled, rotate them. Now slide the top
phase and extrude it. Now we can disable
proportional editing, and we need to
scale it a little. Okay. And for realism, we can add a
subdivision modifier, and also a loop cuts
along the edges. The last thing we need to
create before we move to texturing and machine rendering and all of that
good stuff is text. So press Shift plus
A and create a text. Did it on 90 degrees on the
axis and by pressing tab. Now we can change the text, and let's write something
to attract attention. Here is this menu, we can
change our text, how we want. For now, let's change
the phonet here. I personally choose
the Berlin sense, but you can choose
whatever font you like. Let's also rotate it on Eric
axis by an ty decrease. In this menu, we can also change the depth
more and extrude it. But if we do that, we
might see this bag. Let's do it another way. First, let's convert
it to the mesh. And if we go to the edit mode, we will see this
horrible topology. So let's fix it. And then we
need to add remesh modifier. And change the oxal
size to something less. But be very careful
and change it gradually because less the
number, the more words. And your chances of
crash will rise. And also, this is why
I want you to save your project because
I didn't save it and lost all the progress. Usually, if you didn't
save your project, you can recover if
you click on file, recover and out to save. And here should be all the
out to saves of your project. But for unknown reasons, my bladder decided
not to save anything, so I had to create
everything again. All right, let's back
to our text this time, I set the oxal size to 0.006 and also added a
solidifier modifier. And then apply all modifiers. And as you can see, the number
of polygons is too high. So we need to add
another modifier called decimate and play with the ratio until the number of polygons will be
acceptable to us. Let's say 15-60
thousand polygons, and we need to also
apply this modifier. Now let's go to
the edit mode and select T letter with
x rate turned on, which will allow us to
see through the object, and then press P selection
to separate this letter, and we need to do that with
every letter that we have. Then exit edit mode, and while all the
letters are selected, right click and set the
region to the geometry. And so let's create a
collection for a text by pressing new collection
and giving it a name. And also let all the objects. Let's also scale to a
more realistic size. And also make sure the length of the apple is less than
the length of the can. This is very important
for animation and our object created. Okay.
5. How to Create Materials and Textures: In the previous lesson, we created all the
necessary objects. And now we will learn how to add color to the scene
and figure out how to create and apply materials and textures to the scene
to create a O effect. So let's get started. All right. So the first
material that we'll create is the ice material
for the ice cube. So go to the shading
and select our cube. Then click on new and create
a new material for the cube. And here we need to change
the transmission to one, Now we need to enable one
very important addon, go to the edit, then settings, then add on and
typene branglar in the surge part and put a
checkmark in front of it. After that, we can
close the window. Then press so plus a type
noise texture and create it. In the same way,
create color ramp, and connect noise
texture to the color. Then click on noise texture
and press Control plus T. Let's also connect
cool to the roughness. Now let's change the parameters
of the noise texture. Scale, change to
4.1 itle change to 11.8 or so and the rest will leave as it is. And the color ramp takes the black stick and
place it at the 0.45 position and the
white stick position 0.8. This is the result we have
right now, but we can do it. To do this, let's create
another noise texture. And this time we will create a bump node and duplicate it. This noise texture
connect to the height of the bump bump node
connect to the normal. And, the strand is too much, so we need to change it to 0.08. And also we need to connect this nice texture
to this bump node. And let's change the
nice texture parameters. Detail, we can change to 2.8
and the roughness to 0.4. And let's connect
the pump node to the clear code normal and
also change the strength. But this time to 0.12. And our texture is ready. Now it's time to
create the texture for an apple. So let's do that. So apple and go to the shading. Again, click on to
create new material, then select that node and
press Control plus Shift plus t and select the textures that I have attached
to your below scores. We can also increase the
ten of the normal map. And we can delete
the displacements and the ambient
occlusion textures. Now, let's create a new material for another part of the Apple. We need to go to
this menu and here, click on plus, and here
creates a new material. And here we need to
change the color to brown or something that
will remind us of the wood. And as you can see,
nothing changed. This is because we need to apply this material to this
particular part. And to do that, go
to the edit mode, select any phase of this part
and press L. After that, click on a sign. And as you can see the material applied to our
part to this part. And to make it more realistic. Let's add a nice texture. And in addition to that, we need to add a bump node. Again, connect nice
texture to the height. All that led to do is change the nice and bump no parameters. Now let's add
colors to our text. Sld synle text, and
go to the shading. And add the new material. And here, then is very
quick and simple. We just need to
change the roughness. I played around with
this parameter and find that 0.45 is the
best value for me. You can also try playing with it and see what suits you best. To apply this material
to other letters, let's select them all. And the last one we need to select this letter
is the material and then press Control plus
L and link the materials. And the last but not least. We need to texture the can. But before we do
that, we need to add Sams to the can in order to
apply our texture correctly. Go to the edit mode, and now we need to select the vertices where our
label will start and end. Just select them with right
click and select M Sams. At the bottom of the can, let's select all these vertices by holding out right click
and select Mark Sams. Also, we need to
go to the back of our can and select
the center line. And also mark the scam. Now we can add texture to our. Go to the material settings, click two times on the plus, and create a material
for the second one. It will be a metallic material, so increase the metallic
value to one or close to one and reduce the
roughness to 0.17 or so. We did all that, but
nothing happens. This is because we need to apply this material to
certain parts for, which is why we previously
created the seams. And to apply it, we need
to go to the edit mode, select one phase from
the top and press L. Here we need to select the second material
and press a sign. And we need to do this
at the bottom as well. Also, this whole part
should be metal. Let's apply a material to it. Okay, great. And now it's
time to add a label. So create a new material
for the first slot, then select this node and
press control plus t. And select one of the labels
elite in the description. I will leave you three
or four different labels so that you can learn
how to apply them all. Because when
rendering a product, this part is very important, and you need to pay attention
to the details because if your label is too big or
small and the original, it could ruin everything, and your client might
not be happy with it. Okay, now let's go to the
editor, the editor here, Go to the edit mode,
click on the face, select them all, and now we need to press
and click on rap. In the spin D, let's rotate
the CV map on 90 degrees. And as you can see, we can apply the label to the
can in this way. But as you can see,
there's something wrong, and the label is mirrored. And to fix this,
we need to press Shift plus on the top window, press and then wrap it again. And now we need to select all of these edges from top to button
by holding chief to it. When you have selected them all, press the right button
and select strength pen, and they would be
perfectly straight. Now we need to do this
on this side also. Now we need to just scale it, rotate it and move it until it matches the
actual reference. Let's also increase the metallic and this material
and the roughness. And here we go. You
learned how to texture.
6. How to Animate: In the previous
lesson, we learned how to add color to a scene and apply materials and textures
to create above effect. In this lesson, we will bring our object to life
using animation. So let's get started. Before we start animating, we need to add a
camera to a scene. And by going here, we can change the resolution
of your animation. For example, if you want to create animation
for social media, you need to change
it to 120 to 100 f. I will leave it
at FHD by default. Let's also go into the
camera settings and change the focal length to hundred and 25 to make our
render look more professional. And if you press you
should open this menu. And in the view, we will be
able to check camera view. And now we will be able to move the camera using
the mouse wheel. If we want to do
it more smoothly, you need to press control, hold the mouse wheel
and move the mouse. Now that we've decided
on the camera position, let's move the
Apple and the cube behind the can and let's
duplicate them too. And our objects will
go in that way. Let's also slide the letters
and move it on the axis. So we can see them. And also let's play
them in front of the can somewhere here. Let's move it a little
bit on the axis. Now, let's animate the text. So to do that, go
to the first frame and move the text
down on the axis. And by clicking
location and rotation, we have applied the location of this text and the
rotation for this frame. Now, let's go to the another
frame and move the text. And again, press
location, and rotation. And here's the result we get. But I want the letters to appear one after the other.
And to do this. I'll like the second letter and move the last key frame
forward ten frames. Then we need to
select the fourth later and move the last
key frame forward, but this time by 20 frames. The fourth later, we need
to move 30 frames forward. The fifth letter by
40 frames forward, and so on. Okay. And let's see what we
got. Yeah, this is great. I think we need to make
this animation faster. To do this, select
all the letters and select all the key frames
and just scale them. And by playing at scale, I have this result. Let's also go to the first frame and add
key frames to the apples. Don't go to the 15th frame. Move the apple where
you want it to be and don't forget to check
the. Let's also rotate it. And when we are happy
with the result, we can apply the
key frame. Okay. Good. Now we need to
animate the second apple. Again, move the apple to
the right place and then add a key frame when you
are happy with the result. And that's what we
have right now. The next thing we need to
do is animate the ice cube, and here we need to do the same. First, we need to go
to the first frame and add a keyframe for
all of the ice cubes. Then go to the frame 50. Move the eye rotated, and add another key frame. Now let's go to the frame 98 and move the eye
somewhere here. And when we are ready
with the result, we can apply the key frame. And let's see what we got. And also, if you want to simulate a slow motion
effect of the cube, you can move the last
keyframe further. This is probably too far, I think frame 130
would be enough. And I want this cube to stop
at the end of the animation. So I will go to frame 89
or 90 a and add keyframe. And remove this one. And here we go. Let's
animate another cube. This time, we will
move it to the right. Again, we're doing
the same thing. This is pretty
straightforward and simple. You also need to check if
our objects don't overlap. If they do, just move the object somewhere below or at the
left or at the right. Then move to the last frame, and again move it and rotate it. And when you're ready,
apply the key frame, and let's see what we got. Okay. And here, as you can see the object are overlapping and to
solve this problem, we just need to
select our ice cube. An the key frames a little
bit to the right side. I also deleted the
middle key frame because I like it more, but you can leave
it if you want. By the same
principle, we need to animate all the ice
cubes that we have. In the process, I added a couple more cubes to fill
empty space in the animation. And assess the result
I've got in the end. And the last thing we need
to animate is the can. And it's very simple. Let's go to the
first frame again, but this time we'll move our can down a and add a key frame. Then go to the frame 40. Then move the can up. And add a keyframe. Now we need to go to the frame 60 and just copy and past
the first key frame. Then go to the last frame, which is 98 and copy and
past the second key frame. And you can also tweak the
key frame a bit if you want. This is what we have at the end.
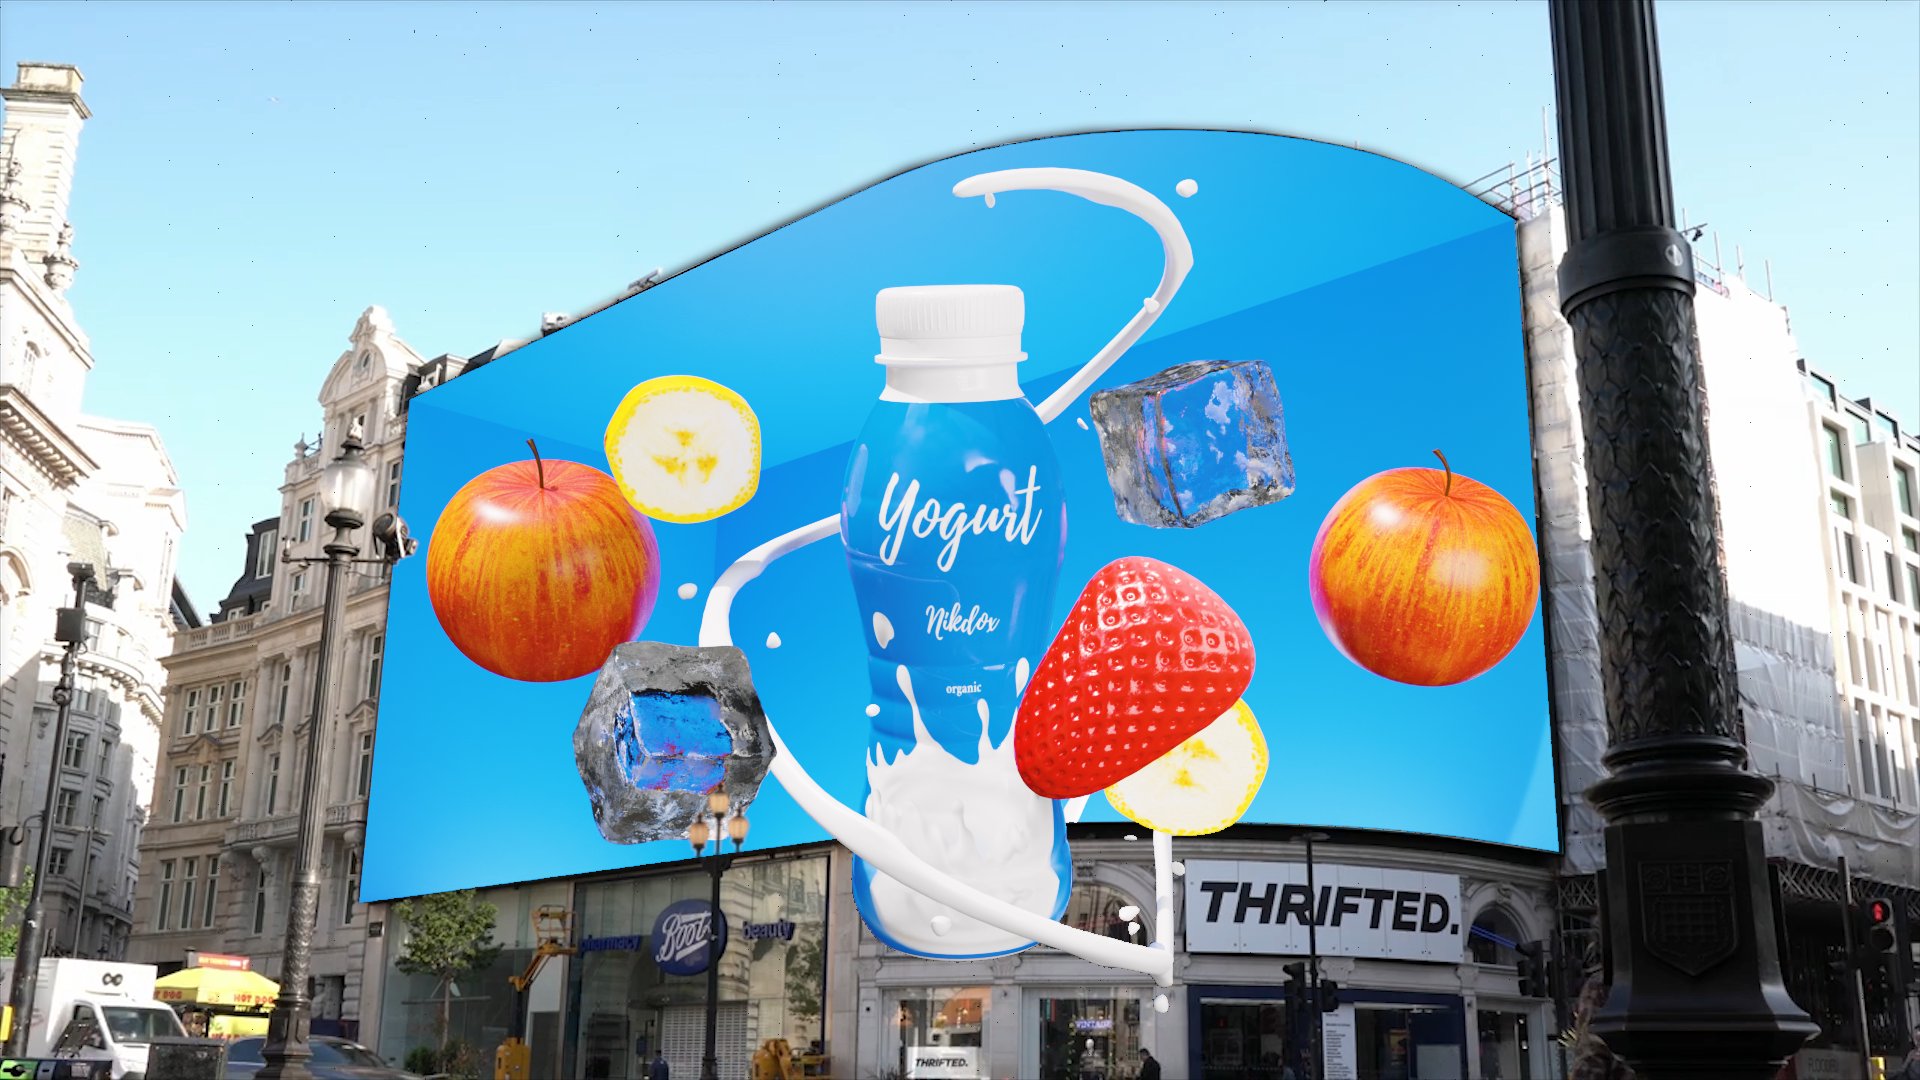
7. Lighting: Now, let's add
light to our scene. But before we start, we need to create a background
for our scene. To do this, create
a plane scale it, and place it under the scene. Let's also duplicate the plane and rotate it 90
degrees on the x axis. This be ground will also
serve as a slight reflector, and we also need to scallet
on the x axis a little. Now, let's add a material to it. And the material
will be very simple. Just let's choose color
for any color you want. And let's change the specular to 0.26 and the roughness to 0.535. Now let's add light
to our scene. First, click here on the globe icon and click on that yellow dot and select the environment texture. Okay. Click Open and you can
deload the HDRI that I have attached below to the course specifically
for the tutorial. Or you can go to a website
like Poly heaven and load any HGRI you need
for absolutely free. It's not an add in
just a little tip. You can see nothing changed. This is because we need to
go to the render vehicle. But before that, let's
click on the TD icon and change the render engine to cycles and the device
to GPO compute. Now if we click here, we'll go to the render
window and see GR. Also, we need to add the
ground material to this scene, here, let's change the
HD strength to 0.5. Now we need to go
to the shading. And here, s word
instead of object. And I want the light from this indo to be on the
left side of our scene. And to do this, select the
HDI and press control plus T. And if we change the
angle on the rotation, we can rotate our HDI. In my case, I need to
rotate it on 62 degrees. If you're in another HDI, you can adjust it
to your liking. Now let's add a
background light. Shift plus A and
create an area light. And rotate it -90
degrees on the x axis. And from the camera view, we need to scale it so that it follows the width and
height of the can. And now we can move it
closer to the background. Now I will show you a
trick professionals using when working
with lighting. We don't usually switch from the object mode to
the rendering wheel, a bunch of times after a
very small lighting change. But what do they do? A grab the t right angle from
both and move it. Splitting the screen in two. And on the left side,
there will be a view from the camera in
the render viewport. And on the right side,
we will edit everything. So let's go to the
render view port here. And as you can see, knifing has changed in the background. And to see the changes, we need to increase the
power of the slide. Go to the settings
of the light and change the strength
to let's say 800. And now we can see this amazing
result at the background. And we can change the position of the
light to your liking. Okay, let's add
another light source. This time spotlight. And move it along the axis. And from the view of the tab, make sure that the radius
covers most of our objects. Also increase power of
the slide to 1,700, or maybe even more. And we can play with path size and make the light
harsh or softer. The last number, the the light. Let's change the power
to something more. Let's add another
one a real light. Let's move it up, scale it, and place it somewhere here. And by clicking two times R, we can direct the light to can. And when we are satisfied
with the result, we can increase the poller. I would say it for 530. Let's duplicate the light. And place it in the same
way on the right side. And for this, we need to change the power
to something low. Shouldn't be the main
source of the light. The main source is the object
that we created recently, the area light that
we created recently. This one is serving
for the right side tonight make it very dark. To make it a bit brighter. And as you can see, we need
more light for the text. So duplicate the spotlight. Move it and rotate it
in front of the text. In the light settings,
we need to change the type of light to the area. And scale it along
the x and z axis. Let's change the power to 53 and change the
pride a little. Also, I think the
slide is too bright. Let's breathe the power. And our lighting.
8. Bonus: All right, ladies and gentlemen, it's time for a bonus. I'll add more realism and
visual appeal to our scene. First, we need to
create a sphere. Spofit and scale it. And after that, we need to move the sphere outside of our scene. And also rename. Then click on the jar, go to the particles settings and add a
new particle systems. Select the hair, click on
Advanced, and in render. It will be all closed. But when you open the render, In the render as, change
the path to the object. And here, you can select
our objects or drop, and here is the result
of the T Earlier, if you deleted the
vertices here, you need to add
them back because the particle system
is based on geometry, and if you have low amount of tices particle system
might not work properly. Let's go to the
particle settings. In the scale, you can change
the scale of our particles, and I scale randomness, you can randomize
the scale of drop, And in number you can
see in number you want. I will stick with 540, and that's basically it. And we can create the same
particle system to the Apple. But instead of doing
that all again, we can apply the same particle
system that we created. You just need to know the
name of the particle system. And if we go to the
render view port, we can see that
we need to create a new material for this drop. So select our drop and create
a new material for it. Change the roughness to zero and change
transparent to one. You can also change the OR to make our water drop
more transparent. I think I need to change this particle system
on the Apple anyway. So to do that, we
need to click on this icon so that the changes
that we apply to the Apple, not applying to, and now we can change
the particle system. I will decrease the number and also play with scale parameters. And also, we can
in the same way, apply the particle system of
this Apple to this apple. This will add realism to our scene and we'll get
way more attention.
9. Render settings: And all that have to do is to change the render settings
before rendering. And we almost set up fine. All we need to do is to change mac samples 500-2 thousand. I don't recommend you to set
it more because it makes no sense and we'll load your
computer and your possessor. And also, don't set it too low because the quality
is also important. If you have LPC, I would recommend you
not go lower than 300, let's say, because
it's below the 300 will be very poor quality. Also, in color management, we need to change the
contrast to medium height. And here we need to change the file format to
GPA instead of P G. Here we can change the file where our
animation will be saved. Now all that remains
is to click and render and render the animation. Okay.
10. What to do with JPG images after Rendering: After we finished rendering, we ended up with
a lot of images. So did look like videos. And in this part, of course, I will show you how to convert those images into a
proper video format. So let's get started. Click on the Plus
button at the top, go to the video editing
and click Video Editing. Then we need to go back
to the first frame. Then click Add and image sequence and then select all the images
you're under it. But before that, make
sure you sort it by name. Otherwise, your animation
could go backwards. And then slide at me. The last thing we need to do is change the
rendering settings. This time, instead
of the PNG format, we need to select
the FPC video and change the contin quality
to constant B trait. Also you can change the
video file and name. Now we need to click on
Render Animation again. But don't worry this time
it won't take much time.
11. Color Grading: Post processing is one of the most important steps you need to take to
impress your audience. Color grading is where
the magic happens, and I will show you how you
can improve your animation and make it even more
beautiful. So let's begin. I personally use premier
pro for color grading, but you can use any
other software. But the basics are all the same. So don't worry if you
have different software. Okay, let's open our program and create a new
project and name it. And after we have
created the project, if you use Premier
Pro, you'll see this. Now we need to find
our animation. Grab it and move it
to this section. At the time, we can
watch our video and now grab it again and
move it to this section. And go to color. B and select our animation. And this is the
place where we will be creating the magic. In the contrast, increase
to let's say for free, and also increase
the highlights. I personally like
when the highlights is in positive
numbers, not negative, but if you like more dark
animations or dark style, you can also make it
a negative number. But for this one,
I think we need to change to something positive, like 70 or 80. And the shadows
retroduc's say -50. Or -70, something like that. Also, we can increase curation and increase
the exposure if the animation too dark. As you can see it already looks
better than the original, but we can make it even better. Let's move on to creative, and here we can
change the filters. Also we can change intensity. Personally, I like this filter, but you can choose
whichever one you want. Now to render it, we need to click on
this bracket and then grab this bracket and move it to the
end of our video. Then go to file port. Sorry media, and then I the precet you can choose
any precess you want. If it's a full HD,
I either choose high quality or the UT preset. For this one, I will
use the YouTube preset and click and use
Maxim render quality. Oh, yeah. In the output name, we can change the name and
destination of the video. As a final step, we need
to click on the export. Okay.
12. Conclusion: Unfortunately, this course
has come to an end. In this course, we learned a
lot of useful things and are ready to create an
aimzing portfolio and conquer our first client. We started the journey with basic knowledge and slowly
but surely moved forward. Learning modeling, sculpting,
and other techniques, and created our products
and other objects. Then we learned how to create textures and painted
our masterpiece. After that, we gave life to our object using
animation and finished it all with color correction and made our video even more
vibrant and attractive. And this is the result
that we got in the end. I'll be glad to see
different variations of your works and perhaps be
inspired by your ideas. Do not forget to share your opinion and your
work in the comments. And if you have questions
about the lesson, I'm always ready to
answer and help you. And unfortunately,
I have to say, by and t in the next course,
 Nikdox Studio