Transcripts
1. Introduction: If you ing to learn blender and attract more clients to
your Fredy services, this course might
be just for you. Many people think that
learning and blender is very difficult and that learning it requires years of hard work. This might be true if you
try to learn on your own, how to watching thousands
of tutorials and spending a lot of time and
effort to go through them all, and in the end, realize
that you learned nothing. In this course, you will
not only learn how to easily create i catch
and fix animations, but also gain knowledge
that will help you create animations of
any kind and taste, without spending days on it. Because in just 1 hour, we will cover all stages of animation creation and create this animation for
your portfolio, which will help you attract more clients to
your fred services. And did you know how
much the beginner way fixed artist
charges for his work? So don't waste your
time and energy and click on this course to
gain valuable skills that will help you
attract more clients and increase your value
as a free designer.
2. Basic knowledge: Lesson will be useful not
only for absolute beginners. We have learned how
to open a blender, but also for pros, because we will also learn
a secret technique that will make your work much easier and save
you a lot of time. This lesson, we will learn all the basic
knowledge that will be necessary not only to
create today's masterpiece, but also which will serve as a basis for you to
create a free model, which will give you
unlimited possibilities and create in masterpieces. Let's get started. The
first thing we need to do is open a blender and
create a new project. Congratulations, you
have learned blender. We have a lot of new
things to learn. But let's start with the theory. The f d world consists of
three directions of length, width, and height, or x, y, and z axis. Bundle, we can
notice them as red, green, and blue lines. You can also find
out which axis you are on by looking here. In blender, as in other
programs, you can scale, rotate, or move an object, along the x egreg or z axis. To scale an object,
you must first select it by clicking on it, and then press S.
In order to rotate, press R key in order
to move G key. Also if you then press
the egg or that keys, you can do these fe actions
along a specific axis. Blender also has modes
that you can choose here. As you can see, there
are a lot of them, but today we will analyze
only two of them, the edit mode and
the object mode, in which we are by default, and which allows us to select different objects and make changes that I
mentioned earlier. Edit mode is intended for more detailed changes
to the object. To go to the edit mode, we need to press tab, and in it, we have the opportunity to
choose between changes vtices, edges, or faces, which
you can select using one, two, or three keys. And we can also rotate them, move them, and scale them. But in added mode, there is another new
action available, and this is extrusion. To extrude, you need to select
the vertex corner or face, and press the e key. Let's move on to how to rotate the camera
and create objects. To see our object from
different angles, you need to hold down the middle mouse button
and move the mouse, or rotate the mouse wheel, to zoom out or move
closer to the object. But how to create an object, Everything is simple here. To do this, we press
Shift plus A and here, we can select a different
set of things that we can create from standard
ships to Suzan. You can play with it and find
out where everything is. Now the trick I promised
at the beginning. Now a question for the experts. Did you know that in edit mode, you can simultaneously
select vertices, edges and faces without
switching between them every time and without using the
annoying menu or keys? Well, this is possible. And to do this, let's
go to the edit mode, and withholding shift, select, for example, vertices and
corners in this menu. Now we can select both. You can even not waste time and select everything at once to save a lot of time and save your fingers from
hard work labor. In this lesson, we learned all the basic knowledge that is useful for creating
a freed model, and also learned a secret
that will make your work much easier and save you a lot of time when
changing an object. In the next lesson, we will apply the
knowledge again and create all necessary object for animation. See in
the next lesson,
3. How to install the addon: L et's start. To
start creating fix, we need to download
two more applications in addition to blender, namely Fpi and fpi
adm for blender. I believe all the
files in description. But if you are creating
Vafix for the first time, you may have problems or
questions with the installation. I will show you how
to do it correctly. First, let's download Fp itself. To do this, we'll
just need to run the installation file and
download it like a regular app. With the F spi blender addon, things are a little
more complicated. To do this, let's open blender
and create a new project. Then click on dit preferences, and make sure that you
click on the addon. Then we need to click
on the Install. And tack the S Pi
blender addon file. Now once we have
selected our file, we need to enter F
Pi into search bar, and then check the box
next to the Fi addon. Then we can close
the setting window, and we can also close
the blender for now.
4. What is Fspy and why is it needed?: So after we have installed
all inventory programs, let's find out how
FSP works. Open it. L here, we need to slide the
image of R by fix reference. I will leave all the files in description below the scores. Let's just select the image
and move it to the F spy. As you can see,
this image is dm, so fixes, let's
select the dm image. And to understand how a spy
works and why we need it, let's imagine that this
image is a free dendlin, or a them inside a blender. What we need to do
is to show where the x and rec axis
will be in this image, and we can do it with
these green and red lines. The green line is
the ecric axis, and the red line is x axis. Let's take the green line, and let's say the side of the screen will be
the egret paxs. So align the green
line with the screen, and we need to do the same thing at the bottom of the screen
with the second green line. The x axis will go
in this direction, so let's move this
red line here. We need to find something in the image that goes
straight in this direction. In this case, the
shadow will be okay. Second red line, let's
put somewhere here. This point also serve us as
a FD courser in blender. Let's move it somewhere here. If we selected the X greg grit
floor in the Free D guide, we can see that it is perfectly
aligned with the screen. Now we can save it by
clicking on file and save us and name our S Pi project. Now it's time to
open the blender and create a new project, and we can delete it all
Csd needs in the future. Now let's add our
newly created Sp file. So click File p and now we will have the Fp option due
to the installed add on. So click on it and select
the recently created S file. As we can see, the image
has become dull again, and to fix this, we
need to go to the data. Then click on the pogrond images and increase the opacity to one. Now we have a shiny
colorful footage. Now let's create a room or
environment for the fix scene, and we create this screen. So press shift plus A
and create a plane. Radiate it on
limited decrease and the gre axis and move
it to the screen. And we need to make
sure that this plane fit the screen
perfectly so that there are no problems in the
future with the screen. Now let's go to the edit mode, select this edge, and
move it on the axis. If necessary, we can also move the vertices a little so that they coincide
with the reference. And now let's select this
edge and move it the axis. Then extrude it
along the x axis, a pressing E, and move this part along the ck until we line up
with the screen. Next, we need to slide this edge and press Control plus B and B, and we can increase the
number of cuts by rotating. Once we happy with the result, we can click and
shade it smooth. Now, let's create a
holdout part that will help us hide all
unnecessary stuff. Select all these vertices at the top and extrude
them all the z axis. And we need to do the same thing with the bottom vertices. A, now we can create an actual
room inside the screen. For that, we need to select this edge and extrude
it on the x axis. If we click here in this
menu and select vertices, we can slap this edge
to any selected verte. All we need to do is to move
the edge on the x axis, and while holding control, select the vertex
we want to slap to. After we've done, simply
connect these edges by pressing F. Also we can connect this
button and tub vertices. First, selecting them
and also pressing F. Now we need to separate
the screen from the room, because in the future, we will animate the screen separately. Let's select these faces, then press P, and selection. We can fight the screen for now, and this is what it looks like from the inside the screen. But there's a shading
issue and to fix it, right click and select
shade out to smooth. Now let's rename
our objects to keep everything clean and
save time in the future, and we need to find the object. Also, if you want,
you can modernize the room and use
your imagination. For example, we can extrude the bottom top to create
the illusion of an endless. And once you're happy
with the result, let's create some magic and
add some hold out material. But before that, we need to
go to the render and change the render engine to cycles
and the device to GP. Now let's apply material to
these places to hide them. Also, let me increase
the strength of the light so we can
see it more clearly. Let's add a room, go
to the materials, and add two material slots. Va car on this plus. For each slot, we need
to create a material. First will be the row material and the second
hold out material. For hold out material, click on the surface
and select hold out. As you can see,
nothing has changed. This is because we need to apply a second material
to these faces. Select the faces we want to
apply to and click a sign, and we need to do the
same with the button pod. And here we go. I will probably return the top of the room because I like it more. You have can trust your heart
and leave that if you want. We can also create a
collection and place all the objects there for more
convenience in the future. To create a collection,
press, Here we go. In this lesson, we learned what is the FS Pi and
how to deal with it and even created the
environment for our fix scene. It will be the foundation
in our fix animation. In the next lesson,
we will learn how to create free models
from reference and we create packaging for our product and a lot of
different fre models. That will serve us to
boost the appearance of the product and see
in the next lesson.
5. Modeling: In the previous lesson
we learned about FSP and created a room for
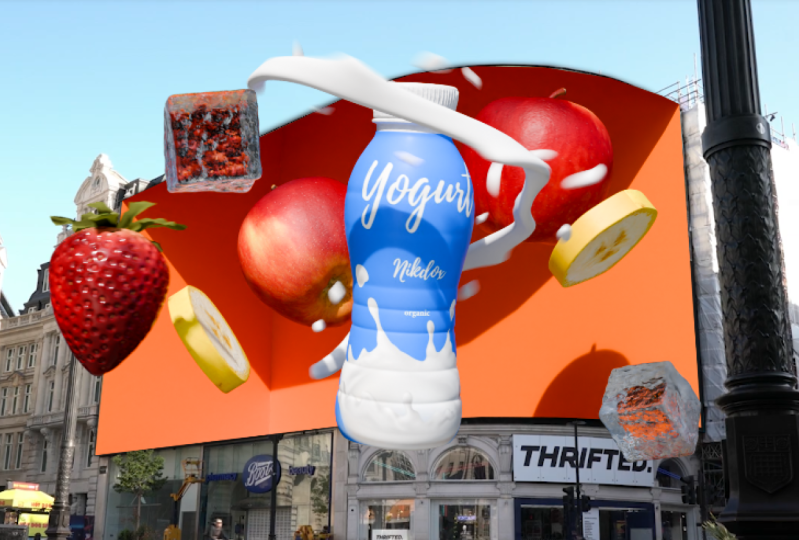
our fix inimation. And in this lesson, we'll
learn how to create 3 moles and create all the necessary object for the scene. So let's get started. Okay, Let's press num three
to go to the front view. Then press Shift
plus A and import the Yogurt packaging image that you can find in
the description below. For greater convenience,
we can move the image a little
along the x axis. Now I will show you
how we can create every round package in
a couple of minutes. This is probably the
fastest way to create something from a
reference in Blenza. To do that, we need to create a plane and rotate it n degrees. Then press and select at center. Also, let's move the image
to the sensor and move along the Z axis so that the bottom of this package is next
to the free courser. Now let's like the plane, press A, and e to extrude. I moved vertices a little
because the reference in this part is dark and you
might not see the faces. Let's move it to the reference, and we need ex and move the vertices
to mar the reference, repeating each corner
of the package. Just press to extrude and move the vertices according
to the reference. Yeah. When we're done, it
will look like this. And as you can see, it's not even close to
a bottle of Yo code, but we can fix this in
a couple of clicks. By coming to edit mode, press some A to select everything and
select the spin tow. And this magic, we
need to make sure that z axis is selected and
now move this slide. In this menu, we can change the angle to 360 to
make it absolutely. Now the packaging is most done. All we need to do is fill the holes at the bottom and
at the top by pressing. And also to add more realism, we can select this phase and
this proportional editing. We can move it along the z axis. And adjust the radius, by scroll, the mouse wheel. As you can see the
proportional editing help other phases
around the selected. Now to add more realism. Let's add a
subdivision modifier. An increased level viewpot, to add more polygans. Also because of a
subdivision modifier, these edges become similar, so we need to press
control plus error and add loop cuts around
the edges to make them. And we can also shade smooth. Now, let's create this
part of the bottle. Now let's slid these phases. Pros shoot plus d to duplicate and then P selection to
make it a separate object. Then we need to s
this object and add a solid to add
thickness to it. And we need to play with
the thickness parameter, and also move the
solidify medi far up. Now, let's repeat this potn
on the lit and to do this, we need to plicate these phases and also make them
separate object. Then go to the edit mode, select one of the edges, press Shift Control and plus, and click plus couple
of times to select these edges and press
Control plus B to Bavel it. Again, we need to select all these edges and
bavel them again. But this time with
fewer segments. Then we need to switch to
the pass by pressing three, and here we need
to choose ex along the normals and pull
that yellow dot. All that left to do
is to add loops and press control B to it and make the edges on the
top and on the bottom sharp. Then select all and press
shift plus S plus z. This will allow us to scale on every axis except of z axis. We need to add the last
loop cut and scale it. If you have this problem, you can turn on the x ray and select those vertices
and scale them up a bit. And this is what
we ended up with, and we can simply
connect this pattern to the lead by first slighting it, then we shift slighting the bottle and precin
control plus j. Now let's quickly
create a label. Go to the edit mode and select all the vertices with dd where
we want your label to end. And then right click
and select mark scene. Also, we need to do
this at the top and select the edges where we
want our label to start. And then select any phase, press L, plus d to duplicate it, and make it separate object. And now we need to add
thickness to our label, so let's add a slitive
high modifier. And again, play with
the thickness prometer. And move solidify fire up. Here, we need to add loop cuts to make
this a harp and fix the shading issues in
the bottom as well. Now our main object is created. All that have to do is to
select all object except the image and press and create a collection
for this bottle. And let's also save
the entire project by pressing control plus S. Let's create another object foreseen, namely the strawberry. To create a strawberry, we need to first create cube, then go to the edit
mode and turn x ray, and this x ray enabled, select the bottom
edges and scale them, and then create a loop cut in the middle and also
scale it a little bit. We also need to scale it on the x axis to create the
shape of the strawberry. After we're done and
happy with the result, let's add a
subdivision modifier. And set the level viewport
to three, and then applied. Now we need to add another
modifier called decimate. Then go to the n subdivide, I relations acres to one, and we can see this
pattern and also applied. Now let's add seeds
to strawberries, and with all edges selected, press Control plus B to bevel. Then press control plus
I to invert it all, and then press e to
extrude and to scale. All right, looking good and
now we need to open this to inset of median points
like individual origin. This will allow us to scale every selected
phase individually. Press S and scale it. Then press I to int, and scale it to the
size of the set. Now let's again
open this menu at the top and choose
Indian point again. Here we need to select stroot along the normals
and extrude it. Then again, choose the
individual origins and scale it, press. And to make it look
more realistic, let's add a subdivision moi. And also shaded so. Here we go our strawberry
is almost created. Last thing we can do is
to change the shape is in proportional addit any phase you want and move it
until you will have the shape of the strawberry because the shape is to perfect After you're satisfied
with the result, we can also rename our strawberry and create
collection for it. All right, let's
create another object. And this time this
will be Apple. Apple is very easy to create. All we need to do is to
create a sphere and in it, s top and bottom vertices. And is proportional
editing enabled, you just need to
scale it on the axis. Let's make sure that you have
median point as a origin. Otherwise, it won't work. And this is basically it. All we need to do is
to add more polygons. For that, we need to add
a subdivision modifier. To create the top
part of the Apple, let's go to the edit mode
and select these vertices. Duplicate them, then
press P selection to make them a separate
object, then select them. We can also set
origin to geometry, and scale it again. Then we need to sl
these vortices, go to the edit mode, and press A to slight
everything and e to extrude. Now all we have to do
is to extrude and scale these vertices until they look
like they do in real life. Also, if you have this problem, just select A to select everything and
press shift plus A. Here, press F to fill
the hole and a loop. And also shade is smooth. Don't forget to
shade this smooth the other part of the apple. When we are satisfied
with the result, we can also create a collection
for these two objects. All right, time, let's
create a banana slabs. Let's add a reference
of the banana, which you can also find
in the description below. Here, we need to focus
on the left image, so let's select this image
and move it to the center. Next, we need to create a pla rotate it and scalt
a little bit. For convenience, we
can turn on the x ray, and then we need to go to the edit mode and just move the faces
according to the reference. Here we can add loop cuts
to add more geometry, and also move the vertices
according to the fs. When we are satisfied
with the result, select or attics and
intrude them on X axis. And to make it more realistic. Let's add subdivision
and as a regular, create a bunch of flop
cuts to make the edges. And to make the edges
even more sharper. We can sit all these
phases and press. And we need to do the
same on the other side. Here we go, the slice
alterna is created. And also let's create
a collection for it. And you can hide or even
delete the reference. I know we've created a lot of objects and learned
a lot of new things, but we don't stop there, and now you will learn how to create an ice cube very quickly. For that, let's create a cube. Go to the edit mode and
add a bunch of loop cuts, papers in control plus r. Then in this menu, we can increase the number
of cuts 10-17. Same thing we need
to do on this side, and also on this side. And let's add a new modifier, which called Display difier and click on U to
create a new object. Then we need to go here to pick a texture and type
choose clouds. In size, we can make the
texture more smooer or harder, and also we come back to
the modifier settings, we can increase the strength and just play around
with the parameters and see what you see
best. We're happy. With the result, we
can smooth it out, and also add the
subdivision modifier. And as for me, I want to make
these edges smooth, so I will just go
to the edit mode, slit all these edges, and just press X, dissolve edges, and delete them. Also in the type, you can choose what
to texture you want and then just limit
yourself on Clouds. Once we established the look of the Qp let's apply the
displace medifier. Also we can use proportional additive to make the shape
even more realistic. This is the result that
we got in the end, and we can also create a collection for it
for more convenience. Now let's display
all the objects that we created and hide them all and probably scale them
to more realistic size. The cube will be
probably this size. The slice banana will
probably have this size. And the Apple
probably this size. Also, we can select this
part of the bottle, then select the bottle itself, press Control plus P, and click Object keep transform. And the same we
can do with label. By doing this, if we select
the bottle and move it, all the object will
move the bottle. I almost forgot
about strawberry. Let's also scale it. Also, we can select this part of the Apple and select
the Apple itself, press control plus P,
object keep transform. In this lesson, we
learned how to create free models with or
without reference, and learned many new techniques and created a food package, fruits and many objects
that will create an amazing look for the main
object in our animation. In the next lesson, we will
add colors and textures to create O effect and amaze
our potential customers.
6. Texturing: The previous lesson, we created all the necessary
object for animation, and this lesson, we will
learn how to add color to our s and create
a valve effect. So let's not waste a
minute and get started. All right, first, quick, first, we need to go to the Shady tab. And our first object, material texture will be the
main object equal bottle. So select it and press slash to view
only selected objects. I slate the bottle itself
and create a new material. And we need to add a noise texture by
pressing Shift plus A. And then create a Color Ramp. And connect nice texture with Color Ramp and Color
Ramp connect roughness. If you press shot plus Control
and click on the node, you can see what this node. Also click on the nice
texture and press Control plus T and connect object
instead of generated. Let's also create a bump net
and connect it to normal. After that, we need to duplicate the noise texture and
connect the color to the hg. And also connect object
to the nice texture. Now all that left
to do is to play around with nice texture
parameters and bump node. Let's decrease the
strength in the bump. And play around
with the stickers. To connect the same material
to this part of the bottle, let's select it, then
select the bottle itself, control L and press
link materials. Now let's apply a
texture for the label. But we also need to select
it and go to the edit mode. Here we need to
select these phases on the back of the bottle. Then write mouse button
and click mark sing. And select any phase, press L to select RF, then press, and unwrap. Now we need to go to
the UV editor here. Yes, and there's a problem because not all
IGs were selected. Select all of them,
again, mark them. Now again, sled them
all and then wrap it. And let's go back to the Shader editor and create a new material
for the label. Then press Control plus T, and here we can open
our label picture. Then we need to go
back to the V editor. Here I have the problem because these vertices don't
suppose to be there, and because of them, not
all I just were selected. You might not have this problem, but if you do select
them and delete. Press X, vertices,
and just delete them. After that, we need
to drop it again. This map is better
than the previous one. Press A here to select and
rotate this map on degrees, and we can also scale it. As you can see, when
we move the CV map, the picture and the
label also moves. Now, clad side all these
edges holding shift plus t. Then right now the button
and choose to strengthen. On this side, also, we need to do the same. Now we just need to scale it, rotate it will be
satisfied with the result and apply our label properly. Also, if you want this
part to be yellow, you can select these phases of the UV map and just move
them up a little bit. As you can see, we have a little distortion
here and to fix this. We need to select these edges, press right mouse
button and click line. Also we can do that for
a couple of near edges. And on the other side as well. If the text looks distorted, we can select these edges and move them a little
bit up or down. Now let's go back to the
shader editor to add more details and make this
label looks more realistic. Let's create a noise texture
and connect it to roughness. Then create a color ramp and place it between
these two nodes, and while picking on the noise te press control T
connect from object to. Again, as we did in
the previous material we can play around with the noise texture and the
color ramp parameters. I personally have
these parameters. All right. Let's create
a texture for the ice. A circular create a
new material for it. For the ice cube texture, we need to create
a noise texture. Press control plus t.
Then create color ramp. Connect the noise texture
to the color ramp, slide the sticker, put
it somewhere here, and the ise sticker
somewhere here. And the color of the color
ramp connect to the roughness. Now let's create another node. This time is pump node, connected to normal, and from this noise ture from the color we need to
connect to the height. And decrease strength to 0.08. Let's change the newest
acture parameters. Scale, I will change
to 4.1 t to 11.8. After that, also we need to
change the transition to one. Then implicate the bump
node and the noise texture. Again connect. Noise texture to the height of the bump node and bump node
to the clear fot normal. The noise texture scale, I will change to five. The DTO to 2.8 and
the roughness to 0.4. As I would increase strength
for this bond tal pibit. And here we go, the cube
material is created. Now, it seems like this, but the render port it will
looks much better. Okay. The next object
will be strawberry. Again create a new material
for the strawberry and again to create
a color ramp. And now we need to
create a new node, which is gradient texture
and connect them. P. Then select the
gradient texture, press control plus t, and also connect color
ramp to the base color. Then click on the plus in the cool ramp to add a
stick in the middle. The lift stick, we need to
change the color to dark red, For the middle, we should pick the same color and
make it brighter. For the right stick, we should make the red color
even brighter. The color should be dark on the bottom and go
brighter to the top. In the gradient texture, change the linear to quadratic, and then change the
rotation on to 90 degree. In my case, I need to play
with stickers and colors. But when we are ready,
we can decrease the roughness to 0.26. Now let's create noise
texture and a bump note. Connect bump no
to the normal and texture to the bump to
the height of the bump. Decrease the bump strength for the ni texture
chain scale to 26 and dt to 2012 0.9 and roughness to 0.4. Here we go, the
strawberry is ready. We need texture two more object, and this time, let's
texture and apple. This will be very easy. Let's always create
a new material. Select this node, which
is called principle BDF, and press shift plus
Control plus C, and then select the texture that you can find
in the description. That's it. If you want to can change scale the texture here. But this is pretty much it. Now let's create material for the wooden
part of the apple. So we need to create
a new material and here we can pick
any wooden color. Brown color will be great. And then create a
noise texture and the bump node. And connect them. All that remains to
do is to play with parameters in noise
texture and bump node. And here we go. Create, and the last object that we need to texture
is the banana slice. For banana, we need to create a new material then
press control plus T, and select the reference that we use to create this banana slice. Now when we go to the edit mode, in select this edge, withholding at the
press shift plus Alt, and select these edges, and mark C. Also
select this edge, and also mark C. Now let's
go to the UV editor. Then click on any
of these paces, press, then press O and nrop. Now we created the EV
map for this part. A that we need to do here
is to rotate and scale the V map to match it with the reference with this picture. When we are done on this side, we need to do the same
thing on the other side. So Unwrap it, and just scale it, rotate it until you
will completely mater. Now we need to add
another material slot for the second texture and create
a new material for it. For this material, select this node and press
control plus t, and select the banana texture. Then to apply this texture
to this sport of the banana, we just select this
phase press L. Then choose the second
material and click aside. Let's fix the position of the
material in the UV editor. First, rap it, slight
fine and wrap, and you can rotate
it and scale it. And fix this. We need to add a loop cut and then babel it. This is the result we have now. But we can add memorialism
to it by adding bump nodes. Connecting it to normal, and we can connect our image to the height
of the bump node, and then change the strength of the bump to something very low. And exactly the same thing we need to do for the
second material. Create a bump connected. Her chain industry.
And here we go. In this lesson, we learned
how to apply materials and how to create
realistic materials for the object in blender. The next lesson we
will bring like and then animate learning
not only the, but also techniques that professionals using
during their work.
7. Animation: In this oral, we
will learn how to animate our object and
bring them to life. So let's not waste a minute,
and let's get started. Let's start the animation
with the screen to create a transition between the
footage and our fix animation. Let's turn all the
objects to the scene. Then go to the first frame, press I and select
location and rotation. Now we have created
a key frame and apply the rotation
and screen position. Then go to the frame 40. Now move the screen along the Z axis and create
a key frame again. And this is what
we have right now. Also, as you can see, we have overlapping here. Just select these vertices
in edit mode and scale them. Now the problem is solved. Also here, I need to apply the row material for this face. Let's go to the frame 62, select all bottle, and
mode inside the room. Somewhere here, so we can
see it from the camera. And we also need to
move all objects there. And then apply location and rotation to each
one by pressing I. After that, we need to
go to frame 80 or 100, then go to the Tapio and move the bottle
toward the camera. Also we can rotate it
towards the camera. The closer we bring an
object to the camera, the larger it will be. Also, if you look at the label, we need to rotate it slightly by pressing r and x two times. And then apply location and rotation animation is too fast, so let's move this
frame further. If we play animation, we can
see these kind of problems. And to fix that we need to go
to the frame in the middle, move the bottle up, and apply a key frame, and
here what we have. For now, now let's
animate the ice, and here we should do the same. Go to the 62 frame,
create a key frame. After that, we need
to go to frame 80 or 100 iced the camera. Rotated and go to the
frame in the middle, move the ice up,
apply a key frame. After we are happy
with the result, we can duplicate the ice cube. Then go to the last keyframe and change the position and
rotation of the cube. And apply location and rotation. Next, we can set the key
frame in the middle. And also change the position
of the first key frame. I want this cube to
appear a little later, then the battle to do this, we need to select
all key frames for this cube and move them
further in the timeline. For this cube, I
will do the same. And here we go. Now let's create a floating
effect for the bottle. Select the bottle, go to 20, 30 frames further,
move the bottle down and apply the
rotation and location. Again, go to 20, 30 frames
further on timeline, and now move the bottle up and apply location
and rotation. And animation is too fast. Let's move the key frames. And when we are satisfied
with the result, just copy and past the last
two key frames every 30, 40 key frames, and if
necessary, move the key frames. And this is what
we got in the end. L et's create an
animation for the cube. Go to the key frame 170 or 200 move the cube
toward the camera, a little and apply location. When we are satisfied
with the result, we can rotate it
and apply rotation. For this cube, we
need to do the same. And this is what
we got in the end. Let's create an animation
for the strawberry. I haven't framed the
strawberries before, so I'll do that right now. Just go to frame 90 or 80
and apply the location. Then move to any other frame, and by pressing
shift plus control, we can move the strawberry
toward the camera, as well as rotated
and set a key frame. I move the last key frame. Then between those key frames, we need to move the strawberry to the right and
set a key frame. Here we need to fix
the overlap by moving it up and applying
the key frame. Then select any next key frame. Move it to the left
side of the room. And apply the changes. This will be the end
of the animation, and if you have overlap, just fix it by moving it up. And as you can see here, the strawberry is
moving sharply. If we look at the animation
of the strawberry from above, we can see why
this is happening. To make the animation so, let's move it here, making this angle of the strawberry
animation not so sharp. Let's move it a little
more to the right. And also remove this key frame. If necessary, we can slow down the animation by
moving the key frames. Let's see what we got here. It looks, but we need to
fix the overlap here. This is an optional step, but I think the strawberry
is moving too fast. So I will select all the
key frames and just scale sine and move them
a little further. Here in the middle
of the animation, I want to create a
slow motion effect. To do that, we need
to set the key frames 35 frames before and further
than this key frame. Then we need to select
them all and scale. Yeah, I scale it too much, but you can play
around and see what works best for you.
And here we go. Now, the last thing we need for strawberry
animation is rotation. And move to the first key frame rotated and set the key frame. And go to the middle keyframe
and just set the rotation. And you can just copy and paste that key frame
to the last one. And this is what we have at PT. I think the whole
animation will end when the strawberry
returns to the room, so I will move the key
frames for the eyes. All right in the same way, we need to animate
the banana slides. Just move banana, rotate it
and apply the key frame. Then duplicate, if you want
to add more than one slice to a scene and just change the location and the
rotation of the key frames. For the rest of the
banar animation, I will just rotate it
on Z axis in one way, apply the key frame, then move 20, 40 frames. Further, timeline rotate
it to the other side, and also apply the key frame. And after we're happy
with the result, we just copy paste the
last two key frames. For the second banana slice, I will do exactly the same. All right, and the
last object you need to animate is the apple. As you can see, the animation process is
very straightforward, and you just need to understand the principles of how it works. The apple appearing, I
animate it the same way. And for the rest
of the animation, I will just tate it on
the axis to the bottle. All right, the animation
is almost ready, and we need to make sure that the last
keyframe and fruits and battle are ending
on the one frame. In my case, I choose
the frame 320. On the frame 350, I need to return all
objects to the room. For example, in the battle, we need to copy first frame
and busted to the frame 350. And also fix the problem with
overlapping, if you have b. And the same thing we need
to do with other objects. But if you don't have applied location key
frame and the frame 320, like the Banana slice, you'll have some troubles. 320 frame and set
location key frame. For safety, you can do that
for all of the object. Again, we need to do that
with all the objects. All right and here's the result that you've got in the end. Now let's animate
the screen again and move it back and the axis. Go to the frame 350, then select the last keyframe
and copy and paste it. After that, copy the
first keyframe and pasted 30 or 40 frames for the
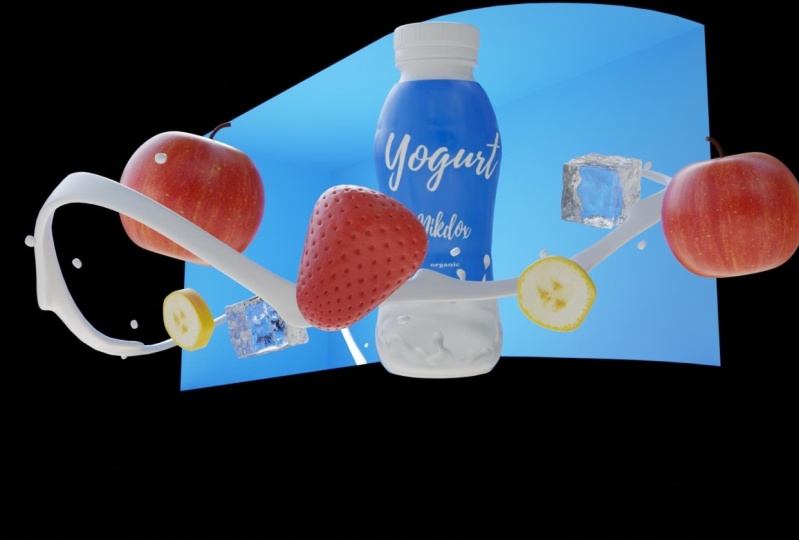
heres of the cut in the end. Now let's add extra
appearance to animation and create
a milk stream. To do that, we need to press s plus A and create ser curve. And in edit mode, select this point and rotate
it on 45 degree on the axis, and now let's create a plane. Scale it and again
scale it on x axis. After this, we need to add
a couple of loop cuts. By will them pressing
control plus B. Next, select this edge
extruded and this edge also. In this way. If we click here, we will be able
to glue vertices. Let me show you, if
we crab this vertice and move to this
one with control, we will glue that and the same
thing we need to do here. Also, let's add a lot in the
middle and make this go. And this is what
we have for now. Also, we can duplicate these phases and
play them randomly, and they will serve
us as a drop of milk. After we are satisfied
with the result, we need to add a ray
modifier and increase count. Also, we need to add
solidify to add thickness. Play round to a
thickness parameter, and after you done, let's add subdision
surface modifier. Feel free to play
with parameters until you're satisfied
with the result. And if you have this
problem with array, just con merge in
array modifier, and it will be gone. And the last modifier we
need to add is curve. As a curve object, we
need to select by curve. Now when we select our curve, and edit mode move any votes, the plane will repeat
the shape of the curve. All right now, we
need to select curve, and then the shift
select milk stream, and clave control plus P and
select object ke transform. This will allow us to avoid problems with corvele moving it. Select Milk stream and
rotate it on 90 degrees, and place it inside of the room. Now, let's let the curve and in edit mode by extruding
and moving the vertices, we can create the path
for the milk stream. Here what I've got at the end and to animate
the milk flow, we need first slide the curve
and press piled plus P, and select clear parents
and keep transformation. And then select the
milk flows and x two. In that way, we can
animate the flow. Also, beside the words in curve and pressing
control plus t, we can bend it, which
will allow us to add more appealing
look to the uation. All right, let's add the key
frames to the milk fall. Select it, move it like this, and add a key frame
for location. The second key frame will be
at the end of the animation. Let's move the flow to the
and add location keyframe. And here's what we
got at the ADs. Looks great, but I think we
can make it even better. Select select all object, except of the screen. If we grab here, we can create another window. In this window, we need to go here and open a graph editor. Here, we need to select all
key forms by pressing A. Then click T and choose Z. Animation should look
slightly different. But if you press
a in this window, then go here and choose
individual centers and scale it. We will see that our animation is much smoother and pleasant. Only now we have
issue with milk flow. So let's fix that by moving
it and setting a key frame. Selected press G, x, x, and move it a little bit. Here we go, our animation is. I also decided to
change the label, and what I did, I just changed the
picture of the label.
8. Lighting: Previous lesson, we
learned a lot about how to animate objects and
created this animation. In this lesson, we
will learn how to add realistic lighting
to our scene. This is what our scene looks
like without animation, and it looks very sad. Doesn't it? So let's fix this. Li on the globe
icon, and in color, if we click on this yellow dot, we can click on the environment. Here we can select our HDR. And to rotate the HG, we need to go to the shading, And here, instead of the
object, select the world. Then select our STI and
test control plus t. And here we can rotate
it on X or QC axis. And I think I could
have a better HTI, so I will choose another one. You can choose any D you like. And I will just play with
the HTI rotation for this. After we decided
on the best angle, we can add material to the room. I choose any color you want. Avts blue or dark blue. You can also increase the
metallic in this material. And to add more realism,
let's add spotlight. Rotate it, and scale it. And place it this way
on this specific angle. And also increase
the power to 1,000. If we have that reflection
on the battle gesto of the multiple importance and the reflection and the
reflection will disappear. Also let's add hold out
material to the screen. By first selecting
it and then here, choosing the hold out material.
9. Render Settings: Okay, our mine is ready, the lighting is lowing, and it's time to render. But before we do that,
we need to change a couple of parameters
to get the best result. So let's go here and
we've already changed the engine to cycles
and the device to GPU. And all that's left
to do is to change the number of samples 200-62800. And if we scroll down
in color management, I look, we need to change the
contrast to medium height. If we go here, we
can change where we save our animation
and the file format. I would advise you
to keep in G and not change to GPAC or to
any other format. And the last thing we need
to do is to return to the rendering
settings and in film, we need to enable transparency. And then start rendering.
10. Post Processing: After the rendering,
you will have all of these pictures and you might ask. What should
I do with them? In this lesson, we
will learn how to turn these images into a video and combine it with the footage. And also we'll learn
color correction and a little bit of masking. So let's not waste a
minute, and let's start it. First of all, we need a
video editing software. In this tutorial, you
will learn how to use premier P for
post processing. So open it and then
create a new project. Now we need to find the footage, grab it and move it here. And then grab it again and
move it to the timeline. All right. Let's now import our animation that we
render it. Click and file. Import and then point
our PNG sequence, slick the first image, and make sure that
image sequence is checked, and after that, click open, and again, grab it to the timeline
above our footage. Usually it's supposed
to be transparent, and as we can see, it is. But don't worry, it's
very hard to fix. Just click on effect here and
on the surge type luma key. And then crowd it and
move to the animation. And here in effect controls decrease threshold
to eight or nine. And here how it looks like. Now, let's do color correction. For that, we need
to click on color here and let's
increase the contrast. Also increase the highlights at and decrease the shadows. Overall, you don't have
rules here because your animation and lighting
might be different. Play around with
these parameters to see what suits you best. These parameters I
have in the end. You can stop and repeat
after me if you want. If we click on the
creative here, we can choose the filters. I personally like this one, but you can pick
whatever you like. All right now when we
made the call of grading, let's do masking to add
realism to this footage. So click on our
footage and with Id, grab it and move up. Here we can zoom in
for more convenience. And let's create a mask by clicking on the span in opacity. What we need to do
next is to drive the mask around this project. Let's o in even more. And just click here and
here and by doing that, we can create A. And when you close it, we can decrease the mask
feasor here in the settings, and basically, the mask
feas projector is created. If we out and the video, we can see that this part of the lamp is
no longer disappearing. However, if we play further, we can see that problem
with Strawberry. The easiest way to fix that
we'll be going to the frame before Strawberry will
interract with lamp, select the ser tool here, and cut this footage on half. Then let's go to the frame when Strawberry is no longer
intract with the lamp. And cut it again. Now we can just
delete this slot, and let's see what we got. All right looks fine, but here we also need to
fix the strawberry issue. And now we need to do
the same thing here. Now let's create the last mask. Again, duplicate the
footage, holding. Now we need to draw the
mask a these lamps. Again, click on the pen icon in. And when we are finished, we're creating this mask. Let's also de mask father. And here how it looks
like in the end. Additionally, we
can improve this. It won't be very
noticeable on the footage. But if you care about details, we can extend the scared piece
and animate the. Then in Here we will click on
this ter next mask path, we will create a keyframe. Slide the mask and now when
we will move the point, will be created keyframe. Summer the points trying to repeat the shape
of the strawberry. When you're done, just go to the next frame and
change the mask again. And do that until strawberry
will past this limb. And now, let's see what results did they achieved by doing this. Looks great and now
let's export our file. First, we need to
show where will be the end of this video,
by click in here, and grabbing this
thing to the place, where we want our video to end. Then click File Export Dia, in the format, make
sure you have H 264. For Full HT resolution, you can choose the YouTube
hundred eight pixel presets. And here you can choose output
and the name of the video. And all the trails to do
is to click on Export.
11. Conclusion: Well, unfortunately, this
course has come to an end, and we have learned many different things from
learning new programs, creating free models, animation, and texturing, to
cool correction, creating mask, and
post processing. And I can confidently say that with the skills
acquired in the course, you are ready to conquire
the peaks of free mountains. Create not only visual effects, but also other animations and renderings of various types, and impress everyone with your work and
attract many client. I'm looking forward to
seeing different varions of your works and being
inspired by them. And if you have any
questions about the course, I can always help you in the chat and personally
answer any of your questions. And with that, I'll see
you in another course.
 Nikdox Studio