Transcripts
1. Introduction: Hi, I'm Elizabeth,
and welcome to my Sandy Skoglin inspired class. We are going to be
looking at the work of installation artist
Sandy Skoglin. Sandy has a really
fantastic art career and an art show coming up in the fall that I'm hoping
to get to Texas to see. But in the meantime, I want
to take you on a journey exploring Sandy Soglin's
early works from the 70s. She creates these wonderful immersive environments
and really explores ways that
you can work with unconventional materials
to cover the surfaces, to kind of create these really
fabulous concept pieces. They really kind of get you thinking about different ideas. Some of them are really
fun and whimsical. Other ones are a little bit
more thought provoking. It's a really
fabulous collection of work that Sandy
Scogin has created. But in her early work, before she began creating room installations and
creating these spaces, she was working much smaller. She was working
within her apartment. She was using things at home. She was manipulating
basic objects and patterns that she had around
and food to create patterns. And we're going to be getting
inspired by her food still lives and creating decorative
paper collages from that. We're going to be looking
at the ways that she used color combination and
merged different patterns, created patterns, and played
with kind of a lot of different interesting shape,
the geometry elements. You're going to have
a lot of fun using your decorative paper
to create collages, inspired by food
still lives that Sandy Skoglin created in the earlier days
of her art career. I hope you'll join me in
class as we get inspired by concept installation
artist Sandy Skoglind. See you in class.
2. Class Project: For our Sandy Skoglin
inspired project, we are going to be
heading on over to the Projects and
Resources section of class to take a look at a Google Sides presentation
I put together that runs a whole line of
Sandy Skogin's work from the very early days through the food still lives and
her installation art because we can take aspects from her installation
conceptual art pieces and incorporate those
into our collages. Then we are going to
be exploring ways that we can manipulate different
decorative pattern papers, whether that be
papers that you have, like from the
scrapbooking section at your art and craft store or even ones that
you've created. You can absolutely make your own decorative
papers for this class. Then how can we manipulate those papers and
rearrange them and merge some different maybe similar
or disparaging patterns together to create abstract
geometric pattern collages. This is a really fun
class that kind of falls along the lines of
more of an art exercise to get you rethinking
about color combinations and color relationships and
the role of pattern in art. But this can absolutely
become something bigger. I can speak from experience that exploring
this artistic process in my own artistic practice
has given me new insights into ways that I think about color and pattern
and shape in my art. So it's a really fantastic
class that is a lot of fun. Our project is very
straightforward and easy on the outset. But the ways that you manipulate your decorative
papers and kind of merge shape and pattern and color relationships
and combinations is going to be really exciting. Head on over to the next
lesson to check out the materials that
you're going to want to have on hand for
class. See you there.
3. Materials: So the materials for
our Sandy Skogin inspired collages
are very basic. We need to have some
sort of background paper that we are going to
glue our cut pieces too. I'm just using
construction paper. The color doesn't matter
because we're going to be completely covering
it with the paper. Then I've got my glue stick.
I've got my scissors. And then I like to have a
piece of copy paper on hand. I do all my gluing
on the copy paper, so the mass stays contained, and then I can keep
my table clean. And then you can use any sort of decorative
papers that you want to. I have a huge selection of different pattern papers that
I got in a pack on Amazon. You can get these in any art supply
store that you have probably in the
scrapbooking section, but there's so many
fantastic ones both online and in store. I have a bunch of this around that I use for different lessons and projects that I teach at various places in our community, and then the extras I
incorporate into my projects. As I get inspired. So this was a great
place to start for finding inspiration for
my Sandy Skoglin project. And we're going to look
at the different ways that Sandy Skoglin plays around with setting up a composition with very
basic geometric ideas. Like there's a very
geometric layout that she uses for her food style
lives that she created. And we're going to use the composition that Scoggin
uses in her early works, as well as the idea of
these different patterns. And the next lesson,
we'll talk about how to kind of decide on your composition
and your pattern and kind of some
things to consider. But if you have an array of
decorative papers like this, scrapbooking papers, you
could make them also. But the idea is you want to have really dense pattern
on your paper, and that is kind of a really
great starting point. So this is all that we
need for our project. This is a really easy one,
but it's a really fun one, and it's going to kind
of stretch stretch you creatively as you kind of consider composition and
color relationships. And how to kind of put it
all together to create really interesting artworks as we look at Sadie
Soglin's earlier work. So let's head over
to the next lesson and start talking about
how you might want to group your papers and consider your layout for your
collage. See you soon.
4. Choosing Papers: So the first thing that
you're going to want to do as you kind of look through
your papers is kind of see what kind of
relationships there are between the different kinds of
patterns. So let's see. If I look at this
one, and I've kind of presorted them a
little bit as I was looking at different options for my Sandy Skogin
inspired collage. I've got a lot of, I've got
very dense ones like this. Sandy's patterns that she was
drawn to and the ones that she created with food
were very dense patterns, so very, very full and active. So this is kind of
fabulous and perfect. But I've also got some
different floral ones. I've got some more
kind of 70s vibe. I've got some kind
of ones like this that are a little bit
more wallpaper oriented, that beautiful kind of a little
bit more elegant floral. I've got a lot of
fun circle ones. So I want to organize
them together. The pack of papers
that I have to work with seem to have some
different sections to them. I have circle sections. I have the wallpaper
floral section. I have some other
really fun patterns that don't necessarily fit in. I have another set
of collage papers from leftover from a
different project, so I might play
along the lines of the geometry of squares would be another
way to organize it. Anyway you want
to do it is fine. For the piece that I made, I went for my circle paper, and then there were a ton of different colors
of circle paper. So, you know, I
had the green and I had yellow in here somewhere. And then I also had a pink
and a purple, a blue, a red, so kind of different dominant colors
to the different papers. So I chose a color scheme that resonated with me
personally, just one I enjoyed. But I also kind of wanted to see how the colors would
play off each other. So my focus two papers. We're going to at least
two focus papers would be, I use the red and I
used the pink dominant, and then I ended up going
back into the lavender and the violet one and
kind of using that for just a couple of
different accents because it just needed a
little something else. Dig through your papers,
kind of see what you have, and make the if you need them. It's so much fun to
make decorative paper. I would never discourage
you from doing that. And kind of start
putting together different color options and
different relationships. So as I'm thinking
about another one, I have a giant stack of papers, and I kind of already started
sorting it a little bit. I think what I want to do for my next piece is maybe do something
along the lines of stripes was one
I was considering. So I kind of pulled all of, you know, the long the
vertical stripe ones. So we have all these
different arrangements of patterns I can pick from. I was also kind of
looking at these two also as another one because the colors
are very similar. We're dealing with yellows
and yellow and oranges, and that would kind of
be fun to play off that. We've got one that's
more dominant in the orange than one that
has dominant yellow. That would be really fun.
There's one of some of the circle ones that I kind of decided not to use
are in here, too. There's a lot of different
ways you can do it. So I'm thinking about
future pieces going with the stripes and then maybe starting with
this as a foundation. If I did this, these
two as my main papers, what I would probably do is then a contrasting color for
some sort of focal point. So Sandy Skogin was
doing food collages. So she would have
the background and then the plate or whatever
surface the food was on, and then she would
organize the food, often peas, carrots, you know, small bits that she could
then create patterns or organize into shapes
like the diamond peas. And she was manipulating
the food to make its own pattern and
its own shape and its own tech like pattern is a big part of
her early works. So I was looking for,
along those lines. And then you can then
in the next lesson, we'll start talking about once
you've chosen your papers, how you might want to start cutting them up to
create your college. There's a lot of different
ways to go about it. Sandy Scoggins has a lot of squares and diamonds
in her pieces. But remember, with these
artist inspired series, we're really looking
at a portion of an artist's career
and technique or, you know, whatever aspect of the artist we're
focusing on we're really kind of zooming in on small
aspects to get inspired. You can weave yourself into these projects as
much as you want to. There is no food involved in the way that I'm setting
up our class project at all. You absolutely
could get some food out and really go for it and create your
own food style life. I think that would be fabulous. I just wanted to play with the materials that I had
on hand and something that I could just
dive into and was going to be very easy to create, but also stretch me mentally and creatively as I
considered papers and composition and then how to manipulate the papers to create an interesting and
dynamic relationship between the different patterns and the different color schemes. So that was the focus I took, but run with this, go nuts, get creative, and I'm incredibly excited to see how everyone's
projects turn out. Heading over to the
next lesson and we'll take our chosen papers, and we will start
cutting them up and mapping out our
composition ideas. I also have a resource
that I'm sharing on the projects and resources
section that not only has Sandy Skoglin's work
beyond the food collages, as well as with a focus
on the food collages, but also some templates of some different composition
and design ideas that you might
want to consider I don't want an understanding of the different ways to
set up a composition to limit anyone from being successful or
feeling stressed. This should be really
fun and really kind of an exciting
project to work on. So dive into the resource days, use any of them that help you and get you inspired
and get you going, and let's get started.
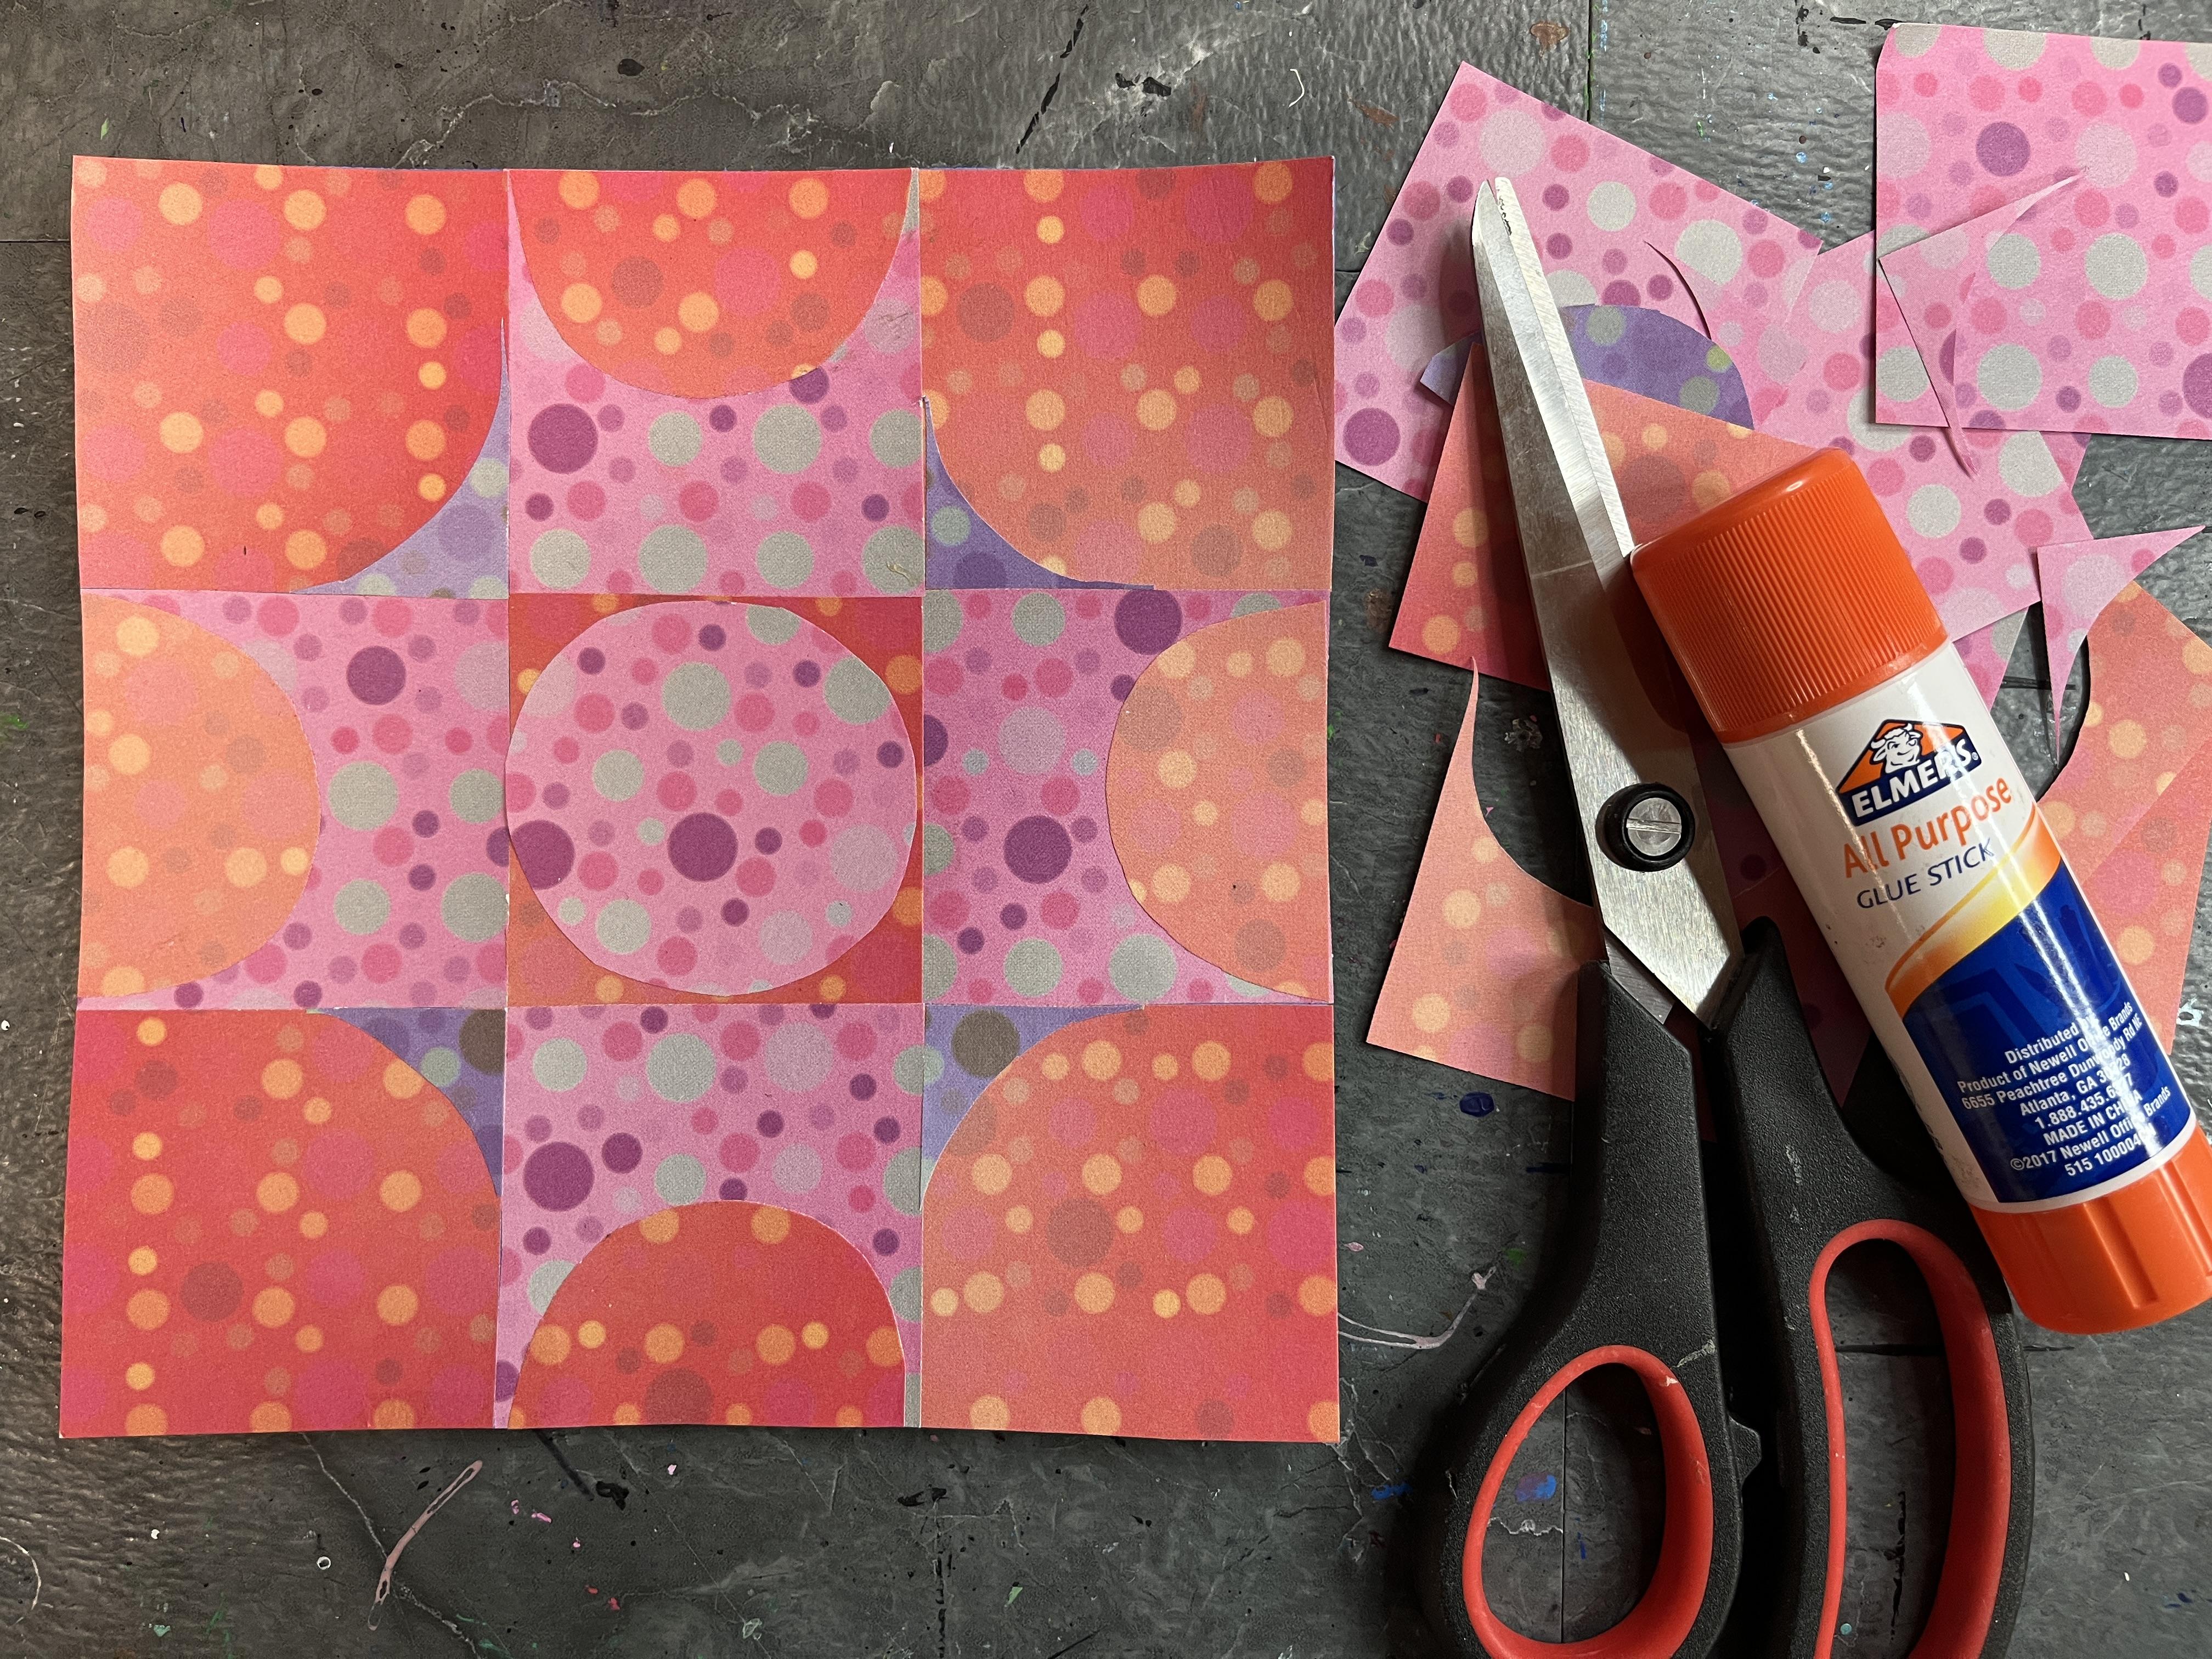
5. Collage: Ten. For my Sandy Scoggin piece, I decided that I wanted to start with a grid
of pattern paper. So I'm breaking up my pattern paper on the back side and measuring
it out to form a grid. So I think I was
doing every 3 ", 4 ". Around there, I just kind of
picked an arbitrary size, figuring out how many
squares I could get out of each of my decorative
papers that I had. And then I'm just measuring all of that out on the back side of the pattern paper so
that I can quickly cut that out to make
the different squares. And this is a great way to start it kind of the grid
foundation is a really nice, easy approach to
the composition. And then as I kind of
worked back into this, I had some different ideas about how I could then break up the grid even more to create
more nuanced patterns. So the first step for
me was just creating the squares that I
was going to use to create my grid design. And then now I'm just
going to cut those out. I could have used
a paper cutter, but I just decided to
kind of quickly do it with my scissors so that I could a little bit faster and then quickly get
to the next step, which was sorting my squares. Because the pattern
paper that I chose had some value scales happening
in the background. Like it was all kind of
the same color family with kind of the
pokaat pattern to it. But as you see, you know, there's the red and then
there's the lighter tones. I'm also using two different
Poka dot papers, too. So I kind of measured
all of it in one so that I could quickly get
a variety of squares. Quickly realized that the
background paper that I decided to glue
it to is too small, so I've swapped it out for a nine by 12 so that I have
lots of room to work with. And then if I have excess,
I'll trim it back down. Because I also decided that
I wanted to work in more of a square format as far
as the scale goes, as far as the proportional
relationships go from height to width. Most of Sandy Skogln'sFlud still lifes are
square in format. So that was another element
of Sandy's that I wanted to kind of lean into
with my own artwork. So I'm doing a checkerboard
gluing down here, so I'm alternating between the red based Poka up paper and the pink
based Poka At paper. And in the end, I'm
going to go with a three by three
grid because it just kind of gave me enough
start to work with, but it wasn't so much
that it got overwhelming. I could see myself as I get more and more into
doing pieces like this, wanting to get and
kind of explore going larger with my pieces
and kind of see how it goes from there as I get more intricate in the ways that I create my patterns and work with distorting the pattern
paper that I'm using. But for the initial one, I kind of wanted to start with something that was
very simple and straightforward
initially so that then I could kind of create layers
of complexity on top of it. So I've got all nine of
my squares glued down, and then I'm going to
use the extra squares, as you'll see here and
kind of figure that out. Once I had everything
glued down, I decided to trim down to just my pattern
paper background. This is kind of like the
first step for starting to kind of compose my
pattern paper collage. And then I was trying to decide what to do with
the rest of them. I did have a little extra
paper because I'd used some of my colors for
a different project. So I was kind of
playing around with how can I get the most out of it? And then how else can I then manipulate the squares
into other shapes. So I started playing around with half circles and kind of figuring out where
those could go. And you could do a lot more planning ahead
of time to kind of figure out how your final composition was going to look I really
like to create in the moment. I'm very process oriented, and I like the process
to kind of guide my movements through different stages of
creating artwork. So you end up with
quite a bit of stacked up layers of paper when you work
this way with collage. But it was kind of
nice because it was, starting with the whole squares, and then by layering
collage elements on top of different sections, I'm blocking out and kind of
taking away almost as if I started with the red
Poka at paper and then was kind of going
in with smaller, more detailed intricate
cut paint pieces. No, it was really fun
to work this way, and I really loved this
process of kind of trial and error and kind of figuring out what
is the next step? What is the next
layer of complexity that I want to build
and really getting inspired by the piece as it evolved through different
stages of pattern and collage. And there were some
things that I really, I tried that I didn't like. Like, here I am
cutting out a circle, and that is going to work great for the
center of my piece. That really kind of breaks up
that center square and kind of mirrors some of
the complexity that I created in the outer
squares by kind of blocking out some of the other
areas of the pink pokats. But as you'll see, I'm kind of, it's a
lot of, like, Oh, I have an idea, and
I'm going to try it, and then I'm going
to kind of decide, is it going to work. Sometimes those ideas
lead to other ideas. In this case, I decided
to grab another piece of Pokat paper that I had that had a different
color base to it. This one has a
purple background. So I'm creating another
square so that I can manipulate that and kind of add a new layer of color
relationships, but still kind of
having something that's unified by having
it still be part of the Poka doot paper series in this package of paper
that I ordered online. So I'm kind of cutting
out another circle, just kind of figuring out
how do I take it from the second step to
the third step, kind of building
it up from there. So we went from
squares, and then we modified the squares
with half circles, and then we went
to a full circle. And now we're kind of trying to figure out where do
we go from there? Do I want to cut that
kind of laying it down and playing with
where do I place it? And how does that change
the look of the piece? So I went from a full
circle to a half circle and just kind of trying to figure
out what's the next step. And I really encourage you to take advantage
of this time in the piece to really
kind of explore and kind of see what
your options are. Like, you might have
some really great ideas that just kind of
hit right away, and then you might
have other ones that take a little bit more time and consideration as you
kind of move papers around. I ended up using the
corners that were left behind from when I cut
the circle out of the square, and that created just a really small subtle thing to
add to this piece. But it was exactly what
it needed to kind of tie together those newer
shapes that I had created when I put the
half circles down just to have this kind of scalloped look go
all the way around. And I could have probably
done it with pink, too. I mean, I had plenty
of paper leftover, but I like the fact that
it's still that, like, subtle cooler color, the purple versus next to the pink in
contrast to the warm reds. But it still feels like it's just different enough to give a little
bit more variety. So I love how this turned out. I am just obsessed with this
method of pattern collage, and I can't wait to do
a ton more of them. So I'll see you in
the next lesson, where we'll wrap
up the glass. Oh
6. Final Thoughts: Thank you so much
for joining me in my Sandy Sooklan inspired
class where we looked at Sandy's early still
life food artworks and the ways that she worked
with color and pattern and shape to create really interesting
dynamic artworks that kind of help
open your eyes to new ways that you can use
those basic elements of art in really exciting
dynamic ways. I hope you had so
much fun creating your decorative paper
collages and that you're getting ideas for
ways that you can incorporate this into other elements of your art practice. Once you have finished
creating your Skandi Skogin inspired patterned collage, be sure to head over to the Projects and
Resources section of class and upload your project
to the student gallery. Share with us some of your
thoughts about how it went, working with your different
decorative papers, and maybe you'll get on a row and you'll create
a bunch of them. So you can always revisit your project and update
it and edit it and add new pieces as you continue to explore these ideas
in your artwork. Then be sure to check out
the artwork of others. It's really fun to kind of see what decorative papers
everyone chose, how we manipulated them, the ways that we
merged our patterns, and made new patterns in our
decorative paper collages. Then over to the review section of class and share a little
bit about how things went. What did you enjoy?
How can you see this influencing your artistic
practice in the long run? What ideas do you have
for your class project if you end up reviewing the class before
creating the project, as I often do and kind of summarize the experience for others who are considering
checking out the class. I know reviews are
really great way to reflect on the learning
experience and also kind of share and create
a community with others around how we experience
the class personally. After you've done all that, I would love to stay connected. So be sure to click
the Follow button so that you can find out
about future art classes. I have a bunch of
artist inspired classes in the works and a ton of other art art classes that
are coming down the line. So it's going to be a
really exciting year over on Skillshare as far as the material that
I'm creating for my students and exploring in
my own artistic practice. I love to stay
connected, so be sure to hop on over to YouTube and
check out my YouTube channel. There's all sorts of fun
stuff over there that can get you excited about
your artistic journey, and we can go on some fun
art adventures together. I love to take you anywhere I'm going related to
art and creativity, and we should follow
each other on Instagram. I post tons of fun
art adventures both in person and
online class related, my artistic practice, what I'm up to, what I'm
getting excited about, other classes and artists I'm checking out and
really trying to share document my artistic journey for myself as well as anyone
who wants to follow along. I would love to follow
along on your art journey. So if you are over on Instagram, sharing what you're up to
artistically, let me know, and we can connect
with each other there and continue
to support each other as creatives out in the wild doing what we
love and having fun. Community is a really
important part of art making, and it's really amazing that various online platforms can
allow us to connect with one another regardless of
the distance we may have between where we are physically existing and creating
in the world. Can't we see you in class
real soon. So till next time.
 Elisabeth Wellfare, Artist, Art Educator