Transcripts
1. Introduction : Hey, everyone. Welcome
to Mixed Media, a creative journey
of self exploration. My name is Sana Asad. I'm an artist, art educator, and holistic art
therapy practitioner. This journey, we are not
aiming for perfection. We are embracing
process over outcome. This is about self discovery, emotional healing,
and personal growth. One creative moment at a time. Over the next seven days, you'll explore simple
yet powerful prom designed to help you connect
with your own thoughts. Reflect on your
emotions and prioritize self care all through the
magic of mixed media art. Each day includes
a short lessons, a creative prom and a guided
space for expression. You don't need to be
an artist to do this. Just bring your curiosity
and open heart. You deserve time to slow down
to reflect and to express. Let this be a gift to yourself. Take a breath, pick
up your tools, and let's begin this journey of self expression
one day at a time.
2. Material Guide : Hey, everyone. Welcome to our material guide for
this mixed media series. For Mixed Media, you can use
any medium you already have. I don't want you to invest first and then start
your creative journey. Whatever you already
have at home, such as maybe watercolor,
color pencils, markers, any brand will work. You don't have to invest in fancy art material to get started with your
creative journey. Now let me show you the
basics like oil pastels. I do have oil pastels, water soluble, as well
as regular oil pastels. I also like to add gelatos
from Faber castle. Faber castle gelatos work
beautifully on any medium. I also use ink a lot
as a first layer, but as a substitute of ink,
you can use watercolor. Washi tape is optional. Hot glue gun is I think essential because
when you want to stick something and
don't have time for waiting, so that works. Posca markers, again, you
can use any regular markers. After this, I do have STEM pads and you can use these stem
pads for stamping afterward, just for adding details. I do have affirmation
stamps and a lot of others. I use highlighters when
I just want to finish and bring more vibrant and
beautiful florescent colors. I feel highlighters
were the best. You can use any medium
for mixed media projects, and that's the beauty I feel. I use mod podge instead of a regular glue stick because I can easily apply on top
of it and once it's dry, it gives a nice gloss,
your art journal, different sizes of the paint
brushes and acrylic paints. You can use gouache paint, acrylic paint in tube
form or in bottle form. The most important,
I feel as an artist, sometimes you feel stuck, no matter you already have a prompt or you're
following along, but sometimes you want to get inspiration
out of the world, something you can
just connect with. Then comes the storybooks
and magazines. Now, let's collect
all the art supplies and begin your creative
journey with me.
3. Resources Downloadable PDF : Hey, everyone. In this video, I'm going to show you how you can use the class resources, and you will get this PDF
downloadable version in your resources section in which you will have the
complete material guide. And step by step
lessons with picture to guide you through each
day's creative process. The most importantly, the
class project worksheets, where you will document your personal transformation
across three timelines, your past, your present and the future you
are stepping in. You can bring your memories onto the paper in writing
or through the symbols. Use this worksheet to reflect honestly what have you overcome? Who are you becoming? What do you want
to carry forward? Remember to create
without judgment means letting go of the need
to make it look right. Remember, to create
without judgment means letting go of the
need to make it look right. It's about how it feels. Allow yourself to be messy, to be honest, to explore.
This is your space. Every math you make on the
page is part of your story. By the end of this challenge, you will have a deeper
connection to your inner world, a better understanding of
the emotional patterns. Practical tools for using
art as a self care ritual, a finished art piece
that tells the story of your transformation
and most of all, a sense of freedom to express
without fear or pressure, low down, to reflect
and express. Let this be a gift to yourself. Let's begin this
journey together, grab all your supplies
and see you in the class.
4. Experiments with Techniques and Medium. : Hey, everyone. Welcome to our introductory video where
we will experiment and make some small mini
abstract tiny doodles to understand how the medium and how the
different materials mix together to create
that mixed media feel. But first, I want you to
explore your color wheel, understand the color theory, which will involve
primary color, secondary color, tertiary color. But the most important is
primary and secondary, cool colors, warm colors,
and complimentary colors. Now, primary colors
are red, yellow, and blue, and by
mixing primary colors, you get the secondary colors. These three colors are
the safest option. The only thing what
you need to remember that do not mix
complimentary color. The colors which are opposite on color wheel are called
complimentary colors. So we don't mix them
or if we want to mix, we always add the barrier means a lot of water
if you are using watercolor or maybe a lot of acrylic white paint if you
are using acrylic paint. Let's begin adding
the small swatches and I'm using watercolor
first to begin with. Here I already completed
these three swatches and then I remember that I did
not press the record button. So please ignore that.
Let's begin again. I will start with the red color, watercolor and make sure that you are not
using a dry brush. There is enough water in your
brush and in your palette. Blend them. Use lots of
water to mix the color. And if you want to make
the color light, again, you need to apply water
because in watercolor, we don't use much of white. We use water to blend them. Red and yellow are safest option because
they are primary colors, and by mixing them,
we get orange color, which is the secondary color. You can blend them, do the
splatters however you want to. First as a beginner, try to blend primary colors. That means red and yellow, yellow and blue or red and blue. In this way, you will see the
second color automatically, the third color will automatically
generate in between. Here I'm using purple and blue because they are
from the same family. Colors beside each other are
called analogous colors. That means they are
like a neighbors. So if you are mixing them, you are still safe. But remember to
add lots of water. In case if the colors are
turning a little bit muddy, the water will help you not to turn into
the dirty shades. Now here my mini watercolors
watches are ready, and it's time for me
to add another medium. I will start with markers and oil pastels and just
go with a flow, use different shapes, lines, whatever comes in your
mind and keep adding. This is the layering. The
first layer was watercolor. It can be just one color
or it can be multiple. The second layer is oil
pastels and I'm going with different colors as well as
different lines and shapes. And then after that, whatever mediums comes, that
will be your next layer. So I am using oil pastels
and then Posca paint marker, and then I will use a little
bit of color pencils. So watercolor layer will
be the fluid layer, and then on top of it, you
are adding more mediums, which is completely fine and
easy for you to work with. The next box, I'm using
Mt patch to apply collage layer like papers or newspaper, anything you want. So for this first apply Mt patch on your swatches or
on your background, and then choose your
medium what you want. Here I have these old like writing newspaper
kind of papers. So I'm just sticking them in horizontal movement to create the rhythm and
motion on my swatch, and then I will see. For these kind of an abstract, you can only choose your
color scheme and the layers, medium or what you
are going to add. But how to do it, what to do it, and
when to do it. This is completely intuitional, it really reflect
your personality, your imagination, and your feeling at
that present moment. You cannot copy anyone. Even after doing this, you will not be able
to copy yourself or recreate this
because that's unique. This is the reason I
think the handmade things are more precious
and more valuable. After the collage is done, you can use oil pastel
or you can use markers. I'm using oil pastils
and then I think I'll add affirmations on top of it because itself, it
looks very pretty. Here I am using watercolor
paints and for the skin tone, it's always
personalized, what tone you want to do it warm
tones, cool tones. For me, I'm using orange with a little bit of red
and lots of water. Then by adding water, I can always make my tint lighter or by adding a little
bit of browns and ochre, I can make it more
on the warm tones. Keep mixing till you feel that, this is the color I wanted and then start with a
slightly darker shade. Towards the hairline and the
cheek bones and the chin and then quickly take water and blend the color so
the paint won't dry, and it will create a very soft transition to the blending. In this journal, we are not
creating something realistic. So just keep practicing and go with the flow
how you want it. I like to add lots of makeup
in my whimsical girls. So I always add a
little blush while the paint is still damp and it creates a very nice
diffuse look when you add a soft blush
on the wet paper. Once the paint is
completely dry, I will use colour pencils
to add the further details, like outlining the eyes, eyelashes, nostril and lips. Also outlining of the hair
and the strands of the hair. Color pencils will
be the best option to create your faces, girls in a very soft and
cute and innocent look. Keep practicing till you feel that now your transition
of the blending is good and you want to
start for your journaling. You can always practice
on a separate paper, and once you feel confident
with your skin tone, you can just start with it. Don't stress yourself to
make a perfect skin tone or a perfect blending
because in the end, we want to enjoy the process to relax
ourself as a self care instead of being
in a pressure to make something perfect
and beautiful. For the color pencil, it's easy for us to give
that nose dimensions as a form because we need to create that little
three D popping effect, for me, it's most important that a little bit
of impression is there. I don't want to
have a very defined nose and the other features. I just add a little
bit of color pencil in a rounded shape around the nostrils and
then comes the lips. Keep going how you feel, how you want to do it, and can't wait to see your practice
in the class resources. Don't forget to upload
these mini experiments, what you have created, and I would love to
see for any feedback, you can always add
in discussions, and I will be there
to help you out.
5. How to cover your journal - make it personalize : Hey, everyone. Welcome
to the first lesson on how to create and
customize your own journal. In today's video, I'll
show you how you can make a beautiful cover using old
fabric. Let's get started. You can choose from a variety of material to personalize
your journal, whether it's fabric,
wrapping paper, or even your own
drawings and sketches. The beauty of customizing
your journal is that it allows you to
truly make it your own, creating a space
where you can express your thoughts and
feelings regularly. Now for this particular journal, I want to consider naming
it something like create without judgment or art
therapy, Myself Care. These names encourage
our mindset, focus on creativity
and self exploration. I want to do something in green, that's currently
my favorite color. So first, I try to do some
stripes with designs, but then this fabric I feel will be easy for me because
it's a pure cotton fabric, and it's nice and
easy to stretch. I don't have to work a lot. So this is the small flower
print fabric I'm using. Start with the size, and you can always use a small
swatches if you have. A rectangle will be perfect. This is taking me to my
childhood memory when I used to cover my school books or for
my children's school book. There are a few things
when you are doing it, it just remind you for those beautiful memories
you have created. For this fabric, I will
use the Decopage glue. You can also use
mot page or you can use any PVC white thick glue. Now this journal comes with a rubber band like a band
which can hold all the papers. So if I'm adding some
different envelopes or scrapbook papers, it will keep them all safe. It has this string. So I am just going to make a small hole and take
out that string. If you don't have this
kind of a journal, then it will be much easier. But if you have
something like this, always remember to do this hole and take out the string
and just let it be. Once you are done with all
the sticking and pasting, then you can easily
use this string. Let's the fun begin. Pour the glue, whatever you are using and use a big brush
and just apply all over. Then if you are a little
non messy person, then I would suggest you
to wear some gloves. Otherwise, you can just use your hands and press it nicely
and stretch the fabric. You can follow along,
stop the video, pause the video, and replay the video if you
don't understand any step. Over the course of this series, I'll be sharing step by step instructions
and various themes. I also want to encourage you to bring your own unique
ideas to the table. Let's brainstorm together,
find inspiration in nature, flip through magazines or draw from your own
life experiences. Remember, this journal is
a canvas of your story. Let it reflect who you are. After the back of my cover, now it's time to
give a finishing. I use hot glue gun and going to apply the hot glue gun and
then fold the fabric inside. And once I'm done with this, then I'm going to
take a new page and that also I'm
going to stick it, so my journal will look neat. Otherwise, if I'm not
going to stick the paper, my journal will
look very untidy. I hope you got my point and just do the
finishing at the end, remove the extra piece of fabric or you can
just push it in. If you're using a paper, then the paper must be a bit softer paper like a
little tissue paper or deco pach paper or if you're just
doing sketching or painting, then you don't need
to do all this step. As you can see, I'm
almost done with my cover and I decide to
keep it simple for now, but that doesn't
mean I won't add extra sketches or
stencils later. Sometimes less is more. But as your creative
journey unfold, feel free to embellish
it as you go along. And remember, I'd love
to see your creativity. When you finish
your journal cover, don't forget to
share it with me. It's always inspiring to see
what everyone comes up with.
6. Class project - Warm Up : Hey, everyone. Welcome
to the class project. And in this video, we will create a large
mixed media collage that visually
narrates your journey from childhood to present, capturing significant
memories, experiences, and aspirations for the future. As a brainstorming, reflect on key milestones and
experiences in your life. Consider events,
feelings, people, and lessons from childhood. To the present day and think about what you envision
for the future. For my mixed media project, I'm starting with the
background with gelatos. You can use oil pastels,
watercolor, acrylic paint, however you want to start with, and whatever colors resonate with your feelings
in the moment. I have no idea about what
exactly I will be doing. So first thing, I'm going to
start with my background, complete the
background painting, the colors which
I want to do it, and then we will take
it to the next step. While I'm waiting
for the background to completely get dry, I am taking some inspiration
from the magazines. I will look around the
pictures which I can connect with my childhood
to present or maybe future. Found some clock which can
be a time to represent how the time is taking and through the time
everything is changing. I'm going to definitely
take this page out and then keep exploring till
I find my inspiration. For you to begin with, this is the best way you can use your childhood photographs, magazines, storybooks, or
even you can printout. Think about what you can
truly enjoy as a past, present, and how you
want to see your future. When you decide your
theme and structure, decide on a layout
for your collage. You might organize it
chronologically from left to right, or thematically
cluster of childhood, adolescence, adulthood. Create sections for key
phases of your life. It can be childhood,
what did you love? What made you happy? What were your dreams? In adolescence, what
challenges did you face? What interest shaped you? In adulthood, what are
your current positions? As an adult, what are
your current passion? What life lessons
have you learned? For future aspiration, what
are your dreams and goals? All these points you can write down and you can think about
it while you are creating. You can gather images
and words that resonate with each section of your
journey, cut out pictures, how I did it from the magazine,
find motivation quotes, begin layering your
images and words if you have on the collage according
to your planned layout. Feel free to overlap items, creating a dynamic and
energetic compositions and there is no right or
wrong while you are creating. Don't forget to keep breathing and listen
to your favorite song, maybe a meditational music, something related
to sound healing. Whatever you feel
will make you calm and enjoy those moments
secure each piece with glue. I'm using mot podge
here and make sure to smooth out any
bubbles or wrinkles. As a mixed media artist,
most of the time, we start with something and we end up with completely
different thing. This is called intuitional art. Intricating the concept of intuitive art into your
collage project can enhance your self discovery
experiences and allow for a deeper connection
to your creative process. Intuitive art is all about
letting go of expectation and focusing on the
spontaneous expression of your emotions
and experiences. That's exactly what will
happen in this class project. This is how you get
comfortable with your material, your thoughts, and how to bring your emotions and memories onto the paper. Now here you can
see, I'm done with my childhood picture and
a picture of future. Now, while I'm doing this, I just start with adding oil pastels and I
thought that let me add a tree behind the old lady. While I'm creating this tree, I'm trying to go with
the dark colors. I started with a brown, but then I want to add
more of the black. The vision of my imagination right now is that
I'm going to add the tree with lots of
leaves on both the sides. But the colors will
show the transition of life and even the flowers. While I'm adding this, you can think about
how you can create the background and it's not a compulsory thing to add
background all the time. You can just play
with your pictures, add random strokes, do
some writing, doodling. Plan how you want to do it. As an artist, when you create, you get a lot of different
ideas while I'm doing this, I just thought that in
between the empty space, if I can add the middle
age, like the adulthood. I just quickly grab a
magazine where it's a fashion magazine
and I can have a lot of different
figurative people, different posture,
different positions. While I'm just
thinking about what exactly look nice
and what will fit, I'm going to take few and then I will see how
I can arrange them. This is something
completely intuitive and it just pop right while
I'm doing this work. Now, this is perfect. It fill up the empty space, and now I feel that this is creating a
transition of life. I can name this artwork
as transition of my life after I smooth
all the wrinkles, and then I'm going to
start with my lease. On one side of my tree, I'm going to add lots of dark
green, browns and yellow. And on the childhood side
of my art journal page, I'm going to add lots of
yellows and greens only. After that, I'm going to
find some treasure from my flower treasure box and going to collect
all the pretty colors, which will symbolize the
joyful and vibrant energy of my childhood as a
foundation of my life. And with flowers, I can bring all those memories that
represent hobbies, interest, and joys
from that period. On other side, I collect some flowers and leaves
which represent fall leaves. Thinking about the shades
of red, yellow, and brown, these colors can evoke
feeling of reflection, wisdom, and the beauty of aging. Add some final touches such as the meaningful quotes or
words about wisdom and growth that integate seamlessly with the flowers
and leafy imagery. This can enhance the emotional
impact of your collage and provide viewers with insight
into your self journey. I can't wait to
see your project, so don't forget to
upload this artwork in your own style with
your memories of childhood as a self discovery
in our class project.
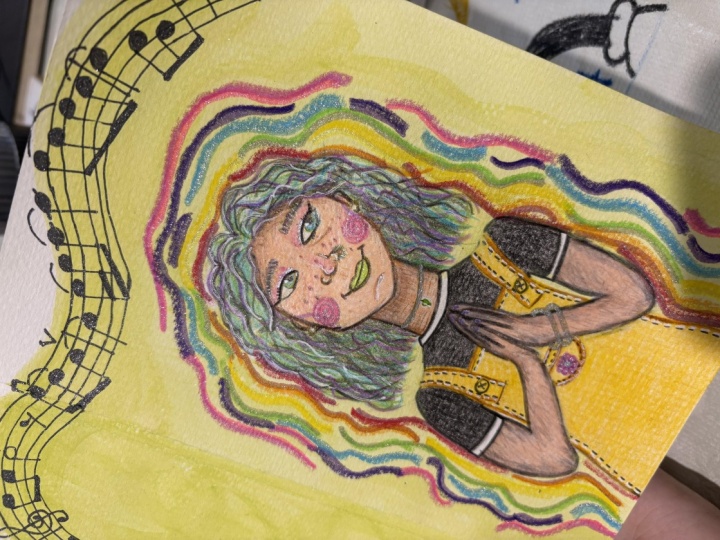
7. Day -1 Chakra girl: Welcome back, and I'm
so excited to have you in the second class of
this mixed media journey. Today we are creating a vibrant Chakra girl
in our journal. For this project, I'll be
using assortment of materials, including mixed media paper, watercolors, acrylic
paints, color pencils, oil pastels, glue, glitter, marker, whatever you have,
you can just gather. Let's begin with
sketching a face. You can either use a template or you can create your
own unique design. You will find the template
in the resources. I'm opting for a whimsical
face and I want to emphasize that it's okay to
be a little asymmetrical. The journal is not
about perfection. It's about allowing your
creativity to flow and enjoy the process more than looking for
the final product. You will find easy
steps in the template. On one side of the template, I have added these steps
what I'm creating. Normally, when we draw a face, we start with a circle. I divide a balanced line, vertical, and then divide
as a horizontal line. To create a whimsical phase, I usually do horizontal
in the middle of the circle and then at the eyes. The technique and the trick is that you need to
draw three eyes, one in the middle and then two on both sides using
the same size. You can use any template as a ruler with ovals or circles. For the nose, you can only have just the two dots or
you can have a line if you feel it's
little hard for you to create a nose
like a button nose. I'm a fan of button nose, so I will do the button nose, and then you can make your shape according
to your choice, whether it's an oval or more
rounded circular shape. Once you're happy with your face and everything
looks perfect for you, you can start adding the hair. Here, I am getting inspired by Frida Carlo with flower crowns, so I want to add
flowers on her head, and the hairs are more flowy. You can choose your own
style for the hair, and if you wish to do the
flower crown, definitely, you can follow along or
bring your own imagination. Once the sketch is done, let's focus on our background. Here you can again,
think about what inspire you the most and the medium you
want to start with. I am going to choose oil pastels and taking out
all the chakra colors, trying to go more on the
pastels, lighter colors. I will add circles that
symbolize the cycle of life, the good deeds we do
or the lessons we learn from the less
favorite experiences. These circles represent
the flow of energy, illustrating how our actions impact our lives and
the world around us. I encourage you to incorporate
colors that represent the Chakras and then add layers of watercolor and
enhance the vibrancy. Next, we will start painting
the dress using watercolor. For the skin, I will
mix orange and white. With just a touch
of pink or red, I like to apply the colors
mainly at the corner and blend them with water to
create soft light tones. Remember this is a journey, so feel free to choose alternative palette
resonate with you. In your resources,
you will be able to see the skin tone chart, along with even if you
want to change the medium, please feel free to do it. If you think that you just
want to use oil pastels or just simple color pencils,
definitely go for it. Once my skin first
layer is done, I will start painting flowers with first oil pastels
or maybe I can go with a watercolor
everywhere and then add more texture
with oil pastels. I really like this pink, so I'm planning to add
a little bit above the eye and a little
blush to make her look more shiny and vibrant with lots
of makeup around her. And this is again, optional. You don't have to do it, but I like to make her
with a lot of makeup, although I don't know
how to do the makeup, but this is something where
I really play with colors. Now, keep this aside
and start taking a separate piece of paper
and apply the chakra colors, red for the root chakra, orange for sacral,
yellow for solar plexus, green for heart chakra, blue for throat chakra, indigo for the third eye, and let for crown. Each of these colors carries
specific meaning and vibration that enhance the
energy of your artwork. If you want to focus
just on one chakra, you can just do one color. According to your preference, I'm incorporating
all the chakras because right now I'm not
focusing on any energy. I just want to make this
girl who's representing all the seven chakras and
bringing a balance in her life. After that, I will take
a color pencil and start adding color pencils in her
eyes. Choose your own color. I'm taking blue and green. Then I will add with black. So I don't use markers or paint. I will only go with
color pencils mainly. After my color
pencils, towards eyes, nose, I'm using oil pastels and applying different lines
and different texture. Whatever comes in my mind, there is no right or wrong, and I don't have any
reference in front of me. Just going with the flow, whatever colors
resonate right now and whatever movement I
feel I want to do it. So keep going
according to the flow. You can always mute this
and just play some song. So that way you will be able to connect
with your artwork, which is more important because this journal
is mainly for self expression and
enjoying the process more. This is the reason I
choose the first page of this journal as a reminder to embrace my creativity and
celebrate what I love. And you can take a moment to explore the
concept of Chakras. Chakras are energy
centered within our bodies that
influence our physical, emotional and
spiritual well being. Each Chakra correspond to
different aspects of our life, affecting everything
from our sense of safety and stability to our
creativity and communication. According to research and people incorporating
Chakra themes into your art allow us to tap
into these energy centers. Promoting healing
and self awareness, when we create with intention, we can align with the
energies of Chakra helping to release blockage and foster a deeper
connection to ourself. Oh After most of the outlining, now it's time for
my gouache paint. You can use acrylic paint. And because in gouache, I have this vibrant pink colour, otherwise, I have used acrylic. And I am mixing
acrylic soft pink and guage dark
pink, bright pink. Now you can take your papers, piece of papers and now start
just use different shapes, whatever comes in your mind. For me, it was hard. And then I just trace one heart and to keep
all the heart same size, I'm just using that
as a template. So feel free to choose
your own shape. And first, I thought that I
can add these hearts on her, but then the hearts
become really big. So I thought that let
me do it on one side. So you can always
plan your artwork. There is no right or wrong. Whatever comes, that is your personalized artwork and you can stick them according
to your own choice. You can make a flower, you
can stick on it or maybe you can write on the
heart however it feels. So right now still I'm
struggling what to do. But now I think I got it. So I'm going to add the line of heart overlapping
and then adding some doodles around
with the black marker. On the other side, I still
have a lot of pieces, like small cut out. So I thought, let me just make some small circles and I can give her a button
of chakra colors. You can always skip this, but I really like this. Now, as the final and last
step for this journal, it's time to personalize
more and we'll personalize our art even
further by adding affirmations. Before that, I am just adding
a little more depth on one side of her portrait,
like adding more. So my chakras and my hearts and my circles
will be more prominent. As the love of
butterflies and wings, I'm just adding wings
that she is ready to fly. So taking a flight so these are small doodles and small
things what you can do it, what you are hiding inside you, and what makes you feel happy and you are afraid
of sharing with the world or with your children
or because now you are an adult and you feel that
if you will do these things, people will think about, Oh, how childish you are. Let's do this in your journal. Adding glitters and sparkles, whatever makes you feel happy. Now it's time to promote self love or motivate you
to embrace your creativity. Writing these affirmations
in your artwork makes it a powerful tool for
healing and self discovery. To wrap up, feel free to
add more details, doodles, designs or whatever you
feel inspired to include. This final touch allow
you to really put your personal stem
on your Chakra girl. Don't forget to
share your artwork, see you in the next class. It
8. Day -2 Dancing Sea Horses. : Hey, everyone. Welcome
to the new lesson. And in this lesson, as you engage in this
creative process, think about a friend in need or someone you wish you could
dive into the ocean with. Let this art session
be the right for you to forget
all the worries you have on land and connect with a person
through your artwork. To start with, we will
begin with watercolor, wet on wet technique, and you can use the
colors of your choice. I will be using shades
of green and blue. Before you apply the color, make sure you use
enough water to make the paper damp and then
start with your painting. You can go with deep blue or
whatever colors you want. I'm just adding little
bit splatters and strokes of color and spreading
them with more water. Till I feel that they look more diffused and
mixed together, go with the flow and feel the blending and
mixing like you are in ocean and you can touch the waves and you can feel
the water around you. Once this is done,
you can add a heart. I'm using a curve line on
both the sides of the paper. You can try different things. Maybe you don't want
to add the heart and you might want to add just
the corals and leaves. But here I am making
a heart shape and adding more water with
water bottle spray. So the lines will not be very harsh and they
will be very soft. Once the line is done, I'm using the same colors
and pressing my brush on the paper and lifting it up
as a brush strokes leaves. The paper is still
damp, it's not dry. That's the reason the colors are very soft and they are blending. Adding a bit of
splatter in between and creating this more
as a watery effect. While I'm adding
these brush strokes, leaves all around my lines
and going with the flow, I want you to connect with the background music and
feel the water around you. This will help you to relax
and unwind yourself with a busy schedule and
juggling with a lot of responsibility and feel
like this is your time. After I'm done with
my heart lines, now it's time for you to just play with the lines,
strokes, splatters, whatever comes to your mind, you can add small fishes
or other sea creatures, or you can just
add more water and splatters to create more depth
like an underwater life. While the background is drying, take a fresh piece of a watercolor paper to
sketch sea horses. You can choose to
draw free hand or use a template to trace go
with what inspires you. I have already added the
template in our resources, so don't forget to download, and each and every
step is there already. A Once you completed your sketch, carefully cut them out. And once you have both
the seahorses ready, then we will start with
applying texture and paint. Painting is completely optional. You can use watercolor ink, acrylic, just simple oil
pastels or colour pencils. Consider using color
psychology to guide your choices and let your
emotions flow on the page. Here I'm using oil
pastels to add some extra texture before
layering on my favorite colors. Apply oil pastels as
a line and texture. Choose white because after
applying watercolor, you will be still able
to see the white lines. This technique can
also be done with white masking fluid like the
watercolor masking fluid. But for that, we
need to wait for the masking fluid to
get dry and then apply. So it's a little
lengthier procedure, and I'm a little impatient
right now to complete this, so I'm using oil pastels. Once you're done adding texture, then you can start applying watercolor according to
your choice of colors. Mix two colors together or three colors or
just use one color. And after the paint is dry, you can add highlighters or
markers or more decorations, whatever feels right
at this moment. It's time to
assemble everything. My background is dry completely. Before I'll bring my sea
horses on the background, I'm going to add a little
dazzling sparkles. I do have this transparent one. Applying mot podge, you can use liquid glue or glue stick. And then I'm going to
sprinkle all the magic, like all the beautiful glitter. And I don't know if it
happens with you or not. Do let me know, because with me when I see glitter,
it excites me. I feel an extra
like an extra shot, extra boost in my body. And that's why in
most of my work, I love adding glitters because
that makes me feel happy. And you can't see
this on the camera, but I can see those beautiful shimmer and dazzling
glitter all around. Now it's time for me to use the hot glue gun because
this is faster and I just want to stick them and don't want them
to move around, sticking my sea horses
as a partner and they are really enjoying the flow in the
beautiful whimsical sea. Just go with the flow
and add your sea horses. If you want to add
more sea animal, maybe instead of two sea horses, you might want to do three or
four or maybe small babies as a family or friends,
feel free to do that. As we wrap up with our
creative journey today, remember that art is not
just about the final piece. It's about the
emotions we explore and the connections we
make along the way. Just like the sea horses
we brought to life, we too can float gracefully
through the challenges, celebrating the bond
we share with others. Keep connecting and
always remember, you have the power to transform your feelings into something
beautiful until next time, stay inspired and
let your creativity flow like the gentle
tide of the ocean.
9. Day 3 Memories: Hey, everyone. Welcome to our enchanting class
title Whimsical Dreams. Discovering magic
through Imagination. I'm so excited to have
you all here today as we embark on an adventure into the world filled with
magic and wonders. While I was planning
for this class, I knew I need to do
something from the past, from my beautiful
memories of my childhood. I grabbed some storybooks, and this storybook is all
about Unicorns birthday, dragons I just want to do
something with unicorns. So here I started with my
sketch and you can use the template to trace
if you are following exactly the same way I
have done this lesson. But if you are
doing some changes, first, you can follow along, go with this, and
then you can bring your own imagination
into this lesson. In this lesson, throughout
our time together, we'll explore the
power of imagination, dive into our
childhood memories, and unleash our creativity as we connect with the whimsical
themes of unicorn, castles, and everything that
sparks joy in our heart. Take a deep breath,
let go of any worries, and prepare to let
your mind soar. Together, we'll create
something truly magical. Are you ready? This artwork
begin with unicorn. And then for the unicorn, I decided to add myself very close to the unicorn,
almost hugging him. You can always try to do
something different with your favorite animal or the
animal from your childhood. Still, I am following some of the storybooks
to get inspired, and this is one of
the storybooks. I really feel that I need
to add some castles because this reminded me of
our visit to Scotland, and unicorns are the
national animal of Scotland. So I thought, let me just create a beautiful European
style background. While I'm making
this background, let's discuss why living out our fantasy
dream is essential. Our imagination is not just
a playground for children. It's a sanctuary for adults too. When we engage in
creative activities, whether it's painting, writing, or daydreaming,
we allow our mind to explore, expand, and unwind. Studies shows that
immersing ourselves in creative pursuit can
lower stress levels, improve mod and foster
problem solving. Each color representing
a feeling, a memory or a dream. By creating something beautiful, we express our
thoughts and feelings, transforming the chaos of daily life into something
magical and serene. Here I'm starting with my
background using watercolor, and each stroke of color
is like a magic for me, taking me to my
childhood memory when my father used to take me
for horse riding lessons. So cherish the memories
which makes you happy and connect with the
loved ones you miss a lot. Now let's imagine
ourselves as a child, full of wonder and laughter. Perhaps you might be
riding a unicorn, or you are discovering
colorful landscapes only found in your dreams. Using the art supplies provided, I want you to create
your magical scene. Incorporate bright colors, fantastic elements,
and most importantly, your feelings and memories, like how I'm adding beautiful light blue color
sky with watercolor. What does your
unicorn look like? What colors represent
your dreams? As my first layer, I will finish all the objects with watercolor. For Castle, I'm using
also watercolor first trying to go over the greens
and yellows combinations, adding lots of water to keep the translucent effect
in my background. Once the background is done, then I'm going to start
with a second layering. You can start with a
watercolor and wait for the watercolor to completely get dry and then begin
with our next layer. Now, after the background
of castles is done, I'm going to start
with my unicorn because unicorn is
still in middle ground. And the face of
the middle ground is on in front of the girl. First, let's begin with the
unicorn and I want to make it completely magical and
out of my imagination. I'm using some warm colors, pink yellow with watercolor, mixing them a lot with water, the colors will mix beautifully, and I won't be able
to see any strokes. You can choose your own unicorn with any color of your choice. You can leave it white with lots of beautiful
colors in the main, or you can make it same
like how I'm doing it. Try to connect with your colors. What colors connect with your
emotions in today's moment. Painting the face with
watercolor with skin tones, we have already covered in the first few videos of
experimenting with techniques. So if you want, please revise that lesson once again to begin with. It's
a very simple one. We don't need to go
with our complicated shading and a lot of realism because it's a imaginary
and whimsical portrait. So begin with your watercolor, depending on the skin
tones you wish to do it. I love to add lots of
makeup all around, like pinks and blushes. But again, if you want to keep it simple
with color pencils, instead of watercolor, that will be a good choice as well. The eyes are close to create a very calming and
peaceful mood for the girl and using some dark shades under the
neck and around the face, and then taking lots of
water to blend the color so the skin will not look
like a patches all around. The first layer for
watercolor is done. Keep this journal on a side and grab some
watercolor paper. You can doodle some flowers, whatever you like it. I am inspired by
daisies this season, so I'm doing daisies and
few other flower, small, bake, try to fill the paper with lots of flowers and leaves. Try to doodle them. No need
for perfection or realism. Just create however you want it. Once you are done, outline
them with a marker, paint the background
with some watercolor, add more watercolor
marker color pencils and just paint them, color them according
to your choice. Once this is done, then
wait for this to dry completely and then you can
cut out and keep aside. Grab some markers. I have
these alcohol markers which works beautifully and I can easily do
lots of layering. As mentioned that this is
a mixed media project, feel free to use
whatever medium, whatever material you wanted. I'm using color
pencils by Derwin. These are easy for me to use, and this is a graphite pencil. I will try to go
with a combination of graphite pencil,
Derven pencil. These are the color soft pencils and going to start with
an outlining first. For the outlining, I prefer to go with a color
pencil outlining or graphite outlining because this will create a very
soft look to the work. You can make this
artwork completely with color pencils only or
only with oil pastels. You don't have to do
so many layering. But as it's a mixed
media work and I really like to connect
with different mediums. That's the reason I
like this approach. Create the lines, strokes, flicking effect, shading,
however you want. You can always get
some inspiration from storybooks or Pinterest
or Google magazines, and just continue with your second layer to bring
the shapes and outlining, add more depth into your
portrait and your work. I'm using skin color just to add a little bit more depth on the
eyes and go as you wanted. The nose is also done
with the colour pencils, exactly the same way we did in our first lesson
experimental with technique. Color pencils are the best
way to keep the artwork, give you the softness
and very cool effect. So without having a very
solid effect in my work, I am going to continue
with my color pencils. No. Now back to the flowers, using markers to enhance
the colors and bring some more vibrant
effect into the flowers because after the
watercolor gets dry, they become a bit faded and I want the vibrancy
in my flowers. The background, my
girl, my unicorn, my castles are a bit softer, but I want the vibrant
effect in my flowers. Here I'm adding some markers. You can use color pencils. Here I have some painted
paper which I use different colors and these are something which we often
use in our studio. You can add some greens, leaves, bushes,
whatever you want. And then just add as a filler. Arrange the flowers according to your choice
wherever you want, and it's your imagination. It's your creativity.
This is the background. Now for the background, I'm going to start with markers. Because I want to
finish it fast, first I try to start
with the color pencils. But then I thought that
it might take a lot of time I want to finish this. I'm starting with a marker, starting with the darker tones, darker shades first, and then going with the medium tones.
You can follow along. If you're using
the color pencil, start with the dark colors and then apply the light colors. If you're doing with watercolor, you need to still follow
the same to bring that depth and
illusion of the form, a little more
realistic look into the bushes and creating the difference between the
front ones and the back ones. Just go with the flow and
enjoy the process more. Keep breathing. Don't
forget to breathe. Keep adding some doodles, whatever makes you happy, and I like to add small hearts, small wings, most of my
mixed media projects. In this studio setting, when I'm taking the workshops, once we finish the work, we
often gather in a circle, sit together, share our
work, share our thoughts. So while we are
doing this online, I would suggest you
to sit in front of the mirror or just take
a moment after you complete your process
work and keep it in front of you and
reflect how you feel. How do your memories
connect with your art? What feelings did you
experience while creating? You can always write
down if you wish, maybe on a piece of
a paper or maybe you want to add some small
thoughts and memories. I really want to do that, but then I thought, no, I will add these doodles
in my on the main, and now I'm going to use some more whimsical looks,
splatters and glitters. At the end of this lesson, I want to remind you all
that our fantasies and creative expressions
are valuable tool for relaxation and healing. Just like our enchanting
unicorns and magical castles, they can transport us
to a place of joy. Whenever you are feeling
overwhelmed, close your eyes, envision your magical world, and let it fill you with
inspiration and tranquility. Looking forward to see
you in next class.
10. Day 4 Tiny doodles : Hey, everyone. I
am so glad you are joining me in this soothing
exploration of watercolor. Today's class is all about
relaxation, experimentation, and finding joy in
the simplicity of art. Let's jump right in. Start by grabbing some
washy tape or masking tape. We'll use these to create small boxes on our
watercolor paper. I recommend working on both
sides of your art journal. On one side, we'll make our
mini boxes and on other side, we'll get creative with
the artwork itself. For my mini boxes, I'm using playful mix
of blues, greens, pink and purple referring to my color wheel and you don't have to worry about
making everything perfect. Just let your
intuition guide you. Using color wheel can also help you decide on your colors. It's always preferable to choose your colors before
you start painting. You won't turn out with the
muddy and messy colors. So let's begin our painting. Now for abstract painting, you don't need to
follow any direction. But yes, if you're painting
realism or landscapes, then definitely, you need to
follow the right direction. But here I'm just going with
the random strokes of color. First, begin with green
and then adding water. The color which will go well
with green is blue for me, because they are analogous side by side colors on color wheel, and I'm going to
keep adding with different strokes of color on
one side of the paper first and then the opposite side of
the paper with contrasting colors like blue and
purple and then pink. Also, I'm going to add
lots of splatters, so the colors will stay on top of each other as a contrast. Remember, you have a freedom to choose colors that
resonates with you, whether you want to stick to a traditional color wheel or let your imagination run wild
with unexpected hues. It's all about what feels
right to you at the moment. Now here, this is done and
this looks beautiful itself, I might not do anything
on this side because I really love the colors and the empty white spaces as well. But for the other side,
I need to remove him because he's taking
half of my table space. By the way, meat bicho. He's my arts can, he's my son, he's my buddy while
I'm painting, he's my furry friend
and I will be painting him very soon
in this journal series. Let's start with our
other side of the paper. On the other side of the page, let's take a different approach. Pick one color from
the palette and mix it with water to
create a beautiful tint. This soft variation
remind us that even the simplest adjustment can lead to stunning results. As the color dry, note how beautiful
the layers can be. It's a great metaphor for our
own growth and experiences. Once all the paint is dry, it's time to let your
imagination soar. Take a moment to sit back
and observe your mini boxes. What lines, shapes, and color combinations
stand out to you. Each observation is a
chance to connect with your inner self and discover
what truly inspires you. Feel free to doodle, sketch, or simply let your
pencil or brush flow. Allow your inner artist to take over and remember
there is no rules. This is your
opportunity to unwind, relax, and enjoy the process. Embrace the freedom of creation. Let it fill you with joy. Research shows that
daily art practice can be form of mindfulness, drawing your focus
away from stress and redirecting it towards
creativity and expression. It's a beautiful way to
check in with your self and cultivate a sense of peace
amidst life's challenges. As you can notice that I am only going with the same color
but darker shade of green, adding few lines and this
box remind me of nature. So when it comes for nature, the first thing is leaves. I'm mixing the colors of
blue, greens and browns. And just going to add a
line and add leaves on it. Maybe you also want to connect with nature in
one of the box if you have used the same green
and you want to add a field of flowers or
maybe just the splatters, or maybe you want to add
only the affirmations to feel free to customize and
personalize your own box. For the next box, I have another
box filled with ribbons, stones, beads, a lot of
different craft items, which I always collect them. Because of the studio classes and the summer camps
and winter cams, we do collect all these things. And some of the things,
I bring it back home with me so I can
use them in my journal. Here for the next box,
I think that I can use some ribbons for the red one because I found a perfect
red and white ribbon. So you can collect anything
you want newspaper, collage, magazine, whatever feels or you can just use color pencil
marker and doodle it. So let's see what comes in my mind and how I'm
going to make this. This looks perfect.
Let's begin with your box number three
for box number three, I can have another box. This box is all about stickers, collage papers and magazines and a lot of different
goodies for me. Even I have some of
my painted papers when I do exploration of color mixing, even
I can use them. But for the browns, I think that what I
can do it give me the feeling of the desert
like uh um sad or maybe, like, a sand or so I collect I found this
very pretty net fabric. So I think I can just
use this fabric and use mod podge and apply
this on my paper. I'm sure you got
the idea that how you can add layers of collage, mixed media, different
objects, stickers, magazines, just
the color pencils or marker, doodle
or affirmation. Now I'm going to
complete my rest of the boxes with similar things and use mod podge and different
objects to layer them, and then we will
complete this side off. So keep doing relax
yourself, keep breathing. Don't forget to breathe
because sometimes we get so intense in the process
that we forgot to breathe. For the yellow one, I
have a lot of things. This paper connects with
me for the yellow box. I'm just going to
make some stripes and use the flower and let's see how I'm
going to arrange them. I can't wait to see
your final projects as well because this is something which is very unique and no one
can copy anybody. I'm excited to see
your original pieces. Now, last two boxes are left
and for the last two boxes, I will use a little bit of acrylic paint, especially
for the blue one. I will also show you how
you can add washi tape into your art piece
as a layering. I have this one, which is
with the greens and blues, which I feel it looks perfect. I'm just going to add, I
never used this before because I feel that washi tape looks beautiful as a borders. But let me try an experiment, and this is your chance to experiment with something
you haven't done it. As we wrap up, take a
moment to reflect on how the simple art exercise can
help you relax and recharge. The beauty of watercolor lies
in its unpredictability. Each layer add
depth and richness, just like our
experiences in life. Every stroke you make is a celebration of
your creativity. Thank you for joining
me today and I hope you found joy in these small
expressive doodles. Remember, art is a
wonderful scape, continue to experiment
with colors and shapes as you explore the
vibrant world around you. Also, never underestimate
the transformative power of your artistic expression. It's a vital part of your
journey towards well being and self discovery. H.
11. Day 5 Fill your cup first : Hey, everyone. Before we
begin, take a moment. Gently close your eyes,
inhale and exhale. You are here and that's enough. Today we are creating
a mixed media piece called fill your cup first. I start with random paint stroke using watercolor and ink. I don't plan them. I just let the colors move. Using acrylic ink or watercolor, you can start with
acrylic paints or pastels, whatever
is available. Using acrylic ink, I use lots of water to spread around
and let it flow on its own. It's not just art, it's an invitation to slow
down to listen inward, and to reconnect with a part of you that may have been quietly
waiting for attention. The stage is about release, letting go of what I'm holding
on without any judgment. The brush become a vessel for all the feelings I
haven't set out loud. Sometimes art therapy
isn't about the outcome, it's about the unloading. It helps us translate
emotions into form, color, and texture when
words feel too heavy. Once the background of
acrylic ink is dry, I'm going to try out this
water soluble oil pastels. This is a completely new bag, so I'm not sure whether
it will work with water or not, but let
me give it a try. You can use the regular oil
pastels glato or you can continue adding another layer of watercolor or acrylic paints. For the second layer,
I'm choosing colors intuitively, more yellow, blues. They reflect where
I am emotionally, tender, hopeful,
tired, but still here. Once the paint is dry, oil pastel is done, I am going to add lots of water to see how it
will blend together. Now it's time to
shift on to collage. I grab an old magazine and
start flipping through. I'm not looking for perfection, I'm looking for resonance, which I can just feel. Yes, this is something I want. I pause when I see an page of a pet dog resting peacefully, eyes gentle, unpoered
by the world. I tear the paper, trace
the image on my paper, and that become my anchor. To transfer this dog, I
will use carbon paper and it will be easy
for me to transfer on the pre painted paper. If you don't have
a carbon paper, you can just cut
out the template, cut out the image, and then
you can use the outlining. Now I begin sketching
a girl softly outline, holding a teacup
close to her heart. Her eyes are closed. She's not performing or posing. She's just being. She
is me. She is you. She represents all of
us who give, give, and give until we feel
like we are disappearing. As I draw her, I think about
what the cup symbolizes. It's not just a mug. It's a vessel of energy, your emotional capacity,
and your creativity. The truth is, you can't
pour from an empty cup. We glorify business
and sacrifices, but ask, how am I? Really? What do I need today? Art give us that sacred space to check in and to witness ourself. For this lesson, I did not add any pre sketch template in the resources
because I really want you to train yourself to use your own imagination by using
collage or photographs, but use the prompt instead of copying exactly
what I am doing today. Your prompt is fill
your cup first. Now, how you can
visualize this and how you can create.
That's more important. Once I'm done with my sketches, as you can notice
that I am only adding more and more colors
as a background, so my images will start popping. I will keep the dress as it is. Combining the oil pastels
and color pencils together. I will add the details. But first, I will wait for the background to
completely get dry. At this stage, if you want, you can leave her
face just as it is. I'm using acrylic paint, white and peach color. I will differentiate between the background and the portrait, like the face because
I want to use the background color for
her dress and the mug. I'm only going to
use some white and peach for neck,
face, and the hand. After that, I will try to
use some color pencils, oil pastels to add more depth and using pastels for the hair. Mixed media allows for emotional
layering just like life. Some days are messy
and textured, others soft and quiet. As I blend shades
into one another, I realize how much I've
neglected these quiet rituals. I've been rushing through life, forgetting that rest is not a
reward, it's a requirement. Every line, every
smudge, here is sacred. For the dog, keeping the
reference in front of me, just following the colors and the directions is
more important. I don't want to make
a realistic dog because I don't want
to stress myself. I just want to
follow the colors, what is there in the picture
and using acrylic paint, oil pastels, and some color
pencils to add the depth. Go as a flow however you want. The beauty of this
lesson is not to stress yourself,
embrace the process. After using mix of medium
pastels, color pencils, acrylic paint, now
it's time for me to start with some extra
collage for the background. Here I have this beautiful
gift wrapping paper from one of the stationary shop, and it has a lot of abstract
shapes, hearts, eyes. In Arabian culture, the eyes represent the evil eye
just to protect yourself. So I really want
to add this one, and I'm just giving
a random shapes, and I will stick them on top of the paper and just at the bottom with the
help of mot pot. You can use newspaper, magazine or collage, or you can just skip this step if
you don't want to add. No Now it's time for me to give a little more extra details with
color pencils. Instead of using markers or
acrylic paint outlining. I prefer to do color pencils or charcoal pencils
for my outlining. It creates a nice soft look. The same thing I will
be doing with a face and lips and even the
eyes for the dog, I will add just the outlining
with color pencils. Now I pause. I sit with the piece and ask,
What do I need more? And the immediate answer is, let's add some flowers leaves that she's in the
forest or she's in the garden. Because I feel relaxed when I am outside in grass walking
with trees and birds. This is what me, myself, how I feel relaxed, definitely bicho
is always there, but these are the few things and that's what come from inside. Let's add some
leaves and flowers. Here I am just using
acrylic paint, green and yellow stroke by stroke, going upward direction. Once the green is dry, then I'm going to add flowers. And So just to add a little extra fun, I take out a few empty tea bags and begin writing words
that feel like medicine. What I want candles,
what I love, definitely taking more nap in
the afternoon and so more. These are my self
care intentions. Tiny reminder of what I so easily forget in the
chaos of everyday life. This exactly you can try
doing it with my glue gun, I carefully tuck
the t bag strings in like they are brewing
right inside the mug. Symbolically, this
is my list of what I will pour into
my own cup first. As I look at the finished piece, I don't see a perfect painting. I see an emotional record, a quiet conversation between
my inner world and my hands. This is the heart
of art therapy. It teaches us to
pause, to explore. And to tend to ourself
without judgment. Self care is an indulgence.
It's preservation. When we learn to
fill our own cup, we begin to show up in the
world with more compassion, more clarity, and more presence. Thank you so much for
creating with me. I hope this practice
remind you for your word. How deeply you deserve your own time,
energy, and kindness. If your cup feels empty lately, this is your sign to
slow down and refill. Be gentle with yourself. You are doing the best you can. You are allowed to rest. You are worthy of joy. You are enough, even in
your quietest moments. See you in the next class.
12. Day 6 Set yourself free: Hey, everyone. Welcome
back to the new lesson. This piece explore
how reconnecting with nature through symbols
like birds, flowers, and textures can reflect
personal growth, emotional healing, and the
courage to move forward. Each bird represent a
stage in self development, grounding, connection,
and freedom. In the noise of everyday life, we often forget how deeply
we are connected to nature. I begin by layering the
background with tone paper. I use the same papers, what I have used in
my previous lessons, same scrapbook papers,
handmade papers, newspapers. Just see what you have. You can use fabric papers, maybe gift wrapping papers, anything you want to
create the layers. Then I cover part of
soft acrylic washes. This layer this layering mirrors
our emotional landscape, something hidden, some exposed. Growth is never linear. Healing is never neat. Each layer says something. What do I need to let go of? What I'm ready to
bring to the surface. Once the painting layer is dry, I'm going to grab some
affirmation stickers, which can resonate my
emotions and my feelings. I'm just going to take them and stick them
with mod podge. You can write by yourself, or you can write on
a separate paper and then stick
them as a sticker. Next, I begin
adding flowers with soft pastel and gelatos
from Faber Castle, soft pink, calming blues and few bright yellows with greens like sunlight
breaking through. In nature, flower blooms
in their own time. In life, so do we. The these blossoms
symbolize self compassion, new beginning, the beauty
that comes after the storm. Each petal a reminder, healing isn't always loud. Sometimes it's soft and slow. In nature, everything
serves a purpose, rest, decay, bloom, flight,
and so it is with us. When we create with symbols
from the Earth like birds, bricks, branches, blossoms, we are really
telling a story of becoming. Next, I draw three birds on
a separate watercolor paper. You can use any paper if you are not planning
to add watercolor. I have these small cutout, so I'm just going to begin
with sketching my birds. I want to add the birds in a
very soft and natural form, so I'm not going to
add lots of colors. The birds are
ready, and now it's time to think how I'm
going to arrange them. I'm not sure what
exactly and where exactly these birds
will be on this page. But while I was arranging, it just came in my mind that birds often
represent freedom. So I feel that let me
add some branches, and I want to make one
bird on a brick wall. The brick wall reminds me
strength is built over time. And just trusting my intuition, I start sketching my brick wall. Grabbing some oil pastels, browns ocher and going
to add the line. After that, I'm
going to just add those shapes to
represent the brick. I don't want to add a realism, but I want to give an
impression of the brick. One bird will be sitting
on the brick wall and the other two will be
sitting on the branch. So it will give me the feeling of they become part
of the environment. I'm creating my inner garden. So you can visualize where
you want your birds or butterflies or what you are creating and how
you can represent them. While I was arranging
all these birds, I immediately
thought that let me just make my background
a little bit more subtle and light because it's too much
of wage everywhere. So I quickly take my
acrylic paint and start giving a very soft wash
on top of my wage layer. Now, I feel that, okay, this looks much better than the previous one here
my birds are here. I'm going to use
mot podge because my hot glue gun
riffles are finished, so I just need to
use mot podge and wait for the layer to
completely get dry. This is how you use
your liquid glue or mot podge if you don't
have the hot glue gun. I am going to add
lots of glitter and sparkles because that
makes me feel happy. Thank you so much for joining me in this creative journey, and I can't wait
to see your work. So don't forget to take a
picture and share it with me. See you soon. Take
care, everyone.
13. Day 7 Layers of Well being : Hey, everyone. Welcome back to the last lesson of
this creative journey. In this video, I'm going to
show you how you can bring your emotions and then
add layers to heal them. My creative process is
guiding force of my life, allowing me to see
the magic around me. In this lesson, we are going to think about people places. What makes us happy? What makes me happy. I'm going to list them
as my first layer. This process will be all
about layers of well being. In this lesson, we will
weave symbols of self care. When it's finished,
this piece may serve as a reminder for how we nurture
and support our well being. Let's begin adding the list. To begin with,
spend a few minutes reflecting on the ways that
you show up for yourself. What things do you do to support your emotional
and physical well being? Are there any special
places you like to go where you feel
calm and at ease? Are there certain people that you feel good
spending time with? Starting anywhere on your paper, make a list of words
for the objects, actions, places, and the people that support
your overall well being. Your list will of course include different things than
mine, and that's perfect. As this is a very
individualized activity, once we made our list, choose a few of the words
that stand out and loosely sketch some simple symbols to represent those
aspects of well being. For my list, top of the
list is family home. Spending time with
my children is the most important
aspect of my life, and then spending
time with my husband, especially a walk on a beach or maybe with nature,
birds, butterflies. These are something
which I feel that is the essential part of
my well being and my cats, as I have seven cats, but one of the cat
is like my son Bisu he is my supporter. He is someone who heals me and he can sense
what is going on. Add this list, add the symbols, and then let's create
on the next layer. Next, I will grab some
oil pastels and I'm going to use my pastels in pink, peach, cream colors, which I
feel I want to do it today. So you can refer to
your color psychology, and then I'm going to
create the symbols large and covering my writing. So you can use oil
pastels, markers, paint whatever medium
you want to or you can layer up with collage magazines. I will first start with oil
pastels and then I'm going to add layers of papers
handmade papers, newspapers, and a
lot of other things. With Mt Podge, it's a very similar to the previous lessons, how we do the layering
with different mediums. Now it's time for
me to think about what other layers or
paint or color I can add. Once some paint is down and dry, we'll take a look at each
area we feel drawn to. Lightly circle any area
that appeals to you and that you'd like to keep as we move forward
with the next layer. I'm adding some acrylic
white after adding the collage and just keep going till you feel that
now I'm ready for sketching those symbols and
adding yourself into the art. Let's begin weaving in symbols. It's like you are just
adding what you want. It can be yourself
as a figurative art or it can be just the symbols
what you have mentioned. I'm going to represent myself in this artwork and using
willow stick because I feel that charcoal will
be a bit easy for me to sketch because my layers are
still not completely dry. So let me begin with
sketching very loose. And here in this video, I'm not going to share a lot of template because I want you to come up with your
own idea of this. And I'm going to start with
the head over and then create a very flowy structure for
the hand and the dress. Not going to show a lot
of different details. This is completely intuitional. It is taking me step by step. I don't have any plan right now, let's just dive into and let's
create some lose sketches. You can use paints to
build up layers and details of the large symbols
that you have sketched, or you can just use oil pastels. After using Willow, I am using oil pastel and sparing
it with my finger. Just give light soft massage on the paper because
the first layer is still not completely dry, the charcoals and oil pastels will mix together with
my acrylic layer. After that, I immediately thought that let me add
some castles because that also make me feel
happy when I see them and these are from my
childhood storybook memories, why not castle instead
of just a regular house? And adding wings
like ready to fly. Then keep adding the symbols, what represent your
self compassion. I'm adding a letter
which I did not write or add as a symbol in my first layer where I
was writing the list. But while I was
doing it, quickly, it just came in my
mind that let's add the personal growth
letter because letter will represent as
my personal growth, as my personal journey from where I started and
where I am today. You might think about or you might get a new idea
while you are creating. Once my loser sketch is done, I'm using watercolor
and the colors I want to keep it same neutral tones. Let's see, maybe I want
to add more colors. Beginning with watercolor,
you can just use acrylic or you can add
layers of pastels. It's completely your choice. Oh You may notice that I start with something, but then I end up with
something completely different. And after adding few bits of
pastel colors with my cer, I'm just going to dry this layer and then I'm going
to add the symbols. Before that, I will add some Posca paint
marker for the face. I don't want to create
any realistic face. It's just a Posca marker
to add the layer, and then I can add some color pencils to
add the features. So go with the flow, keep
adding how you want. And embrace your journey. The face is done,
the hair is done, and now it's time
to add the symbols. And instead of adding
random symbols everywhere on the paper, I thought, let me
add like hanging. So the first thing is my family, my two son will
be in one string, my two daughters will
be in another string, and then my husband
will be exactly on top of my head in a single string. Then comes the cats, hearts and Bhu because
he's very close to me, will be with me and
I'm holding him. And then comes the mother and three son and then two adoptees also there is another heart where is my cat who
is always like, it's not our cat, but she
loves to stay in our backyard. Look for areas or marks
that are distracting to the eyes or that don't add meaning or interest
to your piece. Those may be areas or marks that you like to
remove or paint over. Look for areas you
may want to calm down by making them a bit more of solid colors so that your eyes have a resting
place within the painting. This also helps you create
a comfortable contrast and balance between busier area and areas with more
breathing room. For me, my dress is more
flowy and calmer side, along with the houses
and the buildings. I did not add much because in my background,
there's a lot going on. At the end, I'm going to add
some affirmations stickers. You can write down if you
wish to Walla this is done. It looks fantastic and I feel so relaxed and I really
enjoy the process. I hope you feel the same and can't wait to see
your final piece. Don't forget to share with me, and thank you so
much for joining me for this well being layers. No, layers of well being. Util next time, take care of
yourself and keep creating.
14. Thank you: Thank you so much for joining me on this creative adventure. I hope you found inspiration to connect with your inner self, as well as a way to revisit those whimsical
childhood memories we've always cherished. Remember, this journey
doesn't have to end here. I encourage you to embrace
the techniques we've explored together and let
your imagination flourish on your own time. Each stroke, layer,
and colors hold the potential to reveal new
insights about yourself. So keep the playful
spirit alive. If you enjoy the class, don't forget to share
your experiences by sharing your artwork with me. I would absolutely love to see
your personalized journal, and you deserve
to be celebrated. Thank you for letting me be a part of your
creative journey. Till next time, see you
and take care of yourself.
 Sana Asad, Inspiring Self-Discovery Through Art